Creating Games
with Unity and Maya
How to Develop Fun and Marketable 3D Games
Adam Watkins
AMSTERDAM • BOSTON • HEIDELBERG • LONDON NEW YORK • OXFORD • PARIS • SAN DIEGO SAN FRANCISCO • SINGAPORE • SYDNEY • TOKYO
No part of this publication may be reproduced or transmitted in any form or by any means, electronic or mechanical, including photocopying, recording, or any information storage and retrieval system, without permission in writing from the publisher. Details on how to seek permission, further information about the Publisher’s permissions policies and our arrangements with organizations such as the Copyright Clearance Center and the Copyright Licensing Agency, can be found at our website: www.elsevier.com/permissions.
This book and the individual contributions contained in it are protected under copyright by the Publisher (other than as may be noted herein).
Notices
Knowledge and best practice in this field are constantly changing. As new research and experience broaden our understanding, changes in research methods, professional practices, or medical treatment may become necessary.
Practitioners and researchers must always rely on their own experience and knowledge in evaluating and using any information, methods, compounds, or experiments described herein. In using such information or methods they should be mindful of their own safety and the safety of others, including parties for whom they have a professional responsibility.
To the fullest extent of the law, neither the Publisher nor the authors, contributors, or editors, assume any liability for any injury and/or damage to persons or property as a matter of products liability, negligence or otherwise, or from any use or operation of any methods, products, instructions, or ideas contained in the material herein.
Library of Congress Cataloging-in-Publication Data
Watkins, Adam.
Creating games with Unity and Maya : creating games with Unity and Maya : how to develop fun and marketable 3D games / Adam Watkins.
p. cm.
ISBN 978-0-240-81881-8
1. Computer games--Programming. 2. Video games--Design. 3. Unity (Electronic resource) 4. Maya (Computer file) 5. Three-dimensional display systems. I. Title.
QA76.76.C672W322 2012 794.8'1526--dc23
2011017562
British Library Cataloguing-in-Publication Data
A catalogue record for this book is available from the British Library.
ISBN: 978-0-240-81881-8
For information on all Focal Press publications visit our website at www.elsevierdirect.com
Books like this are the results of a lot of work by a lot of people. It is important to point them out.
First, many thanks to Kelly Michel and the team at the Los Alamos National Laboratory that made working on this book possible. The opportunities to learn and grow have been exciting to me professionally, and I've personally very much enjoyed my time working with my teammates Brian Dickens, Elise Elfman, Jake Green, and Birch Hayes.
Also, thanks to the tireless efforts of my tech editor, Anson Call; the book is more accurate, and tighter conceptually than it would have been without his meticulous work.
Thanks also, of course, to the editors at Focal with whom I have worked on the project: Sara Scott, Laura Lewin, Katy Spencer, and Lauren Mattos.
Acknowledgments . . . . vi
Introduction . . . . xv
Chapter 1: Game Production Process . . . .1
The Team . . . . 1
The Tools and Unity . . . . 4
Teams of Teams and Pipelines . . . . 4
Assets . . . . 5
Art Assets . . . . 5
Technology Assets (Scripts) . . . . 5
Order of Operations . . . . 6
Conclusion and Introduction to Incursion . . . . 6
A Note on Research . . . . 7
And on We Go… . . . . 8
Chapter 2: Asset Creation: Maya Scenography Modeling . . . .9
Scenography Modeling within the Game Design Pipeline . . . . 9
Why Maya Tutorials? . . . .10
A Bit of 3D Theory . . . .11
Rendering . . . .12
Video Cards . . . .13
Limitations and Optimizations for Games . . . .13
Rules of 3D Game Modeling . . . .14
Polycount Matters . . . .14
Topology . . . .15
On to the Tools . . . .16
Tutorial 2 .1: Game Level Modeling: The Entryway . . . .17
Columns Base Shape . . . .18
Dock Creation . . . .20
Dock Optimization . . . .22
Backface Culling . . . .25
Roof Creation . . . .26
Cleaning or Deleting History . . . .27
Handrails . . . .28
Beveling . . . .32
Wrapping Up . . . .33
Homework and Challenges . . . .34
Chapter 3: Asset Creation: Maya Scenography UV Mapping . . . . 37
Scenography UV Layout within the Game Design Pipeline . . . .37
UVs . . . .38
Exploring the UV Texture Editor . . . .39
Tutorial 3 .1: Game Level UV Layout, Tools, and Techniques . . . .40
Mapping Beginning with Automatic Mapping . . . .42
Sewing Shells . . . .45
Further Optimization . . . .49
Maya's Unfold UV via Smooth UV Tool . . . .50
Manual Mapping . . . .52
Conclusion . . . .61
Homework and Challenges . . . .62
Chapter 4: Asset Creation: Maya Scenography Texturing . . . . 63
Textures, Materials, and Shaders . . . .63
Nature of Effective Textures . . . .64
Maya and Unity . . . .65
Tutorials . . . .66
Tutorial 4 .1: Seamless Tiled Textures . . . .66
Select and Prepare a Raw Texture Image . . . .68
Offset and Clone Stamp . . . .68
Unify the Color Balance . . . .70
Apply the Texture . . . .71
Conclusion . . . .74
Tutorial 4 .2: Nontiled Textures and Their Dirt . . . .74
UV Snapshots . . . .75
Preparing the UV Snapshot for Painting in Photoshop . . . .76
Painting the Texture . . . .77
Layer Mixing . . . .78
Layer Masks . . . .79
Saving Multiple Files . . . .82
Application in Maya . . . .82
Conclusion . . . .83
Chapter 5: Asset Creation: Unity Scenography Importing . . . . 89
Unity . . . .89
The Plan . . . .90
Unity Projects . . . .90
Tutorial 5 .1: Creating a Unity Project . . . .90
About the New Project File . . . .92
Unity Interface . . . .93
Toolbar . . . .94
Scene . . . .95
Game . . . .95
Inspector Panel . . . .95
Hierarchy Panel . . . .96
Project Panel . . . .96
Using It All . . . .96
Tutorial 5 .2: Exporting from Maya . . . .97
Optimizing in Maya . . . .97
Export Options . . . .98
The Import Process . . . .99
Unity Nomenclature . . . .101
GameObject . . . .101
Prefabs . . . .101
Scenes . . . .101
Tutorial 5 .3: Importing, Tweaking, and Placing Scenography Assets into Unity . . . .102
Inspector Breakdown . . . .108
Conclusion . . . .112
Homework and Challenges . . . .112
Chapter 6: Asset Creation: Unity Scenography Creation Tools . . . . 113
Asset Creation in Unity . . . .113
Tutorial 6 .1: Adding and Manipulating Unity Water, Sky, and Fog . . . .114
Importing Packages . . . .114
Water . . . .114
Skyboxes . . . .116
Fog . . . .119
Wrapping Up . . . .120
Tutorial 6 .2: Terrain Creation . . . .121
Terrain Editing Tools . . . .125
Conclusion . . . .136
Tutorial 6 .3: Primitives and Particles . . . .136
Tweaking Terrain Settings . . . .143
Conclusion . . . .144
Chapter 7: Asset Creation: Advanced Shading, Lighting, and Baking . . . . . 145
Baking . . . .146
Baking in Unity (aka Unity Lightmapping) . . . .146
Limitations to Unity Lightmapping . . . .147
Plan of Attack . . . .148
Tutorial 7 .1: Normal Maps . . . .148
Additional Tools . . . .150
Conclusion . . . .159
Tutorial 7 .2: Lighting and Baking in Unity . . . .159
Unity's Lighting Instruments . . . .160
Conclusion . . . .177
Homework and Challenges . . . .178
Chapter 8: Asset Creation: Maya Character Creation . . . . 179
Aegis Chung . . . .180
Style Sheet . . . .180
Considerations of Style Sheets . . . .181
Chapter Overview . . . .182
Tutorial 8 .1: Game Character Modeling: Aegis Chung . . . .182
Polycount . . . .182
Conclusion . . . .232
Chapter 9: Asset Creation: Maya Character UV Mapping and Texturing . . . . 233
UV Mapping . . . .234
Tutorial 9 .1: Character UV Mapping . . . .234
Mesh Inspection and Cleanup . . . .234
Finishing Up . . . .260
Conclusion . . . .262
Tutorial 9 .2: Character Texture Painting . . . .262
Ambient Occlusion Pass . . . .264
Face and Head . . . .269
Chapter 10: Asset Creation: Maya Rigging and Skinning and
Unity Animated Character Importing and Implementation . . . . 275
The Process . . . .276
Tutorial 10 .1: Rigging . . . .276
Cleanup . . . .276
Joints and Rigging . . . .280
Conclusion . . . .301
Tutorial 10 .2: Maya Skinning . . . .302
Binding Rigid Body Parts . . . .303
Painting Skin Weights . . . .305
Conclusion . . . .308
Tutorial 10 .3: Maya Animation . . . .310
General Notes on Game Animation . . . .310
Conclusion . . . .314
Tutorial 10 .4: Getting Animated Characters to Unity . . . .314
Using Aegis . . . .316
Tutorial 10 .5: Animating in Unity . . . .319
Conclusion . . . .321
Wrapping Up . . . .321
Homework and Challenges . . . .322
Chapter 11: Unity Sound . . . . 323
Get the Sounds . . . .323
Sound Listener and Sound Source Paradigm . . . .325
Tutorial 11 .1: Placing Sound in Unity . . . .325
Audio Reverb Zones . . . .327
Footsteps . . . .328
Scripting Sound . . . .330
Conclusion . . . .332
Homework and Challenges . . . .332
Chapter 12: Introduction to Unity Scripting Basics and Graphical User Interface . . . . 333
Unity's Scripting Languages . . . .334
Boo Script . . . .334
C# . . . .335
JavaScript . . . .335
A Note about This Approach . . . .336
Tools for Scripts . . . .336
What Is a Script? . . . .337
Getting to It . . . .340
Tutorial 12 .1: Graphical User Interfaces . . . .340
GUITexture . . . .340
Conclusion . . . .354
Homework and Challenges . . . .354
Chapter 13: Unity Triggers . . . . 355
Designating Triggers . . . .356
Tutorial 13 .1: Activating and Changing Screen Hints with Triggers . . . .356
GUIText . . . .357
Custom Fonts . . . .358
Creating Triggers . . . .358
Scripting the GUIText . . . .359
Scripting Triggers . . . .361
Triggers to Swap Levels . . . .364
Conclusion . . . .367
Tutorial 13 .2: Triggers and Doors . . . .367
Divergent Methods . . . .369
Sound and Scripts . . . .372
Cleaning Up with Destroy and Booleans . . . .373
Conclusion . . . .377
Homework and Challenges . . . .377
Chapter 14: Unity Raycasting . . . . 379
Frame Miss . . . .379
Raycasting . . . .380
But First . . . A Few Notes on Scripting and Help . . . .381
Comments via // . . . .381
Commenting Blocks of Script with /* . . . .382
Accessing the Documentation . . . .383
F1 in UniSciTE . . . .384
Decoding a Help Page . . . .384
Tutorial 14 .1: Highlighting Actionable Objects with Raycasting . . . .386
Conclusion . . . .402
Homework and Challenges . . . .402
Chapter 15: Unity Prefabs and Instantiation . . . . 403
Prefabs . . . .403
Prefabs versus Prefab Connections . . . .404
Tutorial 15 .1: The Power of Prefabs . . . .407
Tags . . . .408
Adding Sound . . . .411
Conclusion . . . .412
Instantiation . . . .413
Tutorial 15 .2: Setting Up the Armed Arms . . . .414
Conclusion . . . .417
Tutorial 15 .3: Firing a Gun . . . .417
A Few Notes about Pistol Sparks . . . .419
Quick Note about Detonator and Explosion Framework . . . .420
Conclusion . . . .423
Tutorial 15 .4: Sound Revisited . . . .423
Scope and Optimizing Script . . . .425
Tutorial 15 .5: The EMP Mines . . . .427
Layers . . . .436
Make the EMP Effective . . . .437
Conclusion . . . .439
Chapter 16: Unity: Creating Inventory Systems . . . . 441
State Engine and How Many Scripts? . . . .441
Tutorial 16 .1: Setting Up Inventory GUI and Script . . . .443
Refresher on Interscript Communication . . . .446
Firing Animations in Script . . . .448
Hiding and Showing Weapons . . . .453
Bulking up the GUI System . . . .457
Create a GUIElements Prefab . . . .458
Animate the Inventory to Show and Hide . . . .459
Conclusion . . . .463
Tutorial 16 .2: Keys . . . .464
Accessing the State Engine . . . .465
Building upon the Raycasting Mechanism . . . .465
Creating a Smart Trigger . . . .467
Conclusion . . . .472
Homework and Challenges . . . .472
Chapter 17: Health Systems, Winning, and Losing the Game . . . . 473
Tutorial 17 .1: Winning . . . .474
The Endgame Trigger . . . .476
Conclusion . . . .477
Tutorial 17 .2: Health Systems . . . .478
Creating Health Display . . . .479
Back to Script . . . .481
Things That Hurt . . . .482
Creating the Damage Triggers . . . .482
Broadcast Message . . . .434
Particles Doing Damage (Steam) . . . .487
Timers on Cameras . . . .490
Scene-ClosingFail . . . .491
Global Variables . . . .492
Final Test . . . .494
Conclusion . . . .494
Homework and Challenges . . . .494
Chapter 18: Unity Debugging, Optimization, and Builds . . . . 495
Finding the Bugs . . . .495
Optimization . . . .496
Finding What Needs to Be Optimized . . . .496
Optimizing with Textures . . . .498
Optimizing with Scripts . . . .500
Making the Build . . . .501
Preparing Player Settings . . . .501
Outputting the Final Build . . . .506
Conclusion . . . .508
Why This Book?
The Unity Game Engine has been shaking things up. The engine is only a little over five years old now and in 2010 they have earned Develop Magazine's Grand Prix Award and surpassed 170,000 developers. The user base of consuming Unity products has grown dynamically as well. There are over 30 million total Unity Web Player installations, and the base continues to expand at over 2 million installs per month.
Part of this success undoubtedly comes from their 2009 bold move to give away a free version of Unity Indie. Suddenly, everyone could get their hands on a game engine and anyone with the will to learn could start making games. Unity further empowered the masses by making Unity a viable development platform for iDevices (iPhone, iPod Touch, iPad), Mac, PC, Xbox 360, Wii, and now Android and PlayStation 3. Web deployment further democratized the 3D development and distribution process. At conferences and online Unity is generating quite the buzz. Since I have been using the software, conversations among faculty at training institutions and game developers alike have gone from, “Unity? No, I've never heard of that. Is it new?” to “Yeah, we're using Unity in three of our courses coming up this semester,” and Skype tags that say, “I want Unity 3.0.”
But with all this buzz, and the rapid development and deployment cycle that the Unity 3D team has undergone, there has been a distinct lack of introductory documentation, especially documentation aimed at the entire process of game development. In recent months there have been some new (and really nice) books released to get people into Unity and it is true that Unity provides some nice downloadable projects and some tutorials attached to those projects (which you should grab for free if you haven't yet), but often while my students (who are trained as 3D artists) have worked through these, although they have become familiar with Unity's interface and with what does what, they are simply unable to extrapolate this knowledge into a new “authored from scratch” game. Further, most of the Unity 3D provided tutorials are focused on Unity and provide prebuilt assets that the reader simply plugs into his or her Unity project. This misses some of the vital creative processes and tricks of getting these assets into Unity.
Who's It For?
My professional background recently has been developing training games for inspectors in pursuit of nonproliferation efforts at the Los Alamos National Laboratory. But this is a temporary assignment and part of a one-year research sabbatical. I am on sabbatical from a position as head of 3D Animation at the University of the Incarnate Word in San Antonio, TX where I have taught 3D animation for over 10 years. With this background, as I use tools, I am always thinking of how this particular tool or technique can be taught, and how it can be taught differently to different demographics.
In the construction of this book, there are three main groups of learners in mind:
• Game Enthusiasts: The biggest group of students we have coming
into our university are those with the idea, “I love to play video games, therefore, I'll be great at making them.” Unfortunately this is often not the case—consuming is much different than creating—but, this sort of enthusiasm is important to maintain through the long learning arcs that are required for making 3D games. This book assumes that, at the very least, you love games. And that you are passionate enough about them that you want to create your own games.
This volume is for you. Equipped with a free version of Unity and a copy of Maya, this book will provide you with the necessary steps and ideas to empower your own game creation. The book is organized into manageable tutorials coupled with theory discussions so you can see measurable progress quickly that you can bridge into your own development. In a few days, or weeks, you could have your first tutorial-driven game developed, and the scripts to begin your own.
• Students: Ten years ago, developing 3D animation programs was all the
rage at colleges and universities. This enthusiasm has crept into high schools and even middle schools. With this 3D curriculum—of which you may be a part—has come the natural desire to expand into game development. This book has been specifically structured with you in mind. The tutorials are structured so that they can be tackled in class or as part of a homework assignment. The pacing has been carefully considered to allow for bite-sized chunks of knowledge that are still delivered at a brisk pace. Most importantly, each chapter builds on the next and allows for real progress really quickly.
• Teachers: I have done a lot of training for teachers at colleges, universities,
Included in the appendices for this book (on the supporting website
(http://www.Creating3DGames.com) are some suggested curricula for using this book in a classroom setting. It will help in being able to plug this book into your work flow and class plans. Although it will be critical that you follow the tutorials yourself to understand the questions that the students will undoubtedly have, this volume will provide some tutorials for in class or homework that will help to provide a lot of instruction in learning the 3D-to-game publication process.
Structure
Although presently I am also a game developer, my long-term passion is teaching. I know how people learn 3D and game engines. There is an unfortunate trend for many early learners to pick up a tutorial and immediately start working through the steps without any consideration to why that tutorial was written, and what the basic concepts are behind the steps they are following. At the end of the tutorial, readers have the sense of accomplishment that they have finished the tutorial, but suddenly come to the crushing reality that they can't create their own project, and they couldn't even replicate this project unless the tutorial was in front of them again. Essentially, they have become recipe followers—they can only cook if the book is open in front of them, and if someone else has figured out the steps. They certainly aren't chefs. The goal of this book is to make master game chefs. To do this, there are some specific conventions this book will follow.
First, every chapter and every tutorial will be prefaced with some theory— some explanations of the method behind the madness of what they are about to embark on. This theory will cover not only the reasoning of the tutorial and its goals but also the reasoning behind Maya or Unity and their particular implementation of 3D technique. Avoid the temptation to skip the theory and smash into the tutorial; you will be much more enriched by understanding the reason behind the steps.
Every chapter will also include tutorials, some longer than others, but each with a very specific learning objective in mind. Each tutorial will build upon the last and move us closer to completing the game that will be playable at the end of this book. However, this book is a novel, not a collection of short stories, and if you skip too far ahead too quickly, you will miss vital information that make later chapters seem logical. So even if you know the technique covered and you have no need to follow a given tutorial, be sure you skim through it to see what is being covered there.
they are an important self-assessment tool to check if you have really gotten the core concepts presented in the chapter. You will get the most out of this book if you tackle those challenges. They will cement ideas and strengthen technique before you move on.
Book Paradigm and Assumptions
Although Creating Unity3D Games is meant to be holistic, it is not comprehensive of everything involved in creating 3D games. It is assumed that you have the following things:
• Unity and Maya: At the publication of this book, the latest versions of this
software will be Maya 2011 and Unity 3.2. The Unity 3.2 Indie license is free (downloadable at www.unity3d.com), and if you are a student, Maya 2011 can be had for free for one year at http://students.autodesk.com/ if you sign up at the Autodesk Education Community. For a registered student, your biggest expense of the process will be this book.
• Basic Knowledge of Maya: This knowledge can indeed be basic, but this
book will not take a huge amount of time to work through Maya interface, or basic tools. You should know how to navigate the camera controls and how to conduct basic functions of moving, rotating, and scaling objects. This book will be focusing on very game-specific techniques to modelling, texturing, and animating, and so some general knowledge of Maya will be of great help, although not critical.
• Love and Knowledge of Games: No need to be a game geek. But,
knowing the basics of how games work and what makes them fun will be important to making games. The game in this book will be a first-person and third-first-person hybrid with both first-first-person shooter and puzzle elements. These are carefully designed to help you grasp some important concepts. But always be referencing past knowledge and looking for ways to expand the ideas covered in these pages to your own blockbuster title.
Book Conventions
Throughout this volume, I will be making use of several conventions to assist you in understanding what I'm talking about, and where.
When we are tackling a tutorial, each step will be numbered:
Step 1: Do this and then,
Step 2: Do this. When you're finished, Step 3: Try this.
Usually, these instructions will be tied closely to screenshots to help illustrate the step, or the results of a step.
finishing this tome, there will be frequent “breaks” in the tutorials to do some explaining. Watch for:
Tips and Tricks Warnings and Pitfalls Why?
These will be the important notes that get you beyond the confines of the tutorials, and on to your own million-dollar games.
Finally, navigating through the programs can be tricky (especially in Maya with its multiple nodes). Drop-down menus will be indicated with the following format:
Modeling>Mesh>Combine (Options)
This is shorthand for, “In Modeling mode, go to the Mesh drop-down menu and look for Combine, and choose the Options box.”
In Unity, this will be a little simpler since there are no disappearing drop-down menus like there are in Maya. However, it will be important that we are aware of what things need to be typed—as in code. Any script we type will be listed and formatted like this:
function Update(){
SetActiveRecursively(true); }
Occasionally, there will be some salient information within the code that is important to notice. When this is needed, the text will be bolded (you, however, would not need to use bold text when writing the script):
function Update(){
SetActiveRecursively(true); }
Similarly, new ideas, concepts, or keywords will be bolded within the body of the text.
A Note about the Approach
include some information that might be too basic for those approaching this from a programming background. Not to worry though, the first part of the book is 3D focused, and so there should be plenty of new material for those coming from the scripting world.
Creating Games with Unity and Maya
Game Production Process
Describing the game production process is actually a bit tricky, partly because it is different for every team and different for every budget. But also, the reality is that a team might be, well, you. Indeed, sometimes games are produced by very small groups of people, and occasionally by a team of one.
However, whether you are a team of fifty working on the next AAA blockbuster or a team of one creating a student project that you hope will get you on that team of fifty, there are some specific steps that need to happen to create a playable game. How successful you or your team are at these steps, and completing the steps in a timely manner, will play a big role in how efficiently the project comes together and how successful the game ultimately appears and plays.
The specifics of team management and money management and even time management are really out of the scope of this book (along with marketing your game and getting funding). However, understanding what needs to happen in what order will help you as you assemble your team or build your project.
The Team
of these are important for a profitable game, the focus of this book is learning the technology, so the production of the game will be the focus.
Generally most game production teams (or development teams) contain people in the following roles:
Designer: The Game Designer is the head of the creative vision. He or she
must be artistically able and technically proficient. He is able to straddle the aesthetic and programming ends of the spectrum. More importantly, he understands and often has authored the goals of the game, the genre of the game, the game play, the rules and structure of the game, and any other game mechanics. The game designer typically communicates these goals through a document called a Game Design Document.
The Game Design Document is often predicated by a Game Proposal Document before it can be created. Usually, a game designer has substantial writing skills to be able to communicate the vision of a game. This Game Design Document becomes the bible upon which the other designers reference as the game production goes on.
The structure of this document is out of the scope of what we are covering here, but there are multiple references and examples online of such documents. Further, Game Design Documents should be specific to an organization, financial structure, and even work culture. However, although we might not cover the details of what this document is, what it
does is relevant.
Now a Game Design Document is rarely set in stone. The scope of a game and the features of a game often have to be adjusted due to time, talent, or budget reasons. However, as the production cycle grinds on, effective management and distribution of this document becomes important to keeping the team on task. I have personally witnessed many times where days and even weeks of labor were wasted because team members failed to reference—and managers failed to confirm—that they were referencing a Game Design Document.
Even if you are working as an expansive team of one, developing an internal Game Design Document (even if it is a bulleted list, or a flowchart sketch on your whiteboard, or a list on the back of a napkin) can help you keep an eye on the prize and avoid pitfalls like feature creep, where new options forever find their way into a game and keeps it from ever being released.
Mechanics Engineer: Games have mechanics. Mechanics are the rules
A quick note on this: The academic community has been studying the issue of game play and game mechanics fairly rigorously in recent years. It is still a developing field of study, and is a bit of a moving target as the rules of engagement with your game continue to change. However, if you want to get serious about understanding what makes games fun and how game mechanics can help this, there is an ever-increasing library of research that explores this. In the long run, researching this literature will be worth your while if you want to be a successful game designer or mechanics engineer.
Level Designer: Justifiably, this position has become more and more
prominent in the game production process. This designer creates the environment in which the gameplay takes place. He works carefully with the Game Designer and Mechanics Engineer to ensure that the space he is designing both remains true to the vision of the designer and allows the space for effective game mechanics. These designs are carefully considered and designed and almost always begin with conceptual sketches or paintings and detailed floor plans that lay out where puzzles, challenges, pitfalls, and enemies appear or are interacted with.
Character Designer: This is often one of the sexiest roles because this
person designs the characters. These characters are based upon the goals defined in the Game Design Document, and almost always start on paper with drawings. Conceptual sketches provide quick communication devices before the considerable modeling time is undertaken. These sketches also can provide a visceral response to a concept that often a T-pose-modeled character lacks.
Animator or Motion Designer: Animation is incredibly important in
games since it seems to be the thing that draws our attention. Ironically, even complex games have a fairly limited collection of animations that are cycled as the game is played. Some characters have as many as 100 different moves, but most have much, much less. The animator will create in-game animations that are cycled, but will also often be responsible for cut scenes and more “meaty” assignments where traditional noncycled animation is used. Very large studios often will have separate cinematic (cut scenes and intro animations) departments that are creating higher-rez, prerendered animations.
Writer: Due to strikes in recent years, there has been a migration (at least
Sound Designer: Playing a game with the sound off has its charms,
but anyone who has played a game on a big screen TV, with the lights off, and the sound pumped way up (or on headphones) knows how an effective sound design creates perhaps more ambiance than any visual elements of a game. Too often in all aspects of 3D animation, students or beginners treat sound and music as an afterthought, but it never is in big-budget games.
Sometimes for students there are budget restrictions that prevent custom soundtracks from being used. However, thinking early of sound effects and music will allow for proper timing and can even influence visual choices.
The Tools and Unity
Now that we have generally looked at who is on a team, it is important to talk through what the tools of that team are, and specifically how Unity fits within that tool box.
Unity is classed as a game engine. What this means is that it is the technology that drives a game. The way to think about it in production terms though is as an “assembler.” Unity itself is generally not used to create assets (although there are some things like particles that are created within Unity itself). Almost all the art assets are created outside of Unity itself—the 3D models are created in a 3D application (Maya, Cinema4D, Blender, modo, 3DS Max, Lightwave, etc.), the texture assets are made in Photoshop or BodyPaint, and even the scripts are actually written in some other application (UniSCTE on a PC, Unitron on the Mac, or some other scripting tool all together). All these assets are imported in Unity through a quite painless process where you are then able to combine these assets to create the game.
So, you assemble games in Unity, but most games—and all games with any level of visual complexity—make heavy use of lots of other applications in the process. Just as there are lots of different ways to create 3D assets (some will choose Maya, others 3DS Max, for instance), there are multiple game engines as well. Unity is particularly flexible and accessible; that is why it is the tool of choice in this book. But be aware that there are lots of other methods of creating games (Unreal Engine, CryEngine, Source, etc.).
Teams of Teams and Pipelines
Often, a production team will be broken into two teams, an art team (sometimes called “Creative”) and a technology team. The work of both is critical for a successful game, and communication between the two teams better ensures a smooth process.
Often, technology is being developed and has been developed when the creative team delivers certain assets that are then plugged directly into the game.
However, if you are working alone (and the assumption is that most readers of this book are doing just that) creation of assets in an appropriate order will make the development process much more efficient. So to begin, let's look at the assets needed for the game produced in this book.
Assets
Once the Game Design Document is completed, the lead designer will need to start working out what assets need to be created and when they need to be done. Assets can be a lot of things: 2D elements like GUI and interface designs, texture files, 3D models, sound files, animation clips, as well as things like scripts and other mechanisms that drive the game. For this book, we will focus on two categories of assets: art assets and scripting assets.
Art Assets
For the tutorials covered in this game we will need three art-based assets: models, textures, and animations. The models and animations will be created in Maya while the textures will be created in Photoshop, but linked to the models within Maya. Other visual elements like lighting will take place in both Maya and Unity (depending on which version of Unity you are using).
Technology Assets (Scripts)
Unity allows for mechanics to be built with a variety of scripting mechanisms. Most reference or discussion you will find will be in either Unity's implementation of JavaScript or C#. These scripts are attached to an object or objects within your Unity scene and drive the interaction between the player and the game.
There are many approaches for tackling the scripting problem. My software engineer colleagues that I work with extensively here make heavy use of C# and drive nearly everything in the game (including creation and placement of assets) with these scripts. They understand the structure of the game when they can see the script that is doing it.
forums uses Unity's version of JavaScript as the vernacular. We will hang the scripts off of objects (rather than allowing the script to do this for us) because it is a more visual approach and often easier for artists to understand what's controlling what within the scene.
In either case, the technology assets are just little pieces of ASCII text that harness the power of Unity and allow interaction to be created and controlled.
Order of Operations
In this book, we will be creating all of our art assets first, importing them into Unity as we go, and then we spend the last part of the book creating the tech assets. However, it is important to note that this process of art first, script second is certainly not a rigid one. Unity is very good at allowing art assets to be updated and changed along the way. Sometimes it takes a little bit of reattaching scripts to new objects, but with careful naming, even this is minimized. I find in my own development process, the back and forth between my 3D application and Unity is frequent and important. So in this way, the process outlined in this book is quite unlike a studio's workflow. In a studio, although the scripters will do most of the bug squashing and wrapping up, they will start on developing scripts and programming solutions long before the artists have finished their work. Further, in your own development process, you will find that spaces you thought would work well for a particular challenge or battle don't work quite as planned. Or that a character doesn't quite convey what you had planned. So you go back and rework in 3D in the middle of your scripting process. So while our linear process here lends itself to learning Unity well, it likely will not be the way you work on your own projects.
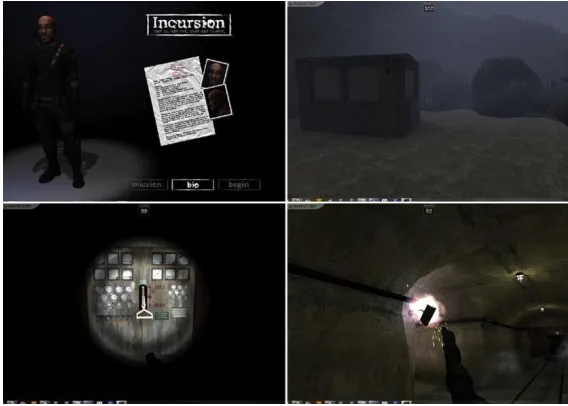
Conclusion and Introduction to
Incursion
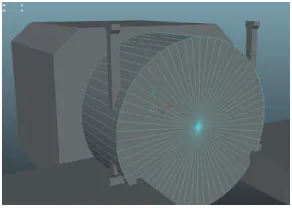
premises. You must bypass these security systems through whatever means necessary (espionage, alternate paths, hacking, explosives) to gain entry to the inner lab where the device is stored. Along the way, all your training (both physical and mental) will be tested (Figure 1.1).
For you as the game development team, this will provide opportunities to model a character, a level design, and various instrumentation. As the scripting team, this game will allow for extensive mini-games as you get a chance to build in the puzzles that are the security devices the player must bypass. All in all, there are a lot of learning opportunities with this game. Note to teachers and students: To make sure that the game stays appropriate for larger audiences, although we will use a gun to defeat certain obstacles, there will be no shooting of people.
A Note on Research
Often people like to pretend that they can sit down and create beautiful environments or characters that flow beautifully out of their minds, through their pencils onto the paper. I suppose there are some character designers who can do exactly this, but only after years of study and observation of anatomy, people, animals, and other designer's work. For most of us mortals, before great work can emerge, we have to research similar locations, feelings, and styles.
[image:28.536.72.356.86.289.2]The space on which we will be basing our game's style is really an abandoned Soviet nuclear submarine base. The base is in Balaklava, Ukraine and has some really fine reference photos online. Because I don't own the rights to these images, they can't be included in the book; however, before we get started, be
sure you do a quick Internet search for “balaklava ukraine submarine” and you will be led to a great collection of web sites with background information, and loads and loads of great photographs.
It will be worth your while to collect images of the space, as you'll recognize them coming together in the book, and these additional reference photos will be valuable. In any case, good research provides information about spaces that most people simply won't include if they are “building it from their head.” There's no need to copy directly from your research, but let your research inform your choices as you build any space. Research, if followed, is guaranteed to bring an added level of sophistication and believability to any project. When you move on to create your own game from scratch, be sure you are providing some real visual meat to your project by doing appropriate research.
And on We Go…
Creating Games with Unity and Maya
Asset Creation: Maya
Scenography Modeling
Scenography Modeling within the Game
Design Pipeline
The game pipeline—specifically, the Unity game development pipeline— can be a fairly flexible thing. There are not that many elements that must be done in a sequential order. Many can be done concurrently, and often the order of steps can be leapfrogged and rearranged. While the art team is developing models, textures, and animations, the tech team (i.e., scripters and programmers) can be developing the technology and mechanics that drive the game. So the things that happen in the following three scenography chapters do not need to be complete before the programmers do their thing (or before you do the programming thing).
doesn't work quite as well as you had hoped when laying it out on paper. Once you walk a space, or try playing the mechanics, you may find that the space you had planned may not be the best. If you've just got quick mock-ups, you can quickly adjust before investing all the time into the scenography asset creation.
However, in a book setting we need to work largely in a linear progression. So for these tutorials we want to imagine that the prototypes have yielded results that have cemented the level and character design. And so, with the approval of the game designer, we are moving forward with our art asset creations.
Why Maya Tutorials?
Unity is the last step in the chain of technologies that creates the game. Without it, an effective game can't be made. But the success of the game will also rely heavily on the effectiveness of the assets that go into it. No matter how well the chef knows the tools and the oven when baking, if he or she uses poor quality ingredients, the cake is not edible.
I've had many students who, when working in Unity, are unable to create the game they envisioned because of poor choices or techniques in their 3D application of choice. General 3D techniques are not necessarily the same as 3D game techniques. Creating economic and correctly structured 3D assets and textures is an absolutely critical part of creating games in Unity.
Why Maya? Well, Maya isn't even my favorite 3D package. However, it does have an amazing market penetration and without a doubt is one of the most powerful 3D tools out there. Ironically, modeling is not one of its strongest points, but for our purposes its polygonal modeling tools will do just fine. Among other parallels, the default camera manipulation and object manipulation tools in Unity have identical keyboard shortcuts to Maya. Additionally, Maya has some very powerful character animation tools, which we will use, that import via FBX very easily into Unity. Ultimately, I chose to create our assets in Maya because the large base means there are lots of people who know how to use the software and you will have lots of options to further your skill set beyond this book once you are done reading it.
Even if you are not a Maya user and are capable in some other 3D app, take a quick look at these chapters to make sure you make note of topology and texture creation and how to extrapolate those techniques into your own application. It will make your game assets stronger, tighter, and better to work within Unity.
tutorials, the assumption is that you are familiar with the basic Maya tools (Move, Scale, Rotate) as well as how to select component parts (vertices, edges, faces). If you don't understand these concepts, it will be worth your while at least to watch the introductory videos that are included with your Maya installation.
A Bit of 3D Theory
Although we assume you know something about Maya's tools, it will be vital that the basic theory of 3D is understood. Without this baseline understanding of how digital 3D works, it will be impossible to appropriately construct assets to be used in a game framework.
Figure 2.1 shows the anatomy of the polygon—the building block of 3D. The main form that we think of as a polygon is referred to in Maya as a face. The face is what the video card (and thus we) “see.” The face's shape is editable by the components that surround it. The face is surrounded by edges that are joined by vertices (singular form is vertex). Most of these sorts of concepts are covered in some form of junior high geometry; the one other important concept and part of a polygon is the normal. The normal defines the front of the polygon. In Figure 2.1, this is indicated by the green line coming right out of the middle of the face. Understanding that faces have normals is important since most game engines save processing power by only drawing the front of a polygon. If the camera is behind the polygons (if the normal is facing away from the camera), the polygon is invisible.
Three-dimensional forms in a 3D application are created when collections of polygons are put together. Think of polygons as unbending sheets of metal. Where the sheets of metal connect can hinge, but the polygon itself cannot. This means that the more polygons present, the more places the mesh can bend, and thus the more complex the form can be. Take a look at Figure 2.2 to see how a form goes from six polygons to 32 polygons to 100 polygons, and the resulting forms that are possible.
Forms that are seen in a 3D environment are drawn by the video card in your computer via a rendering engine of some sort. The rendering engines see shapes by recognizing polygons. To be more specific, most rendering engines actually see only triangular polygons (sometimes called tris). There are several ways to construct these tris; Maya's techniques include NURBS, Subdivs, and straight polygonal modeling. All of these are different methodologies of
constructing forms of assembling polygons. Some methods are derived from curves; others work along the line of creating polygons directly. But at the end of the process, all the methods' results are turned into triangles by a process called tessellation, so that the engine can see them and the video card can draw them.
Rendering
This drawing of polygons and the textures and lighting associated with them is called rendering. There are two kinds of rendering: software and hardware rendering. Software rendering is what commonly is used in television and film projects. The scene is built within a 3D application including lights and textures, and then the CPU is engaged to draw the complex interaction of the objects, colors, and lights in the scene. Because the results are displayed later (not in real time), if it takes a second for a frame to be rendered, or a minute, or even an hour per frame, this is acceptable. The sequential stills that are the output of this process are put together via a video editing package, and watched as a moving image.
Hardware rendering is much different. Games are in this category because the video card renders the polygons within the digital space to represent 3D space. The hardware draws what is on the screen (including all the objects, textures, and light) and needs to do so at many times per second. Generally, if players are getting much below 30 frames per second, they notice the choppiness of the game.
So how does a computer draw 30 frames per second of one project, but one frame every 30 minutes of another? The answer is simply the size of the data set and the hardware dedicated to handle that set. For projects that will not be rendered in real time, the amount of data can be much higher. The number of polygons can be much more, the size and number of textures bigger, and the complex calculations of light more sophisticated. In real-time situations (hardware rendering, with dedicated hardware chugging away on this data set), the amount of data the video card deals with is much, much smaller.
Video Cards
Video cards are a big part of the “hardware” in “hardware rendering.” Video cards come in lots of different configurations and power combinations. The intricacies of how a video card works are varied and cards that seem the same (share the same amount of video RAM) may not actually be identical in their ability to draw assets. However, for our purposes we will oversimplify and say that “bigger” cards (cards with more video RAM) are able to draw more information. “More information” can include a lot of things: more polygons, more textures, or larger textures. It can also mean dynamic lighting visualization. In all cases, a video card being able to render more information means that the complexity of a scene can increase as the video card gets larger.
At this point it is worth noting that the cost of gamer's video cards have become a very manageable cost in most computers. And in fact, when students come to me complaining about slow working conditions on their home computer, the first suggestion I almost always make is to upgrade the video card. One GB video cards can easily be had for less than $100 and it's a quick and easy way to empower a computer to show more polygons more quickly.
The technology embedded in video cards evolves so quickly it would be foolish to try and explain it all in a book—as soon as it was published the specs would be outdated. However, generally, there's no need to buy a workstation card—the gamer's cards usually do quite reasonably and come with a substantially cheaper price tag.
In my 10-plus years of using Maya, I generally have had better experiences with NVidia cards. Either ATI or NVidia seem to get along well with Unity; but NVidia has provided the most predictable experience in authoring 3D elements when using Maya. This is based largely upon anecdotal evidence of my systems and the systems of a few hundred students, but when buying or upgrading a card to work with Maya, NVidia has worked better for me.
Limitations and Optimizations for Games
drawn twice, essentially doubling the number of polygons in the scene), and new visual effects like particles and complex shaders became used and expected by gamers. As the hardware got more powerful, we simply asked more of it.
Rules of 3D Game Modeling
So now that we've established that there are indeed limitations to what computers can show, it's easy to see that limits or rules need to be heeded when creating assets for unity. We will visit new rules with each step (there are specific considerations for texturing, for instance, that we won't cover until later). For this first tutorial, the two rules are:
1. Polycount matters.
2. Topology is critical (quads are best).
Polycount Matters
All the dynamic rise in hardware means that the visual sophistication of games continues to rise at an exciting pace. It also means that carefully creating our assets to allow for room to create these great effects remains the reality. Ultimately, effective use of the number of polygons in a scene (polycount) will be critical to both the immersive impact of the game and conversely, the performance in frame rate at which the game will play. Now, with most recent machines, polycount is much less of an issue than it once was. And frankly, usually if a game is dog-slow, it isn't a case of the sheer number of polys—it's usually related to other texture problems or other issues related to draw calls (more on this later). However, keeping an eye on the number of polys in your scene remains one of the pressures on a video card, and keeping a reasonable poly-budget is important (especially if ultimately developing for any mobile devices).
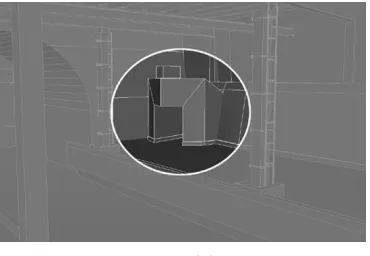
This can sometimes be a tricky balance. Figure 2.3 shows two sphere-like objects. The one on the right has 1000 polygons and the one on the left has 20. Sure enough, the 20-polygon model will require less video card power to draw, but it really doesn't appear to be a sphere anymore. Carefully dialing the details up to effectively communicate the shape while keeping the number of polygons low enough to draw quickly is part of the art that is game asset creation.
For our uses we will be focusing primarily on polygonal modeling techniques (the techniques using the tools in Maya's Polygons mode). The other methods of NURBS (non-uniform rational b-splines) and Subdivs are too indirect in their creation of polygons, and thus we lose control over polygon placement and count.
Topology
Topology refers to the structure or organization of polygons on a surface. Topology matters. Correctly structuring polygons makes a huge difference in how the mesh can be deformed later (with things like joints), how the form interprets collisions in Unity, and how easy it is to lay out UV maps. Much of topology concern centers around the tessellation process—the process of converting the form into three-sided polygons (tris) when it comes time to render.
Maya, like most 3D software, allows the user to create polygons of any number of sides (usually called n-gons). This is relatively new in the 3D production history. Not many years ago, 3D software would allow polygons to be constructed only as tris or quads (four-sided polygons). Tris are pretty hard to work with and manipulate quickly, so quads became the preferred method of organizing polygons. To allow artists to more fluidly create forms, most 3D apps began allowing the user to pay no attention to the number of sides of a polygon as the form was built. However, woe be the modeler who doesn't pay attention to the construction of his polygons. Five- (and more) sided polygons cause all sorts of problems down the road.
The issue is in the tessellation process. When the 3D software (or game engine, like Unity) converts a 3D form into all tris (which it must for the video cards to draw them), there are some shapes that are easier to tessellate. A quad is relatively easy, since it just splits it in half from vertex to vertex (Figure 2.4). However, the tessellation of the n-gon is often unpredictable, especially from a game asset creation standpoint. It does it for sure, but the resulting mesh is a mess (Figure 2.5). This messy tessellation that can be seen in Figure 2.5 may not seem to be a big deal here, but when these polygons are subjected to distortion techniques (like bending a mesh with joints), suddenly the edges where things can actually bend end up being in unpredictable places and result in
unpredictable distortion, and even worse pinching of the mesh. Additionally, when we get to creating UV maps, quads are much easier to work with than any other form.
So the first consideration we need to always keep in mind when modeling is to work with quads. Quadrangles will always make for easier modeling and for the most predictable results as we go. Don't succumb to Maya's temptation to allow for the creation of n-gons; they are nothing but trouble.
On to the Tools
Now that we've established the reason for our two rules of game modeling and discussed the importance of them, we can start to use them in action. In this chapter we will complete four tutorials that will culminate with a completed level (none of the mini-puzzles, just the architecture) in which our game will be set. At the end of this chapter, the player will be able to walk through the unlit halls of the Soviet facility. The tutorials will allow us to model, UV, and texture our asset. Finally, the last tutorial will bring the completed model into Unity. Before we get started, make sure to set up a new Maya project called “Incursion–Maya.” If you are unfamiliar with setting up projects (a vital part of creating assets with Maya, be sure to check out Appendix A, “Creating and Setting Maya Projects” that is housed on the supporting website (http://www. Creating3dGames.com).). Then move on to the tutorial.
The facility we are about to model is large. It was used to service nuclear submarines during the Cold War, and includes multiple levels and many, many hallways. In the following tutorials, we will not be modeling the entire complex or even the entire level that we will be using in the game. Instead, we will be targeting a few specific sections of the facility that are either indicative of the aesthetic style of the level, or that help illustrate a particular technique of modeling that is important to understand.
Do note that we will be using a much larger version of the facility in the construction of the game. We will be building parts of the game in these tutorials with challenges to create the rest included at the end of the chapter. If you're confident with your modeling skills, and don't want to have to create the
remaining parts of the level, you can simply use the versions that are included on the web site (http://www.Creating3dGames.com). However, if you're looking to make sure your game modeling skills are tight, be sure to attempt the challenges at the end of the chapter and complete the entire level by yourself.
Tutorial 2.1: Game Level Modeling:
The Entryway
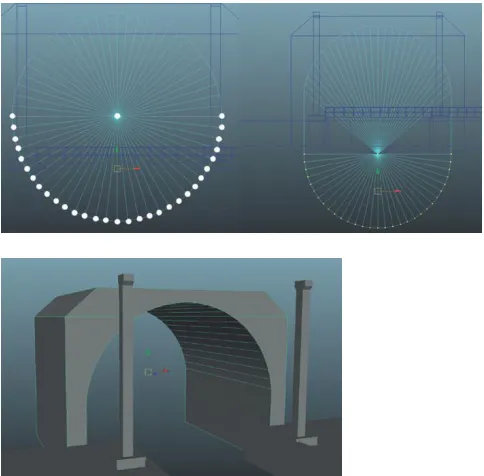
The entry of the Balaklava facility is a great place to start. First, the parts that make up the entry are largely rectilinear. Anything man-made and rectilinear is easily created in 3D applications. Second, all these rectilinear forms are a perfect trap for beginning modelers—a trap to create shapes that neither produce the appropriate sense of age or dirt. Over the course of the tutorials, we will look at taking a simple geometric space and making it look like it's been around for a while (Figure 2.6).
Step 1: Double-check you've got a project set up called “Incursion–Maya.”
If you don't, or don't know how, check out Appendix A.
Step 2: Choose File>Save Scene (Options).
Step 3: Check Incremental Save and click Save Scene.
Why?
Incremental Saves are insurance policies. What happens is that each time a scene is saved, Maya makes a copy of the scene from the last time it was saved and saves it to a folder called incrementalSaves. This does mean that there are lots of copies of your file, but it makes sure that in the catastrophic case of corrupted files you have a backup. Even if you run out of Undo's, an incrementalSaves folder means you can go back in time to what you wanted or needed. Every single semester I have taught, incremental saves have saved at least one student's project.
Step 4: In File Name: enter EntryWay and click the Save button. Note that if the project has been defined correctly, you are in the Incursion–Maya\ scenes folder.
Warnings and Pitfalls
I know it's tempting to skip this step since you're anxious to get started. Worse, I see lots of students who don't quite understand this step and skip it because it doesn't seem important. But keeping track of your assets is critical to success in projects as diverse as games. Create and Set your project in Maya. You must know that your texture files are in the sourceimages folder, and that your scene files are in your scenes folder.
Columns Base Shape
Step 5: Create the base shape of the cement columns with a polygonal
cube (Create>Polygon Primitives>Cube). Using the Channel box, make the cube Width = 1, Height = 16, Depth = 1 units by adjusting the polyCube1 INPUTS (Figure 2.7). Make sure the Subdivision Width, Height, and Depth is set to 1. In the Outline (Window>Outliner), double-click this new pCube and rename it EntryWayColumn.
Why?
X = 1 Y = 16 and Z = 1? How come? Well, no reason actually, except that it's a nice round number. Scale between apps and Unity is always a little tough and something that we will tackle more specifically in Unity. In Maya, absolute sizes are frustratingly difficult to keep track of, so we will focus on relative sizes. However, it is clear from the research that the pillar's cross-sections are square, and so numerically ensuring that this is so is much more accurate than eyeballing the thing. The Subdivision settings are set to 1 because we only need one subdivision to describe the shape, and any more is a waste of polys.
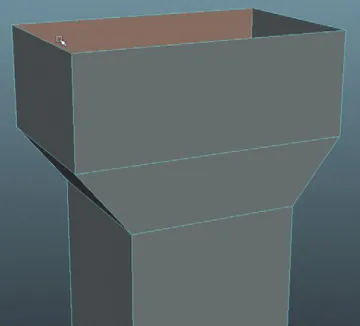
Step 6: Create a base using the Extrude tool to widen the base and give
it depth (Figure 2.8). As a review, right-click on the object and select Face. Select the bottom face, choose Polygons>Edit Mesh>Extrude, and use the manipulator handles to scale out the first extrusion. Repeat the process and use the manipulator handles to add depth.
Why?
The shape here is really a long cube on top of a short squatty one, so why not just create two cubes? There are several reasons for this. First, when we create textures for this object, it will be much easier if we have one solid mesh (more on this later). Second, and more importantly, if we have one object that defines the base and shaft of the column, we have half as many objects to define the same shape. Less objects mean less Draw Calls and thus a faster game (more on this later too).
Step 7: Delete the bottom face.
Why?
We will never see that bottom polygon. But, this polygon will take up texture space (which is at a premium in games) and add to the overall polycount. Yes, it's only one quad (two tris), and doesn't seem like it would be a big deal in the scheme of a big game, but if there are going to be many duplicates of any object, cleaning up faces that absolutely won't be seen can pay dividends for over 100 duplicates. Taking time to keep it clean now will save optimization time later.
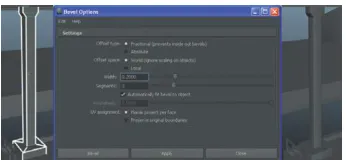
[image:40.536.121.301.470.633.2]Step 8: Repeat similar process to create column capital (Figure 2.9).
Figure 2.8 Creating column base.
Dock Creation
Step 9: Begin creation of the cement dock area in similar fashion. Start
with a cube (renamed in the Outliner to EntryWayDock) that is X = 20, Y = 4, Z = 60 (this can be adjusted later as we build), and extrude the faces as shown in Figure 2.10.
Step 10: Continue working around the dock making sure to make
extrusions at locations that will allow new extrusions that will allow for holes (Figure 2.11).
Tips and Tricks
Deciding when to make extrusions is a skill you build up over time and with experience. I find that sketching out the shape I want to make on a sheet of paper, and then sketching out the places that extrusions would need to be made, helps me quite a bit when it comes time to do it digitally.
Figure 2.10 Beginning to lay out dock.
Step 11: Here's where things might get a bit tricky. What we want to do is
make sure we have new locations to build outcroppings of the dock. Look carefully at how extrusions are made to allow for future extrusions that make the stepping out. Notice that this creates some pretty inefficient topology (geometry where there needn't be), but we will clean that up in a bit (Figure 2.12).
Tips and Tricks
This part of the process is really about roughing out the shape. It won't be perfect right away, so don't worry too much about being exact. When creating this tutorial, I ended up with lots and lots of Undo's to get back to a place that would allow me to more efficiently create the form. 3D creation is a process of stops and starts to be certain.
Step 12: Create a stepped section by deleting faces and filling them in
with the Append to Polygon tool. Select the faces on the far corner (as shown in Figure 2.13) and delete them. This will leave a hole in the mesh that needs to be filled. One way to fill this is the Append to Polygon tool. To use this tool, be sure to be in Object Mode (right-click the object and select Polygons>Edit Mesh>Append to Polygon Tool) and then click an edge of the hole. Purple arrows will appear that show the path of the new polygon that will be created. Click these arrows until the face is filled and press Enter. Repeat for the other plane that needs to be filled.
Figure 2.12 Dock continuation.
Tips and Tricks
When using the Append to Polygon tool, usually there is no need to go all around the outside of the shape that is being filled. It is faster to click one edge, and then click the edge opposite that edge and press Enter. This fills the hole quickly as it figures out the other edges are included in the function.
Tips and Tricks
Notice that after filling the hole, there will be some black chunks across the new planes that have been made. This is happening because the new polygon has soft normals, which are great for organic shapes, but not so great with rigid forms like this dock. To get rid of these, select the object and choose Polygons>Normals>Harden Edge.
Step 13: Rotate the front of the dock. Right-click the dock and choose Vertex from the hotbox menu. Marquee select the vertices across the front of the docs as shown in Figure 2.14. Choose the Rotate tool (keyboard shortcut is the E key), and then (to move the axis of rotation) press and hold the D key on the keyboard. Move the manipulator handles back to the back corner of the collection of vertices that have been selected. Release the D key and rotate the vertices from this new axis just defined.
Tips and Tricks
This rotation trick or moving the axis of rotation (via holding down the D key or by pressing the Insert key) works in Object mode too. The axis of rotation can be moved to wherever it needs to be for a given object. In our case, it's temporary for a selection of components (vertices in this example), but when done while in Object mode, the object will “remember” this new axis location.
Dock Optimization
Step 14: Optimize the mesh. In the process of outlining this shape, we
have quickly made some shapes that could be optimized. As pointed out earlier, polycount is rarely the problem with slow games, but it is certainly one of them. Especially if you are developing for iOS (iPad, iPhone, iPod Touch) or Android, keeping a tight grasp on polycount will be critical.
To optimize what we've created, we will be deleting edges that aren't needed and rearranging some of the edges that exist. Figure 2.15 shows one such edge that we should delete. Double-click the edge that will attempt to select an edge loop and then either press Delete on the keyboard (and then select and delete the vertices it leaves behind), or Ctrl-right-click and choose Edge Loop Utilities > To Edge Loop and Delete (which will automatically delete the left-behind points).
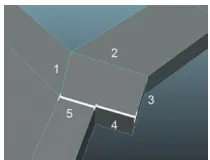
Step 15: Adjust topology to ensure four-sided polygons. Look carefully at
Figure 2.16. Note that this top polygon is actually a five-sided polygon. It's deceptive as sides 4 and 5 at first blush appear to be one edge, but there is a vertex in the middle where that other edge comes out. In a case like this, where all the polygons on the top of the deck are on the same plane, this five-sided poly would likely not cause any trouble; to be sure we will use another new tool, the Split Polygon tool.
In Object Mode, choose Polygons>Edit Mesh>Split Polygons Tool. This tool works by clicking and dragging on an edge to establish where to split the polygon. Usually click an edge and drag along that edge to a point (Figure 2.17). Click again on the opposite edge and drag to the point opposite the first. This will create two polygons (a four-sided one and a three-sided one) where there was once one five-sided polygon.
Step 16: Clean corners. Now that we've used the Split Polygon tool, we can further optimize our polycount in places that make right corners.
Figure 2.18 shows the result of using the Split Polygon tool to make a new cut from corner to corner. After this diagonal cut is made, the two straight edges that used to make the corner can be deleted.
[image:44.536.234.339.273.353.2]Figure 2.16 Deceptive five-sided polygon. Figure 2.15 Edge that isn't needed and should be
deleted. Make sure you delete the points it leaves behind.
Figure 2.17 Using the Split Polygon tool.
Tips and Tricks
Be sure that when getting rid of the edges that are no longer needed that those edges as they continue down the size and bottom of the shape are deleted as well. Additionally, watch for left-over vertices that should be selected and deleted as well.
Step 17: Repeat and optimize throughout right corners (Figure 2.19).
Why?
Looking at Figure 2.19, you can count four four-sided polygons that were involved in the three right angle turns the shape made. This makes for eight tris. Compare that with the seven four-sided polys that were there before (14 tris), and you can see how this sort of optimization can whittle down a polycount in a hurry. Ultimately there are some tradeoffs you have to make. It takes a bit of time to optimize, and if you're taking too much time out to optimize you're eating into your creation time. However, I find that if I do a bit of obvious optimizing as I go, it saves me from hours of painful optimization later.
Step 18: Delete the polygons along the bottom. We don't see them, we
don't need them, get rid of them.
There is certainly some other optimization that can be done here, but we have looked at the basic techniques that are used to make a lean, mean mesh. Feel free to further optimize, but for now we'll move on.
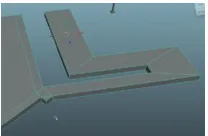
Step 19: Add the lip to inside of the channel. Select the faces as shown
in Figure 2.20 (the faces that are along the inside of the channel into the mountain), and use the Extrude tool to extrude them out just a small bit. This will create a new collection of faces along the dock top. Select these and extrude up to create the lip.
[image:45.536.274.378.194.262.2]Step 20: Duplicate and place the column roughly as shown in Figure 2.21. Yes, I realize it would be better to UV map the column first before duplicating it. And in fact, these columns we are placing now will undoubtedly be deleted and replaced by duplicates that are UV mapped. However, placing these here allow for some important placement of items in the upcoming steps.