Hardening
Linux
Hardening Linux
Copyright © 2005 by James Turnbull
All rights reserved. No part of this work may be reproduced or transmitted in any form or by any means, electronic or mechanical, including photocopying, recording, or by any information storage or retrieval system, without the prior written permission of the copyright owner and the publisher.
ISBN (pbk): 1-59059-444-4
Printed and bound in the United States of America 9 8 7 6 5 4 3 2 1
Trademarked names may appear in this book. Rather than use a trademark symbol with every occurrence of a trademarked name, we use the names only in an editorial fashion and to the benefit of the trademark owner, with no intention of infringement of the trademark.
Lead Editor: Jim Sumser
Technical Reviewer: Judith Myerson
Editorial Board: Steve Anglin, Dan Appleman, Ewan Buckingham, Gary Cornell, Tony Davis, Jason Gilmore, Chris Mills, Dominic Shakeshaft, Jim Sumser
Project Manager: Kylie Johnston
Copy Edit Manager: Nicole LeClerc
Copy Editor: Kim Wimpsett
Production Manager: Kari Brooks-Copony
Production Editor: Kelly Winquist
Compositor: Linda Weidemann
Proofreader: Lori Bring
Indexer: Kevin Broccoli
Artist: Kinetic Publishing Services, LLC
Cover Designer: Kurt Krames
Manufacturing Manager: Tom Debolski
Distributed to the book trade in the United States by Springer-Verlag New York, Inc., 233 Spring Street, 6th Floor, New York, NY 10013, and outside the United States by Springer-Verlag GmbH & Co. KG, Tiergartenstr. 17, 69112 Heidelberg, Germany.
In the United States: phone 1-800-SPRINGER, fax 201-348-4505, e-mail [email protected], or visit http://www.springer-ny.com. Outside the United States: fax +49 6221 345229, e-mail [email protected], or visit http://www.springer.de.
For information on translations, please contact Apress directly at 2560 Ninth Street, Suite 219, Berkeley, CA 94710. Phone 510-549-5930, fax 510-549-5939, e-mail [email protected], or visit http://www.apress.com.
The information in this book is distributed on an “as is” basis, without warranty. Although every precau-tion has been taken in the preparaprecau-tion of this work, neither the author(s) nor Apress shall have any liabil-ity to any person or entliabil-ity with respect to any loss or damage caused or alleged to be caused directly or indirectly by the information contained in this work.
For Lucinda, who put up with having an absentee husband for many months and without whose love and support
I would not have been able to write this book.
Contents at a Glance
About the Author
. . . xvAbout the Technical Reviewer
. . . xviiAcknowledgments
. . . xixIntroduction
. . . xxiCHAPTER 1
Hardening the Basics
. . . 1CHAPTER 2
Firewalling Your Hosts
. . . 79CHAPTER 3
Securing Connections and Remote Administration
. . . 137CHAPTER 4
Securing Files and File Systems
. . . 187CHAPTER 5
Understanding Logging and Log Monitoring
. . . 233CHAPTER 6
Using Tools for Security Testing
. . . 281CHAPTER 7
Securing Your Mail Server
. . . 321CHAPTER 8
Authenticating and Securing Your Mail
. . . 373CHAPTER 9
Hardening Remote Access to E-mail
. . . 403CHAPTER 10
Securing an FTP Server
. . . 443CHAPTER 11
Hardening DNS and BIND
. . . 463APPENDIX A
The Bastion Host Firewall Script
. . . 511APPENDIX B
BIND Configuration Files
. . . 517APPENDIX C
Checkpoints
. . . 525INDEX
. . . 533Contents
About the Author
. . . xvAbout the Technical Reviewer
. . . xviiAcknowledgments
. . . xixIntroduction
. . . xxi■
CHAPTER 1
Hardening the Basics
. . . 1Installing Your Distribution Securely
. . . 2Some Answers to Common Installation Questions
. . . 2Install Only What You Need
. . . 2Secure Booting, Boot Loaders, and Boot-Time Services
. . . 4Securing Your Boat Loader
. . . 5Init, Starting Services, and Boot Sequencing
. . . 8Consoles, Virtual Terminals, and Login Screens
. . . 15Securing the Console
. . . 16The Red Hat Console
. . . 16Securing Virtual Terminals
. . . 17Securing Login Screens
. . . 18Users and Groups
. . . 19Shadow Passwording
. . . 22Groups
. . . 23Adding Users
. . . 24Adding Groups
. . . 26Deleting Unnecessary Users and Groups
. . . 28Passwords
. . . 31Password Aging
. . . 35sudo
. . . 37User Accounting
. . . 42Process Accounting
. . . 44Pluggable Authentication Modules (PAM)
. . . 46PAM Module Stacking
. . . 48The PAM “Other” Service
. . . 49Restricting su Using PAM
. . . 50Setting Limits with PAM
. . . 51Restricting Users to Specific Login Times with PAM
. . . 53Package Management, File Integrity, and Updating
. . . 56Ensuring File Integrity
. . . 57Downloading Updates and Patches
. . . 61Compilers and Development Tools
. . . 64Removing the Compilers and Development Tools
. . . 64Restricting the Compilers and Development Tools
. . . 65Hardening and Securing Your Kernel
. . . 66Getting Your Kernel Source
. . . 66The Openwall Project
. . . 68Other Kernel-Hardening Options
. . . 74Keeping Informed About Security
. . . 75Security Sites and Mailing Lists
. . . 75Vendor and Distribution Security Sites
. . . 76Resources
. . . 76Mailing Lists
. . . 76Sites
. . . 77■
CHAPTER 2
Firewalling Your Hosts
. . . 79So, How Does a Linux Firewall Work?
. . . 80Tables
. . . 82Chains
. . . 82Policies
. . . 82Adding Your First Rules
. . . 83Choosing Filtering Criteria
. . . 86The iptables Command
. . . 87Creating a Basic Firewall
. . . 91Creating a Firewall for a Bastion Host
. . . 97Securing the Bastion Services
. . . 98Firewall Logging
. . . 101Handling ICMP Traffic
. . . 105Spoofing, Hijacking, and Denial of Service Attacks
. . . 108iptables and TCP Flags
. . . 111Some Final Bastion Host Rules
. . . 116Kernel Modules and Parameters
. . . 117Patch-o-Matic
. . . 117Kernel Parameters
. . . 124Managing iptables and Your Rules
. . . 129iptables init Scripts
. . . 131Testing and Troubleshooting
. . . 132Resources
. . . 136Mailing Lists
. . . 136Sites
. . . 136Books
. . . 136■
CHAPTER 3
Securing Connections and Remote Administration
. . . 137Public-Key Encryption
. . . 137SSL, TLS, and OpenSSL
. . . 140Stunnel
. . . 152IPSec, VPNs, and Openswan
. . . 159inetd and xinetd-Based Connections
. . . 167Remote Administration
. . . 169ssh
. . . 171scp and sftp
. . . 175ssh-agent and Agent Forwarding
. . . 177The sshd Daemon
. . . 179Configuring ssh and sshd
. . . 180Port Forwarding with OpenSSH
. . . 183Forwarding X with OpenSSH
. . . 184Resources
. . . 185Mailing Lists
. . . 185Sites
. . . 185■
CHAPTER 4
Securing Files and File Systems
. . . 187Basic File Permissions and File Attributes
. . . 188Access Permissions
. . . 188Ownership
. . . 198Immutable Files
. . . 198Capabilities and lcap
. . . 200Encrypting Files
. . . 202Securely Mounting File Systems
. . . 204Securing Removable Devices
. . . 207Creating an Encrypted File System
. . . 208Installing the Userland Tools
. . . 209Enabling the Functionality
. . . 209Encrypting a Loop File System
. . . 210Unmounting Your Encrypted File System
. . . 214Maintaining File Integrity with Tripwire
. . . 215Configuring Tripwire
. . . 216Explaining Tripwire Policy
. . . 218Network File System (NFS)
. . . 229Resources
. . . 231Mailing Lists
. . . 231Sites
. . . 231Sites About ACLs
. . . 231■
CHAPTER 5
Understanding Logging and Log Monitoring
. . . 233Syslog
. . . 233Configuring Syslog
. . . 235Starting syslogd and Its Options
. . . 239syslog-NG
. . . 241Installing and Configuring syslog-NG
. . . 241The contrib Directory
. . . 242Running and Configuring syslog-NG
. . . 242Sample syslog-ng.conf File
. . . 254Logging to a Database with syslog-NG
. . . 256Secure Logging with syslog-NG
. . . 259Testing Logging with logger
. . . 263Log Analysis and Correlation
. . . 264Installing and Running SEC
. . . 267Inputting Messages to SEC
. . . 269Building Your SEC Rules
. . . 270Log Management and Rotation
. . . 277Resources
. . . 280Mailing Lists
. . . 280Sites
. . . 280Books
. . . 280■
CHAPTER 6
Using Tools for Security Testing
. . . 281Inner Layer
. . . 282Scanning for Exploits and Root Kits
. . . 282Testing Your Password Security
. . . 287Automated Security Hardening with Bastille Linux
. . . 290Outer Layer
. . . 295NMAP
. . . 296Other Methods of Detecting a Penetration
. . . 313Recovering from a Penetration
. . . 315Additional Security Tools
. . . 318dsniff
. . . 318Ethereal
. . . 318Ettercap
. . . 318LIDS
. . . 318Netcat
. . . 319SARA
. . . 319Snort
. . . 319tcpdump
. . . 319Titan
. . . 319Resources
. . . 319Sites
. . . 320■
CHAPTER 7
Securing Your Mail Server
. . . 321Which Mail Server to Choose?
. . . 321How Is Your Mail Server at Risk?
. . . 323Protecting Your Mail Server
. . . 323Chrooting a Sendmail SMTP Gateway or Relay
. . . 324Chrooting Postfix
. . . 330Securing Your SMTP Server
. . . 333Obfuscating the MTA Banner and Version
. . . 333Disabling Dangerous and Legacy SMTP Commands
. . . 336Some Additional Sendmail Privacy Flags
. . . 339Sendmail and smrsh
. . . 339Writing to Files Safely
. . . 340Limiting the Risk of (Distributed) DoS Attacks
. . . 341Relaying, Spam, and Viruses
. . . 346Relaying
. . . 346Antispam
. . . 351Antivirus Scanning Your E-mail Server
. . . 364Resources
. . . 372Mailing Lists
. . . 372Sites
. . . 372■
CHAPTER 8
Authenticating and Securing Your Mail
. . . 373TLS
. . . 373TLS with Sendmail
. . . 377TLS with Postfix
. . . 381SMTP AUTH Using Cyrus SASL
. . . 387Compiling Cyrus SASL
. . . 388Configuring SASL saslauthd
. . . 389SMTP AUTH Using Cyrus SASL for Sendmail
. . . 389Compiling Cyrus SASL into Sendmail
. . . 390Configuring Cyrus SASL for Sendmail
. . . 391Using SMTP Server Authentication with Sendmail
. . . 392Using SMTP Client Authentication with Sendmail
. . . 394SMTP AUTH Using Cyrus SASL for Postfix
. . . 395Compiling Cyrus SASL into Postfix
. . . 395Configuring Cyrus SASL for Postfix
. . . 396Using SMTP Server Authentication with Postfix
. . . 398Using SMTP Client Authentication with Postfix
. . . 400Testing SMTP AUTH with Outlook Express
. . . 400Resources
. . . 402Mailing Lists
. . . 402Sites
. . . 402■
CHAPTER 9
Hardening Remote Access to E-mail
. . . 403IMAP
. . . 404POP
. . . 404Choosing IMAP or POP Servers
. . . 405How Is Your IMAP or POP Server at Risk?
. . . 406Cyrus IMAP
. . . 407Installing and Compiling Cyrus IMAP
. . . 409Installing Cyrus IMAP into a chroot Jail
. . . 411Configuring Cyrus IMAP
. . . 417Cyrus IMAP Authentication with SASL
. . . 422Cyrus IMAP Access Control and Authorization
. . . 425Testing Cyrus IMAP with imtest/pop3test
. . . 428Fetchmail
. . . 430Installing Fetchmail
. . . 431Configuring and Running Fetchmail
. . . 434Resources
. . . 441Mailing Lists
. . . 441■
CHAPTER 10
Securing an FTP Server
. . . 443How Does FTP Work?
. . . 444Firewalling Your FTP Server
. . . 446What FTP Server to Use?
. . . 448Installing vsftpd
. . . 448Configuring vsftpd for Anonymous FTP
. . . 450General Configuration
. . . 451Mode and Access Rights
. . . 452General Security
. . . 454Preventing Denial of Service Attacks
. . . 455Configuring vsftpd with Local Users
. . . 456Adding SSL/TLS Support
. . . 459Starting and Stopping vsftpd
. . . 461Resources
. . . 461Sites
. . . 461■
CHAPTER 11
Hardening DNS and BIND
. . . 463Your DNS Server at Risk
. . . 464Man-in-the-Middle Attacks
. . . 464Cache Poisoning
. . . 465Denial of Service Attacks
. . . 465Data Corruption and Alteration
. . . 466Other Risks
. . . 466What DNS Server Should You Choose?
. . . 466Secure BIND Design
. . . 467Installing BIND
. . . 470Chrooting BIND
. . . 472Permissions in the chroot Jail
. . . 473Starting and Running named
. . . 474Configuring BIND
. . . 476Access Control Lists
. . . 479Logging
. . . 480Options
. . . 484Views and Zones
. . . 493Zones
. . . 497The rndc Command
. . . 504rndc.conf
. . . 505Adding rndc Support to named.conf
. . . 507Using rndc
. . . 508Resources
. . . 510Mailing Lists
. . . 510Sites
. . . 510Information About Zone Files
. . . 510Books
. . . 510■
APPENDIX A
The Bastion Host Firewall Script
. . . 511■
APPENDIX B
BIND Configuration Files
. . . 517A Caching Server
. . . 517An Authoritative Master Name Server
. . . 519A Split DNS Name Server
. . . 520A Sample Named init Script
. . . 523■
APPENDIX C
Checkpoints
. . . 525Chapter 1
. . . 525Chapter 2
. . . 526Chapter 3
. . . 527Chapter 4
. . . 527Chapter 5
. . . 528Chapter 6
. . . 529Chapter 7
. . . 529Chapter 8
. . . 530Chapter 9
. . . 530Chapter 10
. . . 531Chapter 11
. . . 531About the Author
■JAMES TURNBULLis an IT&T security consultant at the Commonwealth Bank of Australia. He is an experienced infrastructure architect with a background in Linux/Unix, AS/400, Windows, and storage systems. He has been involved in security consulting, infrastructure security design, SLA and support services design, and business application support.
About the Technical Reviewer
■JUDITH MYERSONis a systems architect and engineer. Areas of interest include middleware technologies, enterprise-wide systems, database technologies, application development, server/network management, security, firewall technologies, and project management.
Acknowledgments
M
ark Chandler, for his friendship and technical assistance during the writing of this book. Nate Campi, for providing syslog-NG, SEC, and logging information.Introduction
T
his book is a technical guide to hardening and securing Linux hosts and some of the com-mon applications used on Linux hosts. It provides information on how to harden the base Linux operating system, including firewalling and securing connections to your hosts. It also looks at hardening and securing some of the applications commonly run on Linux hosts, such as e-mail, IMAP/POP, FTP, and DNS.No single book on security, even a book on the security of a single operating system, will ever answer all the security questions or address all the possible threats. This book is about providing risk mitigation and minimization. I have set out to identify risks associated with running Linux and some of the applications that run on Linux hosts. I have then provided technical solutions—backed by frequent examples, code, and commands—that minimize, mitigate, or in some circumstances negate those risks. The configurations and examples I provide are designed to ensure your Linux hosts are hardened against attack while not limit-ing the functionality available to your users.
So why should you care about security? The answer to this is simple—because a significant portion of businesses today rely heavily on the security of their IT assets. To use a metaphor: running a computer host is like owning a house. When Unix-flavored operating systems and TCP/IP networking were in their infancy, it was like owning a house in a small country town. The emphasis was on making it easy for people to cooperate and communicate. People left their doors open and did not mind other people exploring their houses or borrowing a cup of sugar. You probably did not really keep anything too valuable in your house, and if you did, people respected it. Your neighborhood was friendly, everyone knew everyone else, and you trusted your neighbors. Your local neighborhood “hacker” was someone who showed expertise with programming, systems, or telecommunications. Security was a secondary consideration, if it was considered at all.
Times have changed. Now the little country town has a big interstate running right through it. You need to lock up your house, install a burglar alarm, and put up a big fence. Your neighbors have become considerably unfriendlier, and instead of borrowing a cup of sugar, they are more interested in stealing your DVD player or burning your house down. Additionally, the items you store in your house now have considerably more value to you, in terms of both their financial cost and their importance to you. Worse, your local neighbor-hood “hacker” has morphed into a variety of bad guys with skills ranging from the base to the brilliant.
■
Note
I do not like the term hackerto describe the people who attack your hosts. The term still has ambi-guities associated with it, and its usage to describe attackers is not 100 percent accurate. Throughout this book I use the term attackerto describe the people who threaten your hosts and applications.Many people scoff at IT security. They claim IT security professionals are paranoid and are overstating the threat. Are we paranoid? Yes, probably we are. Is this paranoia justified? We believe so; in fact, a common refrain in the IT security industry is “Are we being paranoid enough?” IT assets have become absolutely critical to the functioning of most businesses, both large and small. They have also become the repositories of highly valuable commercial, research, customer, and financial information. The guys in the white hats are not the only ones who have noticed the increase in importance of IT assets and the increase in value of the information they contain. The guys in the black hats know exactly how important IT assets are. They know how much damage they can do and how much they can gain from attacking, penetrating, and compromising those assets.
The IT security skeptics claim that the threat of these attackers is overstated. They state that the vast majority of attackers are unskilled, use collections of prepackaged tools that exploit known vulnerabilities, and are no threat to most of your assets. That these make up a significant portion of attacks is indeed true. Take a look at your Internet-facing firewall or IDS logs, and you will see a considerable volume of attacks on your hosts with the patterns or signatures of automated attack tools. Does this lessen the threat to your hosts? Yes, some-times. It can be easier to defend against the less-skilled attacker using a prepackaged tool. The vulnerabilities exploited by these tools and how to fix them are usually well-documented or can be easily patched. But if you do not know about the vulnerability or have not applied the patch, then an attacker using an automated or prepackaged attack tool becomes the same level of threat as a brilliant attacker with a hand-coded attack tool.
The danger posed by these unskilled attackers has also increased. New vulnerabilities are discovered daily. Exploits are frequently built on these vulnerabilities within hours of them being discovered. Some vulnerabilities are not even discovered until someone uses them to exploit a host. This means pre-packaged attack tools are often available to exploit a vulnera-bility before the application developer or vendor has even released a patch. The combination of the speed with which new methods of attack spread and the diminishing gap between the discovery of a vulnerability and the development of an exploit means the risk that one of these attacks gets through is significantly increased if you are not being vigilant. You must take seri-ous, consistent, and systematic precautions to secure your hosts.
In addition to the vast majority of unskilled attackers, a smaller group of skilled attackers exists. These are either intelligent and cunning outsiders or internal staff with in-house knowl-edge. These attackers also pose a serious threat to your hosts, and you need to ensure that your hosts are protected from them, too. This requires that your hosts be hardened and locked down to ensure that only activities that you have authorized using functionality you have approved and installed are conducted.
your hosts and stole your organization’s bank account detail, the numbers of its corporate credit cards, or, worse, the credit card numbers of your customers.
You can see that the potential cost of attacks on IT assets is high. There is a potential monetary cost to your organization from theft, loss of revenue, or productivity. There is also a potential public relations cost through loss of customer or industry confidence. You need to understand how to simply, consistently, and practically secure your IT environment. For your Linux hosts and applications, this book provides this practical understanding.
■
Note
In a later section of this introduction, “Basic Security Tenets,” I talk broadly about some basic secu-rity tenets and theory. This should provide a basic understanding of IT secusecu-rity theory. I recommend you read more widely in this area.Who Should Read This Book?
This book is aimed at people who are new to security but who are not entirely new to Linux. This includes system administrators and engineers, security administrators, and IT managers. This is not a book for absolute beginners. I provide real-world examples of configurations, commands, and scenarios that will help you harden and secure your Linux hosts. While doing this, I try to explain in as much detail as possible to accommodate systems administrators of varying skills. But I do expect that readers are at least familiar with basic to intermediate Linux operations and systems administration.
I recommend you understand the following:
• Basic file manipulation (editors, grep, and so on) • Basic file permissions and ownership
• Basic user administration
• Package management including some knowledge of compiling source packages
• Basic understanding of initand initscripts
• Basic networking including IP addressing, subnets, and administering network resources using the command line
• Basic storage management: partitions, mounting and unmounting, and devices
■
Note
One of the topics I do not cover in this book is Web serving, specifically Apache. For this Irecom-mend another book in this series,Hardening Apache(Apress, 2004) by Tony Mobily, for the complete picture
on installing, configuring, and running secure Apache servers.1In the limited space available in this book,
I could not do this complicated and extensive topic justice.
How This Book Is Structured
This book covers the following topics:Chapter 1, “Hardening the Basics,” covers the basics of hardening your Linux hosts. It introduces the core security features of the Linux operating system and kernel and pro-vides information and examples on how to harden them. It also covers patching and updating your hosts and how to keep up-to-date with the latest security-related infor-mation for Linux.
Chapter 2, “Firewalling Your Hosts,” addresses securing your Linux hosts with the iptablesfirewall. It covers setting up a basic firewall and configuring and managing iptablesand then moves onto advanced topics such as firewall logging, protecting from Denial of Service (DoS) attacks and other network-based attacks. (Appendix A contains firewall scripts for securing a bastion host based on the contents of this chapter.)
Chapter 3, “Securing Connections and Remote Administration,” examines securing con-nections on your hosts. This includes providing secure concon-nections for the administra-tion of your systems using tools such as OpenSSH. I address using OpenSSL and Stunnel to encapsulate connections, and I show how to set up VPN connections.
Chapter 4, “Securing Files and File Systems,” looks at securing your files and file sys-tems. I cover file permissions, file attributes, and symmetric file encryption. I also explain securely mounting your disks and removable file systems, encrypting entire file systems, and using the Tripwire tool to monitor the integrity and status of your files and directories.
Chapter 5, “Understanding Logging and Log Monitoring,” covers logging and monitoring and filtering your logs. I cover the syslogand syslog-ngtools for gathering your log mes-sages. I also show you how to use the SEC tool to correlate log messages and demonstrate how to manage and rotate your log files.
Chapter 6, “Using Tools for Security Testing,” provides information on the tools available to you for testing the security of your hosts. I address testing the security of your pass-words and scanning for root kits. I cover scanning your hosts for vulnerabilities and open ports with tools such as nmapand Nessus. I also demonstrate how to use the Bastille hard-ening script to harden your host.
Chapter 7, “Securing Your Mail Server,” looks at securing and hardening two of the most commonly used e-mail servers, Sendmail and Postfix. I examine running these e-mail servers in achrootjail as well as other methods of limiting their exposure to attack. I also explain how to protect your users from spam and viruses.
Chapter 8, “Authenticating and Securing Your Mail,” addresses securing the transmission of your e-mail and the authentication of your clients to your e-mail servers. I examine using Cyrus SASL and SMTP AUTH to ensure only authenticated clients can use your e-mail servers and demonstrate how to use TLS to provide encryption of the transmis-sion of your e-mail.
Chapter 9, “Hardening Remote Access to E-mail,” addresses securing your user’s remote access to their e-mail via IMAP and POP and using tools such as Fetchmail. I cover pro-viding secure IMAP and POP using SSL and how to build a “black box” secure IMAP server using Cyrus IMAP.
Chapter 10, “Securing an FTP Server,” covers the FTP server and file transfers. I demon-strate how to run secure local and anonymous FTP servers, including how to integrate it with SSL/TLS and authenticate your users with PAM.
Chapter 11, “Hardening DNS and BIND,” looks at running DNS services. I cover DNS-related threats and attacks, how to choose your DNS server, and the basics of secure DNS design. I also cover installing and hardening a BIND DNS server and take you through the security-related configurations options of BIND. Finally, I cover some BIND security fea-tures such as TSIG. (Appendix B contains a number of secure BIND configuration files based on the contents of this chapter.)
Basic Security Tenets
The practical examples I demonstrate in this book are built on some underlying tenets that are crucial to maintaining your security.
• Be minimalist and minimize the risk.
• Defense in depth
• Vigilance
An understanding of these tenets, in combination with the examples and a little common sense, can help you mitigate the risk of an attack on your hosts. In the following sections I briefly articulate the IT security tenets on which I have based this book.
Be Minimalist, and Minimize the Risk
an attacker to compromise your host. The first step in minimizing the risk to your hosts is to remove this excess and unnecessary material. The second step is ensuring that you tightly control what is installed on your hosts. Do not install more than you need to, do not run serv-ices or functionality you do not need, and do not have users you do not need.
This is something you need to do from scratch with the installation of a new hardened host or if hardening an existing host. Obviously, minimizing the functionality of an existing host is harder. You need to make sure you are fully aware of all the functions that host per-forms and ensure you do not switch off or remove something that is required for that host to provide the required functionality. Hardening a production host requires extensive test-ing, and I recommend you proceed only if you have the ability to back out any changes and revert to your original configuration in the event a security change has an adverse effect.
■
Tip
I recommend you use a change control system to ensure all changes are managed and plannedrather than simply implemented. At the least you should keep a journal of the activities you conduct on a particular host. Every time you make a configuration change, you should detail the old and new settings and the change performed in a logbook.
Defense in Depth
The second tenet of good security is defense in depth. At its most basic, defense in depth means taking a layered approach to defending your hosts. The defense in depth concept pro-poses using layers of technology, policies, and processes to protect your systems. This means that, wherever possible in your environment, you do not rely on a single layer for defense of your hosts.
As an example you can look at your connectivity to the Internet. Just installing a firewall between your internal network and the Internet is not enough. In addition to a firewall between your network and the Internet, you should firewall your individual internal hosts, install an IDS system of some kind, and conduct regular penetration testing and vulnerability scanning of your hosts. You should apply this principle to all the components of your host security.
Vigilance
One of the biggest threats to your security is simply doing nothing. No matter how secure your hosts are at this point in time, they will, at varying rates, become less secure as time goes by. This is a consequence of simple entropy, as changes to your applications, environment, and requirements alter the configuration and potentially purpose of your systems. It is also a con-sequence of the changing nature of the threats against you. What you have protected yourself against now may not be what you need to protect yourself against in the future. This is most obviously manifested as new vulnerabilities and exploits of those vulnerabilities are discov-ered in the operating systems, applications, and tools you have running.
your hosts; the more you understand about the normal rhythms of your hosts, the easier it is to spot anomalies that could indicate you are under attack or have been penetrated.
You also need to ensure you keep up-to-date with vulnerabilities, threats, and exploits. In Chapter 1 I talk about some of the sources of information you can utilize to do this. You should subscribe to or review the security-related information your vendors distribute as well as those available from third-party sources such as SANS or CIS.
Finally, the truly vigilant test. And test again. Perform regular security assessments of your hosts and environment. Scan for vulnerabilities using tools such as Nessus or commercial tools such as ISS Security Scanner. Consider using independent third parties to perform penetration testing of your environment and hosts. Ongoing security assurance is vital to make sure you stay protected and hardened from attack.
Downloading the Code and Examples
Some of the lengthier configurations and examples from this book are also available in a zip file from the Downloads section of the Apress Web site (http://www.apress.com). These include the iptablesfirewall script from Chapter 2, the BIND named.confconfiguration files from Chapter 11, and a variety of other configuration files and scripts.
Contacting the Author
Hardening the Basics
A
t the heart of your Linux system is the Linux kernel and operating system. Combined, these form the base level of your system on which all your applications run. Comparatively speak-ing, the Linux operating system and kernel are actually reasonably secure. A large number of security features are built in the kernel, and a variety of security-related tools and features come with most distributions or are available in open-source form. Additionally, Linux offers excep-tional control over whom, how, and what resources and applications users can access. So, where are the risks?Well, as the old saying goes, “The devil is in the details.” The security of your system depends on a wide variety of configuration elements both at the operating system level and the application level. Additionally, the Linux operating system and kernel are complex and not always easy to configure. In fact, Linux systems are nearly infinitely configurable, and subtle configuration changes can have significant security implications. Thus, some security exposures and vulnerabilities are not always immediately obvious, and a lack of understand-ing about the global impact of changunderstand-ing configuration elements can lead to inadvertent exposures.
Furthermore, security on Linux systems never stays static. Once secured, your system does not perpetually stay secure. Indeed, the longer you use your system, the less secure it becomes. This can happen through operational or functional changes exposing you to threats or through new exploits being discovered in packages and applications. Securing your system is an ongo-ing and livongo-ing process. Many of the steps and concepts in this chapter you will apply more than once (for example, after you make an operational change to reaffirm the required level of security), or you will apply on a regular basis to keep your security level consistent.
Finally, many distributions come prepackaged or preconfigured for you with a recom-mended default set of packages, applications, and settings. Usually this configuration is based on the author or vendor understanding what their end user requires of the distribution. Gen-erally speaking, a lot of this preconfiguration is useful and enhances the potential security of your system; for example, Red Hat comes preconfigured to use Pluggable Authentication Mod-ules (or PAM) for a variety of authentication processes. But sometimes this preconfiguration opens security holes or is poorly designed from a security perspective. For example, as a result of the vendor’s desire to make it easy for you to set your system up, they may install, configure, and start applications or services for you. Red Hat automatically configures and starts Send-mail when you take the default installation options, for example.
To be able to address these issues, you need to have a solid understanding of the underly-ing basic security requirements of your system—those of your operatunderly-ing system and kernel. This chapter is entitled “Hardening the Basics” because it is aimed at exploring and explaining
the key areas of security and security configuration at that operating system and kernel level. Additionally, I try to address some of the key weaknesses of a freshly installed Linux distribu-tion or an existing unhardened Linux system and provide quick and practical fixes to them. I will start with some guidelines for installing a Linux distribution and then address boot security, user and password security, PAM, updates and package upgrades, and your kernel, and I will finish up with some information that should help you keep up-to-date with the latest vulnerabilities and security exposures.
Installing Your Distribution Securely
This book does not specifically cover a single distribution but rather tries to offer practical examples that you can use on the majority of Linux distributions (though I most keenly focus on Red Hat and Debian when offering examples of commands and application configuration). As a result, I am not going to take you through the process of installing a particular distribution but rather offer some recommendations about how you should install your Linux distribution. As I articulated in the chapter’s introduction, one of the key tenets of information technology (IT) security is minimizing your risks. The default installation process for most Linux distribu-tions does the opposite. Extraneous and inappropriate applicadistribu-tions are installed, unnecessary users are created, and some potentially highly insecure configuration decisions are made.
Let’s look at some ways to reduce the risks and the issues created during your distribu-tion’s installation process.
Some Answers to Common Installation Questions
Almost all Linux distributions installations ask you a series of questions about your system’s pro-posed configuration during the installation process. They are usually some important security-related questions that you should take care answering. Obviously, whilst I cannot run through what every distribution is going to ask, some questions remain similar across many distributions.
If prompted, enable MD5 and shadow passwording. This will make your passwords sig-nificantly more secure.
When prompted to input arootpassword, always chose a secure password. I will briefly talk about choosing suitable passwords in the “Users and Groups” section of this chapter.
Create a user other than rootif prompted, ensuring you choose a suitable password for this user also, so you have a user other than rootto log onto the system.
If prompted during installation, enable any proposed firewall. If options to control the configuration of the firewall are offered, select the bare minimum of allowed connections. Only explicitly enable connections when you absolutely require them. Remember any firewall you configure during installation will generally not be suitable for production purposes, and you should see Chapter 2 for further information on firewalls.
Install Only What You Need
a Red Hat system I recommend you deselect every possible package option and then install the base system.
I cannot provide you with a definitive list of packages not to install. But a lot of this is com-mon sense. Do you really need NetHack on your production Apache server? I can identify some of the types of packages that are installed by default that you should be able to remove. This also applies to hardening existing systems. You should review all installed packages and remove those not required or those that present significant risks.
Some of the areas I recommend you remove packages from are as follows:
• Games
• Network servers
• Daemons and services
• Databases
• Web tools
• Editors
• Media-related (CD and MP3 players, CD burners)
• Development tools and compilers
• Printing and printing tools
• Office-style applications and tools
• Document management and manipulation
• X-Windows (including Gnome and KDE)
One of my most important recommendations when choosing not to install packages involves X-Windows. Most, if not all, production Linux systems do not need X-Windows to per-form their functions. An e-mail server, for example, should have no requirement for X-Windows. So do not install it. X-Windows is a huge package with numerous components and a history of numerous security vulnerabilities that make it a potentially dangerous package to install. Addi-tionally, on a Linux system, unlike Windows systems, nothing requires the use of a graphical user interface (GUI) to configure that you cannot configure from the command line.
■
Caution
Do not install your distribution whilst connected to the Internet or to a network that is connected to the Internet.then your system is vulnerable. While you are busy waiting to download the required patches, then an attacker has the potential to identify your unprotected system and penetrate it using an as yet unfixed vulnerability.
To mitigate the risks of connecting an unpatched system to the Internet, I recommend you stay offline until you have updated your system with all the required patches. To do this, I rec-ommend you download all the updates and patches required for your system onto another sys-tem first and check the MD5 checksums of the updates against those published by the vendor and their GNU Privacy Guard (GPG) public key. For Red Hat updates the checksums and public key are published on the Red Hat Network site, and for Debian they are contained in the .dsc file, which describes each dpkgpackage. I go into more detail about how to do this in the “Pack-age Man“Pack-agement, File Integrity, and Updating” section later in this chapter.
I recommend setting up a central “updates and patches” machine and download and ver-ify all updates and patches on that system. You can also use this system to perform testing of new releases or updates before migrating them to your production systems. For a new instal-lation you can package and burn the updates onto a CD and load them from the media directly onto the system to be patched.
Secure Booting, Boot Loaders,
and Boot-Time Services
An attacker who has physical access to your system can easily bypass a great deal of your sys-tem’s inherent security (especially controls such as users and passwords) and can reboot it or change the configuration of your boot loader or your initprocess—including what services are run at boot and what sequence they are run in. You need to secure the boot process and ensure you fully understand what happens during your boot process so that your system is secure from this sort of attack.
Attackers who are able to reboot your system can create two major problems. The first is that Linux systems allow a great deal of access to someone who can control how they boot into your system. The second is that taking your system offline is an excellent Denial of Ser-vice attack. Thus, control over who is allowed to reboot your system, how they interact with your boot loader, and what kernel they boot into is something you need to tightly restrict.
Additionally, what services you start and the order you start them in can expose your sys-tem to further risks. Indeed, after a default installation or on an unhardened syssys-tem, many services that are started at boot are not required. Some of the running services even expose you to vulnerabilities because of their particular functionality. In the next section, I will cover some good rules you should follow for securing and organizing your boot process and sequence, including what you allow to start up when your system boots.
Securing Your Boat Loader
Most Linux systems use one of two boot loaders, the Linux Loader (LILO) or Grub. These boot loaders control your boot images and determine what kernel is booted when the system is started or rebooted. They are loaded after your Basic Input/Output System (BIOS) has initialized your system and generally wait a set period of time (generally between 10 and 30 seconds, but you can override this) for you to select a kernel to boot into; if you have not intervened, then they default to a specified kernel and boot into that.
I recommend you do not have too many kernel versions available to boot into, especially older versions of kernels. Many people leave older kernels on their systems and in their boot loader menus. The risk exists that you, or an attacker, could boot into an older kernel with a security vulnerability that could allow an attacker to compromise your system. Clean up when you perform kernel upgrades. I recommend leaving the current and previous versions of the kernel on the system (unless, of course, you have upgraded from the previous kernel to correct a security vulnerability).
Both boot loaders, LILO and Grub, are inherently insecure if your attacker has physical access to your system. For example, by default both LILO and Grub will allow you to boot into single-user mode. In single-user mode you have rootprivileges without having to enter the root password. Additionally, you can enter a variety of other parameters on both the boot loader’s command lines that can provide an attacker with opportunities to compromise your system.
But both LILO and Grub have the option of being secured with passwords to prevent this, and I will show how to address this for both boat loaders.
■
Tip
You should do this in addition to securing your BIOS. Set a BIOS password for your system, anddis-able booting from a floppy drive or CD/DVD drive.
Securing LILO with a Password
To prevent LILO from allowing unrestricted booting, you can specify a password in the lilo.conffile that must be entered if you want to pick a nondefault boot item, add options to the boot items, or boot into single-user mode. Listing 1-1 shows a sample lilo.conffile. Listing 1-1. Sample lilo.confFile
prompt timeout=50 default=linux boot=/dev/hda map=/boot/map install=/boot/boot.b message=/boot/message linear
1. See the “Passwords” section for a definition of a suitably secure password. image=/boot/vmlinuz-2.4.18-14
label=linux
initrd=/boot/initrd-2.4.18-14.img read-only
append="root=LABEL=/"
The two important lines to note are the restrictedand passwordoptions. These do not appear in your lilo.conffile by default; I have added them to Listing 1-1.
The passwordoption allows you to specify a password that must be entered before you are allowed to boot when the system is first started. In Listing 1-1 you would replace the phrase secretpassword with a suitably secure password.1Unfortunately, this password is added into the lilo.conffile in clear text, which means anyone with access to this file (though it should be those only with rootprivileges) can see the password.
The restrictedoption changes the behavior of the passwordoption. With restricted spec-ified, LILO will prompt for a password only if you specify parameters on the boot loader com-mand line. For example, it would prompt you for a password if you tried to enter the parameter single(to enter single-user mode) on the boot loader command line.
You can also specify the passwordand restrictedoptions with a particular kernel image statement. This way you can protect a particular kernel image or provide separate passwords for each kernel image. In the following example I have omitted the restrictedoption, which means a password will always be prompted for when trying to boot this kernel image:
image=/boot/vmlinuz-2.4.18-14 password=secretpassword label=linux
initrd=/boot/initrd-2.4.18-14.img read-only
append="root=LABEL=/"
Anytime you change your lilo.conffile, you need to run the lilocommand to update your LILO configuration.
puppy# /sbin/lilo
Finally, you need to ensure the lilo.conffile has the correct ownerships and permissions to ensure only those authorized can see the password in the file.
puppy# chown root:root /etc/lilo.conf puppy# chmod 0600 /etc/lilo.conf
Securing Grub with a Password
password means that the password cannot be extracted by simply reading the Grub configuration file, /etc/grub.conf.
Let’s first generate a Grub password. Listing 1-2 shows how to do this.
Listing 1-2. Generating a Grub Password
puppy# grub grub> md5crypt Password: ********
Encrypted: $1$2FXKzQ0$I6k7iy22wB27CrkzdVPe70 grub> quit
You enter the Grub shell, execute the md5crpytoption, and are prompted for a pass-word. The password is then encrypted and output on the screen in the form of an MD5 hash. Copy the MD5-encrypted password. Now you need to add the password to your grub.confconfiguration file.
■
Tip
Red Hat has an unusual location for its grub.conffile. The grub.conffile in /etcis symlinkedto /boot/grub/grub.conf, which in turn is symlinked to /boot/grub/menu.lst. I recommend for
simplicity’s sake you edit /etc/grub.conf.
Listing 1-3 shows a sample grub.conffile. Listing 1-3. Sample grub.confFile
default=1 timeout=10
splashimage=(hd0,0)/grub/splash.xpm.gz
password --md5 $1$2FXKzQ0$I6k7iy22wB27CrkzdVPe70 title Red Hat Linux (2.6.7)
root (hd0,0)
kernel /vmlinuz-2.6.7 ro root=LABEL=/ initrd /initrd-2.6.7.img
I have added the option password --md5to the file and specified the generated MD5 pass-word. Now when you reboot you will not be allowed to interact with the Grub boot menu unless you type p and enter the required password.
■
Tip
You could also specify a plain-text password by excluding the --md5from the passwordoption, butYou can also add another parameter to the passwordoption to launch a particular menu file when you have entered the password. To do this, change your passwordoption to the following: password --md5 $1$2FXKzQ0$I6k7iy22wB27CrkzdVPe70 /boot/grub/administrator-menu.lst
When you enter the correct password, Grub will launch the specified menu file. This allows you, for example, to create an additional menu of other kernels or boot options available only to those users who provide the required password.
Like LILO, Grub allows you to protect a specific boot entry. It offers two ways of protecting a particular entry. If you specify the option lockdirectly after the titleentry, then you will not be able to run that boot entry without entering a password previously specified by the password option. I have modified Listing 1-3 to add the lockoption to the following configuration file: default=1
timeout=10
splashimage=(hd0,0)/grub/splash.xpm.gz
password --md5 $1$2FXKzQ0$I6k7iy22wB27CrkzdVPe70 title Red Hat Linux (2.6.7)
lock
root (hd0,0)
kernel /vmlinuz-2.6.7 ro root=LABEL=/ initrd /initrd-2.6.7.img
Now unless you specified the password defined by the passwordoption, you would not be able to boot the Red Hat Linux (2.6.7)kernel image.
You can also use the passwordoption within a boot entry to allow you to specify a particu-lar password for each boot entry; Listing 1-4 shows you how to do it.
Listing 1-4. Protecting a Boot Entry with Grub
title Red Hat Linux (2.6.7)
password --md5 $1$2Q0$I6k7iy22wB27CrkzdVPe70 root (hd0,0)
kernel /vmlinuz-2.6.7 ro root=LABEL=/ initrd /initrd-2.6.7.img
Here I have placed the passwordoption directly after the titleoption. Now before you can boot this entry you will need to specify the correct password.
Finally, you need to ensure the grub.conffile has suitable ownership and permissions to ensure only those authorized can work with the file. Enter the following:
puppy# chown root:root /etc/grub.conf puppy# chmod 0600 /etc/grub.conf
Init, Starting Services, and Boot Sequencing
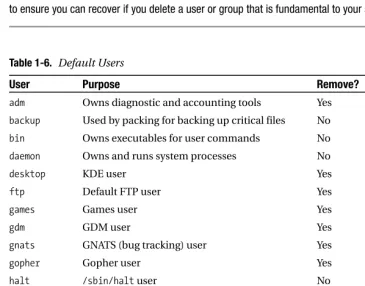
Table 1-1 shows some of the typical services that are generally started on both Red Hat and Debian systems, describes what they do, and tells whether I recommend removing them from your startup.
■
Note
I am referring to the releases Red Hat 9, Red Hat Fedora Core, Red Hat Enterprise Linux 3, and [image:38.576.46.432.177.610.2]Debian Woody 3 here, but generally speaking most distributions start similar services.
Table 1-1. Starting Services for Red Hat and Debian
Service Description Remove?
anacron A variation on the crontool Yes
apmd Advanced Power Management Yes
atd Daemon to the atscheduling tool Yes
autofs Automount Yes
crond The crondaemon No
cups Printing functions Yes
functions Shell-script functions for initscripts No
gpm Mouse support for text applications Yes
irda IrDA support Yes (unless you have IrDA devices)
isdn ISDN support Yes (unless you use ISDN)
keytable Keyboard mapping No
kudzu Hardware probing Yes
lpd Printing daemon Yes
netfs Mounts network file systems Yes
nfs NFS services Yes
nfslock NFS locking services Yes
ntpd Network Time Protocol daemon No
pcmcia PCMCIA support Yes
portmap RPC connection support Yes
random Snapshots the random state No
rawdevices Assigns raw devices to block devices Yes
rhnsd Red Hat Network daemon Yes
snmpd Simple Network Management Protocol Yes (SNMP) support
snmtptrap SNMP Trap daemon Yes
sshd Secure Shell (SSH) daemon No
winbind Samba support Yes
xfs X Font Server Yes
■
Tip
I will talk about inetdand xinetdin Chapter 3.A lot of the services listed in Table 1-1 you can apply common sense when deciding whether to start them. The pcmciascript, for example, is required only if you have PCMCIA devices or the winbindservice if you are using Samba. If you are not doing any printing, then do not start the lpdand cupsdaemons. My recommendations to disable particular services listed in Table 1-1 are based on my experience that these services are not required on a secured production server. For example, you would rarely find the apmddaemon running on a production server, but it is commonly used on laptops to provide the appropriate power management functionality.
■
Tip
The other area of security vulnerability during startup is the potential for your daemons to create files that are too permissive. You set this using the umaskfunction; I will cover umaskin Chapter 4.You can stop these services from starting via a number of methods depending on your distribution. I will focus on the Red Hat and Debian distributions’ methods for handling init scripts. After stopping services, I recommend also removing the related package to stop some-one restarting it.
■
Tip
If you use SuSE, then the yastcentral configuration tool will provide much the same functionality aschkconfigor update-rc.d.Working with Red Hat init Scripts
To help handle your initscripts, Red Hat comes with the command chkconfig. The chkconfig command works by reading two commented lines near the top of each of your initscripts. (Your initscripts should be located in the /etc/rc.d/init.ddirectory.) Listing 1-5 shows the top two lines of a typical Red Hat network initscript.
Listing 1-5. Sample chkconfigLine in an initScript
# chkconfig: 2345 10 90
# description: Activates/Deactivates all network interfaces configured to \ # start at boot time.
(in ascending order) until it stops when the sequence number reaches 90. The description line details the purpose of the service.
You need to add both these lines into any initscript you want to manipulate using the chkconfigcommand.
To use this embedded information, you have to use some command-line options. The first --listshows the current status of all initscripts and what run levels they will start. Listing 1-6 shows this functionality.
Listing 1-6. Listing initScripts Using the chkconfigCommand
puppy# chkconfig --list
kdcrotate 0:off 1:off 2:off 3:off 4:off 5:off 6:off ntpd 0:off 1:off 2:off 3:on 4:off 5:on 6:off courier-imap 0:off 1:off 2:on 3:on 4:on 5:on 6:off
You can see from Listing 1-6 that each initscript is listed together with the available run levels. An onafter the run level indicates the service will be started at that run level, and an off indicates that it will not be started.
To stop a service from starting, you can use the --deloption. puppy# chkconfig --del name
In this syntax, you should replace the namevariable with the name of a script to remove. That script must exist and must contain the two commented chkconfiglines in the top of the script. To add the service back to the boot sequence, you can use the --addoption.
puppy# chkconfig --add name
Again, you should replace the namevariable with the name of the appropriate initscript to be added. If you do not intend to add the script to the initsequence again, then I recom-mend you delete the script from the /etc/rc.d/init.d/directory.
Red Hat also comes with the useful ntsysvcommand-line graphical interface that can be used to configure what services will start in the current or specified run level. See the ntsysv manpage for further details.
After removing scripts from your /etc/rc.d/init.ddirectory, I recommend you further secure the contents of this directory.
puppy# chown root:root /etc/rc.d/init.d/* puppy# chmod -R 700 /etc/rc.d/init.d/*
Working with Debian init Scripts
Listing 1-7. Adding a Debian initScript
kitten# update-rc.d network defaults
The defaultsoption is useful for adding a typical initscript. The defaultstells Debian to start the service at run levels 2, 3, 4, and 5 and to stop the service at run levels 0, 1, and 6 with a default sequence number of 20. You can also specify the sequence numbers with the default option by adding the required sequence numbers after the defaultsoption as a suffix. kitten# update-rc.d network defaults 20 80
The first number indicates the starting sequence number, and the second number indi-cates the stopping sequence number for the service. You can also more explicitly control when an initscript is started and stopped. Listing 1-8 shows how you can specify this control. Listing 1-8. Explicitly Controlling a Debian initScript
kitten# update-rc.d network start 20 2 3 4 5 . stop 20 0 1 6 .
The command in Listing 1-8 provides the same configuration as the defaultsoption but using the full command-line options. You should be able to customize any start and stop com-binations required by modifying the command in Listing 1-8.
If you want to remove an initscript, update-rc.dalso provides an option to do this. In the opposite manner of adding an initscript, you must first delete the required initscript from the /etc/init.ddirectory before removing the associated start and stop scripts from the various run levels. Listing 1-9 shows how to do this.
Listing 1-9. Removing a Debian initScript
kitten# rm -f /etc/init.d/network kitten# update-rc.d network remove
The update-rc.dcommand also comes with two command-line flags you can use. The first option, -n, makes no actual change to the system and merely shows the proposed changes. kitten# update-rc.d -n network defaults
Adding system startup for /etc/init.d/network ... /etc/rc0.d/K20network -> ../init.d/network /etc/rc1-d/K20network -> ../init.d/network /etc/rc6.d/K20network -> ../init.d/network /etc/rc2.d/S20network -> ../init.d/network /etc/rc3.d/S20network -> ../init.d/network /etc/rc4.d/S20network -> ../init.d/network /etc/rc5.d/S20network -> ../init.d/network
After removing scripts from your /etc/init.ddirectory, I recommend you further secure the contents of this directory. Enter the following:
kitten# chown root:root /etc/init.d/* kitten# chmod -R 700 /etc/init.d/*
■
Tip
If you want, you can also download and install chkconfigon a Debian system. You can find a sourceversion that will compile on Debian at http://www.fastcoder.net/~thumper/software/sysadmin/
chkconfig/.
The inittab File
Your initscripts are not the only place where services are started. You should also review the contents of the inittabfile in the /etcdirectory. Though its use to start services is rarer these days, some items still end up in this file. Red Hat systems, for example, place several services in this file, including a trap for the Control+Alt+Delete key combination. Additionally, tty ter-minals are often started in this file. Listing 1-10 shows some service lines in the inittabfile. Listing 1-10. inittabService
sysacc:235:acct:/usr/sbin/acct -q -d ~~:S:wait:/sbin/sulogin
ca::ctrlaltdel:/sbin/shutdown -t3 -r now
The first line shows starting a service called sysacc. The line is broken down into the name of the service being started, the run levels the service will start at, a label for the service, and the command and any options to run separated by colons.
servicename:runlevels:label:command -option -option
You should review all commands being started in this file and determine if they are all needed. If you want to remove a service, simply comment out or delete that line.
■
Tip
For consistency I recommend not starting services in inittabbut using initscripts.■
Tip
Linux pays attention only to the Control+Alt+Delete key combination when used from the console or virtual consoles. For users who are logged into the system via other means—for example, a terminal session—pressing these keys will do nothing.By default most Linux kernels trap this key combination when pressed and pass it to the init system for processing. This allows you to specify the action taken when the Control+Alt+Delete key combination is pressed. The default action is usually to run the shutdowncommand. I recom-mend securing this a bit further by adding the -aoption to the trap in Listing 1-10.
ca::ctrlaltdel:/sbin/shutdown -a -t3 -r now
The -aoption enables the use of the shutdown.allowedfile. Create a file called
shutdown.allowedin the /etcdirectory. Add the users you want to be authorized to use the shutdowncommand to the file, one username per line. You can also have comments and empty lines in this file. Listing 1-11 shows what is inside the sample shutdown.allowedfile. Listing 1-11. Sample shutdown.allowedFile
root bob sarah
If someone other than these users tries to issue a Control+Alt+Delete from the console, they will get an error message.
shutdown: no authorized users logged in
On some systems you may not want anybody to be able to use Control+Alt+Delete. To do this, change the trap line to the following:
ca::ctrlaltdel:
Your /etc/inittabfile also contains the definitions for the virtual terminals available to you on the console using the Alt+number key combination. You can define them using the following lines in inittab:
1:2345:respawn:/sbin/mingetty tty1 2:2345:respawn:/sbin/mingetty tty2
Generally most distributions define six or so virtual terminals. You can reduce the num-ber of virtual terminals started by commenting out some of the ttys in the /etc/inittabfile. After making any changes to the inittabfile, you need to tell the initprocess to review the file. Use the following command:
puppy# telinit q
Then you need to ensure the inittabfile has the correct ownerships and permissions to ensure only those authorized can work with the file.
Boot Sequencing
The order in which you start and stop services on your system is also important. This is mainly for controlling when your firewall and logging services start and stop. Ensure you start your firewall, (iptables, for example) and your syslogdaemon before you bring up your network. This ensures your system will not be connected to any external systems or networks without the protection of your firewall or without any logging of your system occurring. Then during the shutdown of your system, ensure you stop your networking services before you stop your firewall and syslogservices.
On most systems initscripts are started and stopped according to the sequence number given to them; sequence 20 will start before 30, and so on. I briefly covered sequence numbers in the previous “Working with Debian init Scripts” and “Working with Red Hat init Scripts” sec-tions. You should ensure the start sequence numbers for your firewall and your syslogdaemons are lower than the sequence number for your system’s networking service, in other words, the daemons start before your network. Your networking services are usually started by an init script called networkon a Red Hat system and a script called networkingon a Debian system. Then confirm that your system’s networking service stops before your firewall and logging.
■
Tip
I will talk further about booting and some additional security features related to securing file systems in Chapter 4.Consoles, Virtual Terminals, and Login Screens
The next area I will cover is the security of your console, your terminals, and the login screens presented to your users when they log into the system. The console of your system is usually physically attached to your system. (It is usually from the console you will have installed your distribution.) In the Linux world, logging onto the console often allows you to perform activities, commands, or functions that you would not be able to do from other locations, such as via a secure shell (SSH) login. You need to understand what the capabilities of a user logged into the console are and how to secure them further. Additionally, your console also has a number of vir-tual terminals defined that you can access. I talked about defining these virvir-tual terminals in the earlier “The inittab File” section. These also need to be secured, and I will cover in the “Securing Virtual Terminals” section a method of locking these virtual terminals from unauthorized use.Lastly, when users connect to your systems, they are presented with a login screen. The information presented on most default login screens can offer attackers information about your system you do not want to share. Additionally, these login screens are a good method of communicating warnings and notices to the user logging into your system.
2. Red Hat 8, Red Hat 9, and Red Hat Enterprise Linux 3
Securing the Console
I will first talk about where rootcan log on. In Chapter 3 I will talk about restricting rootlogons over SSH to your system. You can further limit where rootcan log on by restricting it to a specific set of terminals. To do this, edit the contents of the /etc/securettyfile. The loginprogram refers to this file to determine whether the rootuser can log into a particular device. Listing 1-12 shows a sample of a typical securettyfile.
Listing 1-12. A Sample securettyFile
tty1 #tty2 #tty3 #tty4
All devices you want to allow rootto log in from should be listed in the file (without the /dev/prefix). I recommend allowing rootlogin only on one terminal and forcing all other logins to be a non-rootuser and if required use suto gain rootprivileges. In Listing 1-12 you can see that only device tty1allows arootlogin. All other devices have been commented out of the file, disabling rootlogin on those devices. You also need to secure the securettyfile to ensure it is modifiable only by root. Enter the following:
puppy# chown root:root /etc/securetty puppy# chmod 0600 /etc/securetty
■
Tip
You can also achieve similar results using the PAM module,pam_access.so. See its configurationfile in /etc/security/access.conf.
The Red Hat Console
On Red Hat systems2when non-rootusers log into the console, they are granted access to some additional programs that they would otherwise not be able to run. Additionally, they are given permissions to certain files they would not have as normal users solely because they are logged onto the console. To achieve this, Red Hat uses a PAM module called pam_console.so, which is defined in the PAM loginservice. See the “Pluggable Authentication Modules (PAM)” section.