This is a repository copy of Dentures for randomised controlled trials.
White Rose Research Online URL for this paper: http://eprints.whiterose.ac.uk/87382/
Version: Accepted Version
Article:
Dillon, S and Hyde, TP (2015) Dentures for randomised controlled trials. The European journal of prosthodontics and restorative dentistry, 23 (2). ISSN 0965-7452
https://doi.org/10.1922/EJPRD_1423Dillion08
[email protected] https://eprints.whiterose.ac.uk/
Reuse
Unless indicated otherwise, fulltext items are protected by copyright with all rights reserved. The copyright exception in section 29 of the Copyright, Designs and Patents Act 1988 allows the making of a single copy solely for the purpose of non-commercial research or private study within the limits of fair dealing. The publisher or other rights-holder may allow further reproduction and re-use of this version - refer to the White Rose Research Online record for this item. Where records identify the publisher as the copyright holder, users can verify any specific terms of use on the publisher’s website.
Takedown
If you consider content in White Rose Research Online to be in breach of UK law, please notify us by
Dentures for randomised controlled trials.
Mr Sean Dillon, B.Sc. Hons, Dental Instructor, Leeds Dental School.
Dr. T. Paul Hyde, BChD, Ph.D. Clinical Lecturer in Restorative Dentistry, Leeds Dental School.
Abstract:
Making complete dentures for dental research is difficult. The difficulty is not in the construction of dentures, but making sure the clinician is blind to the randomizations, and avoiding confounding variables. For research purposes it is essential that two sets of dentures are similar in every way, apart from the area to be investigated. A previous article showed how to duplicate a lower denture when it was articulated against a single upper denture. This paper describes the additional duplication of upper dentures. These additional problems presented the clinical and technical teams at the Leeds Dental Institute some challenges.
Introduction:
Randomised Controlled Trials are considered the gold standard for assessing the superiority of one clinical treatment modality over another. However, when RCT’s have been performed for complete dentures impressions, most researchers have been unable to detect a difference between the two sides of their trial1-7. It may be that these trials found no difference because there is, in truth, no material difference between the two trial interventions, or it could be that aspects of the trial protocol rendered them incapable of detecting a clinically significant difference.
One possible explanation for a trial’s inability to detect a difference is the difficulty in controlling the multiple variables that exist in the process of constructing similar dentures on each side of the trial. A cross over design for a RCT eliminates the patient-related potential confounding variables. It may also help to eliminate some denture and dentist related confounders, but this cannot be assumed. Dentures made for the same patient, made by the same dentist and the same technician still have the potential to vary; for example there may be an unplanned premature contact on one set of dentures, or the precise position of the upper anterior teeth may be different by a fraction of a millimetre yet affect aesthetics. If unplanned differences between the dentures occur, there is potential for patients to assess the dentures based on the unplanned differences rather than chosen aspect (the
the potential to distract the patient from the issue under investigation. It is important these potential confounders are, as far as possible, eliminated.
Table 1
A previous paper8 showed how to duplicate the features of a lower denture when it was articulated against a single upper denture. This article describes the additional processes required for both upper and lower dentures. It gives full details the clinical and laboratory stages that are needed to ensure that dentures produced for RCTs are very similar apart from the one variable under investigation (e.g. the impression surface). The completed RCT for which these technical processes were developed has been completed and that the RCT differentiated a significant difference between the 2 sides of the trial9.This paper describes the technical aspects of denture
duplication and production which was central to the RCT protocol.
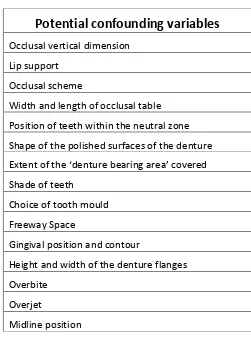
Potential confounding variables
Occlusal vertical dimension
Lip support
Occlusal scheme
Width and length of occlusal table
Position of teeth within the neutral zone
Shape of the polished surfaces of the denture
E
Shade of teeth
Choice of tooth mould
Freeway Space
Gingival position and contour
Height and width of the denture flanges
Overbite
Overjet
Technique.
Primary Impressions:
After patient selection, recruitment and consent, the production of dentures for research purposes began with a set of high quality primary impressions taken using
stock trays and “Aquasil®” impression putty. From this impression the clinician
marked out a line (usually 2mm short of the apparent sulcus depth) using an indelible pencil. This line guided the planned extent of the individual custom impression trays; as it would be transferred to the models upon casting.
The clinician asked for 2 sets of spaced special trays to be constructed. Both sets of trays were constructed using “Voco®” Light Cured Acrylic and were extended to the line marked on the impression. Spacers were laid down using modelling wax with
‘stops’ cut out. For the upper tray, it was usual for one stop to be placed behind the incisive papilla on the palate and another, continuous stop to be placed across the posterior border of the tray as far as the hammular notches. For the lower tray, two stops were placed on the buccal shelf and 2 are placed over the alveolar ridge in the canine region. The desired areas for the stops were chosen for the individual patient and marked out on the impression by the clinician.
The completed trays had stub handles and marked either with the letters A or B. This prevented the clinician selecting the “best” special trays for either the alginate or silicone impressions. To ensure randomisation of the trays the clinician opened a sealed randomisation envelope, supplied by the Clinical Trials Research Unit
(CTRU) that told him which of the special trays to use for alginate and which one for silicone. The envelope was opened after the trays had been checked and adjusted on clinic to remove any over extension.
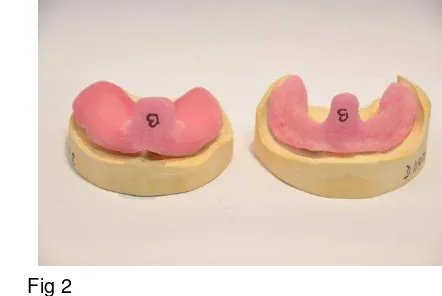
Fig 1 Fig 2
[image:4.595.299.520.515.663.2]Secondary Impressions:
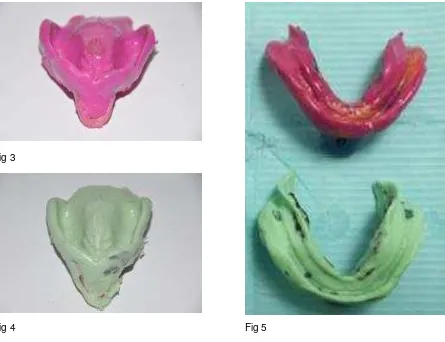
The clinician proceeded to take the impressions using silicone Express 3m® for one set of trays and Xantalgin® alginate using the other set of trays. Unlike the primary impressions, that are often overextended, the secondary impressions were carefully manipulated to the functional depth of the sulcus. These impressions were cast up using vacuum mixed dental stone. See Fig 3,4&5.
The models were identified through a unique number given to the technical team from the CTRU. The alginate and silicone upper and lower models were allocated a seven digit number. The clinician was blind to the number allocation; it was
generated through the CTRU database and known only to the technician who constructed the models.
Fig 3
Fig 4 Fig 5
Figs 3,4 and 5 shows two sets of impressions, one of alginate and one of silicone for the same patient.
[image:5.595.79.524.295.637.2] [image:5.595.319.525.296.623.2]Construction of the stent:
When constructing complete dentures for research projects, difficulty arose when trying to locate one set of upper and lower models to each other in the same position relative to the condyles on the articulator for both sets of models. When using
dentate models this was not so much of an issue as the upper and lower models often articulate against each other usually in one position, whereas for edentulous cases, this was not the case. A way around the issue was to construct a single stent which was used on both of the upper models, alginate and silicone. The stent was constructed on an area of the palate which had been shown to change little on different casts of the same patient10. This stent was connected to a facebow using silicone putty. Dots were placed on the 3 same anatomical points for both sets of models. During articulation the stent was aligned to these points. This ensured that both upper models were placed on the articulator in the same three-dimensional orientation. See Fig 6.
Fig 6
Construction of the 1st Occlusal rims:
The usual technique for recording an occlusion, as described by Basker11, was that rims should be made on rigid bases that are well fitting. However for this study, if the occlusal rim was well-fitting on one model it would not be well fitting on the other model. This created a potential for an unfair advantage to be given to one set of models (one set of dentures) in the trial. A partial solution to that issue was devised and published in an earlier paper8 but that paper only dealt with the orientation of lower models. The solution devised for the lower models was now adapted for use in the trial for the upper models. Preliminary occlusal rims were required to orientate both sets of models. A single set of rims needed to fit and orientate to both sets of models equally well.
Prior to constructing these primary occlusal rims, a wax spacer was painted on one
set of models. It didn’t matter which models the rims were made on; the choice was
[image:6.595.72.268.328.462.2]randomly made. Stops were cut out of the spacers where areas were identified as being the same on both models. The occlusal rims would contact both sets of models in these areas only.
Fig.6. Construction of the light cured stent. Three similar anatomical features are identified on both sets of upper models and highlighted using a black marker pen. The stent is constructed on one of the upper models with markings placed on the stent corresponding to the markings on the model. These dots should line up with the markings on the other upper model. This ensures that both upper models will be aligned similarly to each other when
The upper rim was constructed on an all wax base with a wire strengthener. The
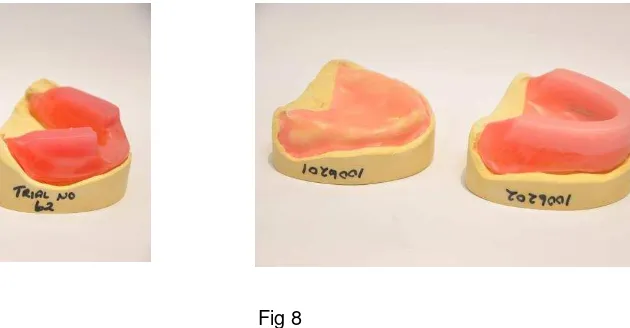
lower was constructed again with an all wax base but using a modified “Manchester Rim” technique12. Figs 7&8. The rims were sent to the clinic where they were
inserted into the mouth and the initial occlusion recorded. These were returned to the lab with the stent to be articulated.
Fig 7 Fig 8
Figs 7&8. Primary upper and lower occlusal rims constructed to fit both master models with wax spacing
1st occlusal recording and stent with facebow
The 1st occlusal recording was returned to the laboratory along with the stent
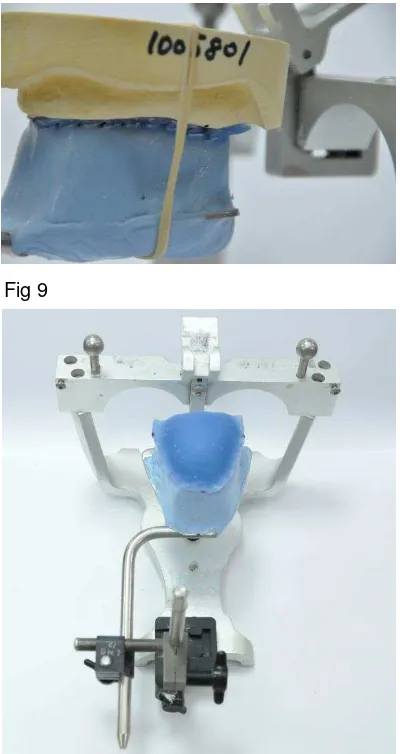
attached to a facebow recording with some silicone putty. Using this facebow stent, both upper models were articulated on a Denar® articulator lining up the dots marked on the models earlier with the stent as described earlier. When both uppers were articulated the facebow was removed and the lower models articulated using the 1st occlusal recording. Figs 9,10&11
From this first occlusal recording 2 new sets of occlusal rims were constructed. This time though they are made to fit accurately to the casts and constructed to the initial occlusal vertical dimension(OVD) as established using the 1st set of rims as they only fitted where it contacted the models. These rims were sent back to the clinic and a final occlusal recording was conducted. Fig 13.
[image:7.595.195.510.179.343.2]
Fig 9 Fig 10
Fig 11
[image:8.595.63.529.75.708.2]
Fig 12 Fig 13
Figs 12&13. Primary occlusal recordings for both sets of models articulated on a Denar Articulator. New well fitting occlusal rims were constructed using the established OVD from the 1st occlusial recording and then returned to the clinic for a second occlusal recording.
[image:8.595.323.522.85.228.2] [image:8.595.70.270.86.463.2] [image:8.595.323.521.523.658.2]
Rearticulation of 2nd occlusal recording and try in:
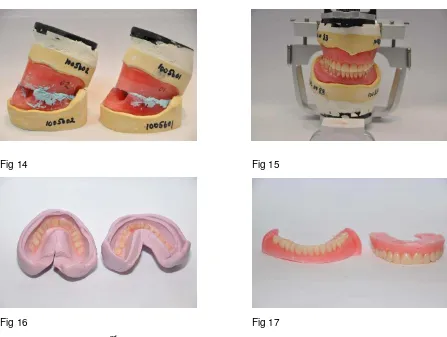
The rims are returned to the laboratory and rearticulated. It is only the lower models that were rearticulated because both upper models were in the same position to each other relative to the condyle on the articulator as this was determined by the facebow recording. Fig 14. The difficulty for the clinician was how to get two sets of occlusal registrations into the Retruded Contact Position RCP as this was the only consistently repeatable position according13 and then to transfer that information to the technician via the occlusal rims in position on the models.
After the wax up of the first try-in was completed, a lab putty matrix was constructed using Coltene Lab Putty®. The upper and lower lab putty matrix’s were constructed when they were on their models. It is important to ensure that its construction was of adequate thickness and rigidity because if it was too thin then the matrix would flex resulting in some tooth movement when removing the second wax up from the matrix.
Once set, the wax dentures were removed from the lab putty matrix. The mould was filled with teeth using and sealed using wax into position to restrict tooth movement. Molten wax was poured into the moulds. Care must be taken at this stage as if the wax was too hot then the wax could contract too quickly and move teeth from the mould. Therefore when melting the wax it is important to make sure that the wax was not too hot.14 When cold the wax and teeth were removed from the mould. Figs 16&17.
Any areas that could prevent the teeth from being set up against the lower model are removed using a hot wax knife, or the vertical height reduced if the wax is interfering with the alveolar ridge. The new lower wax set up was stuck to the already
completed upper waxed up denture from the first try in using some sticky wax. Sticky wax was used because when cold it will break off easily as it is a brittle wax and not move the teeth. Once stuck together both upper and new lower dentures are placed back on to the articulator with their corresponding model. This meant that the upper model from one side of the trial will be articulated against the lower model from the other side of the trial.
Fig 14 Fig 15
Fig 16 Fig 17
Figs 14-17 Shows the 2nd occlusal recording rearticulated and set up for try in. A silicone lab putty matrix constructed over the try in. The wax denture is removed from the matrix and a new denture is constructed from the matrix
[image:10.595.72.519.66.403.2] [image:10.595.72.270.451.592.2]
Fig 20
Finishing the dentures:
The dentures were finished in the usual way using the lost wax process and in the way as described in a previous article8. The dentures were cured overnight.
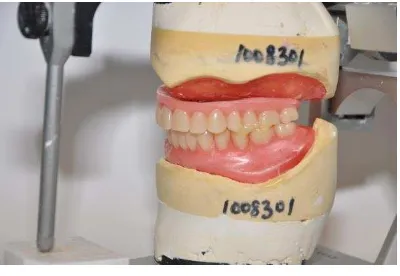
On finishing, the dentures were remounted back onto the articulator to check for any occlusal discrepencies. Once the dentures had been finished, they were colour coded either with a red or a blue dot using different coloured acrylic resin. The colours were placed in the posterior buccal wall/hammular knotch area of the upper denture and on the lingulal wall on the lower. The coloured dots distinguished the dentures for the patient and the clinician but the allocation is randomised so that half the dentures with a red dot were from the alginate side of the trial and half the red dots were from the silicone side of the trial. The coloured dot randomisation was computer generated by the CTRU. The technician opened an envelope on finishing the denture. Within the envelope were instructions to the technician as to which of the dentures should have a red sopt and which should have a blue spot. This ensured that the clinical staff and the patients were blind to the allocation as they didn’t know from which side of the trial their dentures come. Fig 19.
Fig 21 The final polished dentures remounted with their master models back onto the articulator to check for occlusal errors. The final finished dentures with their corresponding red and blue dots incorporated in the acrylic.
Fig 21
[image:11.595.72.272.71.209.2] [image:11.595.69.271.589.721.2]Summary:
This paper describes the technical aspect of the construction dentures for cross over
randomised controlled clinical trial (RCT). Protocols for cross over RCT’s should
include careful adherence to a similar denture duplication process to reduce potential confounding variables and allow trials to detect clinically significant differences when used in conjunction with an adequate sample size calculation.
Acknowledgements:
This presentation presents independent research funded by the UK National Institute for Health Research (NIHR) under its Research for Patient Benefit (RfPB)
References:
1. Firtell DN, Koumjian JH. Mandibular complete denture impressions with fluid wax or polysulfide rubber: a comparative study. Journal of Prosthetic Dentistry 1992; 67:801–4.
2. McCord JF, McNally LM, Smith PW, Grey NJ. Does the nature of the definitive impression material influence the outcome of (mandibular) complete
dentures? European Journal of Prosthodontics and Restorative Dentistry 2005; 13:105–8.
3. Kawai Y, Murakami H, Shariati B, Klemetti E, Blomfield JV, Billette L, et al. Do traditional techniques produce better conventional complete dentures than simplified techniques? J Dent. 2005;33:659–68.
4. Wegner K, Zenginel M, Buchtaleck J, Rehmann P, Wostmann B. Influence of two functional complete denture impression techniques on patient satisfaction: dentist manipulated verses patient manipulated. Int J Prostho 2011; 24:540-42.
5. Omar R, Al-Tarakemah Y, Akbar J, Al-Awadhi S, Behbehani Y, Lamontagne P. Influence of procedural variations during the laboratory phase of complete denture fabrication on patient satisfaction and denture quality. J Dent
2013;41:852–60.
6. Regis RR, Cunha TR, Della Vecchia MP, Ribeiro AB, Silva-Lovato CH, de Souza RF. A randomised trial of a simplified method for complete denture fabrication: patient perception and quality. Journal of Oral Rehabilitation 2013;40:535–45.
7. Cunha TR, Della Vecchia MP, Regis RR, Ribeiro AB, Muglia VA, Mestriner W Jr, de Souza RF. A randomised trial on simplified and conventional methods for complete denture fabrication: masticatory performance and ability. J Dent. 2013 Feb;41(2):133-42.
8. Dillon S, Hyde TP, Brunton PA: A Technique to Construct Duplicate Dentures for Clinical Research. Quin J Dent Tech 2008, 6:30-39.
9. Hyde TP, Craddock HL, Gray J, Pavitt SH, Hulme C, Godfrey M, Fernandez C, Navarro-Coy N, Dillon S, Wright J, Brown S, Dukanovic G, Brunton PA. A Randomised Controlled Trial of complete denture impression materials. J Dent. Accepted for publication 2014.
10. Atkinson HF, Johnson K. An instrument for model measurement in immediate denture research. Australian Dental Journal 1962 Aug: 7(4) p310.
11. Basker RM, Davenport JC: Prosthetic Treatment of the Edentulous Patient, Oxford: Blackwell Publishing Company; 2002.4th ed. p177.
12. McCord J.F, Grant A.A.: British Dental Journal Vol 188, 601 - 606 (2000): June 2000
13. Neill DJ, Nairn RI. Complete Denture Prosthetics. Wright; 1990 3rd ed. P54.