Lucent Technologies
Bell Labs InnovationsPARTNER™ PIus
Communications System
System Manager’s Guide
Lucent Technologies – formerly the communications
systems and technology
AT&T units of AT&T
999-506-142
Comcode 106431281 Issue 2
Copyright © 1990 AT&T All Rights Reserved Printed in U.S.A.
AT&T 999-506-142 Issue 2
October 1990
Notice
Every effort was made to ensure that the information in this document was complete and accurate at the time of printing. However, information is subject to change.
Federal Communications Commission (FCC) Interference Notice
This equipment has been tested and found to comply with the limits for a Class A digital device, pursuant to Part 15 of FCC rules. These limits are designed to provide reasonable protection against harmful interference when the equipment is operated in a commercial environment. This equipment generates, uses, and can radiate radio frequency energy and, if not installed and used in accordance with the instruction manuals, may cause harmful interference to radio communications. Operation of this equipment in a residential area is likely to cause harmful interference, in which case the user will have to correct the interference at his or her own expense.
Trademarks
PARTNER is a trademark of AT&T.
MLS-6, MLS-12, and MLS-12D are trademarks of AT&T. MAGIC-ON-HOLD is a registered trademark of AT&T. MERLIN is a registered trademark of AT&T.
Warranty
AT&T provides a limited warranty to this product. Refer to “AT&T Limited Warranty and Limitation of Liability” in chapter 9.
Ordering Information
The order number for this book is 999-506-142. To order copies of this document, call 1 800 432-6600 in the U.S. and 1 800 255-1242 in Canada. For more information on how to order this and other PARTNERTM
Plus system reference materials, refer to “Reference Materials” in the Introduction. For information on ordering replacement parts, accessories, and other compatible equipment, refer to appendix B, “Product Ordering Information. ”
Support Telephone Numbers
AT&T provides several toll-free customer helplines 24 hours a day. In the U.S., call the Helpline at 1 800 628-2888 if you need assistance when installing, programming, or using your system. In Canada, call one of the following Technical Assistance Centers for service or technical assistance:
Eastern Canada and Ottawa: 1 800 363-1882 Ontario: 1 800 387-4268 Central and Western Canada 1 800 663-9817
Intellectual property related to this product and registered to AT&T Corporation has been transferred to Lucent Technologies Incorporated.
Any references within this text to American Telephone and Telegraph Corporation or AT&T should be interpreted as references to Lucent Technologies Incorporated. The exception is cross references to books published prior to December 31, 1996, which retain their original AT&T titles.
Contents
About This Guide
1
Overview■ The System Manager’s Role 1-1
■ Features and Capabilities 1-2
■ System Components 1-3
■ Optional Equipment 1-5
2
Basic Call Handling with PARTNER Phones■ PARTNER Phone Controls ■ Basic Call Handling
Making an Outside Call Making an Intercom Call Answering a Call
Putting a Call on Hold Transferring a Call
Making a Conference Call Joining a Call
2-1 2-4 2-5 2-6 2-7 2-9 2-10 2-12 2-14
3
User-Programmable Features■ Dial Code Features 3-2
■ Quick Dialing Features 3-6
4
System Features■ System Speed Dialing
■ Dialing Restrictions and Permissions ■ Night Service
■ Pickup Group ■ Calling Group ■ Loudspeaker Paging ■ Hotline
■ Using the Password
5
Changing System Settings ■ Changing the System Clock ■ Adding an Outside Line ■ Adding an Extension■ Adding or Removing Telephone Numbers ■ Adding or Removing Allowed Numbers ■ Adding or Changing Emergency Numbers ■ Changing the Password
■ Connecting the System to a PBX or Centrex
5-1 5-1 5-2 5-3 5-3 5-3 5-4 5-4
6
Using Standard Telephones■ Basic Call Handling 6-3
Making an Outside Call 6-3
Making an Intercom Call 6-3
Answering a Call 6-3
Putting a Call on Hold 6-4
Transferring a Call 6-4
Making a Conference Call 6-5
Speed Dialing 6-5
■ Using Dial Code Features 6-6
■ Using a Combination Extension 6-7
7
Using Optional Equipment■ Fax Machines 7-2
■ Answering Machines 7-10
■ Modems 7-15
■ Credit Card Scanners 7-17
8
Troubleshooting■ When You Have a Problem 8-1
■ In Case of Power Failure 8-15
9
Maintenance and Customer Support■ Maintenance 9-1
■ Customer Support 9-2
Warranty and Post-Warranty Repair 9-2
A
User FormsB
Product Ordering InformationAbout This Guide
The PARTNER™ Plus System Manager’s Guide is a non-technical reference that provides instructions for using the PARTNER Plus Communications System. It explains what the PARTNER Plus system can do, and how to get the most out of its many features and capabilities.
This guide assumes that your system has already been installed and programmed, as described in the Installation and Programming Guide.
How to Use This Guide
■ If you area new user, read chapter 1 through chapter 5 to familiarize yourself with the system’s abilities and basic functions.
■ Once you are experienced with the PARTNER Plus system, use the Table of Contents or Index to locate the information you need.
Product Safety Labels
This book contains product safety labels, identified by a . A CAUTION
label indicates the presence of a hazard that will or can cause property damage or minor personal injury if the hazard is not avoided.
Reference Materials
The following materials are available to help you install, program, and use the PARTNER Plus system (the order numbers are in parentheses):
■
■
System Planner provides the forms needed to plan and record how your
system and telephones are to be programmed. If you need a System
Planner, contact your AT&T customer service representative or authorized
dealer.
Installation and Programming Guide (999-506-141) provides instructions for
installing the hardware and programming the system.
System Manager’s Guide, (999-506-142) provides instructions for using the
system and its many features.
Quick Reference for Users with MLS-Model Telephones (999-506-145,
package of 6) contain basic instructions for using MLS phones with the PARTNER Plus system.
■
■
To order additional reference materials (except the System Planner), call the AT&T Customer information Center:
In the U.S.: 1 800 432-6600 In Canada: 1 800 255-1242
How to Comment on This Guide
A feedback form is located at the end of this guide, after the appendices. If the feedback form is missing, send your comments and recommendations for changes to:
A. Sherwood
AT&T General Business Systems 99 Jefferson Road (Room 2B-63) Parsippany, NJ 07054
Fax: 201 887-6898
Overview
1
The System Manager’s Role
This guide is the system manager’s reference. Wherever a PARTNER Plus Communications System is installed, there is usually one person who becomes responsible for its overall operation and for providing the rest of the staff with help and instruction. We refer to this person as the system manager, who is typically a company’s telecommunications manager or receptionist, but could be any employee who is designated as the “resident expert” in the operation of the PARTNER Plus system.
This guide will help you, the system manager, do the following:
■ Train Co-Workers. The system manager makes sure that co-workers are trained in basic call handling, programming a telephone with the proper features, and using those features effectively. In short, the system manager helps the staff get the most out of their telephones. To help with this task, give each telephone user a Quick Reference Card, and filled-in copies of the “Speed Dial Numbers” form and the “Extension Programming Information” form, both found in appendix A. If anyone on your system uses a standard rotary or touch-tone phone, they should also get a copy of chapter 6, “Using Standard Telephones.”
Change the System. The PARTNER Plus system changes easily to
accommodate expanding needs. This guide will help you accomplish whatever system changes you need to make, whether they be
reprogramming or adding equipment and lines.
Solve Problems. If the system should malfunction, you may be able to
solve the problem by following the steps provided in chapter 8,
“Troubleshooting.” This chapter can also help you with problems co-workers may have using their telephones.
■
■
Features and Capabilities
The PARTNER Plus system is a digital telephone system that can connect as many as 8 telephone lines with up to 24 extensions. It is sophisticated and powerful, yet it is easy to use and can readily change to accommodate your growing needs.
■
■
Display-assisted programming makes it easy to reconfigure the system
yourself when you need to.
Direct connection of standard telecommunications devices means you
do not have to buy extra lines or expensive adapters to connect devices such as standard touch-tone and rotary telephones, answering machines, and fax machines to the PARTNER Plus system.
■
■
■
Fax Management feature lets users monitor fax machines from their
tele-phones and transfer calls to them with a single touch.
Dialing restriction features allow you to control telephone activity and keep
phone bills down by restricting the kinds of calls your users can make, including long-distance calls and calls to 900 number “chat lines.”
Programmable telephone buttons give quick and convenient use of call
handling features such as Last Number Redial, Do Not Disturb, Auto Dialing, and Privacy.
Quick DiaIing allows users to dial frequently called numbers by dialing a
short code or pressing a single button.
Group features allow users to call or page a group of phones simultaneously
and to automatically pick up calls ringing at a group of extensions.
Night Service prevents unauthorized use of telephones after normal
busi-ness hours while allowing incoming calls to be answered. ■
■
■
■
■
Hotline feature lets you create a special hotline telephone that automatically
calls a predetermined extension when someone lifts the handset.
Doorphone feature lets you screen visitors from your phone without having
to walk to and from a normally locked door.
Direct connection of a loudspeaker paging system and an audio source for Music On Hold* means you do not have to buy special adapters or
addi-tional phone lines to connect loudspeakers or an audio source.
Interchangeable system components make the PARTNER Plus system
easy to install, maintain, and upgrade. ■
■
* If you use equipment that rebroadcasts music or other copyrighted materials, you may be required to obtain a license from a third party such as ASCAP or BMI. Or, you can purchase a MAGIC-ON-HOLD® system from AT&T that does not require you to obtain such a license.
System Components
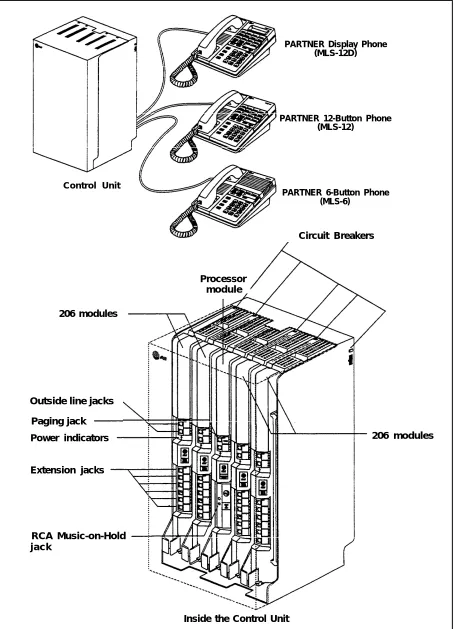
Figure 1-1 on the next page shows a basic PARTNER Plus system. A brief description of each component follows.
■ Control Unit. The control unit is the heart of the PARTNER Plus system. It consists of a backplane, cover, a processor module, and one to four 206 modules.
■ 206 Module. Each 206 module has jacks to connect a maximum of 2
outside telephone lines and 6 extensions. Other telecommunications dev-ices (fax machines, answering machines, modems, etc.) can also be con-nected. Each 206 module has a power indicator, a green light that shows that the system is turned on.
■ Processor Module. The processor module provides the intelligence that
controls most of the system’s features. It also has an RCA jack for a music-on-hold audio source and a jack for a loudspeaker paging system. “MLS” stands for Multi-Line
Series telephones, so designated ■ AT&TMLS-12D™ Telephone. This phone has 12 buttons with lights, which because they can handle more include eight buttons for outside lines or programmable features, two inter-than one outside line. com buttons, two lighted programmable buttons, and six additional
pro-grammable buttons without lights. it has a built-in speaker and microphone, and a display that shows the date, time, the number dialed, programming messages when in the program mode, and the amount of time elapsed dur-ing a call. In order to program the system, you must install an MLS-12D
phone at extension 10. Throughout this guide, the AT&T MLS-12D telephone
is referred to as the PARTNER display phone.
■ AT&T MLS-12™ Telephone. This telephone is identical to the MLS-12D tele-phone except that it has no display. Throughout this guide, the AT&T MLS-12 telephone is referred to as the PARTNER MLS-12-button phone.
■ AT&T MLS-6™ Telephone. This telephone has six buttons with lights, which include four buttons for outside lines or programmable features, and two intercom buttons. It also has a built-in speaker. Throughout this guide, the AT&T MLS-6 telephone is referred to as the PARTNER 6-button phone.
Control Unit
206 modules
PARTNER Display Phone (MLS-12D)
PARTNER 12-Button Phone (MLS-12)
PARTNER 6-Button Phone (MLS-6)
Circuit Breakers
Processor module
Outside line jacks
Paging jack
Power indicators
Extension jacks
RCA Music-on-Hold jack
Inside the Control Unit
206 modules
Figure 1-1 Basic PARTNER Plus System
Optional Equipment
The PARTNER Plus system works with many telecommunications devices, not only PARTNER telephones. You can connect these other devices without having to invest in more lines, expensive adapters, or circuit cards.
Industry Standard Devices
Many types of industry-standard telecommunications devices will work with your PARTNER Plus system. They include:
■
■
■
■
■
■
Limitations
Touch-tone and rotary telephones Cordless telephones
Fax machines Answering machines Modems
Credit card verification terminals
You can connect the above devices to your system regardless of the manufac-turer. However, the following limitations apply:
■
■
It must be a single-line device.
It must be industry standard. That is, it cannot be made specifically for use on a particular telephone system. (For example, you cannot connect an AT&T MERLIN® phone because it is specifically designed for use on a MER-LIN system.)
The device’s Ringer Equivalence Number (REN) cannot be greater than 2. ■
For more information on RENs, refer to the section “Hardware” of chapter 1 in the Installation and Programming Guide.
Connecting and Using
You can connect the standard device so that it is on an extension by itself, or itStandard Devices
can share an extension with another piece of equipment (either another stan-dard device or a PARTNER phone). TO connect two devices on one extension, you will need an inexpensive AT&T 267F2 bridging adapter, two of which are provided free with each 206 module. In addition, the total RENs for both dev-ices must not exceed 2. See the Installation and Programming Guide (figure 2-3) for installation instructions.For information on using standard devices with your PARTNER Plus system, see chapter 6 and chapter 7 in this guide.
Other Devices
YOU can also connect other devices to your system, but only specific models are compatible with the PARTNER Plus system. These devices include:
■ Loudspeaker paging systems ■ Doorphones
■ Headsets
■ Extra alerts (such as chimes or loud bells)
Connecting and Using
For instructions on connecting these devices to your system, see chapter 2 inOther Devices
the Installation and Programming Guide.For information on how to use your loudspeaker paging system with the PARTNER Plus system, see chapter 4 in this guide. For information on using doorphones, headsets, and extra alerts, follow the manufacturer’s instructions.
Ordering Information
Optional equipment is available from many AT&T sources. Contact any of the following for sales information and advice on the equipment that would best meet your needs.
AT&T Catalog Sales 1 800 451-2100
AT&T General Business Systems Sales Office 1 800 247-7000 AT&T PhoneCenter Store 1 800 222-3111
AT8tT Authorized Dealer 1 800 247-1212
Basic Call Handling
with PARTNER Phones
2
PARTNER Phone Controls
Figure 2-1 Shows the buttons and displays on the PARTNER display telephone.
MLS Telephone Controls and Indicators
Display [MLS-12D only]
Shows date and time (when idle) and the number being dialed. During a call, shows the duration of the call. When in program mode, shows progmn-ming options.
Dual-Purpose Line/Programmable Buttons
[MLS-6 has 4 buttons instead of 8]
When connected to an outside line, press to place and receive calls. When not connected to an out-side line, button can be programmed to store dialing sequences or dial code features. An MLS-6 with 4 outside lines has no programmable but-tons.
Intercom
Press either button to place an intercorn (inside) call to another extension.
Feature
Press to enter program mode or use dial code features.
Conf (Conference) Press to add other parties to your call.
Transfer
Press to transfer a call to another extension.
Hold
Press to put a call on hold for later retrieval.
Programmable Buttons (2 with lights)
[MLS-12D and MLS-12 only]
Can be programmed with dial code features or dialing sequences, according 10 needs of user.
Spkr (Speaker) Button Tumson Speaker so you can dial or monitor a call without lifting the handset. See in this chapter, "Using the Speaker and Microphone.”
Mic (Microphone) Button
[MLS-12D and MLS-12 only]
Press to talk without lifting the handset. See in this chapter, "Using the Speaker and Microphone.”
Message Indicator
Indicator lights when someone signals you with the Message Light On feature. See “Dial Code Features” in Chapter 3.
Volume Control Buttons
Press to increase ( ▲ ) or decrease ( ▼ ) the volume of the ringer, speaker, and handset
❑ To adjust ringer volume, while phone is idle and handsets on the phone, press ▲ or ▼ . ❑ To adjust speaker volume, while on a call press
Spkr then press ▲ or ▼ while listening through ❑ To adjust handset volume, while on a call lift handset and press ▲ or ▼ while listening.
Figure 2-1 PARTNER Telephone Controls
Lights
■ These light patterns apply only
for buttons that have lines assigned to them. Lights for unused buttons are always off. Light patterns are different when
the phone is in program mode. ■
There is a green and a red light next to each line button. These lights work in different ways to show calling activity on each line. Green lights indicate activity at your extension; red lights indicate activity at other extensions. The various light patterns are shown below.
■
■
■
Steady On
A steady on light signifies a busy line. When the green light is on, your extension is busy on that line. When the red light is on, someone at another extension is busy on that line.
Off (off continuously)
An off light signifies an idle line, or an unused button.
Flash
A flash pattern (long off, long on) signifies a ringing call. When the green light flashes, a call is ringing on that line at your extension. When the red light flashes, it means that the line is ringing, but not at your extension.
Wink
A wink pattern (long on, short off) signifies a call on hold. When the green light winks, a call is on hold at your extension. When the red light winks, a call is on hold at another extension.
Flutter
A flutter pattern (short on, short off) signifies a call on Exclusive Hold (only you can retrieve the call). When the green light flutters, a call is on Exclusive Hold at your extension.
Broken Flutter
A broken flutter (short on and off followed by long off) signifies fax trouble when the button is programmed as a Fax Management Button (see “Fax Management Button” in chapter 7).
Alternate Red/Green Flash
■
■
An alternating red and green flash (red on, green on, red on, green on) appears on both extensions on a joined call. It also appears on an extension connected in a conference call.
These light pattern definitions are used throughout this guide.
Using the Speaker and Microphone
Every PARTNER telephone has a speaker, which you can turn on by pressing
[Spkr] . The PARTNER display phone and the PARTNER 12-button telephone also have a microphone, which you can turn on by pressing [Mic] . When the green light next to the button is on, the speaker or microphone is on.
On PARTNER phones that have a speaker and a microphone, you can make and answer calls without lifting the handset by turning both the speaker and the microphone on. When you turn on the speaker, you will hear a dial tone. Turn-ing the speaker on and off is the same as liftTurn-ing and replacTurn-ing the handset. On PARTNER phones that have a speaker only, you can turn on the speaker to get a dial tone, dial the call, and hear the call ringing. When the other party answers, you must lift the handset to talk.
You can switch from the handset to the speaker and microphone by pressing
[Spkr] and [Mic] and hanging up the handset. To go from the speaker and
micro-phone to the handset, lift the handset.
Hands-Free Answer
This feature allows you to automatically answer a voice-signaled intercom call.on Intercom (HFAI)
If you leave the microphone on all the time, you can respond to a voice-signaled intercom call without lifting the handset. The incoming voice-signaled intercom call will automatically turn on your speaker. This is called Hands-Free Answeron Intercom. If the microphone is on and an outside call comes in, press [Spkr]
to answer the call.
Basic Call Handling
As soon as your system is installed and programmed, you can make and handle basic calls as described in this section. Basic call handling involves using the buttons on the PARTNER phone that are permanently labeled, such as [Hold] ,
[Conf] , [Transfer] and [Intercom] .
For instructions on how to handle calls using standard rotary and touch-tone phones, see chapter 6.
Using the Handset
The procedures in this section direct you to use the handset to make andor the Speaker
answer calls. However, if you prefer to dial and conduct calls without lifting the handset, you can use the speaker and the microphone instead. If you have a PARTNER display phone or a PARTNER 12-button telephone, leave the micro-phone on all the time. When you want to make or answer a call (or when the instructions direct you to “Lift the handset,”) simply press [Spkr] . If you receive a voice-signaled intercom call while your microphone is on, you will hear the caller’s voice and be able to respond without lifting the handset or turning the speaker on. For more detail on speakerphone operation, see “Using the Speaker and Microphone” in this chapter.A Word About
Dial Tones
You will encounter two different dial tones when making calls with the PARTNER Plus system.
■ Outside dial tone. Generated by your local phone company, indicates that you are connected with an outside line.
■ Intercom dial tone. Generated by the PARTNER Plus system, indicates that you are connected with an inside line. Used to make inside, or intercom, calls.
To hear the difference between the two types of dial tones, press a line button. The dial tone you hear is an outside line dial tone. To hear an intercom dial tone, press either [Intercom] button.
Making an Outside Call
If you lift the handset before pressing a line button, you will be automatically connected to the first idle line. The sequence of idle lines to which you are con-nected is determined by the Automatic Line Selection pro-cedure. See chapter 4 in the
Installation and Programming Guide.
To make an outside call:
1. Press any idle line button. (An idle line button is one that is unlit.) The light next to the line button is steady green.
2. Lift the handset. 3. Dial the number.
On a PARTNER display telephone, the dialed number appears on the display and the call timer begins.
If an outside line you want to use is busy (steady red light), you can reserve it so that when the line becomes free you can make your call on it. Simply press the busy line button without lifting the handset or touching the [Spkr] button. When the line is free, your phone will beep. Then lift the handset and dial the number. This Line Reserve feature is useful when you have to share a line—such as a WATS Iine—with coworkers.
If more than one person reserves a line, each phone on which the line is reserved beeps when the line is free. The first person to pick up the phone is connected to the reserved line; all other reservations for the line are canceled.
Feature Hints
■
■
■
■
System Speed Dial. Allows you to store up to 60 outside numbers that all
system users can dial with a few button presses. See chapter 4.
Personal Speed Dial. Allows each user to store up to 20 outside numbers
that can be dialed with a few button presses. See “Quick Dialing” in chapter 3.
Auto Dial. Allows each user to dial a number with a single touch by storing
the number on a button. See “Quick Dialing” in chapter 3.
Last Number Redial. All users can redial the last dialed number by
press-ing a few buttons. Or, by programmpress-ing Last Number Redial on a button, you can redial a number by pressing the button. See “Dial Code Features” in chapter 3.
Line Assignment. You can create private lines (such as a “boss’s line”), or
regulate outgoing calls by assigning specific lines to specific telephones. See chapter 3 in the Installation and Programming Guide.
Outgoing Call Restriction. You can reduce your phone bills by preventing
callers from making specific kinds of outside calls. See “Call Restrictions ■
■
and Permissions” in chapter 4.
Making an Intercom Call
An intercom call, or inside call, is a call between two extensions in the PARTNER Plus system. When you make an intercom call, there are two ways you can sig-nal the extension you are calling: by ringing or by voice. A ringing intercom call causes the called telephone to ring, whereas a voice-signaled call causes the caller’s voice to be heard on the called telephone’s speaker.
To make a ringing intercom call:
1. Lift the handset.
2. Press an idle [Intercom] button.
You hear the intercom dial tone, and the light next to the Intercom button is green steady.
3. Dial the 2-digit extension number.
To make a voice-signaled intercom call:
You can only voice-signal a
PARTNER phone. 1. Lift the handset.
2. Press an idle [Intercom] button.
You hear the intercom dial tone, and the light next to the Intercom button is green steady.
3. Press [ ✲ ] and the 2-digit extension number. Speak into the handset. Your voice is heard on the other extension’s speaker. If the other extension is busy, it will ring instead.
Feature Hints
■
■
Auto Dial. Allows each user to dial an intercom number with a single touch
by storing the number on a button. See “Quick Dial” in chapter 3.
Calling Group. Anyone can ring or voice-signal a group of extensions at
once. For example, if you need to talk to anyone in the sales group, you can call all the phones in the group at the same time. See chapter 4.
Hotline. You can set up a standard telephone as a Hotline. When anyone
lifts the receiver at a Hotline telephone, an intercom call is automatically made to another specified extension. See chapter 4.
Loudspeaker Paging. This allows you to broadcast an announcement over a
large area if you have a paging system connected to your PARTNER Plus system. See chapter 4.
■
■
Answering a Call
To answer a call:
If a call comes in on a line that When the telephone is ringing. . . has been programmed for
“delayed ring” or “no ring, ” or if 1. Lift the handset.
the Do Not Disturb feature is You are connected to the incoming call. If more than one line is ringing, you are turned on, the call will appear as
a flashing red light, but will not connected to the line that has been ringing longest.
audibly ring. To answer the call, If the call is an intercom call and you have a PARTNER display phone, the caller’s press the line button and lift the
handset. extension number will briefly appear on your display.
Ringing Patterns
A transferred call will ring like an intercom call (ring BEEP) until the person transferring the call hangs up, at which time the call will ring like a transferred call (ring BEEP
BEEP).
To answer a call ringing on a specific line (when more than one line is ring-ing):
1. Press the line button for the line you want to answer. 2. Lift the handset.
You are connected to the incoming call.
The procedure below describes how to answer a call ringing at another exten-sion. Note that the call ringing at the other extension can be any type of call, including a transferred call, or an intercom call. It can even be a call on a line not assigned to your extension.
To answer a call ringing at another extension:
1. Lift the handset. 2. Press [Intercom] .
3. Dial [6] plus the 2-digit number of the extension that is ringing. You are connected to the incoming call.
You can tell what kind of call you are receiving by the way your telephone rings. ■ A single ring (ring. . . ring. . . ring. . .) signifies an outside call.
■ A ring and a beep (ring BEEP. . . ring BEEP. . . ring BEEP . . .) signifies an intercom call.
■ A ring and two beeps (ring BEEP BEEP. . . ring BEEP BEEP. . .
ring BEEP BEEP. . .) signifies either a transferred call, or a transferred call
that was not answered and is ringing back.
Standard rotary and touch-tone phones ring differently. See chapter 6.
Feature Hints
■
■
■
Do Not Disturb. When you need quiet or do not want to be interrupted by
telephone calls, you can stop calls from ringing at your extension. See “Dial Code Features” in chapter 3.
Abbreviated Ringing. You can program an extension to only ring once
while you are on another call. See chapter 3 in the Installation and
Program-ming Guide.
Pickup Group. If one person is responsible for answering calls to a certain
group of phones, or if people in a group have to answer each other’s phones, a call ringing at any extension can be answered from any other extension by dialing a code. This feature is useful when calls often ring at unattended telephones. See chapter 4.
Line Ringing Options. You can program a phone to have a delayed ring or
no ring at all. For example, if a boss and a secretary share the same line and the boss wants the secretary to answer the line first, the boss’s phone is set to delayed ring. When the secretary is not there to answer a call, the call will eventually ring at the boss’s phone. See chapter 4 in the Installation and
Programming Guide.
Night Service. You can prevent unauthorized use of phones after regular
business hours while changing which phones ring on incoming calls. See chapter 4.
■
■
Putting a Call on Hold
There are two types of hold: Hold and Exclusive Hold. Any extension can retrieve a call on Hold as long as it has access to the line on which it is held. A call on Exclusive Hold can only be retrieved at the telephone at which it is held. You can put both outside calls and intercom calls on Hold. Note, however, that a held intercom call is always on Exclusive Hold.
To put an outside or intercom call on Hold:
1. Press [Hold] .
The light next to the line button winks green.
To put an outside call on Exclusive Hold:
1. Press [Feature] [0] [2] .
The light next to the line button flutters green.
To retrieve a call from either type of hold:
1. Press the line button on which the call is held. (For a call on Exclusive Hold, you must beat your own phone.)
The light next to the line button changes from winking or fluttering to steady green.
Notes
■ A user is free to make and receive other calls while a call is on hold.
■ If a call is left on hold for longer than one minute, the extension at which the call is held generates a short Hold Reminder Tone. The reminder tone is sounded once every minute until the held call is retrieved, or until the caller hangs up.
■ Only one party on an intercom call can put the call on hold. If both parties try to put the call on Hold, the call will be disconnected.
Feature Hints
■ Exclusive Hold Button. If you put calls on Exclusive Hold frequently, pro-gram a button to do it with a single touch. See “Dial Code Features” in chapter 3.
■ Music On Hold. You can provide music or news to outside callers on hold. See chapter 2 in the Installation and Programming Guide for instructions on how to connect a stereo or other audio source.
Transferring a Call
To transfer a call means to pass the call from one extension to another. You can transfer both outside calls and intercom calls.
A transferred call will ring like an There are three ways to transfer a call: intercom call (ring BEEP) until the
person transferring the call hangs ■ You can announce the call when it is picked up. up, at which time the call will ring
like a transferred call (ring BEEP ■ You can announce the call through the speaker.
BEEP).
■ You can transfer the call with no announcement.
To transfer a call with an announcement over the handset:
1. While active on a call, press [Transfer] .
You hear the intercom dial tone. The call is put on Hold and its associated light winks green.
2. Dial the 2-digit number of the extension to which you want the call transferred.
3. When someone answers, announce the call. If the call is accepted, hang up. If no one answers or the call is refused, press the held line button next to the winking light and you are reconnected with the caller.
To transfer a call with announcement over speaker:
You can only announce a call
through the speaker of a 1. While active on a call, press [Transfer] .
PARTNER phone. If it is busy, or You hear the intercom dial tone. The call is put on Hold and its associated light
if it is a standard phone, it will winks green. ring instead.
2. Dial [ ✳ ] plus the 2-digit number of the extension to which you want the call transferred.
3. Announce the call.
The other party’s speaker is automatically turned on, and your voice is heard on it. The other party can pick up the call by pressing [Mic] or lifting the handset.
4. If you hang up and the party does not pickup the call, the call will ring back at your phone. Press the held line button next to the winking light (or press the lit [Intercom] button), and you are reconnected with the caller.
To transfer a call with no announcement:
1. While active on a call, press [Transfer] .
You hear the intercom dial tone. The call is put on Hold.
2. Dial the 2-digit number of the extension to which you want the call transferred.
3. Hang up.
If no one answers, the call will ring back at your extension.
Feature Hints
Another way to transfer an out- ■ One Touch Transfer. If you program an intercom number onto a button, you side call is to put it on Hold, and
then have another user pick the can transfer calls to that extension simply by pressing the button. See call up at another extension by “Quick Dialing Features” in chapter 3.
pressing the line button (they see it as winking red) of the held call.
Notes
■ ■
You cannot transfer calls to the Calling Group (see page 4-7).
When you transfer a call to another extension from a PARTNER display phone, the extension number you transfer the call to briefly appears on the display. If that extension does not pickup within a certain number of rings, the call will ring back at your phone with the transfer ring pattern, and the extension number will again briefly appear on the display.
Your system is set at the factory to return a transferred call after it rings four times. You can change this number if you need to. See “Transfer Return Rings” in the Installation and Programming Guide, chapter 3.
Making a Conference Call
A conference call connects up to five parties (including the conference origina-tor) in a single call. You can connect both outside calls and intercom calls in a conference call; however, the call cannot include more than two outside parties.
During the conference call, any inside party can exit the call at any time simply by hanging up. However, if an outside party hangs up during a conference call, the callers that remain on the conference will hear a dial tone. A PARTNER Plus system feature called Conference Drop removes the last added outside party from a conference call. Therefore, when setting up a conference call, plan care-fully. If you have two outside parties on a conference call, and you think that one of those parties may exit the call before the other, add that party last so that you can remove it using Conference Drop while maintaining the connection with the other parties.
The conference originator can put his or her end of the call on Hold during the conference. Other parties can continue to talk while the call originator is on Hold. Other inside parties cannot put their extensions on Hold. When the conference originator hangs up, the conference is disconnected.
To setup a conference call:
If you are adding an intercom extension to a call, you must wait until the party answers before you press [Cont] to add the party.
1.
2.
3.
4.
5.
Set up the call to the first party. (YOU can call the party, or pick up the call from Hold, or answer an incoming call.)
You are connected with the first party.
Press [Conf] .
The first party is now on Hold.
Set up the call to the second party. You are connected with the second party.
Press [Conf] again.
You can now speak with the first and second parties.
Return to step 2 to add one or two more parties.
To drop the last added outside call from a conference call:
1. Press [Feature] [0] [6] . The outside call is dropped.
Notes
■ You can use System Speed Dial, Personal Speed Dial, or Auto Dial numbers to add calls to the conference.
■ You should not add a busy or ringing outside call to a conference; if you do, all callers will hear the busy or ringing signal. If you hear a busy signal or the
party does not answer, reconnect with the held party by pressing the line button.
■ You cannot transfer a conference call.
■ You cannot join a conference call. That is, the conference initiator must add each party to the conference.
■ You cannot add outside calls to a conference call if your system is pro-grammed for Outside Conference Denial. See chapter 3 in the Installation
and Programming Guide.
Feature Hints
■ Conference Drop. If you make conference calls frequently, you can pro-gram the Conference Drop feature onto a button. See “Dial Code Features” in chapter 3.
Quick Dialing. You can use Speed Dialing or Auto Dialing to add parties to
the conference call. See chapter 3. ■
Joining a Call
One extension can connect itself to an outside call at another extension by
join-ing. For example, if John is on an outside call and wants you to participate in
that call, you can join in by pressing the line button of the line on which the call is being conducted. You cannot join an intercom call, and you can only join a call on a line that is assigned to your extension.
To join a call:
A steady red light at a line button indicates a call in progress. . .
1. Press the line button. 2. Lift the handset to speak.
The red and green lights alternately flash. You are now joined with the call.
Notes
■
■
You can tell when someone has joined your call when the steady green light next to the line button changes to an alternately flashing red and green light. Do not confuse joining with conferencing. In joining, you add yourself to a call in progress in the same way you would on a home telephone by picking up an extension. In conferencing, the call originator calls you in the process of setting up the call.
You cannot put a joined call on hold.
If you call an outside line, up to three PARTNER extensions can join you on ■
■
the call (for a total of one outside caller and four inside parties).
Feature Hints
■
■
Privacy. Can be turned on and off as needed to prevent other extensions
from joining a call on your telephone. Any user can program Privacy onto a button so that it can be turned on and off as needed. See “Dial Code
Features” in chapter 3.
Automatic Privacy. Prevents other extensions from joining calls on a
specific extension. This is typically used for answering machines, fax machines, modems, and credit card verification terminals, because trying to join one of these devices could interfere with its operation. See chapter 3 in the Installation and Programming Guide.
User-Programmable Features
3
The user-programmable features described in this chapter are those features that anyone on the PARTNER Plus system can use at his or her telephone. User-programmable features are divided into two groups:
■ Dial Code Features. Used to handle calls more quickly and efficiently, to customize a PARTNER phone for an individual user’s needs, or to activate certain capabilities of the PARTNER Plus system.
Quick Dialing Features. Spare you from constantly having to look up long
telephone numbers by allowing you to dial those numbers with three button presses or fewer.
■
Dial Code Features
There are 10 dial code features. Table 3-1 lists each dial code feature, what the feature does, and how to use it.
Two dial code features, Do Not Disturb and Privacy, must be programmed onto a button with a light.
If there are certain dial code features that someone uses often, he or she can program those features onto a programmable button. This allows the feature to be activated or turned on and off with a single touch. All dial code features can
be programmed onto a button. Since there are more features than buttons,
each person should decide which features are most useful to him or her before assigning them to a button.
Immediately following table 3-1 are instructions on how to program a dial code feature onto a button.
Table 3-1 Dial Code Features
Feature What It Does
Do Not Disturb Prevents your phone
from ringing. Outside callers hear ringing; intercom callers hear a busy signal. If you transfer a call and it is not answered and returns to you, your phone will ring even if Do Not Disturb is on.
How to Use It
This feature must be programmed onto a but-ton with a light. (See instructions in this chapter.) Use button like a switch—when the light is on, Do Not Dis-turb is on.
Dial Code
01
Exclusive Hold Prevents any other Press [Feature] [0] [2] , or 02
extension from picking the programmed button, up a call you put on hold. to hold call. Retrieve the
call by pressing the line button on which the call is held.
Recall Gives you a dial tone Press [Feature] [0] [3] or 03
without having to press the programmed button. the switchhook. (Many
PBX/Centrex features often require a Recall operation in order to work. ) Recall will discon-nect an intercom call.
Save Number Redial Saves the most recently dialed outside number (maximum 20 digits per phone number). After it is saved, the number can be redialed any time until you save a different number. Allows you to make calls before redial-ing a number.
To save a number 04
into memory: before hanging upon the outside call, press
[Feature] [0] [4] or the programmed button. To redial the saved number: lift the handset, then press
[Feature] [0] [4] , or the programmed button.
Last Number Redial Redials the last outside Lift the handset and 05
number dialed (max- press [Feature] [0] [5] , or imum 20 digits per press the programmed phone number). Good button.
for redialing a busy
number. .
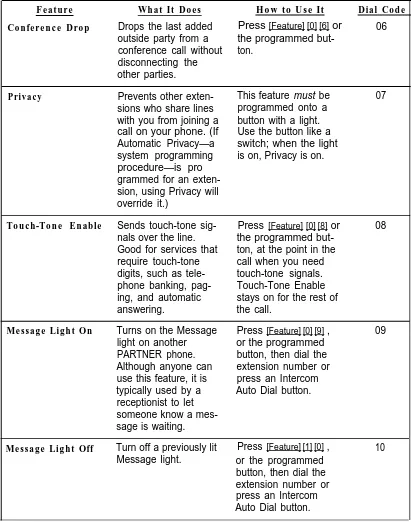
Table 3-1 Dial Code Features (cont.)
Feature What It Does How to Use It Dial Code
Conference Drop Drops the last added Press [Feature] [0] [6] or 06
outside party from a the programmed but-conference call without ton.
disconnecting the other parties.
Privacy Prevents other exten- This feature must be 07
sions who share lines programmed onto a with you from joining a button with a light. call on your phone. (If Use the button like a Automatic Privacy—a switch; when the light system programming is on, Privacy is on. procedure—is pro
grammed for an exten-sion, using Privacy will override it.)
Touch-Tone Enable Sends touch-tone sig- Press [Feature] [0] [8] or 08 nals over the line. the programmed
but-Good for services that ton, at the point in the require touch-tone call when you need digits, such as tele- touch-tone signals. phone banking, pag- Touch-Tone Enable ing, and automatic stays on for the rest of
answering. the call.
Message Light On Turns on the Message Press [Feature] [0] [9] , 09
light on another or the programmed PARTNER phone. button, then dial the Although anyone can extension number or use this feature, it is press an Intercom typically used by a Auto Dial button. receptionist to let
someone know a mes-sage is waiting.
Message Light Off Turn off a previously lit Press [Feature] [1] [0] , 10 Message light. or the programmed
button, then dial the extension number or press an Intercom Auto Dial button.
Programming Dial Code Features onto Buttons
Any user can program a dial code feature onto a button at his or her own phone. Or, you can program other users’ telephones for them by working from exten-sion 10. For instructions on how to do this, see chapter 4 in the Installation and
Programming Guide.
Note that a PARTNER 6-button telephone with 4 outside lines assigned to it has no programmable buttons. However, any unused line button on a PARTNER 6-button phone can be used as a programmable 6-button. In fact, any unused line button on any PARTNER phone can be used as a programmable button.
To program a dial code feature onto a programmable button on an indivi-dual telephone:
You can also use this procedure
to program a new dial code 1. feature over another one already
assigned to a button. Simply
enter the new dial code. 2.
Press [Feature] [0] [0] .
3. 4.
5.
You are in program mode.
Press the button to which you want the dial code feature assigned.
On a PARTNER display phone, the display shows what feature, if any, is currently assigned to that button.
Press [Feature] .
Enter the dial code. (See table 3-1.) For example, to program Last Number Redial, enter [0] [5] .
The button is now programmed.
To program more feature buttons, repeat steps 3 and 4. To exit program
You cannot remove a dial code feature from a button on a PARTNER 6-button phone. You must do it by working from exten-sion 10. See chapter 4 in the
In-stallation and Programming Guide.
mode, press [Feature] [0] [0] , or lift the handset and replace it.
To remove a dial code feature from a programmed button:
1. Press [Feature] [0] [0] .
You are now in program mode.
2. Press the button from which you want the dial code feature removed. On a PARTNER display phone, the display shows what feature, if any, is currently assigned to that button.
3. Press [Mic] .
4. To clear another programmed button, return to step 2. To exit program mode, press [Feature] [0] [0] , or lift the handset and replace it.
Quick Dialing Features
Quick Dialing allows you to dial frequently called numbers by pressing three or
fewer buttons. Quick Dialing spares you from memorizing or constantly looking up different telephone numbers. You can also use Quick Dialing to dial such additional numbers as bank account or credit card numbers.
There are three different Quick Dialing features:
Each Auto Dial, Personal Speed ■ Dial, or System Speed Dial
number can contain up to 20 digits.
■
Auto Dialing. Any user can program numbers onto a telephone’s
pro-grammable button and dial the number by pressing that button. Or, you can program a user’s telephone from extension 10.
Personal Speed Dialing. Any user can program up to 20 numbers of up to
20 digits in each telephone’s memory. Each Personal Speed Dial number is assigned a 2-digit code. The number is dialed by pressing [Feature] plus the 2-digit code. Any user can program Personal Speed Dial numbers at his or her telephone. Or, you can program a user’s telephone from extension 10.
System Speed Dialing. From extension 10, you can program up to 60
■
numbers in the system's memory that any user can dial. Each System Speed Dial number is assigned a 2-digit code. The number is dialed by pressing [Feature] plus the 2-digit code. (System Speed Dialing is covered in chapter 4.)
IMPORTANT: When programming and/or testing emergency numbers (such as 911 or other emergency services):
1. Remain on the line and briefly explain to the dispatcher the reason for the call before hanging up.
2. Perform such activities during the off-peak hours, such as early morning or late evening.
Auto Dialing
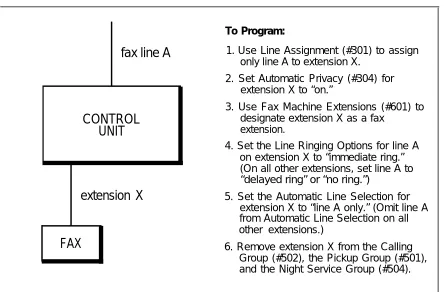
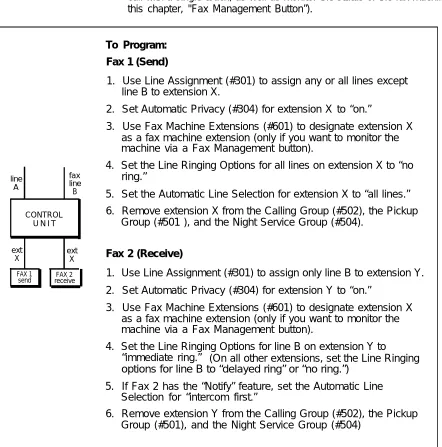
You can program a fax extension number as an Auto Dial number on a PARTNER phone at another extension (the Auto Dial button must have a light). You can then use the Auto Dial number to quickly transfer calls from that extension to the fax machine. In addition, the light on that button shows whether the fax machine is in user busy, returning a call you transferred to it, or not answering calls. If your AT&T fax machine includes the “Notify” feature, the fax machine can also notify you when a fax has been received.
Auto Dialing allows any user to dial a number with a single touch. To use the
Auto Dial feature, you must first program the number onto a programmable but-ton. You can program both outside numbers and intercom numbers for Auto Dialing.
There are added benefits when you store an intercom number for Auto Dialing. They are:
■ One Touch Transfer. You can transfer a call to an extension simply by pressing the Auto Dial button.
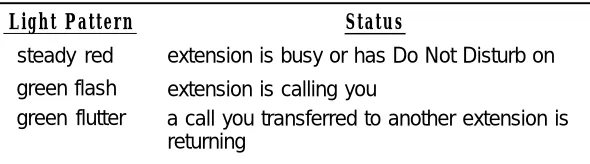
■ Intercom Status. You can monitor the calling activity at another extension by programming the extension onto a button with a light. The light patterns next to the button show the activity at the extension. Table 3-2 shows what each light pattern means.
Table 3-2 Light Patterns on Intercom Auto Dial Button
Light Pattern Status
steady red extension is busy or has Do Not Disturb on green flash extension is calling you
green flutter a call you transferred to another extension is returning
Since there are more features than there are programmable buttons, you should consider using Auto Dial only for your most frequently dialed numbers, or for the extra capabilities you get from programming an intercom number for Auto Dial.
You can also program an Auto Dial number onto an extension while working from extension 10. See chapter 4 in the Installation
and Programming Guide.
You can also use this procedure to program a new Auto Dial number over another one already assigned to a button. Simply enter the new number.
To program an Auto Dial number (at any extension):
1. Press [Feature] [0] [0] .
You are now in program mode.
2. Press the programmable button to which you want the number assigned. 3. To program an intercom number, press the left [Intercom] button and dial the
extension number. To program an outside number, dial the number. If you want to insert special functions into an outside number or numeric
sequence, such as Pause, Stop, Touch-Tone Enable, or Recall, see “Pro gramming Special Functions Into a Telephone Number” in this chapter. 4. To program another button, return to step 2. To leave program mode,
press [Feature] [0] [0] , or lift the handset and replace it.
You are now out of program mode. The Auto Dial number is stored and ready to use.
You cannot remove an Auto Dial 1. number from a button on a
PARTNER 6-button phone. You
must do it by working from exten- 2. sion 10. See chapter 4 in the
In-stallation and Programming Guide.
3. 4.
To remove an Auto Dial number from a programmable button:
Press [Feature] [0] [0] .
You are now in program mode.
Press the programmable button from which you want the Auto Dial number removed.
On a PARTNER display telephone, the display shows what number, if any, is currently assigned to that button.
Press [Mic] .
To clear another programmable button, return to step 2. To exit program mode, press [Feature] [0] [0] , or lift the handset and replace it.
To dial an Auto Dial number:
You can dial an Auto Dial number
while on an outside call. For 1. Press the programmable button on which the Auto Dial number is pro-example, you can do this to dial grammed.
an account number for an A line is automatically selected, the speaker comes on, and the Auto Dial number automatic banking service.
How-dials automatically.
ever, you cannot dial an Auto Dial number while on an intercom call.
If you want to call on a specific line, press the line button before pressing the Auto Dial button.
Personal Speed Dialing
Personal Speed Dialing allows anyone to store up to 20 numbers that can be
dialed with only three button presses. (This is different from Auto Dialing, which allows you to dial a number with a single button press.) Personal Speed Dial numbers are stored into memory and assigned a 2-digit code from 80 through 99. To dial the number, press [Feature] plus the 2-digit code associated with the number. Only outside numbers can be stored for Personal Speed Dialing. Personal Speed Dialing is used for those personal numbers that are dialed fre-quently, but not frequently enough to be programmed onto a button as an Auto Dial number. The Quick Reference Card has a form on which each user can record Personal Speed Dial numbers.
To program a Personal Speed Dial number:
You can use this procedure to
program a Personal Speed Dial 1. number over another one without
first c/earing the old number.
Simply enter the new number. 2.
3.
4.
Press [Feature] [0] [0] . You are now in program mode.
Press [Feature] and then press the 2-digit number between 80 and 99 that you want to assign to the Personal Speed Dial number.
Enter the number, up to 20 digits long. (If you want to include special functions into the number, such as Pause, Stop, Touch-Tone Enable, or Recall, see “Programming Special Functions into a Telephone Number” in this chapter.
To program another Personal Speed Dial number, return to step 2. To leave program mode, press [Feature] [0] [0] , or lift the handset and replace it.
You are now out of program mode. The Personal Speed Dial number is now stored and ready to use.
You cannot remove a Personal Speed Dial number while working from a PARTNER 6-button phone. You must do it by working from extension 10. See chapter 4 in the Installation and Programming
Guide.
To remove a Personal Speed DiaI number from memory:
1. Press [Feature] [0] [0] . You are now in program mode.
2. Press [Feature] and then press the 2-digit code of the Personal Speed Dial number you want to remove.
3. Press [Mic] .
4. To remove another number, return to step 2. To leave program mode, press [Feature] [0] [0] , or lift the handset and replace it.
To dial a Personal Speed Dial number:
You can dial a Personal Speed .
Dial number while on an outside 1. Press [Feature] and then press the 2-digit Personal Speed Dial number call. For example, you can do code.
this to dial an account number for an automatic banking service. However, you cannot dial a
Per-A line is automatically selected, the speaker comes on, and the Personal Speed Dial number dials automatically.
sonal Speed Dial number while
on an intercom call. If you want to call on a specific line, press the line button before pressing
[Feature] .
Programming Special Functions into a Telephone Number
Table 3-3 (p. 3-10) lists certain actions you can program into any Quick Dial number that give it added capabilities for special situations.
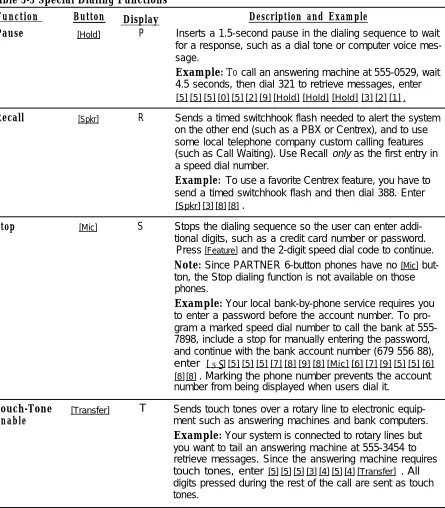
Table 3-3 Special Dialing Functions
Function Button Display Description and Example
Pause [Hold] P Inserts a 1.5-second pause in the dialing sequence to wait
for a response, such as a dial tone or computer voice mes-sage.
Example: To call an answering machine at 555-0529, wait 4.5 seconds, then dial 321 to retrieve messages, enter
[5] [5] [5] [0] [5] [2] [9] [Hold] [Hold] [Hold] [3] [2] [1] .
Recall [Spkr] R Sends a timed switchhook flash needed to alert the system
on the other end (such as a PBX or Centrex), and to use some local telephone company custom calling features (such as Call Waiting). Use Recall only as the first entry in a speed dial number.
Example: To use a favorite Centrex feature, you have to send a timed switchhook flash and then dial 388. Enter
[Spkr] [3] [8] [8] .
Stop [Mic] S Stops the dialing sequence so the user can enter
addi-tional digits, such as a credit card number or password. Press [Feature] and the 2-digit speed dial code to continue.
Note: Since PARTNER 6-button phones have no [Mic] but-ton, the Stop dialing function is not available on those phones.
Example: Your local bank-by-phone service requires you to enter a password before the account number. To pro-gram a marked speed dial number to call the bank at 555-7898, include a stop for manually entering the password, and continue with the bank account number (679 556 88), enter [ ✳ ] [5] [5] [5] [7] [8] [9] [8] [Mic] [6] [7] [9] [5] [5] [6] [8] [8] . Marking the phone number prevents the account number from being displayed when users dial it.
Touch-Tone [Transfer] T Sends touch tones over a rotary line to electronic
equip-Enable ment such as answering machines and bank computers.
Example: Your system is connected to rotary lines but you want to tail an answering machine at 555-3454 to retrieve messages. Since the answering machine requires touch tones, enter [5] [5] [5] [3] [4] [5] [4] [Transfer] . All digits pressed during the rest of the call are sent as touch tones.
System Features
4
System features affect the operation of the entire system and can be
programmed only at extension 10. These features are normally programmed when the system is installed. However, you may from time to time have need to change, remove, or reinstate them. For complete instructions on system
programming procedures, see chapter 3 in the Installation and Programming
Guide.
System Speed Dialing
System Speed Dialing allows you to program phone numbers that any user can
Do not confuse the System
Speed Dial feature with Personal dial by pressing only three buttons. System Speed Dial numbers are typically Speed Dial, which allows each numbers that users may often need to dial, such as suppliers, repair services, user to create an individual list of customers, or other business associates. You can store up to 60 System Speed speed dial numbers. Dial numbers of up to 20 digits each. Each System Speed Dial number is
assigned a 2-digit code from 20 through 79.
You can designate System Speed Dial numbers to override all call restrictions except those imposed by Line Use Restriction (#302). (See “Call Restrictions and Permissions” in this chapter for more information.) These specially designated numbers are called Marked System Speed Dial Numbers.
Appendix A in this guide provides a form on which to record System Speed Dial numbers. Please give a photocopy to each user.
To program a System Speed Dial number (from extension 10):
You can use this procedure to
program a System Speed Dial 1. number over another one without
first clearing the old number.
Simply enter the new number. 2.
Press [Feature] [0] [0] .
Marked System Speed Dial 3. numbers cannot contain a Recall
character. (See “Programming Special Functions into a Telephone Number” in chapter 3 for more in formation.)
4.
You are now in program mode.
Press [Feature] and then dial the 2-digit code (20 through 79) you want assigned to the System Speed Dial number.
Enter the System Speed Dial number (up to 20 digits). If you want the number to override call restrictions, enter a [ ✳ ] in front of the number. (If you want to insert special functions into the number, such as Pause, Stop, Touch-Tone Enable, or Recall, see “Programming Special Functions into a Telephone Number” in chapter 3.)
To program another Speed Dial number, return to step 2. To leave program mode, press [Feature] [0] [0] , or lift the handset and replace it. You are now out of program mode. The System Speed Dial number is stored and ready to use.
IMPORTANT: When programming and/or testing emergency numbers (such as 911 or other emergency services):
1. Remain on the line and briefly explain to the dispatcher the reason for the call before hanging up.
2. Perform such activities during the off-peak hours, such as early morning or
late evening. .
To remove a System Speed Dial number from memory:
You cannot remove a System
Speed Dial number while working 1. Press [Feature] [0] [0] . from a PARTNER 6-button phone. You are now in program mode.
You must do it by working from
extension 10. See chapter 4 in 2. Press [Feature] and then dial the 2-digit System Speed Dial code of the the Installation and Programming number you want to remove.
Guide.
3. Press [Mic] .
4. To delete another number, return to step 2. To leave program mode, press [Feature] [0] [0] , or lift the handset and replace it.
To dial a System Speed Dial number (from any extension):
1. Lift the handset.
2. Press [Feature] and press the 2-digit System Speed Dial code. The phone number dials automatically.
Dialing Restrictions and Permissions
All system programming pro-cedures are identified by a # and a 3-digit number. See chapter 3 of the Installation and Program
ming Guide for detailed
instruc-tions.
The PARTNER Plus system has several programmable procedures that are used to restrict telephone use, and several that are used to to override those restric-tions.* You can use any combination of these procedures to design a system that meets your needs.
There are three basic categories of restrictions that you can program into your system. These are:
■ Restrictions on Lines. Allow you to restrict activity on specific lines at specific extensions. (See “Line Use Restriction (#302),” below.)
■ Restrictions on Extensions. Allow you to restrict the type of calls an
exten-sion can make. (See “Outgoing Call Restrictions (#401 ),” below.)
■ Restrictions on Numbers. Allow you to restrict what kind of numbers an extension can dial. (See “Disallowed Phone Number List (#404 ),” below.) You can also program an extension with the ability to override these restrictions in several ways. See “Restriction Override Procedures, ” below. For instructions on system programming, see chapter 3 in the Installation and Programming
Guide.
* While procedures that restrict dialing are very effective, absolute protection against misuse cannot be guaranteed. PARTNER phones give you more protection against such misuse than standard phones. Therefore, we strongly recommend that you install PARTNER phones where restricting phone use is important.
Dialing Restrictions The procedures that restrict telephone activity are:
■ Line Use Restriction (#302). Allows you to impose incoming and outgoing restrictions on the specific lines assigned to an extension. These restrictions are:
■ Out only. The extension can make but not receive calls (except
transferred calls) on this line.
Example: If part of your business involves heavy outside phone calling, such as telemarketing or phone surveys, you can program a phone so that all its lines are “out only.” The phone can make outside calls, but not receive calls, thereby preventing employees from receiving calls while working.
■ In only. The extension can receive but not make calls on this line.
Example: If part of your business involves taking phone orders, you can set up one or more lines for “in only.” Employees will be unable to make outgoing calls on those lines, thereby keeping them open for incoming calls.
■ No access. The extension cannot make or receive calls on this line.
However, calls can be transferred to it. The employee using this exten-sion can also monitor calling activity on the line by looking at light indica-tors.
Example: The boss may have a private line that no one else can use. However, the boss may want his or her secretary to be able to see whether or not he or she is busy on the phone. The secretary’s phone could have the boss’s line assigned to it, but set for “no access.” This would allow the secretary to see when the boss is on the phone. It would also allow the boss to transfer a call to the secretary.
■ Outgoing Call Restriction (#401). Defines the type of calls an extension can make. There are two types of call restriction:
■ Intercom calls only (i.e., cannot make outside calls) ■ Local calls only (i.e., cannot make toll calls)
Once you program a restriction for an extension, it applies to all the lines on that extension.
Example: You can set up an extension in your lobby as a “courtesy phone” from which visitors can make intercom calls and local calls but not toll calls.