Mac OS X Server
K Apple Computer, Inc.
© 2001 Apple Computer, Inc. All rights reserved.
Under the copyright laws, this publication may not be copied, in whole or in part, without the written consent of Apple.
The Apple logo is a trademark of Apple Computer, Inc., registered in the U.S. and other countries. Use of the “keyboard” Apple logo (Option-Shift-K) for commercial purposes without the prior written consent of Apple may constitute trademark infringement and unfair competition in violation of federal and state laws.
Apple, the Apple logo, AppleScript, AppleShare, AppleTalk, ColorSync, Final Cut Pro, FireWire, Keychain, Mac, Macintosh, Power Macintosh, QuickTime, Sherlock, and WebObjects are trademarks of Apple Computer, Inc., registered in the U.S. and other countries. AirPort, Extensions Manager, Finder, iMac, iMovie, and Power Mac are trademarks of Apple Computer, Inc.
Adobe and PostScript are trademarks of Adobe Systems Incorporated.
Java and all Java-based trademarks and logos are trademarks or registered trademarks of Sun Microsystems, Inc. in the U.S. and other countries.
Netscape Navigator is a trademark of Netscape Communications Corporation. RealAudio is a trademark of Progressive Networks, Inc.
© 1995-2001 The Apache Group. All rights reserved.
UNIX is a registered trademark in the United States and other countries, licensed exclusively through X/Open Company, Ltd.
Contents
Preface
How to Use This Guide 15
What’s Included in This Guide 15
Setting Up Mac OS X Server for the First Time 16 Getting Help for Everyday Management Tasks 16 Getting Additional Information 17
1 Mac OS X Server Administration 19
What Is Mac OS X Server? 19 Using Mac OS X Server 20
K–12 Classrooms and Labs 21 Higher Education Facilities 22 Design and Publishing Businesses 24 Web Service Providers 25
Services Included With Mac OS X Server 26 Directory Services 26
File Services 26 Print Service 27 Web Service 27 Mail Service 28
QuickTime Streaming Service 28 Client Management Services 28 Network Services 28
Macintosh Manager 34 Streaming Server Admin 34 NetBoot Desktop Admin 35
Setting Up Your Server for the First Time 35
Step 1: Get acquainted with the server and its administration applications 35
Step 2: Install the server 35
Step 3: Log in 35
Step 4: Create share points 36
Step 5: Define default home directory settings 36
Step 6: Define users 36
Step 7: Define groups 37
Step 8: Assign privileges to share points 38
Step 9: Set up additional services as required 38
Where to Find More Information About Mac OS X Server and Server Management 40 If You’re New to Server and Network Management 40
If You’re an Experienced Server Administrator 40
2 Directory Services 41
What Are Directory Services? 41
User Information Needed for Authentication 41 Other User Information Needed by the Server 41 Where You Can Define User Information 42 How the Server Finds User Information 45 Using NetInfo 46
Before You Set Up NetInfo 46
Setting Up NetInfo for the First Time 50 Using LDAP 51
Before You Set Up LDAP Server Access 51 Setting Up LDAP for the First Time 51 Setting Up Search Policies 52
Before You Set Up Your Search Policy 55 Setting Up Search Policies for the First Time 55
How User Information Is Used 57 Characteristics of Users 58 Characteristics of Groups 59 Before You Set Up Users and Groups 59
Setting Up Users and Groups for the First Time 59
Step 1: Modify the administrator account defined at server setup 59
Step 2: Create new users 60
Step 3: Create new groups (optional) 60 User Settings 60
General User Settings 61 Advanced User Settings 62 User Comment 65 Mail Service Settings 65 Group Settings 68
Users and Groups Strategies and Tips 70
Exporting and Importing Users and Groups 70
Setting Up Home Directories to Mount Automatically 70 Mac OS X Server Password Restrictions 71
Solving Problems With Users and Groups 72
4Sharing 73
What Is Sharing? 73
Before You Assign Privileges 73 Explicit Privileges 74 Types of Privileges 74 User Categories 74
Client Users and Privileges 75 Security Issues 75
Setting Up Sharing for the First Time 76
Step 1: Turn file service on 77
Step 2: Create a share point 77
NFS Access Control Settings 81 Solving Problems With Sharing 82
5 File Services 83
What Are File Services? 83 Before You Set Up File Services 83
Setting File and Folder Privileges 83 Restricting Guest Access 84
Allowing Access to Registered Users Only 84 Apple File Service 85
Before You Set Up Apple File Service 85
Setting Up Apple File Service for the First Time 85 Apple File Service Settings 86
Solving Problems With Apple File Service 91 Apple File Service Specifications 92 Windows Services 93
Before You Set Up Windows Services 93
Setting Up Windows Services for the First Time 94 Windows Services Settings 95
Solving Problems With Windows Services 99 Windows Services Specifications 99 Network File System (NFS) Service 100
Who Should Use NFS Service? 100 Before You Set Up NFS Service 100 Setting Up NFS for the First Time 101 NFS Service Settings 101
NFS Access Control Settings 102 File Transfer Protocol (FTP) Service 104
Before You Set Up FTP Service 104
Setting Up FTP Service for the First Time 104 FTP Service Settings 105
Where to Find More Information About File Services 109
6 Print Service 111
What Is Print Service? 111
Connecting Printers to the Server 111 Sharing Queues Over the Network 112 Managing Print Queues and Their Jobs 113 Monitoring Print Jobs 113
Before You Set Up Print Service 113
Setting Up Print Service for the First Time 114
Step 1: Add printers 114
Step 2: Configure print service 114
Step 3: Configure print queues 114
Step 4: Start print service 114
Step 5: Enable Windows services (optional) 114
Step 6: Set up printing from client computers 114 Print Service Settings 115
General Print Service Settings 115 Print Queue Settings 116 Print Job Settings 117
Solving Problems With Print Service 118
7 Web Service 121
What Is Web Service? 121
Before You Set Up Web Service 121 Configuring Web Service 122 Providing Secure Transactions 122 Setting Up Web Sites 122
Hosting More Than One Web Site 122 Understanding WebDAV Security 123 Setting Up Web Service for the First Time 123
Step 1: Set up the Documents folder 123
Step 5: Start Web service 124
Step 6: Connect to your Web site 124 Web Service Settings 125
General Settings for Web Service 125 Sites Settings for Web Service 127 MIME Types Settings for Web Service 128 Proxy Settings for Web Service 129 Web Site Settings 130
General Settings for Web Sites 131 Logging Settings for Web Sites 133 Access Settings for Web Sites 134 Security Settings for Web Sites 136 Strategies and Tips for Web Service 137
Using Persistent Connections to Improve Server Performance 137 Working With Web Modules 138
Using a Common Gateway Interface (CGI) Script 140
Understanding Multipurpose Internet Mail Extension (MIME) 141 Setting Up Secure Sockets Layer (SSL) Service 142
Monitoring Service Activity and Performance 146 Advanced Apache Configuration 147
Disabling the Cache for Dynamic Web Pages 148 Understanding WebDAV Realms and Privileges 149 Solving Problems With Web Service 149
Web Service Specifications 150
Where to Find More Information About Web Service 151
8 Mail Service 153
What Is Mail Service? 153 Post Office Protocol 153
Internet Message Access Protocol 154 Simple Mail Transfer Protocol 154 Before You Set Up Mail Service 154
Setting Up Mail Service for the First Time 155
Step 1: Set up MX records 155
Step 2: Start mail service 155
Step 3: Configure mail service 156
Step 4: Select default host settings 157
Step 5: Enable mail for users and create a postmaster account 157 Mail Service Settings 158
General Settings 158 Messages Settings 159 Filter Settings 160 Protocols Settings 162 Host Settings 166
Incoming Mail Settings 166 Outgoing Mail Settings 167 Network Settings 169
Where to Find More Information About Mail Service 170
9 QuickTime Streaming Server 173
What Is QuickTime Streaming Server? 173 Viewing Streamed Media: How It Works 173 Who Should Use QuickTime Streaming Server? 174 Before You Set Up QuickTime Streaming Server 174
Sample Setup for Live Video 175
Setting Up QuickTime Streaming Server for the First Time 175
Step 1: Open Streaming Server Admin 176
Step 2: Choose your streaming server settings 176
Step 3: Set up a Web page to show streamed media (optional) 176 Streaming Server Settings 177
General Settings 177 Logging Settings 178 Connected Users 179
Inside QuickTime Streaming Server 184 Compatible File Formats 184
Controlling Access to Streamed Media 185
Getting Media Through Firewalls or Networks With Address Translation 188 Setting Up a Relay 189
Solving Problems With QuickTime Streaming Server 192
Where to Find More Information About QuickTime Streaming Server 194
10 Macintosh Management Service 195
What Is Macintosh Management Service? 195
Who Should Use Macintosh Management Service? 195 Before You Set Up Macintosh Manager 196
Setting Up Macintosh Manager for the First Time 196
Step 1: Make sure users with home directories exist in Users & Groups 196
Step 2: Make sure Macintosh Management service is running 196
Step 3: Log in as an administrator 196
Step 4: Add user accounts 197
Step 5: Create a Macintosh Manager administrator 197
Step 6: Create a workgroup 197
Step 7: Set security options 197 Macintosh Manager Settings 198
Global Security Settings 225 Global CD-ROMs Settings 227
Macintosh Manager Strategies and Tips 228
Providing Quick Access to Unimported Users 228
Setting Up Macintosh Manager on Large or Growing Networks 229 Creating Workgroups to Meet Your Network’s Needs 229
Choosing Desktop Environments for Your Workgroups 230 Maximizing Security 231
Inside Macintosh Manager 232
How Macintosh Manager Starts Up 232
How Macintosh Manager Works With Preferences 232 How Macintosh Manager Ensures Security 237
How Client Computers Are Updated From the Server 238
How Macintosh Manager Keeps Track of Users, Workgroups, and Computer Lists 238 About the Macintosh Manager Share Point 239
Using Macintosh Manager and NetBoot Services Together 240 Solving Problems With Macintosh Manager 241
Problems Logging In to Macintosh Manager 241 Problems Client Users May Have 242
Where to Find More Information About Macintosh Manager 243
11 NetBoot 245
What Is NetBoot? 245
Who Should Use NetBoot? 245 Before You Set Up NetBoot 246
Planning Your Network 246 NetBoot Server Worksheet 253
Setting Up NetBoot Server Software for the First Time 254
Step 1: Install NetBoot server software (optional) 254
Step 2: Use the NetBoot Setup Assistant 254
Step 3: Set up Macintosh Manager 255
Improving NetBoot Performance 257 Server Performance Factors 258 Inside NetBoot 260
Solving Problems With NetBoot 261
12 Network Services 263
What Are Network Services? 263
Service Location Protocol (SLP) Directory Agent (DA) Service 264 Who Should Use SLP DA Service? 264
Before You Set Up SLP DA Service 264
Setting Up SLP DA Service for the First Time 265 SLP DA Service Settings 267
SLP DA Service Strategies and Tips 269
Dynamic Host Configuration Protocol (DHCP) Service 271 Who Should Use DHCP Service? 271
Before You Set Up DHCP Service 271
Setting Up DHCP Service for the First Time 272 DHCP Service Settings 274
DHCP Service Strategies and Tips 279 Domain Name System (DNS) Service 280
Who Should Use DNS Service? 280 Before You Set Up DNS Service 280
Setting up DNS Service for the First Time 281 DNS Service Strategies and Tips 282
IP Filter Service 285
What Is IP Filter Service? 285
Who Should Use IP Filter Service? 286 Before You Set Up IP Filter Service 286
Setting Up IP Filter Service for the First Time 289 IP Filter Service Settings 290
IP Filter Window Settings 295
Appendix A
Advanced Topics 301
TCP/IP Topics 301
Ports Used by Mac OS X Computers 301 Setting Up a Private TCP/IP Network 304 Setting Up Multiple IP Addresses for a Port 305 Creating IP Filter Rules Using ipfw 306
Where to Find More Information About Setting Up TCP/IP 308 File Format for Importing or Exporting Users and Groups 308
Example XML File 308
Creating Your Own Users and Groups File 312 Where to Find More Information About XML 314 LDAP Data Specifications 314
Mapping User Data 315
Mapping Network Service Data 321 Using the Default Mappings 322 Configuring LDAP Access 323 Backing Up Server Information 328
Appendix B
Mac OS X Server Information Worksheet 329
Glossary 333
P R E F A C E
How to Use This Guide
What’s Included in This Guide
Whether you’re new to networking or an experienced administrator, this book is your starting point. The chapters you choose to read depend on what you plan to do with your server.
m Read Chapter 1, “Mac OS X Server Administration,” for an overview of how Mac OS X Server is used, the services it provides, how you administer it, and how you set it up for the first time.
m Chapters 2, 3, and 4 describe three of the core components of Mac OS X Server— directory services, users and groups, and sharing. Most services depend on how you set up these three components, so it’s worthwhile to take the time to read these chapters. m Chapter 5, “File Services,” describes the file services included in Mac OS X Server: Apple
file service, Windows services, Network File System (NFS) service, and File Transfer Protocol (FTP) service.
m Chapter 6, “Print Service,” tells you how to share PostScript™-compatible printers among
users on Macintosh, Windows, and other computers.
m Chapter 7, “Web Service,” describes Web service in Mac OS X Server. You’ll learn how to set up secure transactions on your Web server and host multiple Web sites.
m Chapter 8, “Mail Service,” includes information about mail service in Mac OS X Server, including using mail over the Internet and choosing the best protocols for your network. m Chapter 9, “QuickTime Streaming Server,” describes the service that lets you deliver
media over the Internet in real time.
m Chapter 10, “Macintosh Management Service,” offers information about how you can use Macintosh Manager to manage your client computers more effectively.
m Chapter 12, “Network Services,” presents information about Mac OS X Server’s network services, which include Service Location Protocol (SLP) Directory Agent (DA) service, Dynamic Host Configuration Protocol (DHCP) service, Domain Name System (DNS) service, and IP filter service.
m Appendix A, “Advanced Topics,” provides supplemental information for administrators who want more details about advanced server management.
m Appendix B, “Mac OS X Server Information Worksheet,” provides a form for recording information about your server.
m The glossary lists and defines all the acronyms you’ll encounter as you read this manual. Read any chapter that’s about a service you plan to provide to your users. Each service’s chapter includes an overview of how the service works, what it can do for you, strategies for using it, and how to set it up for the first time. Also take a look at any chapter that describes a service with which you’re unfamiliar. You may find that some of the services you haven’t used before can help you run your network more efficiently and improve performance for your users.
Toward the end of some chapters is a section, “Inside” the service, that includes more technical information for the advanced user. You’ll want to read this section if you want a deeper understanding of the software or protocols that are running behind the scenes in a particular service.
Most chapters end with a section called “Where to Find More Information.” This section points you to Web sites and other reference material where you can find more detailed information about the service.
Setting Up Mac OS X Server for the First Time
If you haven’t installed and set up Mac OS X Server, do so now. Refer to Getting Started With Mac OS X Server, the fold-out card that came with your software, for instructions on server installation and setup. After completing the steps in that document, use the instructions in Chapter 1 of this guide to set up your server for the first time.
Getting Help for Everyday Management Tasks
Getting Additional Information
These documents are available at www.apple.com/macosx/server/
m Mac OS X Server Migration Guide provides instructions for upgrading to Mac OS X Server from AppleShare IP, Macintosh Manager, and Mac OS X Server 1.2.
C H A P T E R
1
1
Mac OS X Server Administration
This chapter introduces Mac OS X Server and gives an overview of its administration. It also provides several suggestions for helping you get started with your server:
m “Setting Up Your Server for the First Time” on page 35 provides a procedure for getting your server up and running quickly.
m “Where to Find More Information About Mac OS X Server and Server Management” on page 40 lists resources for server and network management information for both novice and experienced server administrators.
What Is Mac OS X Server?
Mac OS X Server is a powerful server platform that delivers a complete range of services to users on the Internet and the local network:
m It lets you connect users to each other, using such services as mail and file sharing. m It helps you share system resources, such as printers and computers.
m It can host Internet services, such as Web sites and streaming video.
This chapter introduces you to the services included with Mac OS X Server and provides a tour of the programs you use to administer them. First you’ll read about how the services can be put to use in educational, publishing, and Internet service environments. Then you’ll review the capabilities of individual services and get an introduction to the applications that let you administer them. Finally, you’ll find instructions for getting the server up and running.
Using Mac OS X Server
Your server can address the needs of many environments. This section gives examples of four common environments:
K–12 Classrooms and Labs
Servers in any educational environment need to help students access the Internet, send mail, manage files, view videos, and print documents. They also need to help teachers access lesson plans and other classroom materials, as well as student records and centralized administrative information. The Mac OS X Server Web, mail, print, and file services support all these needs:
Servers supporting K–12 classrooms and labs have several special requirements:
m They need to provide ways to control the student workstation environment. Mac OS X Server software includes client management services, which let you manage and monitor Macintosh computers used by students.
For example, Macintosh Management service lets you control which applications students can access. You can also define application preferences, desktop patterns, and other personal desktop settings so that students experience the same environment on different computers on the network.
m They must also efficiently handle many simultaneous requests for the same Internet resources. Mac OS X Server provides caching Web proxy service, so that Web content that has already been downloaded doesn’t need to be retrieved again from the Internet the next time it is requested.
Web and mail services
Client management services Print service
Mac OS X Server The Internet
Mac OS 9 clients Mac OS X clients File
services
Mac OS X Server
Mac OS 8 clients
Higher Education Facilities
In colleges and universities, server requirements are much more complex and varied, because the students and the workstations they use are highly diverse. This complexity requires a complete range of file and network services:
m The wide range of client computers—Macintosh, Windows, UNIX, Linux—demands flexible file access support. The highly scalable IP-based file services in Mac OS X Server support file access from anywhere on the network via Apple Filing Protocol (AFP), Network File System (NFS), File Transfer Protocol (FTP), and Server Message Block (SMB).
Web and mail services
The Internet
LDAP server
File, print, directory, and network
services UNIX NFS file server
Mac OS X Server Mac OS X Server Windows NT server
m The server offers PostScript-compatible print spooling and job accounting for print jobs submitted using LPR, the industry-standard TCP printing protocol, as well as the Windows SMB protocol.
m Because higher education networks are heterogeneous and complex, network services are critically important. Domain Name System (DNS) and Service Location Protocol (SLP) services are only two examples of services that Mac OS X Server provides to help client computers and services find resources on a network. Dynamic Host Configuration Protocol (DHCP) helps you serve students who log in to the network from portable computers. m IP filtering, another Mac OS X Server network service, provides a security firewall around
sensitive data.
Design and Publishing Businesses
Mac OS X Server provides services that fully support the workflow needs of Internet designers and publishers:
m The popular Apache Web server is built into Mac OS X Server.
m The Web-based Distributed Authoring and Versioning (or WebDAV ) technology, integrated into the server’s Web service, lets you do drag-and-drop publishing and file sharing from Mac OS X computers.
m For video, QuickTime Streaming service lets you broadcast streaming video to client computers in real time.
m Apple Filing Protocol (AFP) lets you transfer large files among workgroup members.
Print service
Mac OS X Server The Internet
Windows clients Mac OS 9 clients Mac OS X clients WebDAV
services File
services
Web Service Providers
Mac OS X Server provides the support necessary for hosting ecommerce Web sites and providing other Internet services that require high availability and scalability:
m Web service is based on Apache, an open source HTTP Web server. You can host many Web sites on a single server, each with its own address (multilink multihoming). You can configure your server to support multiple addresses per Ethernet card (virtual hosting). m Web service supports Secure Sockets Layer (SSL) protection for secure Internet connections. m The server includes deployment components of the WebObjects software suite. These
application services let you deploy ecommerce applications that can connect to multiple databases and generate HTML and Java™ dynamically.
m Mac OS X Server also includes built-in support for Perl, Java Servlets, JavaServer Pages, and PHP.
m QuickTime Streaming Server lets you broadcast multimedia in real time to viewers using an industry-standard streaming protocol.
m The server automatically restarts when a service or power failure occurs, maximizing service availability.
The Internet
Mail service WebObjects
Mail service
Web, FTP, and QuickTime
Streaming services
Mac OS X Server Mac OS X Server
Mac OS X Server Mac OS X Server “farm”
Mac OS X Server WebDAV
service
Services Included With Mac OS X Server
These Mac OS X Server services are highlighted in this section: m directory services
m file services m print service m Web service m mail service
m QuickTime Streaming service m client management services m network services
m application services
Directory Services
Directory services let your server locate information about users and groups (collections of users) that is needed for authentication and authorization. Directory services let you configure your server to find user information stored right on the server or in a location that has been set up to share information among servers.
While you usually store user information using the built-in NetInfo directory system, your server can also retrieve it from standard Lightweight Directory Access Protocol (LDAP) servers. If you store user names in multiple directory systems, the server automatically searches the locations you specify in the order you prefer when it needs to validate a user.
File Services
File services allow your client users to access files, applications, and other resources over a network. Mac OS X Server includes these file services:
Apple File Service
Apple file service, which uses the Apple Filing Protocol (AFP), lets you share resources with Macintosh clients. Macintosh users can connect to your server and access folders and files as if they were located on their own computers. Mac OS X users access your server using the Connect To Server command in the Finder’s Go menu; you can also automatically mount directories on Mac OS X computers when they start up. Mac OS 8 and Mac OS 9 users use the Chooser or Network Browser. Apple file service is fully integrated into the operating system environment, providing support for such features as file aliases and Sherlock.
Windows Services
Windows services let users of Windows or Windows-compatible computers take advantage of Mac OS X Server resources. Without any additional software, Windows users can find your server and browse for files and print queues using their familiar Network Neighborhood windows.
FTP Service
File Transfer Protocol (FTP) lets users transfer files over the Internet. Users of any computer that supports FTP can download files from your server—usually by using an Internet browser or FTP client application. FTP also offers a standard way for both known and anonymous users to transfer files to and from your server.
NFS Service
Network File System (NFS) service lets you make directories (folders) available for users who have NFS client software. NFS is often used to export directories for UNIX clients.
Print Service
Print service lets you share PostScript-compatible printers among users who submit print jobs from Macintosh, Windows, and UNIX computers. Any user whose computer is configured to print using the standard LPR protocol or the Windows SMB protocol can submit print jobs to printers you configure your server to manage.
Web Service
The heart of Mac OS X Server Web service is Apache, the dominant open source Web server. If you are already familiar with Apache, you will continue to enjoy its log file analysis tools, configuration file handling, and readily available documentation.
Web service in Mac OS X Server also offers you the ability to customize your Web
environment. You can set up Web sites for as many domains as you’d like, configure secure (SSL-based) communications on a per site basis, and use the built-in support for such application services as CGI, WebObjects, Perl, PHP, and Java Servlets.
Mail Service
Mail service lets you provide email service for users over your network or over the Internet. The service provides multiple-domain mail support as well as built-in junk mail protection. It supports all the standard mail protocols: Internet Message Access Protocol (IMAP), Post Office Protocol (POP), and Simple Mail Transfer Protocol (SMTP).
To provide mail service over the Internet, you can define Domain Name System (DNS) services on your network or use DNS services offered by your Internet service provider (ISP). DNS is one of the Mac OS X Server network services and is required for SMTP mail handling.
QuickTime Streaming Service
QuickTime Streaming Server lets you stream multimedia in real time using the industry-standard RTSP/RTP protocol.
You can deliver live and prerecorded media over the Internet to both Macintosh and Windows users, or relay streamed media to other streaming servers. You can provide unicast streaming, which sends one stream to each individual client, or multicast streaming, which sends the stream to a group of clients.
Client Management Services
Client management services let you simplify and control the environment that Macintosh client users experience.
Macintosh Management Service
Macintosh Management servicelets you set network-wide policies for controlling user access to applications, home directories, and printers. You can also define the environment users see when they log in. You can use this service to manage clients with Mac OS 8.1 or later installed.
NetBoot
NetBoot allows Macintosh client computers to start up using a Mac OS 9 operating system provided by a Mac OS X Server.
NetBoot lets you configure and update Mac OS 9 computers by simply updating their startup image. The server hosts a startup image that contains a System Folder and applications folder for all Mac OS 9 computers. Any changes made on the server are automatically reflected on the client computers when they restart.
Network Services
m DHCP service m DNS service m IP filter service
SLP DA Service
Service Location Protocol (SLP) provides structure to the services available on a network and gives users easy access to them.
Anything that can be addressed using a URL can be a network service—for example, file servers and WebDAV servers. When a service is added to your network, it uses SLP to register itself on the network; you don’t need to configure it manually. When a client computer needs to locate a network service, it uses SLP to look for services of that type. All registered services that match the client computer’s request are displayed for the user, who then can choose which one to use.
SLP Directory Agent (DA) is an improvement on basic SLP, providing a centralized repository for registered network services. You can set up a DA to keep track of services for one or more
scopes (groups of services). When a client computer looks for network services, the DA for the scope in which the client computer is connected responds with a list of available network services. Because a client computer only needs to look locally for services, network traffic is kept to a minimum and users can connect to network services more quickly.
DHCP Service
Dynamic Host Configuration Protocol (DHCP) is a protocol that helps you administer and distribute IP addresses dynamically to client computers from your server. From a block of IP addresses that you define, your server locates an unused address and “leases” it to client computers as needed. DHCP is especially useful when an organization has more clients than IP addresses. IP addresses are assigned on an as-needed basis, and when they are not needed, they are available for use by other clients.
DNS Service
Domain Name System (DNS) service lets users connect to a network resource, such as a Web or file server, by specifying a domain name (such as server.apple.com) rather than an IP address (192.168.11.12). DNS is a distributed database that maps IP addresses to domain names.
You will use DNS if you use SMTP mail service or if you want to create subdomains within your primary domain. You will also use DNS if you are hosting multiple Web sites. If you don’t have an ISP who handles DNS for your network, you can set up a DNS server on your Mac OS X Server.
IP Filter Service
IP filter service protects your server and the content you store on it from intruders. It provides a software firewall, scanning incoming IP packets and accepting or rejecting them based on filters you define.
You can set up server-wide restrictions for packets from specific IP addresses. You can also restrict access to individual services—such as Web, mail, and FTP—by defining filters for the ports used by the services.
Application Services
WebObjects offers a flexible and scalable way to develop and deploy ecommerce and other Internet applications. WebObjects applications can connect to multiple databases and dynamically generate HTML content.
Your server includes the WebObects deployment system and an unlimited license to deploy your WebObjects applications. You can also purchase the WebObjects development tools if you want to create WebObjects applications.
The remainder of this guide does not address WebObjects. For more information and documentation on WebObjects, go to the WebObjects Web page:
www.apple.com
How You Administer the Services
This section introduces the administration applications you use to configure and manage the services in Mac OS X Server and tells you how to get started using them:
m Server Admin: You use Server Admin to configure and manage most services, to set up and manage server user accounts, and to configure share points (items such as folders and disks you want users to share on the server).
You can use Server Admin either on your server or remotely, using secure, encrypted communications between a computer running Mac OS X or another server and the server you are administering. Server Admin has an individual module for managing each service. See “Server Admin” on page 31 for more information.
m Streaming Server Admin: This browser-based application lets you set up and manage streaming service from a Web browser.
You can use this application, described in “Streaming Server Admin” on page 34, from any computer that has Netscape Navigator™, Netscape Communicator, or Microsoft Internet
Explorer, versions 4.5 or later, installed.
m NetBoot Desktop Admin: Use NetBoot Desktop Admin to install, update, or remove items from the system image your NetBoot clients use to start up.
You can use NetBoot Desktop Admin from a client computer with Mac OS 9 installed. See “NetBoot Desktop Admin” on page 35 for more information about this application.
Server Admin
You can use Server Admin locally (at the server) or remotely (from a computer running Mac OS X or another Mac OS X Server) to administer services on one or more Mac OS X Servers.
When you install Mac OS X Server, Server Admin is automatically installed on the server. To install the remote Server Admin component on a computer running Mac OS X, follow these steps:
1 On a Mac OS X computer with networking configured, insert the Mac OS X Server CD.
2 Open the Admin Install folder and double-click the installer package, Admin_Install.mpkg.
3 Choose the Custom Install option, then select Server Admin.
Server Admin is installed in /Applications/Utilities/.
Logging in to Server Admin
To log in to Server Admin:
1 Open Server Admin (located in /Applications/Utilities/) by clicking the Server Admin icon in the Dock:
You can manage multiple servers simultaneously by logging in to each server and administering it from its own toolbar.
Getting Acquainted With the Toolbar
After you open Server Admin and log in to a server, a toolbar for that server appears. You administer services by using the service modules, which are arranged on four tabs in the toolbar.
Here is a summary of when to use the service modules and where to find more information about them in this guide:
To do this Use this module
Go here for more info
View information about your server
Server Info module (in the General tab) page 34
View server logs Log Viewer (in the General tab) page 33
Set up and manage directory services
Mac OS X utilities for Directory Services page 41
Set up and manage users
Users & Groups module (in the General tab) Sharing module (in the General tab)
page 57 page 73
Work with Macintosh Management service
Macintosh Mgr module (in the General tab) page 195
Set up and manage file services m Apple file service
m Windows services
m FTP service
m NFS service
Modules in the File & Print tab:
m Apple m Windows m FTP m NFS page 85 page 93 page 104 page 100
When you click a Server Admin module, a menu of commands appears. For information about how to use the commands to manage your services, refer to the pages indicated in the table above or see the onscreen help for the module. For information about how to use Server Admin in general, look in the Help menu in the Server Admin menu bar.
At the bottom of the toolbar, a status bar indicates how many services are running and alerts you to conditions that warrant your attention. A globe identifies running services, and a triangle containing “!” identifies alerts. These symbols also appear on individual module icons, and on any tab containing a module with an alert.
Viewing Logs
The Log Viewer lets you monitor errors and other noteworthy events logged by various services and applications running on your server. Log Viewer windows are dynamically updated as new log records are written, letting you monitor multiple services in real time.
Click Log Viewer, then choose the service whose logs you want to view. Choose Print Service, for example, to view logs for print service and for each of the server’s print queues. If you don’t see the service you are interested in, make sure the service is running, then check the system log (choose System Software from the Log Viewer menu, then choose System Log from the Display pop-up menu).
Later chapters in this guide and the onscreen help provide information about the logs for particular services. Also refer to the onscreen help for information about using the Log
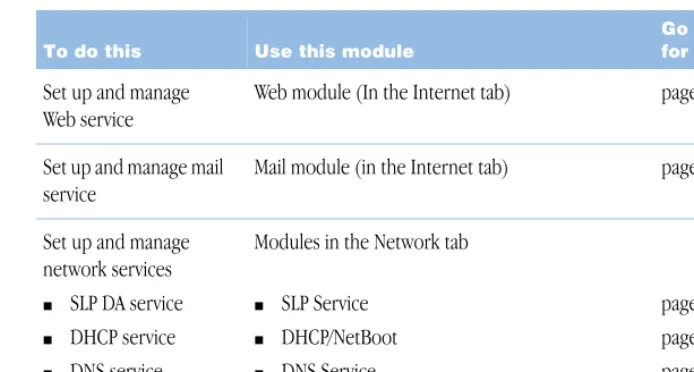
Set up and manage Web service
Web module (In the Internet tab) page 121
Set up and manage mail service
Mail module (in the Internet tab) page 153
Set up and manage network services m SLP DA service
m DHCP service
m DNS service
m IP filter service
Modules in the Network tab
m SLP Service
m DHCP/NetBoot
m DNS Service
m IP Filter
page 264 page 271 page 280 page 285
To do this Use this module
Getting Information About Your Server
Click Server Info, then choose Show Server Info to view the serial number and networking characteristics of your server.
If you need to change the server’s serial number, click Server Info, then choose Change Product Serial Number.
Macintosh Manager
You use the Macintosh Manager application to administer Macintosh Management service and set up user environments for client computers on your network. You can use Macintosh Manager locally (at the server) or remotely (from a Mac OS 9 or Mac OS X computer on the same network as your Mac OS X Server).
In addition to Macintosh Manager, you’ll also use two Server Admin modules to administer Macintosh Management service: Users & Groups and Sharing. Details about all these applications can be found starting on page 195.
Logging in to Macintosh Manager
Open Macintosh Manager by clicking its icon in the Dock. Log in using a server administrator user name and password. As a server administrator, you automatically have global
administrator privileges for Macintosh Manager. Once you are logged in, you can add users, create workgroups, and manage computers on the network.
You can also open Macintosh Manager by clicking Macintosh Mgr in the Server Admin General tab, then choosing Open Macintosh Manager.
Starting and Stopping Macintosh Management Service
To start and stop Macintosh Management service, use the Macintosh Mgr module of Server Admin. You can also use the Macintosh Mgr module to set whether Macintosh Management service automatically starts when the server starts up.
Streaming Server Admin
You can use Streaming Server Admin from any computer that has a Web browser installed and running. To open Streaming Server Admin, open a browser and enter the URL for Streaming Server Admin on your server. Then enter the streaming server administrator login ID and password. The connection established is secure.
NetBoot Desktop Admin
On a Mac OS 9 computer, use the Chooser to locate the NetBoot server volume, then log in to it as a server administrator. You can then open NetBoot Desktop Admin and make changes to the startup image. Follow the onscreen instructions when using NetBoot Desktop Admin.
You can read more about NetBoot administration starting on page 245.
Setting Up Your Server for the First Time
Follow these steps to get your server up and running quickly. After you complete step 8, users will be able to access the server and take advantage of basic Apple file service features. Step 9 refers you to other places in this guide where you can get instructions for setting up additional services you want to provide your users.
Step 1: Get acquainted with the server and its administration
applications
If you haven’t already done so, read the earlier sections of this chapter. These sections describe some common scenarios in which Mac OS X Server can be used, in both business and education environments. Then they introduce the services you can provide to your users and survey the applications you use to administer the server.
These sections introduce terms and concepts you’ll encounter as you proceed through the remaining steps.
Step 2: Install the server
Use the worksheet and instructions in Getting Started With Mac OS X Server to install your server and make it ready to use on your network.
Step 3: Log in
Using the owner/administrator name and password you specified during step 2, log in to the server. Then log in to the Server Admin application:
1 Open Server Admin from the Dock or from Applications/Utilities.
2 In the Address box, enter the IP address or domain name you assigned to the server during step 2.
3 In the User Name box, enter the owner/administrator name. In the Password box, enter the owner/administrator password.
Step 4: Create share points
A share point is a hard disk (or hard disk partition), CD-ROM disc, or folder that contains files you want users to share. If you are a teacher, for example, you may want to set up a share point for individual classes—Math, English, Biology—so that students in each class can access their assignments and handouts.
To create share points:
1 In a Finder window, open the folder in which you want to create the share point. Choose New Folder from the File menu. Name the share point.
2 In Server Admin, click the File & Print tab and make sure that Apple file service is running. If it’s not, click Apple and choose Start Apple File Service.
3 Click the General tab. Then click Sharing and choose Set Sharing Attributes. Select the folder you created and click Choose.
4 Click “Share this item and its contents,” then click Save.
5 Repeat steps 1 through 4 for each share point you want to create.
Step 5: Define default home directory settings
A home directory is a folder for a user’s personal files. Each student, for example, might use a home directory for storing class notes or assignments they’re working on.
If you define default home directory settings, a home directory is automatically created for each new user you define on your server. To define default home directory settings:
1 In the General tab of Server Admin, click Users & Groups and choose Home Directory Defaults.
2 Choose Local to set up a simple default strategy. You can always change your strategy later if you need to.
3 Choose the share point in which you want the home directories to reside from the Share Point pop-up list. You can choose the predefined Users share point or one of the share points you created earlier.
4 Click Save.
Whenever you define a new user, a home directory will be created for the user in the share point you selected and named using the “short name” you enter for the user. The user owns the home directory, meaning the user has Read & Write access to the directory and has complete control over access to the files in the home directory.
Step 6: Define users
2 In the Name field, enter a name that identifies the user (for example, Bob W. Brown, Jr.).
3 In the Short Name field, enter a short name for the user. Although the user can log in to the server using the name you specify in step 2, a short name is more convenient. Also, remember that the user’s home directory will be named using the short name. The short name is also used in the user’s email address if you set up mail service on the server.
Typically the short name is 8 characters or shorter. Use only letters, numbers, the hyphen character (-), or the underscore character (_).
4 In the Password field, enter the password the user should use to log in to the server. Although you define the password initially, the user can change it when logging in to the server or by using the Password pane in System Preferences. Enter a password that won’t be easily guessed by unauthorized users.
The password is case-sensitive and does not appear on the screen as it is entered. Make sure you have not pressed the Caps Lock key before entering the password. Avoid spaces and Option-key combinations.
5 Select “User can administer the server” if you want the user to be able to administer the server. When you first set up the server, only the owner/administrator designated during setup can administer it. Server administrators can use all the server management applications and have complete access to all the server’s facilities.
6 Select “User can log on” to let the user log in to the server, then click Save.
7 Repeat steps 1 through 6 for each user you want to be able to access the server.
Step 7: Define groups
Groups are collections of users with similar needs. For example, you can add math students to a math class group and give the group access to files in the math group’s share point.
Groups simplify the administration of shared resources. Instead of granting access to those resources to each individual who needs them, you can simply add the users to a group, and grant access to the group.
To define a group:
1 In the General tab of Server Admin, click Users & Groups and choose New Group.
2 Enter a name for the group. Avoid the space character or Option-key characters if you want to be able to send mail to the group.
3 To add users to the group, click Open U&G List. Locate the users you want to add, then drag them into the group settings window.
Step 8: Assign privileges to share points
To assign access privileges for your share points to the users and groups you have defined:
1 In the General tab of Server Admin, click Sharing and choose Show Disks & Share Points.
2 Double-click a share point.
3 In the General tab, click Users & Groups, then choose Open U&G List.
4 To change the share point owner, drag a user from the Users & Groups List window to the Owner field in the sharing window. Use the pop-up menu to the right of the Owner field to set access privileges for the owner.
5 To assign access privileges to a group, drag a group from the Users & Groups List window to the Group field in the sharing window. Then use the pop-up menu to the right of the Group field to set access privileges for the group. If the group is a math class group, for example, you may want to grant Read Only access so that math students can read information you place within the share point but not change it.
6 To assign access privileges to any user who can log in to the server, use the pop-up menu to the right of Everyone.
Step 9: Set up additional services as required
Decide which additional services you want to set up, then refer to the chapters indicated in the following table. Browse through the chapter first to become familiar with what’s in it. Then use the instructions for what to do before you set up the service and how to set it up
for the first time. This information, supplemented by detailed procedures available in the onscreen help, will guide you through setting up individual services.
If you want to Set up Instructions are in
Assign access privileges to folders and files within a share point
Folders and files, then assign access privileges
Chapter 4, “Sharing,” on page 73
Implement additional Apple file service features
Apple file service Chapter 5, “File Services,” on page 85
Provide file and print services for Windows users
Windows services Chapter 5, “File Services,” on page 93
Make folders available for users with NFS client software
NFS service Chapter 5, “File Services,” on page 100
Share printers among users print service Chapter 6, “Print Service,” on page 111
Set up Web sites or WebDAV support on the server
Web service Chapter 7, “Web Service,” on page 121
Provide email service for your users
mail service Chapter 8, “Mail Service,” on page 153
Broadcast multimedia in real time from the server
QuickTime Streaming Service Chapter 9, “QuickTime Streaming Server,” on page 173
Manage the environment that Mac OS 8.1 and later users experience
Macintosh Management service
Chapter 10, “Macintosh Management Service,” on page 195
Provide identical System and applications folders for all Mac OS 9 client computers
NetBoot Chapter 11, “NetBoot,” on page 245
Automate registration for network devices accessible using a URL
SLP DA service Chapter 12, “Network Services,” on page 263
Assign IP addresses dynamically to client computers
DHCP service Chapter 12, “Network Services,” on page 271
Set up a domain name server DNS service Chapter 12, “Network Services,” on page 280
Filter IP packets that the server receives
IP filter service Chapter 12, “Network Services,” on page 285
Share user information among multiple Mac OS X Servers and/or Mac OS X computers
directory services Chapter 2, “Directory Services,” on page 41
Where to Find More Information About Mac OS X Server and Server Management
If You’re New to Server and Network Management
If you want to learn more about Mac OS X Server, see the Mac OS X Server Web site:
www.apple.com/macosx/server/
Online discussion groups can put you in touch with your peers. Many of the problems you encounter may already have been solved by other server administrators. To find the lists available through Apple, see the following site:
www.lists.apple.com
Consider obtaining some of these reference materials. They contain background information, explanations of basic concepts, and ideas for getting the most out of your network.
m Teach Yourself Networking Visually, by Paul Whitehead and Ruth Maran (IDG Books Worldwide, 1998).
m Internet and Intranet Engineering, by Daniel Minoli (McGraw-Hill, 1997).
In addition, NetworkMagazine.com offers a number of online tutorials on their Web site:
www.networkmagazine.com
If You’re an Experienced Server Administrator
If you’re already familiar with network administration and you’ve used Mac OS X Server, Linux, UNIX, or a similar operating system, you may find these additional references useful. m A variety of books from O’Reilly & Associates cover topics applicable to Mac OS X Server,
such as Internet Core Protocols: The Definitive Reference, DNS and BIND, and TCP/IP Network Administration. For more advanced information, see Apache: The Definitive Guide, Writing Apache Modules with Perl and C, Web Performance Tuning, and Web Security & Commerce, also published by O’Reilly and Associates. See the O’Reilly & Associates Web site:
www.ora.com
m See the Apache Web site for detailed information about Apache: www.apache.org/
C H A P T E R
2
2
Directory Services
What Are Directory Services?
Your Mac OS X Server uses directory services to find information about users. The server needs user information for authentication and to support various services.
User Information Needed for Authentication
When a user logs in to a Mac OS X Server, the server authenticates the user—or determines whether the user is a valid user. Only valid users are entitled to access a server or take advantage of the services it provides.
To authenticate a user, the server consults this information for the user: m user name
m password m user ID
At a minimum—regardless of the services your users will use—each user that you want to be able to access the server must have a user name, a password, and a user ID stored in a location accessible to the server. When a user logs in and enters a user name and password, the information entered must match one of the users defined for the server for the user to be authenticated.
Other User Information Needed by the Server
Other user information is needed by individual services. For example, mail service requires mail settings for each user, and Macintosh Management service needs to know a user’s home directory. Most services require the user ID.
Where You Can Define User Information
User information needed by directory services is stored on Mac OS X Servers in NetInfo databases. A NetInfo database is known as a domain.
Mac OS X Servers can also retrieve user information from standard servers known as Lightweight Directory Access Protocol (LDAP) servers. LDAP servers are often used to handle requests for user information.
Where you store your server’s user information is determined by whether it needs to be shared.
If User Information on a Server Is Not Shared
When your server supports users whose information cannot be obtained from another Mac OS X Server on the network, information for users must reside locally, on the server itself. In this case, it is stored in a NetInfo domain—called the local domain—on the server:
When a user logs in to the server, directory services search for the user in the local domain. The user can access the server only if the user is defined in the local domain.
Every Mac OS X Server has a local domain. Users defined in a local domain are visible only to the computer on which the domain resides. While defining users in the local domain is adequate for standalone servers or servers used in simple networks, in many cases it is more efficient for computers to share user information. Sharing user data minimizes redundancy, so when a user’s data changes, it needs to be changed in fewer places.
Mac OS X Server Local NetInfo domain
If User Information on a Server Can Be Shared
When your network has several Mac OS X Servers that provide services for users, user
information stored in a NetInfo domain on one of the servers can be shared among the servers:
You define a shared domain when NetInfo information needs to be visible from multiple Mac OS X Servers.
In the picture above, users who are defined in the shared domain can access both servers. When a user logs in to either server, directory services search for the user in the local domain on that server. If the user is not found, directory services look for the user in the shared domain.
Mac OS X Server Local domain Shared domain
Mac OS X Server Local domain
A shared domain can also be used to manage who can use a computer running Mac OS X:
Like Mac OS X Server, a computer running Mac OS X always has a local NetInfo domain. In the picture above, users who are defined in the Mac OS X local domain or in the shared domain on the server can use the Mac OS X computer.
Mac OS 9 user Mac OS X user Windows user Local
domain Mac OS X Server
Local domain Shared domain
If Information External to the Server Can Be Shared
Some organizations—such as universities and worldwide corporations—maintain user information on LDAP servers. Your Mac OS X Server can be configured to retrieve user information from these standard systems:
When a user logs in to one of the Mac OS X Servers, directory services still search for the user in NetInfo domains, starting with the local domain. But if the user is not found and the server has been configured to use an LDAP server, the server consults the LDAP server for information about the user.
How the Server Finds User Information
Directory services, which are part of the underlying architecture of a Mac OS X Server, provide a centralized roadmap that the server uses to find information about users, groups (collections of users), and devices—all the people and resources your server supports.
When your server needs user information, directory services identify where the server should look for that information:
Mac OS 9 user Mac OS X user Windows user Local
domain Mac OS X Server
Local domain Shared domain
Mac OS X Server Local domain
LDAP Server
Directory Services
When your server needs to access user information stored in multiple locations, such as NetInfo domains on different servers and one or more LDAP servers, directory services also control the order in which the server searches those locations.
The locations searched and the order in which they are searched are called a server’s search policy. When a user logs in, directory services look for the user in the local NetInfo domain, then possibly in a shared domain or LDAP server, depending on how the search policy has been set up.
Using NetInfo
NetInfo lets you store and manage user information on a Mac OS X Server.
There’s always at least one NetInfo domain defined on a server—the local domain. Information stored in the local domain is visible only to the server on which it resides. It cannot be shared with other servers. So users defined in the local domain have access only to the server on which the local domain resides.
If you want to share information in a NetInfo domain, you need to make the local domain a
child of a shared domain, called the parent domain.
Before You Set Up NetInfo
If you think you can take advantage of shared NetInfo domains, you need to understand parent-child hierarchies.
Two-Level Hierarchies
The simplest hierarchy is a two-level hierarchy:
Parent NetInfo domain Local NetInfo
Here’s a scenario in which a two-level hierarchy might be used:
Each department (English, Math, Science) has its own computer. The students in each department are defined as users in the local domain of that department’s computer. All three of these local domains have the same parent—the root domain—in which all the instructors are defined. Instructors, as members of the root domain, can use services on all the departmental computers. The members of each local domain can only use services on the server where their local domain resides.
Local domain on English department’s
computer
Local domain on Math department’s
computer
Local domain on Science department’s
While local domains reside on their respective servers, a parent domain can reside on any Mac OS X Server accessible from the child domain’s computer. In this example, the root domain can reside on any server accessible from the departmental servers. It can reside on one of the departmental servers, or—as shown here—on an entirely different server on the network:
When an instructor logs in to any of the three departmental servers and cannot be found in the local domain, the server searches the root domain.
A root domain is a special kind of shared domain. It is the shared domain that is always at the top of a NetInfo hierarchy. It is visible to all computers that use the hierarchy. In this example, the root domain is the only shared domain, but in more complex hierarchies, there may be many shared domains.
Faculty Mac OS X Server
English department’s computer
Math department’s computer Local
domain Root domain
Local domain
Science department’s computer
Local domain
More Complex Hierarchies
NetInfo also supports multilevel domain hierarchies. Complex networks with large numbers of users may find this kind of organization useful, although it’s much more complex to administer:
In this scenario, an instructor defined in the root domain can use Mac OS X computers on which any of the local domains reside. Research fellows, defined in the Research domain, can log in to any Mac OS X computers whose local domains have the Graduates or Postgraduates domain as their parent, because the Research domain is the parent of the Graduates and Postgraduates domains.
How a Server Searches Through NetInfo Hierarchies
The default search strategy for a server is to search for a user in NetInfo domains, starting with the local domain:
m If the server’s local domain has no parent, the server searches only the local domain. m If the server’s local domain does have a parent NetInfo domain, the server searches the
parent domain when a user is not found in the local domain. If the user is not found in the local domain’s parent and that parent domain is configured as the child of a second parent domain, the second parent is searched. If the user is still not found, the server continues searching up through the NetInfo hierarchy, stopping when the user is found or after the final parent has been searched.
If you want your server to search other NetInfo domains, or if you want to specify that LDAP servers be searched, use the Directory Setup application to customize the search policy, as described in “Setting Up Search Policies” on page 52.
Research domain Root domain
Undergraduates domain
Graduates domain
Setting Up NetInfo for the First Time
Follow these steps to set up your NetInfo domains:
Step 1: Assess your server access requirements Identify which users need to access your Mac OS X Servers.
Users whose information is not accessible from an LDAP server, or whose information can be managed most easily on a Mac OS X Server, should be defined in a NetInfo domain.
Step 2: Design the NetInfo hierarchy
Determine whether user information should be stored in a local NetInfo domain or in a NetInfo domain that can be shared among servers. Design your NetInfo hierarchy, identifying the shared and child domains you want to use, the servers on which the shared domains should reside, and the parent-child relationship between domains. In general, try to limit the number of users associated with any domain to no more than 10,000.
Chapter 2, “NetInfo Planning,” in Understanding and Using NetInfo provides some guidelines that will help you decide what your NetInfo hierarchy should look like.
Step 3: Set up the NetInfo hierarchy
These are the main steps for setting up NetInfo hierarchies:
1 Set up shared domains. On each server you want to host shared domains, you create them and configure them so that they bind together into the hierarchy you want.
2 Set up local domains on each Mac OS X computer so that they bind to the shared domain you want to act as the parent domain.
3 Set up replication. You can replicate shared domains to improve reliability and speed of access to their data.
4 Set up Windows user authentication. If Windows users need to be authenticated using NetInfo and encrypted passwords, you enable Authentication Manager in all the domains in the NetInfo hierarchy.
5 Populate shared domains with users, groups, and other information you want to share.
Chapter 3, “Setting Up NetInfo Hierarchies,” in Understanding and Using NetInfo describes what to do in each of these steps.
Step 4: Customize your search policy (optional)
Using LDAP
Your server’s built-in LDAP support lets it retrieve user information from an LDAP V2 server.
LDAP servers can maintain information for a wide variety of individuals or network resources, including users, groups, printers, or servers. Once an LDAP server has been set up, you can easily configure your Mac OS X Server to access it to retrieve user and other information.
Before You Set Up LDAP Server Access
Before it can serve as a resource for Mac OS X Server user information, an LDAP server must be configured to support LDAP-based authentication and password checking. The system administrator responsible for maintaining the LDAP server and its data should configure the LDAP server for access.
To provide the appropriate information for user authentication, the LDAP server must contain entries and attributes for four items: user name (in RecordName and RealName fields), password, and user ID. Depending on which Mac OS X Server services a user will need access to, additional information may also be required.
After the LDAP server is configured to supply all needed data, make a note of the search base and attribute name of each data item. You will need this information when configuring your Mac OS X Server for LDAP access.
Setting Up LDAP for the First Time
Follow these steps to configure your server to access an LDAP server; see “Configuring LDAP Access” on page 323 for more details.
Step 1: Prepare LDAP server data
Modify the LDAP server entries and attributes as necessary to provide the data needed for server authentication, and for the other services that will use the data. “LDAP Data Specifications” on page 314 provides complete specifications for LDAP data that’s used by Mac OS X Servers. It may be necessary to add, modify, or reorganize information in your LDAP server to provide the information in the format needed.
Step 2: Enable LDAP support
Open the Directory Setup application (located in Applications/Utilities). Click the lock and log in as server administrator. Select LDAPv2 in the Directory Setup Services pane, then click Configure.
Step 3: Identify the LDAP server
Step 4: Define the LDAP search base
In the Records pane, map the record type “Users” to one or more search bases on the LDAP server that provide user information (for example, o=people, ou=your company name). Also map the record type “Groups” if you will be retrieving group information from the LDAP server.
Step 5: Map the data types for user and group information
In the Data pane, map at least the data types RecordName, RealName, Password, and UniqueID to the LDAP fields that will supply values for them. For example, UniqueID may be stored in an LDAP field named userid. If other information will be retrieved, map additional data types as needed.
Step 6: Define the connection attributes
In the Access pane, enter information about the connections established between your server and the LDAP server, such as the maximum time to spend searching for data on the LDAP server.
Step 7: Indicate how you want to use LDAP data
Either add the LDAP server to the server’s search policy or define aliases for specific users on the LDAP server. “Setting Up Search Policies,” next, tells you how.
Setting Up Search Policies
A server looks for user information in the locations specified in the server’s search policy.
If you are using only NetInfo domains to store user information, the default search policy is usually sufficient. But when you want to search LDAP servers or additional NetInfo domains, you define a custom search policy by using Directory Setup.
The Default Search Policy
Your Mac OS X Server always searches its local NetInfo domain when a user tries to log in.
Graduates domain Local domain Is the user
If a user is not found in the local domain, any parent domain defined for the local domain is searched:
If the user is still not found, the next parent in the NetInfo hierarchy is searched, and so on until the root domain is searched:
Graduates domain Local domain Is the user
defined here? No
Is the user
defined here? Root domain Research domain Graduates domain
Local domain No