Web Development Kit and Webtop
Version 6.5 SP2
Deployment Guide
P/N 300009274 A02
EMC Corporation Corporate Headquarters: Hopkinton, MA 01748‑9103 1‑508‑435‑1000 www.EMC.com
EMC believes the information in this publication is accurate as of its publication date. The information is subject to change without notice.
THE INFORMATION IN THIS PUBLICATION IS PROVIDED AS IS. EMC CORPORATION MAKES NO REPRESENTATIONS OR WARRANTIES OF ANY KIND WITH RESPECT TO THE INFORMATION IN THIS PUBLICATION, AND SPECIFICALLY DISCLAIMS IMPLIED WARRANTIES OF MERCHANTABILITY OR FITNESS FOR A PARTICULAR PURPOSE.
Use, copying, and distribution of any EMC software described in this publication requires an applicable software license. For the most up‑to‑date listing of EMC product names, see EMC Corporation Trademarks on EMC.com.
Preface
...
9Chapter 1 Quick Start
...
11Chapter 2 Planning for Deployment
...
13Required and optional supporting software
...
13Typical configuration
...
14Preparing the Content Server
...
15Application server host requirements
...
15Directory name restriction
...
15Content transfer directory permissions
...
15DNS resolution
...
15Deploying multiple applications
...
16Deploying language packs
...
16Customizing an application
...
16Chapter 3 Planning for Mixed Environments (5.3.x and 6.x)
...
17Chapter 4 Preparing the Client Hosts
...
19Ensuring a certified JVM on browser clients
...
19Enabling HTTP content transfer in Internet Explorer 7
...
20Enabling UCF content transfer in Internet Explorer 7 on Windows Vista
...
20Enabling content transfer in Firefox
...
21Firefox version 3.x
...
21Supporting Outlook mail message archives
...
23Using Citrix Presentation Server Client
...
24Turning off the pop‑up blocker in Internet Explorer
...
24Configuring the Runaway JavaScript Timer in Safari
...
24Chapter 5 Preparing the Application Server Host
...
27Setting the Java memory allocation
...
28Turning off failover
...
28Preparing environment variables for non‑default DFC locations
...
29Preparing JBoss and Apache Tomcat
...
29Preparing WebLogic server
...
30 Supporting large content transfer operations in a managed serverPreparing Oracle Application Server
...
32Preparing Sun Java System Application Server/Sun GlassFish Enterprise Server
...
33Turning off tag pooling
...
33Modifying the Sun policy file
...
34Turning off failover
...
35Preparing to use an external web server
...
35Chapter 6 Migrating a WDKbased Application
...
37Chapter 7 Deploying a WDKbased Application
...
39Preparing the WAR file for deployment
...
40Enabling DFC connections to repositories
...
40Enabling DFC memory optimization
...
42Configuring UCF
...
42Forcing UCF to install a configured JRE
...
42Enabling presets and preferences repositories
...
43Enabling retention of folder structure and objects on export
...
43Enabling modal pop‑up windows
...
44Enable the EMCMF format in WDK‑based applications
...
44Enabling external searches
...
45Configuring the connection to the search server
...
45Configuring the connection to the backup search server
...
46Deploying multiple applications
...
46Enabling Documentum Collaborative Services
...
46Deploying Documentum Webtop in a Load Balancing and Failover scenario
...
48Chapter 8 Completing the Deployment
...
49Configuring IBM WebSphere after deployment
...
49Changing the classloader and compiler settings
...
49Setting com.ibm.ws.webcontainer.invokefilterscompatibility to true
...
50Configuring Oracle Application Server
...
50Deploying default virtual link support
...
50Accessing the application
...
51Testing WDK samples
...
51Chapter 9 Configuring Single SignOn for Security Servers
...
53Chapter 10 Installing Application Connectors
...
57Overview
...
57Enabling installation on Windows 2003
...
58GUI installation of Application Connectors
...
58Command‑line installation of Application Connectors
...
60Location of installed files on the client host
...
61Chapter 11 Installing Documentum Webtop Federated Search Service (FS2)
...
63Viewing installation log files
...
65Chapter 12 Enabling the Webtop Express DocApp
...
67Chapter 13 Troubleshooting Deployment
...
69Wrong JRE used for application server
...
69No global registry or connection broker
...
69No connection to repository
...
70DM_VEL_INSTANTIATION_ERROR
...
70Login page incorrectly displayed
...
70Slow performance
...
70Out of memory errors in console or log
...
71Slow display first time
...
71DFC using the wrong directories on the application server
...
71Application startup errors
...
71Tag pooling problem
...
71UCF client problems
...
72Citrix client problems
...
72Connection issues between an Federated Search server and IPv6 clients
...
73Presets not working
...
73Blank page error on deploying DA
...
74Chapter 14 Deploying a Custom Application
...
75Using the comment stripper utility
...
75List of Figures
Figure 1. Basic WDK host configuration
...
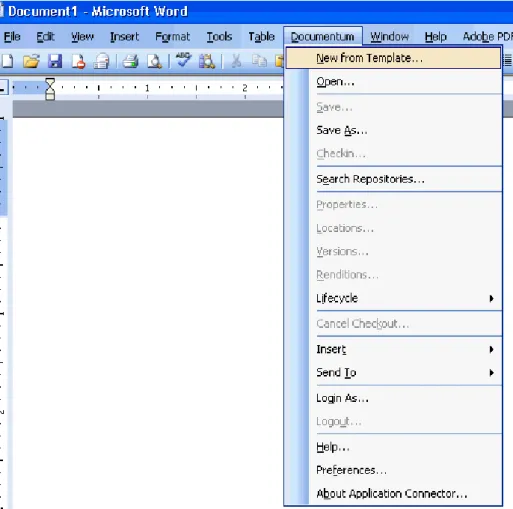
14 Figure 2. Documentum menu in authoring application...
60List of Tables
Table 1. Directories and files to back up
...
37Table 2. Preferences configuration elements
...
43Table 3. Modal window elements in app.xml (<modalpopup>)
...
44Table 4. Authentication elements (<authentication>)
...
54Table 5. Location of files installed by Application Connectors on the client host
...
61Table 6. Express user capabilities
...
67Table 7. Comment stripper utility parameters
...
75This guide describes how to deploy EMC Documentum Webtop and applications that are built on Web Development Kit (WDK) or Webtop.
WDK is a developer toolkit based on industry standards that facilitates the development of complex web‑based applications connecting to EMC Documentum Content Server and content repositories. WDK contains a large library of reusable components and controls that perform common content management functions and provide a uniform user interface to applications built with WDK. Webtop is a web application built on WDK that serves as the basis for the EMC Documentum web client applications. These applications can be customized using WDK. For additional information on developing or customizing applications with WDK, refer to theWeb Development Kit Development Guide.
This guide may include instructions for application servers, or combinations of operating systems and application servers that are not supported for your product. For the list of supported platforms, refer to the release notes for the product that you are deploying.
Intended audience
This manual is intended primarily for administrators who are deploying an application based on WDK or Webtop. EMC Documentum web client products are built on WDK or Webtop and have their own deployment guides. These client deployment guides contain the same general information that is in this guide as well as information specific to the client product.
To deploy a WDK‑based application, you should be familiar with the application server’s operating system and be able to install and configure a J2EE application server.
Revision history
The following changes have been made to this document.
Revision Date Description
Related documentation
You can download this deployment guide and the release notes for WDK and Webtop on the product download site. Each Webtop‑based application contains an online user guide in HTML format and a PDF version of that guide in the help subdirectory of the application WAR file.
The following developer documentation is available on the product download site for configuring and customizing WDK and Webtop applications. Additionally, some WDK‑based products have their own development guides with information specific to the product.
• Web Development Kit Development Guide
• Web Development Kit and Webtop Reference Guide
• Web Development Kit Tutorial
• System Upgrade and Migration Guide
• WDK_Samples_and_TestBed_version.zip whereversionis the product version number. • JavaDoc API reference documentation
Quick Start
This chapter describes the steps you need to perform to deploy your application. The steps are described in more detail in the chapters of this guide. Your product or environment may require additional steps, which you can find in the product‑specific chapter or chapters of this guide or in the index.
To perform a simple product deployment
1. Plan the deployment. (Refer toChapter 2, Planning for Deployment.)
Check that you have required and optional supporting software, prepare the Content Server, check application server environment requirements, prepare for multiple applications, plan for language pack deployment, and (if supported) plan to deploy a customized application. 2. Prepare the clients. (Refer toChapter 4, Preparing the Client Hosts.)
Install a supported browser virtual machine and perform specific browser preparations for IE 7 and Firefox. If needed, you will install the mail message converter and prepare Citrix clients. 3. Prepare the application server. (Refer toChapter 5, Preparing the Application Server Host.)
Configure UCF, ensure you have sufficient memory allocated to the application server Java instance, turn off failover if it is not needed, and follow application‑server and proxy‑server specific preparation instructions.
4. Deploy the product WAR file using the application server standard deployment mechanism. (Refer toChapter 7, Deploying a WDK‑based Application.)
You must first unpack the WAR file archive and enter some information that is specific to your environment: your connection broker and global registry information, optional presets and preferences repositories, and optional Federated Search server.
5. Complete the deployment. (Refer toChapter 8, Completing the Deployment.)
After successful deployment, you can deploy root virtual link support, enable WebSphere global security if needed, and test the application samples.
Planning for Deployment
This chapter addresses software and hardware decisions you must make before you deploy a WDK‑based application. This chapter contains instructions that are shared by all WDK‑based products. Check your release notes for information on the application servers, browsers and other software in the environment that are certified for your product.
This chapter discusses the following topics:
• Required and optional supporting software, page 13
• Typical configuration, page 14
• Preparing the Content Server, page 15
• Application server host requirements, page 15
• Deploying multiple applications, page 16
• Deploying language packs, page 16
• Customizing an application, page 16
Required and optional supporting software
Additional software products are required for WDK and WDK applications including the following: • Content Server and its associated database
• Content Server global repository • Connection broker
You must specify one or more connection brokers in the dfc.properties file. Refer toTo configure connections in dfc.properties before deployment:, page 41for information on configuring the connection broker before deployment.
• J2EE application server or servlet container
All WDK‑based applications require DARs that must be installed in the repository. The Webtop DARs are provided in Content Server version 6.5.
Typical configuration
When deployed on a single application server, a typical WDK‑based application requires the following network components:
• Application server host on which the WDK‑based application will be deployed
• Separate Content Server host, where a repository is installed and where one or more Content Servers run
• Global registry repository
• Client hosts that run a supported web browser
Figure 1, page 14shows the network components.
Figure 1. Basic WDK host configuration
Caution: For security and performance reasons, do not install the Content Server and a WDK‑based application on the same host. In addition, the Content Server installs an internal JBoss server that for licensing reasons cannot be used to deploy web applications.
Clustered environments — WDK‑based applications can be deployed in supported clustered environments. Refer to the release notes for each WDK‑based application to learn which managed server configurations are supported.
Preparing the Content Server
The following topics describe Content Server requirements.
Content Server installs certain DARs that are required for a WDK‑based application. You do not need to perform a separate installation of these. Products built on WDK or Webtop may require additional DARs, which are available on the product download site.
The global registry requirement — A global registry of Content Server version 6.x must be installed in your environment in order to run a WDK‑based application. A global registry is a Content Server that has been designated as a global registry. For information on designating your application’s global registry before deployment, refer toEnabling DFC connections to repositories, page 40.
Application server host requirements
The application server host used for WDK‑based applications has the requirements described in the following sections.
Directory name restriction
Java does not allow directories containing the following characters, which must not appear in the directory names or paths of Documentum applications:
! \ / : * ? " < > |
Content transfer directory permissions
The content transfer directory on the application server host is used to store files temporarily when they are transferred between the repository and the client machine. The default content transfer directory is specified in the app.xml file as the value of <server>.<contentlocation>. The application server instance owner must have write permissions on this temporary content transfer location. You can change the default value to a location on your application server host for which the application server instance owner has write permission. For information on specifying locations in the UCF client and server configuration files, refer toWeb Development Kit Development Guide.
Some application servers require policies that grant permissions to write to these directories. Refer to deployment information for your application server to see Documentum policy settings.
Deploying multiple applications
You can deploy multiple WDK‑based applications of version 6.x on a single host. Each instance of an application must be deployed to a different virtual directory. If the applications share the same application server instance, the applications must be the same version–version 6.x or later.
You can deploy applications to separate instances of the application server. If the applications use different versions of DFC, you must deploy them in separate application server instances.
Deploying language packs
Language packs are available to localize (translate) WDK‑based applications. A language pack is a language‑specific archive file that contains a graphical user interface (GUI) and user documentation that have been localized into a language other than the default application language, U.S. English. To deploy language packs, unpack your product WAR file and add the language packs according to the instructions inWeb Development Kit Applications Language Pack Installation and Release Notes.
Customizing an application
A developer license is required to develop custom applications. See your EMC Documentum account representative to obtain a developer license.
Configuration — Configuration is defined for support purposes as changing an XML file or modifying a Java Server Page (JSP) page to configure controls on the page. Configuration does not require a developer license.
Customization — Customization is defined for support purposes as the extension of WDK classes or the modification of JSP pages to include new functionality. Customization requires a developer license.
Planning for Mixed Environments (5.3.x
and 6.x)
All WDK‑based applications require DARs or DocApps that must be installed in the repository. The Webtop 6.5 DARs or 6.0 DocApps are provided in the Content Server of the corresponding version. If your application supports connections to a Content Server version 5.3.x, you must have a Content Server 6.x global registry.
The following features in the Webtop DARs or DocApps will not be available with a 5.3.x Content Server:
• Accelerated Caching Services (ACS) and Branch Office Caching Services (BOCS) write operations • Create relationships
• Presets
• Lifecycle enhancements in the properties, checkin, import and new document user interface. • LWSOs
If the Content Server version is 5.3, the read notification feature will use the 5.3 email notification script that is configured in the Content Server. It will not provide metadata or links.
Preparing a 5.3.x Content Server repository — The WDK‑based application WAR file contains scripts to upgrade the repository for subscriptions. Run the DQL script subscriptionInstall.dql that is located under the root web application directory, in webcomponent/install. Taxonomy Manager support scripts are located in the directory webcomponent/install/admin/tm.
Supporting WDK 5.3.x and 6.x applications on the application server — A 5.3.x application cannot share the same instance as a version 6.x application. One or both of the applications will not work properly.
The following behavior of EMCMF would be applicable for Webtop 6.5 SP1 and Content Server 5.3.x or 6.x combination:
• EMCMF support: This is available provided you have configured EMCMF support on the Content Server 5.3.x or 6.x. For this, you have to install the following DocApps:
— MessagingApp DocApp — DCO DocApp
Preparing the Client Hosts
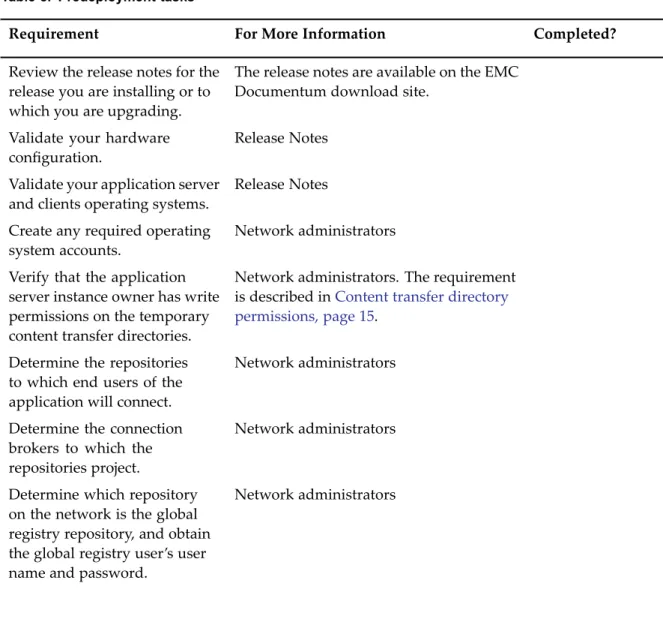
This chapter contains instructions that are shared by all WDK‑based products. Check your release notes for information on the browsers that are certified for your product.
This chapter contains information on the following predeployment tasks: • Ensuring a certified JVM on browser clients, page 19
• Enabling HTTP content transfer in Internet Explorer 7, page 20
• Enabling UCF content transfer in Internet Explorer 7 on Windows Vista, page 20
• Enabling content transfer in Firefox, page 21
• Supporting Outlook mail message archives, page 23
• Using Citrix Presentation Server Client, page 24
• Turning off the pop‑up blocker in Internet Explorer
• Configuring the Runaway JavaScript Timer in Safari
Ensuring a certified JVM on browser clients
Browser client hosts require a certified version of the Sun Java virtual machine (JVM or VM) to initiate content transfer in a WDK application. New machines may not have a JVM installed in the browser. Check the release notes for your product version for the JVMs that are supported.
If the WDK‑based application is configured to use UCF content transfer, a lightweight applet is downloaded to the browser when the client makes the first content transfer or preferences request. On Windows clients, if the JVM required for UCF is not present on the client machine, UCF uploads to a Windows client a private JVM. This VM does not replace the JVM that is used by the browser. For non‑Windows browser hosts with a JVM of 1.4.x, you must pre‑install version 1.5.0_06.x of the Sun JRE that will then be used by UCF.
Since the UCF VM file (Sun JRE) is over 10 MB in size, the installation can cause a delay. You can avoid this delay by installing a compatible local JVM prior to using UCF transfer.
Enabling HTTP content transfer in Internet
Explorer 7
Internet Explorer (IE) version 7 has a default security setting that prevents the display of the file download dialog. You must add the WDK‑based application URL to the list of trusted sites in the browser in order to perform checkout, view, or edit in HTTP mode.
Nothing happens when user exports as CSV if the browser security settings are disabled for ’prompt for file downloads’ and ’file download’. These are disabled by default in IE7. The user must enable them.
To enable HTTP file download in IE 7:
1. In the IE 7 browser menu, chooseTools>Internet Optionsand click theSecuritytab. 2. ChooseTrusted sitesand then clickCustom level.
3. Scroll to theDownloadssection and enableAutomatic prompting for file downloads. 4. ClickOKtwice to save settings.
5. Close all browser windows and restart the browser.
Enabling UCF content transfer in Internet
Explorer 7 on Windows Vista
Internet Explorer 7 on Windows Vista OS does not display a file download dialog to permit UCF content transfer unless it is enabled by adding the application server host to the trusted sites list and doing one of the following:
• Turn off User Account Control (UAC) security for each client. • Configure the application to use file registry mode.
To add the application server host to the list: 1. In IE7, go toTools>Internet Options Securitytab.
2. SelectTrusted sites. ClickCustom levelin the sectionSecurity level for this zone. 3. Scroll toDownloadsand checkAutomatic prompting for file downloads.
4. ClickOKto accept changes, and close the browser. To turn off UAC on each client:
1. Log in as a user who has administrator privileges on the Windows Vista machine. 2. Open the Control panel and chooseAdministrative Tools.
3. In the left pane, chooseUser Accounts. 4. ChooseTurn User Account Control on or off.
6. ClickOKand restart the system.
To configure UCF to use file registry mode:
1. Ensure the clients have checked in all checked out files.
2. Open the file ucf.installer.config.xml located in WDK‑based applications directory /wdk/contentXfer.
3. Locate the element <platform os=ʺwindowsʺ arch=ʺx86ʺ>, which configures Windows clients. 4. Locate the child element <defaults>.<configuration name=ʺcom.documentum.ucfʺ>.<option
name=ʺregistry.modeʺ>.
5. Change the value element to the following:
<value>file</value>
6. Save and restart the application.
Enabling content transfer in Firefox
Firefox 2 requires a setting to enable content transfer. To enable file download in Firefox:
1. Open theOptionsmenu in Firefox.
2. In theMaindialogDownloadssection, enableShow the Downloads window when downloading a fileandClose it when all downloads are finished.
3. CheckAlways ask me where to save files.
4. On theTabsdialog, checkNew pages should be opened in: a new window.
5. On theContentdialog, checkLoad images automatically,Enable JavaSript, andEnable Java. 6. Install the Firefox add‑on FireBug, which is available from mozilla.org.
Firefox version 3.x
In Firefox version 3.x, the file browse tag (<input type=’file’…./>) returns the file name only as its default behavior. Since WDK based applications require the absolute file path, configuration is required. See this link for more information:
To configure a Firefox version 3.x browser:
1. Add a new preference calledsigned.applets.codebase_principal_supportand set its value totrue. This configuration can be performed either by each end user or by administrators who can push the configuration to all end users. Both procedures are provided below.
a. For end user configuration:
• Typeabout:configin the browser location bar. PressEnterand accept the warning message as shown below:
• Search for signed.applets.codebase_principal_support; if the preference is found, ensure that its value is set totrue. If the preference is not available, add the preference as shown below and set its value totrue. Close the browser and then relaunch it, verifying that the preference is set totrue.
b. For administrators wishing to push the configuration to all users on Firefox: • Create a file named user.js and add the following details to the file:
user_pref("signed.applets.codebase_principal_support",true);
• Push the user.js file into the user profile location of Mozilla Firefox. For more information, consult the update available at:https://developer.mozilla.org/En/A_Brief_Guide_to_ Mozilla_Preferences
For example, the profile directory may appear as C:\Documents and
Settings\<usename>\Application Data\Mozilla\Firefox\Profiles\k6uvinlv.default. The user profile directory location for Mozilla Firefox differs depending on the operating system. For more information, seehttp://kb.mozillazine.org/Profile_folder.
2. The end user must allow this change when notified by the Internet Security alert:
Supporting Outlook mail message archives
WDK supports viewing and exporting dm_message_archive objects. If your WDK‑based product displays Outlook mail messages, read these instructions.
dm_message_archive objects can be viewed as HTML or as .msg files in Outlook. To view or export dm_message_archive objects as .msg files, the client must have an email converter installed. This converter can be automatically installed as part of the UCF download. However, the converter can take a long time to download and install. You can avoid this delay by deploying the ES1_MRE.exe installer using standard mechanisms, such as Microsoft Systems Management Server (SMS).
To enable automatic download of the email converter:
1. Uncomment the ES1_MRE.exe section in the app\wdk\contentXfer\ucf.installer.config.xml file on the application server.
2. Specify <messageArchive‑support> in wdk/app.xml.
You can run an email message migration utility that converts the .msg objects to a .emcmf objects. The emcmf object type adds email‑specific attributes and attachment handling. This utility is available on the Powerlink site.
Note: The Webtop 6.5 SP1 email functionality will work with 5.3 or 6.0 Docbase only if you have DCO, Collaborative Services and Messaging App DocApps installed on this Docbase as these DocApps are available with DCO license. If you do not have DCO license, the Webtop 6.5 SP1 email functionality would not be supported on the Docbase.
Using Citrix Presentation Server Client
Citrix Presentation Server Client can be used as a web browser. Check the release notes for your WDK‑based product to determine whether Citrix clients are supported for your product.
In the Citrix environment, content files are exported or checked out to the Presentation Server host, not to individual client hosts. Each individual user works on a client host with an image of a web browser that is running on the Presentation Server host. For detailed information on enabling applications on Presentation Server, refer to documentation provided by Citrix.
Note: If you have previously attempted to content transfer to the client, it will use the client’s location machine, and you must delete the ucf directory that was installed on the local client machine under the user’s OS home directory, for example, C:\Documents and Settings\<username>\Documentum\ucf.
Turning off the popup blocker in Internet
Explorer
Windows XP SP2 and SP3 installs a pop‑up blocker in Internet Explorer that is enabled by default. HTTP content transfer operations in WDK applications are prevented by the pop‑up blocker. You must turn off the pop‑up blocker for HTTP transfer.
Configuring the Runaway JavaScript Timer in
Safari
The slow script warning message may appear in the Webtop application when certain operations are performed (export, breadcrumb navigation, and so on). To avoid this issue, Webtop users must unselect theEnable Runaway JavaScript Timeroption in theDebugmenu in Safari 3.0 or earlier, or select theDisable Runaway JavaScript Timeroption in theDevelopmenu in Safari 3.1 or later, prior to logging in to Webtop.
To enable the Debug menu in Safari 3.0 or earlier: 1. Close the Safari browser, if it is open.
2. In theUtilitiesfolder, open Terminal.app. The Terminal window appears. 3. Specify the following command in the Terminal window:
defaults write com.apple.Safari IncludeDebugMenu 1
4. Press the Return key.
5. Specify the Administrator’s password, if you are prompted.
6. Press the Return key. The name of your Mac machine is displayed indicating that theDebug menu has been enabled in Safari.
7. Quit the Terminal. 8. Restart Safari.
To enable the Develop menu in Safari 3.1 or later: 1. Close the Safari browser, if it is open.
2. In theSafarimenu, selectPreferences. A dialog box displaying the General tab appears. 3. Click the Advanced tab.
4. Select theShow Develop in menu barcheckbox, and close the dialog box. 5. Restart Safari.
To configure the Runaway JavaScript Timer option in the Safari browser: Perform one of the following steps:
• In Safari 3.0 or earlier, unselect theEnable Runaway JavaScript Timeroption in theDebugmenu. • In Safari 3.1 or later, select theDisable Runaway JavaScript Timeroption in theDevelopmenu.
Preparing the Application Server Host
This chapter contains instructions that are shared by all WDK‑based products. Check your release notes for information on the application servers that are certified for your product.
This chapter describes the tasks you must complete to prepare the application server host before deploying your WDK‑based application.
Before you deploy a WDK‑based application, ensure that your J2EE application server or Servlet container is a supported version and that it can successfully serve sample JSP pages.
Tip: EMC recommends but does not require that you uninstall DFC 5.x and any application that uses DFC 5.x and then reboot before deploying an application based on WDK 6.x. For uninstall procedures, refer to the 5.x product documentation.
This chapter contains the following sections. Your selected application server and optional external web server must be certified for your product.
• Setting the Java memory allocation, page 28
Required information for all application servers • Turning off failover, page 28
• Preparing environment variables for non‑default DFC locations, page 29
Information for enterprise environments that do not use the default (recommended) DFC environment locations.
• Preparing JBoss and Apache Tomcat, page 29
• Preparing WebLogic server, page 30
• Preparing IBM WebSphere, page 30
• Preparing Oracle Application Server, page 32
• Preparing Sun Java System Application Server/Sun GlassFish Enterprise Server, page 33
• Preparing to use an external web server, page 35
EMC does not provide support for installing or running application servers. Refer to the documentation for each application server for instructions on installing, stopping, starting, and running the application server. Contact the application server vendor for technical support.
Setting the Java memory allocation
The minimum recommended Sun Java memory allocation values for application servers on a small system are the following:
Xms1024m Xmx1024m
Application servers can slow down, throw exceptions, or crash with an application that has a large number of Java Server Pages. Set the MaxPermSize parameter to 128 or later to avoid this problem. Document caching can consume at least 80 MB of memory. User session caching can consume approximately 2.5 MB to 3 MB per user. Fifty connected users can consume over 200 MB of VM memory on the application server. Increase the values to meet the demands of the expected user load. To achieve better performance, add these parameters to the application server startup command line:
server
XX:+UseParallelOldGC
servermust be the first parameter on the command line.
Performance will improve because the Java client VM is not suitable for long running server jobs and the default Java garbage collector cannot clean up the heap quickly enough—especially when the application server machine runs on multiple CPUs.
For more information on these settings, refer to Java documentation at the Sun web site
(http://java.sun.com). More information on application server performance tuning and benchmarking for Documentum products is available from your EMC Documentum SE or EMC Documentum Consulting.
Turning off failover
If your application server and environment combination does not support failover, you can turn off failover in app.xml. Refer to your product release notes to determine whether failover is supported for your environment.
If you do not turn off failover, you may see failover validation messages in the application server log, but these should not interfere with operations. Do not attempt to use the application in a failover environment that is not certified.
To turn off failover for the application, open app.xml in the custom directory and add the following element:
<failover>
<enabled>false</enabled> </failover>
Preparing environment variables for
nondefault DFC locations
The base location for content transfer on the application server host is specified by the DFC environment variable dfc.data.dir. This location is specified as the value of the key dfc.data.dir in dfc.properties located within the application WAR file in WEB‑INF/classes. If this variable is not set in the environment for the application server, the default location is the documentum subdirectory of the current working directory. (The current working directory contains the application server executable.) For example, in Tomcat the location is %CATALINA_HOME%/bin. On WebLogic, it is %BEA_HOME%/domains/wl_server/documentum.
By default, the checkout and export directories are subdirectories of the dfc.data.dir directory, and the user directory is the same as dfc.data.dir. If you wish to use non‑default locations for these, you can create environment variables for dfc.checkout.dir, dfc.export.dir, and dfc.user.dir, respectively. The default value of dfc.registry.mode, which corresponds to the key dfc.registry.mode in dfc.properties, is ʺfileʺ. The full path to this file by default is dfc.user.dir/documentum.ini. For a non‑default file name or location, specify it as the value of the environment variable dfc.registry.file.
Preparing JBoss and Apache Tomcat
Please refer to your product release notes to determine whether JBoss or Apache Tomcat is a supported application server for your product.
You must disable tag reuse in JBoss and Apache Tomcat in the web.xml file of the Tomcat /conf directory. The location of web.xml file in JBoss application is
//server/default/deploy/jboss‑web.deployer/conf/web.xml. Find the JSP servlet entry in web.xml. Add the enablePooling initialization parameter and set it to false:
<servlet> <servletname>jsp</servletname> <servletclass>org.apache.jasper.servlet.JspServlet</servletclass> <initparam> <paramname>enablePooling</paramname> <paramvalue>false</paramvalue> </initparam> <initparam> <paramname>fork</paramname> <paramvalue>false</paramvalue> </initparam> <initparam> <paramname>xpoweredBy</paramname> <paramvalue>false</paramvalue> </initparam> <loadonstartup>3</loadonstartup> </servlet>
Preparing WebLogic server
Please refer to your product release notes to determine whether BEA WebLogic is a supported application server for your product.
The following topic describes preparations that may be necessary before you deploy a WDK‑based application.
If you are deploying Webtop in a cluster environment, seeInstalling and Configuring an Oracle WebLogic Application Server for EMC Documentum WDK/Webtop.
Supporting large content transfer operations in a
managed server environment
If you are deploying in a WebLogic Managed Server environment and you use UCF to perform large content operations, set the WLIOTimeoutSecs parameter for the web server plugin to a very large value. UCF requires a sticky session for a single operation. For additional details, refer to BEA’s documentation on Web Serve Plug‑ins parameters.
Preparing IBM WebSphere
Please refer to your product release notes to determine whether IBM WebSphere is a supported application server for your product.
The following topics describe how to prepare the application server to support failover in a cluster, to apply policies for Java 2 security, and to support non‑default content transfer locations. Refer to your product release notes to determine whether failover is supported for your application.
If you are deploying Webtop in a cluster environment, seeInstalling and Configuring IBM WebSphere Application Server for EMC Documentum WDK/Webtop.
Supporting failover in a cluster
Failover in a clustered environment requires a setting. Set theNoAffinitySwitchBackcustom property to true in the WAS cluster. For more information on this setting, refer to the WebSphere documentation.
Applying policies for WebSphere security
If WebSphere global security is enabled for the application server, by default it enables Java 2 security. Java 2 security requires security policies. You must apply the policies in the Documentum files app.policy, library.policy and was.policy. These files are provided by EMC Documentum on the download site in the compressed archive PolicyFiles.zip. These files contain the minimum set
of policies that are required for the application to run without error. Add these policies to your existing files.
You must set up the environment variables that are referenced in these policies, and the application server instance owner must have write permission on these directories. Define the following environment variables:
• dfc.data.dir
By default, the dfc.data.dir directory is the Documentum subdirectory of the directory that contains the application server executable.
• webtop.content.xfer
Specifies the temporary content transfer directory on the application server. Must match the value in app.xml of the element <contentxfer>.<server>.<contentlocationwindows> or <contentlocationunix>.
The policy files in PolicyFiles.zip contain the minimum required policies for the dfc.data.dir directory. To add additional policies for non‑default content transfer locations, add the following lines to library.policy. For each policy that you add, set up an environment variable that specifies the non‑default location.
Tip: Select only the policies that are needed for your application.
Policy for local user directory (non‑default location) — This policy is required if the user directory for the application server host machine is a non‑default location. The default location is the same as the location specified by the dfc.properties key dfc.data.dir.
permission java.io.FilePermission "${dfc.user}${/}", "read, write, delete"; permission java.io.FilePermission "${dfc.user}", "read, write, delete";
Policy for checkout and export directories (non‑default location) — These environment variables must specify the same location as the value of the dfc.properties keys dfc.checkout.dir and
dfc.export.dir. The default locations for these directories are checkout and export subdirectories of dfc.data.dir.
permission java.io.FilePermission "${dfc.checkout}${/}", "read, write, delete";
permission java.io.FilePermission "${dfc.checkout}", "read, write, delete"; permission java.io.FilePermission "${dfc.export}${/}", "read, write,
delete";
permission java.io.FilePermission "${dfc.export}", "read, write, delete";
Policy for DFC registry file (non‑default location) — The value of the dfc.registry environment variable must match the location specified in dfc.properties for the key dfc.registry.file.
permission java.io.FilePermission "${dfc.registry}${/}", "read, write, delete";
permission java.io.FilePermission "${dfc.registry}", "read, write, delete";
Policy for non‑Webtop WDK‑based temporary content transfer (non‑default location) — You can use this policy for TaskSpace or other application that is not based on Webtop:
permission java.io.FilePermission "${wdk.content.xfer}${/}", "read, write, delete";
permission java.io.FilePermission "${wdk.content.xfer}", "read, write, delete";
Policy for documentum applications directory (non‑default location) — The default location is dfc.data.dir.
permission java.io.FilePermission "${documentum}${/}", "read, write, delete";
permission java.io.FilePermission "${documentum}", "read, write, delete";
Policy for DFC class cache directory (non‑default location) — The default location is dfc.data.dir/cache.
permission java.io.FilePermission "${dfc.cache.dir}${/}", "read, write, delete";
permission java.io.FilePermission "${dfc.cache.dir}", "read, write, delete";
Policy for Web Publisher —
permission java.io.FilePermission "${wp.content.xfer}${/}", "read, write, delete";
permission java.io.FilePermission "${wp.content.xfer}", "read, write, delete";
Policy for Documentum Administrator —
permission java.io.FilePermission "${da.content.xfer}${/}", "read, write, delete";
permission java.io.FilePermission "${da.content.xfer}", "read, write, delete";
Policy for Digital Asset Manager —
permission java.io.FilePermission "${dam.content.xfer}${/}", "read, write, delete";
permission java.io.FilePermission "${dam.content.xfer}", "read, write, delete";
Policy for Content Intelligence Services —
permission java.io.FilePermission "${cis.content.xfer}${/}", "read, write, delete";
permission java.io.FilePermission "${cis.content.xfer}", "read, write, delete";
Preparing Oracle Application Server
Please refer to your product release notes to determine whether Oracle Application Server is a supported application server for your product.
To disable tag pooling for the application: 1. Open orion‑web.xml.
2. Change the default value of the <init‑param> tags_reuse_default fromcompiletimeto the value noneas shown in the following example:
<servlet>
<servletname>jsp</servletname>
<servletclass>oracle.jsp.runtimev2.JspServlet</servletclass> <initparam>
<paramname>tags_reuse_default</paramname> <paramvalue>none</paramvalue>
</initparam> </servlet>
To disable tag pooling for all applications:
1. Open global‑web‑application.xml in < ORACLE_HOME >\j2ee\home\config 2. Add the following init‑param in the <servlet> element:
<servlet> <initparam>
<paramname>tags_reuse_default</paramname> <paramvalue>none</paramvalue>
</initparam> </servlet>
Preparing Sun Java System Application
Server/Sun GlassFish Enterprise Server
Please refer to your product release notes to determine whether Sun Java System Application Server 8.2 or Sun GlassFish Enterprise Server 2.1 is a supported application server for your product. The following topics describe preparations to deploy a WDK‑based application.
Turning off tag pooling
You must turn off tag pooling for the domain in which you deploy WDK‑based applications. For the domain in which you will deploy the application, open default‑web.xml, for example,install path/domains/domain1/config/default‑web.xml. Add the <init‑param> to the jsp servlet declaration as follows:
<servlet>
<servletname>jsp</servletname>
<servletclass>org.apache.jasper.servlet.JspServl <initparam>
<paramname>xpoweredBy</paramname> <paramvalue>true</paramvalue>
</servlet>
Modifying the Sun policy file
You must modify the server.policy file located in the server instance /config directory to add permissions for DFC location variables. Add the following policies if they are not already present in your file.
Add the following policies if they are not already present in your file and if the application is installed as a J2EE module:
grant {
permission java.util.PropertyPermission "*", "read,write";
permission java.io.FilePermission "${user.home}/", "read, write, delete"; permission java.io.FilePermission "/tmp/", "read, write, delete";
permission java.io.FilePermission "${java.io.tmpdir}/", "read, write, delete";
permission java.io.FilePermission "${instance.config.dir}/", "read, write, delete";
permission java.lang.RuntimePermission "createClassLoader"; permission java.net.SocketPermission "*", "connect,accept"; permission java.lang.RuntimePermission "getProtectionDomain"; permission java.lang.RuntimePermission "shutdownHooks"; permission java.lang.reflect.ReflectPermission "*";
grant "file:${com.sun.aas.instanceRoot}/applications/j2eemodules/webtop/{ permission java.security.AllPermission;
};
Note: The reference to ʺWebtop” represents the module name. If the application is installed with a name other than ʺWebtop”, you must replace the ʺWebtop” string with the module name.
Add the following policies if they are not already present in your file, and if the application is installed as a J2EE application:
grant {
permission java.util.PropertyPermission "*", "read,write";
permission java.io.FilePermission "${user.home}/", "read, write, delete"; permission java.io.FilePermission "/tmp/", "read, write, delete";
permission java.io.FilePermission "${java.io.tmpdir}/", "read, write, delete";
permission java.io.FilePermission "${instance.config.dir}/", "read, write, delete";
permission java.lang.RuntimePermission "createClassLoader"; permission java.net.SocketPermission "*", "connect,accept"; permission java.lang.RuntimePermission "getProtectionDomain"; permission java.lang.RuntimePermission "shutdownHooks"; permission java.lang.reflect.ReflectPermission "*";
grant "file:${com.sun.aas.instanceRoot}/applications/j2eeapps/webtop/" { permission java.security.AllPermission;
};
Note: The reference to ʺWebtop” represents the application name. If the application is installed with a name other than ʺWebtop”, you must replace the ʺWebtop” string with the application name.
Replace the following variable in these policies or create an environment variable for it so that it can be resolved:
• $(instance.config.dir): The instance configuration directory, example: /var/opt/SUNWappserver7/ domains/domain1/server1/config/
Turning off failover
The Sun application server does not support failover. You must turn it off in the app.xml file located in the custom directory. Add the following lines to custom/app.xml:
<failover>
<filter clientenv='portal'> <enabled>false</enabled> </filter>
<filter clientenv='not portal'> <enabled>false</enabled> </filter>
</failover>
Preparing to use an external web server
Please refer to your product release notes to determine whether external web servers are supported for your product.
External web servers are sometimes used as a front end to the application server. For example, an external web server may be used for balancing the loads on a collection of application servers or used as a forward or reverse proxy server.
UCF content transfer uses chunked transfer encoding, a standard of the HTTP 1.1 specification. Many proxy web servers such as the Sun server implement chunked transfer encoding in a way that does not work properly with UCF. If the external server does not support HTTP 1.1 chunked encoding, you must configure UCF in the WDK‑based application to use an alternative chunked encoding. The
Web Development Kit Development Guidecontains information on this configuration.
If you are deploying in a manager server or network deployment environment, the external web server must provide session affinity support.
Migrating a WDKbased Application
This chapter contains instructions that are shared by all WDK‑based products. Check your release notes for information on the application servers, browsers, and other software that are certified for your product. Review this chapter and perform the tasks described in it before migrating a WDK application. Customization of Documentum Administrator is not supported.
Table 1, page 37shows the files, directories, and subdirectories on the application server host that should be backed up.
Table 1. Directories and files to back up
Directory/file To back up if present
custom/app.xml app.xml
custom subdirectories JSP files
custom/config XML files
custom/strings Properties files
custom/theme subdirectories Branding files
WEB‑INF/classes subdirectories Custom classes
custom/src subdirectories Custom source files
WEB‑INF/tlds Custom tag libraries
WEB‑INF/classes/com/
documentum/web/formext/session
Back up AuthenticationSchemes.properties, KeystoreCredentials.properties, and
TrustedAuthenticatorCredentials.properties if customized
After installing the new version of the product, copy your backed‑up customizations into the new version. Recompile your custom classes to ensure that the custom code still works. For information about migration, refer toDocumentum 6.5 System Upgrade and Migration Guide.
Note: If the Documentum Collaboration Services (DCS) functionality is available prior to upgrading WDK‑based applications, refer to theEnabling Documentum Collaborative Servicessection for instructions on enabling the feature.
Deploying a WDKbased Application
This chapter contains instructions that are shared by all WDK‑based products. Check your release notes for information on the application servers, browsers and other software in the environment that are certified for your product.
After you complete the required predeployment tasks, deploy a WDK application on the application server host.
The following topics describe how to deploy the application: • Preparing the WAR file for deployment, page 40
• Enabling DFC connections to repositories, page 40
• Enabling DFC memory optimization, page 42
• Configuring UCF, page 42
• Forcing UCF to install a configured JRE, page 42
• Enabling presets and preferences repositories, page 43
• Enabling retention of folder structure and objects on export, page 43
• Enabling modal pop‑up windows, page 44
• Enable the EMCMF format in WDK‑based applications, page 44
• Enabling external searches, page 45
• Deploying multiple applications, page 46
• Enabling Documentum Collaborative Services, page 46
Preparing the WAR file for deployment
Perform the following procedure to prepare the WDK‑based application WAR file. To deploy a WDKbased application:
1. Download the WDK application WAR file from theEMC download siteto a temporary directory on the application server host.
2. Unpack the WAR file and modify the dfc.properties file following the instructions inEnabling DFC connections to repositories, page 40. You must perform this procedure before attempting to connect to Documentum repositories.
3. Enable the optional presets and preferences repositories in dfc.properties following the instructions inEnabling presets and preferences repositories, page 43.
4. Add or migrate customizations from previous WDK‑based applications. 5. Apply language packs if you have purchased them.
6. Make any UCF configuration changes that your applications needs before deploying. Refer to the
WDK Development Guidefor details. 7. Re‑archive the WAR file.
8. Deploy the WAR file according to the deployment instructions in your application server documentation.
Enabling DFC connections to repositories
You must provide connection broker and global registry values in dfc.properties before your application can connect to repositories.
A global registry of Content Server version 6.x is required for WDK‑based applications. The global registry is a central repository that serves several purposes:
• Deploys service‑based business objects (SBOs) • Stores network location objects
• Stores application presets, unless another repository is configured in app.xml
• Stores persistent user preferences, unless another repository is configured in app.xml
TheContent Server Installation Guidecontains information about enabling a repository as a global registry.
You can copy information from the dfc.properties file that was generated by the Content Server installer on your global registry host. The generated dfc.properties file contains the connection broker address and the encrypted global registry user login information.
To use the dfc.properties file information from the global registry Content Server repository:
1. On the global registry repository host, locate the Content Server installation directory. On Windows hosts, the default installation directory is C:\Documentum. On UNIX hosts, this directory is specified by the environment variable $DOCUMENTUM.
2. Open the file dfc.properties that is located in the config subdirectory. 3. Copy the following keys and their values from the file:
dfc.docbroker.host[0]=address
dfc.globalregistry.repository=repository_name
dfc.globalregistry.username=username
dfc.globalregistry.password=encrypted_password
dfc.docbroker.port[0]=port_number
4. Unpack the application WAR file.
5. Open the dfc.properties file located in WEB‑INF/classes within this expanded WAR file directory. 6. Paste in the values that you copied from the global registry dfc.properties.
7. Use a text editor to configure additional properties in this file or make any changes to it. 8. Save the dfc.properties file and deploy the application.
Note: If you create a new WAR file from this application directory, you must ensure that any paths that you specify in dfc.properties are valid directories on the application server and that the application server instance owner has write permission on the specified directories.
To configure connections in dfc.properties before deployment: 1. Unpack the application WAR file.
2. Open the file dfc.properties in WEB‑INF/classes.
3. Add the fully qualified hostname for the docbroker to the following key. You can add backup hosts by incrementing the index number within brackets.
dfc.docbroker.host[0]=host_name
4. If you wish to use a port for the docbroker other than the default of 1489, add a port key to dfc.properties:
dfc.docbroker.port=port_number
5. Add the global registry repository name to the following key:
dfc.globalregistry.repository=repository_name
6. Add the username of the dm_bof_registry user to the following key:
dfc.globalregistry.username=dm_bof_registry_user_name
The global registry user, who has the username of dm_bof_registry, has read access to objects in the /System/Modules and /System/NetworkLocations only.
7. Add an encrypted password value for the following key:
java cp dfc.jar com.documentum.fc.tools.RegistryPasswordUtils
password_to_be_encrypted
Enabling DFC memory optimization
The DFC diagnostics are set to true by default. To free up memory resources, set
dfc.diagnostics.resources.enable in dfc.properties. Refer toEnabling DFC connections to repositories, page 40for the procedure of unpacking the war file and modifying dfc.properties. Add the following line to your dfc.properties file:
dfc.diagnostics.resources.enable=false
Configuring UCF
TheWeb Development Kit Development Guidecontains the following procedures: • How to configure different content transfer mechanisms (UCF or HTTP) for roles.
• How to configure the UCF client content transfer directories, including client path substitution. • How to support self‑signed or unsigned SSL certificates.
• How to configure the UCF server for forward and reverse proxy servers and alternative chunking. Note: The web server associated with an application server must support chunked requests. The web server forwards HTTP requests using chunked transfer encoding, as described in the HTTP/1.1 protocol, to the back‑end application server. If chunked requests are not supported then the client should use UCF alternative chunking mode.
Forcing UCF to install a configured JRE
If your WDK‑based application uses UCF content transfer, it is mandatory that the browser has a Sun JRE installed. By default, the UCF installer uses the Sun JRE that is installed in the browser if its version is the same as or later than the version of JRE in the UCF installer. A later version of JRE sometimes introduces problems in an application.
If you do not want to allow multiple JRE versions, you can configure the UCF installer to use or install only the version that is configured in the installer configuration file. If that version is already installed, the UCF installer will use it. If it is not present, the UCF installer will install and use the configured version. You must add an enforceJreInstallation attribute to the runtime java element in the file ucf.installer.config.xml to use the configured JRE version. This file is located in your web application directory, wdk/contentXfer. Change the runtime java element by adding the enforceJreInstallation attribute as follows:
platform os="windows" arch="x86">
<runtime type="java" version="1.5.0" href="winjre1.5.0_06.zip" exePath="jre1.5.0_06\bin\java.exe" enforceJreInstallation="true"/>
If users have already installed UCF, you must force an update of the UCF configuration every time you make changes to the UCF configuration on the application server. Ensure that you append a new letter to the app version to force the update. In the following example, the version 6.5.0.223 is changed:
<app id="shared" version="6.5.0.223a" compatibilityVersion="5.3.0"/>
Enabling presets and preferences repositories
By default, presets and persistent preferences are stored in the global repository. For better performance, you can configure your application to use different repositories for presets and persistent preferences.
Add your preferences repository settings to app.xml in the /custom directory of the application. Copy the entire <preferencesrepository> element from /wdk/app.xml into /custom/app.xml and then specify your repository. For information on other preferences settings in app.xml, refer toWeb Development Kit Development Guide.
Table 2. Preferences configuration elements
Element Description
<preferencesrepository> Contains a <repository> element. If this element is not present, user preferences are stored in the global repository, which can slow down performance.
.<repository_path> Specifies the path within the preference repository in which to store preferences. If the path does not exist at application startup, it will be created.
.<repository> Specifies the repository in which to store
preferences, preferably not the global repository. To give users the ability to create presets using the presets editor, assign those users the role dmc_wdk_presets_coordinator.
Enabling retention of folder structure and
objects on export
To enable retaining the same folder structure (as the one in the repository) and the contained objects on the local file system when the parent folder is exported, add the following element to your app.xml in the custom directory:
<deepexport>
Enabling modal popup windows
The modal pop‑up window is a secondary browser pop‑up window with no browser controls either to maximize or minimize the window. This pop‑up window appears centered in the screen. The pop‑up window provides a similar experience on the web as in desktop, where you can interact with a component in a pop‑up window. The user interface for the component appears in a pop‑up window (child window) on top of the parent window. If you invoke another component from the child window, the user interface of the component appears on top of the child window and thus stacked one over the other pop‑up windows. You cannot access the parent window until you close all the pop‑up windows.
The modal pop‑up window is supported only on Internet Explorer browser environment. The pop‑up window is not 508–compliant and hence it is not supported when 508 accessibility features are turned on through the User Preferences.
In the wdk/app.xml file, <modalpopup> enables and disables the modal pop‑up feature.
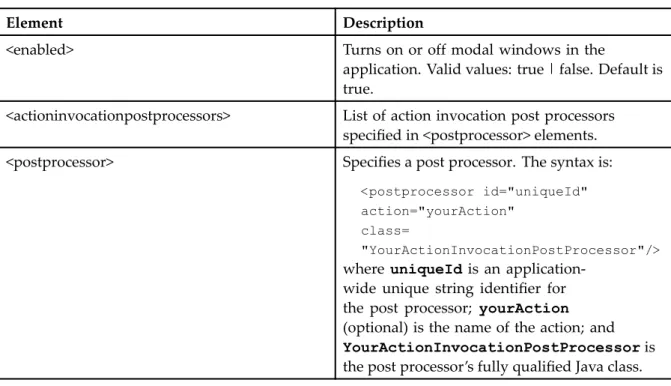
Table 3, page 44describes the elements that configure modal windows in app.xml:
Table 3. Modal window elements in app.xml (<modalpopup>)
Element Description
<enabled> Turns on or off modal windows in the
application. Valid values: true | false. Default is true.
<actioninvocationpostprocessors> List of action invocation post processors specified in <postprocessor> elements.
<postprocessor> Specifies a post processor. The syntax is:
<postprocessor id="uniqueId" action="yourAction"
class=
"YourActionInvocationPostProcessor"/>
whereuniqueId is an application‑ wide unique string identifier for the post processor; yourAction
(optional) is the name of the action; and
YourActionInvocationPostProcessoris the post processor’s fully qualified Java class.
Enable the EMCMF format in WDKbased
applications
Webtop 6.5 SP1 can handle (import/export) EMCMF format email message (dm_message_archive object). Enabling this feature increases the UCF initialization time, so the first content transfer operation may take some time.
To enable import and export of email messages in the EMCMF format: To enable import and export of email messages in the EMCMF format, do the following: 1. Install DocApps on 5.3 and 6.0 Repositories:
• On 5.3 and 6.0 content servers, install the DCO, Collaborative Services, and Messaging application (which is part of Email Archive) Docapps.
Note:The Webtop 6.5 SP1 email functionality will work with 5.3 or 6.0 Docbase only if you have DCO, Collaborative Services and Messaging App DocApps installed on this Docbase, these DocApps are available with DCO license. If you do not have DCO license, the Webtop 6.5 SP1 email functionality would not be supported on these Docbase.
2. Add the following lines toapp.xml(located in the custom directory).
Note:Refer toWeb Development Kit Development Guidefor details on these configuration elements.
<messageArchivesupport> <enabled>true</enabled> <supportedfileformat>
<fileformat>msg</fileformat> </supportedfileformat>
<defaultattachmentobjecttype>dm_document</defaultattachment objecttype>
<storeemfobjectasarchive>false</storeemfobjectasarchive> <skipduplicatemessages>true</skipduplicatemessages> </messageArchivesupport>
3. Uncomment the ES1_MRE line in thewdk/contentXfer/ucf.installer.config.xmlfile. Note: If the EMCMF is enabled after Webtop is being used in the production, incrementing the version in app id element of the ucf.installer.config.xml file is imminent. It forces UCF to pick up the changes made to the ucf.installer.config.xml file as shown below. Otherwise, the ES1_MRE will not get downloaded on to the client machine; it should be installed manually on each client machine.
<app id="shared" version="6.5.0.036" compatibilityVersion="5.3.0"/>
to
<app id="shared" version="6.5.0.036a" compatibilityVersion="5.3.0"/>
Enabling external searches
To allow users to search external sources, an administrator must configure a connection to an Federated Search server. (The Federated Search server is a separate product that is purchased separately from Webtop and Content Server.) If this connection has not been configured, you cannot include external sources in your search.
To configure the connection to an Federated Search server: 1. Unpack the client application WAR file.
2. Open the file dfc.properties in WEB‑INF/classes.
3. Enable the Federated Search server by setting the following: dfc.search.ecis.enable=true
4. Specify the RMI Registry host for the Federated Search server by setting the following: dfc.search.ecis.host=host_IP
dfc.search.ecis.port=port Where
• host_IPis IP address or machine name of the Federated Search server.
• portis the port number that accesses the Federated Search server. The default port is 3005.
Configuring the connection to the backup search server
You can set a backup server in case the primary Federated Search server is unreachable. If a DFC‑application cannot connect to the primary Federated Search server to query external sources, the backup server is contacted. You can define the time period after which the application will try to connect again to the primary server. To define the backup server, specify the RMI host and port in the dfc.properties file:
• dfc.search.ecis.backup.host: host of the backup Federated Search server. Default value is: localhost.
• dfc.search.ecis.backup.port: port of the backup Federated Search server. Default value is: 3005. • dfc.search.ecis.retry.period: waiting period before retrying to connect to the primary Federated
Search server. This time is in milliseconds. Default value is: 300000.
Deploying multiple applications
Two or more WDK‑based applications of version 6.x can share the same application server instance if they are version 6 or later.
Enabling Documentum Collaborative Services
Web Development Kit (WDK) 6.5 SP2 supports enabling and disabling of Documentum Collaborative Services (DCS) in Webtop. DCS can be enabled or disabled in Webtop by modifying the Custom app.xmlof your WDK application with the configuration described in this section. By default, the DCS feature isdisabledin the Webtop application. Note that the performance of Webtop may be impacted marginally after enabling DCS because Webtop will include the extra functionality.