Installation and Configuration
B E A M e s s a g e Q f o r W i n d o w s N T V e r s i o n 5 . 0
D o c u m e n t E d i t i o n 4 . 0
O c t o b e r 1 9 9 8
BEA MessageQ
Copyright
Copyright © 1998 BEA Systems, Inc. All Rights Reserved.
Restricted Rights Legend
This software and documentation is subject to and made available only pursuant to the terms of the BEA Systems License Agreement and may be used or copied only in accordance with the terms of that agreement. It is against the law to copy the software except as specifically allowed in the agreement. This document may not, in whole or in part, be copied photocopied, reproduced, translated, or reduced to any electronic medium or machine readable form without prior consent, in writing, from BEA Systems, Inc.
Use, duplication or disclosure by the U.S. Government is subject to restrictions set forth in the BEA Systems License Agreement and in subparagraph (c)(1) of the Commercial Computer Software-Restricted Rights Clause at FAR 52.227-19; subparagraph (c)(1)(ii) of the Rights in Technical Data and Computer Software clause at DFARS 252.227-7013, subparagraph (d) of the Commercial Computer Software--Licensing clause at NASA FAR supplement 16-52.227-86; or their equivalent.
Information in this document is subject to change without notice and does not represent a commitment on the part of BEA Systems. THE SOFTWARE AND DOCUMENTATION ARE PROVIDED "AS IS" WITHOUT WARRANTY OF ANY KIND INCLUDING WITHOUT LIMITATION, ANY WARRANTY OF
MERCHANTABILITY OR FITNESS FOR A PARTICULAR PURPOSE. FURTHER, BEA Systems DOES NOT WARRANT, GUARANTEE, OR MAKE ANY REPRESENTATIONS REGARDING THE USE, OR THE RESULTS OF THE USE, OF THE SOFTWARE OR WRITTEN MATERIAL IN TERMS OF CORRECTNESS, ACCURACY, RELIABILITY, OR OTHERWISE.
Trademarks or Service Marks
BEA, BEA Builder, BEA Connect, BEA Jolt, BEA Manager, and BEA MessageQ are trademarks of BEA Systems, Inc. BEA ObjectBroker is a registered trademark of BEA Systems, Inc. TUXEDO is a registered trademark in the U.S. and other countries.
All other company names may be trademarks of the respective companies with which they are associated.
MessageQ Installation and Configuration Guide for Windows NT
Document Edition Part Number Date Software Version
4.0 850-001010-003 October 1998 MessageQ for Windows NT, Version 5.0
Contents:
Preface
Purpose of This Document ... vii
Who Should Read This Document... vii
How This Document Is Organized... vii
How to Use This Document ... viii
Opening the Document in a Web Browser... viii
Printing from a Web Browser ... ix
Documentation Conventions ...x
Related Documentation ... xii
MessageQ Documentation ... xii
Contact Information... xiii
Documentation Support... xiii
Customer Support... xiii
1. Installing MessageQ
Preparing to Install the MessageQ Software ... 1-1 Checking the Software Distribution Kit... 1-1 Media ... 1-2 Hardcopy and Online Documentation... 1-2 Complying with the Installation Prerequisites ... 1-3 Backing up the System Disk ... 1-3 Installing the MessageQ Software on Windows NT Systems... 1-3 Choosing Which Subsets to Install... 1-4 Installing MessageQ on Systems Already Running MessageQ ... 1-4 Installing MessageQ for Windows NT... 1-5 Recovering from Installation Errors... 1-13 Using the Online User Documentation ... 1-13
Performing Postinstallation Tasks ... 1-14 Configuring the Network... 1-15 Starting the MessageQ Service for Windows NT ... 1-15 Adding the MessageQ Drive and Directory to Your Path... 1-16 Converting Your Group Initialization File to Version 5.0 ... 1-17
2. Configuring MessageQ
Overview of MessageQ System Configuration ... 2-1 Message Queuing Bus ... 2-2 Message Queuing Groups... 2-3 Message Queues ... 2-3 Using Naming... 2-5 Cross-Group Connections ... 2-6 Server Processes ... 2-6 Configuring a Message Queuing Group ... 2-8 Defining Parameters in the Group Initialization File ... 2-10 Default Values for Parameters... 2-11 Identifying the Group Initialization File Version ... 2-11 Setting Group Characteristics in the Profile Section ... 2-12 Setting Message Recovery System Parameters in the MRS Section ... 2-15 Configuring the Client Library Server in the CLS Section ... 2-19 Enabling Network Connections in the Cross-Group Section ... 2-21 Defining the Message Routing Database in the Route Section ... 2-23 Route Discovery... 2-26 Visit Counts... 2-27 Client/Server Message Routing... 2-28 Defining Queues in the Queue Configuration Section ... 2-29 Defining Name-to-Queue Translations in the Group Name Section... 2-36 Configuring Global Naming... 2-37 Configure Groups to Run or Use the Naming Agent ... 2-37 Configure the Namespace ... 2-38 Configure a Default Namespace Path for Each Group ... 2-40 Define the Queue Names in the Group Initialization File... 2-40 Using the Test Utility to Test Your Group Configuration... 2-42
3. Managing MessageQ
Using the Monitor Utility ... 3-1 Connecting to the MessageQ Environment ... 3-2 Connecting to a Group from the Command Line... 3-2 Connecting to a Running Group From the Monitor Utility ... 3-3 Starting a Message Queuing Group... 3-5 Starting a Group from the Command Line... 3-5 Starting a Group From the Monitor Utility ... 3-6 Creating a Custom Group Startup Icon on the Desktop... 3-7 Starting a Group from the Startup Program Group ... 3-7 Shutting Down a Running Group ... 3-8 Shutting Down a Group from the Command Line ... 3-8 Shutting Down a Group From the Monitor Utility ... 3-9 Shutting Down a Group From the Group Control Process System Menu . 3-9 Starting a Cross-Group Connection... 3-10 Stopping a Cross-Group Connection... 3-10 Starting a Queue ... 3-11 Stopping a Queue ... 3-11 Running the Client Library Server ... 3-12 Starting CLS ... 3-12 Stopping the CLS ... 3-13 Restricting Remote Access to CLS ... 3-13 Managing Message Recovery Services ... 3-14 Replaying Journal Messages ... 3-15 Printing Journal Files ... 3-16 Changing Group Characteristics at Runtime ... 3-18 Enabling or Disabling Quotas ... 3-19 Setting Quotas for Dynamic Queues ... 3-20 Enabling Queue Quotas for Selective Queues ... 3-20 Defining Timeout Intervals for Link Drivers ... 3-21
4. Monitoring MessageQ
Invoking the Monitor Utility ... 4-1 Enabling Statistics ... 4-2 Enabling Quotas ... 4-2
Viewing Link and Queue Activity... 4-3 Viewing Link Traffic Counts ... 4-3 Viewing Link Traffic Rates... 4-4 Viewing Link Traffic Detail ... 4-5 Viewing Link Detail ... 4-6 Viewing Queue Traffic Counts ... 4-7 Viewing Queue Traffic Rates ... 4-8 Viewing Queue Traffic Detail ... 4-10 Viewing Queue Detail ... 4-10
5. Troubleshooting
Error Logging ... 5-1 Tracing... 5-2 Enabling Tracing ... 5-2 Disabling Tracing ... 5-3
Preface
Purpose of This Document
This document provides information on installing and configuring BEA MessageQ on Windows NT systems.
Who Should Read This Document
This document is intended for the following audiences:
t system installers who will install BEA MessageQ on supported platforms
t system administrators who will configure, manage, and troubleshoot BEA MessageQ on supported platforms
How This Document Is Organized
BEA MessageQ Installation and Configuration Guide for Windows NT is organized as follows:
t Chapter 1, “Installing MessageQ,” preinstallation, installation, and postinstallation tasks.
t Chapter 2, “Configuring MessageQ,” provides instructions on configuring a message queuing group, defining parameters in a group initialization file, and testing the group configuration.
t Chapter 3, “Managing MessageQ,” describes how to perform common
management tasks, such as connecting to a MessageQ environment, starting and stopping groups and queues, running the Client Library Server, managing message recovery, changin group characteristics at runtime, and enabling and disabling quotas.
t Chapter 4, “Monitoring MessageQ,” describes how to use the Monitor utility to view link and queue activity.
t Chapter 5, “Troubleshooting,” describes how to use the MessageQ Event Watcher and tracing capabilities to diagnose problems with your MessageQ application.
How to Use This Document
This document is designed primarily as an online, hypertext document. If you are reading this as a paper publication, note that to get full use from this document you should access it as an online document via the BEA MessageQ Online Documentation CD. The following sections explain how to view this document online, and how to print a copy of this document.
Opening the Document in a Web Browser
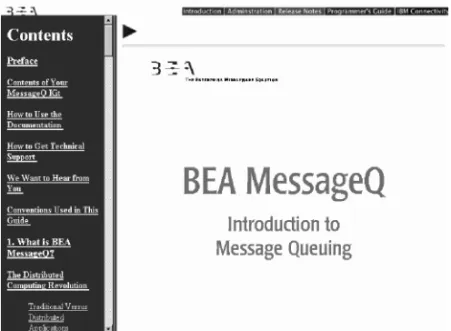
To access the online version of this document, open the index.htm file in the top-level directory of the BEA MessageQ Online Documentation CD. On the main menu, click the Introduction to Message Queuing button. Figure 1 shows the online document with the clickable navigation bar and table of contents.
Note: The online documentation requires a Web browser that supports HTML version 3.0. Netscape Navigator version 3.0 or Microsoft Internet Explorer version 3.0 or later are recommended.
Figure 1 Online Document Displayed in a Netscape Web Browser
Printing from a Web Browser
You can print a copy of this document, one file at a time, from the Web browser. Before you print, make sure that the chapter or appendix you want is displayed and
selected in your browser.
To select a chapter or appendix, click anywhere inside the chapter or appendix you want to print. If your browser offers a Print Preview feature, you can use the feature to verify which chapter or appendix you are about to print. If your browser offers a Print Frames feature, you can use the feature to select the frame containing the chapter or appendix you want to print. For example:
The BEA MessageQ Online Documentation CD also includes Adobe Acrobat PDF files of all of the online documents. You can use the Adobe Acrobat Reader to print all or a portion of each document. On the CD’s main menu, click the Bookshelf button. On the Bookshelf, scroll to the entry for the BEA M3 document you want to print and click the PDF option.
Documentation Conventions
The following documentation conventions are used throughout this document.
Convention Item
boldface text Indicates terms defined in the glossary.
Ctrl+Tab Indicates that you must press two or more keys simultaneously. italics Indicates emphasis or book titles.
monospace text
Indicates code samples, commands and their options, data structures and their members, data types, directories, and file names and their extensions. Monospace text also indicates text that you must enter from the keyboard. Examples:
#include <iostream.h> void main ( ) the pointer psz chmod u+w *
\tux\data\ap .doc tux.doc BITMAP float monospace boldface text
Identifies significant words in code. Example:
void commit ( )
monospace italic text
Identifies variables in code. Example:
String expr
UPPERCASE TEXT
Indicates device names, environment variables, and logical operators. Examples:
LPT1 SIGNON OR
{ } Indicates a set of choices in a syntax line. The braces themselves should never be typed.
[ ] Indicates optional items in a syntax line. The brackets themselves should never be typed.
Example:
buildobjclient [-v] [-o name ] [-f file-list]... [-l file-list]...
| Separates mutually exclusive choices in a syntax line. The symbol itself should never be typed.
Related Documentation
The following sections list the documentation provided with the MessageQ software, related BEA publications, and other publications related to the technology.
MessageQ Documentation
The MessageQ information set consists of the following documents:
BEA MessageQ Introduction to Message Queuing BEA MessageQ Programmer’s Guide
BEA MessageQ System Messages BEA MessageQ Client Guide
BEA MessageQ FML Programmer’s Guide BEA MessageQ FML Reference Pages
... Indicates one of the following in a command line:
t That an argument can be repeated several times in a command line t That the statement omits additional optional arguments
t That you can enter additional parameters, values, or other information
The ellipsis itself should never be typed. Example:
buildobjclient [-v] [-o name ] [-f file-list]... [-l file-list]...
. . .
Indicates the omission of items from a code example or from a syntax line. The vertical ellipsis itself should never be typed.
Note: The BEA MessageQ Online Documentation CD also includes Adobe Acrobat PDF files of all of the online documents. You can use the Adobe Acrobat Reader to print all or a portion of each document.
Contact Information
The following sections provide information about how to obtain support for the documentation and software.
Documentation Support
If you have questions or comments on the documentation, you can contact the BEA Information Engineering Group by e-mail at [email protected]. (For information about how to contact Customer Support, refer to the following section.)
Customer Support
If you have any questions about this version of ProductName, or if you have problems installing and running ProductName, contact BEA Customer Support through BEA WebSupport at www.beasys.com. You can also contact Customer Support by using the contact information provided on the Customer Support Card, which is included in the product package.
When contacting Customer Support, be prepared to provide the following information:
t Your name, e-mail address, phone number, and fax number
t Your company name and company address
t Your machine type and authorization codes
t The name and version of the product you are using
C
HAPTER1
Installing MessageQ
This chapter contains the following topics that describe how to install MessageQ software on Windows NT systems:
t Preparing to Install the MessageQ Software
t Installing the MessageQ Software on Windows NT systems
t Performing Postinstallation Tasks
Preparing to Install the MessageQ Software
Before you install MessageQ, there are several installation requirements you should perform to ensure that the installation runs smoothly and the software is installed correctly, as follows:1. Check the contents of the distribution kit.
2. Comply with the hardware, software, and disk space requirements. 3. Back up your system disk.
4. Choose the type of installation that is applicable for your system (typical, compact or custom).
Checking the Software Distribution Kit
Use the bill of materials (BOM) to check the contents of your software distribution kit. The kit contains the following:
1
I
NSTALLINGM
ESSAGEQ
Media
Your kit contains a CD-ROM for industry-standard CD readers, labeled MessageQ for Windows NT, Version 5.0. This CD-ROM contains both Digital Alpha© and Intel® versions.
Hardcopy and Online Documentation
Your kit contains the following hardcopy documentation:
t Installation and Configuration Guide for Windows NT
t Installation and Configuration Guide for UNIX
t Release Notes
The MessageQ for UNIX user documentation set contains the following online manuals:
t Introduction to Message Queuing
t Programmer’s Guide
t FML Programming Guide
t Reference Manual
t Installation and Configuration Guide for Windows NT
t Installation and Configuration Guide for UNIX
t MessageQ Client for Windows User’s Guide
t MessageQ Client for UNIX User’s Guide
t System Messages
As part of your software distribution kit, MessageQ provides this online
documentation in HTML format which you can read using any World Wide Web browser. For more information on how to access the online documentation, refer to the section on Using the Online User Documentation.
I
NSTALLINGTHEM
ESSAGEQ S
OFTWAREONW
INDOWSNT S
YSTEMSComplying with the Installation Prerequisites
Before you install MessageQ software you must have access to an account with Administrator privileges on the system where you are installing MessageQ. Also, your system must meet the hardware, software, and disk space requirements listed in this manual.
Backing up the System Disk
We recommend that you back up your system disk before installing any software. For details on performing a system disk backup, see your Windows NT system
documentation.
Installing the MessageQ Software on
Windows NT Systems
This topic describes the tasks for installing the MessageQ software on Windows NT systems, as follows:
t Choosing Installation Options
t Installing MessageQ on Systems Already Running MessageQ Software
t Installing MessageQ on Systems Not Running MessageQ Software
t Recovering from Installation Errors
The length of a MessageQ installation can vary, depending on the type of media from which you are installing and your system configuration. You can stop the installation procedure any time by clicking Exit or Cancel in the currently active dialog. When you interrupt the installation, files created up to that point are not deleted automatically; you must delete these files manually.
1
I
NSTALLINGM
ESSAGEQ
Choosing Which Subsets to Install
The MessageQ installation dialogue displays a list of options that let you choose the type of MessageQ installation for your system. If you choose an installation option and then decide you don’t want to install it, you can cancel your selection to redisplay the list of available options.
Table 1-1 describes the types of installations available and the subsets installed for each installation type.
Installing MessageQ on Systems Already Running
MessageQ
We recommend that you install Version 5.0 software in the default installation directory called C:\Program Files\BEA Systems\BEA MessageQ. If you have a Table 1-1 MessageQ Installation Options for Windows NT Systems
Installation Option Description
Typical Installs all of the program options. This installation is recommended for most users. The Typical option installs the following subsets:
t Server Files t Client Files
t Online Documentation
Compact Installs the minimum required options to run MessageQ. The Compact option installs the following subset:
t Client Files
Custom This installation lets you choose the exact MessageQ options you want installed on your system. You can choose from the following subsets:
t Server Files t Client Files
I
NSTALLINGTHEM
ESSAGEQ S
OFTWAREONW
INDOWSNT S
YSTEMSto install into the same directory, the previous version of the software will be completely overwritten. Regardless of the directory in which the product is installed, the icons for the Program Manager are overwritten to point to the new installation. If a previous version is installed, you will not be able to access it from the Program Manager using the icons.
Note: Before you can run your existing applications under MessageQ Version 5.0, you must convert your group configuration data to use the Version 5.0 format. Refer to the last section in this chapter entitled Performing Postinstallation Tasks for more information on how to convert existing group configuration data.
Installing MessageQ for Windows NT
The following procedure describes how to install MessageQ software for Windows NT.
Note: You can stop the installation procedure at any time by clicking Exit in the Installation Options dialog. You can also return to the previous dialog by clicking Back.
1. Log into the Administrator account.
2. Load the MessageQ distribution CD-ROM into the CD reader.
3. Open Windows Explorer or click on the My Computer icon and select the CD drive.
4. Double-click the applicable folder based on your system processor: WinNT for the Intel version and AlphaNT for the Alpha version.
5. Double-click setup.exe to start the installation.
6. Click Next after the SETUP utility displays the dialog box that welcomes you to the MessageQ software installation.
1
I
NSTALLINGM
ESSAGEQ
7. If you have BEA TUXEDO or BEA M3 installed on your system, select a BEA TUXEDO or BEA M3 version to install upon and click Next. You can also install MessageQ as a standalone product.
I
NSTALLINGTHEM
ESSAGEQ S
OFTWAREONW
INDOWSNT S
YSTEMS8. Choose the destination location and click Next. The default installation for MessageQ is C:\Program Files\BEA Systems\BEA MessageQ.
1
I
NSTALLINGM
ESSAGEQ
I
NSTALLINGTHEM
ESSAGEQ S
OFTWAREONW
INDOWSNT S
YSTEMS10. If you select a Custom installation, you are prompted to select the components you want to install and click Next. The Select Components box displays a description of the selected component and shows you information on space required and space available.
1
I
NSTALLINGM
ESSAGEQ
11. Choose the Program Folder name and click Next.
12. You are prompted to install the MessageQ license file. You can install the license at a later time, but you can not use MeessageQ until a valid license file has been installed. Click Yes to proceed with license installation.
I
NSTALLINGTHEM
ESSAGEQ S
OFTWAREONW
INDOWSNT S
YSTEMS13. Insert the BEA MessageQ License Diskette or browse to a location where the license file has been stored and click OK.
14. After the license file has been successfully installed and all files are transferred to your system, click Finish to complete the installation
1
I
NSTALLINGM
ESSAGEQ
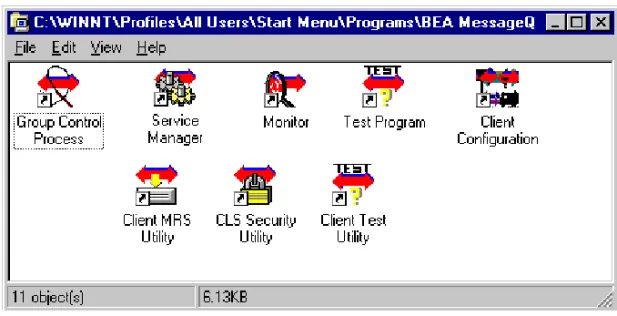
Figure 1-1 shows the MessageQ program group created after a Typical installation is complete.
Figure 1-1 MessageQ Program Group Server Icons
Table 1-2 describes the program group utility icons. Table 1-2 Utility Group Programs
MessageQ Icon Description
MessageQ Monitor Windows-based program that lets you monitor the messaging activity of the MessageQ message queuing buses and groups you have created.
MessageQ Group Control Process Program that creates a MessageQ for Windows NT message queuing group.
MessageQ Test Program Windows-based utility that enables you to test message exchanges between the queues you configured. See the Programmer’s Guide for more information.
MessageQ Loader Automatically loads the group configuration at group startup, and can be invoked manually to change certain group characteristics while a group is running.
I
NSTALLINGTHEM
ESSAGEQ S
OFTWAREONW
INDOWSNT S
YSTEMSThe CLS Security Utility, Client Configuration, Client MRS Utility, and Client Test Utility are all part of BEA MessageQ Client for Windows and are described in the BEA
MessageQ Client for Windows User’s Guide.
Recovering from Installation Errors
If errors occur during the MessageQ installation procedure for Windows NT, be sure you have met all of the system software and hardware requirements.
If the installation fails, SETUP displays a dialog indicating that the installation was not successful. Installation failures can occur if the following conditions exist:
t The operating system version is not supported by MessageQ software.
t TCP/IP networking software is not installed or configured.
t There is insufficient disk space on the target drive.
t The kit has missing or unreadable files.
If you encounter a problem while using MessageQ and you believe the error is caused by a problem with MessageQ, call BEA technical support. See Customer Support in the Preface for additional information.
Using the Online User Documentation
MessageQ includes online documentation in HTML format that can be read using a World Wide Web browser. To use the HTML-based online documentation, invoke a World Wide Web browser, and use the “Open File” option to open the following file:
MessageQ Service Manager Windows-based utility used to configure the message queuing groups that you would like to be automatically started and stopped by the MessageQ Service. Refer to the section entitled Starting the MessageQ Service for Windows NT for more information.
Table 1-2 Utility Group Programs
1
I
NSTALLINGM
ESSAGEQ
drive:\installation directory\doc\bmq\v5_0\index.htm Where:
Begin navigating the online documentation using the hyperlinks. Note that each category of information (introduction, administration, programming, etc.) in the online documentation set is accessible on the index.htm page. The first page in each book is the table of contents and the cover page. Hyperlinks can be used to navigate through the information contained within a single book. To view information in a different book, use the navigation bar at the top of the page or click on the BEA Systems logo to jump to the initial page to select another book.
For those sites with a corporate intranet, MessageQ documentation can be copied to a single node and linked into the corporate information base contained on an internal Web site. Copying the online documentation to an intranet server limits the use of disk space to a single system while making it accessible to everyone on the corporate intranet. After the documentation is copied to the corporate Intranet server, users must be given a URL to access the documentation or a description of the page from which the documentation can be accessed.
Performing Postinstallation Tasks
After completing the installation procedure, you can perform the required and optional postinstallation tasks. MessageQ does not require you to perform the postinstallation tasks in a particular order.
The postinstallation tasks are as follows:
drive: The letter of the drive (for example, C:, D:, or E:) where you installed MessageQ
\installation directory The directory where you installed MessageQ (for example: \BEA Systems\BEA MessageQ\)
Configure the network Required
P
ERFORMINGP
OSTINSTALLATIONT
ASKSConfiguring the Network
To configure MessageQ for Windows NT to communicate with remote systems, you must have configured TCP/IP networking and started the TCP/IP service. The remote systems that you intend to communicate with must have their names and Internet Protocol (IP) addresses entered in the \winnt\system32\drivers\etc\hosts file. Note that the local system must have an entry in this file as well, if MessageQ is to operate properly. Enter the local system name using uppercase letters.
It is important to note that the node names are case sensitive. Your Windows NT system name, which was defined when Windows NT was installed or when you used the Network applet in the Control Panel, is in uppercase. To use MessageQ for Windows NT to communicate with other networked systems by way of TCP/IP, we recommend that your TCP/IP host name be the same as your Windows NT system name, and should be defined in uppercase letters.
For example, if your Windows NT system is ANTARES, your TCP/IP host name, as defined in the Network applet and the \winnt\system32\drivers\etc\hosts file should also be defined as ANTARES. Your Windows NT system name is the name that will be presented to remote MessageQ systems when initiating connections.
Starting the MessageQ Service for Windows NT
MessageQ for Windows NT provides a service that starts buses and groups on demand. The MessageQ Service for Windows NT runs in the background when no one is logged on to the system. By default, the MessageQ Service for Windows NT is not started when it is installed.
To use the MessageQ Service, you must begin by using the MessageQ Service Manager to configure the message queuing groups that you would like to be automatically started and stopped by the MessageQ Service. You can run this utility
Add the MessageQ drive and directory to your Path Required
1
I
NSTALLINGM
ESSAGEQ
by double clicking the MessageQ Service Manager icon in the main MessageQ window. You must also define the environment variable BEADIR as the full path of the MessageQ installation directory.
To start the MessageQ service, select the Services applet in the Control Panel and choosing Start. When the service starts up, it will in turn start all message queuing groups configured for automatic startup. You can also change the default configuration of the MessageQ Service using the Services applet in the Control Panel to enable the MessageQ Service to start automatically when the system boots.
Adding the MessageQ Drive and Directory to Your Path
The MessageQ executable images must be located in the user’s default path to operate properly. Add the MessageQ drive and directory to your Path and define the BEADIR environment variable as follows:
1. Open the Control Panel. 2. Double-click the System icon.
3. In the System Properties window, click on the environment tab to edit the Path entry. If no path variable is present, create one by entering “Path” in the Variable field.
4. Click the Value text field and then press the End key, or use the right arrow key to scroll to the end of the field.
5. If the Value field is blank, enter the following at the end of the field: drive:\installation directory\bin
where:
drive: The letter of the drive (for example, C:, D:, or E:) where you installed MessageQ for Windows NT
\installation directory\bin
The directory path where you installed MessageQ for Windows NT. For example:
P
ERFORMINGP
OSTINSTALLATIONT
ASKSIf a path variable is present, do not delete it. Add a semicolon (;) to the end of the existing Path specification and then add the MessageQ Path variable as described above.
6. Click Set to set the drive and directory path.
7. If no BEADIR variable is present, create one by entering “BEADIR” in the Variable field.
8. Enter the full installation path for BEA MessageQ in the Value field, for example, C:\Program Files\BEA Systems\BEA MessageQ\.
9. Click OK to confirm the new settings. 10. Close the Control Panel.
11. Log out of the Windows NT system and then log back in to initialize the new Path and BEADIR environment variable..
Converting Your Group Initialization File to Version 5.0
MessageQ for Windows NT provides a conversion utility that lets you quickly convert your existing group configuration data so that it is compatible with the Version 5.0 software. This section describes how to use the conversion utility called dmqconvert. MessageQ for Windows NT, Version 5.0 no longer provides the Configuration Editor for configuring message queuing groups. This release now uses an initialization file to store all group configuration data making the Windows NT environment compatible with all other MessageQ Server environments. Due to this change, MessageQ configuration data is no longer stored in the NT Registry. When you convert your existing groups to Version 5.0, the MessageQ conversion utility copies the existing data from the NT Registry to the file that you specify using a common group initialization file format.
Note that the conversion utility does not update the group initialization file to include the new Version 5.0 sections and parameters. To update your initialization file to use new Version 5.0 features, refer to the information in this chapter, which describes all the sections and parameters in the group initialization file. Using a text editor, you can add to or change the existing initialization files to incorporate Version 5.0 parameters and their associated settings.
1
I
NSTALLINGM
ESSAGEQ
1. Open an MS-DOS command prompt window.
1. Change directory to the MessageQ installation directory, for example: cd \Program Files\BEA Systems\MessageQ
2. To convert your initialization file, enter the following command: dmqconvert -b x -g y -f myfile.init
Where:
x The Bus number of the group initialization file you want to convert
y The Group number of the group initialization file you want to convert
C
HAPTER2
Configuring MessageQ
This chapter contains the following topics that describe how to configure MessageQ message queuing buses using the Configuration Editor and message queuing groups by editing the group initialization file:
t Overview of MessageQ Configuration
t Starting the Configuration Editor
t Configuring a Message Queuing Bus
t Configuring a Message Queuing Group
Overview of MessageQ System
Configuration
Before applications can exchange information, you must configure the MessageQ environment by defining the default values and parameter settings for the following components:
t Message Queuing Bus
t Message Queuing Groups
t Message Queues
t Cross-group Connections
2
C
ONFIGURINGM
ESSAGEQ
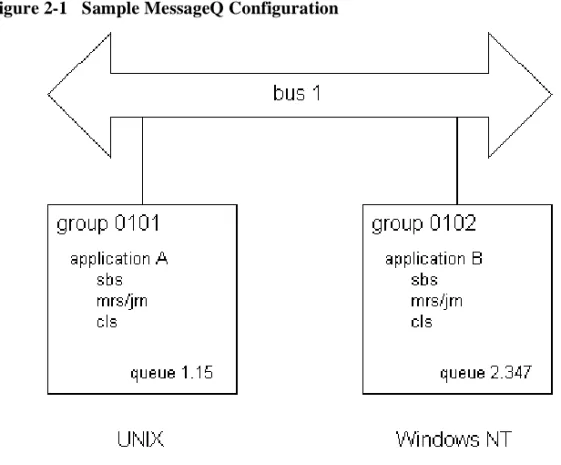
Figure 2-1 shows a sample MessageQ configuration. The configuration shows a message queuing bus that contains two message queuing groups, one on a Digital UNIX system and the other on a Windows NT system. Both groups are able to exchange messages using a cross-group connection. Each application is associated with at least one primary message queue and several server processes, such as MRS/JRN, SBS, and CLS.
Figure 2-1 Sample MessageQ Configuration
The following topics describe the standard components of a MessageQ configuration.
Message Queuing Bus
The MessageQ message queuing bus is the backbone of MessageQ because it forms the interprocess communication highway that applications use to send and receive messages. The message queuing bus is made up of one or more message queuing groups that are configured to communicate with each other.
O
VERVIEWOFM
ESSAGEQ S
YSTEMC
ONFIGURATIONMessage Queuing Groups
A MessageQ message queuing group is a collection of related processes that share system resources. A single group must reside on a single system; however, a single system can support multiple groups. Applications that manage common resources or have frequent or high-volume communications with each other should be placed in the same group.
A group connects related applications or components of the same application. Communication between groups on the same system and between applications running in different message queuing groups on different systems requires that a computer network be configured. (See the Configuring the Network topic in Chapter 1 for more information.)
Groups are labeled with a four-digit bus ID and a five-digit group ID. Groups with the same bus ID form a message queuing bus; only groups that share a bus ID can communicate. A Group Control Process automatically creates the resources required for a group using the values and settings in the group initialization file. All MessageQ processes are started by way of the Group Control Process.
Message Queues
A message queue provides an area for an application to store and retrieve messages. Message queues can be thought of as attachment points on the message queuing bus. Each message queue is identified by a unique queue number, which is part of the queue address. Message queues can be temporary or permanent.
If an application needs to use a queue for a short period of time, the queue should be configured as a temporary queue. However, if an application needs to use a queue for an extended period of time (for example, a financial application that tracks the buying and selling of particular stocks), then the queue should be configured as a permanent queue.
2
C
ONFIGURINGM
ESSAGEQ
A message queue is configured by the application developer and is managed by MessageQ. MessageQ supports three types of message queues: primary, secondary, and multireader. Table 2-1 describes these message queues.
Primary and secondary queues can be permanent or always writable. A queue that is always writable can store messages when there are no receiver programs attached. A permanent queue cannot store messages unless a receiver program is attached to it. Multireader queues are always writable, and temporary queues are only active when a receiver program is attached.
Applications must be associated with at least one message queue to receive MessageQ messages. For example, a system designer may designate queue 3 in group number 1 to receive temperature readings from a semiconductor furnace. After the bus, group, and queue address have been defined, the sender application must know the queue address to direct messages containing temperature readings. The receiver application must know the queue address from which to read messages about temperature changes in the furnace.
Applications also can send and receive messages from message queues in one or more message queuing groups. The application designer decides how to distribute
messaging based on the requirements of the application. Table 2-1 Types of Message Queues
Queue Type Description
Primary Serves as the main mailbox for a MessageQ application. An application is limited to one primary queue, although it may be associated with multiple secondary or multireader queues. When an application reads a message from a primary queue, the message is removed from the queue. Messages are read in first-in/first-out (FIFO) order, unless another order is specified. Secondary Serves as an alternate mailbox for an application to receive messages Multireader Serves as a central mailbox for multiple applications. This lets more than
one application simultaneously attach to and read messages from the same queue.
O
VERVIEWOFM
ESSAGEQ S
YSTEMC
ONFIGURATIONUsing Naming
Naming is a MessageQ capability that enables applications to refer to queues by name instead of using their physical address in the MessageQ configuration. Using names separates applications from the specifics of the network environment and enables system managers to make configuration changes without requiring developers to change the applications. Developers use the pams_locate_q function to locate the queue address for a queue name at runtime. Currently, the MessageQ naming capability applies only to queue names. There is no ability to assign a name to other MessageQ entities such as groups or buses.
Names can be defined to have a local or global scope. Local names are visible only to applications running in a particular group. Global names are available for use by any application attached to the message queuing bus.
Also, names can be defined using a static or dynamic approach. Static definition means that the definition of the name-to-queue translation is provided in the Global Name Table (%GNT) section (see Defining Name-to-Queue Translations in the Group Name Section for more information) of the MessageQ configuration file for the group. Dynamic definition means that an application has created a name-to-queue translation using the pams_bind_q function and that MessageQ must look up the definition that has been created.
The MessageQ process that supports the naming capability is called the Naming Agent. The Naming Agent is responsible for creating entries in the name space that were created by static or dynamic definitions. In addition, the Naming Agent provides the look up capability for name-to-queue translations that are made dynamically at runtime.
When you configure a group, you must decide the message queuing group in which the Naming Agent will run. You can also define a backup Naming Agent group in the event that the first group becomes unavailable. This definition is set in the %NAM section (see “Defining the Naming Agent Process in the Name Section” for more information) of the group initialization file. The group that is assigned to run the Naming Agent starts the Naming Agent process at group startup.
2
C
ONFIGURINGM
ESSAGEQ
Cross-Group Connections
Communication between groups requires the use of a network protocol. MessageQ for Windows NT supports TCP/IP as a network protocol.
There are two types of cross-group connections: direct and indirect. Groups that share a physical network connection can be configured directly in the %XGROUP section of the group initialization file. Groups that do not share a physical network connection can be configured indirectly in the %ROUTE section of the group initialization file. See Enabling Network Connections in the Cross-Group Section and Defining the Message Routing Database in the Route Section for instructions on how to configure direct and indirect cross-group connections.
You can also specify timeout intervals for testing cross-group connections. For more information, see the “Defining Timeout Intervals for Link Drivers” topic.
Server Processes
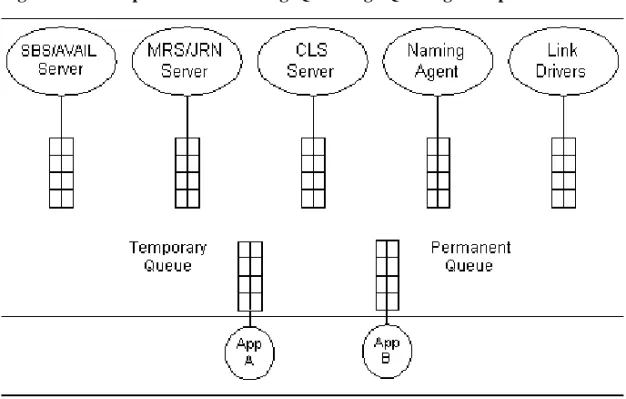
MessageQ for Windows NT provides several server processes that provide key features of MessageQ, such as recoverable messaging, message broadcasting, cross-group communication, and message queuing support for MessageQ Clients. Figure 2-2 shows the server processes and other components of a MessageQ message queuing group.
O
VERVIEWOFM
ESSAGEQ S
YSTEMC
ONFIGURATIONFigure 2-2 Components of a MessageQ Message Queuing Group
The server processes can be enabled by setting values in the %PROFILE section of the group initialization file. Table 2-2 describes the server processes that are available to MessageQ for Windows NT.
Table 2-2 MessageQ Server Processes
Server Process Description
Selective Broadcasting Services (SBS) Server
Controls the broadcasting of data between an application and multiple receiving applications. In addition, the SBS server provides AVAIL/UNAVAIL message-based services.
Message Recovery Services (MRS)/Journal (JRN) Server
Manages the disk storage required to handle recoverable message traffic. The MessageQ message recovery system guarantees message delivery if the system, network, or application fails. Messages designated as recoverable are directed to an MRS server for storage and removed from storage when delivery is confirmed by a user or another MRS server. This server also controls journal management functions such as the handling, opening, closing, and dumping of all journal files.
2
C
ONFIGURINGM
ESSAGEQ
Configuring a Message Queuing Group
MessageQ for Windows NT Version 5.0 requires users to configure groups by editing a group initialization file using a text editor. This approach is now used by all MessageQ server implementations and makes group configuration data portable among all MessageQ server platforms.
Note: The Configuration Editor utility that previously shipped with the MessageQ for Windows NT product is now obsolete. In Version 5.0 configuration data is no longer stored in the NT Registry. Instead it is maintained in a group initialization file for each message queuing group. If you have existing configuration data that was created using the Configuration Editor utility, you need to convert the data to a MessageQ Version 5.0 group initialization file. Refer to the last section of Chapter 1 entitled Performing Postinstallation Tasks for information on how to use the MessageQ conversion utility. To create a group initialization file for each group that you need to configure, make a copy of the template file called group.init and copy it to the working directory for the group. The working directory is the directory in which your application or applications are designed to execute. You can use the standard settings in the template file as the configuration data for your group, or you can change them as described in this section. You may want to add comments on your specific configuration. Use the exclamation, pound sign, semicolon, or asterisk characters (!, #, ;, or *) to as comment characters.
When you run the dmqstartup procedure, MessageQ uses the settings contained in the group initialization file to set the characteristics of the group it creates. The group.init template can be found in the following location:
Program Files\BEA Systems\BEA MessageQ\TEMPLATES\group.init Client Library Server (CLS) Provides full message queuing support for applications
running in a MessageQ Client environment Table 2-2 MessageQ Server Processes
C
ONFIGURINGAM
ESSAGEQ
UEUINGG
ROUPTable 2-3 gives an overview of the sections of the group initialization file. Table 2-3 Sections of the Group Initialization File
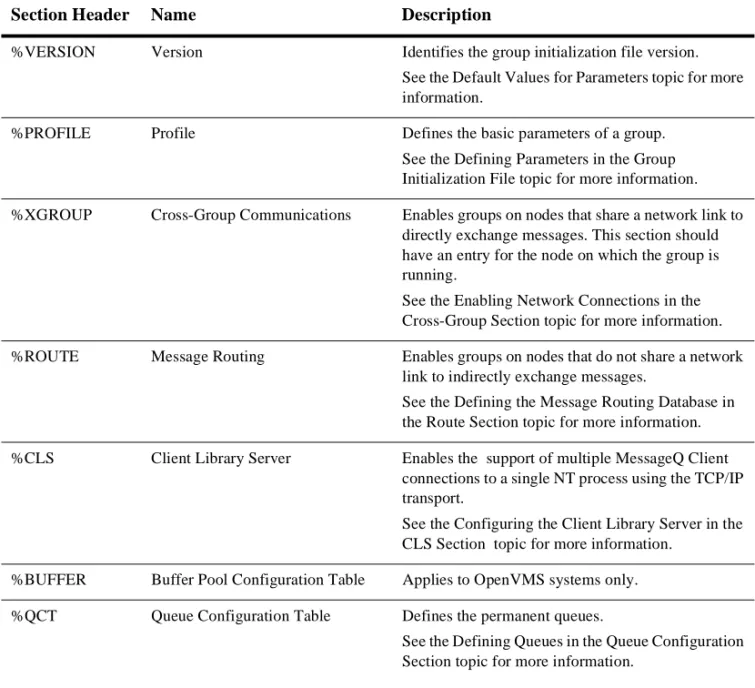
Section Header Name Description
%VERSION Version Identifies the group initialization file version. See the Default Values for Parameters topic for more information.
%PROFILE Profile Defines the basic parameters of a group. See the Defining Parameters in the Group Initialization File topic for more information. %XGROUP Cross-Group Communications Enables groups on nodes that share a network link to
directly exchange messages. This section should have an entry for the node on which the group is running.
See the Enabling Network Connections in the Cross-Group Section topic for more information. %ROUTE Message Routing Enables groups on nodes that do not share a network
link to indirectly exchange messages.
See the Defining the Message Routing Database in the Route Section topic for more information. %CLS Client Library Server Enables the support of multiple MessageQ Client
connections to a single NT process using the TCP/IP transport.
See the Configuring the Client Library Server in the CLS Section topic for more information.
%BUFFER Buffer Pool Configuration Table Applies to OpenVMS systems only. %QCT Queue Configuration Table Defines the permanent queues.
See the Defining Queues in the Queue Configuration Section topic for more information.
2
C
ONFIGURINGM
ESSAGEQ
Defining Parameters in the Group
Initialization File
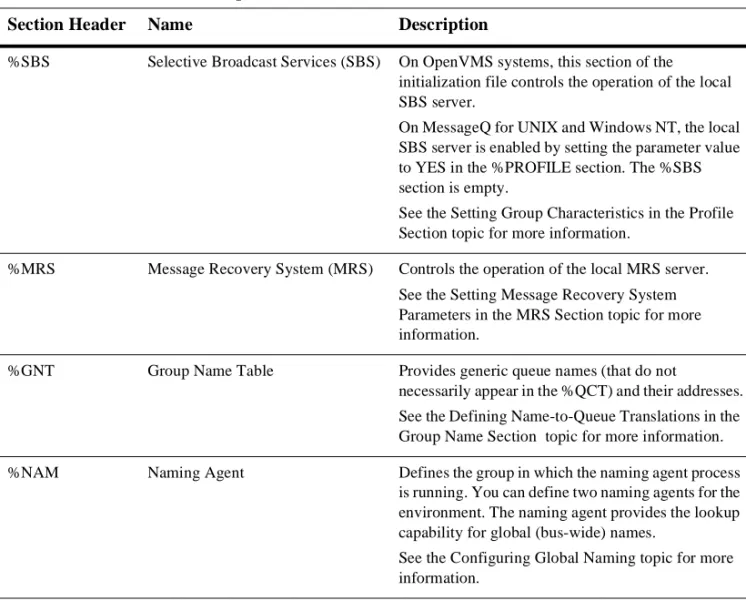
The MessageQ group initialization file is a ASCII text file that can be created and modified using any text editor. You define parameters in the group initialization file by providing numeric values within a specified range or enabling settings to be YES %SBS Selective Broadcast Services (SBS) On OpenVMS systems, this section of the
initialization file controls the operation of the local SBS server.
On MessageQ for UNIX and Windows NT, the local SBS server is enabled by setting the parameter value to YES in the %PROFILE section. The %SBS section is empty.
See the Setting Group Characteristics in the Profile Section topic for more information.
%MRS Message Recovery System (MRS) Controls the operation of the local MRS server. See the Setting Message Recovery System Parameters in the MRS Section topic for more information.
%GNT Group Name Table Provides generic queue names (that do not
necessarily appear in the %QCT) and their addresses. See the Defining Name-to-Queue Translations in the Group Name Section topic for more information. %NAM Naming Agent Defines the group in which the naming agent process
is running. You can define two naming agents for the environment. The naming agent provides the lookup capability for global (bus-wide) names.
See the Configuring Global Naming topic for more information.
Table 2-3 Sections of the Group Initialization File
D
EFININGP
ARAMETERSINTHEG
ROUPI
NITIALIZATIONF
ILEor NO. To create a group initialization file for each message queuing group, make a copy of the template file, copy it to the group working directory and edit the copy. Do not edit the sample template file that is distributed with the MessageQ kit.
MessageQ also lets you modify a subset of parameters in the group initialization file at runtime. You can use the MessageQ Loader utility to dynamically reload the group initialization file without having to stop and restart MessageQ. Refer to the section Changing Group Characteristics at Runtime in Chapter 3 for a list of the parameters that you can change for a running group. Several of the modifiable parameters can only be changed if certain conditions exist. These conditions are noted in the parameter description.
Note that Windows NT services cannot access mapped drives when using the default System Account. To allow access to mapped drives, modify the service entry using the Control Panel Services applet to specify "This Account" and a "Password". The account and password must have privileges on the mapped drive.
The following topics describe the parameters, values, and settings in the group initialization file.
Default Values for Parameters
The group.init file template file contains most of the common parameters that you will need to configure. The following sections of this guide describe all available parameters that you can set using this file. The default values for all parameters are set at group startup, regardless of whether the parameter appears in the group initialization file. If a parameter is not specified, or is specified as a "." or -1, then the paramater takes on the default value.
Some sections of the sample group.init file are commented out because they are not used by default. To use these sections, you must uncomment these lines and set the values as appropriate for your environment.
Identifying the Group Initialization File Version
The %VERSION (file version) section consists of a single line that identifies the group initialization file version. (Note that this is the initialization file version, and is not equivalent to the product version number.) MessageQ for NT systems accepts group
2
C
ONFIGURINGM
ESSAGEQ
initialization files with version number 4.0 only. MessageQ uses the version number to be able to correctly parse configuration information for the message queuing group at startup.
Listing 2-1 shows a sample %VERSION section.
Listing 2-1 Sample %VERSION Section
%VERSION 4.0
Setting Group Characteristics in the Profile Section
The %PROFILE section configures the primary characteristics (default values and parameter settings) of a group. This section is also enables MessageQ Server processes such as MRS/JRN and SBS. Each server process is dedicated to a specific task or set of tasks.
You can start the following server processes by indicating “YES” for each server entry in the %PROFILE section:
t MRS Server—Enables recoverable messaging.and journaling services for postconfirmation and dead letter journals.
t SBS Server—Enables message broadcasting and AVAIL/UNAVAIL notification. Listing 2-2 shows a sample %PROFILE section:
Listing 2-2 Sample %PROFILE Section
%PROFILE !
ACCEPT_KILL_COMMAND...YES...! accept kill commands from DMQ monitor ENABLE_XGROUP NO ! allow cross-group communications XGROUP_VERIFY NO ! do not verify cross group links
D
EFININGP
ARAMETERSINTHEG
ROUPI
NITIALIZATIONF
ILEXGROUP_TABLE_SIZE 20 ! size of the group link table
GROUP_BYTE_QUOTA 8388608 ! maximum number of bytes on all queues
GROUP_MAX_MESSAGE_SIZE 32000 ! largest message size permitted in this group ATTACH_TMO 600 ! timeout in seconds for locates
ENABLE_MRS NO ! start recoverable messaging servers ENABLE_JRN YES ! enable PCJ journaling when MRS is enabled ENABLE_SBS YES ! start selective broadcast and AVAIL/UNAVAIL
DEFAULT_NAMESPACE_PATH /u/mydir ! default namespace path for naming agent
%EOS
Table 2-4 describes the parameters of the %PROFILE section. Table 2-4 Profile Parameters
Parameter Range Default Description
ACCEPT_KILL_COMMAND YES NO
YES Controls group control process termination requests from the MessageQ Monitor utility. A NO setting means that any message requests to shut down group control processes are ignored.
Note: This parameter can be modified at
runtime.
ENABLE_XGROUP YES
NO
NO Enables MessageQ TCP/IP network access. A YES setting causes the appropriate link drivers to start up, to perform cross-group
communications.
XGROUP_VERIFY YES
NO
NO Verifies incoming TCP/IP connections. A YES setting causes all connections to be validated against the cross-group connection table, much like an Access Control List (ACL).
2
C
ONFIGURINGM
ESSAGEQ
FIRST_TEMP_QUEUE 101– 3950
200 Selects the starting number of the pool of temporary queue pool. This defines the size of the permanent and temporary queue pools for a group.
XGROUP_TABLE_SIZE 1– 32,000
20 Selects maximum number of group entries. This parameter defines the maximum number of group entries that MessageQ tracks, and does not affect the maximum group address. GROUP_BYTE_QUOTA 1,048,576–
Unlimited
8,388,608 Sets the maximum number of message bytes on queues in memory. This includes user queues and all internal queues (such as recoverable messages that have not been written to a journal yet). The primary purpose of this parameter is to prevent the group server from becoming excessively large.
Note: Although the range for this parameter is
unlimited, you should not specify a value that is more than 30% of the virtual memory configured for the system.
GROUP_MAX_USER_QUEUE 101-3999 999 Sets the highest user queue number
GROUP_MAX_MESSAGE_SIZE 1-4194304 32,000 Specifies the largest message size permitted in this group
ATTACH_TMO >0 600 Selects the maximum elapsed time that an attach queue operation can take before a status of PAMS_TIMEOUT is returned to the caller. This number is in units of seconds.
Note: This parameter can be modified at
runtime.
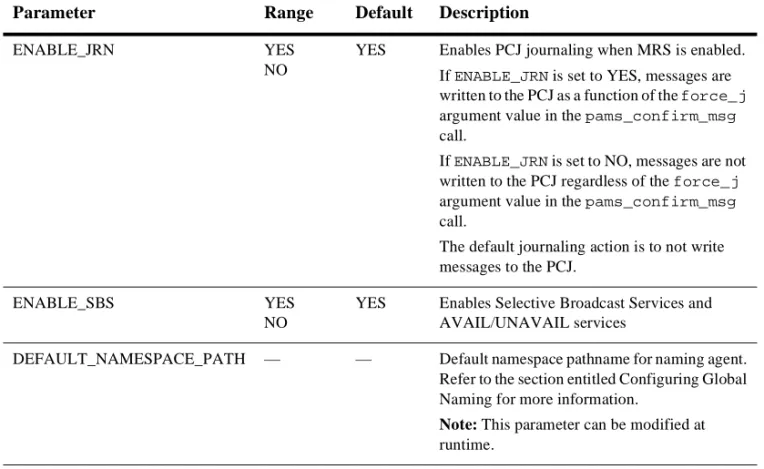
ENABLE_MRS YES
NO
NO Enables Message Recovery Services Table 2-4 Profile Parameters
D
EFININGP
ARAMETERSINTHEG
ROUPI
NITIALIZATIONF
ILEIf the group you have defined will use resources such as message recovery services, CLS, group connections, permanent queues, or name-to-queue translations, you must define them next.
Setting Message Recovery System Parameters in the
MRS Section
The %MRS section lets you enable MessageQ Message Recovery Services (MRS), which provide a mechanism for guaranteed message delivery by storing messages on disk and automatically attempting redelivery until the message is received by the target system. On MessageQ for NT systems, message recovery is provided by the dmqjourn journal process.
ENABLE_JRN YES
NO
YES Enables PCJ journaling when MRS is enabled. If ENABLE_JRN is set to YES, messages are written to the PCJ as a function of the force_j argument value in the pams_confirm_msg call.
If ENABLE_JRN is set to NO, messages are not written to the PCJ regardless of the force_j argument value in the pams_confirm_msg call.
The default journaling action is to not write messages to the PCJ.
ENABLE_SBS YES
NO
YES Enables Selective Broadcast Services and AVAIL/UNAVAIL services
DEFAULT_NAMESPACE_PATH — — Default namespace pathname for naming agent. Refer to the section entitled Configuring Global Naming for more information.
Note: This parameter can be modified at
runtime. Table 2-4 Profile Parameters
2
C
ONFIGURINGM
ESSAGEQ
The MessageQ startup procedure starts up the MRS Server only if the ENABLE_MRS parameter is set to YES in the Profile section. In addition, setting the ENABLE_JRN parameter in the Profile section to YES enables message recovery services to log messages to the auxiliary journals called the postconfirmation journal and the dead letter journal. For a complete description of MRS, refer to the Programmer’s Guide. MessageQ provides the following types of recovery journals:
When configuring the path for journal files on Windows NT systems, note that Windows NT services cannot access mapped drives when using the default System Account. Modify the service entry using the Control Panel Services applet to specify "This Account" and a "Password". The account and password must have privileges on the mapped drive.
Listing 2-3 shows a sample %MRS section and Table 2-5 describes the parameters of the %MRS section.
Listing 2-3 Sample %MRS Section
%MRS
Journal Type Description
Store and Forward (SAF) Used to store recoverable messages targeted at a remote group on the local system. Messages are automatically re-sent after communication with the target group is restored.
Destination Queue File (DQF) Used to store recoverable messages targeted at the local group on the local system. Messages are automatically re-sent when the queue becomes active.
Postconfirmation Journal (PCJ) Used to store successfully confirmed recoverable messages. The PCJ forms an audit trial of message exchange that can be read or printed. The default journaling action is to not write messages to the PCJ. Dead Letter Journal (DLJ) Used to store messages that could not be stored for
automatic recovery by MRS. Undelivered DLJ messages can be re-sent under user or application control.
D
EFININGP
ARAMETERSINTHEG
ROUPI
NITIALIZATIONF
ILECACHE_PERCENTAGE 90 ! %rcv msg quota for MRS msgs MRS_JOURNAL_PATH C:\my\rj_path ! recovery journal path
MRS_POST_CONFIRMATION_PATH C:\my\pcj_path ! post confirmation journal path MRS_DEAD_LETTER_PATH C:\my\dlj_path ! dead-letter journal path
MAX_CACHE_BYTES 4194304 ! maximum number of unwritten bytes %EOS
Table 2-5 %MRS Parameters
Parameter Range Default Description
MRS_JOURNAL_PATH — — If a recoverable message cannot be delivered to the target application, the journal process writes it to the recoverable journal file. Journal files are dynamically created and deleted as needed by the journal process. The size of the journal file is fixed. The journal process creates a new journal file each time the current file fills up and attempts to empty journal files by periodically attempting to reach the corresponding remote queue.
2
C
ONFIGURINGM
ESSAGEQ
CACHE_PERCENTAGE 1 –
100
50 Specifies the maximum number of recoverable messages that can appear in a queue at one time. We recommend that you always set this parameter to under 100. This parameter operates as follows:
t When a message queue is attached,
enough recoverable messages are delivered to match this limit.
t When the limit is reached, no more
recoverable messages are delivered until enough recoverable messages are dequeued by the target to drop below the set limit.
t While recoverable message delivery is
stopped due to the limit, new recoverable messages are written to the DQF file to be delivered in order of receipt. Non-recoverable messages are delivered as usual.
MRS_POST_CONFIRMATION_PATH — — Recoverable messages that successfully reach the delivery interest point can be written to the postconfirmation journal of the target group. If no path is specified, this parameter defaults to the same setting as MRS_JOURNAL_PATH.
MRS_DEAD_LETTER_PATH — — Recoverable messages that cannot be stored by the message recovery system are written to the dead letter journal of the sender program’s group. The DLJ file provides a backup mechanism for recovering messages that could not be stored for automatic recovery. If no path is specified, this parameter defaults to the same setting as MRS_JOURNAL_PATH. Table 2-5 %MRS Parameters
D
EFININGP
ARAMETERSINTHEG
ROUPI
NITIALIZATIONF
ILEConfiguring the Client Library Server in the CLS Section
The %CLS section lets you configure the MessageQ Client Library Server. The CLS provides MessageQ applications running on a supported MessageQ client system with access to message queuing. Applications can communicate with other distributed applications anywhere in the MessageQ network using a single connection to a CLS process connected to the bus. For detailed information about the CLS, refer to the
MessageQ Client for Windows NT User’s Guide.
Listing 2-4 shows a sample %CLS section.
Listing 2-4 Sample %CLS Section
%CLS !
! Max Security ! Endpoint Transport Clients File
! 12345 TCPIP 25 C:\my\dmqclsec.txt ! 64365 TCPIP 50
%EOS
MAX_CACHE_BYTES 1,048,576– Unlimited
4,194,304 Sets the maximum number of bytes that have not yet been written to disk. A large value improves the performance of recoverable messaging, particularly for PCJ and SAF journals. There is no maximum value for this parameter.
Note: Although the range for this
parameter is unlimited, you should not specify a value that is more than 30% of the virtual memory configured for the system.
Table 2-5 %MRS Parameters
2
C
ONFIGURINGM
ESSAGEQ
Table 2-6 describes the parameters of the %CLS section: Table 2-6 %CLS Parameters
Parameter Range Default Description ENDPOINT TCP/IP:
1024 – 65535
— Identifies the TCP/IP port number that the server uses to accept incoming connections. The same endpoint is used in the configuration of MessageQ Clients to locate the CLS.
For TCP/IP transport, port numbers less than 1024 are reserved. There is no restriction on the use of port numbers within the available range by CLS. However, you should select port numbers that do not conflict with port numbers used by MessageQ TCP/IP Link Drivers or other TCP/IP-based applications on your system.
TRANSPORT TCPIP — The name of the network protocol stack to be used for the server. For MessageQ for NT systems, this value is TCPIP. MAX CLIENTS 1 –
512
32 The maximum number of clients the server will serve at any given time. This parameter applies to OpenVMS systems only.
Note: This parameter can be modified at runtime, but the CLS
must be stopped.
SECURITY FILE — — The full pathname of the security file. If no security file is specified, security is not enabled. The MessageQ kit provides a template file called dmqclsec.txt. To configure security, copy this file to your group working directory and modify it as appropriate for your environment. For more information about the CLS security file, see the Restricting Remote Access to CLS topic in Chapter 3.
Note: This parameter can be modified at runtime, but no process
D
EFININGP
ARAMETERSINTHEG
ROUPI
NITIALIZATIONF
ILEEnabling Network Connections in the Cross-Group
Section
To enable message queuing between different systems in a network, you must create MessageQ message queuing groups on each system and establish cross-group connections between them. Messages can be exchanged between groups using two methods:
Your configuration will probably use both methods, so it is important to understand that if a group is defined in the %XGROUP section, it cannot be designated as a target group in the %ROUTE section (as described in the Defining the Message Routing Database in the Route Section topic). It can, however, be designated as a route-through group.
The %XGROUP section lets you define cross-group communication connections among groups that share a physical network link. Each line in the %XGROUP section defines a single cross-group connection, which creates two new link drivers for each unique group number. The %XGROUP section provides the link drivers with the information needed to connect to other MessageQ message queuing groups through TCP/IP networks.
t All parameters for a given connection must appear on the same line.
t You must provide an entry for the local (current) group.
t Changing the node/host name in the group.init file then running the Loader utility results in an additional entry at the front of the %XGROUP table rather than a replacement entry. In this case, there is link configuration information in the running group that does not match the group.init file and that is also not accessible from any monitor display.
To Exchange Messages...
Between... Use...
Directly Groups that share a physical network link
Cross-group connections (%XGROUP section) Indirectly Groups that do not share a physical
network link
Message routing (%ROUTE section)
2
C
ONFIGURINGM
ESSAGEQ
Listing 2-5 Sample %XGROUP Section
%XGROUP !
!Group Group Node/ Init Thresh- Buffer Recon- Window Trans- End- !Name Number Host old Pool nect Delay Size port point
GROUP1 1 delius Y 2000000 . 30 10 25000 TCPIP 10001 GROUP2 2 bizet N 4000000 . 30 10 25000 TCPIP 10002 GROUP3 3 bartok N 8000000 . 30 10 25000 TCPIP 10003 GROUP4 4 boehm N 4000000 . 30 10 250 TCPIP 10004 GROUP4 4 rameau N 4000000 . 30 10 250 TCPIP 10004
%EOS
Table 2-7 describes the parameters of the %XGROUP section. Table 2-7 %XGROUP Parameters
Parameter Range Default Description
GROUP NAME — — Name by which the remote MessageQ group is known to the local group
GROUP NUMBER 1-32000 — MessageQ Group Number of the remote group
NODE/HOST — — Name by which the remote node is known to the local node
INITIATE Y
N
D (Disable)
— Logical value indicating whether connections to this node should be initiated or disabled.
Y — The Group Control Process initiates a connection to the node.
N — The Group Link Table and Group Link Vector Table entries are built for the node; however, a connection is not initiated.