Juniper Networks, Inc.
1194 North Mathilda Avenue Sunnyvale, CA 94089 USA408-745-2000
www.juniper.net
Odyssey Access Client for Windows
User Guide
Enterprise Edition
FIPS Edition
Release 5.3
February 2011
1988, 1989, 1991, 1992, 1993, 1994. The Regents of the University of California. All rights reserved.
GateD software copyright © 1995, the Regents of the University. All rights reserved. Gate Daemon was originated and developed through release 3.0 by Cornell University and its collaborators. Gated is based on Kirton's EGP, UC Berkeley's routing daemon (routed), and DCN's HELLO routing protocol. Development of Gated has been supported in part by the National Science Foundation. Portions of the GateD software copyright © 1988, Regents of the University of California. All rights reserved. Portions of the GateD software copyright © 1991, D. L. S. Associates.
This product includes software developed by Maker Communications, Inc., copyright © 1996, 1997, Maker Communications, Inc.
Products made or sold by Juniper Networks or components thereof might be covered by one or more of the following patents that are owned by or licensed to Juniper Networks: U.S. Patent Nos. 5,473,599, 5,905,725, 5,909,440, 6,192,051, 6,333,650, 6,359,479, 6,406,312, 6,429,706, 6,459,579, 6,493,347, 6,538,518, 6,538,899, 6,552,918, 6,567,902, 6,578,186, and 6,590,785.
Juniper Networks, the Juniper Networks logo, NetScreen, and ScreenOS are registered trademarks of Juniper Networks, Inc. in the United States and other countries. JUNOS and JUNOSe are trademarks of Juniper Networks, Inc. All other trademarks, service marks, registered trademarks, or registered service marks are the property of their respective owners.
Copyright © 2011 Juniper Networks, Inc. All rights reserved. Printed in the USA.
FCC Statement
The following information is for FCC compliance of Class A devices: This equipment has been tested and found to comply with the limits for Class A digital device, pursuant to part 15 of the FCC rules. These limits are designed to provide reasonable protection against harmful interference when the equipment is operated in a commercial environment. The equipment generates, uses, and can radiate radio-frequency energy and, if not installed and used in accordance with the instruction manual, may cause harmful interference to radio communications. Operation of this equipment in a residential area is likely to cause harmful interference, in which case users will be required to correct the interference at their own expense.
The following information is for FCC compliance of Class B devices: The equipment described in this manual generates and may radiate radio-frequency energy. If it is not installed in accordance with the instruction manual, it may cause interference with radio and television reception. This equipment has been tested and found to comply with the limits for a Class B digital device in accordance with the specifications in part 15 of the FCC rules. These specifications are designed to provide reasonable protection against such interference in a residential installation. However, there is no guarantee that interference will not occur in a particular installation.
If this equipment does cause harmful interference to radio or television reception, which can be determined by turning the equipment off and on, the user is encouraged to try to correct the interference by one or more of the following measures:
Reorient or relocate the receiving antenna.
Increase the separation between the equipment and receiver.
Consult the dealer or an experienced radio/TV technician for help.
Connect the equipment to an outlet on a circuit different from that to which the receiver is connected.
Caution: Changes or modifications to this product could void the user's warranty and authority to operate this device and may result in the equipment no longer complying with FCC requirements for Class A or Class B digital devices. In that event, your right to use the equipment may be limited by FCC regulations, and you may be required to correct any interference to radio or television communications at your own expense.
U.S. Government Rights
Commercial software and commercial software documentation: This documentation is commercial computer software documentation and the products (whether hardware or software) covered by this documentation are or contain commercial computer software. Government users are subject to the Juniper Networks, Inc. standard end user license agreement and any applicable provisions of the FAR and its supplements. No further rights are granted. Products (whether hardware or software) covered by, and information contained in, this documentation are controlled by U.S. Export Control laws and may be subject to the export or import laws in other countries. Nuclear, missile, chemical, biological weapons end uses or end users, whether direct or indirect, are strictly prohibited. Export or re-export to countries subject to U.S. embargo or to entities identified on US export exclusion lists, including, but not limited to, the denied persons and specially designated national lists, is strictly prohibited.
Disclaimer
THE SPECIFICATIONS AND INFORMATION REGARDING THE PRODUCTS IN THIS MANUAL ARE SUBJECT TO CHANGE WITHOUT NOTICE. ALL STATEMENTS, INFORMATION AND RECOMMENDATIONS IN THIS MANUAL ARE BELIEVED TO BE ACCURATE BUT ARE PRESENTED WITHOUT WARRANTY OF ANY KIND, EXPRESS OR IMPLIED.
THE SOFTWARE LICENSE AND LIMITED WARRANTY FOR THE ACCOMPANYING PRODUCT ARE SET FORTH IN THE INFORMATION PACKET THAT SHIPPED WITH THE PRODUCT AND ARE INCORPORATED HEREIN BY REFERENCE. IF YOU ARE UNABLE TO LOCATE THE SOFTWARE LICENSE OR LIMITED WARRANTY, CONTACT YOUR JUNIPER NETWORKS REPRESENTATIVE FOR A COPY.
End User License Agreement
READ THIS END USER LICENSE AGREEMENT ("AGREEMENT") BEFORE DOWNLOADING, INSTALLING, OR USING THE SOFTWARE. BY DOWNLOADING, INSTALLING, OR USING THE SOFTWARE OR OTHERWISE EXPRESSING YOUR AGREEMENT TO THE TERMS CONTAINED HEREIN, YOU (AS CUSTOMER OR IF YOU ARE NOT THE CUSTOMER, AS A REPRESENTATIVE/AGENT AUTHORIZED TO BIND THE CUSTOMER) CONSENT TO BE BOUND BY THIS AGREEMENT. IF YOU DO NOT OR CANNOT AGREE TO THE TERMS CONTAINED HEREIN, THEN (A) DO NOT DOWNLOAD, INSTALL, OR USE THE SOFTWARE, AND (B) YOU MAY CONTACT JUNIPER NETWORKS REGARDING LICENSE TERMS.
1. The Parties. The parties to this Agreement are Juniper Networks, Inc. and its subsidiaries (collectively "Juniper"), and the person or organization that originally purchased from Juniper or an authorized Juniper reseller the applicable Iicense(s) for use of the Software (“Customer”) (collectively, the “Parties”).
2. The Software. In this Agreement, "Software" means the program modules and features of the Juniper or Juniper-supplied software, and updates and releases of such software, for which Customer has paid the applicable license or support fees to Juniper or an authorized Juniper reseller. "Embedded Software" means Software which Juniper has embedded in the Juniper equipment.
3. License Grant. Subject to payment of the applicable fees and the limitations and restrictions set forth herein, Juniper grants to Customer a non-exclusive and non-transferable license, without right to sublicense, to use the Software, in executable form only, subject to the following use restrictions:
a. Customer shall use the Embedded Software solely as embedded in, and for execution on, Juniper equipment originally purchased by Customer from Juniper or an authorized Juniper reseller.
b. Customer shall use the Software on a single hardware chassis having a single processing unit, or as many chassis or processing units for which Customer has paid the applicable license fees; provided, however, with respect to the Steel-Belted Radius or Odyssey Access Client software only, Customer shall use such Software on a single computer containing a single physical random access memory space and containing any number of processors. Use of the Steel-Belted Radius software on multiple computers requires multiple licenses, regardless of whether such computers are physically contained on a single chassis.
c. Product purchase documents, paper or electronic user documentation, and/or the particular licenses purchased by Customer may specify limits to Customer's use of the Software. Such limits may restrict use to a maximum number of seats, registered endpoints, concurrent users, sessions, calls, connections, subscribers, clusters, nodes, realms, devices, links, ports or transactions, or require the purchase of separate licenses to use particular features, functionalities, services, applications, operations, or capabilities, or provide throughput, performance, configuration, bandwidth, interface, processing, temporal, or geographical limits. In addition, such limits may restrict the use of the Software to managing certain kinds of networks or require the Software to be used only in conjunction with other specific Software. Customer's use of the Software shall be subject to all such limitations and purchase of all applicable licenses.
d. For any trial copy of the Software, Customer's right to use the Software expires 30 days after download, installation or use of the Software. Customer may operate the Software after the 3D-day trial period only if Customer pays for a license to do so. Customer may not extend or create an additional trial period by re-installing the Software after the 3D-day trial period.
4. Use Prohibitions. Notwithstanding the foregoing, the license provided herein does not permit the Customer to, and Customer agrees not to and shall not: (a) modify, unbundle, reverse engineer, or create derivative works based on the Software; (b) make unauthorized copies of the Software (except as necessary for backup purposes); (c) rent, sell, transfer, or grant any rights in and to any copy of the Software, in any form, to any third party; (d) remove any proprietary notices, labels, or marks on or in any copy of the Software or any product in which the Software is embedded; (e) distribute any copy of the Software to any third party, including as may be embedded in Juniper equipment sold in the secondhand market; (f)use any 'locked' or key-restricted feature, function, service, application, operation, or capability without first purchasing the applicable Iicense(s) and obtaining a valid key from Juniper, even if such feature, function, service, application, operation, or capability is enabled without a key; (g) distribute any key for the Software provided by Juniper to any third party; (h) use the Software in any manner that extends or is broader than the uses purchased by Customer from Juniper or an authorized Juniper reseller; (i) use the Embedded Software on non-Juniper equipment; (j) use the Software (or make it available for use) on Juniper equipment that the Customer did not originally purchase from Juniper or an authorized Juniper reseller; (k) disclose the results of testing or benchmarking of the Software to any third party without the prior written consent of Juniper; or (I) use the Software in any manner other than as expressly provided herein.
5. Audit. Customer shall maintain accurate records as necessary to verify compliance with this Agreement. Upon request by Juniper, Customer shall furnish such records to Juniper and certify its compliance with this Agreement.
6. Confidentiality. The Parties agree that aspects of the Software and associated documentation are the confidential property of Juniper. As such, Customer shall exercise all reasonable commercial efforts to maintain the Software and associated documentation in confidence, which at a minimum includes restricting access to the Software to Customer employees and contractors having a need to use the Software for Customer's internal business purposes.
7. Ownership. Juniper and Juniper's licensors, respectively, retain ownership of all right, title, and interest (including copyright) in and to the Software, associated documentation, and all copies of the Software. Nothing in this Agreement constitutes a transfer or conveyance of any right, title, or interest in the Software or associated documentation, or a sale of the Software, associated documentation, or copies of the Software.
8. Warranty, Limitation of Liability, Disclaimer of Warranty. The warranty applicable to the Software shall be as set forth in the warranty statement that accompanies the Software (the "Warranty Statement"). Nothing in this Agreement shall give rise to any obligation to support the Software. Support services may be purchased separately. Any such support shall be governed by a separate, written support services agreement. TO THE MAXIMUM EXTENT PERMITTED BY LAW, JUNIPER SHALL NOT BE LIABLE FOR ANY LOST PROFITS, LOSS OF DATA, OR COSTS OR PROCUREMENT OF SUBSTITUTE GOODS OR SERVICES, OR FOR ANY SPECIAL, INDIRECT, OR CONSEQUENTIAL DAMAGES ARISING OUT OF THIS AGREEMENT, THE SOFTWARE, OR ANY JUNIPER OR JUNIPER-SUPPLIED SOFTWARE. IN NO EVENT SHALL JUNIPER BE LIABLE FOR DAMAGES ARISING FROM UNAUTHORIZED OR IMPROPER USE OF ANY JUNIPER OR JUNIPER·SUPPLIED SOFTWARE. EXCEPT AS EXPRESSLY PROVIDED IN THE WARRANTY STATEMENT TO THE EXTENT PERMITTED BY LAW, JUNIPER DISCLAIMS ANY AND ALL WARRANTIES IN AND TO THE SOFTWARE (WHETHER EXPRESS, IMPLIED, STATUTORY, OR OTHERWISE), INCLUDING ANY IMPLIED WARRANTY OF MERCHANTABILITY, FITNESS FOR A PARTICULAR PURPOSE, OR NONINFRINGEMENT. IN NO EVENT DOES JUNIPER WARRANT THAT THE SOFTWARE, OR ANY EQUIPMENT OR NETWORK RUNNING THE SOFTWARE, WILL OPERATE WITHOUT ERROR OR INTERRUPTION, OR WILL BE
10. Taxes. All license fees for the Software are exclusive of taxes, withholdings, duties, or levies (collectively “Taxes”). Customer shall be responsible for paying Taxes arising from the purchase of the license, or importation or use of the Software.
11. Export. Customer agrees to comply with all applicable export laws and restrictions and regulations of any United States and any applicable foreign agency or authority, and not to export or re-export the Software or any direct product thereof in violation of any such restrictions, laws or regulations, or without all necessary approvals. Customer shall be liable for any such violations. The version of the Software supplied to Customer may contain encryption or other capabilities restricting Customer's ability to export the Software without an export license.
12. Commercial Computer Software. The Software is "commercial computer software" and is provided with restricted rights. Use, duplication, or disclosure by the United States government is subject to restrictions set forth in this Agreement and as provided in DFARS 227.7201 through 227.7202-4, FAR 12.212, FAR 27.405(b)(2), FAR 52.227-19; or FAR 52.227-14(ALT III) as applicable.
13. Interface Information. To the extent required by applicable law, and at Customer's written request, Juniper shall provide Customer with the interface information needed to achieve interoperability between the Software and another independently created program, on payment of applicable fee, if any. Customer shall observe strict obligations of confidentiality with respect to such information and shall use such information in compliance with any applicable terms and conditions upon which Juniper makes such information available.
14. Third Party Software. Any licensor of Juniper whose software is embedded in the Software and any supplier of Juniper whose products or technology are embedded in (or services are accessed by) the Software shall be a third party beneficiary with respect to this Agreement, and such licensor or vendor shall have the right to enforce this Agreement in its own name as if it were Juniper. In addition, certain third party software may be provided with the Software and is subject to the accompanying Iicense(s), if any, of its respective owner(s). To the extent portions of the Software are distributed under and subject to open source licenses obligating Juniper to make the source code for such portions publicly available (such as the GNU General Public License (“GPL”) or the GNU Library General Public License (“LGPL”)), Juniper will make such source code portions (including Juniper modifications, as appropriate) available upon request for a period of up to three years from the date of distribution. Such request can be made in writing to Juniper Networks, Inc., 1194 N. Mathilda Ave., Sunnyvale, CA 94089, ATTN: General Counsel. You may obtain a copy of the GPL at http://www.gnu.org/licenses/gpl.html. and a copy of the LGPL at http://www.gnu.org/licenses/lgpl.html.
15. Miscellaneous. This Agreement shall be governed by the laws of the State of California without reference to its conflicts of laws principles. The provisions of the U.N. Convention for the International Sale of Goods shall not apply to this Agreement. For any disputes arising under this Agreement, the Parties hereby consent to the personal and exclusive jurisdiction of, and venue in, the state and federal courts within Santa Clara County, California. This Agreement constitutes the entire and sole agreement between Juniper and the Customer with respect to the Software, and supersedes all prior and contemporaneous agreements relating to the Software, whether oral or written (including any inconsistent terms contained in a purchase order), except that the terms of a separate written agreement executed by an authorized Juniper representative and Customer shall govern to the extent such terms are inconsistent or conflict with terms contained herein. No modification to this Agreement nor any waiver of any rights hereunder shall be effective unless expressly assented to in writing by the party to be charged. If any portion of this Agreement is held invalid, the Parties agree that such invalidity shall not affect the validity of the remainder of this Agreement. This Agreement and associated documentation has been written in the English language, and the Parties agree that the English version will govern. (For Canada: Les parties aux présentés confirment leur volonté que cette convention de même que tous les documents y compris tout avis qui s'y rattaché, soient redigés en langue anglaise. (Translation: The parties confirm that this Agreement and all related documentation are and will be in the English language.))
Table of Contents v
Table of Contents
About This Guide xi
Audience... xi
Conventions... xii
Documentation ... xiii
Release Notes and Product Documentation ... xiii
Context-Sensitive Help... xiv
Requesting Technical Support ... xiv
Self-Help Online Tools and Resources... xiv
Open a Case with JTAC... xv
Chapter 1 Odyssey Access Client Overview 1 How OAC Operates in a Network... 2
Authentication in a Unified Access Control Network... 2
Authentication in a Traditional Network (Without UAC)... 5
About FIPS Mode (FIPS Edition Only)... 6
xSec ... 6
FIPS Adapter and Driver Requirements ... 7
Certificate Requirements for FIPS Compliance ... 7
Network Requirements for FIPS Compliance ... 7
Chapter 2 Installing Odyssey Access Client 9 Before You Begin ... 9
Verifying Access Privileges ... 9
Disabling Fast User Switching... 9
Requirements ... 10
Supported Windows Operating Systems... 10
Network Adapter Cards ... 10
Browsers ... 10
License ... 10
Installing OAC in a UAC Network ... 11
About Agentless Clients ... 11
Using Automatic Trust for Infranet Controllers ... 12
Installing OAC for Windows in a Traditional Network ... 12
Chapter 3 Using Odyssey Access Client Manager 13 Opening Odyssey Access Client Manager... 13
Logging In to Odyssey Access Client Manager ... 13
Using Single Sign-On ... 13
Odyssey Access Client Manager User Interface ... 14
Odyssey Access Client Manager Menu Bar ... 15
File Menu... 15
vi Table of Contents
Tools Menu... 16
Help Menu ... 18
Navigation Pane ... 18
Adapters List... 18
Infranet Controllers List ... 18
Configuration... 18
Informational Graphics and Detailed Status ... 19
Signal Power Status Icons ... 19
Connection Status Icons ... 20
Encryption Key Status Icons ... 20
Content Pane ... 21
Exiting from Odyssey Access Client Manager... 21
Chapter 4 Managing Connections 23 Connecting to an Infranet Controller... 23
Managing Concurrent Infranet Controller Sessions ... 24
Infranet Controller Session Limits... 24
Extending the Current Infranet Controller Session... 25
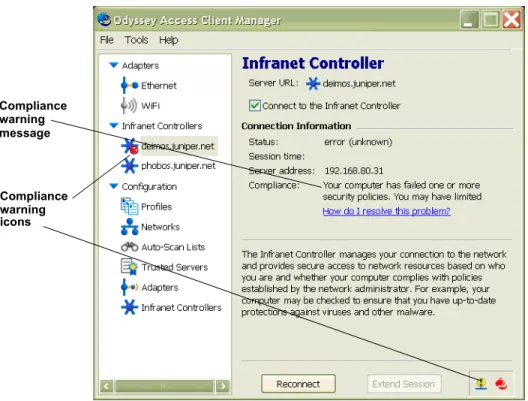
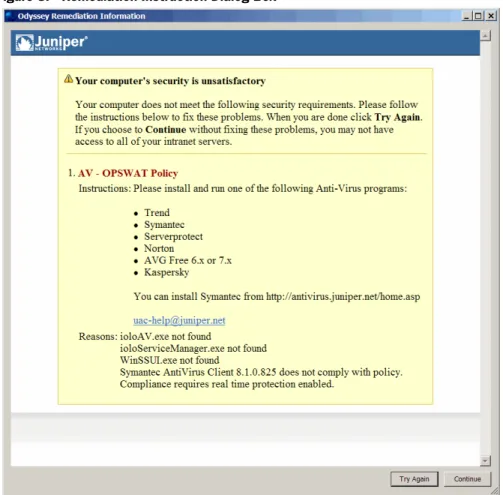
Compliance Failure and Remediation ... 25
Responding to Remediation Messages... 26
Disconnecting from an Infranet Controller ... 26
Connecting to a Wired Network ... 27
Connecting to a Different Network ... 27
Reconnecting to a Network ... 27
Disconnecting from a Network ... 28
Connecting to a Wireless Network ... 28
Reconnecting to a Wireless Connection... 29
Scanning for a Wireless Network ... 29
Using Auto-Scan Lists ... 30
Making Concurrent Network Connections ... 30
Using Wireless Suppression ... 30
Session Management Tasks ... 30
Surveying Local Wi-Fi Airwaves ... 30
Using Scripts... 31
Checking for New Scripts... 31
Managing SIM Card PIN Settings... 32
Using Forget Password ... 33
Using Session Resumption... 33
Using Preemptive Networks ... 34
Using Automatic Reauthentication... 34
Using Server Temporary Trust ... 35
Using Temporary Network Support ... 36
Managing EAP-FAST Credentials... 36
Managing Notification Settings ... 37
Managing Windows Login Settings ... 38
Odyssey Access Client Administrator ... 40
Troubleshooting ... 40
Viewing Log Files... 40
Running Diagnostics... 40
Chapter 5 Managing Network Adapters 43 Adding a Network Adapter... 43
Table of Contents
Table of Contents vii
Renaming an Adapter ... 44
Removing an Adapter ... 45
Checking Adapter Status ... 45
Connection Information ... 45
OAC Interaction with Other Adapter Software ... 47
Chapter 6 Configuring Authentication Profiles 49 Authentication Profile Overview... 49
Adding or Modifying a Profile ... 50
Specifying a Profile Name... 50
Configuring User Information ... 51
Specifying a Login Name ... 51
Using Passwords for EAP Authentication ... 52
Configuring a Password ... 52
Using Certificates for Authentication ... 53
Using Soft Tokens for Authentication... 55
Using SIM Cards for Authentication ... 57
Configuring EAP Authentication Settings... 58
Authentication Protocols for FIPS Mode (FIPS Edition Only) ... 59
Configuring Outer EAP Authentication Protocols ... 60
Server Validation—Mutual Authentication ... 61
Setting Token Card Credential Options ... 62
Using an Anonymous Login Name... 62
Configuring TTLS Inner Authentication Protocols ... 63
Selecting Inner Authentication Protocols for TTLS ... 64
Configuring PEAP Inner Authentication Protocols ... 67
Selecting Inner Authentication Protocols for PEAP ... 68
Using Certificates for EAP-PEAP Authentication... 69
Configuring EAP-POTP for Inner Authentication ... 69
Configuring Authentication for Infranet Controllers ... 70
Setting a Preferred Realm and Role ... 70
Using a Token Card for Authentication ... 71
Removing an Authentication Profile... 72
Chapter 7 Configuring Wireless Networks 73 Adding or Modifying a Wireless Network ... 73
Specifying a Network Name (SSID) ... 73
Using a Network Description ... 74
Specifying a Network Type (Channel) ... 74
Specifying an Association Mode ... 74
Selecting an Encryption Method ... 75
Selecting a FIPS Association Mode (FIPS Edition Only) ... 75
Using FIPS Secure Encryption (FIPS Edition Only) ... 75
Configuring a Network That Does Not Broadcast an SSID... 76
Specifying an Authentication Profile ... 76
Using Automatic Key Generation ... 77
Using Preconfigured Key Settings ... 77
Removing a Network ... 79
Chapter 8 Managing Auto-Scan Lists 81 Adding an Auto-Scan List ... 81
Specifying a Preemptive Auto-Scan List ... 82
viii Table of Contents
Viewing Networks in an Auto-Scan List ... 83
Removing an Auto-Scan List... 83
Chapter 9 Managing Infranet Controller Connections 85 About Infranet Controllers... 85
Adding an Infranet Controller ... 86
Connecting to an Infranet Controller... 86
Viewing Infranet Controller Status... 86
Disconnecting from an Infranet Controller... 87
Chapter 10 Managing Trusted Servers 89 Trust Configuration Overview ... 89
Methods for Configuring Trust in OAC ... 90
Simple Trust Configuration ... 90
Adding a Trusted Server ... 91
Removing a Trusted Server... 92
Editing a Trusted Server Entry ... 92
Advanced Trust Configuration... 92
Displaying a Trust Tree... 93
Adding Certificate Nodes ... 93
Adding Authentication Servers or Intermediate CA Nodes ... 93
Adding Identity... 94
Removing Trust Tree Nodes ... 95
Viewing Certificate Information ... 96
Managing Untrusted Servers... 96
Displaying Certificate Information ... 96
Chapter 11 Viewing Log Files and Diagnostics 99 Viewing Logs... 99
Log Viewer Controls ... 99
Viewing Diagnostics ... 100
IPsec Diagnostics... 101
IPsec Configuration ... 101
Network Agent Diagnostics... 101
Host Enforcer Configuration ... 101
Network Configuration ... 102
Route Configuration... 102
Refresh ... 102
Save All Diagnostics... 102
Appendix A Network Security Concepts 103 Network Security ... 103
Encryption and Association for Secure Authentication... 104
OAC Features for a Secure Network... 105
802.11 Wireless Networking ... 105
Types of 802.11 Wireless Networks... 106
Wireless Network Names... 106
Wired-Equivalent Privacy ... 107
Wi-Fi Protected Access and Encryption Methods ... 108
802.1X Authentication ... 109
Extensible Authentication Protocol ... 109
Table of Contents
Table of Contents ix
Reauthentication ... 114 Session Resumption ... 114
Audience ix
About This Guide
This guide describes how to install, configure, and use the Juniper Networks Odyssey Access Client (OAC) for wired or wireless network access. It addresses these licensed editions of OAC:
OAC Enterprise Edition
OAC Federal Information Processing Standard (FIPS) Edition
Some OAC features and options require a specific OAC license. For example, FIPS mode requires a FIPS Edition license. Such distinctions are identified as they occur in this guide.
You can deploy OAC in a network that includes the Juniper Networks Unified Access Control (UAC) security solution, where authenticated access to protected network resources is managed by an Infranet Controller. Alternatively, you can deploy OAC in a traditional network where OAC might negotiate with an authentication, authorization, and accounting (AAA) server for authenticated access.
For general information about network security, see Appendix A, “Network Security Concepts.”
Audience
This guide is intended for any Windows user who uses Odyssey Access Client to obtain access to wired or wireless network.
This guide is also intended for network administrators responsible for maintaining configurations for OAC end users.
x Conventions
Conventions
The following tables show the conventions used throughout this book. Table 1 defines notice icons; Table 2 defines text conventions; Table 3 defines CLI conventions; and Table 4 defines GUI conventions.
Table 1: Notice Icons
Icon Meaning Description
Note Indicates important features or instructions.
Caution Indicates that you may risk losing data or damaging your hardware.
Warning Alerts you to the risk of personal injury.
Table 2: Text Conventions
Convention Description
Plain sans serif type URLs, filenames, and directory names.
Italics Terms defined in text.
Variable elements for which you supply values.
Book titles.
+ (plus sign) Key names linked with a plus sign indicate that you must press two or more keys simultaneously.
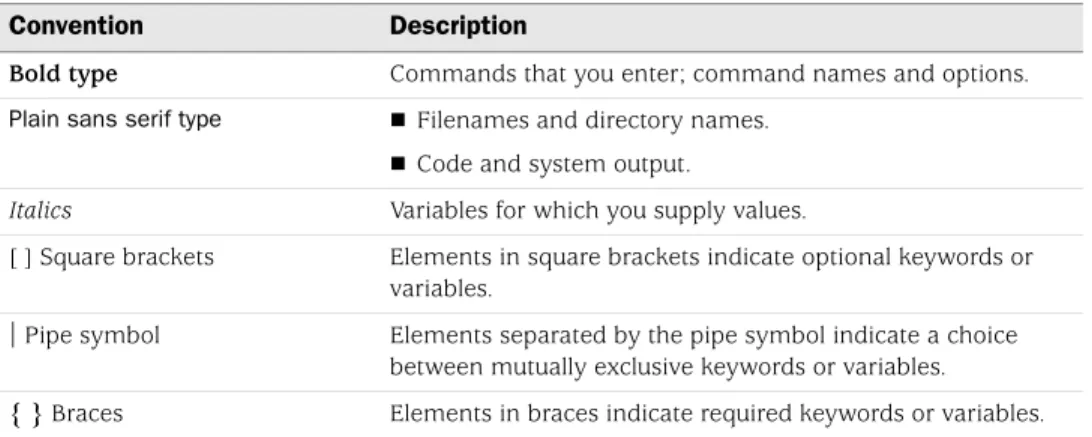
Table 3: CLI Conventions
Convention Description
Bold type Commands that you enter; command names and options.
Plain sans serif type Filenames and directory names.
Code and system output.
Italics Variables for which you supply values.
[ ] Square brackets Elements in square brackets indicate optional keywords or variables.
| Pipe symbol Elements separated by the pipe symbol indicate a choice between mutually exclusive keywords or variables. { } Braces Elements in braces indicate required keywords or variables.
Table 4: GUI Conventions
Convention Description
> (chevron) Navigation paths through the UI.
Bold type User interface elements that you select in a procedure, such as tabs, buttons, and menu options.
Documentation xi
About This Guide
Documentation
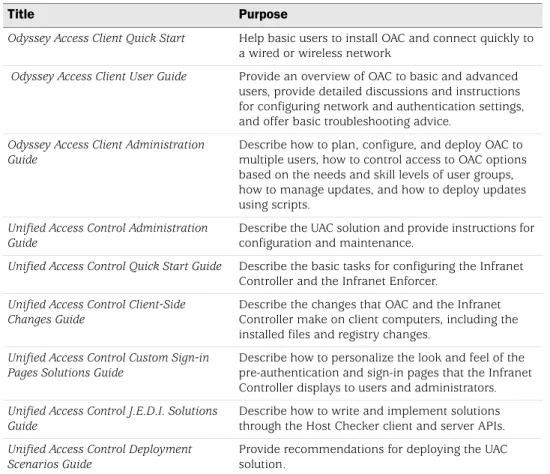
Table 5 describes the available OAC and UAC documentation.
Release Notes and Product Documentation
You can access this manual, as well as the OAC release notes, the Odyssey Access Client Quick Start Guide, and the Odyssey Access Client Administration Guide on the Web at:
http://www.juniper.net/techpubs/
Release notes provide the latest information about features, changes, known problems, and resolved problems. If the information in the release notes differs from the information found in the documentation set, follow the release notes.
Italics Variables for which you supply values.
Table 4: GUI Conventions (continued)
Convention Description
Table 5: OAC/UAC Documentation Set
Title Purpose
Odyssey Access Client Quick Start Help basic users to install OAC and connect quickly to a wired or wireless network
Odyssey Access Client User Guide Provide an overview of OAC to basic and advanced users, provide detailed discussions and instructions for configuring network and authentication settings, and offer basic troubleshooting advice.
Odyssey Access Client Administration Guide
Describe how to plan, configure, and deploy OAC to multiple users, how to control access to OAC options based on the needs and skill levels of user groups, how to manage updates, and how to deploy updates using scripts.
Unified Access Control Administration Guide
Describe the UAC solution and provide instructions for configuration and maintenance.
Unified Access Control Quick Start Guide Describe the basic tasks for configuring the Infranet Controller and the Infranet Enforcer.
Unified Access Control Client-Side Changes Guide
Describe the changes that OAC and the Infranet Controller make on client computers, including the installed files and registry changes.
Unified Access Control Custom Sign-in Pages Solutions Guide
Describe how to personalize the look and feel of the pre-authentication and sign-in pages that the Infranet Controller displays to users and administrators.
Unified Access Control J.E.D.I. Solutions Guide
Describe how to write and implement solutions through the Host Checker client and server APIs.
Unified Access Control Deployment Scenarios Guide
Provide recommendations for deploying the UAC solution.
xii Requesting Technical Support
Context-Sensitive Help
OAC includes online help that you can access from Help > Help Topics on the Odyssey Access Client Manager menu bar.
To access context-sensitive online help for OAC, press the F1 key. The resulting help describes the active OAC dialog box and provides links to information on OAC features and functions, to configuration and administration procedures, and to descriptions of other OAC dialog boxes.
Requesting Technical Support
Technical product support is available through the Juniper Networks Technical Assistance Center (JTAC). If you are a customer with an active J-Care or JNASC support contract, or are covered under warranty, and need post-sales technical support, you can access our tools and resources online or open a case with JTAC.
JTAC policies—For a complete understanding of our JTAC procedures and policies, review the JTAC User Guide located at
http://www.juniper.net/customers/support/downloads/710059.pdf.
Product warranties—For product warranty information, visit
http://www.juniper.net/support/warranty/.
JTAC hours of operation—The JTAC centers have resources available 24 hours a day, 7 days a week, 365 days a year.
Self-Help Online Tools and Resources
For quick and easy problem resolution, Juniper Networks has designed an online self-service portal called the Customer Support Center (CSC) that provides you with the following features:
Find CSC offerings—http://www.juniper.net/customers/support/
Find product documentation—http://www.juniper.net/techpubs/
Search for known bugs or find solutions and answer questions using our Knowledge Base— http://kb.juniper.net/
Download the latest versions of software and review your release notes—
http://www.juniper.net/customers/csc/software/
Search technical bulletins for relevant hardware and software notifications—
http://www.juniper.net/alerts/
Participate in the Juniper Networks Community Forum—
http://www.juniper.net/company/communities/
Open a case online in the CSC Case Manager—
Requesting Technical Support xiii
About This Guide
To verify service entitlement by product serial number, use our Serial Number Entitlement (SNE) Tool, which can be found on
https://tools.juniper.net/SerialNumberEntitlementSearch/.
Open a Case with JTAC
You can open a case with JTAC on the Web or by telephone.
Use the Case Manager tool in the CSC at
http://www.juniper.net/customers/cm/.
Call 1-888-314-JTAC (1-888-314-5822) toll free in USA, Canada, and Mexico. For international or direct-dial options in countries without toll-free numbers, visit us at http://www.juniper.net/customers/support/requesting-support/.
1
Chapter 1
Odyssey Access Client Overview
Odyssey Access Client (OAC) is networking software that runs on endpoint computers (desktop, laptop, or notepad computers and supported wireless devices). Use OAC to establish secure wireless and wired connections in a corporate network. You can also use OAC to connect to public and home wireless networks.
In corporate networks, OAC negotiates with 802.1X wireless access points, 802.1X switches, and Infranet Controllers for authenticated, secure access to protected networks. An authentication server, such as Juniper Networks Steel-Belted Radius, must validate each user. In a Juniper Networks Unified Access Control (UAC) environment, the user’s computer is checked for security compliance before being allowed network access. In networks with 802.1X switches, the switches become enforcement points in the network security architecture.
Corporate networks usually have both wired and wireless networks to support mobile computing at work. OAC supports secure, authenticated network access for both wired and wireless connections, so you can have a secure wired connection from your office and a secure wireless connection when you take your laptop to meetings. OAC supports extensive configuration options, making it an effective solution for any networking environment. Use OAC for the following tasks:
Manage network adapters.
Configure and control connections to wired and wireless networks.
Configure and use authentication profiles to connect to secure networks.
Connect to an Infranet Controller to access protected resources.
Set up a list of frequently used wireless networks in order of preference.
Manage server trust settings.
Use certificate-based authentication methods with smart cards.
Run a script to update your current OAC configuration settings.
If you have an OAC FIPS license, configure FIPS 140-2 certified encryption when you connect to a network.
2 How OAC Operates in a Network
How OAC Operates in a Network
When you attempt to connect to an 802.1X network, OAC requests authenticated access through a wireless access point or through an 802.1X switch. The
authentication sequence is the same whether you use a wired or a wireless connection. In either case, your access to protected resources requires authentication by an AAA (authentication) server.
With 802.1X, you are authenticated for network access based on matching
authentication protocols, such as the Extensible Authentication Protocol (EAP), and on your user credentials, such as a password, certificate, or a token card. For details about configuring EAP protocols, see “Configuring Outer EAP Authentication Protocols” on page 60. For details about setting up credentials, see “Configuring User Information” on page 51.
OAC can be deployed in two distinct network environments:
A network with the UAC solution manages authentication using an Infranet Controller (see “Authentication in a Unified Access Control Network” on page 2). The Infranet Controller includes an integrated Steel-Belted Radius server.
A traditional network manages authentication with a standard AAA server, such as Steel-Belted Radius.
Authentication in a Unified Access Control Network
UAC provides enhanced security measures that not only authenticate users but verify that the software running on the user’s computer complies with corporate security policies.
UAC encompasses a variety of components that, together, provide secure authenticated access to network resources. These components include:
Infranet Controller—A central policy management server that validates the user’s identity and the computer’s security compliance and manages network policies. Those policies are created on the Infranet Controller and are used for configuring OAC, Host Checker, and access to protected resources. The Infranet Controller distributes the policies to OAC, Host Checker, and the Infranet Enforcer.
Infranet Enforcer—A Juniper Networks security device that operates with the Infranet Controller to enforce security policies. The Infranet Enforcer is deployed in front of the servers and protected resources.
Host Checker—A software component of OAC that checks your computer for compliance with the security policies that your Infranet Controller
administrator specifies. For example, Host Checker might verify that your computer has the current antivirus software version and security setting or that it has the latest operating system patch or service pack installed.
How OAC Operates in a Network 3
Chapter 1 Odyssey Access Client Overview
Host Enforcer—A software component of OAC that protects your computer from attacks by other computers by allowing only the incoming and outgoing traffic that your Infranet Controller administrator specifies for your assigned role. (A role defines settings for your user account, such as which resources you can access.)
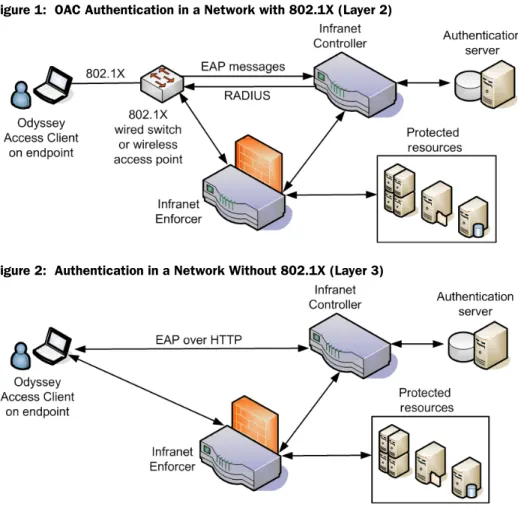
In a UAC network, OAC users can be authenticated for network access in the following ways:
A wired (Layer 2) connection through an 802.1X switch (see Figure 1).
A wireless (Layer 2) connection through an 802.1X wireless access point (see Figure 1).
A direct (Layer 3) connection to an Infranet Controller. In this case, OAC connects to the Infranet Controller and authentication occurs using EAP-over-HTTP (see Figure 2).
Figure 1: OAC Authentication in a Network with 802.1X (Layer 2)
Figure 2: Authentication in a Network Without 802.1X (Layer 3)
In a UAC network, you can connect to more than one network and to more than one Infranet Controller. When you connect to a UAC network, your network connection might be authenticated by an AAA server that is integrated with the Infranet Controller or by a separate AAA server external to the Infranet Controller.
4 How OAC Operates in a Network
The Infranet Controller authenticates you as a user and determines which protected resources you can access based on your username and the realm and role to which you belong. After you are authenticated, the Infranet Controller tells another device on the network, called the Infranet Enforcer, about the networks and resources that you are allowed to access. The Infranet Enforcer then manages your access to protected network resources.
For information on realms and roles, see “Setting a Preferred Realm and Role” on page 70. For a broader discussion of UAC components and concepts, see the
Unified Access Control Administration Guide.
Quarantine and Remediation
A network security policy defines the rules and requirements that must be met by devices requesting access to the network. Security enforcement checking ensures that all endpoints (computing devices) comply with the network’s security policy.
Remediation is the process of bringing a device into compliance with an organization’s security policy.
The Infranet Controller checks your computer periodically to verify compliance with all prescribed security requirements. For example, the Infranet Controller might confirm that antivirus software is running on your computer.
If a computer complies with a site’s network security policy, the user is granted access to protected network resources based on the user realm and role configured in the Infranet Controller.
If a computer does not comply with a site’s network security policy, the user might be denied access or redirected to a special network for remediation.
Access denied—The computer might be denied network access until it meets security compliance requirements. In some cases, the network denial might last a few seconds, while the computer’s antivirus software settings are updated automatically. In other cases, the computer might be denied network access until the user takes a specific action, such as installing necessary software or running an antivirus scan.
Access granted—The computer might be granted access to protected networks while being brought into compliance in the background.
Access redirected—The computer might be redirected to a special
quarantine network or VLAN, which provides remediation instructions and access to update files or other resources needed for compliance. For example, a quarantine network might instruct the user to install Windows update patches or service packs in order to be granted access to protected resources. When the quarantined computer complies with the network security policy, the Infranet Controller can redirect it to the protected network automatically.
How OAC Operates in a Network 5
Chapter 1 Odyssey Access Client Overview
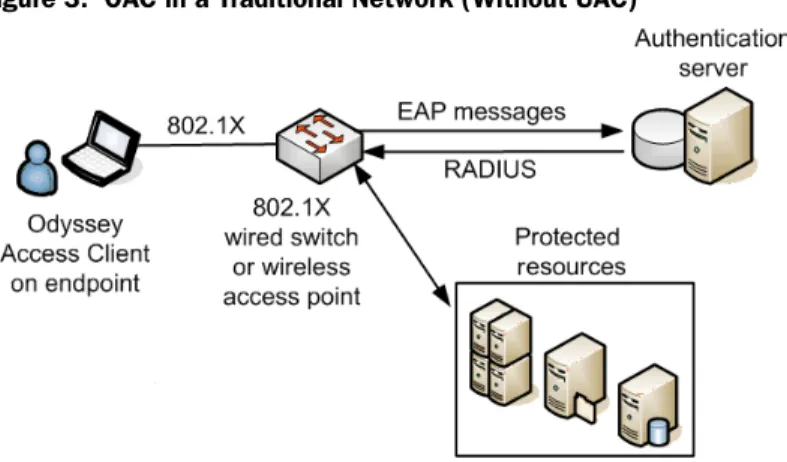
Authentication in a Traditional Network (Without UAC)
When deployed in traditional networks that do not include UAC components, OAC can negotiate authentication to the network through an 802.1X switch or through an 802.1X wireless access point (see Figure 3).
Figure 3: OAC in a Traditional Network (Without UAC)
The following steps describe a typical 802.1X authentication process.
1. When a client attempts to connect to an 802.1X network, it signals a network access device (802.1X wired switch or wireless access point) that it is making an authentication request.
In a wired network, the 802.1X switch brokers the request for network access, which triggers a prompt for authentication credentials from the authentication server.
In a wireless network, the 802.1X authentication occurs after the client connects to (associates with) an access point.
For more information on 802.1X association, see “Specifying an Association Mode” on page 74 and “802.11 Wireless Networking” on page 101.
2. The network access device (access point or 802.1X switch) forwards the authentication request to the authentication server.
3. The authentication server compares the credentials submitted in the access request with the information in the authentication database.
4. If the authentication succeeds, the server instructs the network access device to grant access to the client computer. Depending on the information returned for the user, the server might restrict the user’s access to specific networks or resources.
5. The network access device then informs the client that it has been authenticated and is granted access to the network.
6 About FIPS Mode (FIPS Edition Only)
About FIPS Mode (FIPS Edition Only)
The Federal Information Processing Standard (FIPS) is a U.S. government security standard used to certify hardware and software cryptographic modules. After a module is certified as FIPS-compliant by an accredited testing laboratory, federal agencies and departments can reference the module’s FIPS certificate to confirm the module is appropriate for their use.
The FIPS edition of OAC provides an encryption module that runs on your computer before data is transmitted. When you use OAC in FIPS mode, all cryptographic operations, such as exchange of keys and encryption of network traffic, take place using a validated FIPS encryption module. In FIPS mode, the number of cryptographic operations that are allowed for authentication and data encryption are restricted. For example, WEP and TKIP use RC4 encryption, which is not allowed, so FIPS mode disables WEP and TKIP in OAC.
xSec
xSec is a data link layer (Layer 2) protocol that provides a framework for securing wired and wireless connections using strong encryption and authentication.If you have xSec-compliant (Aruba) switches in your network, you can use xSec for association and AES for encryption. The xSec protocol operates a network adapter in open/unencrypted mode, but data packets are encrypted by an intermediate driver before they are forwarded to the network.
There are no network interface cards that operate in 802.11i FIPS mode with OAC on Windows Vista and Windows 7. If FIPS mode is required on Windows Vista or Windows 7, you must use xSec for encryption.
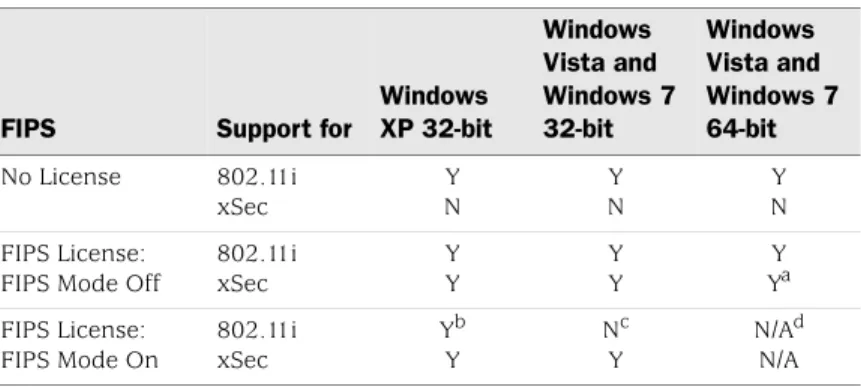
Table 6 illustrates support for FIPS mode settings and for xSec by platform. Table 6: Support for FIPS Mode and xSec by Platform
FIPS Support for
Windows XP 32-bit Windows Vista and Windows 7 32-bit Windows Vista and Windows 7 64-bit No License 802.11i xSec Y N Y N Y N FIPS License:
FIPS Mode Off
802.11i xSec Y Y Y Y Y Ya
a.A FIPS license is supported on Windows Vista 64 and Windows 7 64 but treated as an Enterprise Edition license, with the exception that xSec is supported. FIPS License: FIPS Mode On 802.11i xSec Yb Y
b.Supported if a FIPS-compliant driver is installed. Nc
Y
c.No FIPS-compliant driver is available.
N/Ad N/A
d.FIPS mode is not supported on Windows Vista 64 and Windows 7 64.
About FIPS Mode (FIPS Edition Only) 7
Chapter 1 Odyssey Access Client Overview
FIPS Adapter and Driver Requirements
If your computer is running a version of Windows other than Windows Vista, you need a FIPS-compliant network adapter and the appropriate adapter drivers to operate in FIPS mode. Contact Juniper Networks for the latest list of verified wireless adapters or see the Odyssey Access Client User webpage
(http://www.juniper.net/customers/
support/products/aaa_802/oac_client_user.jsp.) for information about adapter drivers you can use with the OAC FIPS module:
You may not be not required to install a new driver if you use xSec association. See “Selecting a FIPS Association Mode (FIPS Edition Only)” on page 75.
Certificate Requirements for FIPS Compliance
If you use EAP-TLS for authentication, a user certificate must be installed on your computer before it is configured for FIPS–compliant connections. This operation should be performed only by a network administrator.
For FIPS 140-2 compliance, private key operations must be performed by a FIPS-validated module. Some cryptographic providers conform to this requirement. For example, the Microsoft Cryptographic provider used in the Microsoft Certificate Store conforms to these standards for the following operating systems:
All versions of Windows XP
Windows Vista (32-bit version only)
Some older versions of Windows do not meet the NIST standards for private key protection. You can use OAC to perform the FIPS-compliant encryption required to protect the private key on the system. To do so, you must make sure that the private key of the user certificate is marked as Exportable.
Network Requirements for FIPS Compliance
Your network must support WPA2 or xSec association and AES encryption if you want to use OAC in FIPS mode. Refer to “Using FIPS Secure Encryption (FIPS Edition Only)” on page 75 for information on how to set up a FIPS-compliant authentication profile.
You should configure your network servers as trusted servers in OAC. For more information, see “Managing Trusted Servers” on page 89.
Before You Begin 9
Chapter 2
Installing Odyssey Access Client
This chapter discusses how to install OAC for Windows in a UAC network that includes an Infranet Controller and in a traditional wired or wireless network.
Before You Begin
Before you begin installing OAC, you should verify you have the appropriate access privileges and verify that Fast User Switching is disabled.
Verifying Access Privileges
You may require administrative privileges on your computer to install OAC. If the installer service is running on your machine, you do not need those privileges. However, some OAC tools, such as Odyssey Access Client Administrator, require that you have administrative privileges to use them.
Install a network adapter and associated driver software if your computer does not have one built in.
Disabling Fast User Switching
Fast user switching allows users to switch between user accounts on a computer without quitting applications and logging out. Fast User Switching can represent a security vulnerability, since non-authenticated user sessions might access desktop connections after an authenticated user logs into a protected network.
Fast User Switching can interfere with OAC operation when Remote Desktop (RDP) is running. After you disable Fast User Switching, Remote Desktop and OAC can interoperate without a problem.
By default, Fast User Switching is disabled for Windows XP computers that are part of a domain, and enabled for Windows XP computers that are part of a workgroup. Fast User Switching is enabled for domain users and workgroup users on
computers running Windows Vista. To disable Fast User Switching:
1. Select Start> Control Panel > User Accounts > Change the way users log on or off.
The Change the way users log on or off setting does not appear unless you are part of a workgroup.
10 Requirements
2. Clear the setting for Fast User Switching.
Requirements
This section describes the software and hardware requirements for OAC.
Supported Windows Operating Systems
OAC runs on the following Windows operating systems:
Windows XP Professional with Service Pack 3
Windows Vista Business Edition (32-bit and 64-bit)
For information on supported platforms and Web browsers, see:
https://www.juniper.net/techpubs/software/uac/4.xrelnotes/j-uac-ic-4.0r1-b14913-s upportedplatforms.pdf.
Network Adapter Cards
On Windows XP, OAC is compatible with any wireless adapter card that supports standard 802.11 interfaces.
FIPS Edition Only: To use FIPS 140-2 compliant secure encryption, you must have an adapter driver installed that is compatible with the Juniper Networks FIPS module.
Wireless Adapter Requirement for Windows Vista
OAC requires native Vista WLAN miniport drivers for wireless network access. OAC does not support legacy XP WLAN miniport drivers on Vista. If you try to configure legacy wireless adapters in OAC on Vista, they display as an unknown adapter type.
Browsers
If your network includes an Infranet Controller, you must have Internet Explorer 6.0 or later installed, because OAC uses services present in Internet Explorer 6.0 to communicate with the Infranet Controller.
License
You must have a valid license to run OAC. Each OAC edition has a corresponding license key. See your system administrator for information about your license. OAC for Windows supports Enterprise Edition and FIPS Edition licenses. If you install a FIPS Edition license on a computer running 64-bit Windows Vista, OAC operates in Enterprise Edition mode (not FIPS mode) with support for xSec.
NOTE: FIPS mode is not supported on the 64-bit version of Windows Vista. OAC accepts a FIPS license for both 32- and 64-bit Vista but does not support FIPS secure encryption for 64-bit systems.
Installing OAC in a UAC Network 11
Chapter 2 Installing Odyssey Access Client
You can purchase license keys from Juniper Networks. To install an OAC license, select Help > License Keys.
Installing OAC in a UAC Network
This section describes how to download OAC to your computer in a UAC network—one that includes an Infranet Controller.
1. Open a Web browser and navigate to the IP address for your Infranet Controller. Ask your administrator for the address information needed to access the Infranet Controller.
2. When you access the Infranet Controller, enter your authentication credentials, such as your username and password.
After you are authenticated, the Infranet Controller downloads and installs a preconfigured copy of OAC to your computer based on your access privileges (realm and role). This default configuration provides the exact settings you need. Subsequent connections to the Infranet Controller might require that your OAC configuration be updated, in which case the update will be
downloaded automatically to your system. The old version of OAC is removed before the new version is downloaded and your current configuration settings are maintained.
During installation, the following components are installed to support OAC in a UAC network:
Network agent
Juniper Universal Network Service (JUNS)
Trusted Network Computing (TNC) client
Tunnel manager
If you try to access the Web or protected resources on your corporate network before OAC is running, a network firewall might redirect your browser to a Web portal page that downloads and installs OAC on your system.
Network administrators can deploy OAC to multiple users with an MSI (Microsoft Installer) file. OAC may have default configuration settings but may not yet be configured specifically for the network resources you need to access. After OAC is running, navigate to an Infranet Controller, to download your initial OAC
configuration settings automatically.
About Agentless Clients
For roles with restricted access, such as guest accounts, the Infranet Controller provides a transparent (“agentless”) connection through a web interface. When you access a protected network from an agentless connection, you do not configure settings.
12 Installing OAC for Windows in a Traditional Network
Using Automatic Trust for Infranet Controllers
OAC is configured to trust an Infranet Controller automatically if it can verify that the Infranet Controller is passing a valid certificate. For this verification to occur, the trusted root CA certificate for the Infranet Controller must be installed on your computer. If the CA certificate is not installed, you cannot sign into the Infranet Controller.
During OAC installation, the Infranet Controller automatically installs the CA certificate on your computer. If you are prompted during installation, you must allow the installation of the CA certificate. If the trusted root CA certificate is preinstalled on your computer, then the prompt does not appear during installation.
Adding a Certificate to the Trusted Server Database
The first time that you navigate to the Web portal, you might be prompted to add a certificate to your trusted server database. This happens only if you do not have the certificate on your computer and if the certificate is available from the local trust server. If you choose not to accept the certificate and do not have temporary trust enabled, authentication to that trust server fails. See “Adding Authentication Servers or Intermediate CA Nodes” on page 93 for temporary trust settings.
Installing OAC for Windows in a Traditional Network
This section discusses methods for installing OAC in a network environment that does not include an Infranet Controller.
1. Run the OAC installer using one of the following procedures:
Insert the installation CD-ROM into your CD-ROM drive. The installation process starts automatically. If the installation process does not start, double-click setup.exe on the CD-ROM.
Download and double-click the installer for the OAC file (OdysseyAccessClient.msi).
The installation wizard displays a series of installation prompts. Respond to each prompt and click Next to continue.
2. Click Install to begin the installation process.
After OAC is installed, you might be prompted for additional information needed to use OAC.
NOTE: If your administrator configures the OAC single (automatic) sign-on feature, you are not prompted for credentials.
Opening Odyssey Access Client Manager 13
Chapter 3
Using Odyssey Access Client Manager
This chapter presents an overview of how to use the Odyssey Access Client Manager application to configure OAC.
Opening Odyssey Access Client Manager
OAC runs as a service on Windows computers. To open Odyssey Access Client Manager, double-click the OAC icon in the system tray or choose Start > Programs > Juniper Networks > Odyssey Access Client >
Odyssey Access Client Manager.
Logging In to Odyssey Access Client Manager
When you open Odyssey Access Client Manager, a dialog box may prompt you for authentication credentials. The specific credentials required depend on your company’s authentication policy. The credential types that you can use with OAC include the following:
Login name and password.
Certificate (required for EAP-TLS authentication).
Soft token.
SIM card. You can use this method with a SIM card reader and, most commonly, with the Windows Mobile version of OAC.
Smart card.
The methods allowed vary based on your company and whether or not you are connecting remotely. In most cases, a login dialog box indicates what is required. Ask your administrator about the required login credentials for your corporate network.
Using Single Sign-On
If OAC has been configured for single (automatic) sign-on, there is no prompt for credentials before Odyssey Access Client Manager opens. Similarly, if an Infranet Controller has been configured for single sign-on, there is no prompt for credentials. In both cases, your Windows login credentials are used.
14 Odyssey Access Client Manager User Interface
Odyssey Access Client Manager User Interface
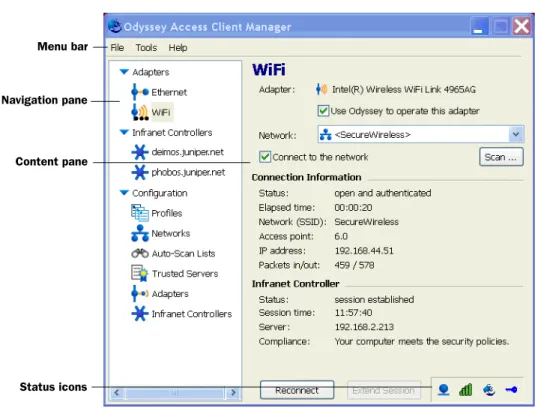
Figure 4 on page 14 identifies the components of a standard window in the Odyssey Access Client user interface.
Figure 4: Odyssey Access Client User Interface
The Odyssey Access Client Manager user interface consists of the following:
The menu bar provides a range of options. See “Odyssey Access Client Manager Menu Bar” on page 15 for information on the Odyssey Access Client Manager menu bar.
The navigation pane displays lists of configured adapters and Infranet
Controllers and a set of named icons that you can use to perform configuration tasks. See “Navigation Pane” on page 18 for information on the Odyssey Access Client Manager navigation pane.
The content pane displays the user interface controls that correspond to the selection you make in the navigation pane. See “Content Pane” on page 21 for information on the Odyssey Access Client Manager content pane.
The status icons at the bottom right indicate your current security compliance status, wireless signal power, authentication status, and encryption status. See “Informational Graphics and Detailed Status” on page 19 for information on how to interpret the OAC status icons.
If you are new to OAC, you should spend some time exploring each option to become familiar with the Odyssey Access Client Manager user interface.
Menu bar
Navigation pane
Content pane
Odyssey Access Client Manager Menu Bar 15
Chapter 3 Using Odyssey Access Client Manager
Odyssey Access Client Manager Menu Bar
The Odyssey Access Client Manager has three menus: File, Tools, and Help. A fourth menu (View) may appear in the menu bar if your network administrator has configured Odyssey Access Client Manager to hide one or more settings by default.
File Menu
The File menu includes the following items:
Forget Password—Discards the current password or PIN that you used to log on. If your password is required later, a dialog box prompts you for it. If you do not select this option, OAC remembers your password for the duration of the session. See “Using Forget Password” on page 33.
Forget Temporary Trust—Discontinues a temporary trust setting for a server. See “Using Server Temporary Trust” on page 35 and “Adding a Trusted Server” on page 91.
Clear Cached Credentials (FIPS Edition Only)—Securely clears all
cryptographic keys and other critical security parameters from memory. While this process takes place, it briefly interrupts network traffic, which requires OAC to reestablish a new connection and negotiate new cryptographic keys. Use this option any time you leave your computer unattended or when you need to transfer control of a shared computer to another user.
Close—Closes the Odyssey Access Client Manager window display. To reopen it, double-click the program icon in the system tray.
FIPS Mode On / FIPS Mode Off (FIPS Edition Only)— Turns FIPS mode on or off.
Use this option if your network security policy requires FIPS encryption. This option does not appear unless you have installed an OAC FIPS license. See “About FIPS Mode (FIPS Edition Only)” on page 6.
View Menu (Hidden Settings)
Your network administrator can configure Odyssey Access Client Manager to hide OAC features and settings that you do not need. The View menu appears only if any of the settings listed below have been hidden:
Configuration Profiles Networks Auto-Scan Lists Trusted Servers Adapters
16 Odyssey Access Client Manager Menu Bar
Infranet Controllers
Use the View menu to show hidden options or to hide them again.
Locked Settings
An administrator can lock (restrict) access to specific features or options even though they appear in the UI. For example, auto-scan lists may be disabled for all users or for logical groups of users based on a role. If you attempt to use such options or features, the top of the dialog box for the option indicates that it is “read only,” meaning that you cannot use it.
Tools Menu
The Tools menu includes the following items:
Odyssey Access Client Administrator—Manages and deploys OAC configurations. It is only available if you have administrative privileges.
SIM Card Manager—Manages SIM card PIN settings. See “Managing SIM Card PIN Settings” on page 32.
Survey Airwaves—Displays Wi-Fi and peer-to-peer networks in your vicinity. See “Surveying Local Wi-Fi Airwaves” on page 30.
Logs—Opens the Log Viewer and displays the current contents of the
debuglog.log file. See “Viewing Logs” on page 99.
Diagnostics—Displays a variety of diagnostic information that is helpful for troubleshooting. See “Viewing Diagnostics” on page 100.
Run Script—Runs scripts to update your OAC configuration. See “Running a Script Manually” on page 31.
Check New Scripts—Checks the default directory for new scripts deployed by your administrator. See “Checking for New Scripts” on page 31.
Preferences—Toggles the display of the system tray icon, the control panel icon, and the OAC splash screen.
Windows Logon Settings—Overrides the default setting for network connection timing. See “Managing Windows Login Settings” on page 38.
Options—Accesses the following tabbed areas:
Security
Enable session resumption—Restricts session resumption for any session older than the time that you set. See “Using Session Resumption” on page 33.
Enable automatic reauthentication—Enables periodic automatic reauthentication and sets the reauthentication frequency setting. See “Using Automatic Reauthentication” on page 34.
Odyssey Access Client Manager Menu Bar 17
Chapter 3 Using Odyssey Access Client Manager
Enable server temporary trust—Allows you to be authenticated on a network whose authentication server is not yet configured as trusted in the Trusted Servers dialog box. See “Using Server Temporary Trust” on page 35.
Enable temporary network support—Lets you control whether OAC maintains or deletes an SSID from a scanned wireless connection. See “Using Temporary Network Support” on page 36.
Prompt for smart card PIN—Enables OAC to prompt for a smart card
personal identification number (PIN). See “Managing SIM Card PIN Settings” on page 32.
Interfaces
Wireless suppression—Defaults to a wired network connection whenever it is available to preserve wireless bandwidth for users who do not have a wired connection. See “Using Wireless Suppression” on page 30.
Manage wired/wireless adapters—Enables OAC to automatically configure any wired or wireless adapter. See “Managing Global Settings for Adapters” on page 44.
Preemptive Networks—Specifies an auto-scan list of networks that, if found, take precedence over any network or auto-scan list currently enabled in the connection dialog box when searching for a network.
EAP-FAST—Controls when OAC prompts for EAP-FAST credentials. See “Managing EAP-FAST Credentials” on page 36.
Notifications—Controls the display of notification messages relating to authentication and network connection status. See “Managing Notification Settings” on page 37.
Default Login Name—Modifies the default login name format that appears in any authentication profile you create. The option appears in Odyssey Access Client Manager only if your administrator has enabled it. Rarely used, it allows you to set up a login name format when the network to which you need to connect has a different login name format requirement from the configured default.
NOTE: Preemptive networks affect which networks to search for and in what order to search. They do not affect when to search. If you select the Switch to a
preferred network check box for an auto-scan list, OAC actively monitors the SSIDs being broadcast so that, if an SSID higher up on the list is detected, OAC switches to that network. This feature requires SSIDs to be broadcast to be effective.
18 Navigation Pane
Help Menu
The Help menu includes the following items:
Help Topics—Opens the OAC online help interface.
License Keys—Shows when the current OAC license expires and whether to add or remove an OAC license key if you have permission.
Odyssey Access Client User Page—Accesses the Juniper Networks Customer Support webpage.
Juniper Networks Home Page—Accesses the home page for Juniper Networks.
Purchase Information—Accesses the Juniper Networks webpage to buy other products.
About—Shows the specific release version of OAC.
Navigation Pane
The navigation pane contains a group of options, each of which contains one or more items that you can configure or use for connecting to the network. The selection that you make determines which content dialog box appears. If this is your first experience with the Odyssey Access Client Manager, explore the options and the selections that you can make and notice how the content area changes for each selection.
Adapters List
The Adapters list shows the wired and wireless adapters configured in OAC. Select an adapter from this list to display its network connection status in the content pane on the right.
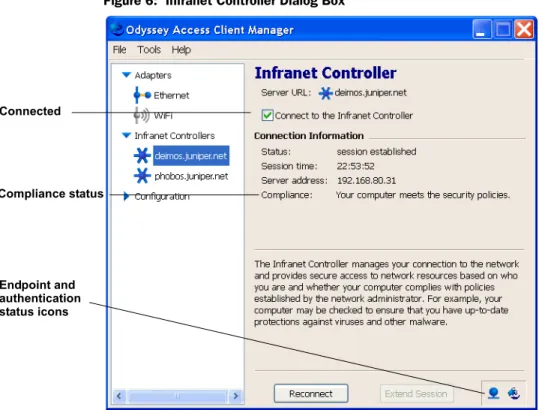
Infranet Controllers List
The Infranet Controllers list shows each Infranet Controller that has been configured in OAC. Select an Infranet Controller from this list to display its connection status and settings.
Configuration
The Configuration folder lists categories of OAC configuration settings.
Profiles
Sets up collections of login and authentication configuration information, such as your password or certificate. See Chapter 6, “Configuring Authentication Profiles” on page 49.
Informational Graphics and Detailed Status 19
Chapter 3 Using Odyssey Access Client Manager
Networks
Configures settings for wired and wireless networks, such as a network’s
connection type, encryption type, and whether to use 802.1X authentication. You can use these networks to populate your auto-scan lists. See Chapter 7,
“Configuring Wireless Networks” on page 73.
Auto-Scan Lists
Sets up an ordered list of wireless networks with which you want to establish a network connection. Auto-scan lists are convenient when you move your computer from one location to another, since OAC can scan for networks in the list to keep you connected automatically. See Chapter 8, “Managing Auto-Scan Lists” on page 81.
Trusted Servers
Configures trusted network servers and sets certificate and identity information for the servers that can authenticate you when you connect. Configuring trusted servers is required for protocols that implement mutual authentication. See Chapter 10, “Managing Trusted Servers” on page 89.
Adapters
Configures wired and wireless adapters for your computer. See Chapter 5, “Managing Network Adapters” on page 43.
Infranet Controllers
Configures the names and URLs of Infranet Controllers to which you need to connect. See Chapter 9, “Managing Infranet Controller Connections” on page 85.
Informational Graphics and Detailed Status
Status icons in the lower right corner of the Odyssey Access Client Manager window indicate the power, authentication, and encryption status of your OAC connections. Click a status icon to displayed detailed status information.
Signal Power Status Icons
Signal power status icons indicate the wireless signal strength between your PC and an access point. More colored bars indicate a stronger signal.
Figure 5: Signal Power Status Icons
When an adapter dialog box is active, you can press Alt+1 to display signal power information.