Database Administrator Guide
THE INFORMATION IN THIS PUBLICATION IS PROVIDED “AS IS.” EMC CORPORATION MAKES NO REPRESENTATIONS OR WARRANTIES OF ANY KIND WITH RESPECT TO THE INFORMATION IN THIS PUBLICATION, AND SPECIFICALLY DISCLAIMS IMPLIED WARRANTIES OF MERCHANTABILITY OR FITNESS FOR A PARTICULAR PURPOSE.
Use, copying, and distribution of any EMC software described in this publication requires an applicable software license.
For the most up-to-date listing of EMC product names, see EMC Corporation Trademarks on EMC.com All other trademarks used herein are the property of their respective owners.
Table of Contents iii
Greenplum Database DBA Guide 4.2 - Contents
Preface... 1
About This Guide... 1
About the Greenplum Database Documentation Set... 1
Document Conventions... 2
Text Conventions... 2
Command Syntax Conventions... 3
Getting Support... 3
Product information... 3
Technical support... 4
Chapter 1: Introduction to Greenplum... 5
Chapter 2: Accessing the Database... 6
Establishing a Database Session... 6
Supported Client Applications... 7
Greenplum Database Client Applications... 8
pgAdmin III for Greenplum Database... 9
Database Application Interfaces... 12
Third-Party Client Tools... 13
Troubleshooting Connection Problems... 14
Chapter 3: Configuring Client Authentication... 15
Allowing Connections to Greenplum Database... 15
Editing the pg_hba.conf File... 16
Limiting Concurrent Connections... 17
Encrypting Client/Server Connections... 18
Chapter 4: Managing Roles and Privileges... 20
Security Best Practices for Roles and Privileges... 20
Creating New Roles (Users)... 21
Altering Role Attributes... 21
Role Membership... 22
Managing Object Privileges... 23
Simulating Row and Column Level Access Control... 24
Encrypting Data... 25
Encrypting Passwords... 25
Enabling SHA-256 Encryption... 25
Time-based Authentication... 27
Chapter 5: Defining Database Objects... 28
Creating and Managing Databases... 28
About Template Databases... 28
Creating a Database... 28
Viewing the List of Databases... 29
Altering a Database... 29
Dropping a Database... 30
Creating and Managing Tablespaces... 30
Creating a Filespace... 30
Moving the Location of Temporary or Transaction Files... 31
Creating a Tablespace... 32
Viewing Existing Tablespaces and Filespaces... 33
Dropping Tablespaces and Filespaces... 33
Creating and Managing Schemas... 34
The Default “Public” Schema... 34
Creating a Schema... 34
Schema Search Paths... 34
Dropping a Schema... 35
System Schemas... 35
Creating and Managing Tables... 35
Creating a Table... 35
Choosing the Table Storage Model... 39
Heap Storage... 39
Append-Only Storage... 39
Choosing Row or Column-Oriented Storage... 40
Using Compression (Append-Only Tables Only)... 41
Checking the Compression and Distribution of an Append-Only Table 42 Support for Run-length Encoding... 43
Adding Column-level Compression... 43
Altering a Table... 48
Dropping a Table... 49
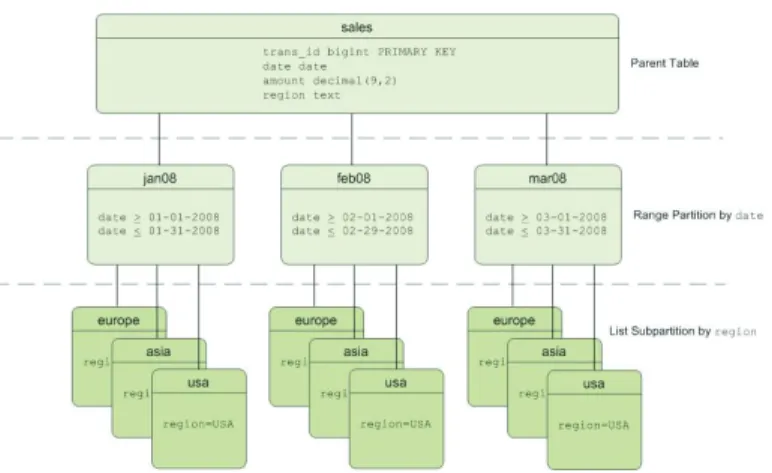
Partitioning Large Tables... 50
Table Partitioning in Greenplum Database... 51
Deciding on a Table Partitioning Strategy... 51
Creating Partitioned Tables... 52
Loading Partitioned Tables... 55
Verifying Your Partition Strategy... 56
Viewing Your Partition Design... 56
Maintaining Partitioned Tables... 57
Creating and Using Sequences... 60
Creating a Sequence... 61
Using a Sequence... 61
Altering a Sequence... 61
Dropping a Sequence... 61
Using Indexes in Greenplum Database... 61
Index Types... 63
Creating an Index... 64
Examining Index Usage... 65
Managing Indexes... 65
Dropping an Index... 66
Creating and Managing Views... 66
Creating Views... 66
Dropping Views... 66
Chapter 6: Managing Data... 67
About Concurrency Control in Greenplum Database... 67
Inserting Rows... 68
Updating Existing Rows... 69
Deleting Rows... 69
Table of Contents v
Working With Transactions... 70
Transaction Isolation Levels... 70
Vacuuming the Database... 71
Configuring the Free Space Map... 72
Chapter 7: Loading and Unloading Data... 73
Greenplum Database Loading Tools Overview... 73
External Tables... 73
gpload... 74
COPY... 74
Loading Data into Greenplum Database... 75
Accessing File-Based External Tables... 75
Using the Greenplum Parallel File Server (gpfdist)... 79
Using Hadoop Distributed File System (HDFS) Tables... 81
One-time HDFS Protocol Installation... 81
Creating and Using Web External Tables... 88
Loading Data Using an External Table... 89
Loading and Writing Non-HDFS Custom Data... 89
Using a Custom Format... 90
Creating External Tables - Examples... 93
Handling Load Errors... 95
Loading Data... 98
Optimizing Data Load and Query Performance...100
Unloading Data from Greenplum Database...100
Defining a File-Based Writable External Table...101
Defining a Command-Based Writable External Web Table...102
Unloading Data Using a Writable External Table...103
Unloading Data Using COPY...103
Transforming XML Data...104
XML Transformation Examples...112
Formatting Data Files...115
Formatting Rows...115
Formatting Columns...115
Representing NULL Values...116
Escaping...116
Character Encoding...117
Chapter 8: About Greenplum Query Processing...118
Understanding Query Planning and Dispatch...118
Understanding Greenplum Query Plans...119
Understanding Parallel Query Execution...120
Chapter 9: Querying Data...122
Defining Queries...122
SQL Lexicon...122
SQL Value Expressions...122
Using Functions and Operators...132
Using Functions in Greenplum Database...133
User-Defined Functions...133
Built-in Functions and Operators...134
Advanced Analytic Functions...137
Query Performance...149
Query Profiling...149
Reading EXPLAIN Output...149
Reading EXPLAIN ANALYZE Output...151
Examining Query Plans to Solve Problems...152
Chapter 10: Managing Workload and Resources...154
Overview of Greenplum Workload Management...154
How Resource Queues Work in Greenplum Database...154
Steps to Enable Workload Management...158
Configuring Workload Management...159
Creating Resource Queues...160
Creating Queues with an Active Query Limit...160
Creating Queues with Memory Limits...161
Creating Queues with a Query Planner Cost Limits...161
Setting Priority Levels...162
Assigning Roles (Users) to a Resource Queue...163
Removing a Role from a Resource Queue...163
Modifying Resource Queues...164
Altering a Resource Queue...164
Dropping a Resource Queue...164
Checking Resource Queue Status...164
Viewing Queued Statements and Resource Queue Status...165
Viewing Resource Queue Statistics...165
Viewing the Roles Assigned to a Resource Queue...165
Viewing the Waiting Queries for a Resource Queue...166
Clearing a Waiting Statement From a Resource Queue...166
Viewing the Priority of Active Statements...167
Resetting the Priority of an Active Statement...167
Chapter 11: Defining Database Performance...168
Understanding the Performance Factors...168
System Resources...168
Workload...168
Throughput...168
Contention...169
Optimization...169
Determining Acceptable Performance...169
Baseline Hardware Performance...169
Performance Benchmarks...169
Chapter 12: Common Causes of Performance Issues...170
Identifying Hardware and Segment Failures...170
Managing Workload...171
Avoiding Contention...171
Maintaining Database Statistics...171
Identifying Statistics Problems in Query Plans...171
Tuning Statistics Collection...172
Optimizing Data Distribution...172
Table of Contents vii
Greenplum Database Maximum Limits...173
Chapter 13: Investigating a Performance Problem...174
Checking System State...174
Checking Database Activity...174
Checking for Active Sessions (Workload)...174
Checking for Locks (Contention)...174
Checking Query Status and System Utilization...175
Troubleshooting Problem Queries...175
Investigating Error Messages...175
Preface
This guide provides information for database administrators and database superusers responsible for administering a Greenplum Database system.
• About This Guide • Document Conventions • Getting Support
About This Guide
This guide explains how clients connect to a Greenplum Database system, how to configure access control and workload management, perform basic administration tasks such as defining database objects, loading and unloading data, writing queries, and managing data, and provides guidance on identifying and troubleshooting common performance issues.
This guide assumes knowledge of database management systems, database administration, and structured query language (SQL).
Because Greenplum Database is based on PostgreSQL 8.2.15, this guide assumes some familiarity with PostgreSQL. References to PostgreSQL documentation are provided for features that are similar to those in Greenplum Database.
About the Greenplum Database Documentation Set
As of Release 4.2.3, the Greenplum Database documentation set consists of the following guides.
Table 0.1 Greenplum Database documentation set
Guide Name Description
Greenplum Database Database Administrator Guide
Every day DBA tasks such as configuring access control and workload management, writing queries, managing data, defining database objects, and performance troubleshooting. Greenplum Database System
Administrator Guide
Describes the Greenplum Database architecture and concepts such as parallel processing, and system administration tasks for Greenplum Database such as configuring the server, monitoring system activity, enabling high-availability, backing up and restoring databases, and expanding the system. Greenplum Database Reference
Guide
Reference information for Greenplum Database systems: SQL commands, system catalogs, environment variables, character set support, datatypes, the Greenplum MapReduce
specification, postGIS extension, server parameters, the gp_toolkit administrative schema, and SQL 2008 support. Greenplum Database Utility
Guide
Reference information for command-line utilities, client programs, and Oracle compatibility functions.
Greenplum Database Installation Guide
Information and instructions for installing and initializing a Greenplum Database system.
Document Conventions 2
Document Conventions
The following conventions are used throughout the Greenplum Database documentation to help you identify certain types of information.
• Text Conventions
• Command Syntax Conventions Text Conventions
Table 0.2 Text Conventions
Text Convention Usage Examples
bold Button, menu, tab, page, and field names in GUI applications
Click Cancel to exit the page without saving your changes.
italics New terms where they are defined
Database objects, such as schema, table, or columns names
The master instance is the postgres
process that accepts client connections.
Catalog information for Greenplum Database resides in the pg_catalog
schema.
monospace File names and path names Programs and executables Command names and syntax Parameter names
Edit the postgresql.conf file. Use gpstart to start Greenplum Database.
monospace italics Variable information within file paths and file names
Variable information within command syntax
/home/gpadmin/config_file COPY tablename FROM 'filename'
monospace bold Used to call attention to a particular part of a command, parameter, or code snippet.
Change the host name, port, and database name in the JDBC connection URL:
jdbc:postgresql://host:5432/m ydb
UPPERCASE Environment variables
SQL commands Keyboard keys
Make sure that the Java /bin
directory is in your $PATH.
SELECT * FROM my_table;
Command Syntax Conventions Table 0.3 Command Syntax Conventions
Text Convention Usage Examples
{ } Within command syntax, curly
braces group related command options. Do not type the curly braces.
FROM { 'filename' | STDIN }
[ ] Within command syntax, square
brackets denote optional arguments. Do not type the brackets.
TRUNCATE [ TABLE ] name
... Within command syntax, an ellipsis denotes repetition of a command, variable, or option. Do not type the ellipsis.
DROP TABLE name [, ...]
| Within command syntax, the pipe
symbol denotes an “OR”
relationship. Do not type the pipe symbol.
VACUUM [ FULL | FREEZE ]
$ system_command # root_system_command => gpdb_command =# su_gpdb_command
Denotes a command prompt - do not type the prompt symbol. $ and
# denote terminal command prompts. => and =# denote
Greenplum Database interactive program command prompts (psql
or gpssh, for example).
$ createdb mydatabase
# chown gpadmin -R /datadir
=> SELECT * FROM mytable;
=# SELECT * FROM pg_database;
Getting Support
EMC support, product, and licensing information can be obtained as follows. Product information
For documentation, release notes, software updates, or for information about EMC products, licensing, and service, go to the EMC Powerlink website (registration required) at:
Getting Support 4 Technical support
For technical support, go to Powerlink and choose Support. On the Support page, you will see several options, including one for making a service request. Note that to open a service request, you must have a valid support agreement. Please contact your EMC sales representative for details about obtaining a valid support agreement or with questions about your account.
1.
Introduction to Greenplum
Greenplum Database is a massively parallel processing (MPP) database server based on PostgreSQL open-source technology. MPP (also known as a shared nothing
architecture) refers to systems with two or more processors that cooperate to carry out an operation - each processor with its own memory, operating system and disks. Greenplum uses this high-performance system architecture to distribute the load of multi-terabyte data warehouses, and can use all of a system’s resources in parallel to process a query.
Greenplum Database is essentially several PostgreSQL database instances acting together as one cohesive database management system (DBMS). It is based on PostgreSQL 8.2.15, and in most cases is very similar to PostgreSQL with regard to SQL support, features, configuration options, and end-user functionality. Database users interact with Greenplum Database as they would a regular PostgreSQL DBMS. The internals of PostgreSQL have been modified or supplemented to support the parallel structure of Greenplum Database. For example, the system catalog, query planner, optimizer, query executor, and transaction manager components have been modified and enhanced to be able to execute queries simultaneously across all of the parallel PostgreSQL database instances. The Greenplum interconnect (the networking layer) enables communication between the distinct PostgreSQL instances and allows the system to behave as one logical database.
Greenplum Database also includes features designed to optimize PostgreSQL for business intelligence (BI) workloads. For example, Greenplum has added parallel data loading (external tables), resource management, query optimizations, and storage enhancements, which are not found in standard PostgreSQL. Many features and optimizations developed by Greenplum make their way into the PostgreSQL
community. For example, table partitioning is a feature first developed by Greenplum, and it is now in standard PostgreSQL.
Establishing a Database Session 6
2.
Accessing the Database
This chapter explains the various client tools you can use to connect to Greenplum Database, and how to establish a database session. It contains the following topics: • Establishing a Database Session
• Supported Client Applications
• Troubleshooting Connection Problems
Establishing a Database Session
Users can connect to Greenplum Database using a PostgreSQL-compatible client program, such as psql. Users and administrators always connect to Greenplum
Database through the master - the segments cannot accept client connections.
In order to establish a connection to the Greenplum Database master, you will need to know the following connection information and configure your client program accordingly.
Table 2.1 Connection Parameters
Connection Parameter Description Environment Variable Application name The application name that is
connecting to the database. The default value, held in the
application_name connection parameter is psql.
$PGAPPNAME
Database name The name of the database to which you want to connect. For a newly initialized system, use the
template1 database to connect for the first time.
$PGDATABASE
Host name The host name of the Greenplum Database master. The default host is the local host.
Supported Client Applications
Users can connect to Greenplum Database using various client applications: • A number of Greenplum Database Client Applications are provided with your
Greenplum installation. The psql client application provides an interactive command-line interface to Greenplum Database.
• pgAdmin III for Greenplum Database is an enhanced version of the popular management tool pgAdmin III. Since version 1.10.0, the pgAdmin III client available from PostgreSQL Tools includes support for Greenplum-specific features. Installation packages are available for download from the pgAdmin download site.
• Using standard Database Application Interfaces, such as ODBC and JDBC, users can create their own client applications that interface to Greenplum Database. Because Greenplum Database is based on PostgreSQL, it uses the standard PostgreSQL database drivers.
• Most Third-Party Client Tools that use standard database interfaces, such as ODBC and JDBC, can be configured to connect to Greenplum Database. Port The port number that the
Greenplum Database master instance is running on. The default is 5432.
$PGPORT
User name The database user (role) name to connect as. This is not necessarily the same as your OS user name. Check with your Greenplum administrator if you are not sure what you database user name is. Note that every Greenplum Database system has one superuser account that is created automatically at initialization time. This account has the same name as the OS name of the user who initialized the Greenplum system (typically gpadmin).
$PGUSER
Table 2.1 Connection Parameters
Supported Client Applications 8 Greenplum Database Client Applications
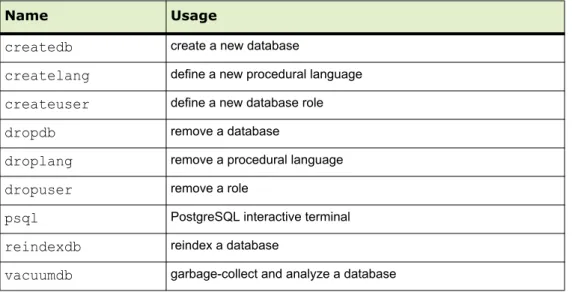
Greenplum Database comes installed with a number of client applications located in
$GPHOME/bin of your Greenplum Database master host installation. The following are the most commonly used client applications:
Table 2.2 Commonly used client applications
Name Usage
createdb create a new database
createlang define a new procedural language
createuser define a new database role
dropdb remove a database
droplang remove a procedural language
dropuser remove a role
psql PostgreSQL interactive terminal
reindexdb reindex a database
vacuumdb garbage-collect and analyze a database
When using these client applications, you must connect to a database through the Greenplum master instance. You will need to know the name of your target database, the host name and port number of the master, and what database user name to connect as. This information can be provided on the command-line using the options -d, -h, -p, and -U respectively. If an argument is found that does not belong to any option, it will be interpreted as the database name first.
All of these options have default values which will be used if the option is not specified. The default host is the local host. The default port number is 5432. The default user name is your OS system user name, as is the default database name. Note that OS user names and Greenplum Database user names are not necessarily the same. If the default values are not correct, you can set the environment variables
PGDATABASE, PGHOST, PGPORT, and PGUSER to the appropriate values, or use a psql ~/.pgpass file to contain frequently-used passwords. For information about
Greenplum Database environment variables, see the Greenplum Database Reference Guide. For information about psql, see the Greenplum Database Utility Guide.
Connecting with psql
Depending on the default values used or the environment variables you have set, the following examples show how to access a database via psql:
$ psql -d gpdatabase -h master_host -p 5432 -U gpadmin $ psql gpdatabase
$ psql
If a user-defined database has not yet been created, you can access the system by connecting to the template1 database. For example:
$ psql template1
After connecting to a database, psql provides a prompt with the name of the database to which psql is currently connected, followed by the string => (or =# if you are the database superuser). For example:
gpdatabase=>
At the prompt, you may type in SQL commands. A SQL command must end with a ;
(semicolon) in order to be sent to the server and executed. For example:
=> SELECT * FROM mytable;
See the Greenplum Reference Guide for information about using the psql client application and SQL commands and syntax.
pgAdmin III for Greenplum Database
If you prefer a graphic interface, use pgAdmin III for Greenplum Database. This GUI client supports PostgreSQL databases with all standard pgAdmin III features, while adding support for Greenplum-specific features.
pgAdmin III for Greenplum Database supports the following Greenplum-specific features:
• External tables
• Append-only tables, including compressed append-only tables • Table partitioning
• Resource queues
• Graphical EXPLAIN ANALYZE
Supported Client Applications 10 Figure 2.1 Greenplum Options in pgAdmin III
Installing pgAdmin III for Greenplum Database
The installation package for pgAdmin III for Greenplum Database is available for download from the official pgAdmin III download site (http://www.pgadmin.org). Installation instructions are included in the installation package.
Documentation for pgAdmin III for Greenplum Database
For general help on the features of the graphical interface, select Help contents from the Help menu.
For help with Greenplum-specific SQL support, select Greenplum Database Help
from the Help menu. If you have an active internet connection, you will be directed to online Greenplum SQL reference documentation. Alternately, you can install the Greenplum Client Tools package. This package contains SQL reference
documentation that is accessible to the help links in pgAdmin III.
Performing Administrative Tasks with pgAdmin III
This section highlights two of the many Greenplum Database administrative tasks you can perform with pgAdmin III: editing the server configuration, and viewing a graphical representation of a query plan.
Editing Server Configuration
The pgAdmin III interface provides two ways to update the server configuration in
postgresql.conf: locally, through the File menu, and remotely on the server through the Tools menu. Editing the server configuration remotely may be more convenient in many cases, because it does not require you to upload or copy
postgresql.conf.
To edit server configuration remotely
1. Connect to the server whose configuration you want to edit. If you are connected to multiple servers, make sure that the correct server is highlighted in the object browser in the left pane.
2. Select Tools > Server Configuration > postgresql.conf. The Backend Configuration Editor opens, displaying the list of available and enabled server configuration parameters.
3. Locate the parameter you want to edit, and double click on the entry to open the Configuration settings dialog.
4. Enter the new value for the parameter, or select/deselect Enabled as desired and click OK.
5. If the parameter can be enabled by reloading server configuration, click the green reload icon, or select File > Reload server. Many parameters require a full restart of the server.
Viewing a Graphical Query Plan
Using the pgAdmin III query tool, you can run a query with EXPLAIN to view the details of the query plan. The output includes details about operations unique to Greenplum distributed query processing such as plan slices and motions between segments. You can view a graphical depiction of the plan as well as the text-based data output.
To view a graphical query plan
1. With the correct database highlighted in the object browser in the left pane, select
Tools > Query tool.
2. Enter the query by typing in the SQL Editor, dragging objects into the Graphical Query Builder, or opening a file.
3. Select Query > Explain options and verify the following options:
• Verbose — this must be deselected if you want to view a graphical depiction of the query plan
• Analyze — select this option if you want to run the query in addition to viewing the plan
4. Trigger the operation by clicking the Explain query option at the top of the pane, or by selecting Query > Explain.
The query plan displays in the Output pane at the bottom of the screen. Select the Explain tab to view the graphical output. For example:
Supported Client Applications 12 Figure 2.2 Graphical Query Plan in pgAdmin III
Database Application Interfaces
You may want to develop your own client applications that interface to Greenplum Database. PostgreSQL provides a number of database drivers for the most commonly used database application programming interfaces (APIs), which can also be used with Greenplum Database. These drivers are not packaged with the Greenplum Database base distribution. Each driver is an independent PostgreSQL development project and must be downloaded, installed and configured to connect to Greenplum Database. The following drivers are available:
Table 2.3 Greenplum Database Interfaces
API PostgreSQL Driver Download Link
ODBC pgodbc Available in the Greenplum Database Connectivity package, which can be downloaded from the EMC Download Center.
JDBC pgjdbc Available in the Greenplum Database Connectivity package, which can be downloaded from the EMC Download Center.
Perl DBI pgperl http://gborg.postgresql.org/project/pgperl
General instructions for accessing a Greenplum Database with an API are:
1. Download your programming language platform and respective API from the appropriate source. For example, you can get the Java development kit (JDK) and JDBC API from Sun.
2. Write your client application according to the API specifications. When programming your application, be aware of the SQL support in Greenplum Database so you do not include any unsupported SQL syntax. See the Greenplum Database Reference Guide for more information.
Download the appropriate PostgreSQL driver and configure connectivity to your Greenplum Database master instance. Greenplum provides a client tools package that contains the supported database drivers for Greenplum Database. Download the client tools package and documentation from the EMC Download Center.
Third-Party Client Tools
Most third-party extract-transform-load (ETL) and business intelligence (BI) tools use standard database interfaces, such as ODBC and JDBC, and can be configured to connect to Greenplum Database. Greenplum has worked with the following tools on previous customer engagements and is in the process of becoming officially certified: • Business Objects
• Microstrategy
• Informatica Power Center
• Microsoft SQL Server Integration Services (SSIS) and Reporting Services (SSRS) • Ascential Datastage
• SAS • Cognos
Greenplum Professional Services can assist users in configuring their chosen third-party tool for use with Greenplum Database.
Troubleshooting Connection Problems 14
Troubleshooting Connection Problems
A number of things can prevent a client application from successfully connecting to Greenplum Database. This section explains some of the common causes of connection problems and how to correct them.
Table 2.4 Common connection problems
Problem Solution
No pg_hba.conf entry for host or user
To enable Greenplum Database to accept remote client connections, you must configure your Greenplum Database master instance so that connections are allowed from the client hosts and database users that will be connecting to Greenplum Database. This is done by adding the appropriate entries to the pg_hba.conf configuration file (located in the master instance’s data directory). For more detailed information, see “Allowing Connections to Greenplum Database” on page 15.
Greenplum Database is not running
If the Greenplum Database master instance is down, users will not be able to connect. You can verify that the Greenplum Database system is up by running the gpstate utility on the Greenplum master host. Network problems
Interconnect timeouts
If users connect to the Greenplum master host from a remote client, network problems can prevent a connection (for example, DNS host name resolution problems, the host system is down, and so on.). To ensure that network problems are not the cause, connect to the Greenplum master host from the remote client host. For example:
pinghostname
If the system cannot resolve the host names and IP addresses of the hosts involved in Greenplum Database, queries and connections will fail. For some operations, connections to the Greenplum Database master use localhost and others use the actual host name, so you must be able to resolve both. If you encounter this error, first make sure you can connect to each host in your Greenplum Database array from the master host over the network. In the /etc/hosts file of the master and all segments, make sure you have the correct host names and IP addresses for all hosts involved in the Greenplum Database array. The 127.0.0.1 IP must resolve to localhost. Too many clients already By default, Greenplum Database is configured to allow a maximum of
250 concurrent user connections on the master and 750 on a segment. A connection attempt that causes that limit to be exceeded will be refused. This limit is controlled by the max_connections
parameter in the postgresql.conf configuration file of the Greenplum Database master. If you change this setting for the master, you must also make appropriate changes at the segments.
3.
Configuring Client Authentication
When a Greenplum Database system is first initialized, the system contains one predefined superuser role. This role will have the same name as the operating system user who initialized the Greenplum Database system. This role is referred to as
gpadmin. By default, the system is configured to only allow local connections to the
database from the gpadmin role. If you want to allow any other roles to connect, or if you want to allow connections from remote hosts, you have to configure Greenplum Database to allow such connections. This chapter explains how to configure client connections and authentication to Greenplum Database.
• Allowing Connections to Greenplum Database • Limiting Concurrent Connections
Allowing Connections to Greenplum Database
Client access and authentication is controlled by the standard PostgreSQL host-based authentication file, pg_hba.conf. In Greenplum Database, the pg_hba.conf file of the
master instance controls client access and authentication to your Greenplum system. Greenplum segments have pg_hba.conf files that are configured to allowonly client connections from the master host and never accept client connections. Do not alter the
pg_hba.conf file on your segments.
See The pg_hba.conf File in the PostgreSQL documentation for more information. The general format of the pg_hba.conf file is a set of records, one per line.
Greenplum ignores blank lines and any text after the # comment character. A record consists of a number of fields that are separated by spaces and/or tabs. Fields can contain white space if the field value is quoted. Records cannot be continued across lines. Each remote client access record has the following format:
host database role CIDR-address authentication-method
Each UNIX-domain socket access record has the following format:
local database role authentication-method
The following table describes meaning of each field. Table 3.1 pg_hba.conf Fields
Field Description
local Matches connection attempts using UNIX-domain sockets. Without a record of this type, UNIX-domain socket connections are disallowed. host Matches connection attempts made using TCP/IP. Remote TCP/IP
connections will not be possible unless the server is started with an appropriate value for the listen_addresses server configuration parameter.
hostssl Matches connection attempts made using TCP/IP, but only when the connection is made with SSL encryption. SSL must be enabled at server start time by setting the ssl configuration parameter
Allowing Connections to Greenplum Database 16 Editing the pg_hba.conf File
This example shows how to edit the pg_hba.conf file of the master to allow remote client access to all databases from all roles using encrypted password authentication.
Note: For a more secure system, consider removing all connections that use trust
authentication from your master pg_hba.conf. Trust authentication means the role is granted access without any authentication, therefore bypassing all security. Replace trust entries with ident authentication if your system has an ident service available.
Editing pg_hba.conf
1. Open the file $MASTER_DATA_DIRECTORY/pg_hba.conf in a text editor.
hostnossl Matches connection attempts made over TCP/IP that do not use SSL.
database Specifies which database names this record matches. The value all
specifies that it matches all databases. Multiple database names can be supplied by separating them with commas. A separate file containing database names can be specified by preceding the file name with @.
role Specifies which database role names this record matches. The value
all specifies that it matches all roles. If the specified role is a group and you want all members of that group to be included, precede the role name with a +. Multiple role names can be supplied by
separating them with commas. A separate file containing role names can be specified by preceding the file name with @.
CIDR-address Specifies the client machine IP address range that this record matches. It contains an IP address in standard dotted decimal notation and a CIDR mask length. IP addresses can only be specified numerically, not as domain or host names. The mask length indicates the number of high-order bits of the client IP address that must match. Bits to the right of this must be zero in the given IP address. There must not be any white space between the IP address, the /, and the CIDR mask length.
Typical examples of a CIDR-address are 172.20.143.89/32 for a single host, or 172.20.143.0/24 for a small network, or 10.6.0.0/16 for a larger one. To specify a single host, use a CIDR mask of 32 for IPv4 or 128 for IPv6. In a network address, do not omit trailing zeroes.
IP-address IP-mask
These fields can be used as an alternative to the CIDR-address notation. Instead of specifying the mask length, the actual mask is specified in a separate column. For example, 255.0.0.0 represents an IPv4 CIDR mask length of 8, and 255.255.255.255 represents a CIDR mask length of 32. These fields only apply to host, hostssl, and hostnossl records.
authentication-method Specifies the authentication method to use when connecting. Greenplum supports the authentication methods supported by Postgre 9.0.
Table 3.1 pg_hba.conf Fields
Field Description
2. Add a line to the file for each type of connection you want to allow. Records are read sequentially, so the order of the records is significant. Typically, earlier records will have tight connection match parameters and weaker authentication methods, while later records will have looser match parameters and stronger authentication methods. For example:
# allow the gpadmin user local access to all databases # using ident authentication
local all gpadmin ident sameuser host all gpadmin 127.0.0.1/32 ident host all gpadmin ::1/128 ident
# allow the 'dba' role access to any database from any # host with IP address 192.168.x.x and use md5 encrypted # passwords to authenticate the user
# Note that to use SHA-256 encryption, replace md5 with # password in the line below
host all dba 192.168.0.0/32 md5
# allow all roles access to any database from any
# host and use ldap to authenticate the user. Greenplum role # names must match the LDAP common name.
host all all 192.168.0.0/32 ldap ldapserver=usldap1 ldapport=1389 ldapprefix="cn="
ldapsuffix=",ou=People,dc=company,dc=com" 3. Save and close the file.
4. Reload the pg_hba.conf configuration file for your changes to take effect:
$ gpstop -u
Note: Note that you can also control database access by setting object privileges as described in “Managing Object Privileges” on page 33. The pg_hba.conf file just controls who can initiate a database session and how those connections are
authenticated.
Limiting Concurrent Connections
To limit the number of active concurrent sessions to your Greenplum Database system, you can configure the max_connections server configuration parameter. This is a local parameter, meaning that you must set it in the postgresql.conf file of the master, the standby master, and each segment instance (primary and mirror). The value of max_connections on segments must be 5-10 times the value on the master. When you set max_connections, you must also set the dependent parameter
max_prepared_transactions. This value must be at least as large as the value of
max_connections on the master, and segment instances should be set to the same value as the master.
For example:
In $MASTER_DATA_DIRECTORY/postgresql.conf (including standby master):
Encrypting Client/Server Connections 18
max_connections=100
max_prepared_transactions=100
In SEGMENT_DATA_DIRECTORY/postgresql.conf for all segment instances:
max_connections=500
max_prepared_transactions=100
To change the number of allowed connections 1. Stop your Greenplum Database system:
$ gpstop
2. On your master host, edit $MASTER_DATA_DIRECTORY/postgresql.conf and change the following two parameters:
max_connections (the number of active user sessions you want to allow plus the number of superuser_reserved_connections)
max_prepared_transactions (must be greater than or equal to
max_connections)
3. On each segment instance, edit SEGMENT_DATA_DIRECTORY/postgresql.conf
and and change the following two parameters:
max_connections (must be 5-10 times the value on the master)
max_prepared_transactions (must be equal to the value on the master) 4. Restart your Greenplum Database system:
$ gpstart
Note: Raising the values of these parameters may cause Greenplum Database to request more shared memory. To mitigate this effect, consider decreasing other memory-related parameters such as
gp_cached_segworkers_threshold.
Encrypting Client/Server Connections
Greenplum Database has native support for SSL connections between the client and the master server. SSL connections prevent third parties from snooping on the packets, and also prevent man-in-the-middle attacks. SSL should be used whenever the client connection goes through an insecure link, and must be used whenever client certificate authentication is used.
To enable SSL requires that OpenSSL be installed on both the client and the master server systems. Greenplum can be started with SSL enabled by setting the server configuration parameter ssl=on in the master postgresql.conf. When starting in SSL mode, the server will look for the files server.key (server private key) and
server.crt (server certificate) in the master data directory. These files must be set
up correctly before an SSL-enabled Greenplum system can start.
Important: Do not protect the private key with a passphrase. The server does not prompt for a passphrase for the private key, and the database startup fails with an error if one is required.
A self-signed certificate can be used for testing, but a certificate signed by a certificate authority (CA) should be used in production, so the client can verify the identity of the server. Either a global or local CA can be used. If all the clients are local to the organization, a local CA is recommended.
Creating a Self-signed Certificate without a Passphrase for Testing Only To create a quick self-signed certificate for the server for testing, use the following OpenSSL command:
# openssl req -new -text -out server.req
Fill out the information that openssl asks for. Be sure to enter the local host name as
Common Name. The challenge password can be left blank.
The program will generate a key that is passphrase protected, and does not accept a passphrase that is less than four characters long.
To use this certificate with Greenplum Database, remove the passphrase with the following commands:
# openssl rsa -in privkey.pem -out server.key # rm privkey.pem
Enter the old passphrase when prompted to unlock the existing key.
Then, enter the following command to turn the certificate into a self-signed certificate and to copy the key and certificate to a location where the server will look for them.
# openssl req -x509 -in server.req -text -key server.key -out server.crt
Finally, change the permissions on the key with the following command. The server will reject the file if the permissions are less restrictive than these.
# chmod og-rwx server.key
For more details on how to create your server private key and certificate, refer to the OpenSSL documentation.
Security Best Practices for Roles and Privileges 20
4.
Managing Roles and Privileges
Greenplum Database manages database access permissions using the concept of roles. The concept of roles subsumes the concepts of users and groups. A role can be a database user, a group, or both. Roles can own database objects (for example, tables) and can assign privileges on those objects to other roles to control access to the objects. Roles can be members of other roles, thus a member role can inherit the object privileges of its parent role.
Every Greenplum Database system contains a set of database roles (users and groups). Those roles are separate from the users and groups managed by the operating system on which the server runs. However, for convenience you may want to maintain a relationship between operating system user names and Greenplum Database role names, since many of the client applications use the current operating system user name as the default.
In Greenplum Database, users log in and connect through the master instance, which then verifies their role and access privileges. The master then issues out commands to the segment instances behind the scenes as the currently logged in role.
Roles are defined at the system level, meaning they are valid for all databases in the system.
In order to bootstrap the Greenplum Database system, a freshly initialized system always contains one predefined superuser role (also referred to as the system user). This role will have the same name as the operating system user that initialized the Greenplum Database system. Customarily, this role is named gpadmin. In order to create more roles you first have to connect as this initial role.
Security Best Practices for Roles and Privileges
• Secure the gpadmin system user. Greenplum requires a UNIX user id to install and initialize the Greenplum Database system. This system user is referred to as
gpadmin in the Greenplum documentation. This gpadmin user is the default database superuser in Greenplum Database, as well as the file system owner of the Greenplum installation and its underlying data files. This default administrator account is fundamental to the design of Greenplum Database. The system cannot run without it, and there is no way to limit the access of this gpadmin user id. Use roles to manage who has access to the database for specific purposes. You should only use the gpadmin account for system maintenance tasks such as expansion and upgrade. Anyone who logs on to a Greenplum host as this user id can read, alter or delete any data; including system catalog data and database access rights. Therefore, it is very important to secure the gpadmin user id and only provide access to essential system administrators. Administrators should only log in to Greenplum as gpadmin when performing certain system maintenance tasks (such as upgrade or expansion). Database users should never log on as gpadmin, and ETL or production workloads should never run as gpadmin.
• Assign a distinct role to each user that logs in. For logging and auditing purposes, each user that is allowed to log in to Greenplum Database should be given their own database role. For applications or web services, consider creating a distinct role for each application or service. See “Creating New Roles (Users)” on page 21.
• Use groups to manage access privileges. See “Role Membership” on page 22. • Limit users who have the SUPERUSER role attribute. Roles that are
superusers bypass all access privilege checks in Greenplum Database, as well as resource queuing. Only system administrators should be given superuser rights. See “Altering Role Attributes” on page 21.
Creating New Roles (Users)
A user-level role is considered to be a database role that can log in to the database and initiate a database session. Therefore, when you create a new user-level role using the
CREATE ROLE command, you must specify the LOGIN privilege. For example:
=# CREATE ROLE jsmith WITH LOGIN;
A database role may have a number of attributes that define what sort of tasks that role can perform in the database. You can set these attributes when you create the role, or later using the ALTER ROLE command. See Table 4.1, “Role Attributes” on page 21 for a description of the role attributes you can set.
Altering Role Attributes
A database role may have a number of attributes that define what sort of tasks that role can perform in the database.
Table 4.1 Role Attributes
Attributes Description
SUPERUSER | NOSUPERUSER Determines if the role is a superuser. You must yourself be a superuser to create a new superuser. NOSUPERUSER is the default. CREATEDB | NOCREATEDB Determines if the role is allowed to create databases. NOCREATEDB
is the default.
CREATEROLE | NOCREATEROLE Determines if the role is allowed to create and manage other roles. NOCREATEROLE is the default.
INHERIT | NOINHERIT Determines whether a role inherits the privileges of roles it is a member of. A role with the INHERIT attribute can automatically use whatever database privileges have been granted to all roles it is directly or indirectly a member of. INHERIT is the default. LOGIN | NOLOGIN Determines whether a role is allowed to log in. A role having the
LOGIN attribute can be thought of as a user. Roles without this attribute are useful for managing database privileges (groups). NOLOGIN is the default.
CONNECTION LIMIT connlimit If role can log in, this specifies how many concurrent connections the role can make. -1 (the default) means no limit.
Role Membership 22 You can set these attributes when you create the role, or later using the ALTER ROLE
command. For example:
=# ALTER ROLE jsmith WITH PASSWORD 'passwd123'; =# ALTER ROLE admin VALID UNTIL 'infinity'; =# ALTER ROLE jsmith LOGIN;
=# ALTER ROLE jsmith RESOURCE QUEUE adhoc; =# ALTER ROLE jsmith DENY DAY 'Sunday';
A role can also have role-specific defaults for many of the server configuration settings. For example, to set the default schema search path for a role:
=# ALTER ROLE admin SET search_path TO myschema, public;
Role Membership
It is frequently convenient to group users together to ease management of object privileges: that way, privileges can be granted to, or revoked from, a group as a whole. In Greenplum Database this is done by creating a role that represents the group, and then granting membership in the group role to individual user roles.
Use the CREATE ROLE SQL command to create a new group role. For example:
=# CREATE ROLE admin CREATEROLE CREATEDB;
Once the group role exists, you can add and remove members (user roles) using the
GRANT and REVOKE commands. For example: =# GRANT admin TO john, sally;
PASSWORD ‘password’ Sets the role’s password. If you do not plan to use password authentication you can omit this option. If no password is specified, the password will be set to null and password authentication will always fail for that user. A null password can optionally be written explicitly as PASSWORD NULL.
ENCRYPTED | UNENCRYPTED Controls whether the password is stored encrypted in the system catalogs. The default behavior is determined by the configuration parameter password_encryption (currently set to md5, for SHA-256 encryption, change this setting to password). If the presented password string is already in encrypted format, then it is stored encrypted as-is, regardless of whether ENCRYPTED or UNENCRYPTED is specified (since the system cannot decrypt the specified encrypted password string). This allows reloading of encrypted passwords during dump/restore.
VALID UNTIL ‘timestamp’ Sets a date and time after which the role’s password is no longer valid. If omitted the password will be valid for all time.
RESOURCE QUEUE queue_name Assigns the role to the named resource queue for workload management. Any statement that role issues is then subject to the resource queue’s limits. Note that the RESOURCE QUEUE attribute is not inherited; it must be set on each user-level (LOGIN) role. DENY {deny_interval | deny_point} Restricts access during an interval, specified by day or day and time.
For more information see “Time-based Authentication” on page 27. Table 4.1 Role Attributes
=# REVOKE admin FROM bob;
For managing object privileges, you would then grant the appropriate permissions to the group-level role only (see Table 4.2, “Object Privileges” on page 23 ). The member user roles then inherit the object privileges of the group role. For example:
=# GRANT ALL ON TABLE mytable TO admin; =# GRANT ALL ON SCHEMA myschema TO admin; =# GRANT ALL ON DATABASE mydb TO admin;
The role attributes LOGIN, SUPERUSER, CREATEDB, and CREATEROLE are never
inherited as ordinary privileges on database objects are. User members must actually
SET ROLE to a specific role having one of these attributes in order to make use of the attribute. In the above example, we gave CREATEDB and CREATEROLE to the admin
role. If sally is a member of admin, she could issue the following command to assume the role attributes of the parent role:
=> SET ROLE admin;
Managing Object Privileges
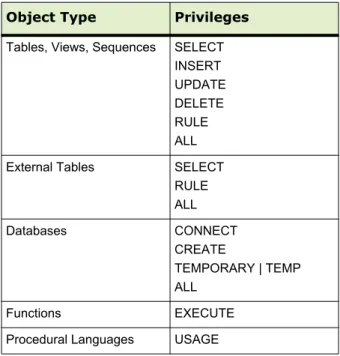
When an object (table, view, sequence, database, function, language, schema, or tablespace) is created, it is assigned an owner. The owner is normally the role that executed the creation statement. For most kinds of objects, the initial state is that only the owner (or a superuser) can do anything with the object. To allow other roles to use it, privileges must be granted. Greenplum Database supports the following privileges for each object type:
Table 4.2 Object Privileges
Object Type Privileges Tables, Views, Sequences SELECT
INSERT UPDATE DELETE RULE ALL External Tables SELECT
RULE ALL Databases CONNECT CREATE TEMPORARY | TEMP ALL Functions EXECUTE Procedural Languages USAGE
Managing Object Privileges 24 Use the GRANT SQL command to give a specified role privileges on an object. For
example:
=# GRANT INSERT ON mytable TO jsmith;
To revoke privileges, use the REVOKE command. For example:
=# REVOKE ALL PRIVILEGES ON mytable FROM jsmith;
You can also use the DROP OWNED and REASSIGN OWNED commands for managing objects owned by deprecated roles (Note: only an object’s owner or a superuser can drop an object or reassign ownership). For example:
=# REASSIGN OWNED BY sally TO bob; =# DROP OWNED BY visitor;
Simulating Row and Column Level Access Control
Row-level or column-level access is not supported, nor is labeled security. Row-level and column-level access can be simulated using views to restrict the columns and/or rows that are selected. Row-level labels can be simulated by adding an extra column to the table to store sensitivity information, and then using views to control row-level access based on this column. Roles can then be granted access to the views rather than the base table.
Schemas CREATE
USAGE ALL Custom Protocol SELECT
INSERT UPDATE DELETE RULE ALL
Note: Privileges must be granted for each object individually. For example, granting ALL on a database does not grant full access to the objects within that database. It only grants all of the database-level privileges (CONNECT, CREATE, TEMPORARY) to the database itself.
Table 4.2 Object Privileges
Object Type Privileges
Encrypting Data
PostgreSQL provides an optional package of encryption/decryption functions called
pgcrypto, which can also be installed and used in Greenplum Database. The
pgcrypto package is not installed by default with Greenplum Database, however you can download a pgcrypto package from the EMC Download Center, then use the Greenplum Package Manager (gppkg) to install pgcrypto across your entire cluster . The pgcrypto functions allow database administrators to store certain columns of data in encrypted form. This adds an extra layer of protection for sensitive data, as data stored in Greenplum Database in encrypted form cannot be read by users who do not have the encryption key, nor be read directly from the disks.
It is important to note that the pgcrypto functions run inside database server. That means that all the data and passwords move between pgcrypto and the client application in clear-text. For optimal security, consider also using SSL connections between the client and the Greenplum master server.
Encrypting Passwords
In Greenplum Database versions before 4.2.1, passwords were encrypted using MD5 hashing by default. Since some customers require cryptographic algorithms that meet the Federal Information Processing Standard140-2, as of version 4.2.1, Greenplum Database features RSA’s BSAFE implementation that lets customers store passwords hashed using SHA-256 encryption.
To use SHA-256 encryption, you must set a parameter either at the system or the session level. This technical note outlines how to use a server parameter to implement SHA-256 encrypted password storage. Note that in order to use SHA-256 encryption for storage, the client authentication method must be set to password rather than the default, MD5. (See “Encrypting Client/Server Connections” on page 18 for more
details.) This means that the password is transmitted in clear text over the network, so we highly recommend that you set up SSL to encrypt the client server communication channel.
Enabling SHA-256 Encryption
You can set your chosen encryption method system-wide or on a per-session basis. There are three encryption methods available: SHA-256, SHA-256-FIPS, and MD5 (for
backward compatibility). The SHA-256-FIPS method requires that FIPS compliant libraries are used.
System-wide
To set the password_hash_algorithm server parameter on a complete Greenplum
system (master and its segments):
1. Log into your Greenplum Database instance as a superuser.
2. Execute gpconfig with the password_hash_algorithm set to SHA-256 (or
SHA-256-FIPS to use the FIPS-compliant libraries for SHA-256)
$ gpconfig -c password_hash_algorithm -v 'SHA-256'
Encrypting Passwords 26
$ gpconfig -c password_hash_algorithm -v 'SHA-256-FIPS'
3. Verify the setting:
$ gpconfig -s
You will see:
Master value: SHA-256 Segment value: SHA-256
or:
Master value: SHA-256-FIPS Segment value: SHA-256-FIPS
Individual Session
To set the password_hash_algorithm server parameter for an individual session: 1. Log into your Greenplum Database instance as a superuser.
2. Set the password_hash_algorithm to SHA-256 (or SHA-256-FIPS to use the FIPS-compliant libraries for SHA-256):
# set password_hash_algorithm = 'SHA-256' SET
or:
# set password_hash_algorithm = 'SHA-256-FIPS' SET
3. Verify the setting:
# show password_hash_algorithm; password_hash_algorithm
You will see:
SHA-256
or:
SHA-256-FIPS Example
Following is an example of how the new setting works:
1. Login in as a super user and verify the password hash algorithm setting:
# show password_hash_algorithm password_hash_algorithm
---SHA-256-FIPS
2. Create a new role with password that has login privileges.
create role testdb with password 'testdb12345#' LOGIN;
3. Change the client authentication method to allow for storage of SHA-256 encrypted passwords:
Open the pg_hba.conf file on the master and add the following line:
host all testdb 0.0.0.0/0 password
4. Restart the cluster.
5. Login to the database as user just created testdb. psql -U testdb
6. Enter the correct password at the prompt.
7. Verify that the password is stored as a SHA-256 hash.
Note that password hashes are stored in pg_authid.rolpasswod
a. Login as the super user. b. Execute the following:
# select rolpassword from pg_authid where rolname = 'testdb';
Rolpassword
---sha256<64 hexidecimal characters>
Time-based Authentication
Greenplum Database enables the administrator to restrict access to certain times by role. Use the CREATE ROLE or ALTER ROLE commands to specify time-based constraints.
Creating and Managing Databases 28
5.
Defining Database Objects
This chapter covers data definition language (DDL) in Greenplum Database and how to create and manage database objects.
• Creating and Managing Databases • Creating and Managing Tablespaces • Creating and Managing Schemas • Creating and Managing Tables • Partitioning Large Tables • Creating and Using Sequences
• Using Indexes in Greenplum Database • Creating and Managing Views
Creating and Managing Databases
A Greenplum Database system is a single instance of Greenplum Database. There can be several separate Greenplum Database systems installed, but usually just one is selected by environment variable settings. See your Greenplum administrator for details.
There can be multiple databases in a Greenplum Database system. This is different from some database management systems (such as Oracle) where the database instance is the database. Although you can create many databases in a Greenplum system, client programs can connect to and access only one database at a time — you cannot cross-query between databases.
About Template Databases
Each new database you create is based on a template. Greenplum provides a default database, template1. Use template1 to connect to Greenplum Database for the first
time. Greenplum Database uses template1 to create databases unless you specify another template. Do not create any objects in template1 unless you want those objects to be in every database you create.
Greenplum uses two other database templates, template0 and postgres, internally. Do not drop or modify template0 or postgres. You can use template0 to create
a completely clean database containing only the standard objects predefined by Greenplum Database at initialization, especially if you modified template1.
Creating a Database
The CREATE DATABASE command creates a new database. For example:
To create a database, you must have privileges to create a database or be a Greenplum superuser. If you do not have the correct privileges, you cannot create a database. Contact your Greenplum administrator to either give you the necessary privilege or to create a database for you.
You can also use the client program createdb to create a database. For example, running the following command in a command line terminal connects to Greenplum Database using the provided host name and port and creates a database named
mydatabase:
$ createdb -h masterhost -p 5432 mydatabase
The host name and port must match the host name and port of the installed Greenplum Database system.
Some objects, such as roles, are shared by all the databases in a Greenplum Database system. Other objects, such as tables that you create, are known only in the database in which you create them.
Cloning a Database
By default, a new database is created by cloning the standard system database template, template1. Any database can be used as a template when creating a new database, thereby providing the capability to ‘clone’ or copy an existing database and all objects and data within that database. For example:
=> CREATE DATABASE new_dbname TEMPLATE old_dbname;
Viewing the List of Databases
If you are working in the psql client program, you can use the \l meta-command to show the list of databases and templates in your Greenplum Database system. If using another client program and you are a superuser, you can query the list of databases from the pg_database system catalog table. For example:
=> SELECT datname from pg_database;
Altering a Database
The ALTER DATABASE command changes database attributes such as owner, name, or default configuration attributes. For example, the following command alters a database by setting its default schema search path (the search_path configuration parameter):
=> ALTER DATABASE mydatabase SET search_path TO myschema, public, pg_catalog;
Creating and Managing Tablespaces 30 Dropping a Database
The DROP DATABASE command drops (or deletes) a database. It removes the system catalog entries for the database and deletes the database directory on disk that contains the data. You must be the database owner or a superuser to drop a database, and you cannot drop a database while you or anyone else is connected to it. Connect to
template1 (or another database) before dropping a database. For example: => \c template1
=> DROP DATABASE mydatabase;
You can also use the client program dropdb to drop a database. For example, the following command connects to Greenplum Database using the provided host name and port and drops the database mydatabase:
$ dropdb -h masterhost -p 5432 mydatabase
Warning: Dropping a database cannot be undone.
Creating and Managing Tablespaces
Tablespaces allow database administrators to have multiple file systems per machine and decide how to best use physical storage to store database objects. They are named locations within a filespace in which you can create objects. Tablespaces allow you to assign different storage for frequently and infrequently used database objects or to control the I/O performance on certain database objects. For example, place frequently-used tables on file systems that use high performance solid-state drives (SSD), and place other tables on standard hard drives.
A tablespace requires a file system location to store its database files. In Greenplum Database, the master and each segment (primary and mirror) require a distinct storage location. The collection of file system locations for all components in a Greenplum system is a filespace. Filespaces can be used by one or more tablespaces.
Creating a Filespace
A filespace sets aside storage for your Greenplum system. A filespace is a symbolic storage identifier that maps onto a set of locations in your Greenplum hosts’ file systems. To create a filespace, prepare the logical file systems on all of your
Greenplum hosts, then use the gpfilespace utility to define the filespace. You must be a database superuser to create a filespace.
Note: Greenplum is not directly aware of the file system boundaries on your underlying systems. It stores files in the directories that you tell it to use. You cannot control the location on disk of individual files within a logical file system.
To create a filespace using gpfilespace
1. Log in to the Greenplum Database master as the gpadmin user.
$ su - gpadmin
2. Create a filespace configuration file:
$ gpfilespace -o gpfilespace_config
3. At the prompt, enter a name for the filespace, the primary segment file system locations, the mirror segment file system locations, and a master file system location. For example, if your configuration has 2 primary and 2 mirror segments per host:
Enter a name for this filespace> fastdisk
primary location 1> /gpfs1/seg1
primary location 2> /gpfs1/seg2
mirror location 1> /gpfs2/mir1
mirror location 2> /gpfs2/mir2
master location> /gpfs1/master
4. gpfilespace creates a configuration file. Examine the file to verify that the
gpfilespace configuration is correct.
5. Run gpfilespace again to create the filespace based on the configuration file:
$ gpfilespace -c gpfilespace_config
Moving the Location of Temporary or Transaction Files You can move temporary or transaction files to a specific filespace to improve database performance when running queries, creating backups, and to store data more sequentially.
The dedicated filespace for temporary and transaction files is tracked in two separate flat files called gp_temporary_files_filespace and
gp_transaction_files_filespace. These are located in the pg_system
directory on each primary and mirror segment, and on master and standby. You must be a superuser to move temporary or transaction files. Only the gpfilespace utility can write to this file.
About Temporary and Transaction Files
Unless otherwise specified, temporary and transaction files are stored together with all user data. The default location of temporary files,
<filespace_directory>/<tablespace_oid>/<database_oid>/pgsql_tmp
is changed when you use gpfilespace --movetempfiles for the first time. Also note the following information about temporary or transaction files:
• You can dedicate only one filespace for temporary or transaction files, although you can use the same filespace to store other types of files.
• You cannot drop a filespace if it used by temporary files.