D C
aerospace climate control electromechanical filtration
fluid & gas handling
hydraulics
pneumatics process control sealing & shielding
P1/PD Electronic Controls
Parker Hannifin Corporation Hydraulic Pump Division Marysville, Ohio USA
II
WARNING - USER RESPONSIBILITY
FAILURE OR IMPROPER SELECTION OR IMPROPER USE OF THE PRODUCTS DESCRIBED HEREIN OR RELATED ITEMS CAN CAUSE DEATH, PERSONAL INJURY AND PROPERTY DAMAGE.
This document and other information from Parker-Hannifin Corporation, its subsidiaries and authorized distributors provide product or system options for further investigation by users having technical expertise.
The user, through its own analysis and testing, is solely responsible for making the final selection of the system and components and assuring that all performance, endurance, maintenance, safety and warning requirements of the application are met. The user must analyze all aspects of the application, follow applicable industry standards, and follow the information concerning the product in the current product catalog and in any other materials provided from Parker or its subsidiaries or authorized distributors.
To the extent that Parker or its subsidiaries or authorized distributors provide component or system options based upon data or specifications provided by the user, the user is responsible for determining that such data and specifications are suitable and sufficient for all applications and reasonably foreseeable uses of the components or systems.
OFFER OF SALE
The items described in this document are hereby offered for sale by Parker-Hannifin Corporation, its subsidiaries or its authorized distributor. This offer and its acceptance are governed by the provisions stated in the detailed "Offer of Sale" elsewhere in this document.
© Copyright 2013, Parker Hannifin Corporation. All Rights Reserved.
Contents
Pump Setup and Powering Electronic Controls ...1
Loading the GUI (Graphical User Interface) Software ...2
How to use the GUI (Graphical User Interface) ...2
Data Monitor Quick View Tab ...3
Pump Information Tab ...4
System Status Tab ...5
Pump Data Tab ...6
Pump Setting Tab ...7
Enter Model Number Tab ...8
File Load Save Tab ...9
Data Log Tab ...10
Tools Tab ...11
Controller Tuning Mode ...12
High Speed Data Logging ...13
Function Generator Settings ...14
Displacement Min/Max User Calibration ...15
Calibrate Analog Pump Commands ...17
Can Bus Address Setup / Canbus J1939 message ...18
Functions we can provide ...20
Pump Setup and Powering
Electronic Controls
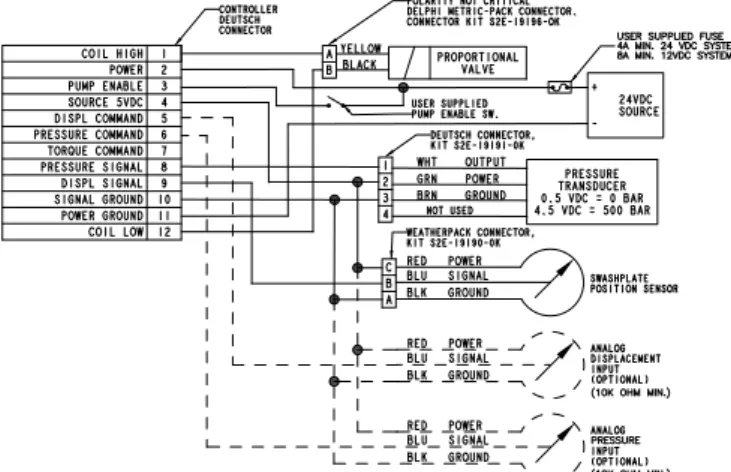
1. Power the pump electronics through
CONNECTOR A according to the pin
connections in Table 1 and the electronic
control wiring diagram.
A. Connect pin 2 to external power supply, 10-36 VDC 75 watt minimum.
B. Pin 11 must be connected to external power supply ground.
C. Power and solenoid connections are suggested to be 16AWG. Sensor and command functions 20 AWG.
D. Pin 3, pump enable, must have system voltage applied to the pin for the controller to function. When Pin 3 is open the controller will send no current to the pump. CAUTION: depending upon pump control option selected the pump will go to full displacement or zero displacement when in this condition.
2. When Pins 2 and 3 have power supplied
to them and pin 11 has ground the pump
controller is ready to operate.
3. Displacement control of the pump can be
accomplished in four ways.
A. Fixed internal setting in the control that can be accessed and changed via the GUI. B. A variable voltage signal (0-5VDC) on pin 5
of connector A. See table 1. C. Internal function generator that
can only be accessed via the GUI. D. Via the SAE J1939 CAN protocol see page 17 for J1939 information.
Connector A 12 PIN Deutsch
PIN Designation Type Signal
1 Coil High Output PWM
2 External Power Supply Input 10-36 VDC
3 Pump Enable Input 10-36 VDC
4 +5 VDC Reference Supply Output +5 VDC 5 Displacement Command Input 0-5 VDC 6 Pressure Command Input 0-5 VDC
7 Torque Command Input 0-5 VDC
8 Pressure Feedback Input 0-5 VDC 9 Displacement Feedback Input 0-5 VDC 10 +5 VDC Reference Supply Ground Input 0 VDC 11 External Power Supply Ground Input 0 VDC
12 Coil Low Output PWM
Table 1: CONNECTOR A – 12 Pin
Connector B 6 PIN Deutsch Connector
PIN Designation Signal
1 RS232 Receive 2 RS232 Ground 3 CAN Lo 4 CAN Hi 5 Chassis Ground* 0 VDC 6 RS232 Transmit
Table 2: CONNECTOR B 6-Pin
Electronic Control – Wiring Diagram
Note:
Parker Hannifin Corporation Hydraulic Pump Division Marysville, Ohio USA
2
Loading the GUI (Graphical
User Interface) Software
How to use the GUI
(Graphical User Interface)
1. Turn on the computer
2. Install the GUI software onto the computer.
A. Insert CD into CD drive B. Run the file named “setup.exe” C. Follow installation instructions
D. If the computer already has an older version of the GUI, the “setup.exe” file will need to be run twice.
i. The first time the “setup.exe” file is run it will prompt the user to uninstall the older version GUI.
ii. Run the “setup.exe” file again and it will prompt the user to install the new version of the GUI.
E. To place the P1/PD Control GUI on the desktop a shortcut needs to be created. Do Not try to copy the executable file to the desktop. Create a shortcut to the executable and place the shortcut on the desktop.
3. System Requirements
A. Desktop or laptop computer with Windows 98/NT/2000/XP/7 operating system
1. Plug in CONNECTOR B (6 pin cable
S2E-19259 and RS-232 cable S2E-19180)
into the controller, and plug the DB9
connector into the computer.
2. Make certain the pump electronics are
powered according to the “Pump Setup
and Powering Electronic Controls” section.
3. Start the P1/PD
Electronic Controls_GUI program.
4. When connected to the Controller the GUI
should look like this:
A. If the computer isn’t communicating with the pump, turn the power to the electronics off, close the GUI down, check the RS-232 connector and the 12 pin connector to make certain there is a good connection.
i. Turn the power back on to the pump electronics, wait a couple of seconds and then start the GUI software. ii. If there is still a problem, make
cer-tain that the serial port is “enabled” in the BIOS setup.
5. The controller is equipped with two light
emitting diodes (LED). The red LED
indicates that the controller has power.
The Green LED indicates that the
processor is functioning; this LED will
flash on and off. If the Green LED is not
flashing then the main processor has
been damaged and the controller
will not function.
Data Monitor
Quick View Tab
A. Pump Enable
¾ Green: Pin 3 is connected to external power
¾ Grey: Pin 3 is low or open
¾ When in this condition The pump will not
function properly. The controller will send zero current to the displacement control valve. ¾ Not all Electronic controlled pumps will
respond the same to a zero current signal from the controller.
¾ Pumps with valves defaulting to a minimum
stroke value will go to 0 % stroke (or customer setting, see pump settings tab) or to -100% stroke for pumps equipped with overcenter capabilities.
¾ Pumps with valve defaulting to maximum
stroke value with go to 100% stroke (or customer setting, see pump settings tab)
B. Controller Ready
¾ Green: Sensor and valve coil circuitry are within specified limits
¾ Grey: There is an error in the system
¾ Possible causes:
¾ Pin 3 is low or open.
¾ Displacement or pressure
sensor feedback is out of range. ¾ Valve coil circuit is open
or grounded.
¾ Go to system status tab
and check active errors.
C. Access Level
¾ There are four levels of access
in the GUI software
¾ Display: End user can only view
settings on the controller, no password is needed for this level. ¾ Basic: End user has the capability to
upload software to the controller, no password is needed for this level.
¾ User: End user can recalibrate and tune
the controller. Can also reset the pump model number. This level is password protected and can be access by entering “USER” into the password field when prompted.
¾ Advanced: Parker internal use only.
D. Monitor:
¾ Basic pump command and feedback
signals are displayed here.
¾ For example: Pump displacement
¾ If unit is a standard pump the monitor will show a displacement between 0-100%.
¾ If the unit is an overcenter capable pump then the pump monitor will displace a displacement between -100 and 100%.
B
D
C A
Parker Hannifin Corporation Hydraulic Pump Division Marysville, Ohio USA
4
Pump Information Tab
A. Display Pump and controller information
User born date:
End user may choose to
enter a machine commissioning date or a date
for the last time the parameter were changed.
This information is end user generated and
can be accessed by double clicking.
Controller name issued by user:
Allows the
end user to name function of the electronic
control. This information is end user generated
and can be accessed by double clicking.
Whenever a user changes a setting in the
GUI they will need to click the
“save settings
now”
button in the lower left corner of the
GUI. If they do not settings will default back to
original settings when the controller is started
again.
System Status Tab
A. Checks that the displacement sensor
output is within its proper operating range
B. Checks that the pressure sensor output is
within its proper operating range
C. Checks for opens or shorts in the the Valve
coil circuitry.
D. Under normal operating conditions the
green LED will blink ever half second.
When an error is active the green LED
will blink every ten seconds. The red LED
is active when the system has power.
Prior to Firmware Revision C 7-26-2013
these were not used for error indication.
Parker Hannifin Corporation Hydraulic Pump Division Marysville, Ohio USA
6
Pump Data Tab
A. Control Mode
¾ This identifies the control option running
B. Displacement Command Type
¾ There are 4 different command types the
user can chose from
¾ Digital
¾ This is a fixed setting that can only be adjusted via the GUI.
¾ Analog
¾ This is a variable setting that can be adjusted externally via a 0 to +5 VDC command on pin 5 of the controller.
¾ CAN
¾ This is a variable setting that can be adjusted externally via the SAE J1939 CAN
communication protocol.
¾ Function Generator
¾ This is an internally programmed command, function generator can only be changed via the GUI.
C. Pump Data Check boxes
¾ Checking the On/off all box will cause all signals to be shown in the data log. Remov-ing the check from the On/Off all box will cause all signals to be removed from the data log.
¾ The user can also chose what signals they
wish to see in the data log by individually checking or removing the check from each box.
D. Pump Data
¾ Allows the user to toggle between normal
and extended data modes
¾ Normal data does not display feedback
and command voltages, extended data will show this information in addition to the normal data.
Whenever a user changes a setting in the GUI they will need to click the “save settings now” button in the lower left corner of the GUI. If they do not settings will default back to original settings when the controller is started again.
B
D
C
Pump Setting Tab
A. Max Displacement Cmd
¾ Similar to a max volume stop, for example
if 80% is entered and the pump is in analog mode then 5 volts will now correspond to 80% instead of 100% displacement.
B. Max Pressure Limit
¾ For example if 210 bar is entered then 5 volts would correspond to 210 bar instead of 280 bar.
C. Pump_Enable on Pin_3 goes low or Open
1. PumpEnable0_QCmd
¾ Allows user to set displacement of pump when pin goes low. Can go to 0% stroke on over-center pumps. Adjustment is in counts. For standard pumps 100 counts equals 0% stroke, 4000 counts equals 100% stroke. For over cener pumps 100 counts equals -100% stroke, 2050 counts equals 0% stroke, and 4000 counts equals 100% stroke.
2. PumEnable0_PCmd
¾ Allows user to set pressure setting when pin goes low. Default to 20 bar.
D. Analog Ramp
¾ RampUp or Ramp Down for Displacement
signal on Pin_5. 1 sec corresponds for the time to go from 0 to 100 %.
E. Digital Ramp Function
¾ Fully internal control Ramp function.
F. Canbus Setup
1. Pump Canbus Address
2. External Controller Canbus Address
G. Fixed Pump Shaft Speed
¾ Setup by customer used to calculate
Pump horsepower consumption.
H. Outlet System Pressure
¾ Default to 500 bar.
I. Enter Model Numbers
¾ Customer can enter the model # of the
pump used with the controller. Entering model # of pump will enable factory default settings for the control type. Model # of pump must be entered.
J. Coil Current Limits
¾ Ia max and Ib max will set the maximum
current the controller will deliver to the valve.
¾ Ia min and Ib min will set the minimum
current the controller will deliver to the valve.
¾ These functions are only used when a
customer specified valve is used and is running at a resistance not standard with the pumps.
¾ Standard setting for the maximum value
is 100%, minimum value is 0%
¾ Contact technical support before
adjusting these values.
B D C J A E F G H
Parker Hannifin Corporation Hydraulic Pump Division Marysville, Ohio USA
8
Enter Model Number Tab
A. Pump Model Number
¾ Customer option to use this electronic controller on a different pump
B. Pump Serial Number
¾ Used by customer support to store “as
delivered” controller information.
C. Pump Part Number
D. Factory Born Date
E. Electronic Control
Ext Pressure Sensor Setting
¾ Allows for customer supplied pressure
sensor to be configured. For example, factory default sensor is 500bar. Customer may use a 400bar sensor, then the setup will be 400 bar.
F. SEND TO PUMP
¾ This will send the model code to the controller and set defaults based on the model code selected.
G. CANCEL
¾ If you don’t want to save parameters to the NOVRAM, then click this button to go to the previous panel. B D C A E F G
Note: Once parameters are sent to the
controller user must click on the “save
settings now” button in the lower right
to save the pump model code to the
permanent memory.
File Load Save Tab
A. Save User Setting
¾ Will let the user save the pump parameter
settings and values to a computer that is connected to the controller through the RS-232 cable.
B. Back all setting
¾ Back up all the parameters in the controller. This will back up everything the user has changed as well as the other parameters they have not changed.
C. Load file to pump
¾ Will load saved pump parameter settings
and values from the file on the computer to the electronic controller.
D. View Settings:
¾ Allows the user to see all the pump
param-eters and their settings or values.
B
D C A
Parker Hannifin Corporation Hydraulic Pump Division Marysville, Ohio USA
10
Data Log Tab
A. Start/Stop Data Log
¾ Saves pump data.
¾ Make sure to specify log interval (B), log frequency (C), log file name (D) and log file folder (E) before starting to log data.
¾ Click the button again to stop logging data.
B. Log Interval
¾ Specifies how often data is to be logged
¾ Can be specified in seconds or
minutes. Can also select to log all data points.
¾ If all data points is selected time interval is not fixed. ¾ If endurance logging is selected
then the user will need to specify how often to activate the log and for how long.
C. Log save interval
¾ User can specify how often
the data is saved.
¾ Data is saves to a .csv file
(comma separated values excel file). This file is retrievable in the event of power loss.
D. Log File Name
¾ User can save the file with a unique user
generated name.
E. Log File Folder:
¾ User can save the file to a unique user generated folder
F. Data to be Logged
¾ User can specify what data they wish to log.
¾ Checking the parameter will add
the data to the log file. Removing the check with remove the data from the log file.
B D C A E F
Tools Tab
A. Controller Tuning Mode:
¾ Advanced level access for changing the
controller gain settings on the pump.
B. Comport Details
¾ Displays information on the Comport.
C. High Speed Data Logging
¾ Clicking on this will allow the user to access the high speed data logging functions in the GUI.
¾ This function will log data faster than the standard data logging covered in data log portion of the user guide.
¾ This function is covered in more
detail in the High speed data logging section.
D. Update Pump Controller Software
¾ Allows the user to download an
updated .hex file to the controller.
E. Function Generator Settings
¾ Allows the user to access
the function generator and tune the settings to the application.
¾ Only active when displacement
command type has function generator selected ¾ This function is covered in more detail in the function generator setting section
F. Displacement Min/Max User Adjustment.
¾ Allows the user to calibrate theirdisplacement feedback sensor
¾ This function is covered in more
detail in the displacement min/max user calibration section.
G. Calibrate Analog Input Commands
¾ Allows the user to calibrate the analog input commands to the controller
¾ There are three input commands
that can be calibrated
¾ Displacement
¾ Pressure
¾ Torque
¾ All three commands follow
the same procedure
¾ These functions are covered
in more detail in the calibrate analog input commands section.
B D C A E G F
Parker Hannifin Corporation Hydraulic Pump Division Marysville, Ohio USA
12
Controller Tuning Mode
A. Control Variables
¾ Here the user can change the individual
control parameters for their application
¾ These parameters include:
¾ Bias Current
¾ Bias current is the holding current applied to the valve to hold the pump in position.
¾ This value has no unit, see the below chart for count to current correlation.
¾ Nominal range is between 22800 (1.3487 A) and 25200 (1.5778 A).
¾ When making adjustments to this it is recommended that small steps are taken and then tested immediately.
¾ If the displacement feedback is always higher than the command then the Vbias is too high.
¾ If the displacement feedback is always lower than the command the Vbias to too low.
¾ Proportional Gain
¾ Integral Gain
¾ Derivative Gain
¾ Integral Gain Time Constant
¾ Digital Lead Decay
¾ Digital Lead Gain
¾ Ensure machinery is in a safe condition before making adjustments to these items.
B. Save to file
¾ Saves the current settings to a file on a local hard drive
¾ It is advised that the user save the settings before making any changes to create a restore point.
C. Load
¾ Load settings from a file on a local hard drive
D. Restore Factory Defaults
¾ Will restore all settings to factory condition ¾ These settings will not be
application specific and will not have any changes that may have been made specifically for the application.
E. Exit Tuning Mode
¾ Will return you to the Tools tab.
¾ Be sure you click on the “save
settings now” box in the lower right
corner of the GUI. If this is not done the system will default to previous settings upon restart.
B D A C E Adjustment Range 140cc 100cc 75cc 60cc 45cc 28cc 18cc Max Min
Displacement Control Loop
Vbias 22500 22500 22500 22500 22500 22500 22500 27000 18000 Q-Ctrl_Kp 500 500 500 250 225 200 125 630 100 Q_Ctrl_Ki 8 8 8 8 8 8 8 630 0 Q_Ctrl_Ti_y 3 3 3 3 3 3 3 630 0 Q_Ctril_Digital lead_DL_A1 40 40 40 40 40 40 40 43 38 Q-Ctrl_lead_gain_DL_B1 350 350 350 350 350 350 350 350 350 Pressure Control Loop
P_Ctrl_Kp_P 300 300 300 250 225 200 125 1200 100 P_Ctrl_Ki_P 20 20 20 20 30 30 30 1200 0 P-Ctrl_Ti_p 6 6 6 6 3 3 3 1200 0 P_Ctrl_Derivative_Gain_Kd_P 1000 1000 1000 1000 700 700 700 1200 0 P_Ctrl_Kd_P_Time constant_DB_A1 60 60 60 60 60 60 60 320 32 P-Ctrl_Cam_Derivative_Gain_Kcam_d 800 800 800 800 600 600 600 1200 0 P-Ctrl_sensor_feedback_filter 4 4 4 4 4 4 4 200 1 P-Ctrl_Kp_P_1 1000 1000 1000 500 500 500 500 1200 100 P-Ctrl_Kp_P_2 1200 1200 1200 700 700 700 700 1200 100 Vbias
Count Current Coil (A)
Vbias
Count Current Coil (A)
Vbias
Count Current Coil (A)
Vbias
Count Current Coil (A) 700 0.009 8000 0.3127 19000 1 30000 2.0319 800 0.0123 9000 0.3645 20000 1.0908 31000 2.1066 900 0.0152 10000 0.4134 21000 1.1816 32000 2.1662 1000 0.0187 11000 0.4602 22000 1.2741 33000 2.2468 1100 0.0216 12000 0.5159 23000 1.3674 34000 2.324 2000 0.0513 13000 0.5942 24000 1.4629 35000 2.382 3000 0.0908 14000 0.6097 25000 1.56 36000 2.4574 4000 0.1363 15000 0.6942 26000 1.6488 37000 2.5342 5000 0.1804 16000 0.777 27000 1.7534 6000 0.2241 17000 0.8256 28000 1.8632 7000 0.2625 18000 0.9128 29000 1.9262
High Speed Data Logging
A. Select Data to be Logged
¾ Here the user can select what functions
they wish to log.
¾ Data can be toggled on and off by
checking or removing the check from the read box
B. Type
¾ User can select the type of function generator the unit will be using.
¾ There are three types:
¾ Sine Wave
¾ Pulse Signal
¾ Ramp Function
¾ Function generator frequency
can be modified. Adjusting the frequency will automatically change the sample rate.
C. Amplitude
¾ Amplitude is expressed as a percent
based on maximum sensor range.
¾ Offset
¾ Default Offset is 50%
¾ Offset and amplitude cannot have
a sum greater than 100%. ¾ If the offset is 40% then
the maximum amplitude is 60%. If the maximum amplitude is greater than 60% it is truncated.
¾ For over center pumps 0 to 100%
is actually -100 to +100%.
D. Click here to start and stop data logging.
B
D
A
Parker Hannifin Corporation Hydraulic Pump Division Marysville, Ohio USA
14
Function Generator Settings
A. Type
¾ User can select the type of function
genera-tor the unit will be using
¾ There are three types:
¾ Sine Wave
¾ Pulse signal
¾ Ramp function
B. Frequency
¾ User can adjust the frequency of the
function generator
¾ This will automatically adjust the sample rate
C. Command Type Select
D. Amplitude
¾ Amplitude is expressed as a percent based
on maximum sensor range.
¾ Offset
¾ Default offset is 50%
¾ Offset and amplitude cannot have
a sum greater than 100%.
¾ If the offset is 40% then the maximum amplitude is 60%. If the maximum amplitude is greater than 60% it is truncated.
¾ For over center
pumps 0 to 100% is actually
-100 to +100%.
E. Control Mode and Command Type
¾ Control mode is what function
the pump controller is regulating.
¾ 40-Qcmd type sets what input
is controlling pump displacement.
¾ 140-Pcmd type sets what input
is controlling pump pressure.
¾ 180-LScmd type sets what input
is controlling pump load sense (this function is not currently active).
¾ 230-TQcmd type sets what input
is controlling pump torque command.
F. Click OK to Return to Tools Tab
¾ Be sure you click on the “save settings now” box in the lower right corner of the GUI. If this is not done the system will default to previous settings upon restart.
B
D
C
A
E
F
Displacement Min/Max
User Calibration
A. Pump Displacement Monitor
¾ Here the user can monitor the following displacement functions:
¾ Displacement command percentage
¾ Pump displacement percentage
¾ Pump raw displacement counts
¾ Sensor voltage based on raw
displacement counts
¾ Displacement sensor is connected
to pin 9 of the controller.
B. Pump displacement feedback counts
¾ Here the user will be able to adjust theminimum and maximum displacement feedback counts to calibrate the displacement sensor. This only needs to be performed on a pump that is having a new controller connected to it. Controllers shipped with the pump are calibrated to the pump at the factory.
This table lists the Factory Default CMD 53 and CMD 54 setting for CW and CCW P1/PD pumps with electronic controls. These settings
may or may not apply to your unit and are intended as a base start point when setting up a new application.
Note: Displacement Min/Max user calibration table is located on the next page.
B
A
Rotation Center? CMD 53 CMD 54Over
CW NO 2252 778
CCW NO 2252 3726
CW YES 778 3726
Parker Hannifin Corporation Hydraulic Pump Division Marysville, Ohio USA
16 Displacement Min/Max user calibration table:
This table gives a comparison between the raw counts and the position sensor voltage on pin 9 of the controller. The difference between 0 stroke and 100% stroke is always 1.6 VDC, which is 1474 counts. See expanded displacement counts table for finer tuning.
Voltage Counts 0.5 410 0.51 419 0.52 428 0.53 438 0.54 447 0.55 456 0.56 465 0.57 474 0.58 484 0.59 493 0.6 502 0.61 511 0.62 520 0.63 529 0.64 538 0.65 548 0.66 557 0.67 566 0.68 575 0.69 584 0.7 593 0.71 602 0.72 612 0.73 621 0.74 630 0.75 640 0.76 649 0.77 658 0.78 667 0.79 677 0.8 686 0.81 695 0.82 704 0.83 714 0.84 723 0.85 732 0.86 741 0.87 750 0.88 760 0.89 769 0.9 778 0.91 787 0.92 796 0.93 806 0.94 815 0.95 824 0.96 833 0.97 842 0.98 852 0.99 861 1 870 1.01 879 1.02 888 1.03 898 1.04 907 1.05 916 1.06 925 1.07 934 1.08 944 1.09 953 1.1 962 1.11 971 1.12 980 Voltage Counts 1.13 990 1.14 999 1.15 1008 1.16 1017 1.17 1026 1.18 1036 1.19 1045 1.2 1054 1.21 1063 1.22 1073 1.23 1082 1.24 1091 1.25 1101 1.26 1110 1.27 1119 1.28 1128 1.29 1138 1.3 1147 1.31 1162 1.32 1176 1.33 1191 1.34 1205 1.35 1220 1.36 1235 1.37 1249 1.38 1264 1.39 1278 1.4 1293 1.41 1297 1.42 1301 1.43 1304 1.44 1308 1.45 1312 1.46 1316 1.47 1320 1.48 1323 1.49 1327 1.5 1331 1.51 1340 1.52 1349 1.53 1359 1.54 1368 1.55 1377 1.56 1386 1.57 1395 1.58 1405 1.59 1414 1.6 1423 1.61 1432 1.62 1441 1.63 1451 1.64 1460 1.65 1469 1.66 1478 1.67 1487 1.68 1497 1.69 1506 1.7 1515 1.71 1524 1.72 1533 1.73 1543 1.74 1552 1.75 1561 Voltage Counts 1.76 1570 1.77 1579 1.78 1589 1.79 1598 1.8 1607 1.81 1616 1.82 1625 1.83 1635 1.84 1644 1.85 1653 1.86 1662 1.87 1671 1.88 1681 1.89 1690 1.9 1699 1.91 1708 1.92 1717 1.93 1727 1.94 1736 1.95 1745 1.96 1754 1.97 1763 1.98 1773 1.99 1782 2 1791 2.01 1800 2.02 1810 2.03 1819 2.04 1828 2.05 1838 2.06 1847 2.07 1856 2.08 1865 2.09 1875 2.1 1884 2.11 1893 2.12 1902 2.13 1911 2.14 1920 2.15 1930 2.16 1939 2.17 1948 2.18 1957 2.19 1966 2.2 1975 2.21 1984 2.22 1994 2.23 2003 2.24 2012 2.25 2022 2.26 2031 2.27 2040 2.28 2049 2.29 2059 2.3 2068 2.31 2077 2.32 2086 2.33 2096 2.34 2105 2.35 2114 2.36 2123 2.37 2132 2.38 2142 Voltage Counts 2.39 2151 2.4 2160 2.41 2169 2.42 2178 2.43 2188 2.44 2197 2.45 2206 2.46 2215 2.47 2224 2.48 2234 2.49 2243 2.5 2252 2.51 2261 2.52 2270 2.53 2280 2.54 2289 2.55 2298 2.56 2307 2.57 2316 2.58 2326 2.59 2335 2.6 2344 2.61 2353 2.62 2363 2.63 2372 2.64 2381 2.65 2391 2.66 2400 2.67 2409 2.68 2418 2.69 2428 2.7 2437 2.71 2446 2.72 2455 2.73 2464 2.74 2473 2.75 2483 2.76 2492 2.77 2501 2.78 2510 2.79 2519 2.8 2528 2.81 2537 2.82 2547 2.83 2556 2.84 2565 2.85 2575 2.86 2584 2.87 2593 2.88 2602 2.89 2612 2.9 2621 2.91 2630 2.92 2639 2.93 2649 2.94 2658 2.95 2667 2.96 2676 2.97 2685 2.98 2695 2.99 2704 3 2713 3.01 2722 3.02 2731 3.03 2741 3.04 2750 3.05 2759 3.06 2768 3.07 2777 3.08 2787 3.09 2796 3.1 2805 Voltage Counts 3.11 2814 3.12 2823 3.13 2833 3.14 2842 3.15 2851 3.16 2860 3.17 2869 3.18 2879 3.19 2888 3.2 2897 3.21 2906 3.22 2915 3.23 2925 3.24 2934 3.25 2943 3.26 2952 3.27 2961 3.28 2971 3.29 2980 3.3 2989 3.31 2998 3.32 3007 3.33 3017 3.34 3026 3.35 3035 3.36 3044 3.37 3053 3.38 3063 3.39 3072 3.4 3081 3.41 3090 3.42 3100 3.43 3109 3.44 3118 3.45 3128 3.46 3137 3.47 3146 3.48 3155 3.49 3165 3.5 3174 3.51 3183 3.52 3192 3.53 3202 3.54 3211 3.55 3220 3.56 3229 3.57 3238 3.58 3248 3.59 3257 3.6 3266 3.61 3275 3.62 3284 3.63 3294 3.64 3303 3.65 3312 3.66 3321 3.67 3330 3.68 3340 3.69 3349 3.7 3358 3.71 3367 3.72 3376 3.73 3386 3.74 3395 3.75 3404 3.76 3413 3.77 3422 3.78 3432 3.79 3441 3.8 3450 3.81 3459 3.82 3468 Voltage Counts 3.83 3478 3.84 3487 3.85 3496 3.86 3505 3.87 3514 3.88 3524 3.89 3533 3.9 3542 3.91 3551 3.92 3560 3.93 3570 3.94 3579 3.95 3588 3.96 3597 3.97 3606 3.98 3616 3.99 3625 4 3634 4.01 3643 4.02 3652 4.03 3662 4.04 3671 4.05 3680 4.06 3689 4.07 3698 4.08 3708 4.09 3717 4.1 3726 4.11 3735 4.12 3745 4.13 3754 4.14 3763 4.15 3773 4.16 3782 4.17 3791 4.18 3800 4.19 3810 4.2 3819 4.21 3828 4.22 3837 4.23 3846 4.24 3855 4.25 3865 4.26 3874 4.27 3883 4.28 3892 4.29 3901 4.3 3910 4.31 3919 4.32 3928 4.33 3938 4.34 3947 4.35 3956 4.36 3965 4.37 3974 4.38 3984 4.39 3993 4.4 4002 4.41 4011 4.42 4021 4.43 4030 4.44 4039 4.45 4049 4.46 4058 4.47 4067 4.48 4076 4.49 4086 4.5 4095
Calibrate Analog
Pump Commands
The process for calibrating the analog input command is the same regardless of which command you are calibrating. In this example we are calibrating the displacement command input.
Step 1
Click on “calibrate analog displacement command”
Step 2
Click on “Begin”
Step 3
Send a “0” command to your controller and click “set 0V”
Step 4
Send a maximum displacement signal to your controller and click “set 5V”
Once this has been completed a screen momentarily display stating that calibration is complete
Parker Hannifin Corporation Hydraulic Pump Division Marysville, Ohio USA
18
Canbus J1939 message
Name Identifier Repeat Rate Position Bytes Parameter Length Comment
Equipment operation
and control J1939/21
EOAC 18FDE3 RequestAs 3 P1/PD Q loop command 1 byte 0 ~ 100 % (for standard pump)0 ~ 100 % = -100%~ 100 % (for overcenter pump) PGN =
64995 Read 4,5 P commandP1/PD 2 byte 0 ~280 bar
6 load senseP1/PD
command 1 byte 20 ~80 bar, not used
7, 8 commandTorque 2 byte 0 ~375 Nm
Name Identifier Repeat Rate Position Bytes Parameter Length Comment
Hydraulic pressure
Governor Info J1939/21
HPG 18F008SA 50 ms 1,2 pressure P1/PD
feed back 2 bytes
0~128,510Kpa 0~ 280 bar PGN = 61448 Read 5,6 P1/PD Load sensor pressure feed back
2 bytes 0~ 280 bar – not used
7,8
P1/PD Displacement
position Feed back
2 bytes 0 ~ 100 % (for standard pump)0 ~ 100 % = -100%~ 100 % (for overcenter pump)
Can Bus Address Setup
• Electronic Control CanBus address:
¾ By default is 40 = 0x28 (Hex)
• Customer ECU Canbus Address:
¾ IQAN Default CanBus address
is 39 = 0x27 (Hex)
• Canbus address verification and setup by
RS232 configuration GUI software:
¾ Command_31 Customer
ECU Canbus address
¾ Costumer has to set up this number
to match customer(example:IQAN) ECU address =39
¾ Command_32 Electronic Control Canbus
Address (Read/Write can be saved to NOVRAM) Default = 40
Canbus J1939 message
Name Identifier Repeat Rate Position Bytes Parameter Length Comment
Equipment Performance
Data J1939/21
EPD 18FDE4SA 500 ms
PGN =
64996 Read 3.4 P1/PD Pump fault detect 2-byte
3-1 global enable
3-2 = 1 pressure sensor fault 3-3 =1 Displacement sensor fault
3-4 =1 load sense pressure fault – not incorporated 3-5 = 1internal temperature fault
3-6 =1 power supply fault – not incorporated 3-7 =1 external load sense fault – not incorporated 3-8 =1 external outlet pressure fault – not incorporated 4-1 = 1 Q loop Command fault Q_ p
4-2 = 1 P_loop command fault
4-3 = 1 internal speed sensor fault – not incorporated 4-4 = 1external speed fault – not incorporated 4-5 =1 Coil Circuit short fault
4-6 =1 Coil Circuit open fault
5,6 P1/PD pump temperature 2-byte -40 ~ 250 c
7,8 internal speedP1/PD pump 2-byte 0 ~ 4500 rpm, not used
Name Identifier Repeat Rate Position Bytes Parameter Length Comment
Proprietary A J1939/21
PropA 18EFDASA ASAP 1 Password 1 byte 170= 0xAA
PGN =
61224 Write/ Read 2 P1/PD Q loop Command 1 byte
0 ~ 100 % (for standard pump) 0 ~ 100 % = -100%~ 100 % (for
overcenter pump)
3,4 P1/PD Pressure Command 2 byte 0 ~ 280 bar
5 P1/PD LS loopCommand 1 byte 20 ~ 80 bar, not used
6~7 Torque loopCommand 2 byte 0~ 375 Nm
8.1~8.7 CommandNumber 7 bit Command number42 = 0 x 2A(hex)
8.8 Command MSB bit8
direction 1 bit
0 = read 1 = write
Parker Hannifin Corporation Hydraulic Pump Division Marysville, Ohio USA
20
Functions we can provide
• Electronic Q control
• Electronic Q, with mech. pressure
compensator
• Electronic P/Q
• Electronic P/Q, with mech. pressure
compensator
• Electronic Torque control (can be included
to the P/Q options above)
The items described in this document and other documents and descriptions provided by Parker Hannifin Corporation, Hydraulics Group, and its authorized distributors (“Seller”) are hereby offered for sale at prices to be established by Seller. This offer and its acceptance by any customer (“Buyer”) shall be governed by all of the following Terms and Conditions. Buyer’s order for any item described in its document, when communicated to Seller verbally, or in writing, shall constitute acceptance of this offer. All goods or work described will be referred to as “Products”.
1. Terms and Conditions. Seller’s willingness to offer Products, or accept an order for Products, to or from Buyer is expressly conditioned on Buyer’s assent to these Terms and Conditions and to the terms and conditions found on-line at www.parker.com/saleterms/. Seller objects to any contrary or additional term or condition of Buyer’s order or any other document issued by Buyer.
2. Price Adjustments; Payments. Prices stated on the reverse side or preceding pages of this document are valid for 30 days. After 30 days, Seller may change prices to reflect any increase in its costs resulting from state, federal or local legislation, price increases from its suppliers, or any change in the rate, charge, or classification of any carrier. The prices stated on the reverse or preceding pages of this document do not include any sales, use, or other taxes unless so stated specifically. Unless otherwise specified by Seller, all prices are F.O.B. Seller’s facility, and payment is due 30 days from the date of invoice. After 30 days, Buyer shall pay interest on any unpaid invoices at the rate of 1.5% per month or the maximum allowable rate under applicable law.
3. Delivery Dates; Title and Risk; Shipment. All delivery dates are approximate and Seller shall not be responsible for any damages resulting from any delay. Regardless of the manner of shipment, title to any products and risk of loss or damage shall pass to Buyer upon tender to the carrier at Seller’s facility (i.e., when it’s on the truck, it’s yours). Unless otherwise stated, Seller may exercise its judgment in choosing the carrier and means of delivery. No deferment of shipment at Buyers’ request beyond the respective dates indicated will be made except on terms that will indemnify, defend and hold Seller harmless against all loss and additional expense. Buyer shall be responsible for any additional shipping charges incurred by Seller due to Buyer’s changes in shipping, product specifications or in accordance with Section 13, herein.
4. Warranty. Seller warrants that the Products sold hereunder shall be free from defects in material or workmanship for a period of eighteen months from the date of delivery to Buyer. The prices charged for Seller’s products are based upon the exclusive limited warranty stated above, and upon the following disclaimer: DISCLAIMER OF WARRANTY: THIS WARRANTY COMPRISES THE SOLE AND ENTIRE WARRANTY PERTAINING TO PRODUCTS PROVIDED HEREUNDER. SELLER DISCLAIMS ALL OTHER WARRAN-TIES, EXPRESS AND IMPLIED, INCLUDING MERCHANTABILITY AND FITNESS FOR A PARTICULAR PURPOSE.
5. Claims; Commencement of Actions. Buyer shall promptly inspect all Products upon delivery. No claims for shortages will be allowed unless reported to the Seller within 10 days of delivery. No other claims against Seller will be allowed unless asserted in writing within 60 days after delivery or, in the case of an alleged breach of warranty, within 30 days after the date within the warranty period on which the defect is or should have been discovered by Buyer. Any action based upon breach of this agreement or upon any other claim arising out of this sale (other than an action by Seller for any amount due to Seller from Buyer) must be commenced within thirteen months from the date of tender of delivery by Seller or, for a cause of action based upon an alleged breach of warranty, within thirteen months from the date within the warranty period on which the defect is or should have been discovered by Buyer.
6. LIMITATION OF LIABILITY. UPON NOTIFICATION, SELLER WILL, AT ITS OPTION, REPAIR OR REPLACE A DEFECTIVE PRODUCT, OR REFUND THE PURCHASE PRICE. IN NO EVENT SHALL SELLER BE LIABLE TO BUYER FOR ANY SPECIAL, INDIRECT, INCIDENTAL OR CONSEQUENTIAL DAMAGES ARISING OUT OF, OR AS THE RESULT OF, THE SALE, DELIVERY, NON-DELIVERY, SERVICING, USE OR LOSS OF USE OF THE PRODUCTS OR ANY PART THEREOF, OR FOR ANY CHARGES OR EXPENSES OF ANY NATURE INCURRED WITHOUT SELLER’S WRITTEN CONSENT, EVEN IF SELLER HAS BEEN NEGLIGENT, WHETHER IN CONTRACT, TORT OR OTHER LEGAL THEORY. IN NO EVENT SHALL SELLER’S LIABILITY UNDER ANY CLAIM MADE BY BUYER EXCEED THE PURCHASE PRICE OF THE PRODUCTS.
7. Contingencies. Seller shall not be liable for any default or delay in performance if caused by circumstances beyond the reasonable control of Seller.
8. User Responsibility. The user, through its own analysis and testing, is solely responsible for making the final selection of the system and Product and assuring that all performance, endurance, maintenance, safety and warning requirements of the application are met. The user must analyze all aspects of the application and follow applicable industry standards and Product information. If Seller provides Product or system options, the user is responsible for determining that such data and specifications are suitable and sufficient for all applications and reasonably foreseeable uses of the Products or systems.
9. Loss to Buyer’s Property. Any designs, tools, patterns, materials, drawings, confiden-tial information or equipment furnished by Buyer or any other items which become Buyer’s property, may be considered obsolete and may be destroyed by Seller after two consecutive years have elapsed without Buyer placing an order for the items which are manufactured using such property. Seller shall not be responsible for any loss or damage to such property while it is in Seller’s possession or control.
10. Special Tooling. A tooling charge may be imposed for any special tooling, including
11. Buyer’s Obligation; Rights of Seller. To secure payment of all sums due or otherwise, Seller shall retain a security interest in the goods delivered and this agreement shall be deemed a Security Agreement under the Uniform Commercial Code. Buyer authorizes Seller as its attorney to execute and file on Buyer’s behalf all documents Seller deems necessary to perfect its security interest. Seller shall have a security interest in, and lien upon, any property of Buyer in Seller’s possession as security for the payment of any amounts owed to Seller by Buyer.
12. Improper Use and Indemnity. Buyer shall indemnify, defend, and hold Seller harmless from any claim, liability, damages, lawsuits, and costs (including attorney fees), whether for personal injury, property damage, patent, trademark or copyright infringement or any other claim, brought by or incurred by Buyer, Buyer’s employees, or any other person, arising out of: (a) improper selection, improper application or other misuse of Products purchased by Buyer from Seller; (b) any act or omission, negligent or otherwise, of Buyer; (c) Seller’s use of patterns, plans, drawings, or specifications furnished by Buyer to manufacture Product; or (d) Buyer’s failure to comply with these terms and conditions. Seller shall not indemnify Buyer under any circumstance except as otherwise provided.
13. Cancellations and Changes. Orders shall not be subject to cancellation or change by Buyer for any reason, except with Seller’s written consent and upon terms that will indemnify, defend and hold Seller harmless against all direct, incidental and consequential loss or damage. Seller may change product features, specifications, designs and availability with notice to Buyer.
14. Limitation on Assignment. Buyer may not assign its rights or obligations under this agreement without the prior written consent of Seller.
15. Entire Agreement. This agreement contains the entire agreement between the Buyer and Seller and constitutes the final, complete and exclusive expression of the terms of the agreement. All prior or contemporaneous written or oral agreements or negotiations with respect to the subject matter are herein merged.
16. Waiver and Severability. Failure to enforce any provision of this agreement will not waive that provision nor will any such failure prejudice Seller’s right to enforce that provision in the future. Invalidation of any provision of this agreement by legislation or other rule of law shall not invalidate any other provision herein. The remaining provisions of this agreement will remain in full force and effect.
17. Termination. This agreement may be terminated by Seller for any reason and at any time by giving Buyer thirty (30) days written notice of termination. In addition, Seller may by written notice immediately terminate this agreement for the following: (a) Buyer commits a breach of any provision of this agreement (b) the appointment of a trustee, receiver or custo-dian for all or any part of Buyer’s property (c) the filing of a petition for relief in bankruptcy of the other Party on its own behalf, or by a third party (d) an assignment for the benefit of creditors, or (e) the dissolution or liquidation of the Buyer.
18. Governing Law. This agreement and the sale and delivery of all Products hereunder shall be deemed to have taken place in and shall be governed and construed in accordance with the laws of the State of Ohio, as applicable to contracts executed and wholly performed therein and without regard to conflicts of laws principles. Buyer irrevocably agrees and consents to the exclusive jurisdiction and venue of the courts of Cuyahoga County, Ohio with respect to any dispute, controversy or claim arising out of or relating to this agreement. Disputes between the parties shall not be settled by arbitration unless, after a dispute has arisen, both parties expressly agree in writing to arbitrate the dispute.
19. Indemnity for Infringement of Intellectual Property Rights. Seller shall have no liability for infringement of any patents, trademarks, copyrights, trade dress, trade secrets or similar rights except as provided in this Section. Seller will defend and indemnify Buyer against allegations of infringement of U.S. patents, U.S. trademarks, copyrights, trade dress and trade secrets (“Intellectual Property Rights”). Seller will defend at its expense and will pay the cost of any settlement or damages awarded in an action brought against Buyer based on an allegation that a Product sold pursuant to this Agreement infringes the Intel-lectual Property Rights of a third party. Seller’s obligation to defend and indemnify Buyer is contingent on Buyer notifying Seller within ten (10) days after Buyer becomes aware of such allegations of infringement, and Seller having sole control over the defense of any allegations or actions including all negotiations for settlement or compromise. If a Product is subject to a claim that it infringes the Intellectual Property Rights of a third party, Seller may, at its sole expense and option, procure for Buyer the right to continue using the Product, replace or modify the Product so as to make it noninfringing, or offer to accept return of the Product and return the purchase price less a reasonable allowance for depreciation. Notwithstanding the foregoing, Seller shall have no liability for claims of infringement based on information provided by Buyer, or directed to Products delivered hereunder for which the designs are specified in whole or part by Buyer, or infringements resulting from the modification, combination or use in a system of any Product sold hereunder. The foregoing provisions of this Section shall constitute Seller’s sole and exclusive liability and Buyer’s sole and exclusive remedy for infringement of Intellectual Property Rights.
© 2014 Parker Hannifin Corporation, all rights reserved This literature replaces ALL previous literature 1M ST HY28-2674-01/P1/UK Effective: March 1, 2014
Your local authorized Parker distributor
Ed. 2013-08-01
EMEA Product Information Centre Free phone: 00 800 27 27 5374
(from AT, BE, CH, CZ, DE, DK, EE, ES, FI, FR, IE, IL, IS, IT, LU, MT, NL, NO, PL, PT, RU, SE, SK, UK, ZA)
US Product Information Centre Toll-free number: 1-800-27 27 537 www.parker.com
Europe, Middle East, Africa
AE – United Arab Emirates,
Dubai
Tel: +971 4 8127100 [email protected]
AT – Austria, Wiener Neustadt Tel: +43 (0)2622 23501-0 [email protected]
AT – Eastern Europe, Wiener Neustadt Tel: +43 (0)2622 23501 900 [email protected] AZ – Azerbaijan, Baku Tel: +994 50 22 33 458 [email protected]
BE/LU – Belgium, Nivelles Tel: +32 (0)67 280 900 [email protected] BG – Bulgaria, Sofia Tel: +359 2 980 1344 [email protected] BY – Belarus, Minsk Tel: +375 17 209 9399 [email protected] CH – Switzerland, Etoy Tel: +41 (0)21 821 87 00 [email protected]
CZ – Czech Republic, Klecany Tel: +420 284 083 111 [email protected] DE – Germany, Kaarst Tel: +49 (0)2131 4016 0 [email protected] DK – Denmark, Ballerup Tel: +45 43 56 04 00 [email protected] ES – Spain, Madrid Tel: +34 902 330 001 [email protected] FI – Finland, Vantaa Tel: +358 (0)20 753 2500 [email protected]
FR – France, Contamine s/Arve Tel: +33 (0)4 50 25 80 25 [email protected] GR – Greece, Athens Tel: +30 210 933 6450 [email protected] Tel: +36 23 885 470 [email protected] IE – Ireland, Dublin Tel: +353 (0)1 466 6370 [email protected]
IT – Italy, Corsico (MI) Tel: +39 02 45 19 21 [email protected]
KZ – Kazakhstan, Almaty Tel: +7 7273 561 000
NL – The Netherlands, Oldenzaal Tel: +31 (0)541 585 000 [email protected] NO – Norway, Asker Tel: +47 66 75 34 00 [email protected] PL – Poland, Warsaw Tel: +48 (0)22 573 24 00 [email protected]
PT – Portugal, Leca da Palmeira Tel: +351 22 999 7360 [email protected] RO – Romania, Bucharest Tel: +40 21 252 1382 [email protected] RU – Russia, Moscow Tel: +7 495 645-2156 [email protected] SE – Sweden, Spånga Tel: +46 (0)8 59 79 50 00 [email protected]
SK – Slovakia, Banská Bystrica Tel: +421 484 162 252
SL – Slovenia, Novo Mesto Tel: +386 7 337 6650 [email protected] TR – Turkey, Istanbul Tel: +90 216 4997081 [email protected] UA – Ukraine, Kiev Tel +380 44 494 2731 [email protected]
UK – United Kingdom, Warwick Tel: +44 (0)1926 317 878
ZA – South Africa, Kempton Park Tel: +27 (0)11 961 0700
North America
CA – Canada, Milton, Ontario Tel: +1 905 693 3000
US – USA, Cleveland (industrial)
Tel: +1 216 896 3000
US – USA, Elk Grove Village (mobile)
Tel: +1 847 258 6200
Asia Pacific
AU – Australia, Castle Hill Tel: +61 (0)2-9634 7777 CN – China, Shanghai Tel: +86 21 2899 5000 HK – Hong Kong Tel: +852 2428 8008 ID – Indonesia, Tangerang Tel: +62 21 7588 1906 IN – India, Mumbai Tel: +91 22 6513 7081-85 JP – Japan, Fujisawa Tel: +81 (0)4 6635 3050
KR – South Korea, Seoul Tel: +82 2 559 0400
MY – Malaysia, Shah Alam Tel: +60 3 7849 0800
NZ – New Zealand, Mt Wellington Tel: +64 9 574 1744
SG – Singapore
Tel: +65 6887 6300
TH – Thailand, Bangkok Tel: +662 717 8140
TW – Taiwan, New Taipei City Tel: +886 2 2298 8987
VN – Vietnam, Ho Chi Minh City Tel: +84 8 3999 1600
South America
AR – Argentina, Buenos Aires Tel: +54 3327 44 4129 BR – Brazil, Cachoeirinha RS Tel: +55 51 3470 9144 CL – Chile, Santiago Tel: +56 2 623 1216 MX – Mexico, Toluca Tel: +52 72 2275 4200