User’s manual
Contents Index
1
Cintiq 22HD (DTK-2200)
Setting up
Using the display stand
Using the pen
Customizing the pen
Using the pen display
Customizing the pen display
Using the Radial Menu
Application-specific settings
FAQs
Contents Index
2 Cintiq 22HD
User’s Manual
Version 1.0, Rev C0612
Copyright © Wacom Co., Ltd., 2012
All rights reserved. No part of this manual may be reproduced except for your express personal use.
Wacom reserves the right to revise this publication without obligation to provide notification of such changes. Wacom does its best to provide current and accurate information in this manual. However, Wacom reserves the right to change any specifications and product configurations at its discretion, without prior notice and without obligation to include such changes in this manual.
The above year indicates when this manual was prepared. However, the date of release to the users of the “manual” is simultaneous with the introduction into the market of the applicable Wacom product.
Cintiq and Wacom are registered trademarks of Wacom Co., Ltd.
Adobe and Photoshop are either registered trademarks or trademarks of Adobe Systems Incorporated in the United States and/or other countries. Microsoft, Windows, and Vista are either registered trademarks or trademarks of Microsoft Corporation in the United States and/or other countries. Apple, the Apple logo, and Mac are trademarks of Apple, Inc., registered in the U.S. and other countries.
Any additional company and product names mentioned in this documentation may be trademarked and/or registered as trademarks. Mention of third-party products is for informational purposes only and constitutes neither an
endorsement nor a recommendation. Wacom assumes no responsibility with regard to the performance or use of these products.
ExpressKey is a registered trademark of Ginsan Industries, Inc., and is used with permission. Front cover image courtesy of www.daniellieske.com
Contents Index
3
TABLE OF CONTENTS
About the manual 5
UNPACKING YOUR CINTIQ 6
USING THE CINTIQ DISPLAY STAND 7
Display stand features 8
Display stand location 9
Mounting Cintiq on the display stand 10
Adjusting the display incline 11
Adjusting rotation 11
Removing Cintiq from the display stand 12
SETTING UP YOUR CINTIQ 13
System requirements 13
Step 1: Hardware installation 14
Step 2: Software installation 17
GETTING TO KNOW YOUR CINTIQ 18
Pen display features 18
Front view 19
Rear view 20
Pen features 21
WORKING WITH YOUR CINTIQ 22
Setting up your work area 22
Configuring Cintiq for handedness 24
Using the Grip Pen 24
Holding the pen 25
Positioning 26 Clicking 26 Dragging 27
Using the side switch 27
Working with pressure sensitivity 27
Drawing with tilt 28
Erasing 28
Pen display controls 29
Using the hardware control buttons 30
Using the ExpressKeys 31
Using the Touch Strips 33
Working with multiple monitors 35
Adjusting the display 36
Factory presets, auto-sync, and user settings 36 On Screen Display (OSD) settings 37
Power saving 39
CUSTOMIZING YOUR CINTIQ 40
Manage your control panel settings 41
Control panel overview 42
Calibrating the pen display 44
Customizing the pen 45
Adjusting tip feel and double-click 46
Adjusting eraser feel 47
Advanced tip and eraser pressure settings 47
Customizing tool buttons 48
Customizing tilt sensitivity 49 Customizing pen display functions 49
Customizing the ExpressKeys 50
Customizing the Touch Strips 51
Button functions 52
Using and customizing the Radial Menu 59
Working with Display Toggle 60
Application-specific settings 61
Creating an application-specific setting 62 Changing application-specific settings 63 Removing application-specific settings 63
Working with multiple tools 64
Contents Index
4 TROUBLESHOOTING 66
Testing Cintiq 67
Testing controls and input tools 69 Testing the hardware control buttons 70
Testing the ExpressKeys 70
Testing the Touch Strips 70
Testing a pen 71
Display troubleshooting 72
General display problems 72
VGA problems 74
Pen tablet troubleshooting 75
General problems 75
Windows-specific problems 79
Mac-specific problems 80
Technical support options 82
Obtaining software updates 83
FREQUENTLY ASKED QUESTIONS 84
CARE AND MAINTENANCE 86
Caring for Cintiq 86
Replacing the pen nib 87
OTHER USEFUL INFORMATION 89
Optional display configurations 90 Using an alternate mount or stand 91
Cable removal and replacement 94
Uninstalling Cintiq 96
Using the Express View display 97
Managing preferences 98
Installing multiple tablets 99
Using applications integrated for tablet control 100
Importing expert settings 101
Pen and digital ink capabilities in Windows 102
Product information 103
Ordering parts and accessories 104 Available parts and accessories 104 GLOSSARY 105 INDEX 108
Contents Index
5
ABOUT THE MANUAL
This manual provides quick access to information about your Cintiq. The information is common to Windows and Mac computers. Windows screen captures are shown unless otherwise noted. • Go directly to table of contents or index topics by clicking on them.
• Use the navigation controls to move through the manual.
• Use your .pdf viewer zoom-in tool to increase the size of the manual on your display screen. See the viewer application help for information on any additional tools that help you use and print the manual. • SMALLCAPITALLETTERS are used to identify the names of keyboard keys, dialog boxes, and control panel
options.
• Be sure to see also the Important Product Information guide for Cintiq, located on the Installation CD. The guide includes product safety precautions, specifications, and your license agreement.
• The following information is not included with this product: information about your specific computer hardware or operating system, or information about your application software. Your best source for this information is the set of manuals and discs that came with your hardware, operating system, or
application.
Wacom’s philosophy is to continually improve all of its products. As a result, engineering changes and improvements are made from time to time. Therefore, some changes, modifications, and improvements may not be covered in this manual.
Go to front page.
Go to table of contents. Page back, or page forward.
Go to index. Go back to previous view.
Go to topic. Topic continued.
Contents Index
Contents Index
6
UNPACKING YOUR CINTIQ
Your Cintiq 22HD interactive pen display comes with the Cintiq display stand and a variety of accessory parts. The product parts and accessories are packed together in the accessories box. To avoid damage, see the instructions on the following pages before setting up and using Cintiq or the Cintiq stand.
Carefully unpack and place all items on a stable surface. Save the packing materials and package box for use when shipping or storing Cintiq.
• Remove any packing materials from the back of the pen display and cabling. • After unpacking, inventory and ensure the box contents are complete.
Note: Some configurations may include additional CDs or DVDs containing application software. To install, see the instructions for those CDs or DVDs.
Before installing, take some time to learn about your Cintiq interactive pen display and Cintiq display stand.
Cintiq interactive pen display Patented Cintiq display stand
See display stand features.
Pen, with personalization rings To personalize, unscrew the tip cone and replace the ring with a different color.
Quick Start Guide
Warranty card included with some configurations. Installation CD
Includes the software driver and Important Product Information guide.
AC power adapter and cable
Pen stand,
includes replacement nibs and nib extraction tool
Grip, wide-bodied
Some configurations do not include all shown items. Check the product listing. Rotation lock screws,
Contents Index
7
USING THE CINTIQ DISPLAY STAND
The Cintiq display stand is designed to support the weight of your Cintiq interactive pen display. • Cintiq can accommodate a variety of uses and working styles. Use the stand to adjust the working
position of Cintiq so as to best meet your needs throughout the day.
• You can move or slide Cintiq to different locations on your desktop. Remember that you may need to adjust the incline to which you have positioned Cintiq before moving the pen display.
Display stand features Display stand location
Mounting Cintiq on the display stand Adjusting the display incline
Adjusting rotation
Removing Cintiq from the display stand
Adjust the display stand to a lower position as needed to emulate an easel, animator’s table, or drafting table.
At the lowest position of the stand, Cintiq can be freely rotated to any angle without touching the desktop for the greatest comfort and accuracy of stroke while drawing or editing images.
Adjust the stand to a more vertical position when a large amount of keyboard input is required. This position is also useful when presenting your work to co-workers or clients.
Contents Index
8
DISPLAY STAND FEATURES
Place the Cintiq display stand on your desktop or other stable work surface. Select a level location where the stand is stable and will not tip or fall when the pen display is mounted on it. Take some time to
familiarize yourself with the display stand components.
Next: Mount the Cintiq interactive pen display on the Cintiq stand. See mounting Cintiq on the display stand.
Warning
Incline adjustment levers
When Cintiq is mounted on the stand, use these levers to adjust the display incline. See adjusting the display incline.
Bearing recess
Front feet
The front feet have rubber pads to reduce slippage on the desktop.
Rear feet
The rear feet are on rollers, allowing them to move when adjusting incline.
Do not operate the incline adjustment levers when Cintiq is not mounted on the stand, and do not lift the stand by the adjustment levers. The stand is spring-loaded and may cause injury or damage if released without the weight of Cintiq on the stand. Improper operation may lead to physical injury or damage to the stand. Be careful to avoid catching your finger in the gap of the movable portion of the stand.
Do not place on any unsteady surface or table. Do not place on slanted areas, unstable areas, or areas where vibration is present. Physical damage or personal injury may result if this product falls from an unsuitable surface.
Contents Index
9
DISPLAY STAND LOCATION
Select a location on your desktop or other work surface that is level and stable.
• Choose a location on a desktop or other working surface that is flat, clean, and free of any moisture or oily film.
• Make sure the Cintiq display stand is placed in a stable position on your desktop or other work surface so that it will not tip or fall when Cintiq is mounted on it.
Place Cintiq securely on a level, stable desktop or other working surface.
Do not place this product on any unsteady surface or table. Do not place on slanted areas, unstable areas, or areas where vibration is present. Physical damage or personal injury may result if this product falls from an unsuitable surface.
Do not place this product on any wet surface or table. Doing so may cause the this product to slip, allowing the product to fall.
Contents Index
10
MOUNTING CINTIQ ON THE DISPLAY STAND
Before mounting Cintiq on the stand for the first time, remove any packing materials from the back of the pen display and cabling.
• Make sure the stand is placed in a stable position on your desktop or other work surface so that it will not tip or fall when Cintiq is mounted on it. Securely grasp Cintiq with both hands. The display should face toward you, with the power button on top and status LEDs located to the upper left.
• Align Cintiq parallel to the front of the display stand so the bearing hub is located between the
V-shaped upper edges of the bearing recess. The V-shaped edges will serve as a guide for positioning the bearing hub. See – A – below.
• With the back of Cintiq resting against the stand, lower Cintiq until the bearing hub rests securely in the bearing recess. The pen display will be held in place by gravity. There will be no audible ‘snap’ to indicate a mechanical lock. See – B – below.
• Check for stability of the display stand. Carefully move the pen display and stand through their full range of motion. See adjusting the display incline.
• If you do not need to rotate the Cintiq pen display, you can secure it to the stand with the rotation lock screws. See optional display configurations.
To learn about other mounting options, see using an alternate mount or stand. Bearing hub
Bearing recess
– A – – B –
After mounting the pen display on the stand, remove the foam blocks that lock the
adjustment levers in place. Save these blocks with the other packaging materials. You will need them if in the future you want to ship Cintiq.
When operating the incline adjustment levers, Cintiq must be mounted on the stand with the stand feet resting on a stable, flat surface. The stand is spring-loaded and can snap back quickly, causing injury or damage if not operated properly.
Contents Index
11
ADJUSTING THE DISPLAY INCLINE
You can adjust the pen display height and incline to best meet your needs throughout the day.
To change the display incline or viewing angle, face the front of the pen display and grasp it on the left and right side at approximately the same height as the display stand adjustment levers. Use your fingertips to gently pull the incline adjustment levers toward the pen display. This will release a clutch mechanism. Tilt the display to adjust the incline setting.
• To lower Cintiq, pull the left incline adjustment lever toward Cintiq and gently lower Cintiq to the desired incline angle. Release the lever to lock the stand in place.
• To raise Cintiq, pull the right incline adjustment lever toward Cintiq and gently raise Cintiq to the desired incline angle. Release the lever to lock the stand in place.
Note: The incline adjustment levers exhibit some natural play before the clutch mechanism engages. When adjusting incline, set the display stand to an incline slightly higher than you plan to work with, then lower the display to the desired position.
Next: Familiarize yourself with the pen display. See getting to know your Cintiq.
ADJUSTING ROTATION
To adjust rotation, grasp Cintiq by the main body and rotate the pen display to the desired position. It will move on the bearing hub.
Cintiq can be rotated on the display stand when the incline is less than or equal to 25 degrees. You can only rotate the pen display 180 degrees in either direction.
If you do not plan to rotate the pen display, use the rotation lock screws and fasten the display to the stand in a horizontal position. See optional display configurations.
Before moving Cintiq, first adjust the stand to its full upright position. This will reduce the spring tension so the stand will not accidentally release and snap shut. If the pen display is in landscape orientation, use one hand to grasp the bottom of the display and with your other hand grasp the back of the stand. Be sure to lift on both the display and the stand so the stand will not separate from the display when moving Cintiq.
If Cintiq is in portrait orientation or has been locked to the stand with the rotation lock screws, the stand will not separate from the pen display and Cintiq can be safely lifted by grasping the display with both hands. See optional display configurations.
Contents Index
12
REMOVING CINTIQ FROM THE DISPLAY STAND
The Cintiq interactive pen display has been specifically designed for use when mounted on the Cintiq display stand. However, there may be times when it will be necessary to remove the pen display from the stand. For example, you may want to locate the pen display on a suitable VESA mounting arm.
See using an alternate mount or stand. To remove Cintiq from the display stand:
• If the rotation lock screws are attached, remove them from the back of Cintiq.
• Position the pen display to landscape orientation before removing it from the display stand. The stand will not release unless Cintiq is in landscape orientation.
• Next, raise the stand incline to the highest position. See adjusting the display incline.
• Firmly grasp the pen display on both the left and right sides, and lift out of the display stand.
Note: When packing Cintiq for transport, first adjust the stand to its lowest position and place the foam packing blocks under the incline adjustment levers before removing Cintiq from the stand. The foam blocks will keep the stand from snapping shut while in its packaging. Always pack Cintiq and its stand in their original containers and protective cushions. Never pack Cintiq while it is mounted on the stand. Doing so may damage the pen display or stand during transport.
Important: When removing Cintiq from the display stand, always lift Cintiq in a direction parallel to the front of the stand. You may also need to slightly rotate Cintiq so the stand will release.
Contents Index
13
SETTING UP YOUR CINTIQ
Your Cintiq 22HD interactive pen display functions as both a display and a pen tablet. Follow the instructions below to complete the hardware and software installation.
Important: You MUST install the Wacom driver software for correct pen-on-screen functionality.
System requirements
Step 1: Hardware installation Step 2: Software installation
SYSTEM REQUIREMENTS
Make sure your computer meets the following minimum system requirements:
• PC. Windows 7, Vista (SP2 or later), XP (SP3 or later). 32 or 64-bit configurations. DVI or VGA port. Available USB port and CD-ROM drive.
• Mac. OS X, v10.5.8 or later. Intel-based platforms only are supported. DVI or VGA port, or appropriate Mini DisplayPort to DVI adapter. Available USB port and CD-ROM drive.
Cintiq supports digital (DVI) and analog (VGA) video signals. For optimum performance, connect Cintiq to a digital video card.
VGA connection is not recommended as the display quality will not be as good as with a digital connection. VGA connection requires that you obtain an appropriate DVI-I to VGA adapter cable. Check with your local product retailer or an online outlet.
Notes:
Cintiq can be used alone or with another display, such as a CRT monitor or LCD projector. To use Cintiq with another display, you will need two video cards or a video card with dual output. You may be able to set up Cintiq as a mirrored, extended, or independent display. When working with more than one monitor, Cintiq will map to the monitors based upon how your system is configured. By default, if you are in mirror mode, the pen display will map to the entire space on each monitor. See your hardware and operating system documentation for details on configuring your system for use with multiple monitors.
A Display Toggle function is available for use with multiple display systems. This enables you to toggle the screen cursor between Cintiq and your other displays.
Contents Index
14
STEP 1: HARDWARE INSTALLATION
In this step, connect the video, USB, and power cables.
If you have not already done so, mount Cintiq on the display stand.
Important: Never connect or disconnect the video or power cables while your computer or pen display are powered on. This can damage the display or video card.
1. Turn off your computer.
2. Determine if your computer has a digital (DVI) or analog (VGA) port. If your computer has only one video port, unplug your previous monitor or add a second video card. For best results, connect Cintiq to a DVI-D or DVI-I card.
3. Follow the below instructions for your video port. Make sure to tighten any connector thumbscrews. See – A – in the connection diagram.
4. Plug the USB connector into an available USB port on your computer or USB hub attached to your computer. See – B – in the connection diagram.
5. Connect the power adapter to Cintiq. See – C – in the connection diagram.
6. Connect the adapter power cable and plug into an AC outlet. See – D – in the connection diagram. 7. Turn on the pen display. The power LED will glow orange.
For DVI operation, connect the Cintiq video cable to the DVI port located on your computer video card.
The Cintiq video cable has a DVI-D connector. Cintiq can be connected to either a DVI-D or a DVI-I card.
For VGA operation, you will need to obtain a Wacom accessory DVI-I to VGA adapter cable. See ordering parts and accessories.
Remove the DVI-D cable from Cintiq and replace it with a DVI-I to VGA adapter cable. See cable removal and replacement. Connect the adapter cable between the Cintiq and your video card.
If connecting to a Mac Mini DisplayPort, you will need to obtain an appropriate active adapter cable, such as those offered by Kanex, Apple, or other manufacturers. Check with your local product retailer or an online outlet for availability.
Connect the adapter between the DVI-D end of the Cintiq video cable and your Mac. DVI-I
DVI-D
Contents Index
15 Cintiq cabling diagram
– A –
Cintiq video cable with DVI-D connector, or appropriate DVI-I to VGA adapter cable Video card:
DVI-D, DVI-I, or VGA
– C – DC input.
Connect to extension cable. AC
– D –
Power adapter
Caution
Do not connect or disconnect the video or power cables while Cintiq or your computer are turned on. This can damage the display or computer video card.
Only use a power adapter specified for use with your pen display. Use of an improper power adapter may damage the pen display.
– B – USB
Contents Index
16 8. Turn on your computer. The interactive pen display will install as a default monitor.
9. As necessary, configure the display control panel settings for the proper size and color resolution. For best results, set Cintiq to the maximum (native) resolution of 1920x1080. See the Important Product Information guide located on the Installation CD for details about resolution sizes that can be used with Cintiq. The display size and color resolution may be constrained by the capabilities of your video card. To fine-tune, see adjusting the display.
Windows: If you are using Cintiq as a secondary display, you may first need to enable Cintiq in your display properties control panel.
After the LCD monitor portion of the installation is working to your satisfaction, move on to step 2: software installation.
Notes:
Each LCD panel is produced under very stringent quality standards. Production techniques cannot guarantee an absolutely perfect display. Wacom does not allow any pixel to be always white. A small number of subpixels are allowed to show a wrong color for some parts of the color spectrum. See the Important Product Information guide for more information.
If an image has fine striping (such as screen stripes), it may appear to flicker or display a moiré pattern.
Do not apply excessive pressure on the display screen surface, it may cause the appearance of a moiré or pooling pattern. If this occurs, use less pressure on the display screen when working with the pen.
When a still image is displayed for a long period of time, an after-image may remain for a short time. To prevent this, use a screen saver or other power management feature.
To extend the life of the pen display backlight, set your computer’s power management to turn off the display when not in use for extended periods of time.
Your eyes may feel more comfortable if you reduce the display screen brightness when working with Cintiq for extended periods of time. This will also extend the life of the backlight and reduce the heat felt on the display screen surface.
Some models may include a color profile on the Installation CD. To activate for use with Cintiq, first identify Cintiq as a pen display in the system display settings control panel. Then select the Cintiq profile in the color management control panel. For details, see the color management information in your operating system and application documentation.
Contents Index
17
STEP 2: SOFTWARE INSTALLATION
Important: You MUST install the Wacom driver software for correct pen-on-screen functionality.
Save your work and close all open applications. Temporarily disable any virus protection programs. 1. Insert the Installation CD into your computer’s CD-ROM drive. If the software installer menu does not
display, double-click on the INSTALL icon located on the CD. (When available, you can also download and install the latest software driver from the Wacom web site for your region.)
2. Click INSTALL TABLET and follow the prompts to install the driver software. 3. Reactivate your virus protection program.
4. After completing the software installation, make sure you can use your pen on the Cintiq display screen to move the screen cursor.
When you place the pen tip on the display screen, the screen cursor should immediately jump to a corresponding position approximately beneath the pen tip. Lift the pen tip and place it on the display screen surface in a different location. The screen cursor should again jump to the new position. This is known as absolute positioning, and enables you to position the screen cursor without having to drag your pen across the display screen surface.
5. Check the Read Me file for updated information. Review also the Important Product Information guide located on the Installation CD for cautions and warnings. If you have trouble installing Cintiq, see troubleshooting.
6. Next, precisely align the screen cursor with the pen tip position. See calibrating the pen display. Notes:
User-specific preferences are supported. After logging on, each user can customize their personal settings in the Wacom Tablet control panel. Switching to another user (either by logging on or fast user switching methods) will load the settings for that user.
If the pen display does not respond properly or you lose cursor control, the pen display preferences may be corrupted. See managing preferences to delete the current preference settings and return the pen display to its factory default condition.
Driver installation automatically activates the pen input functions available within Microsoft Windows 7, Vista, and Office 2007 or later (except for Windows 7 Starter and Home Basic, and Windows Vista Home Basic). See pen and digital ink capabilities in Windows.
To download a new software driver (when available) from the Internet, see obtaining software updates.
Contents Index
18
GETTING TO KNOW YOUR CINTIQ
The Cintiq 22HD interactive pen display combines the benefits of a Liquid Crystal Display (LCD) with the control, comfort, and productivity of Wacom’s cordless, battery-free pen technology. This gives you a direct pen-on-screen interface for your computer.
The basic components of your Cintiq include a Wacom pen tablet internally mounted behind a high quality color display, the Wacom Grip Pen, and the Cintiq display stand.
This manual describes how to set up and use your Cintiq. The Wacom Tablet control panel enables you to customize your pen and pen display settings. To learn more, see customizing.
Note: Not all product models are available in all regions. Pen display features
Pen features
PEN DISPLAY FEATURES
After the Cintiq pen display is safely mounted on the Cintiq stand, take some time to familiarize yourself with the features and components of your Cintiq interactive pen display. Although they will appear as separate devices to your operating system, the display and tablet sensor function as an integrated output and input device. The tablet sensor reports pen coordinates, pressure, tilt, switch, eraser, and other information.
• Many applications have built-in support for pen display features (such as pressure sensitivity,
tilt, and rotation). Visit the Wacom web site to learn about applications that support these features. See product information.
• For information on how best to use pen display features within a specific application, see the instructions in that application’s manuals.
Front view Rear view
Contents Index
19
FRONT VIEW
Status LED
• When using pen in active area of the pen display, lights blue when the pen tip, eraser, or side switch are pressed.
• LED will not light unless the USB cable is plugged into an active USB port and a video signal is present.
Power LED
• Lights blue when power has been supplied to Cintiq and a video signal is present.
• Glows orange when no video signal is detected. (e.g., The computer is turned off, starting up, or has entered a power management mode in which video signals are not sent.)
ExpressKeys
See pen display controls.
See also rear view.
Hardware control buttons
Press the right button to work with LCD settings using the On Screen Display (OSD). When in LCD settings (OSD) mode, the four upper right ExpressKeys are used for
adjusting the display
settings. USB accessory port
Touch Strip Mode One on each side. Press to toggle between Touch Strip functions.
See pen display controls. See also using the Express View display.
Contents Index
20
REAR VIEW
Important: Always store the interactive pen display on the Cintiq display stand or in its original packing carton when not in use. Do not store the pen display on a surface that would excessively bend or crimp the cables.
Next step: Review the pen features and learn about the Cintiq display stand. Then, if you have not already done so, move on to setting up your Cintiq.
Power button
Push to turn the pen display on or off.
Security slot
Touch Strip One on each side. See pen display controls.
Cabling
DVI-D, USB, and power.
See also front view. Bearing hub
Fits into the bearing recess on the Cintiq stand.
Allows rotation of Cintiq, and easy mounting and removal from the stand. See also using an alternate mount or stand.
Contents Index
21
PEN FEATURES
Important:
• Use only the pen that came with your product, or a Wacom accessory pen specified for use with Cintiq. Other pens may not function properly. See available parts and accessories. Also, the Cintiq pen tip is specifically designed for use with the Cintiq pen display. The tips on other pens could damage the Cintiq display screen.
• When not in use, place the pen in the pen stand or lay it flat on your desk. To maintain the sensitivity of your pen, do not store it in a container where it will rest on the tip or eraser.
Improper storage may damage pen tip pressure sensor(s).
Eraser: When brought within proximity of the pen display screen, the tablet portion of the display reports the pen location. Pressure information is reported as you press down on the eraser. By default, the function is set to ERASE.
Side switch: Be sure the customizable side switch is in a convenient location where you can toggle it with your thumb or forefinger but not accidentally press it while using the pen.
You can use the switch whenever the pen tip is within proximity of the display screen. You do not need to touch the pen tip to the display surface.
Toggle the switch in either direction to activate the button functions. By default, the upper switch is set to DOUBLE CLICK and the lower switch is set to RIGHT CLICK.
Pen tip (replaceable nib): The pen activates as soon as it is brought within proximity of the pen display screen. This allows you to position the screen cursor without touching the pen tip to the display screen.
When pressure is applied to the pen tip, the pen simulates a primary mouse button click. Tip click pressure can be adjusted in the Wacom Tablet control panel.
Tips:
• The pen enters proximity when the tip or eraser is brought within 5 mm (0.2 inch) of the pen display screen surface. • To resume operations after the pen display has entered auto
sleep mode, bring the pen tip within proximity or touch the pen tip on the pen display screen.
Contents Index
22
WORKING WITH YOUR CINTIQ
The Cintiq 22HD interactive pen display and Cintiq display stand were designed for a wide range of flexibility and ergonomic work approach. The design allows you to quickly adjust Cintiq to a different height and position whenever the need arises. Experiment by adjusting the display incline to determine which best fits your particular working style and tasks.
As you work with Cintiq you can rest your hand lightly on the display screen, just as if it were a drawing board or sheet of paper.
Because the Cintiq pen display surface will be a little higher than your desk, consider adjusting the height of your desk or chair to assure comfortable use of the device.
Setting up your work area
Configuring Cintiq for handedness Using the Grip Pen
Pen display controls
Working with multiple monitors Adjusting the display
SETTING UP YOUR WORK AREA
To minimize fatigue, organize your work area to create a comfortable environment. Position Cintiq, the pen, and your keyboard for easy access without unnecessary reaching. The pen display and any other displays should be positioned so you can view them comfortably with a minimum of eyestrain.
• If you have not already done so, be sure to configure Cintiq for your preferred handedness. • When using Cintiq as a display, align the top of the pen display in line with the level of your eyes.
• If working with a keyboard, consider locating the keyboard slightly below the desk surface in an adjustable keyboard tray.
• Maintain a good posture at all times.
Adjust Cintiq to a position that best meets your creative needs.
Contents Index
23 • Periodically shift your gaze from your computer and focus on other objects within the room. This will
help to relax your eyes.
• Use a gentle grip when working with the pen. Take short breaks between tasks to stretch and relax your muscles.
• Alternate tasks throughout the day. Minimize awkward postures and repetitive movements. • Change your position if you feel any discomfort.
• Alternate between different modes of use. For example, every few hours adjust the Cintiq display stand to a different working position.
• Study the rest of this chapter to learn more about working with Cintiq. • Learn about the basics of customizing Cintiq for the way you like to work. Tips:
• Do not pull the cabling from their computer connections by accidentally moving the pen display too far from the computer.
• If the rotation lock screws are attached to the back of Cintiq, they must be removed before Cintiq can be rotated.
• Before rotating the pen display, be sure the cables are freely rotating behind the unit.
• Cintiq can also be mounted to articulated arms or other third-party stands meeting the VESA MIS-D 100/100 (4 screw) specification for monitor stands. See using an alternate mount or stand for details.
Note regarding RSI: Wacom makes no representation, promise or guarantee that Wacom products will cure or prevent, in whole or in part, mouse-induced repetitive stress symptoms, injuries or conditions. Individual results may vary. Always obtain competent medical advice to determine the most appropriate treatment for your specific situation.
Contents Index
24
CONFIGURING CINTIQ FOR HANDEDNESS
During the installation process, you were prompted to choose a default configuration for Cintiq based on whether you are right- or left-handed. The configuration you chose was used to determine the default settings for the ExpressKeys and Touch Strips.
However, you can use the Wacom Tablet control panel to easily reconfigure Cintiq for left- or right-handed users at any time. The ExpressKey and Touch Strip settings are automatically reconfigured when you change the handedness setting.
USING THE GRIP PEN
The cordless, battery-free pen senses the amount of pressure and tilt you apply to the tip. There are four basic techniques for using the pen: pointing, clicking, double-clicking, and dragging. If you are unfamiliar with using the pen, see the following pages.
Holding the pen Positioning Clicking Dragging
Using the side switch
Working with pressure sensitivity Drawing with tilt
Erasing
To reconfigure for left- or right-handed users:
1. Launch the Wacom Tablet control panel by pressing the center
hardware control button. Click OPTIONS....
2. Choose the appropriate setting for your preferred handedness. 3. Click OK. The existing ExpressKey and Touch Strip settings are
swapped (or flipped) between left and right. Notes:
The hardware control buttons are not affected when you change the handedness setting.
Likewise, changing the handedness setting does not affect the ExpressKeys used to control the LCD settings when in LCD settings (OSD) mode.
This procedure does not affect the default orientation. At the system log on and user switching screens, the pen display uses the default configuration you chose during the install process. To change the default configuration, you must re-install the Wacom driver.
Contents Index
25
HOLDING THE PEN
Hold the pen like you would a normal pen or pencil. Adjust your grip so that the side switch is in a convenient location where you can toggle it with your thumb or forefinger. Be careful not to accidentally press the switch while drawing or positioning with the pen. Tilt the pen in any way that feels most comfortable. As you work with Cintiq you can rest your hand lightly on the display screen.
Place the pen stand within easy reach. When not in use, place the pen in the pen stand or lay it flat on your desk. The stand allows for vertical or horizontal placement of the pen.
If you are working in a multi-user environment or otherwise want to personalize your pen, unscrew the tip cone and replace the colored ring with one of another color (included).
You can customize the pen settings at any time.
Nib removal tool
Replacement nibs • 6 standard nibs • 3 hard felt nibs • 1 stroke nib
Unscrew the base of the pen stand to access a nib removal tool and assorted replacement nibs.
Important: To maintain the sensitivity of your pen, do not store it in a container where it will rest on the tip or eraser. Improper storage may damage the pen tip pressure sensor(s).
Contents Index
26
POSITIONING
CLICKING
To position the screen cursor, move the pen slightly above the Cintiq display screen without touching the screen surface. Press the pen tip on the display screen to make a selection.
Note: Calibrating the pen display ensures correct alignment of the screen cursor with the pen tip. If the screen cursor does not jump to a position near the pen tip when you place the pen on the display screen, then the pen display software driver may not be installed or is not loading. Install the driver software if
necessary. Otherwise, see troubleshooting.
Tap the display screen once with the pen tip, or touch the pen to the display screen with enough pressure to register a click. Tip: Configure Windows to select when hovering the pen over
an icon and to launch the icon with a single click. To turn on this feature, first open a folder.
Windows 7 and Vista: From the ORGANIZE pull-down menu choose FOLDERAND SEARCH OPTIONS. From the GENERAL
tab select SINGLE-CLICKTOOPENANITEM (POINTTOSELECT). Windows XP: From the TOOLS pull-down menu choose FOLDER OPTIONS.... From the GENERAL tab select SINGLE
-CLICKTOOPENANITEM (POINTTOSELECT).
Press the upper side switch (when set to DOUBLE CLICK), or quickly tap the display screen twice in the same place with the pen tip. Double-clicking is easier when using the pen perpendicular to the pen display screen.
Contents Index
27
DRAGGING
USING THE SIDE SWITCH
The pen comes equipped with a side switch. This switch has two customizable functions that can be selected by rocking the switch in either direction. You can use the side switch whenever the pen tip is within proximity (5 mm (0.2 inch)) of the display screen surface. You do not need to touch the pen tip to the display surface in order to use the switch. By default, the upper switch is set to DOUBLE CLICK, and the lower switch is set to RIGHT CLICK. You can customize or disable the switch functions using the Wacom Tablet control panel.
WORKING WITH PRESSURE SENSITIVITY
The pen responds to the nuance and inflection of your hand movements, enabling you to create natural-looking pen and brush strokes within applications that support this feature.
To draw, ink, or write with pressure sensitivity, move the pen along the display screen surface while applying various amounts of pressure downward on the tip of the pen. Press hard for thick lines or dense color. Press gently for thin lines or softer color. Some applications require that you first select a pressure-sensitive tool from the application tool palette.
To adjust tip feel, see adjusting tip feel and double-click.
Visit the Wacom web site to learn about applications that support pressure. See product information. Select an object, then slide the pen tip across the display
Contents Index
28
DRAWING WITH TILT
The pen display recognizes when you tilt the pen from vertical to incline positions. Tilt can be used to control line shape and thickness in supporting applications.
Visit the Wacom web site to learn about applications that support tilt. See product information.
ERASING
In supporting applications the pen eraser works like the eraser on a pencil. In text applications, use the eraser to select text and then lift the eraser from the pen display screen to delete the text. Visit the Wacom web site to learn about
applications that support the eraser. See product information. If the eraser is not supported in an application, you can still use the eraser for positioning, drawing, or annotation.
Contents Index
29
PEN DISPLAY CONTROLS
To improve your workflow in graphics or other applications, Cintiq features ExpressKeys and Touch Strips. While using the pen with your dominant hand, you can simultaneously use your other hand to operate the ExpressKeys or Touch Strip.
Touch Strips
Located on back of pen display, one on each side. Slide your finger over the Touch Strip to zoom, scroll, or issue assigned keystroke actions. See using the Touch Strips.
ExpressKeys
Press the customizable keys to perform frequently used functions or keystrokes, or to emulate button clicks or modifier keys. See using the ExpressKeys.
A Display Toggle function is available for use on multiple monitor systems. This feature enables you to toggle the screen cursor between Cintiq and your other displays. For example: Cintiq can be used as a pen display where the cursor is positioned at the pen tip location, or toggled for use as a standard Wacom tablet where the cursor can be moved across the entire desktop or any display on your system.
Touch Strip Mode Press to toggle between Touch Strip functions. The left button toggles the left Touch Strip functions, and the right button toggles the right Touch Strip.
Each time you press a Touch Strip Mode button, an overlay appears briefly on your display screen to show the function
assignments. See also using the Express View display. Hardware control buttons Press a button to activate the assigned function. See using the hardware control buttons.
Contents Index
30
USING THE HARDWARE CONTROL BUTTONS
Press a button to:
• Display a diagram of your current Cintiq settings. • Launch the Wacom Tablet control panel.
• Work with LCD settings using the On Screen Display (OSD). Press the button again to toggle off the function.
Notes:
You may notice a slight delay in response time, depending on the speed of your computer. The control buttons cannot be customized.
Launches the Wacom Tablet control panel. Press to close the control panel when open.
Toggles the four upper right ExpressKeys between normal operation and the LCD settings (On Screen Display) mode. In LCD settings (OSD) mode, the OSD menu is activated on your display screen and the upper right ExpressKeys are used for adjusting the display. Press to toggle back to ExpressKeys mode.
Shows (on your display screen) a diagram of the pen display ExpressKey, Touch Strip, and pen settings. The current functions for each control are shown. Press to dismiss the diagram.
Contents Index
31
USING THE EXPRESSKEYS
Press individual keys to perform frequently used functions or keystrokes. ExpressKeys can also be used to modify your pen or other input tool properties as you work.
Default settings are listed below. Right-handed configuration shown. For left-handed configuration, the ExpressKey settings are swapped (or flipped) between left and right.
REDO SAVE TAB NEW LAYER BRUSH PANEL ON SCREEN KEYBOARD FITONSCREEN COPY MERGED UNDO RADIAL MENU PRECISION MODE DISPLAY TOGGLE SHIFT CTRL/COMMAND ALT/OPT PAN/SCROLL
Note: The ExpressKeys can be operated in combination with one another. For example, program one key for the CTRL function and another for ALT. When you press both keys at the same time a CTRL+ALT function is initiated.
Contents Index
32 Tips:
• Use the Radial Menu to expand the functionality of your Cintiq.
• Press a Touch Strip Mode button for 2 seconds or more to activate the Express View display, which shows the ExpressKey settings.
• Display an interactive diagram of the current pen display settings by pressing the appropriate hardware control button at the top of the pen display. You can also press an ExpressKey or other tool button set to SETTINGS.
Consider some of these ways to use the ExpressKeys: • Set a key to a commonly used keyboard shortcut. • Set a key to launch a commonly used file or application.
• If you prefer not to (or cannot) use the side switches on your Grip Pen, then set a key to right- or double-click.
• Choose from any of the other available functions. See customizing the ExpressKeys for details.
Important: Some applications can override and control the ExpressKey functions. For details, see
using applications integrated for tablet control.
Use the Wacom Tablet control panel to customize the ExpressKey options. Manage your control panel settings
Control panel overview Customizing the ExpressKeys
Contents Index
33
USING THE TOUCH STRIPS
Slide your finger over the Touch Strip to zoom in or out, scroll down or up, or issue an assigned keystroke function.
Example of zooming in
Move your finger downward along the strip to zoom in or scroll down in most applications. Tap the lower portion of the Touch Strip for single increment changes based on the assigned function.
Example of zooming out
Move your finger upward to zoom out or scroll up. Tap the upper portion of the Touch Strip for single increment changes.
Tap upper or lower portion of strip for incremental changes. Press and hold your finger at either end of strip to
continuously scroll.
Press a Touch Strip Mode button (located on front of pen display) to toggle between customizable states. The left button toggles the left Touch Strip functions, and the right button toggles the right Touch Strip. Any disabled settings are skipped in the toggle sequence.
As you press each button, an overlay appears briefly on your display screen to show the button assignments.
Contents Index
34 Default settings are the same for both Touch Strips.
Note: In some regions the defaults may vary, depending on application and operating system differences. See customizing the Touch Strips to modify how the Touch Strips work.
For left-handed configuration, the Touch Strip settings are swapped (or flipped) between left and right.
Important: Some applications can override and control the Touch Strip functions. For details, see
using applications integrated for tablet control.
Use the Wacom Tablet control panel to customize the Touch Strip options. Manage your control panel settings
Control panel overview Customizing the Touch Strips
AUTO SCROLL/ZOOM. Sets the strip to zoom in graphics applications and scroll in other applications. Some applications may interpret zooming as scrolling, or may completely ignore zooming. Similarly, scrolling may be interpreted as zooming, or ignored completely.
CYCLE LAYERS. Sets the strip to cycle layers in applications that support this function.
BRUSH SIZE. Sets the strip to increase or decrease the brush size of your drawing tool when working in Adobe Photoshop.
ROTATE. Enables you to rotate or flip an entire image when working in Adobe Photoshop CS4 or later.
Contents Index
35
WORKING WITH MULTIPLE MONITORS
When working with Cintiq and additional monitors on the same system, the screen cursor movement on the standard monitors will depend on your system configuration.
If a second monitor is connected in mirror mode, both Cintiq and the other monitor will show identical images and screen cursor movement.
If you are using Cintiq with other monitors in extended monitor mode, you have several options for navigating on the other monitors:
• Set an ExpressKey or pen side switch to the DISPLAY TOGGLE function. You can then press the button to
toggle the screen cursor between Cintiq and your other displays.
For example: Cintiq can be used as a pen display where the screen cursor is positioned at the pen tip location on the pen display screen surface. Display Toggle enables you to use Cintiq as a standard Wacom tablet where the screen cursor can be moved across the entire desktop or additional displays. • Set a pen side switch or an ExpressKey to MODE TOGGLE. You can then quickly switch between pen
mode for working on Cintiq and mouse mode for working on the other monitors.
You can also purchase an Intuos5 tablet and use it to work on the other monitors in PEN mode. The pen will work on both Cintiq and the tablet.
Contents Index
36
ADJUSTING THE DISPLAY
Use the Cintiq controls to adjust a variety of display settings. Factory presets, auto-sync, and user settings
On Screen Display (OSD) settings Power saving
FACTORY PRESETS, AUTO-SYNC, AND USER SETTINGS
Factory presets: For optimal display quality, set your video card to a resolution of 1920x1080. This is the maximum (native) resolution that can be used with Cintiq. See the Important Product Information guide for details.
Auto-sync: Cintiq automatically synchronizes to the incoming signal. The auto-sync function sets the horizontal and vertical screen position, as well as pitch and phase. Auto-sync will function between the supported horizontal and vertical frequency ranges. See the Important Product Information guide for details.
If Cintiq does not synchronize with the incoming signal, you can use the OSD RESET or AUTO ADJUST
options to initiate display synchronization. Further screen display adjustments can be manually made using the On Screen Display (OSD) settings.
Color calibration: Changing the color, color temperature, contrast, brightness, or backlight from their default settings will override the color profile used with Cintiq.
Contents Index
37
ON SCREEN DISPLAY (OSD) SETTINGS
The OSD function enables you to optimize a variety of pen display settings at the touch of a button.
• Press the LCD settings button to toggle the four upper right ExpressKeys to LCD settings (OSD) mode. The OSD menu will appear on your display screen. See using the hardware control buttons.
• When in LCD settings (OSD) mode, the upper right ExpressKeys are used to adjust the display settings. Follow the on-screen prompts as you work with the OSD.
Notes:
Press the OSD toggle button to close the menu. All settings are saved when the OSD menu closes and will be used the next time the pen display receives a similar video signal. This is applicable to all display modes.
If you make changes to the display appearance and cannot return to the original settings, use the RESET option to return the pen display to its original factory defaults.
Use the ExpressKeys to navigate and adjust the available menu options shown in the OSD. • Select the highlighted item.
• Navigate up, or increase selected value. • Navigate down, or decrease selected value. • Return to previous menu level.
Contents Index
38 Menu options are available when you open the On Screen Display.
BRIGHTNESS/CONTRAST options include:
• BRIGHTNESS. Increases or decreases the image brightness.
• CONTRAST. Increases or decreases image contrast. Changes in contrast may affect color accuracy.
• BACKLIGHT. Increases or decreases the backlight brightness level.
CUSTOM RGB options include:
• RED. Independently adjusts the red color value.
• GREEN. Independently adjusts the green color value. • BLUE. Independently adjusts the blue color value.
Any changes you manually make to the color settings will override the color profile settings. COLOR PRESETS include:
• 5000K, 6500K, 9300K. Enables you to adjust the pen display color temperature, in degrees Kelvin. Default is 6500K.
• DIRECT displays the colors directly from the video card without any adjustment. When selected, contrast
or brightness cannot be adjusted. DISPLAY SETTINGS include:
• SCALING options.
FULL. Resizes the image to fill the whole screen.
ASPECT. Resizes the image to fill as much of the screen as possible while maintaining the correct aspect
ratio.
1:1. Displays the image at the actual resolution.
• HORIZONTAL POSITION. (VGA only.) Changes the horizontal position of the image. To automatically adjust, use the AUTO ADJUST option.
• VERTICAL POSITION. (VGA only.) Changes the vertical position of the image. To automatically adjust, use the AUTO ADJUST option.
Contents Index
39 VGA SETTINGS include:
• PHASE. (VGA only.) Synchronizes the signal timing of the pen display to that of your graphics card. Use when you experience an unstable or flickering image, or horizontal distortion lines.
• PITCH. (VGA only.) Changes the display data frequency to match that of your graphics card. Use when you experience an unstable or flickering image, or vertical distortion lines.
• AUTO ADJUST. (VGA only.) Choose this function to automatically optimize the display screen image. OTHER SETTINGS include:
• LANGUAGE. Choose the language in which to display the OSD menu.
• MENU TRANSPARENCY. Changes the opaqueness of the OSD menu background.
• RESET returns the display parameters of the current mode to their factory default settings.
POWER SAVING
Cintiq conforms to VESA power saving guidelines.
When used with a Display Power Management Signaling (DPMS) compliant computer or video card, the display will automatically comply with the power saving parameters shown below.
When power-saving functions are in effect, the screen display is darker than usual.
COMPUTER MODE H-SYNC V-SYNC VIDEO POWER LED
Power ON Yes Yes Active Blue
Standby mode No Yes Blanked Orange
Suspend mode Yes No Blanked Orange
Contents Index
40
CUSTOMIZING YOUR CINTIQ
After mastering the basics of using your pen and Cintiq 22HD interactive pen display, you may want to customize the way Cintiq works. This chapter describes how to adjust your pen display and input tool settings.
Advanced users can learn how to further optimize Cintiq by creating application-specific settings. Manage your control panel settings
Control panel overview Calibrating the pen display Customizing the pen
Customizing pen display functions Button functions
Using and customizing the Radial Menu Working with Display Toggle
Application-specific settings Working with multiple tools
Contents Index
41
MANAGE YOUR CONTROL PANEL SETTINGS
Launch the Wacom Tablet control panel by pressing the appropriate Cintiq hardware control button. You can also open the Wacom Tablet control panel using the pen on the pen display:
• Windows. Click on the Windows START button and choose ALL PROGRAMS. Then select WACOM TABLET
and choose the WACOM TABLET PROPERTIES option.
• Mac. Open SYSTEM PREFERENCES from either the Dock, the Apple menu, or from the APPLICATIONS folder. Then click on the WACOM TABLET icon.
You can begin customizing Cintiq after opening the control panel. See control panel overview.
Note: User-specific preferences are supported. After logging on, each user can customize their personal settings in the Wacom Tablet control panel. Switching to another user will load the settings for that user.
Tip: Display an interactive diagram of the current pen display settings by pressing the appropriate hardware control button at the top of the pen display.
Click on any section of the diagram to open the appropriate Wacom Tablet control panel tab. Settings may vary depending on your product model.
Contents Index
42
CONTROL PANEL OVERVIEW
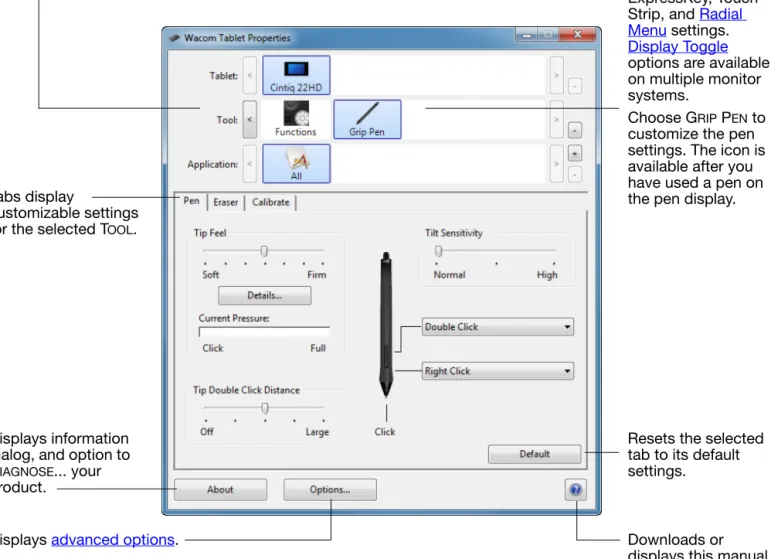
Use the Wacom Tablet control panel to customize your Cintiq or Grip Pen. When you open the control panel, an icon for the Grip Pen or other input tool is displayed in the TOOL list. The appropriate tabs are
displayed.
To customize, make changes to the tab controls. Experiment with different settings to find what works best for you. Any changes you make will take effect immediately. Click DEFAULT to return to the factory settings.
Tool Tips are available for most control panel items. Position the screen cursor over an item and let it rest there. The appropriate Tool Tip will pop up in a few moments.
Your keyboard tab and arrow keys can also be used to navigate the control panel. Tabs display
customizable settings for the selected TOOL.
Displays information dialog, and option to DIAGNOSE... your product.
Resets the selected tab to its default settings.
Icons represent your pen display (TABLET), TOOL, and APPLICATION settings.
Choose FUNCTIONS to customize the ExpressKey, Touch Strip, and Radial Menu settings.
Display Toggle
options are available on multiple monitor systems.
Choose GRIP PEN to customize the pen settings. The icon is available after you have used a pen on the pen display.
Displays advanced options. Downloads or
Contents Index
43 Control panel lists and tabs: The control panel TABLET, TOOL, and APPLICATION lists allow you to select the
pen display or tablet, tool, or application for which you want to change settings.
Note: The APPLICATION list is optional. It is not necessary to select or add applications in order to customize your Cintiq tool(s).
The TABLET list displays an icon for any supported pen display or tablet that has been installed on your system and is currently connected. All settings shown below the list apply to the selected pen display or tablet. • The control panel will not launch unless a
supported pen display or tablet is connected to the computer.
• Settings can only be viewed or changed for an attached pen display or tablet.
• A pen display or tablet cannot be deleted from the control panel list unless it is attached to the computer.
See also installing multiple tablets and renaming the tablet in the tablet list.
Current selections are highlighted.
The TOOL list displays icons for the pen display FUNCTIONS and for the different tools that have been used on the pen display.
To customize settings for a tool, click on its icon within the TOOL list. The appropriate tabs will be displayed. See
customizing pen display functions and customizing the pen.
Note: The pen will be automatically added to the TOOL list when first used on the pen display, and functions using the default settings.
See also working with multiple tools.
Use the APPLICATION list to define TOOL settings that apply only to a specific application. See application-specific settings.
Contents Index
44
CALIBRATING THE PEN DISPLAY
For optimum performance, you must calibrate the pen display to align the screen cursor with the position of the pen on the display screen. This is required to compensate for viewing angle, and to adjust for parallax. Set Cintiq in its working position, then follow the below procedure.
Tip: To see the screen cursor slightly offset from the actual position of the pen tip, calibrate by clicking on a spot showing that offset from the crosshairs. For example, to have the screen cursor appear 2.5 mm (1/10th of an inch) above and to the left of the pen tip, calibrate by clicking on a spot 2.5 mm (1/ 10th of an inch) below and to the right of the crosshairs.
Important: If using a VGA connection, first RESET the pen
display. See On Screen Display (OSD) settings.
1. Open the Wacom Tablet control panel. If more than one pen display is installed on your system, select the pen display you are working with from the TABLET list. 2. Select GRIP PEN from the TOOL list.
Then select the CALIBRATE tab.
3. If you are working with multiple monitors, select the MONITOR corresponding to your Cintiq. Only monitors that are set to one of the resolutions supported by Cintiq will appear in the list.
4. Click CALIBRATE... to activate the
calibration screen.
5. Hold the pen and position your head as you normally do when working with the pen display. Use the pen tip to click on the center of the crosshairs in the upper-left corner.
6. Then click on the center of the crosshairs that are displayed in the upper-right, lower left, and lower right corners. 7. Test the alignment by positioning the pen
at a few different points on the display. Click OK to accept the calibration. Click TRY AGAIN to recalibrate.
Contents Index
45
CUSTOMIZING THE PEN
Use the pen when opening the Wacom Tablet control panel. The pen will be selected in the TOOL list and the
appropriate tabs will be displayed. If not selected, choose the pen from the TOOL list. Select a tab and
choose from the available options.
Wacom offers a number of optional pens, such as the Art Pen and Airbrush, that are compatible for use with Cintiq.
• The Art Pen features a pressure-sensitive tip and eraser, as well as sensitivity to tilt and rotation. Rotating the barrel in supporting applications creates a unique effect.
• The Airbrush is a true digital airbrush. It features a pressure-sensitive tip and eraser, tilt sensitivity, and a fingerwheel to control the application of digital paint.
These tools are fully supported in the Wacom driver software. They will appear in the TOOL list of the
Wacom Tablet control panel after you touch the pen display screen with the tip of the tool. The control panel will update to show the new tool and the options available for customization.
In supporting applications you can adjust the functionality of the Art Pen rotation or the Airbrush fingerwheel within the application. See the documentation that came with your application for details. To learn more about these and other optional tools that can be used with Cintiq, visit the Wacom web site for your region. On the web site you can also learn about applications that currently support the advanced features of these tools.
Adjusting eraser feel
Adjusting tip feel and double-click
Advanced tip and eraser pressure settings Application-specific settings
Customizing tilt sensitivity
Contents Index
46
ADJUSTING TIP FEEL AND DOUBLE-CLICK
To adjust the tip sensitivity of your pen, select the PEN tab.
Customizes the amount of pressure needed to click, draw, or ink.
To create broad brush strokes or to click with a light touch, use a SOFT tip setting. For maximum control while drawing thin lines, use a FIRM tip setting.
With your screen cursor positioned over an empty area of the control panel, press down on the pen display screen with your pen tip. Use the pressure bar to
determine how hard you must press on the pen to reach maximum pressure. Click to further customize the tip sensitivity.
Tips:
• Use a soft TIP FEEL for a wider range of pressure values in most pressure-sensitive applications.
• In some applications a soft pressure setting can make the pen overreact so that slight pressure on the pen will be magnified on the screen. If you experience this, try a firmer TIP FEEL setting.
• To make double-clicking easier, expand the tap area that accepts a double-click (the double-click distance). • A large double-click distance may cause a delay at the beginning of brush strokes in some drawing
applications. This may also cause a delay at the beginning of a drag action or inking stroke. If you notice such effects, try setting a smaller double-click distance and using the side switch to double-click. You can also set an ExpressKey to double-click.
Adjusts the size of the double-click area. Drag slider to OFF if you do not want double-click assist.
Contents Index
47
ADJUSTING ERASER FEEL
To adjust the eraser sensitivity of your pen, select the ERASER tab.
ADVANCED TIP AND ERASER PRESSURE SETTINGS
To further customize tip or eraser pressure settings, select the PEN or ERASER tab and click on the
CUSTOMIZE... button. Options within the PEN FEEL DETAILS dialog box enable you to independently change the tip or eraser pressure sensitivity and click threshold settings.
Important: In the PEN and ERASER tabs, these settings are adjusted simultaneously with the TIP FEEL
or ERASER FEEL slider, which override the advanced pressure settings.
Customizes the amount of pressure needed to erase.
Click to further customize
the eraser sensitivity.
With your screen cursor positioned over an empty area of the control panel, press down on the pen display screen with your pen eraser. Use the pressure bar to determine how hard you must press on the eraser to reach maximum pressure.
Select the function to perform when using the eraser.
Using your pen tip or eraser, make several strokes within the box to test the results of your changes. Graphically displays the selected pressure
sensitivity curve and click threshold settings. Move the pressure controls to change the sensitivity curve.
• CLICK THRESHOLD determines the amount of force required to register pressure or generate a tip click.
• Use the SENSITIVITY control to change the slope of the pressure response curve. • MAX PRESSURE determines how hard you
must press the pen tip to reach maximum pressure.
A curve that increases quickly makes the pen feel more sensitive.
Contents Index
48
CUSTOMIZING TOOL BUTTONS
Select the PEN tab to change the functions assigned to the side switches and tip of your pen.
Select the function to perform when pressing the upper or lower side switch. The selected function occurs when you bring the pen tip within 5 mm (0.20 inch) of the display screen surface without touching the screen and then press the upper or lower side switch.
Tip: To make double-clicking easier, set the side switch to DOUBLE CLICK.
Double-click here to change the pen tip function.
• At least one tool button should be set to the CLICK function. • The tip must be set to CLICK in order to draw in most graphics
applications. You can change the SIDE SWITCH MODE to best
fit the way you like to use the pen when making right-clicks or other click functions. Click on the control panel OPTIONS... button. Select:
• HOVER CLICK to perform click functions without touching the pen tip to the display screen surface. This is the default setting for all except Tablet PCs.
• CLICK & TAP to enable the precise placement of click functions. When selected, you must first press the side switch then touch the pen tip to the display screen surface in order perform the function.
Hover click
Contents Index
49
CUSTOMIZING TILT SENSITIVITY
To adjust the tilt sensitivity of your pen, select the PEN tab. Tilt sensitivity determines how far you have to tilt
the tool to produce the maximum tilt effect. You need to tilt the pen less at high sensitivity than at low sensitivity.
Visit the Wacom web site to learn about applications that currently support tilt.
CUSTOMIZING PEN DISPLAY FUNCTIONS
To customize the interactive pen display, open the Wacom Tablet control panel and select the FUNCTIONS
icon in the TOOL list. Select a tab to customize, and change settings using the available options. Drag to increase or decrease TILT
SENSITIVITY. Test the new setting in an
application that supports tilt.
The tilt setting applies to both the tip and eraser of your tool.
Tilt is direction sensitive and can be used in some applications to control brush
orientation or other characteristics.
Using and customizing the Radial Menu Customizing the Touch Strips
Customizing the ExpressKeys
Working with Display Toggle