INSTALLATION AND
PROGRAMMING GUIDE
9651
HARDWIRED CONTROL
PANEL
Every effort has been made to ensure that the contents of this book are correct. However, neither the authors nor Cooper Security Limited accept any liability for loss or damage caused or alleged to be caused directly or indirectly by this book. The contents of this book are subject to change without notice.
Printed and published in the U.K. Part number 496929 Issue 2
Contents
1. INTRODUCTION... 3
Operator Controls and Displays - 9930 ...4
System Features...5 Detectors ...5 User Control ...5 2. Technical Description ... 6 Specification ...6 Power Supply ...6 Outputs ...6 Inputs ...6 Fuses ...6 Control Unit PCB ...7 3. INSTALLATION ... 8 Overview...8 Cabling Keypads ...8
Fitting the System ...9
Fitting the Control unit Case...9
Fitting a 9930 Keypad ...9
Wiring the Control Unit ...11
Cable Entries ...11
Mains Connection...11
Remote Keypads ...12
Connecting Keypads, Exit Terminate Buttons, Lock Switches and Sounders...12
Detector Circuit Connections...13
Using Programmable Outputs ...14
Wiring Keyswitches ...15
Fitting a Plug-by Communicator ...16
Fitting a Battery ...18
Initial Start Up ...18
4. Programming ... 20
Entering Programming Mode...20
Programming Commands...20
Leaving Programming Mode ...24
Engineer Reset...24
Re-entering Programming Mode ...25
Restoring the Access Codes (1st stage reset)...25
Restoring All Factory Default Programming ...25
Programming Command Reference...26
0: Country Defaults...26
01 - 08 : Zone Programming ...26
20: Change Engineer Code...30
21: Zone Configuration...31
22: Loudspeaker Chime ...31
23: RedCare Reset...31
25: Continuous Sounder...31
27: Exit Fault External Sounders...31
28: Status Display...32
29: Entry Alarm Delay Time ...32
30: Silent or Audible PA ...32
31: Zone Tamper Reset ...32
33: System Reset ...33
39: Level A Exit Mode...34
40: System Auto Re-Arm...35
41: Bell Delay ...35
42: Bell Duration ...35
43: Level A Entry Time ...35
44: Level A Exit Time...35
45: Entry/Exit Tone Volume...35
46: Tamper Alarm Annunciation...36
50: CSID Code ...36
51: Setting Time and Date...36
52: Omit Tamper Allowed ...37
53: Abort Reset...37
59: Sounder Tamper...Error! Bookmark not defined. 60: Level B Final Exit Operation ...37
61: Level B Entry Route Response ...37
62: Level B Exit Mode...38
63: Level B Alarm Response ...38
64: Level B Entry Time ...38
65: Level B Exit Time...38
70: Level C Final Exit Operation...38
71: Level C Entry Route Operation ...39
72: Level C Exit Mode ...39
73: Level C Alarm Response...39
74: Level C Entry Time ...39
75: Level C Exit Time ...39
76: Level D Exit Mode ...39
77: Level D Alarm Response...40
78: Level D Entry Time ...40
79: Level D Exit Time ...40
81, 82, 83, : Output Programming ...40
85: Burglar Communications Re-arm ...42
86: Dual Ply Entry Warning ...43
87: Keypad Dual Key Alarms ...43
90 - 97: See “5.Testing”...44
98: Load Full Defaults...44
99: Leave Programming Mode ...44
126: Select Language...45
151 - 158: Plug by Communicator Outputs ...45
5. Testing...48
Reading the Log (Command 90) ...48
Keypad and Event Log Displays ...48
Testing Outputs (Commands 91-96) ...50
Engineer Walk Test (Command 97) ...50
1. INTRODUCTION
The 9651 control unit is designed to be fully programmable to suit individual site requirements and user needs. Note that in the UK the product does not comply with the ACPO 2000 alarm policy and DD243: 2002.
The system comprises a control unit in a metal shielded case and up to four separate keypads (see Figure 1 on the next page). You should always fit at least one keypad.
The control unit provides:
° A four-wire bus connection for keypads.
° Connections for eight Fully Supervised Loop (FSL) zones or eight Closed Circuit Loop (CCL) with a common tamper.
° Connections for three fully programmable outputs.
° Internal sounder loudspeaker output with electronically generated Chime, Alarm, Fire and Entry/Exit tones. (The volume of the Entry/Exit and Chime tones can be adjusted).
° Pins and wired harness for a plug-by communication device.
The control unit provides connectors for eight Closed Circuit (CC) zones or eight Fully Supervised Loop (FSL) zones on its own printed circuit board. The control unit supports the 9930 sixteen character Liquid Crystal Display (LCD) keypad. The keypad(s) can accommodate the 934EUR-00 “Prox” reader module to allow the end users to set and unset the system using a “Prox” token in place of a four digit access code.
As an Installer you can program the system from the keypads. When
programming from the keypads the programming interface is arranged as a set of three-digit numbered commands similar to those used by the 9800 family of products.
The system can provide for up to 16 separate users. User facilities include: ° Four different security levels (full and three part sets) on the 9651. The
levels can be programmed by the Installer. ° User programmable Duress code.
° Keyswitch setting/unsetting.
° Dual key PA alarm from the keypads.
Setting, unsetting & resetting using a “Prox” token
Before attempting to program the system, make sure you are completely familiar with the functions of the system and its programmable options.
1 - Control unit 4 - Door contacts 2 - Keypads 5 - fused mains spur 3 - PIRs
Figure 1. 9651 System Layout
Operator Controls and Displays - 9930
Figure 2. 9930 Remote Keypad.
The 9930 keypad has a 32 character LCD display that shows "first to alarm" information, level status, and programming commands. In addition there are
a Glows steadily when mains power is present. Flashes when the system is working from battery backup.
f Glows steadily if a telephone line fault is present.
s Glows steadily if:
a) A fault or tamper circuit is active while the system is unset. b) The system needs an engineer or remote reset.
c) A telephone line fault is present. The 9930 keypad provides the following keys: 9 Used to start a test of the detectors.
8 Used to start a test of the sounders and strobe. 7 Used to enable or disable the Chime facility.
6 Used to set the internal clock calendar, which provides a time stamp on printed log entries.
5 Used to display the log (250 events). 4 Used to change the user access codes.
Y Used to enter programming and setting/unsetting commands.
X Used to set the system with individual zones (including 24 hour zones) temporarily omitted.
ABCD Level setting keys. Level A sets the whole system.
System Features
Detectors
The control unit provides connections for up to eight separate detector
zones. Each zone can be connected as a two wire FSL or a four wire CC with global tamper. See "4. Programming - Programming Commands" for the
factory default settings and instructions on how to change the zone types and attributes.
User Control
The control unit provides 16 independent user access codes and or
Scantronic “Prox” tags . The user can change these codes or add or delete “Prox” tags at any time, but cannot program the system with these codes. The user can set the system in the following modes:
Full Set All the zones function as programmed during installation. Part Set B, C & D Selected zones are omitted. You must program the
zones to be omitted during installation.
Set with Omit One or more zones temporarily omitted. The user selects the zones to be omitted before setting.
2. Technical Description
Specification
Environmental -10° to +40 °C. EN50131 “Class II” 75 % RH.
Dimensions Junior combi box: 243mm W, 234mm H, 87mm D
Weight Junior combi box: 2.45 kg (without standby battery)
Internal Clock ±10 minutes over one year (depending on the accuracy of the mains supply frequency). Conforms to BS4737 1986 Part 1. for Audible or Remote signalled systems. Designed to fulfil the requirements of a EN 50131-1 Grade 2 Intruder Alarm System.
Power Supply
All currents accurate to ±5%.
System power supply 230VAC +/- 10% (ambient Temp. 20°. C) 1.0A total.
Control unit power 115mA nominal quiescent, 150mA active. 9930 Remote Keypad 20mA quiescent, 35mA with keypad backlight
on.
Standby Battery 12 Volt, 7.0AH rechargeable lead-acid, Gel Type battery (not supplied).
Power Supply Type A power supply designed to fulfil the requirements of EN 50131-1 Grade 2.
Outputs
O/P 1, 2, 3 3 open collector transistor outputs, 500mA, 12VDC, negative applied.
LS Can support two parallel connected externally
mounted 16 Ohm loudspeakers for internal sounder or EE tones.
AUX 500mA maximum, 12VDC.
Coms OP1-8 12V logic outputs, -ve applied in alarm (+ve removed).
Inputs
TR = Tamper return for bell.
Tellback/RedCare reset* = +12V applied to operate reset. Line Fault input = +12V applied to indicate line failure.
Fuses
F1 - 12V AUX 1A Fast.
Control Unit PCB
Figures 3 show the layout of the 9651control unit PCB.
BA TT F-2A 12V A U X F-1A 1 2 3 4 5 12 11 10 9 8 7 6
1. Outputs. 7. NVM Reset pins. 2. Aux power. 8. Battery connector. 3. Tamper switch. 9. Battery fuse. 4. Zone connectors. 10. Kick start pins.
3. INSTALLATION
Overview
A typical installation comprises the following main steps:
1. Carry out a Risk Assessment of the premises and agree a security grade for the proposed alarm installation. Decide on positions for wired
detectors, control unit, keypads, external and internal sounders. As part of the site survey ask the user what facilities they require .
3. Ensure that there is a suitable mains supply present at the site of the control unit.
4. If you are going to use a communication device (for example a Speech Dialler) arrange for a PTT (Public Telephone and Telegraph) connection point near to the control unit.
5. Install the wired detectors and run cables to the control unit. Connect each detector to its cable.
7. Run cables from the keypads, external and internal sounders to the control unit.
8. Install keypads and connect them to their cabling. Ensure that each one has the correct address setting.
9. Install internal and external sounders and connect them to their cabling. 10. Install the control unit and connect it to the mains supply cabling. Do not
apply power at this point.
11. At the control unit, complete all connections to keypads, and sounders. 12. Apply power and program the control unit.
13. Test that the alarm system functions as required.
14. If required, install a communication device (for example a Speech Dialler), connect it to the PTT network, and check that it functions correctly.
15. Hand the system over to the user and instruct them in its use.
Cabling Keypads
Cooper Security recommend that you use a minimum 4-core 7/0.2 alarm cable for wiring keypads.
You can connect the keypads in either a star or bus configuration. If you are intending to use long cable runs then Cooper Security recommend that you use star wiring with no more than 300m of cable total for the keypad wiring. The maximum length of any one run from control unit to the most remote keypad depends on the number of items connected to the cable. You can double the maximum length by using two cores each for the 0V and 12V
recommended cable lengths in metres for 7/0.2 cable, assuming that you connect all items at the end of a single cable run. In real life you may be able to improve on these figures by spreading items along the cable length.
7/0.2 8-core cable Length (m)
No items 1 core 2 cores on 0V and 12V.
One 200 —
Two 100 200
Three 65 130
Four 50 100
It is possible to extend the keypad cable run by using additional power supplies, but only up to a recommended maximum of 300m
When carrying out the cabling there are two important points to remember: 1. Do not connect anything other than keypads to the keypad bus. The
keypad bus power supply is limited to a maximum of 400mA and can supply no more than a maximum of four keypads.
2. Make sure that the voltage between 0V and 12V of the keypad bus at the furthest point from the control unit is at least 12.0VDC when all the keypad backlights are on.
Note: The following instructions assume that you have already run all the
necessary cabling.
Fitting the System
Fitting the Control unit Case
1. Remove the control unit case from the packing. 2. Remove the front screws and slide off the case lid.
3. The upper part of the case back provides a central keyway. Mark and drill a hole for the keyway. Temporarily fix the case back to the wall. Now mark the position of two more fixing holes, remove the case back and continue to drill the holes.
4. Refit the case back to the wall using not less than 30mm x No 8 Dome or Pan-head screws.
Fitting a 9930 Keypad
The backplate of the 9930 keypad contains an adjustable cam that you can use to make sure the tamper switch will operate correctly when the keypad is mounted on an uneven surface. Figure 4 shows the backplate and the
1 1 1 2 1 1. Fixing hole. 2. Adjustable cam.
Figure 4. Backplate of the 9930 Keypad
Cooper Security recommend that you mount the keypad using No 8 or 6 screws (M4/M3.5) as follows:
1. Select which cable entry you are going to use and break out the appropriate plastic sections.
2. Hold the backplate in place against the wall and mark the position of the centre hole in the adjustable cam (see Figure 4).
3. Drill and plug the hole, and screw the backplate to the wall through the adjustable cam. Do not tighten the screw completely home.
4. Make sure the backplate is level and mark, drill and plug at least two other fixing holes. Screw the backplate to the wall through the fixing holes.
5. Cut the plastic webs connecting the cam to the remainder of the base plate.
Note: If you do not cut the webs then the tamper switch will not operate if the
complete keypad is forced off the wall.
6. Mount the front of the keypad (containing the keypad pcb) onto the backplate and make sure that the tamper switch operates.
8. If the tamper switch does not operate then rotate the cam until the tamper switch operates correctly when the front of the keypad is mounted on the backplate.
9. If the “Prox” reader and tags are required, follow the installation instructions in the separate guide supplied with the 934EUR-00 Prox reader.
Wiring the Control Unit
Cable Entries
The control unit case back provides several cable entries. The back is designed to stand away from the wall to leave space for cables.
Mains Connection
The control unit must be permanently connected to a 3A fused spur outlet fitted with a readily accessible disconnect device. Connect the mains supply to the control unit using the 3-way terminal block located in the control unit back. Secure the mains cable to the case anchor point using the cable tie provided. Note that the control unit has a T-250mA internal mains fuse. All electrical connections should be carried out by a qualified electrician and must comply with the current IEE Wiring Regulations: 16 Edition, Appendix 5 -
Standard Circuit Arrangement.
To Control Panel Transformer
L N
T 250mA 250V 230V ~50Hz 200mA
Figure 5. Mains Connection
Connect the 21VAC lead from the mains transformer to the main pcb. See Figures 3 for the location of the 21VAC connector.
Caution: Do not apply mains power at this point. Do not work inside the control unit case when mains power is present.
Remote Keypads
Keypad Addressing
The control unit is supplied with one remote keypad. If you have fitted more keypads then each one must be given a separate "address". Links LK2 to LK4 set the keypad address, as shown in Figure 6.
2 3 4 ON BACKLIGHT 2 3 4 2 3 4 2 3 4 2 3 4 ON BACKLIGHT BACKLIGHTON Keypad 1 Address
Backlight ON Backlight OFF
Keypad 2
Keypad 3 Keypad 4
Figure 6. Keypad Addressing. Keypad Backlight
When supplied from the factory the control unit is configured with the keypad backlight ON. To turn the keypad backlight OFF remove the jumper from the "ON BACKLIGHT" link, shown in Figure 6.
Connecting Keypads, Exit Terminate Buttons, Lock Switches
and Sounders
Figure 7 shows the connections for any of the remote keypads.
To connect an exit terminate button use the "ET" connector terminals on the keypad PCB.
Use the "ET" connector terminals to connect a Lock Switch. If using a lock switch do not connect any other device to the "ET" terminals.
Note The lock switch must be closed circuit when the lock is unlocked.
Typical internal Sounder 16Ohm loudspeaker (2 Max in parallel) Typical SAB 9930 Keypad 4-core 9651 Control Unit 9651 Control Unit To other keypads Bell Strobe +ve -ve 0V 12V CLK DATA ET 0V 12V CLK DATA Lock Switch OR
Exit terminate button (NO, push to make) Bell
-ve Hold Off -ve Tamper Return +ve Hold Off -ve Apply Trig
OP1 OP2 OP3 TR + LS 12V AUX 12V AUX 0V 0V
Fig 7. Keypad and Sounder Connections
Detector Circuit Connections
The left hand edge of the main PCB provides 14 connectors that can be used for up to 8 FSL or 8 CCL zones. During programming use command 21 to configure these connectors as either CCL zones or two wire FSL zones.
Closed Circuit Zones
Figure 8 shows how to connect CCL zones. Note that there is a single Global tamper loop that serves all zones.
1 2 3 Zone 1 Zone 2 Global Anti-tamper Zone 3 Zone 4 Zone 5 Zone 6 Zone 7 Zone 8 Tamper loop Zone 1 Zone 2 Alarm contacts Alarm contacts
FSL Connections
The control unit zone connectors provide space for up to eight FSL zones. Each FSL zone is a ‘Fully Supervised Loop’ using a two wire closed loop. The loop uses two resistors of different values to differentiate between ‘Circuit’ and ‘Tamper’ signals: a 2K2 resistor fitted in series at the end of the wired loop, and a 4K7 resistor fitted across the alarm contact, see Figure 9.
With the loop in a normal state and the alarm contacts closed (shorting out the 4K7 resistor), the total resistance of the loop is 2K2. When the alarm contacts open (removing the short from the 4K7 resistor) the resistance of the loop increases to 6K9 and the control unit detects an alarm condition. If a tamper device opens then the loop resistance will be open circuit and the control unit detects a tamper signal.
To connect a detector to an FSL loop you must wire suitable resistors to the detector. Always check resistor colour coding before wiring resistors into circuit, see Figure 10.
The wiring resistance of the cable to the detector (including joints) should be restricted to a maximum of 100 ohms. The recommended maximum cable distance per zone is 200 - 300 metres.
Zone 1 Zone 2 1 2 2K2 EOL 4K7 Alarm contacts Tamper contacts 2K2 EOL 4K7 Alarm contacts Tamper contacts Figure 9. FSL Connections Yellow Violet Red Gold 4k7 Red Red Red Gold 2k2
Figure 10. Resistor Colour Code for FSL Resistors
Note: You can leave the global anti-tamper connectors unlinked if you are
using FSL wiring.
Using Programmable Outputs
In the 9651 OP1, 2 and 3 are "pull down type" outputs that provides negative applied control signals. If necessary use command 159 to invert the output polarity.
To program the outputs use programming command 81 for OP1, command 82 for OP2 and command 83 for OP3 (see "4. Programming"). Figure 11 shows some example applications for OP3
Shock Sensor Reset
Use Command 83 4
VIPER +ve
0V
Bell Follow Buzzer/Relay
Use Command 83 0
Relay energises/buzzer sounds when bell activates.
BUZZER/RELAY
PIR Set Latch/Walk Test
For:
Set Latch use Command 83 3 Walk Test use Command 83 5
PIR OP3 OP2 OP1 12V 0V TR + LS 12V AUX 0V 12V AUX 0V OP3 OP2 OP1 12V 0V TR + LS 12V AUX 0V 12V AUX 0V OP3 OP2 OP1 12V 0V TR + LS 12V AUX 0V 12V AUX 0V
Figure 11. Wiring Examples for Programmable Output OP3
Wiring Keyswitches
To allow a user to set and unset the system using a keyswitch, connect a fixed position or spring loaded (momentary) key switch to a zone input. Note that a key switch cannot reset the system. When programming the control unit select zone type (KM) for momentary or (KF) for fixed position keyswitches. Figure 12 shows the connections for a keyswitch.
Fixed Keyswitch (KF)
Keyswitch CC FSL System
OFF Closed 2k2 Unset ON Open 6k9 Set Momentary Keyswitch (KM) Keyswitch CC FSL System Operate Close-Open-Close 2k2-6k9-2k2 Unset Operate Close-Open-Close 2k2-6k9-2k2 Set
Figure 12. Connecting a Keyswitch
4k7
2k2
CC Wiring CCT(n)
CCT(n) FSL Wiring
Fitting a Plug-by Communicator
The 9651 can be fitted with a communicator or speech dialler, for example the Scantronic 660, 8400, and 8440 digital communicators or the SD1 or SD2 Speech diallers. To fit a communicator inside the control unit, follow the
instructions below. To connect an SD1 or SD2 follow the instructions provided with those products.
Caution: Follow the instructions in the order shown, or you may damage the control unit and/or communicator.
1. Disconnect mains and battery power from the control unit and remove the case lid, if the system has already been installed.
2. Detach the main PCB from the support pillars in the control unit case, and lift the PCB carefully to the left.
3. Fit the communicator between the PCB support pillars, making sure that the main PCB can fit back into position (see Figure 13).
Figure 13. . Fitting a Plug By Communicator in a Junior Combi Box. 4. Make any necessary connections from the communicator to the Comms
Wiring Harness. Figure 14 shows the outputs available on the free ends of the Comms Wiring Harness.
Comms O/P1 (Brown) -ve applied (+ve removed) in alarm Comms O/P2 (Orange) -ve applied (+ve removed) in alarm Comms O/P3 (Yellow) -ve applied (+ve removed) in alarm Comms O/P4 (Green) -ve applied (+ve removed) in alarm Comms O/P5 (Blue) -ve applied (+ve removed) in alarm Comms O/P6 (Purple) -ve applied (+ve removed) in alarm Comms O/P7 (White) -ve applied (+ve removed) in alarm Comms O/P8 (Grey) -ve applied (+ve removed) in alarm
Line Fail input (White/Brown) +12V applied to indicate telephone line fail.
Tell Back input (White/Orange) +12V appied to change from engineer to customer reset. 0V (Black)
12V (Red)
Com Connector Cable, Part No. 485210
Figure 14. Communications Wiring Harness.
5. Plug the Comms Wiring Harness onto the communications connector on the main PCB (see Figure 3).
6. Re-fit the PCB to the support pillars. Secure the PCB to the support pillars with the screws provided (Figure 15). Make sure that the bottom left corner of the PCB is seated on its support pillar.
Figure 15. Fitting Control Unit PCB. If the system has already been installed:
7. Re-connect the battery. 8. Fit the case lid.
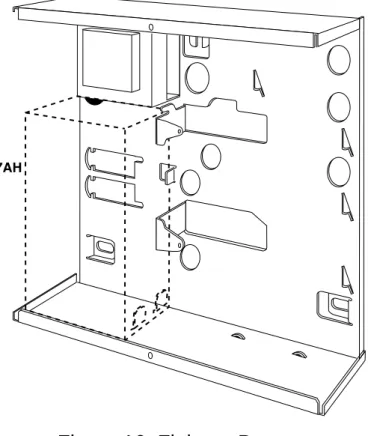
Fitting a Battery
Fit a rechargeable battery into the back of the case. The case provides space for a 12V 7AH battery. Make sure the battery terminals are oriented in the position shown in Figure 16.
7AH
Figure 16. Fitting a Battery
Initial Start Up
Before applying power to the control unit, ensure that:
• All remote keypads have been addressed and connected. • All external and internal sounders are connected.
• All wired zone circuits are connected. Then:
1. Connect the battery to the control unit PCB.
2. Briefly short the kick start pins together (they are located above battery connector, see Figure 3).
The green power LED on the keypad flashes and the internal sounder may sound. Ignore any display at this stage.
3. Key-in the factory default user access code: 1234.
The internal sounder stops. Ignore any display at this stage.
4. Please fit the case lid before applying mains power (this also defeats the tamper switch).
The power LED on the keypad glows steadily.
6. Key-in 0 followed by the factory default engineer access code: 7890. (You do not have to remove the control unit lid.)
The display shows: Installer Mode
You are now in programming mode.
4. Programming
Entering Programming Mode
Installation - Initial Power Up” describes how to enter programming mode for the first time in a new installation. If you wish to enter programming mode at any other time:
1. Make sure the system is unset.
2. Press 0, then key in the Engineer’s code (default 7890).
The display shows: Installer Mode
You are now in programming mode.
While the system is in programming mode all keypads except the one you are using will be locked, displaying “Busy”.
Programming Commands
When delivered from the factory the control unit already has default program settings. To change the default programming you must be in programming mode. Then:
1. Key in the appropriate Command number and press Y. The display shows the current value of the Command. 2. Key in digits to select the value you require.
The display shows the new value.
3. Press Y to store the new value of the Command.
If at any time you change your mind, repeat step 1 to 3. The table on the following pages shows the Commands and their options. ( A “Y” next to a Command value shows that it is the factory default.)
The factory default access codes are: Engineer Code 7890
Access Code User 1 1234
Access Code Users 2 to 16 X 002 .... X 016 (inactive) Duress Code X017 (inactive)
Note: The factory default Access Codes 02 to 16 and the Duress Code must
be changed by USER 1 to a four digit number to activate them. See
“9651 User Guide” for a more detailed explanation of changing user
Command Key in: 0 Country PTT Defaults 0YnY
n = country, one of: 0 = UK (Y) 1 = Italy 2 = Spain 3 = Portugal 4 = Netherlands 5 = France 6 = Belgium 7 = Germany 8 = Switzerland 9 = Austria X1 = Ireland X2 = OEM 1 X3 = OEM 2 X4 = OEM 3 X5 = Norway X6 = Denmark X7 = Sweden
Note: If you carry out this Command then the system will load all defaults for the selected country.
01 - 08 Zone nn nnYYab
nn = zone number 01 to 08
Note: For zones 1 to 8 key in “01” to “08”.
a = Zone type, one of: 00 = NU (not used) 01 = PA (panic alarm) 02 = FR (fire zone) 03 = NA (normal alarm) 04 = 24 (24 hour zone) 05 = FE (final exit) 06 = ER (entry route) 07 = SA (Shock Analyser) 08 = TC (Technical) 09 = KB (Keybox) 10 = SD (Smoke detector) 11 = KM (Key switch momentary) 12 = KF (Key switch latched) 13 = AM (Anti mask) 14 = FB (forbikobler zone) b = Zone attributes, any of:
X1 = C (chime) X2 = S (soak test) X3 = D (double knock) X4 = O(Omit allowed) B = b (armed in Level B) C = c (armed in Level C) D = d (armed in Level C)
X7 = Shock Analyser sensitivity (enter a number in the range 1 (lowest) to 6 (maximum) (default) Z01=FEbcd Z02=Erbcd Z03-Z07=Nabcd Z08=PA
Example: Zone 07 is a Normal Alarm, active in Part Set B, Omit Allowed. Type in: 03 Normal Alarm
B Active in Part Set B
X4 Omit Allow
21 Zone Configuration 21YnY
0 Close Circuit Y
1 Fully Supervised Loop
22 LS Chime Output 22YnY
Loudspeaker chime volume 0 Off ( Keypad only)
1 low, 9 = max 5
23 RedCare Reset 23YnY
0 Off Y
1 On
25 Internal Sounder 25YnY
0 LS Timed (Follows external bell) Y 1 Continuous
27 Exit Fault External Sounder 27YnY
0 Internal Y
1 Local
28 Status Display 28YnY
0 Panel status visible all the time Y 1 Panel status hidden 180s after setting
2 Display for 30 s on valid access code entry
29 Entry Alarm Delay Time 29YnY
0 Delay off Y
1 Delay on
30 PA Response 30YnY
0 Audible Y
1 Silent
31 Zone Tamper Reset 31YnY 0 Engineer reset off
1 Engineer reset on
33 System Reset 33YnY
0 Eng reset off Y
1 Eng reset on
34 PA Reset 34YnY
0 PA cust reset Y
1 PA eng reset
35 First Circuit Lockout 35YnY
0 Lock out on Y
1 Re-arm
36 Alarm Abort 36YnY
0 Abort off Y
1 Abort on
37 Day Tamper Comms 37YnY
0 Day Tamper off Y
1 Day Tamper on
38 System Tamper Reset 38YnY
0 Customer Reset
1 Engineer Reset Y
39 Level A Exit Mode 39YnY
0 Timed Y
1 Terminated 2 Final door 3 Lock Set
40 System Auto Re-Arm 40YnY
0 Rearm Never Y
1 Rearm 1 2 Rearm 2 3 Rearm 3
41 Bell Delay 41YnY 0 No delay Y 1 1.5 minutes 2 3 minutes 3 5 minutes 4 10 minutes 5 15 minutes 6 20 minutes 42 Bell Duration 42YnY 1 1.5 minutes 2 3 minutes 3 5 minutes 4 10 minutes 5 15 minutes Y 6 20 minutes
43 Level A Entry Time 43YnY
1 10 Seconds 2 20 seconds 3 30 seconds 4 45 seconds Y 5 60 seconds 6 120 seconds
44 Level A Exit Time 44YnY
1 10 Seconds 2 20 seconds Y 3 30 seconds 4 45 seconds 5 60 seconds 6 120 seconds 45 Entry/Exit Volume 45YnY
0 No Entry/Exit tones from Loudspeaker n EE tone volume from LS (1=low,
9=max) 5
46 Tamper Alarm Response 46YnY
0 Internal sounders 1 Keypad sounders
2 Internal and keypad sounders Y
50 CSID Code 50Yn....nnY
n....n = Seed code for remote reset none
51 Set Time and Date 51Y
see “Setting Time and Date”
52 Omit Tamper Allowed 52YnY
0 Alarm contacts only Y
1 Alarm plus tamper contacts
53 Abort reset 53YnY
0 Abort System Y
1 Abort User
60 Level B final exit operation 60YnY 0 B=FE = FE (Final exit) Y 1 B=FE = NA (Normal alarm)
61 Level B Entry route 61YnY 0 B=ER = ER (Entry route) Y 1 B=ER = FE (Start entry timer)
62 Level B Exit Mode 62YnY
0 Timed plus low tone Y
1 Instant set
2 Silent set (kpd beeps at end of setting period) 3 As Level A
63 Level B Alarm response 63YnY
0 Keypad sounder Only 1 Internal sounder and keypad sounders
Y 2 Local (all sounders, no comms)
3 Full alarm (all sounders and comms)
64 Level B Entry Time 64YnY
1 10 seconds 2 20 seconds 3 30 seconds 4 45 seconds Y 5 60 seconds 6 120 seconds
65 Level B Exit Time 65YnY
1 10 Seconds 2 20 seconds Y 3 30 seconds 4 45 seconds 5 60 seconds 6 120 seconds
70 Level C Final Exit Operation 70YnY 0 C=FE = FE (Final exit) Y 1 C=FE = NA (Normal alarm)
71 Level C Entry Route 71YnY 0 C=ER = ER (Entry route) Y 1 C=ER = FE (Start entry timer)
72 Level C Exit Mode 72YnY 0 Timed plus low tone (default)
1 Instant set
2 Silent set (kpd beeps at end of setting period)
3 As Level A
73 Level C Alarm Response 73YnY
0 Keypad sounder only
1 Internal sounder and keypad sounders
Y 2 Local (all sounders, no comms)
3 Full alarm (all sounders and comms)
74 Level C Entry Time 74YnY
1 10 seconds 2 20 seconds 3 30 seconds 4 45 seconds Y 5 60 seconds 6 120 seconds
75 Level C Exit Time 75YnY
1 10 Seconds Y 2 20 seconds 3 30 seconds 4 45 seconds 5 60 seconds 6 120 seconds
76 Level D Exit Mode 76YnY 0 Timed plus low tone (default)
1 Instant set
2 Silent set (kpd beeps at end of setting period)
3 As Level A
77 Level D Alarm Response 77YnY
0 Keypad sounder only
1 Internal sounder and keypad sounders
Y 2 Local (all sounders, no comms)
78 Level D Entry Time 78YnY 1 10 seconds 2 20 seconds Y 3 30 seconds 4 45 seconds 5 60 seconds 6 120 seconds
79 Level D Exit Time 79YnY
1 10 Seconds 2 20 seconds Y 3 30 seconds 4 45 seconds 5 60 seconds 6 120 seconds
81 Output 1 Type, one of 81YnY Where n is one of the following:
00 Bell (default full/part set sys.) 01 EE follow
02 Armed lamp 03 Set latch
04 Shock sensor reset 05 Walk test
06 Ready lamp 07 24 hour alarm 08 Strobe
09 Smoke sensor reset 10 French Siren Test 11 Strobe Set 12 Pulse Set o/p 1 13 Pulse Unset o/p 1 26 Pulsed Set o/p 1 27 Pulsed Set o/p 2 28 Pulsed Set o/p 3 29 Pulsed Set o/p 4 30 Pulsed Unset o/p 1 31 Pulsed Unset o/p 2 32 Pulsed Unset o/p 3 33 Pulsed Unset o/p 4
82 Output 2 Type, one of 82YnY
See Command 81 for a list of options. Default for Command 82 is 08 Strobe.
83 Output 3 Type, one of 83YnY
See Command 81 for a list of options. Default for Command 83 is 03 Set latch.
85 Burg Comms Rearm 85YnY
0 Latch Y
1 Rearm
86 Dual Ply Entry 86YnY
0 Off Y
1 On (not recommended in U.K.)
87 Dual Key Alarm 87YnY
0 Off Y
1 On
90 Event Log* 90YnY
0 Print log
1 View earlier events 3 View later events
92 Test Output 2 See “5. Testing” 92Y
Output 2 operates, press X or Y to end test.
93 Test Output 3 See “5. Testing” 93Y
Output 3 operates, press X or Y to end test.
94 Test Internal Sounder (Single System Only) See “5. Testing”
94Y
Internal sounders operate, press X or
Y to end test.
95 Test Kpd Sounder See “5. Testing” 95Y
Keypad sounders operate, press X or
Y to end test.
97 Engineer Walk Test See “5. Testing” 97Y
Zn indication and chime operate when cct open
Y (Clear) End walk test
98 Load Defaults 98Y1Y 99 Leave Programming 99YY 126 Language 126YnnY nn = 0 = English(Y) 1 = Italian 2 = Espanol 3 = Portugu 4 = Nederl 5 = Francai 6 = Deutsch 7 = Norsk 8 = Svenska 9 = Dansk
151 Plug by Comms Output 1 151YnnY
nn 00 Not Used 01 Fire (default) 02 PA 03 Burglar 04 Open/Close 05 Alarm Abort 06 Technical Alarm 11 AC Fail 12 Tamper Alarm 13 Open 14 Close 15 Zone Omitted 16 Medical 17 Key-Box 18 Anti-Mask 19 Smoke Detector 30 Set o/p 1 31 Set o/p 2 32 Set o/p 3 33 Set o/p 4 34 Unset o/p 1 35 Unset o/p 2 36 Unset o/p 3 37 Unset o/p 4
152 Plug by Comms Output 2 152YnnY Default 02 PA. See Command 151
153 Plug by Comms Output 3 153YnnY Default 03 Burglar. See Command 151
154 Plug by Comms Output 4 154YnnY Default 04 Open/Close. See Command 151
157 Plug by Comms Output 7 157YnnY Not used. See Command 151
158 Plug by Comms Output 8 158YnnY Default 06 Technical. See Command
151
159 Invert Plug-by Comms Outputs 0= +ve removed
1 - +ve Applied
Y 170 Set o/p 1 Time
Set o/p 2 Time Set o/p 3 Time Set o/p 4 Time
Set range 01-12 seconds 171 Set o/p 1 ABCD
Set o/p 2 ABCD Set o/p 3 ABCD Set o/p 4 ABCD
Toggle ABCD
172 Unset o/p 1 Time Unset o/p 2 Time Unset o/p 3 Time Unset o/p 4 Time
Set range 01-12 seconds 173 Unset o/p 1 ABCD
Unset o/p 2 ABCD Unset o/p 3 ABCD Unset o/p 4 ABCD
Toggle ABCD 174 Fire o/p 1 Fire o/p 2 Fire o/p 3 Fire o/p 4 Select if o/p required to operate if a Fire Alarm 175 PA o/p 1 PA o/p 2 PA o/p 3 PA o/p 4 Select if o/p required to operate if a PA Alarm
Leaving Programming Mode
When all programming has been completed: 1. Key-in ‘99 Y’ at the keypad
The display shows: 99:Exit Eng ?
2. Press Y.
The display shows: 99:Checking Sys
followed by the time and date. The system is now in user mode.
Note: If there is a fault, for example an open tamper circuit, the display shows
this and will not return to Day mode. Press X and rectify the faults.
Engineer Reset
To perform an Engineer Reset:
1. Check that the display is showing the alarm condition.
2. Key in 0 followed by the Engineer’s code (default 7890), followed by 99
YY.
Re-entering Programming Mode
You can go back into programming mode whenever the system is unset and not in alarm:
1. Key in 0 followed by the Engineer’s code (default 7890).
The display shows: Installer Mode
You are now in programming mode.
Restoring the Access Codes (1st stage reset)
If the user and/or engineer codes are lost, then:
1. First remove mains power and then open the case and disconnect the battery.
2. Identify the NVM Reset pins and Kick Start pins on the main pcb (see Figures 3).
3. Short the NVM Reset pins together using a small wire link. Short the Kick Start pins together with another small wire link.
4 Reconnect the battery.
5. Remove the shorts from the NVM Reset pins and Kick Start pins. The control unit loads the factory default access codes:
User 1: 1234, Engineer: 7890.
6. Close the control unit and apply mains power. 7. Carry out an engineer reset.
Restoring All Factory Default Programming
If you wish to restore all factory default options then:
1. Enter programming mode (if you are not already there). 2. Key in 98 Y at the keypad.
The display shows: Load default
3. Press 1 Y at the keypad. 4. Press Y.
The keypad gives a double confirmation tone and the system loads the factory default Command values, erasing all previously programmed values.
Programming Command Reference
0: Country Defaults
Use this Command to select the country and PTT defaults (to select language see Command 126).
Note: 1. If you select options
X
5,X
6 orX
7 (Norway, Sweden or Denmark) then the control unit also changes the method of entering programming mode. See “Entering Programming Mode” at the beginning of thischapter.
2. This Command loads default access codes and programming options. See “Programming Commands” for details of the options available.
01 - 08 : Zone Programming
The zone programming Commands 01 to 08 take three or more digits. The first two digits describe the zone type, subsequent digits describe the zone attributes.
When you key in the zone number and press Y the display shows the zone number and any text caption for the zone. At this point you can edit the zone text (see next page). Press Y again to start entering the zone types and attributes. When you have entered the zone type and attributes press Y once more to store the changes.
Zone Names
When you key in the zone number and press Y the display shows the current zone name with a flashing cursor under the first letter. Enter letters from the keypad one at a time by pressing a number key repeatedly until the display shows the letter you want. You may already be familiar with typing out short messages on a mobile phone using the same sort of system. Figure 17 shows which letters are assigned to each key. Press C to move the cursor to the next space for a new letter.
If you make a mistake press C or D to move the cursor over the letter you want to change, and key in the new letter. If you want to delete a name
completely press D to move the cursor under the extreme left hand character of the name. Press D again. The display clears the old name.
The system can store a maximum of 12 characters per name, including spaces and punctuation marks.
Figure 17. Letters Generated by Each Number Key Zone Types
The following types are available:
00 Not Used (NU) The system ignores Zones with this type. Key in 00 for a zone that will not be used.
Note: If a zone is programmed as ‘Not Used’, it is not necessary to link the
circuit or anti-tamper connections.
Option Zone Type
01 Panic Alarm (PA) - Operating a device programmed as ‘Panic Alarm’ will start either a silent alarm transmission to the ARC, or an audible alarm, depending on how you have programmed PA Response, (see Command 30). PA alarms operate whether the system is set or unset. 02 Fire (FR) - Smoke or heat detectors connected to FR type zones
cause the speakers to give a distinctive fire signal (internal sounders pulsing “Dee Dah Dee Dah...”). Fire alarms operate whether the
system is set or unset, and will always trigger communications if fitted. 03 Normal Alarm (NA) - A zone programmed as ‘Normal Alarm’ will start
an alarm when the system is set.
04 24 Hr Zone (24) - This zone causes an internal alarm if violated when the system is unset, and a full alarm if the system is set. Providing the Installer programs 24hr zones with ‘Omit Allow’, the user can omit 24 hour zones in Day mode. Note that the control unit re-instates all 24Hr zones if anyone sets the system.
05 Final Exit (FE) - Zones of this type must be the last detector to be activated on exit, or the first to be activated on entry. You can use zones of this type to finally set the system, or to start the entry
06 Entry Route (ER) - Use this zone type for detectors sited between the Final Exit door/detector and a keypad. If an ‘Entry Route’ zone is violated when the system is set, an alarm will occur. If the entry/exit timer is running when an Entry Route zone is violated then no alarm occurs until the entry/exit timer expires.
07 Shock Analyser (SA) - You can apply this zone type to zones 1 to 4 Only. This zone type can accommodate up to 4 - 5 “Inertia” type sensors normally fitted on windows or patio doors.
(See also “Zone Attributes - Sensitivity”.)
08 Technical (TC) - Use this zone type when you want to monitor equipment, for example a freezer, without raising a full alarm. If a technical alarm zone is activated while the system is set, the system makes no audible alarm. However, when a user unsets the system the keypad indicates a fault. If a technical alarm zone is activated while the system is unset then the system starts a pulsed tone from the keypad. If programmed, the control unit also starts communication. When a user enters a valid code the keypad stops the tone and displays the zone.
09 Key Box (KB) - This zone type is for use in Scandinavia only. When a zone of this type is required, the Installer connects the alarm wires of the zone to a special external key box and the tamper wires to the box enclosure switch. When someone opens the box the control unit logs the event and communicates it to the ARC. The control unit also provides a Key Box output type that you can program to trigger one of the plug by communicator output pins, see Command 151.
10 Smoke Detector (SD) - Use this type for zones connected to 12V smoke detectors. This type is active whether the system is set or unset and the control unit will transmit a specific alarm to the ARC if triggered. The control unit also provides a Smoke Detector output type that you can program to trigger one of the plug by communicator
output pins, see Command 151.
If a zone of this type causes an alarm then the user will need to enter an access code to disarm and reset the system.
Key Switch - There are two Key Switch zone types: Momentary and Fixed. These two zone types are intended for use on zones that connect to an access control keypad, electronic key or other type of hardwired device used to set or unset the system.
When the user operates the Keyswitch while the system is unset then the control unit starts the programmed exit mode.
When the user operates the Keyswitch while the system is set then the control unit unsets the system immediately.
To set Level A do not assign a Keyswitch zone to levels B, C or D. To set any other level assign the Keyswitch zone to a single level.
11 Momentary (KM) - Use this zone type to connect a momentary keyswitch to a single zone.
12 Fixed (KF) - Use this zone type to connect a fixed position keyswitch to a single zone.
13 Anti-Mask Zone (AM) - Note This zone type is for use in EN50131 Grade 3 systems only and is not applicable on the 9651 control panel.
14 Forbikobler (FB) - This zone type is a Scandinavian entry/exit zone. Use this type on zones connected to stand alone external keypads or access controllers. The zone operates as a normal entry/exit zone but when triggered by the external keypad during the exit time the control unit stops the exit time and sets the system. If the zone is triggered while the system is set then the control unit starts the entry time. Zone Attributes
Specific zone types can have one or more attributes programmed by the digit after the zone Command and type. (To remove an attribute, key in the
attribute digit again.) Option
X1 Chime (C) When enabled by the user, the system gives a non-alarm warning tone when any zones programmed as ‘Chime’ are opened. This facility operates only while the system is unset.
Note: 1. ‘Chime’ is available only for Normal Alarm, Final Exit, Entry Route
and Shock Analyser zone types.
2. To make chime available from the keypad sounders but not the internal sounder then program Command 22 with option 0.
X2 Soak Test (S) Use this zone attribute if you want to place under long term test a detector that you suspect is giving false alarms. Zones with this attribute are disabled for 14 days after you return the control unit to user mode. If the zone is opened while the system is set then the Service LED glows and the control unit logs the event as a “Soak Test Fail Zn” (n is the zone number) without sounding any bells or starting signalling. The Service LED stays alight until the Engineer resets the system. After midnight on the 14th day the control unit returns the zone to normal use.
X3 Double Knock (2) Zones with this attribute will cause an alarm condition only if one or more sensors generate two alarms events within a five minute time window, or if one zone remains open for more than 10 seconds. Programming a zone as ‘Double Knock’ is a way of reducing false alarms caused by environmental changes, but is not normally recommended.
Note: ‘Double Knock’ is available only for Normal Alarm and Entry Route
zone types.
X4 Omit Allow (O) When applied to a zone, this attribute allows the user to omit the zone.
B Level B When applied, the zone will be armed when the user selects Level B.
C Level C When applied, the zone will be armed when the user selects Level C.
D Level D When applied, the zone will be armed when the user selects Level D.
X7 Sensitivity When you use this Command you must also enter an extra digit in the range 1 to 6 in order to set the sensitivity of the shock sensor. 1 is least sensitive, 6 is most sensitive. Note that to use this attribute you must make one of zones 1 to 4 a shock analyser type. To adjust the sensitivity you must enter the complete Command, for example to change the sensitivity to 3 you must key in: X7 + 3.
20: Change Engineer Code
To change the Engineer access code:
1. Make sure you are in programming mode. 2. Key in 20 and press Y.
The display shows: 20:Code
3. Key in a new four digit Engineer access code.
The display shows: 20:Code ****
21: Zone Configuration
This Command allows you to select the wiring type of the zone connectors on the main PCB. The options available are:
Option
0 Eight Closed circuit zones with global anti tamper on control unit. 1 Eight Fully Supervised Loop (FSL) zones on control panel.
See Chapter 3 for wiring details.
22: Loudspeaker Chime
A user may find that the chime tone from the keypads is not loud enough. If so, then use Command 22 option 1 to make the internal sounder also give the chime tone. To alter the volume of the tone from the internal sounder enter a digit in the range 1 to 9. 1 is quietest, 9 is loudest. The internal sounder demonstrates the volume of the tone when you enter the digit.
23: RedCare Reset
Option 1 enables RedCare Reset, which is designed to operate with the plug-by communicator lead.
Note: You must set System Reset to Engineer (Command 33 option 1) to
ensure RedCare Reset works correctly.
After an alarm the user keys in their access code to silence the alarm, but cannot reset the system. The first to alarm display and Service LEDs remain visible. The user contacts the ARC, who verifies the user's identity. The ARC sends a signal back to the control unit. The Service LED goes dark and the end user can now reset the system with any valid access code, providing that there are no faults.
Use option 0 (the default) to disable the function.
25: Continuous Sounder
Option 0 of this Command makes the internal sounder follow the external bell delay and duration times. Option 1 makes the internal sounder continue after the external bell times out.
27: Exit Fault External Sounders
When programmed with option 0 the system operates the internal sounders if the user tries to exit while a zone is still violated (for example a door is not shut). When programmed with option 1 the system operates the external sounders as well as the internal sounders.
28: Status Display
Use option 1 of this Command if you do not wish to show keypad displays permanently. The keypad displays “Level Set” for 180 seconds after the user sets the system and then reverts back to the time and date display. Use this option when installing a system in the U.K.
When set to option 0 the keypad displays “Level Set” the whole time that the alarm system is set.
Use option 2 to make the keypad display revert to time and date 30 seconds after any event. Note that if you use this option the s and f LEDs also operate for only 30 seconds.
29: Entry Alarm Delay Time
This Command determines what the system will do if a user strays from an entry route zone during entry. ( If this Command is enabled, the system will fulfil the requirements of EN 50131-1.)
Use option 0 to make the system generate an immediate alarm if the user strays from an entry route zone during entry.
If you use option 1 and the user strays from the entry route during entry time then the system waits until the end of the entry time and then adds 30
seconds before raising a full alarm. From the entry stray the internal sounder will operate to alert the user that they have made a mistake and have time to unset the system.If the user enters an access code before the end of the entry time or within the additional 30 seconds then the user can reset the system.
30: Silent or Audible PA
This Command selects how the system responds when a PA zone operates. Option
0 (Audible PA) The system operates the sounders and, if a
communicator is fitted, sends a PA message to the ARC.The keypad displays the PA zone when a user disarms the system.
1 (Silent PA) The sounders stay silent. If a communicator is fitted the system sends a PA message to the ARC.The keypad displays the PA zone when a user disarms the system.
31: Zone Tamper Reset
Use this Command to ensure that the system complies with Scandinavian requirements for resetting zone tamper alarms while the system is unset. Use option 0 to allow user reset after a zone tamper.
Use option 1 to enforce engineer reset. The user can silence the alarm, but the engineer must reset the system by entering the engineering access code,
33: System Reset
If you wish to make the system engineer reset, then use option 1. For user reset use option 0.
Certain types of event will always need an Engineer reset, no matter what option you choose for Command 33. These events are:
Auxilliary 12V supply fuse blown. Keypad missing or failed.
A low battery at the control unit.
34: PA Reset
If you wish to make the system engineer reset after a PA alarm then use option 1. For user reset use option 0.
35: First Circuit Response
If you select option 0 (Lock out) then the complete system rearms at the end of the programmed bell run time, but excludes the first zone to activate during the set cycle.
If you select option 1 (Re-arm) then, when an alarm occurs, the complete system (including the first zone to activate) rearms at the end of the
programmed bell run time (providing the zone is closed). While the zone is open, the system locks it out. If the zone closes after the system rearms, the system reinstates it.
36: Alarm Abort
Users occasionally trigger false alarms by accident. The control unit can be programmed to allow users to abort an alarm by enabling option 1.
If a user accidentally triggers an alarm while the system is set, then the control unit activates Channel 3, starts the bell delay timer and alarm abort timer. To abort the alarm the user must enter a valid access code during the abort period. When the user successfully enters the code during the abort period the system deactivates Channel 3 and triggers the programmed abort channel simultaneously in order to signal a separate code abort, as required by some ARCs.
Note: The alarm abort period is controlled by the ARC at 120 seconds.
37: Daytime Tamper Communication
This Command controls how the control unit reports tampers while the alarm system is unset.
38: System Tamper Reset
This Command allows you to choose whether the customer can reset the system after a tamper alarm. This facility is independent of that offered by Commands 31 and 33. If you select option 0 (customer) then the user can reset the system after a system tamper alarm providing no fault exists. If you select option 1 (engineer) then you must enter the engineer access code at a keypad to reset the system after a system tamper alarm.
39: Level A Exit Mode
Use this Command to select the exit mode for Level A (Full Set).
Note: The keypads give a double beep confirmation tone at the end of all
setting modes.
Option
0 Timed. Use this option EITHER if the user completes setting the
system by pushing an exit terminate button connected to a keypad OR if no exit terminate button is connected, and the system sets after a delay selected using Command 44.
1 Terminate. Use this option if the user completes setting the system by pushing an exit terminate button connected to a keypad. Note that the exit time is infinite in this option.
2 Final door set. Use this option to complete setting the system by closing a door fitted with a Final Exit zone detector. Note that the exit time is infinite in this option.
3 Lock Set. To use this method you must install a lock switch with the contacts connected to the ET terminals of a keypad. This facility is available on keypad software version 1.4.2 onwards.
Note: 1. The lockswitch contacts must be closed circuit with the lock
unlocked.
2. Do not connect more than one lockswitch (or any other device) to the keypad ET terminals.
To set the system the user first enters their access code at a keypad. The control unit starts the exit tone. Note that the exit time is infinite in this option. The user then closes the final exit zone and turns the key in the lock switch to “locked”. The system sets seven seconds after the lock switch contacts open (detector settling time), and changes the final exit zone to a Normal Alarm zone.
To unset the system the user turns the lock switch to “unlocked” (closing the lock switch contacts). The keypads start a continuous tone. When the user opens the final exit zone the control unit starts
the entry timer. The user completes entry by unsetting the system in the normal way.
Note: If an intruder opens the final exit door without first unlocking the
lockswitch then the control unit immediately starts an alarm.
If you select Timed (options 0), Terminate (option 1), or Final Door (option 2) exit modes the system allows a seven second settling time after pressing an exit terminate button or closing a final door.
40: System Auto Re-Arm
This Command lets you program the number of times that the system will re-arm when the bell delay expires. The system re-re-arms all closed zones. Select option 0 to make the system never re-arm (the system will go into alarm once only). Select options 1 to 4 to make the system re-arm once, twice, three times or always.
Use this Command in conjunction with Command 35 - First Circuit Response. If the system has rearmed, then when a user enters the system through the entry route the control unit will give an audible internal alarm in place of the normal entry tone.
41: Bell Delay
When the system is set and (for example) an intruder violates a zone, then the system waits for the programmed Bell Delay before operating the external sounder. The system then operates the external sounder for the programmed Bell Duration. See “Programming Commands” for the Command options.
42: Bell Duration
This Command lets you set the length of time the system will operate the external sounder during an alarm. See “Programming Commands” for the Command options.
43: Level A Entry Time
This Command lets you set the Entry Time for Full Set. See “Programming Commands” for the Command options. The time starts when a user opens any Final Exit zone.
44: Level A Exit Time
This Command lets you set the Exit Time for Full Set. See “Programming Commands” for the Command options.
tones, while option 9 gives the loudest entry/exit tones. The internal sounder demonstrates the volume of the tone when you enter the digit.
46: Tamper Alarm Annunciation
Use this Command to chose which sounders the control unit will activate for a tamper alarm while the system is unset.
Option
0 Selects internal sounders only. 1 Selects keypad sounders only.
2 Selects internal sounders and keypad sounders.
50: CSID Code
To allow the customer to use the ‘Remote Reset’ facility, you must program the control unit as ‘Engineer Reset’ (Command 33 option 1) and then install a four digit Central Station Identification (CSID) code.
First make contact with the ARC and obtain the CSID code. Then ensure that the system is in programming mode. Next, key in:
50 Y nnnn Y
Where nnnn is the "CSID Code".
The control unit now contains the same CSID code as the ARC. After an alarm the control unit can generate a ‘Reset Code’ which will be recognised by the ARC 7300 Remote Reset decode programmer.
After an alarm the user keys in their access code to silence the alarm, but cannot reset the system. The system generates a four digit code number and displays it on the keypad. The user calls the ARC and tells them the number shown on the keypad display. The ARC verifies the user's identity, then enters the code number into a special programmer. The programmer generates an ‘Anti Code’, which the ARC gives back to the user. The user then enters the ‘Anti Code’ at the keypad to reset the system.
Note: To delete a CSID code key in “0000” over the existing code.
51: Setting Time and Date
The system has an internal clock/calendar which it uses to date stamp the log print-out. To set the system’s clock/calendar to the correct time and date: 1. Enter programming mode (if you are not already there).
2. Key in 51Y at the keypad.
The display shows the current date, for example: D11 M09 Y01
4. Key in the two digits for the month number and press Y . Use a leading zero for January to September.
5. Key in the two digits of the year and press Y.
The display shows the current time, for example: H09 M15
6. Key in two digits for the hours of the day and press Y. Use the 24-hour clock.
7. Key in two digits for the minutes and press Y.
The keypad sounder gives a double “bleep” and the display shows “Installer Mode”. The system sets its internal clock/calendar to the time you have given it.
52: Omit Tamper Allowed
This Command ensures that the control unit omits the tamper contacts as well as the alarm contacts when a user omits a zone.
Note: You must give the zone the omit attribute to allow the user to omit a
zone.
Option
0 The control unit omits alarm contacts only
1 The control unit omits both alarm and tamper contacts when the user omits a zone.
53: Abort Reset
Option
0 Ensures that reset after abort is the same as system reset (see Command 33).
1 Enables customer reset after an abort.
60: Level B Final Exit Operation
Command 60 controls how the system will treat Final Exit zones in part set Level B. When the Command option is set to 0 any Final Exit zones included in part set B will continue to act as Final Exit zones during part set B. When the option is set to 1 any Final Exit zones included in part set B will act as Normal Alarm zones during part set B.
61: Level B Entry Route Response
to 1 any Entry Route zones included in part set B will act as Final Exit zones during part set B.
62: Level B Exit Mode
Command 62 specifies the exit mode for Level B. Option
0 Low Tone. Timed set with the exit tone fixed at half volume.Use Command 65 to select the exit time.
1 Instant Set (no exit tone)
2 Silent Set. (Timed Set with no exit tone) .Use Command 65 to program the Exit time.
3 As A. The exit mode chosen for Level A (whole system) is also applied to this level.
Note: The keypads give a double beep confirmation tone at the end of all
setting modes.
63: Level B Alarm Response
Command 63 specifies the alarm response for Level B. Option
0 Keypad sounders.
1 Internal sounders and keypad sounders
2 Local alarm (internal and external sounder only).
3 Full alarm (communication outputs and internal/external sounders).
64: Level B Entry Time
This Command sets the entry time for Level B. See “Programming Commands” for options.
65: Level B Exit Time
This Command sets the exit time for Level B. See “Programming Commands” for options.
70: Level C Final Exit Operation
Command 70 controls how the system will treat Final Exit zones in part set Level C. When the Command option is set to 0 any Final Exit zones included in part set Level C will continue to act as Final Exit zones during part set Level C. When the option is set to 1 any Final Exit zones included in part set Level C will act as Normal Alarm zones during part set C.
71: Level C Entry Route Operation
Command 71 controls how the system treats Entry Route zones during part set Level C. When the option is set to 0 all Entry Route zones included in part set Level C will continue to act as Entry Routes during part set Level C. When the option is set to 1 any Entry Route zones included in part set Level C will act as Final Exit zones during part set C.
72: Level C Exit Mode
Command 72 specifies the exit mode for Level C. Option
0 Low Tone. Timed set with the exit tone fixed at half volume. Use Command 75 to select the exit time.
1 Instant Set (no exit tone)
2 Silent Set. (Timed Set with no exit tone) .Use Command 75 to program the Exit time.
3 As A. The exit mode chosen for Level A (whole system) is also applied to this level.
Note: The keypads give a double beep confirmation tone at the end of all
setting modes.
73: Level C Alarm Response
Command 73 specifies the alarm response for Level C. Option
0 Keypad sounders only.
1 Internal sounders and keypad sounders.
2 Local alarm (internal and external sounder only).
3 Full alarm (communication outputs and internal/external sounders).
74: Level C Entry Time
This Command sets the entry time for Level C. See “Programming Commands” for options.
75: Level C Exit Time
This Command sets the exit time for Level C. See “Programming Commands” for options.
0 Low Tone. Timed set with the exit tone fixed at half volume. Use Command 79 to select the exit time.
1 Instant Set (no exit tone)
2 Silent Set. (Timed Set with no exit tone ).Use Command 79 to program the Exit time.
3 As A. The exit mode chosen for Level A (whole system) is also applied to this level.
Note: That the keypads give a double beep confirmation tone at the end of all
setting modes.
77: Level D Alarm Response
Command 77 specifies the alarm response for Level D. Option
0 Keypad sounders only.
1 Internal sounders and keypad sounders.
2 Local alarm (internal and external sounder only).
3 Full alarm (communication outputs and internal/external sounders).
78: Level D Entry Time
This Command sets the entry time for Level D. See “Programming Commands” for options.
79: Level D Exit Time
This Command sets the exit time for Level D. See “Programming Commands” for options.
81, 82, 83, : Output Programming
The system has three transistorised, high current, programmable outputs. Command 81 programs output 1, Command 82 programs output 2 and,
Command 83 programs output 3. All three Commands take a single following digit that selects the function.
Note: The outputs are a "pull down” type that provide negative applied control
signals. The outputs float(neither + or -) when inactive, and 0V when active.