Dreamweaver
®
8
FOR
Janine Warner
Dreamweaver
®
8
FOR
About the Author
Janine Warneris a bestselling author, journalist, and Internet consultant. Since 1995, she’s written and coauthored 10 books about the Internet, includ-ing Creating Family Web Sites For Dummies, Dreamweaver For Dummies(now in its sixth edition) and Teach Yourself Dreamweaver Visually.
Janine has been featured on technology news specials for ABC, NBC, and ZDTV and has been interviewed on numerous radio programs in the United States and abroad. Her articles and columns have been published in a variety of publications, including The Miami Herald newspaper, Shape Magazine, and the Pulitzer-Prize-winning Point Reyes Light.
Janine is a popular speaker at conferences and events throughout the US, and her fluency in Spanish has brought her many invitations to speak in Latin America and Spain. She also serves as a judge for the Arroba de Oro, a series of Internet award contests held throughout Latin America. Through her par-ticipation as a speaker at the award’s events, she helped to create an Internet literacy program for high school students in Central America.
Janine has also been a part-time faculty member at the University of Southern California Annenberg School for Communication and at the University of Miami where she taught online journalism. She now serves as the Multimedia Program Manager for the Western Knight Center, a joint project of USC and UC Berkeley, funded by the Knight Foundation.
From 1998 to 2000, Janine worked fulltime for The Miami Herald, first as its Online Managing Editor and later as Director of New Media, managing a team of designers, programmers, and journalists who produced the online editions of The Miami Heraldand El Nuevo Herald, as well as Miami.com. She also served as Director of Latin American Operations for CNET Networks, an inter-national technology media company.
An award-winning former reporter, she earned a degree in Journalism and Spanish from the University of Massachusetts, Amherst, and worked for sev-eral years in Northern California as a reporter and editor before becoming interested in the Internet in the mid 90s.
Dedication
Author’s Acknowledgments
Let me start by thanking my husband, David LaFontaine, whose patience and support have kept me fed, loved, and entertained, even while working long hours to make seemingly impossible deadlines.
Thanks to my wonderful contributor, Susannah Gardner, for gracing these pages with examples of her own beautiful Web design work (see it on the Web at www.hopstudios.com) and for revising Chapters 8 and 9. I recommend both of her latest books, Buzz Marketing with Blogs For Dummiesand
BitTorrent For Dummies.
Thanks to Frank Vera, a skilled programmer who deserves credit for revising the three most complex chapters in this book, Chapters 13, 14, and 15, on dynamic database features in Dreamweaver.
Thanks also to Sheila Castelli, who designed many of the Web sites featured in the examples. You can find her work online at www.digitalcottage.com. Thanks to the entire editorial team: Travis Smith for his superb tech editing; Becky Huehls and Rebecca Senninger for catching the details and improving the prose; and Bob Woerner for shepherding this book through the develop-ment and publishing process.
Publisher’s Acknowledgments
We’re proud of this book; please send us your comments through our online registration form located at www.dummies.com/register/.
Some of the people who helped bring this book to market include the following:
Acquisitions, Editorial, and Media Development
Project Editor:Rebecca Huehls
Acquisitions Editor:Bob Woerner
Copy Editor:Rebecca Senninger
Technical Editor:Travis Smith
Editorial Manager:Leah Cameron
Editorial Assistant:Amanda Foxworth
Cartoons:Rich Tennant (www.the5thwave.com)
Composition Services
Project Coordinator:Adrienne Martinez
Layout and Graphics: Carl Byers, Andrea Dahl, Lauren Goddard, Stephanie D. Jumper, Barbara Moore, Barry Offringa
Proofreaders: Laura Albert, Leeann Harney, Robert Springer
Indexer: Joan Griffitts Special Help: Mary Lagu
Publishing and Editorial for Technology Dummies
Richard Swadley,Vice President and Executive Group Publisher
Andy Cummings,Vice President and Publisher
Mary Bednarek,Executive Acquisitions Director
Mary C. Corder,Editorial Director
Publishing for Consumer Dummies
Diane Graves Steele,Vice President and Publisher
Joyce Pepple,Acquisitions Director
Composition Services
Gerry Fahey,Vice President of Production Services
Contents at a Glance
Introduction ...1
Part I: Fulfilling Your Dreams ...9
Chapter 1: Introducing Your New Best Friend ...11
Chapter 2: Setting Up a Web Site with Dreamweaver ...33
Part II: Looking Like a Million (Even on a Budget) ...71
Chapter 3: Planning and Maintaining a Web Site ...73
Chapter 4: Coordinating Your Design Work ...89
Chapter 5: Adding Graphics ...127
Part III: Advancing Your Site ...151
Chapter 6: Coming to the HTML Table ...153
Chapter 7: Framing Your Pages ...179
Chapter 8: Cascading Style Sheets ...197
Part IV: Making It Cool ...237
Chapter 9: Advanced HTML: CSS Layouts, DHTML, and Behaviors ...239
Chapter 10: Roundtrip Integration: Fireworks and Dreamweaver ...273
Chapter 11: Showing Off with Multimedia ...285
Chapter 12: Forms Follow Function ...311
Part V: Working with Dynamic Content ...327
Chapter 13: Building a Dynamic Web Site: Getting Started ...329
Chapter 14: Bringing Data into the Mix ...343
Chapter 15: Using Forms to Manage Your Dynamic Web Site ...363
Part VI: The Part of Tens ...383
Chapter 16: Ten Great Sites Designed with Dreamweaver ...385
Chapter 17: Ten Web Site Ideas You Can Use ...397
Chapter 18: Ten Timesaving Dreamweaver Tips ...403
Table of Contents
Introduction ...1
Why Choose Dreamweaver? ...1
Foolish Assumptions ...2
About This Book ...3
Conventions Used in This Book ...3
How This Book Is Organized ...4
Part I: Fulfilling Your Dreams ...4
Part II: Looking Like a Million (Even on a Budget) ...4
Part III: Advancing Your Site ...5
Part IV: Making It Cool ...5
Part V: Working with Dynamic Content ...6
Part VI: The Part of Tens ...6
Icons Used in This Book ...6
Where to Go from Here ...7
Part I: Fulfilling Your Dreams ...9
Chapter 1: Introducing Your New Best Friend . . . .11
So What’s New in Dreamweaver 8? ...12
Introducing the Many Components of Dreamweaver ...13
The Workspace ...13
Working on Web Pages Created in Another Web Design Program ...29
Microsoft FrontPage ...29
Microsoft Word ...30
Adobe GoLive ...30
Other HTML editors ...31
Chapter 2: Setting Up a Web Site with Dreamweaver . . . .33
Setting Up a New or Existing Site ...34
Defining a site ...35
Setting up Web server access for FTP ...37
Creating New Pages ...41
Naming Web Pages ...42
Designing your first page ...43
Creating a headline ...44
Indenting text ...45
Changing fonts and text sizes ...46
Setting Links ...53
Linking pages within your Web site ...53
Setting links to named anchors within a page ...54
Linking to pages outside your Web site ...56
Setting a link to an e-mail address ...56
Changing Page Properties ...57
Adding Meta Tags for Search Engines ...61
Previewing Your Page in a Browser ...63
Putting Your Web Site Online ...63
Synchronizing Local and Remote Sites ...65
Cloaking Options ...68
Part II: Looking Like a Million (Even on a Budget) ...71
Chapter 3: Planning and Maintaining a Web Site . . . .73
Visualizing Your Site ...74
Preparing for Development ...74
Developing a New Site ...75
Managing your site’s structure ...75
Naming your site’s files ...76
Organizing images ...79
Handling links ...80
Finding and Fixing Broken Links ...82
Checking for broken links ...83
Fixing broken links ...83
Testing Your Work with the Site Reporting Feature ...85
Chapter 4: Coordinating Your Design Work . . . .89
Templating Your Type ...89
Creating Predesigned Pages with Dreamweaver’s Design Files ...90
Creating Your Own Templates ...93
Creating a new custom template ...94
Saving any page as a template ...97
Making attributes editable ...98
Using custom templates ...100
Making Global Changes with Templates ...101
Attaching and Detaching Templates ...103
Reusing Elements with the Library Feature ...104
Creating and using Library items ...105
Editing one instance of a Library item ...108
Using a Tracing Image to Guide Your Layout ...109
Making the Most of Dreamweaver’s Site-Management Features ...111
Using a Testing Server ...112
Staying in touch with integrated e-mail ...113
Using Design Notes ...114
Activating Site Map Layout ...118
Using the File View Columns option ...120
Enabling Contribute features ...121
Remembering Your History ...122
Using the Quick Tag Editor ...123
Chapter 5: Adding Graphics . . . .127
Getting Great Graphics ...127
Buying royalty-free clip art and photographs ...128
Creating your own images ...129
Understanding the Basics of Web Graphics ...131
Inserting Images on Your Pages ...134
Aligning Images on a Page ...136
Centering an image ...136
Aligning an image with text wrapping ...136
Creating complex designs with images ...138
Image Editing in Dreamweaver ...138
Cropping an image ...139
Adjusting brightness and contrast ...141
Sharpening an image ...141
Using the Transparent GIF Trick ...142
Creating a Background ...143
Creating Image Maps ...147
Part III: Advancing Your Site ...151
Chapter 6: Coming to the HTML Table . . . .153
Creating Tables in Layout Mode ...154
Editing Tables in Layout Mode ...159
Changing Table Options in Standard Mode ...160
Merging and splitting table cells ...162
Controlling cell options ...163
Formatting tables with color schemes ...165
Formatting multiple columns in a table ...166
Sorting Table Data ...169
Importing Table Data from Other Programs ...170
Using Tables for Spacing and Alignment ...171
Using tables to design forms ...172
Aligning a navigation bar ...174
Follow the Three Clicks Rule ...400
Map It Out ...400
Be Prepared for Fast Updates ...401
Back It Up ...402
Chapter 18: Ten Timesaving Dreamweaver Tips . . . .403
Splitting the View ...403
Inserting Content with Formatting ...404
Getting a Head Start on Your Designs ...404
Tabling Your Designs ...405
Designing in a Flash ...405
Making Fireworks Work with Your Images ...406
Finding Functional Fonts ...406
Differentiating DHTML for All Browsers ...406
Directing Your Viewers ...407
Keeping Frequently Used Items Handy ...408
Introduction
I
’ve been writing about Macromedia Dreamweaver since the first version came out in the mid 1990s, and I’m pleased to say that this latest (and long-awaited) version 8 makes this program better than ever. If you’ve never used Dreamweaver before, don’t worry; this book shows you everything you need to know about the old features, as well as the new ones. If you have used earlier versions of Dreamweaver, it’s definitely time to upgrade and make sure you have all the tools available to create a fabulous Web site. If you’re like most of the Web designers I know, you don’t have time to wade through a thick book before you start working on your Web site. That’s why I wrote Dreamweaver 8 For Dummiesin a way that makes it easy for you to find the answers you need quickly. You don’t have to read this book cover to cover. If you’re in a hurry, just go right to the information you need most and get back to work. If you’re new to Web design, or you want to really get to know the intricacies of Dreamweaver, skim through the chapters to get an overview and then go back and read what’s most relevant to your project in greater detail. Whether you are building a simple site for the first time or working to redesign a complex site for the umpteenth time, you find every-thing you need in these pages.Why Choose Dreamweaver?
With each new version of Dreamweaver, this award-winning program becomes more efficient and powerful. Yet somehow, Macromedia continues to make Dreamweaver intuitive and easy to use, even as its programmers work long hours to keep up with the latest innovations in Web design and release a new version of this program nearly every year since its creation. The high-end features and ease of use of Dreamweaver make it an ideal choice for professional Web designers, as well as for those new to working on the Internet. And the new features in version 8 make Dreamweaver better than ever!
Among all the Dreamweaver features, these are some of the best:
Dreamweaver has clean HTML code and sophisticated support for the latest HTML options (such as Dynamic HTML).
Cascading Style Sheets, better known as CSS, have become popular among professional Web designers. It’s no wonder; this powerful part of the HTML code can save considerable time and give you greater design control than ever before. As you’d expect, Dreamweaver 8 offers more sophisticated support for CSS and better rendering within the design environment.
Dreamweaver 8 even makes adding high-end features for creating database-driven Web sites easier. These features used to be sold separately in Dreamweaver UltraDev, but since Dreamweaver MX 2004, they’ve been integrated into this one powerful program. Now, in version 8, these fea-tures have been further refined and enhanced to work better than ever.
As in previous versions, you find a state-of-the-art integrated text editor that makes switching back and forth between Dreamweaver and a text editor easier (if you prefer to look at the code, behind your pages you find some great enhancements to the text editor in this version). If you’ve never written HTML before, don’t be intimidated by these fancy features. The Dreamweaver graphical design environment uses carefully designed palettes and windows to make it easy for you to create high-end Web sites that include such features as animations, interactive forms, and e-commerce systems, even if you don’t know HTML.
Foolish Assumptions
Although Dreamweaver is designed for professionaldevelopers, I don’t assume you’re a pro — at least not yet. In keeping with the philosophy behind the For Dummies series, this book is an easy-to-use guide designed for readers with a wide range of experience. Being interested in Web design and wanting to create a Web site is key, but that desire is all that I expect from you.
About This Book
I designed Dreamweaver 8 For Dummiesto help you find the answers you need when you need them. You don’t have to read this book cover to cover and memorize it (and I don’t really recommend this as beach reading). Con-sider this a quick study guide and a reference when you need it. Each section of the book stands alone, giving you easy answers to particular questions and step-by-step instructions for specific tasks.
Want to find out how to change the background color on a page, create a nested table, build HTML frames, or get into the really cool stuff such as style sheets and layers? Then jump right in and go directly to the section that most interests you. Oh, and don’t worry about keeping all those new HTML tags in your head. You don’t have to memorize anything. The next time you need to do one of these tasks, just go back and review that section. And don’t worry about getting sand on this book if you do take it to the beach — I promise it won’t complain!
Conventions Used in This Book
Keeping things consistent makes them easier to understand. In this book, those consistent elements are conventions. Notice how the word conventions
is in italics? That’s a convention I use frequently. I put new terms in italics and then define them so that you know what they mean.
When I type URLs (Web addresses) or e-mail addresses within regular para-graph text, they look like this: www.jcwarner.com. Sometimes, however, I set URLs off on their own lines, like this:
www.jcwarner.com
I do provide examples, such as this code which links a URL to a Web page, I set off HTML in the same monospaced type as URLs:
<A HREF=”http://www.jcwarner.com”>Janine’s Web Site</A>
When I introduce you to a new set of features, such as options in a dialog box, I set these items apart with bullets so that you can see that they’re all related. When I want you to follow instructions, I use numbered steps to walk you through the process.
How This Book Is Organized
To ease you through the learning curve associated with any new program, I organized Dreamweaver 8 For Dummiesto be a complete reference. The following sections provide a breakdown of the parts of the book and what you can find in each one. Each chapter walks you through the features of Dreamweaver step by step, providing tips and helping you understand the vocabulary of Web design.
Part I: Fulfilling Your Dreams
This part introduces you to Dreamweaver and covers getting started with the basics. In Chapter 1, I give you a handy reference to toolbars and menu options. I also describe the new features in version 8. You may prefer to skim this chapter as it’s designed to give you an overview of the program, and you don’t have to memorize the contents of each menu and toolbar. In Chapter 2, I start you on the road to creating your first Web site, including setting up your site, importing an existing site, creating new Web pages, applying basic formatting to text, and even placing images and setting links on your pages. To make this chapter more interesting and help you see how all these fea-tures come together, I walk you through creating a real Web page in this chap-ter as I show you how each features works.
Part II: Looking Like a Million
(Even on a Budget)
you don’t have any broken links. In Chapter 4, I introduce you to some of my favorite Dreamweaver features, including sophisticated template capabilities, that enable you to create more consistent designs and even lock sections of a page to protect them. I also love Dreamweaver’s Library items, which can be used to place and update commonly used elements on your pages, such as navigation bars or copyright tags. If you work with a team of designers, you may be especially interested in the check in and check out features covered in this chapter for version control and integrated e-mail for communicating with other team members. Chapter 4 also covers tracing images, the Quick Tag Editor, Design Notes, and the History palette.
Chapter 5 introduces you to the basics of creating, converting, and optimiz-ing graphics for the Web and shows you how to add graphic elements to your pages. You can find tools and strategies for creating the best images for your Web site, as well as tips for finding free images online and buying graphics that are specially designed for the Web.
Part III: Advancing Your Site
In Part III, I show you how to use Dreamweaver with some of the more advanced HTML features. In Chapter 6, you discover how to use HTML tables to create page layouts that work in the most common Web browsers. A high-light of this chapter is Layout mode, which makes creating complex Web designs easier than ever. In Chapter 7, you find all you need to know about designing a site with HTML frames. (This chapter helps you decide when you should and shouldn’t use frames and gives you plenty of step-by-step instruc-tions for creating HTML frames in Dreamweaver.)
Chapter 8 provides an overview of how Cascading Style Sheets work and how they can save you time. CSS has become a popular way to create designs and manage formatting on Web pages, and these features have been nicely improved in Dreamweaver 8. In this chapter, you find descriptions of the style definition options available in Dreamweaver as well as instructions for creat-ing and applycreat-ing styles.
Part IV: Making It Cool
In Chapter 11, you find out how easily you can add multimedia to your Web pages, including how to link a variety of file types — from Flash to Java to RealAudio — to your Web pages. Then in Chapter 12, I cover HTML forms and how to use Dreamweaver to add interactive elements, such as surveys, search engines, online discussion areas, and e-commerce systems to your pages.
Part V: Working with Dynamic Content
Part V features three chapters that cover the most advanced features in Dreamweaver 8. Chapter 13 is designed to help you understand how database-driven Web sites work and why they have become so important on the Web. In Chapter 14, you discover how to add dynamic content to your pages, define data sources, and display record sets. And in Chapter 15, you pull it all together and find out how to build master pages, create pages to search databases, and test your work with a live connection.
Part VI: The Part of Tens
In The Part of Tens, you get three quick references to help you get the most out of Dreamweaver and avoid some of the common design mistakes on the Web. In Chapter 16, you find descriptions and images of ten Web sites created with Dreamweaver to give you an idea of what’s possible. In Chapter 17, you find ten great Web design ideas; and in Chapter 18, you get ten tips to save you time and make your sites work better.
Icons Used in This Book
When I want to point you toward something you can download for your use, I use this icon.
This icon points you toward valuable resources on the World Wide Web.
This icon signals technical stuff that you may find informative and interesting but isn’t essential for using Dreamweaver. Feel free to skip over this stuff.
This icon indicates a tip or technique that can save you time and money — and a headache — later.
This icon warns you of any potential pitfalls — and gives you the all-important information on how to avoid them.
Where to Go from Here
In this part . . .
Chapter 1
Introducing Your New Best Friend
In This Chapter
Introducing the new features of Dreamweaver 8
Examining your Web site objectives
Finding your way around in Dreamweaver
W
elcome to the wonderful world of Dreamweaver 8. If you’re an experi-enced Web designer, you’re going to love the power and sophistica-tion of this Web editor. If you’re new to building Web sites, you’ll appreciate its simplicity and intuitive interface. Either way, this chapter starts you on your way to making the most of Dreamweaver by introducing you to the menus and panels that make this program so useful.Dreamweaver can help you with every aspect of Web development, from designing simple pages, to fixing links, to publishing your pages on the World Wide Web. Dreamweaver can handle the simplest HTML, as well as some of the most complex and advanced features possible on the Web, including Cascading Style Sheets and Dynamic HTML (see Chapters 8 and 9 for more information on these features). Dreamweaver also integrates a powerful HTML text editor into its easy-to-use graphical design environment so you can work in the HTML code if you prefer.
If you already work in another Web design program or you’re updating a site that was created in another program, don’t worry — you can use Dreamweaver to modify existing Web pages and continue to develop your Web site without losing all the time you’ve already invested. For example, if you’ve been working in a program such as Microsoft FrontPage or Adobe GoLive, you can change to Dreamweaver to edit and develop your site further. All Web design programs create HTML pages, and those pages can be opened in any other Web design program. At the end of this chapter, in the “Working on Web Pages Created in Another Web Design Program” section, you find a few warnings about the chal-lenges you may encounter because the code can vary slightly from program to program, but once you clean up those differences, you should be fine.
So What’s New in Dreamweaver 8?
Now the good stuff. All those requests you make to Macromedia, all that wishful thinking . . . believe it or not, they heard you and many of the little — and not so little — things we all have been wanting in this program are finally here, as well as a few extras you might expect!
The following list provides you a quick overview of some of the new features you find in version 8:
When you first launch Dreamweaver 8, you’ll notice a few changes to the Workspace. Although it has no dramatic changes, the programmers at Macromedia have added some clever new features, including a magnify-ing glass feature complete with a little icon in the status bar just below the work area. Much like the magnifiers common in image-editing pro-grams, this new feature enables you to zoom in to view page elements in greater detail or zoom out to see the full layout of a larger page.
You’ll find some of the most extensive changes in the way Dreamweaver handles CSS — important upgrades as Cascading Style Sheets become increasingly popular among professional designers. Among other things, you’ll find improved CSS rendering, better support for positioning, and a more unified CSS panel that includes the Rule Tracker, Property Grid, and a new Composite view.
You can find one of my favorite new feature sets on the Edit menu. Paste Special enables you to paste formatted text (and even tables) from other programs, such as Microsoft Word or Excel, with options about what for-matting is kept. You can choose to paste text with structural forfor-matting, such as tables and paragraph marks; with or without basic formatting, such as bold and italics; and you can even opt to clean up the often problematic paragraph formatting from Word as you paste in the text. If you specify your choices in Dreamweaver’s Preferences, anytime you use the paste feature your text is inserted based on your favorite options.
Going beyond the predesigned templates included in previous versions, Dreamweaver now includes Starter Pages, which not only include topic-based designs. They actually include text. Of course, you can edit the text; but if you’re creating a calendar of events or a product catalog, for example, the general text already in place on these pages gives you a head start.
I always recommend that you design your pages for the broadest audi-ence, and that definitely includes designing for the disabled, such as the blind who use special browsers that read Web pages aloud. Macromedia has always been good about including accessibility features, and I’m pleased to see those features support the Priority 2 Web Content Accessibility Guidelines.
Introducing the Many Components
of Dreamweaver
Dreamweaver can seem a bit overwhelming at first. It has so many features, and they are spread out in so many panels, toolbars, and dialog boxes that you can easily get lost. If you prefer to learn by poking around, have at it (and feel free to skip ahead to the next chapter where you start building your first Web page). If you want a tour before you get started, the next few sections introduce you to the interface and provide an overview of the basics of Dreamweaver. You also discover where to find common features and func-tions, which the rest of the book covers in more detail.
The Workspace
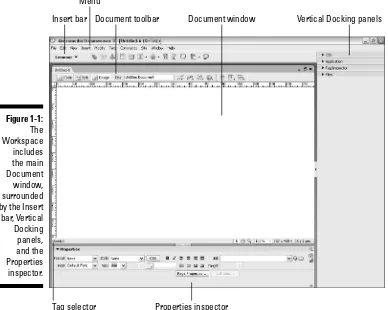
When you launch Dreamweaver, the Start Screen appears in the main area of the program (and it reappears anytime you don’t have a file open). From the Start Screen, you can choose to create a new page from one of the many Dreamweaver pre-made templates, or you can create a new blank page by selecting HTML from the Create New options in the middle column. When you select HTML, Dreamweaver creates a new blank HTML page in the main
Workspace,as shown in Figure 1-1. You can type text directly into any page in the Workspace and apply basic formatting with the many formatting options described later in this chapter.
The Document window
The big, open area in the main area of the Workspace is the Document window, which is where you work on new and existing pages. If you use the Designer interface in Design view, you see your page as it would display in a Web browser. If you want to see the HTML code behind your page, click the Code button at the top of the work area. Choose the Split button to see the HTML code and Design view simultaneously (which you can see in Figure 1-2). Pages viewed on the World Wide Web may not always look exactly the way they do in the Document window in Dreamweaver because not all browsers support the same HTML features or display them identically. For best results, always test your work in a variety of Web browsers, and design your pages to work best in the browsers that your audience are most likely to use. Fortu-nately, Dreamweaver includes features that help you target your page designs to specific browsers, such as the Check Target Browsers feature covered in Chapter 3.)
Insert bar
Tag selector Menu
Document toolbar Document window Vertical Docking panels
Properties inspector
Figure 1-1:
Customizing the interface
The docking panels, palettes, and bars in Dreamweaver provide easy access to most of the program’s features. The default settings put the Properties inspector at the bottom of the page, the Insert bar at the top, and the panels on the right, but you can move these elements around the screen by selecting them and use drag and drop to move them to another part of the screen. You can also close any or all the panels on the right by clicking the tiny Options icon in the top right of each panel and selecting Close Panel from the drop-down list (it looks like three bullet points with lines next to them and a little arrow underneath, and it’s really, really small). You can close them all at once by choosing Window➪Hide Panels (or by clicking the arrow in the middle of the row of panels), and you can access any or all the panels through the vari-ous options on the Window menu. If you want to open a particular panel — the CSS Styles panel, for example — choose Window➪CSS Styles and it expands to become visible on your screen. The Properties inspector, Insert bar, and panels are integral parts of this program, and you find a lot more information about them throughout the book. Check out the Cheat Sheet at the front of this book for a handy reference to the Properties inspector options. In Chapter 2, you discover how to use some of the most common features, such as the icon for inserting an image on the Insert bar at the top of the screen.
Figure 1-2:
The Insert bar
The Insert bar, located at the top of the screen, comes with eight subcate-gories, each with a different set of icons representing common features. Click the small arrow to the right of the name to access the drop-down list to switch from displaying the buttons on one subcategory to showing the but-tons for another. The options are
Common bar:Displays icons for many of the most common features, including links, tables, and images.
Layout bar:Displays layer and table options essential for creating com-plex layouts.
Forms bar:Surprise! This one features all the most common form ele-ments, such as radio buttons and boxes.
Text bar:Displays common text-formatting features, including para-graphs, breaks, and lists.
HTML bar:Offers a mishmash of raw HTML, such as rules, tables, frames and, scripts.
Application:Use these options when building dynamic Web pages pow-ered by database material.
Flash elements:A single icon allows you to place a Flash file on your Web page.
Favorites:Right-click (Windows) or Control+click (Mac) to customize your most-used HTML elements.
At the very end of the drop-down list, you find the Show as Tabs option, which enables you to display the names of the Insert bars as tabs across the top of the screen, as shown in Figure 1-3.
The Favorites Insert bar is blank by default, and you can customize it to hold your own collection of options. Simply right-click (Windows) or Control+click (Mac) in the bar and you can easily customize this bar.
Throughout the book, I refer to these Insert bars by their full names, such as the Forms Insert bar or the Layout Insert bar. You find more information on each of these in their relevant chapters. For example, Chapter 12 covers the Forms Insert bar in detail; and Chapters 13, 14, and 15 cover the Application Insert bar.
The Properties inspector
The Properties inspector is docked at the bottom of the page in Dreamweaver. If you prefer it at the top of the screen, you can drag it up there, and it locks into place; but I rather like that it’s handy, yet out of the way, at the bottom of the screen.
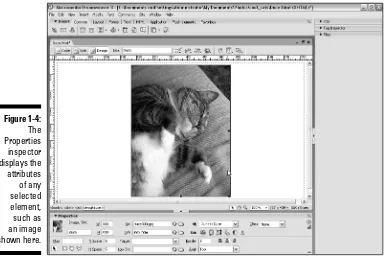
The Properties inspector displays the properties of a selected element on the page. A property is a characteristic of HTML — such as the alignment of an image or the size of a cell in a table — that you can assign to an element on your Web page. If you know HTML, you recognize these as HTML attributes. When you select any element on a page (such as an image), the inspector changes to display the relevant properties for that element, such as the height and width of an image. You can alter these properties by changing the fields in the Properties inspector. You can also set links and create image maps using the options in the Properties inspector.
Figure 1-4 shows the image options displayed in the Properties inspector, including height and width, alignment, and the URL(Uniform Resource Locator or, more simply, Web address) to which the image links.
At the bottom-right corner of the Properties inspector, you see a small arrow. Click this arrow (or double-click in any open inspector space) to reveal addi-tional attributes that let you control more advanced features, such as the image map options when a graphic is selected.
Figure 1-3:
Figure 1-5 shows the Properties inspector when you select a table. Notice that the fields in the inspector reflect the attributes of an HTML table, such as the number of columns and rows. (See Chapter 6 to find out more about HTML tables.)
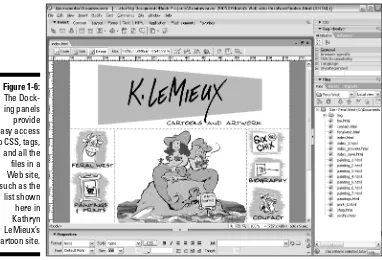
The Docking panels
The Docking panels, shown in Figure 1-6, are located to the right of the work area (although you can easily move them anywhere on the screen). The Docking panels display a variety of important features in Dreamweaver, including all the files and folders in a site (in the Files panel), Cascading Style Sheets (in the CSS
Figure 1-5:
Attributes of a selected HTML table or cell.
Figure 1-4:
The Properties inspector displays the attributes
panel) and more. You can open and close panels by clicking the small arrow to the left of the panel’s name. To display more panels, select the panel name from the Window menu. To hide all the visible panels at once, click the tab with the small arrow in the middle, left of the row of panels.
The following list offers a description of some of the elements that you access through the Docking panels (the others are described in greater detail in their respective sections of the book).
Files panel:Shown in Figure 1-6, the Files panel lists all the folders and files in a Web site and helps you manage the structure and organization of the site. You can move files in and out of folders and even create new folders in this panel, and Dreamweaver automatically adjusts any related links. The Files panel is also where you access FTP (file transfer protocol)
capabilities to upload or download files from a server. You can use the Connect button at the top of this panel to dial quickly into your server and use the Get Files and Put Files arrows to transfer pages. (See Chapter 2 for more about the Files panel and built-in FTP features.)
Figure 1-6:
Assets panel:The Assets panel, shown in Figure 1-7, automatically lists all the images, colors, external links, multimedia files, scripts, templates, and Library items in a Web site. You can add a stored item, such as a graphic, to a Web page simply by dragging the element into the work area. You find more on templates and Library items in Chapter 4. These features work only if you define your site using the Site Definition dialog box (by choosing Site➪Manage Sites) and then identifying the main folder of your Web site. If you find that the Library or other options aren’t available, follow the steps in Chapter 2 to define your site (a setup process you should go through for all your sites).
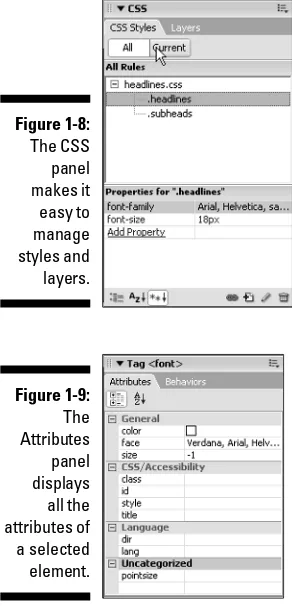
CSS panel:The Cascading Style Sheets panel includes Layers and CSS Styles panels. CSS styles are similar to style sheets used in word pro-cessing and desktop publishing programs, such as Microsoft Word and QuarkXPress. You define a style and name it, and the style is then included in the CSS Styles panel (see Figure 1-8). The Layers panel pro-vides access to layers options, which enable you to precisely position elements on a page. (For more information about CSS and layers, see Chapters 8 and 9.)
Figure 1-7:
Tag panel:The Tag panel provides access to attributes and behaviors. In Dreamweaver, behaviorsare scripts (usually written in JavaScript) that you can apply to objects to add interactivity to your Web page. Essentially, a behavior is made up of a specified event that, when trig-gered, causes an action. For example, an eventmay be a visitor clicking an image, and the resulting action may be that a sound file plays. Figure 1-9 shows the Tag panel’s Attributes tab, which displays all the attributes of a selected element. You can change attributes in the Attributes tab as well as in the Properties inspector. (Chapter 9 provides more information on creating and applying behaviors.)
Figure 1-9:
The Attributes panel displays
all the attributes of a selected element.
Figure 1-8:
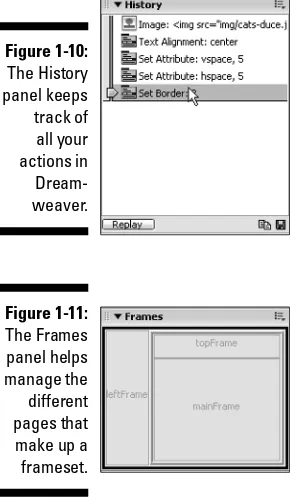
History panel:The History panel, shown in Figure 1-10, keeps track of every action you take in Dreamweaver. You can use the History panel to undo multiple steps at once, to replay steps you performed, and to auto-mate tasks. Dreamweaver automatically records the last 50 steps, but you can increase or decrease that number by choosing Edit➪Preferences➪
General (Windows) or Dreamweaver➪Preferences➪General (Mac), and changing the maximum number of history steps.
Application panel: This panel includes the Database, Bindings, Server Behaviors, and Components panels. These features are used only if you work with a database-driven site (the most technically complex of the features covered in this book). You find more on database options in Chapters 13, 14, and 15.
Frames panel: If you create a site design that uses frames, a set of HTML tags that enable you to divide a screen into sections made up of sepa-rate pages, you use the Frames panel to manage the different pages on the screen, such as the three frames shown in Figure 1-11.
Figure 1-11:
The Frames panel helps manage the different pages that make up a frameset.
Figure 1-10:
The History panel keeps track of
The menu bar
At the top of the screen, the Dreamweaver menu bar provides easy access to all the features that you find in the Insert bar, Properties inspector, and panels, as well as a few others that are available only from the menu. The fol-lowing sections provide a general description of each of the menu options.
The File menu
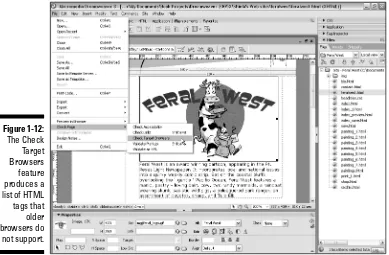
You find many familiar options, such as New, Open, and Save, on the File menu, shown in Figure 1-12. You also find a Revert option, which is similar to the Revert feature in Adobe Photoshop. This sophisticated undo feature enables you to return your page quickly to its last-saved version if you don’t like the changes you made.
The File menu also includes access to Design Notes, a unique feature that associates private notes with HTML and other files. Take a look at Chapter 4 for more information about Design Notes and other Dreamweaver features that make collaboration easier.
You can also find features useful for checking your work in Web browsers on the File menu. Most Web design programs include some way of previewing your work in a browser. Dreamweaver takes this feature two steps further by enabling you to check your work in a number of browsers and even test the compatibility of your pages in different versions of different browsers. Figure 1-12 shows the Check Page options, which includes Check Accessibility, Check Links, and Check Target Browsers — all great tools for testing your work. The Check Target Browsers option enables you to specify a browser and version, such as Safari 2.0, Netscape 6, or Internet Explorer 6.0. When you do a browser check, Dreamweaver generates a report listing any HTML features you use that the chosen browser doesn’t support.
The Check Links feature verifies all the links in a site and produces a report with all broken and unresolved links. The Check Accessibility feature checks to make sure the page displays properly in browsers for the blind and other systems for the disabled.
The Edit menu
You also find the Preferences settings on the Edit menu (Windows) or on the Dreamweaver (Mac). Before you start working with a new program, go through all the Preferences options to ensure that the program is set up the best way for you.
The View menu
The View menu provides access to some helpful design features, such as grids and rulers, as well as the new zoom features. The Visual Aides option on the View menu gives you the option of turning on or off the borders of your HTML tables, frames, and layers, as well as controlling visibility of image maps and other invisible elements. This option is useful because you often want to set the border attribute of these HTML tags to zero so that they’re not visible when the page displays in a browser. However, while you work on the design of your page in Dreamweaver, seeing where elements, such as tables and layers, start and stop is very useful. Checking the frame options on the View menu lets you see the borders in Dreamweaver even if you don’t want them visible to your site’s visitors.
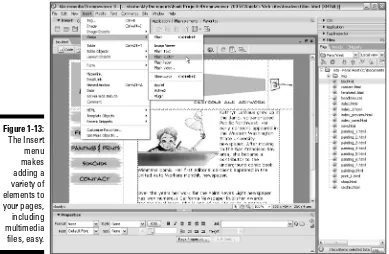
The Insert menu
As shown in Figure 1-13, the Insert menu offers access to a number of fea-tures unique to Web design. From this menu, you can insert elements such as a horizontal rule, a Java applet, a form, or a plug-in file.
Figure 1-12:
Dreamweaver offers extra support for inserting Flash and Shockwave Director files, both of which are products from Macromedia. (You can find out more about using multimedia files in Chapter 11.)
The Modify menu
The Modify menu is another place where you can view and change object properties, such as the table attributes shown in Figure 1-14. The properties (usually called attributesin HTML) let you define elements on a page by set-ting alignment, height, width, and other specifications.
Page Properties
To alter properties for an entire page, such as text and link colors, use the Page Properties dialog box shown in Figure 1-15. Available from the Modify menu or by clicking the Page Properties button at the bottom of the Properties inspector, the Page Properties panel also enables you to specify the background color or to use an image as a page background.
Figure 1-13:
The Text menu
You can easily format text with the Text menu by using simple options, such as bold and italic, as well as more complex features, such as font styles and custom style sheets. Text formatting options have evolved dramatically on the Web. Just a few years ago, you didn’t even have the option of specifying a particular font style or controlling leading and spacing. Today you have more control than ever over the look of your Web pages, although these options aren’t yet universally supported. The Text menu also features options that
Figure 1-15:
The Page Properties dialog box provides access to background and text color attributes.
Figure 1-14:
enable you to quickly create headers and subheads, check spelling, and create lists.
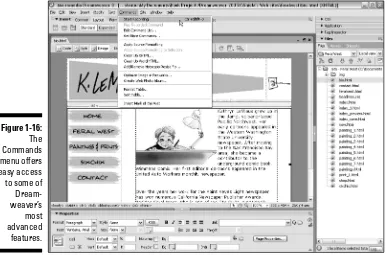
The Commands menu
The Commands menu, shown in Figure 1-16, provides access to a host of options in Dreamweaver. These options include the Start and Play Recording features, which let you quickly save a series of steps and then repeat them. To use this feature, choose Commands➪Start Recording, perform whatever actions you want to record — for example, copying and pasting some text — and then choose Stop Recording. To perform any action again, choose Commands➪Play Recorded Command. You can download an action by choosing Commands➪Get More Commands, which automatically launches a browser and takes you to the Macromedia Web site. You can download new commands from the Web site that add functionality to Dreamweaver. The Clean Up XHTML and Clean up Word HTML options on the Commands menu help you correct incorrect or redundant HTML code, and the Clean Up Word HTML feature is designed especially to correct the common problems caused by the Save As HTML feature in Microsoft Word.
The Add/Remove Netscape Resize Fix option on this menu inserts or removes a JavaScript script designed to help correct an old Netscape bug by automati-cally reloading the page when users resize their browser windows.
Figure 1-16:
The Create Web Photo Album option launches Macromedia Fireworks and uses it to automate the creation of a photo album with a series of images. If you choose Optimize Image in Fireworks, a selected image automatically opens in the optimization area in Fireworks. (Both these commands require that you have Fireworks installed.)
The Site menu
The Site menu provides access to the options you need to set up your site, a process required before many of the other Dreamweaver features work prop-erly. (Chapter 2 covers this process.) The Site menu also gives you easy access to the Check In and Check Out features, which are options that can help you keep a team of designers from overwriting each other’s work. (Chapter 4 talks about this feature.)
The Window menu
The Window menu lets you control the display of panels and dialog boxes, such as Insert, Properties, and Behaviors. To make these panels visible, select the panel name so that a check mark appears next to the feature you want to display; to hide them, select again to remove the check mark. Other panels and dialog boxes, such as CSS Styles and HTML Code Inspector, are also listed on the Window menu for easy access.
The Help menu
The Help menu provides easy access to help options that can assist you in figuring out many features of Dreamweaver. You also find access to the Dreamweaver template and example files on the Help menu.
Templates and examples provide visual samples of common HTML designs, such as tables and frames, and provide design ideas and great shortcuts for creating complex layouts.
The status bar
The status bar appears at the bottom left of any open Dreamweaver docu-ment. On the right end of the status bar, you can see tool icons that control the on-screen display of your document. On the left end, you find a row of HTML codes that indicate how elements on your page are tagged. If you place your cursor in bold text that is centered, for example, the status bar might display <BODY><CENTER><B>. This feature makes double-checking the kind of formatting applied to any element on your page easy.
Working on Web Pages Created in
Another Web Design Program
In theory, all Web design programs should be compatible because HTML files are, at their heart, just ordinary text files. You can open an HTML file in any text editor, including Macintosh TextEdit and Windows Notepad. However, HTML has evolved dramatically over the years and different Web programs follow different standards, which can cause serious conflicts when a page cre-ated in one program opens in another.
One of the reasons Dreamweaver is so popular is because it creates very clean code and is considered more accurate and more respectful of HTML standards than other programs. Dreamweaver is also better at creating pages that work in different browsers and on different platforms, but importing files created in another Web program can be challenging, even in Dreamweaver. To help with the transition, Dreamweaver includes some special features, such as the Clean Up Word HTML option, designed to fix some of the common problems with Microsoft Word’s HTML code.
Before you start working on a site that was developed in another program, you need to import the site into Dreamweaver. I recommend you make a backup of the site first so you have a copy of all the original pages (strange things can happen when you open a site created in another program). You find step-by-step instructions for importing an existing Web site in Chapter 2. The following sections describe the most popular HTML editors and what you need to know if you’re moving files from one of these programs to Dreamweaver.
Microsoft FrontPage
to continue editing them in Dreamweaver the way you did in FrontPage. Although you don’t need to alter the code for these components, thanks to the Dreamweaver respect for unique code, you can’t edit FrontPage’s built-in com-ponents in Dreamweaver.
If you use CSS or layers in FrontPage, you need to pay special attention to those features as you convert your site to Dreamweaver. Microsoft FrontPage isn’t as good as Dreamweaver at creating high-end features that work in both Netscape Navigator and Microsoft Internet Explorer, so you probably want to improve your code if you expect viewers to use any browser other than Internet Explorer. Because CSS and layers are more complex than HTML to code, you probably don’t want to edit this code manually — converting from other editors to Dreamweaver can get pretty tricky. Tables can also get messy when you switch from one program to another. In some cases, you may find that the simplest solution is to delete the elements that you created in FrontPage and re-create them in Dreamweaver. (For more on CSS and layers, check out Chapters 8 and 9.)
Microsoft Word
Although Microsoft Word is a word processor and is not considered an HTML editor per se, it does have HTML output capabilities. As a result, you will likely encounter pages that have been created and saved in Microsoft Word at some point. The problems you find in HTML code generated from Word are similar to the problems generated from FrontPage: They both tend to create unusual and sometimes redundant code that deviates from HTML standards. Because Word-generated HTML is so common, Dreamweaver includes a spe-cial Clean Up Word HTML command. To use this feature, choose Commands➪
Clean Up Word HTML and then specify the code you want altered in the Clean Up Word HTML dialog box. When you use this feature, Dreamweaver removes excess code, which can help your pages load faster and work better in differ-ent browsers.
After you use Dreamweaver to clean up Word HTML, you should not expect to edit the file in Word again. The code may be cleaner, but depending on the formatting options you’ve used, Word may no longer be able to read it.
Adobe GoLive
If you have included any JavaScript actions in your pages using GoLive, you may not be able to edit them in Dreamweaver, but the actions should still work when the page displays in a browser. Likewise, CSS and other Dynamic HTML features created in GoLive do not always work well in Dreamweaver unless you know how to edit the code manually. If your page contains any actions or DTHML features, you may find re-creating the page in
Dreamweaver your best option.
Not long before the writing of this book, Adobe purchased Macromedia and although, to date, no announcement has been made about changes to GoLive, I imagine that both GoLive and Dreamweaver are likely to see changes in the future that will either make them more compatible or make one of them obso-lete. I’m betting on Dreamweaver, not only because I’m the author of this book, but because it has the largest market share; but it’s hard to predict what will happen to GoLive, which is also a strong Web design program.
Other HTML editors
In the early days of the Web, lots of different visual HTML editors were being used. Today only a few major ones are left. The few that I discuss here seem to capture most of the market. Still, you may find yourself inheriting sites built in really old editors such as Claris HomePage, or Symantec VisualPage. Each of these programs present fewer problems than either Frontpage or GoLive because they aren’t capable of creating the complex, high-end fea-tures that are hardest to migrate from one program to another.
For the most part, you can open any HTML page with Dreamweaver and con-tinue developing it with little concern. If you run into problems, remember that you always have the option of re-creating the page from scratch in Dreamweaver — a sure way to get rid of any unwanted code. You may also want to use the Dreamweaver Clean Up XHTML feature to identify poten-tially problematic code. To use this feature, choose Commands➪Clean Up XHTML and then select the elements you want to alter in the Clean Up HTML dialog box.
Chapter 2
Setting Up a Web Site
with Dreamweaver
In This Chapter
Building a new siteMaking new pages
Creating links
Getting your Web site online
I
f you’re ready to dive in and start building your Web site, you’ve come to the right place. In this chapter, you find what you to need to start building a Web site whether you are working on an existing Web site or creating a new one. First you discover an important preliminary step — site setup, which enables Dreamweaver to keep track of the images, links, and other elements in your site. Then, you get into the fun stuff, creating your first page and adding images and text.Before you start creating or editing individual pages, setting up your site using the site-management features in Dreamweaver is really important. Whether you’re creating a new site or working on an existing site, follow the steps in the next section to get Dreamweaver ready to manage the site for you. The site-management features enable Dreamweaver to keep track of the elements in your site, automatically create links, update your server, and even manage a team of developers. With the enhancements in this latest ver-sion, all these features are even more powerful and easy to use.
Setting Up a New or Existing Site
The site-management features in Dreamweaver are designed to ensure that everything works properly in your Web site by making certain that links con-nect and files and folders are placed correctly on your hard drive. If you don’t do site setup, you risk breaking links between pages. The site setup process also gets you ready to use Dreamweaver’s file transferring tools, including FTP capabilities (File Transfer Protocol). These tools facilitate the transfer of your pages to and from your local computer to your Web server. Dreamweaver also includes special features that help track and manage updates to your server anytime you make changes to your site.
As you go through the site setup process, you start by telling Dreamweaver which folder on your hard drive is the one that you use to store all the files and folders for your Web site. You need to keep all the files and folders for your site in one main folder because when you finish building your site and upload it to your Web server, the individual pages, images, and other ele-ments must remain in the same relative location on the Web server as they are on your hard drive, and that’s most easily accomplished by storing them all in one main folder.
If this setup seems a little confusing to you, don’t worry; it’s a quick easy process and as long as you keep all the files of your Web site in one main folder, you’ll be fine. Just trust me; don’t skip this first step.
When you use site setup for a new Web site, Dreamweaver by default creates a new folder on your hard drive to ensure that you save all the pages and other elements of your site in one place. If you prefer, you can change the location of that folder or create a new one yourself.
If you’re working on an existing site, you follow the same steps for site setup, but instead of creating a new folder, you direct Dreamweaver to the folder that contains the existing site.
If you’re an experienced Web designer and just want to make quick changes to a site or use the FTP features to access files on a server without doing the site setup steps, Dreamweaver does enable you to use these features without completing site setup. To access FTP features and set them up quickly, choose Site➪Manage Sites and then choose New➪FTP & RDS Server from the Manage Sites dialog box. This shortcut enables you to work directly on your server using FTP & RDS Server; but Dreamweaver does not manage link checking, and none of the other site-management features work.
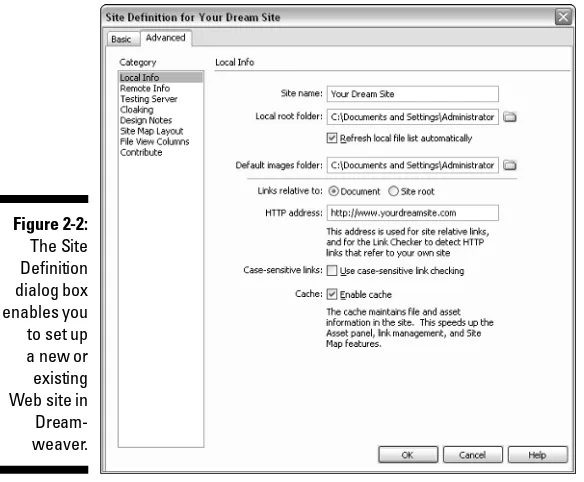
Defining a site
The following steps walk you through the process of using the Site Definition dialog box to define your site. Whether you create a new site or work on an existing Web site, this first step is important to your Web design work because you identify your site structure, which enables Dreamweaver to set links and effectively handle many of the site-management features explained in later chapters.
If you want to work on an existing site that is on a remote Web server, follow the steps in the sidebar, “Downloading an existing Web site,” later in this chapter.
To define a site using the Site Definition dialog box, follow these steps.
1. Choose Site➪Manage Sites.
The Manage Sites dialog box appears, as shown in Figure 2-1.
2. Click the New button and then select Site.
The Site Definition dialog box appears, as shown in Figure 2-2.
3. Click the Advanced tab.
The Advanced window appears. If you prefer, you can use the Basic wizard that steps you through the setup process, but I find it easier to understand what’s happening when I can view all the options at once on the Advanced tab.
4. Make sure that the Local Info category is selected in the Category box.
Figure 2-1:
The Manage Sites dialog box keeps a list of all the sites you
5. In the Site Name text box, type a name for your site.
You can call your site whatever you like; this name is only used for you to keep track of your sites. Many people work on more than one site in Dreamweaver so the program includes a way to name and keep track of them. After you name it here, the name appears as an option on the drop-down list in the Files panel. You use this list to select the site you want to work on when you open Dreamweaver. In the example shown in Figure 2-2, I named the new site I created “Your Dream Site.”
6. Click the Browse button (it resembles a file folder) next to the Local Root Folder text box to locate the folder on your hard drive that con-tains your Web site.
If you’re working on a new site, create a new folder and designate that as the location of your site in Dreamweaver. If you’re working an existing site, select the folder that contains the files for that site.
7. If Refresh Local File List Automatically isn’t already selected, click to place a check mark in the box next to this option if you want
Dreamweaver to automatically update the list of all the new pages you add to your site.
This feature helps Dreamweaver work more efficiently by speeding the process of tracking and identifying files in your site.
Figure 2-2:
The Site Definition dialog box enables you to set up a new or
8. Specify the Default Images folder by entering the location or using the Browse button to locate it.
You do not have to identify an images folder, but it’s another way Dreamweaver helps keep track of things for you. If you store images in more than one folder, you can leave this box blank. If you’re setting up a new site, you can create a new folder inside your site folder and identify that as your images folder, even if it is empty. (You find more information about images in Chapter 5.)
9. Type the URL of your Web site in the HTTP Address text box.
The HTTP Address is the URL, or Web address, that your site will have when published on a Web server. If you do not yet know the Web address for your site or you do not plan to publish it on a Web server, you can leave this box blank. Include the http://at the beginning, and a /at the end.
10. Check the Use Case-Sensitive Link Checking box.
Unless you know for sure that you don’t have to worry about the case of your filenames, have Dreamweaver help you enforce the case sensitivity of your site’s links. (See Chapter 3 for more on file naming.)
11. Check the Enable Cache option.
Dreamweaver creates a local cache of your site to quickly reference the location of files in your site. The local cache speeds up many of the site-management features of the program and takes only a few seconds to create.
12. Click OK to close the Site Definition dialog box.
If you haven’t checked the Enable Cache option, a message box appears asking whether you want to create a cache for the site. Figure 2-2 shows what the Site Definition dialog box looks like when all the areas in the Local Info section are filled in.
Setting up Web server access for FTP
You can find several options in the Remote Info section on the Access drop-down list. In the following section, you find instructions on how to set up FTP access, which is the second choice on the drop-down list. If you aren’t going to publish your site on a server, choose None from the drop-down list and go on to the next section. If you’re going to send your site to a server located on your local network, choose Local/Network; then use the Browse button to specify that server’s location on your network. The other options — WebDAV, RDS, and Microsoft Visual SourceSafe — are advanced options that you don’t need to worry about if you’re working on a site you’ll host on a commercial service provider. (You can find more about working with these advanced options in Chapters 13, 14, and 15.)
The most common way to publish a Web site after you develop it is to use FTP to send the site to a remote server, such as those offered by commercial Internet service providers. If that is how you’re going to publish your site, follow the upcoming steps, and you’ll be all set when you’re ready to publish your Web site.
If you don’t have your server information, or you’re anxious to start building your site on your own hard drive first, you can skip this part of the setup process and come back to it when you’re ready to publish your site.
Figure 2-3:
You need the following information to set up the FTP option in Dreamweaver. If you’re using a remote server, such as an Internet service provider, ask your provider for the following information:
FTP host name
Path for the Web directory
FTP login
FTP password
Choose FTP from the Access drop-down list in the Remote Info page of the Site Definition dialog box (refer to Figure 2-3), and follow these steps:
1. In the FTP Host text box, type the hostname of your Web server.
It should look something like ftp.host.comor shell.host.comor
ftp.domain.com, depending on your server. (In my example, I used
ftp.yourdreamsite.com.)
2. In the Host Directory text box, type the directory on the remote site in which documents visible to the public are stored (also known as the site root).
It should look something like public/html/or www/public/docs/. Again, this depends on your server.
3. In the Login and Password text boxes, type the login name and pass-word required to gain access to your Web server. If you check the Save box, Dreamweaver stores the information and automatically sup-plies it to the server when you connect to the remote site.
This is your unique login and password information that provides you access to your server.
Click the Test button to make sure that you’ve entered everything cor-rectly. If there are no problems, Dreamweaver responds with a box saying
Dreamweaver connected to your Web server successfully.
4. Put a check mark in the Use Passive FTP or Use Firewall options only if your service provider or site administrator instructs you to do so.
If you aren’t on a network but you do use a commercial service provider, you should not need to check either option.
5. Click OK to save your Web Server Info settings and close the Site Definition dialog box.
Creating New Pages
Every Web site begins with a single page. Visitors are first greeted by the front page — or home page — of your site, and that’s usually a good place to start building. Dreamweaver makes building a home page easy: When the pro-gram opens, you see a Start Screen with shortcuts to many handy features for creating new pages.
If you want to create a simple, blank Web page, choose HTML from the Create New list in the middle row (see Figure 2-4). If you are creating a dynamic site, you may choose ColdFusion, PHP, or one of the ASP options. (If you don’t even know what those options mean, you probably won’t need to use them, but you can find some information about these advanced options in Chapters 13, 14, and 15.)
Get in the habit of saving new Web pages into your main Web site folder as soon as you create them, even though they are still blank. As you create links or add images to your pages, Dreamweaver needs to be able to identify the location of your page, and it can’t do that until you save the page.
Figure 2-4:
The Start Screen provides
If the Start Screen is not visible because you have an existing page already open or you’ve opted not to show it, follow these steps to create a new page:
1. Choose File➪New.
2. Select Basic Page from the Category list.
3. Select HTML from the Basic Page list.
4. Choose File➪Save to save your page.
You find many other options in the Dreamweaver New Document window, including a wide range of predesigned templates. For now, don’t worry about all those. In this chapter, you start off by creating a simple blank page. You find instructions for working with templates in Chapter 4. Make sure you add a page title to each of your pages. You can add a page title by changing the text in the Title box on the Document toolbar. By default, Dreamweaver inserts the words Untitled Pageinto the Title box, but you can put any text you want in this box. The page title doesn’t appear in the body of your Web page, but it’s important because this text appears at the top of the browser window, usually just to the right of the name of the browser. This text also appears in a user’s list of Favorites or Bookmarks when that user bookmarks your site.
Naming Web Pages
When you save Web pages, images, and other files in your site, you need to be careful what you name them and you need to include an extension at the end to identify the file type (such as .htmlfor HTML files or .giffor GIF images). Dreamweaver automatically adds the extension to the end of HTML files, but you can change preferences to use either .htmlor .htm. In theory, these extensions are interchangeable, but some servers read only .htmlso that’s the safer bet.
Filenames in Web sites get incorporated into links and links are easier to manage when they don’t include spaces or special characters. For example you shouldn’t name a Web page with an apostrophe, such as cat’s page.html. If you want to separate words, use the underscore (_) or the hyphen (-). For example, cat-page.htmlis a fine filename. Numbers are fine and capital let-ters don’t really matter, as long as the filename and the link match, which Dreamweaver takes care of for you when you create links (just be careful if you ever create a link in the HTML code).
One of the most confusing and important filename rules in Web design is that the main page (or the front page)of your Web site must be called index.html. That’s because most servers are set up to serve the index.htmlpage first. (Although some servers also serve other filenames, such as home.html, or
Creating a headline
Most Web pages have some kind of headline at the top of the page. To make your headline bold, centered, and a large font size, follow these steps:
1. Highlight the text you want to format.
2. In the Properties inspector at the bottom of the page, select the B icon to make the selected text bold.
The heading becomes bold.
3. In the Properties inspector at the bottom of the page, select the center icon.
The text automatically centers.
4. In the Properties inspector, use the Size drop-down list and select 36.
The text changes to font size 36, and you have a headline at the top of your page that looks something like the headline shown in Figure 2-5. In general, I find the Properties inspector the easiest way to apply basic format-ting, but some people prefer using the drop-down lists from the Text menu bar. Both achieve the same results with the exception that Dreamweaver features fo