HP 3PAR Online Import for HDS Storage
1.3.0 Data Migration Guide
Abstract
This guide provides information on using HP 3PAR Online Import for HDS Storage software to migrate data from an HDS Storage system to an HP 3PAR StoreServ Storage system.
HP Part Number: QL226-98149 Published: May 2015
© Copyright 2014, 2015 Hewlett-Packard Development Company, L.P.
Confidential computer software. Valid license from HP required for possession, use or copying. Consistent with FAR 12.211 and 12.212, Commercial Computer Software, Computer Software Documentation, and Technical Data for Commercial Items are licensed to the U.S. Government under vendor's standard commercial license.
The information contained herein is subject to change without notice. The only warranties for HP products and services are set forth in the express warranty statements accompanying such products and services. Nothing herein should be construed as constituting an additional warranty. HP shall not be liable for technical or editorial errors or omissions contained herein.
Links to third-party websites take you outside the HP website. HP has no control over and is not responsible for information outside HP.com.
Acknowledgements
Microsoft®, Windows®, Windows® 7, and Windows Server® are trademarks of the Microsoft Group of companies. Oracle RAC is a registered trademark of Oracle and/or its affiliates.
Contents
1 Overview of HP 3PAR Online Import for HDS Storage...6
Types of Data Migration...6
Understanding Which Data is Migrated...6
HDS Storage to HP 3PAR StoreServ Storage Migration Process...7
2 Migration Process Checklists...8
Online Migration...8
Prerequisite Component Installation...8
Premigration...8
Migration...8
Post-Migration...9
Minimally Disruptive Migration...9
Prerequisite Component Installation...9
Premigration...10
Migration...11
Post-Migration...12
Offline Migration...12
Prerequisite Component Installation...12
Premigration...12
Migration...13
Post-Migration...13
3 Installation and Setup for Data Migration...14
Configuration Rules for HP 3PAR Online Import Support...14
Installing the HCS/SMI-S...14
HCS CLI SMI-S License...14
HCS Device Manager License...18
Installing the HP 3PAR Online Import Utility...20
Migrations Supported by HP 3PAR Online Import Utility...26
Migrations Supported for HDS USP_VM, HDS USP_V, HDS USP, and HDS NSC...27
4 Preparing for Data Migration...31
Data Migration Considerations...31
General Considerations...31
System Requirements...32
Planning for Migration...32
Network and Fabric Zoning Requirements...32
Reconfiguring the Host Multipath Solution...33
Working with Consistency Groups...34
5 Premigration Steps...36
Zoning the Source HDS Storage to the Destination HP 3PAR StoreServ Storage System...36
Identifying the Source and Destination Storage Systems...37
Prerequisites...37
Required Information...37
Adding the Source Storage System...38
Adding the Destination Storage System...38
Preparing the Host for Data Migration...39
Creating the Data Migration Task...41
Required Information...41
Issuing the createmigration Command...42
6 Performing Data Migration for Red Hat Linux, Oracle RAC, ESXi 5.5, and HP-UX
11 v3...44
Online Data Migration with Removal of Hitachi Dynamic Link Manager...44
Online Migration with Linux Native Device-Mapper...50
7 Performing Minimally Disruptive Migration Using a Windows Host...56
Creating the Data Migration Task...56
Updating Host Multipath Software and Unzoning from the Source HDS Storage System...56
Starting the Data Migration from Source HDS Storage System to Destination HP 3PAR StoreServ Storage System...59
Bringing the Windows Host Back Online...60
8 Performing Minimally Disruptive Migration Using a Linux Host...62
Creating the Data Migration Task...62
Updating Host Multipath Software and Unzoning from Source HDS Storage System...62
Starting the Data Migration from Source HDS Storage System to Destination HP 3PAR StoreServ Storage System...64
Bringing the Linux Host Back Online...65
9 Performing Minimally Disruptive Migration Using an AIX Host...67
Creating the Data Migration Task...67
Updating Host Multipath Software and Unzoning from Source HDS Storage System...67
Starting the Data Migration from the Source HDS Storage System to the Destination HP 3PAR StoreServ Storage System...69
Bringing the AIX Host Back Online...70
10 Performing Minimally Disruptive Migration Using an HP-UX Host...73
Creating the Data Migration Task...73
Updating Host Multipath Software and Unzoning from Source HDS Storage System...73
Starting the Data Migration from the Source HDS Storage System to the Destination HP 3PAR StoreServ Storage System...74
Bringing the HP-UX Host Back Online...75
11 Performing Offline Data Migration...77
Creating the Data Migration Task...77
Zoning the Host to the Destination HP 3PAR StoreServ Storage System...77
Shutting Down the Host...77
Starting the Data Migration from Source HDS Storage System to Destination HP 3PAR StoreServ Storage System...78
Performing Post-Migration Tasks Specifically for Offline Migration...79
12 Performing Common Migration and Post-migration Tasks...80
Viewing Migration Status...80
Viewing all Migrations...80
Viewing Migrations for a Selected Source Storage System...80
Viewing a Selected Migration...80
Viewing Selected Migration Progress by LDEV...80
Aborting a Migration...80
Performing Subsequent Migrations...80
13 Troubleshooting...81
HP 3PAR Online Import Utility Error Messages...81
Troubleshooting Resources...81
Understanding the HP 3PAR Online Import Utility Data Migration Process...81
HP 3PAR Online Import Utility Server Logs and Output...82
Increase the HP 3PAR Online Import Utility Server Logging Level...83
Troubleshooting Issues...83
Cannot Add a Source HDS Storage system...83 4 Contents
Cannot Create a Migration...84
Cannot Log into the HP 3PAR Online Import Utility...85
The HP 3PAR Online Import Utility Does Not Open in Windows 7...85
Trailing Spaces in IP Address Return Login Error...85
Powering on or Migrating a VMware ESX Virtual Machine Fails after a Successful Migration...85
VMware Datastore Errors Following a Successful Migration...86
The adddestination Command Returns Error OIUERRDST0004...86
The addsource Command for HDS Storage Fails...87
The createmigration Command Fails for Migrated LUNs in a Host Group with No Host...87
The createmigration Command Fails for LUN Name or Host Name Containing Special Characters...88
The createmigration Command Returns Error OIUERRAPP0000 or OIURSLAPP0000...88
The createmigration Command Returns Error OIUERRDB1006...88
The createmigration Returns Error OIUERRPREP1014...88
The createmigration Command Returns Error OIUERRCS1002...89
The createmigration Command with -srcvolmap Returns Error OIUERRAPP0000...89
The showmigration Command Returns Error OIUERRDST0008...89
The showtarget Command Does Not Return HDS Storage Details...90
The startmigration Command Fails with Host Name That Exceeds 31 Characters...90
The startmigration Command Returns Error OIUERRMS10006...90
14 Appendices...91
Appendix A: HP 3PAR Online Import Utility CLI Commands...91
adddestination...91
addsource...91
createmigration...93
help...95
installcertificate...96
removedestination...97
removemigration...97
removesource...98
showconnection...98
showdestination...99
showmigration...99
showmigrationdetails...101
showpersona...101
showsource...103
startmigration...104
Appendix B: Identifying and Deleting Source Array LUN Paths...105
Appendix C: Rolling Back to the Original Source Array...109
Appendix D: Clearing a Persistent SCSI Reservation with HP 3PAR OS 3.2.1 MU3 or Later...112
Appendix E: Use Case: Data Migration for an Oracle RAC Cluster...112
15 Support and Other Resources...117
Contacting HP...117
HP 3PAR documentation...117
Typographic conventions...120
HP 3PAR branding information...120
16 Documentation feedback...121
Glossary...122
Index...123
1 Overview of HP 3PAR Online Import for HDS Storage
HP 3PAR Online Import for HDS Storage manages the migration of data from a source HDS Storage system to a destination HP 3PAR StoreServ Storage system. Using HP 3PAR Online Import for HDS Storage, you can migrate HDS LDEVs s and host configuration information to a destination HP 3PAR StoreServ Storage system without changing host configurations. The termsstorage system
andarrayare used interchangeably throughout this guide, and may refer to either the HDS Storage or HP 3PAR StoreServ Storage systems. Thesourcein the migration is the HDS Universal Storage Platform VM (HDS USP_VM), the HDS Universal Storage Platform V (HDS USP_V), the HDS TagmaStore Universal Storage Platform (HDS USP) or the HDS TagmaStore Network Storage Controller (HDS NSC), and thedestinationis the HP 3PAR StoreServ Storage system.
HP 3PAR Online Import for HDS Storage coordinates the movement of data from the source to the destination while servicing I/O requests from the hosts. During the data migration, host I/O is serviced from the host HDS Storage system through the HP 3PAR StoreServ Storage system. The host/LDEV presentation implemented on the HDS Storage is maintained on the destination HP 3PAR StoreServ Storage system.
For additional information about supported HDS Storage systems, see the HP 3PAR Online Import support matrix on HP SPOCK:
HP SPOCK(http://www.hp.com/storage/spock)
Types of Data Migration
HP 3PAR Online Import for HDS Storage supports three types of data migration procedures. The appropriate type of data migration depends on the objects being migrated and the migration type. • Online—Migration type used when migrating a host or a LDEV presented to a host. During
online migration, all presentation relationships between hosts and LDEVs being migrated are maintained. Host I/O to the data is not disrupted during an online migration.
• Minimally disruptive migration (MDM)—Migration type used when migrating a host or an LDEV presented to a host. Host I/O is interrupted only during the time it takes to reconfigure the host.
• Offline—Migration type used when migrating one or more unpresented LDEVs. During offline migration, only the selected LDEVs are migrated. No hosts are migrated in this situation.
Understanding Which Data is Migrated
Data can be migrated by selecting a host or an LDEV on the source HDS Storage system. In addition to the host or LDEV explicitly selected for migration, other objects can be included in the migration using implicit selection. The migration process identifies the relationship between hosts and presented LDEVs and selects all additional objects to completely migrate the hosts. Consequently, the objects that will be migrated are the combination of the explicit and the implicit selection and may lead to the migration of a large amount of LDEVs.
Selecting a single host results in migration of the following: • The host as well as any LDEVs presented to it
• Any other hosts to which those LDEVs are presented • Any LDEVs presented to those other hosts
The maximum number of LDEVs that can be migrated with MDM is 255. For an offline migration, the maximum number of volumes that can be migrated is 25. If you have more offline volumes to migrate, rerun the migration steps for the additional volumes.
IMPORTANT: The implicit selection of objects for migration occurs automatically and cannot be modified. If the number of objects selected for migration exceeds 255 for MDM and 25 for offline migration, the migration will be not be submitted and will return a failed status.
The migration process selects objects to migrate using the following rules:
• Hosts—When selecting a single host or group of hosts with LDEV presentations, all the LDEVs presented to the host(s) are migrated. In addition, any presentations the source LDEVs have to other hosts will include those hosts and all of their presented LDEVs in the migration. • Presented LDEVs—When selecting an LDEV or group of an LDEVs with host presentations, the
selected LDEVs and the hosts to which they are presented are migrated. In addition, any presentations the source hosts have with other LDEVs will be included in the migration. • Unpresented LDEVs—Only the selected unpresented LDEVs are migrated. The offline migration
type is the only type available for unpresented LDEV migration.
NOTE: For more information about supported and unsupported configurations and about the implicit selection of objects for migration, see“Migrations Supported by HP 3PAR Online Import Utility” (page 26).
HDS Storage to HP 3PAR StoreServ Storage Migration Process
The process for migrating HDS Storage LDEVs to an HP 3PAR StoreServ Storage system consists of three parts:
• Premigration—Work done to define the source and destination storage system for a migration definition. This work is not repeated when migrating a second host or additional volumes between the same source and the destination system after the first migration.
• Migration—Creating and executing the migration. The migration work can include the process of unzoning the host from the source storage system, zoning the host to the destination storage system, and removing the migration definition after the migration is complete. This work is repeated for every migration.
• Post-migration—Work done to clean up the configuration after migration is completed. During migration, LDEVs are renamed for use by the HP 3PAR StoreServ Storage. In an LDEV on the HDS Storage system, the colon becomes an underscore; for example, an LDEV name like04:6A
becomes04_6A.
All emulation types for Open-x systems are supported.
Mainframe volumes on the HDS Storage system cannot be migrated.
2 Migration Process Checklists
Follow the steps in this chapter to perform online migration, MDM, or offline migration.
Online Migration
Prerequisite Component Installation
Table 1 Prerequisite component installation—Online
See Step
Number
HP SPOCK(http://www.hp.com/storage/spock) Check the HP SPOCK website to confirm proper
configuration. 1
See also“Configuration Rules for HP 3PAR Online Import Support” (page 14)
“Installing the HCS/SMI-S” (page 14) Install the HCS.
2
“Installing the HP 3PAR Online Import Utility” (page 20)
Install the HP 3PAR Online Import Utility. 3
Premigration
Table 2 Premigration checklist—online
See: Step
Number
“Zoning the Source HDS Storage to the Destination HP 3PAR StoreServ Storage System” (page 36) Zone the HDS Storage system and the HP 3PAR
StoreServ Storage system as peers. 1
“Adding the Source Storage System” (page 38) Using the HP 3PAR Online Import Utility, add a
source storage system with theaddsource command.
2
“Adding the Destination Storage System” (page 38)
Using the HP 3PAR Online Import Utility, add a destination storage system with the
adddestinationcommand). 3
Validate connections by using the HP 3PAR Online Import Utilityshowconnection command.
Migration
If the HDLM is installed, it must be uninstalled, and the native OS multipath software must be used to configure multipathing; see the third column in theTable 3 (page 8)for details about each step. If the HDLM is not installed, see the column on the right for details.
Table 3 Migration checklist—Online
If the HDLM is not installed, see: If the HDLM is installed, see:
Step Number
“Online Migration with Linux Native Device-Mapper” (page 50), step 1
“Online Data Migration with Removal of Hitachi Dynamic Link Manager” (page 44),step 1 Zone the host to the HP 3PAR
StoreServ Storage system. 1
“Online Migration with Linux Native Device-Mapper” (page 50), step 2
Configure device-mapper on the host.
2 1. Uninstall the HDLM. See:
“Online Data Migration with Removal of Hitachi Dynamic Link Manager” (page 44), step 2
Table 3 Migration checklist—Online(continued)
If the HDLM is not installed, see: If the HDLM is installed, see:
Step Number
NOTE: A maintenance window is required.
2. Configure device-mapper on the host. See:
“Online Data Migration with Removal of Hitachi Dynamic Link Manager” (page 44), step 3
3. Remount application file systems. See:
“Online Data Migration with Removal of Hitachi Dynamic Link Manager” (page 44), step 4
“Online Migration with Linux Native Device-Mapper” (page 50), steps 3–5
“Online Data Migration with Removal of Hitachi Dynamic Link Manager” (page 44),steps 5–7 Using the HP 3PAR Online Import
Utility, create a migration with the createmigrationcommand. 3
“Online Migration with Linux Native Device-Mapper” (page 50), steps 6–8
“Online Data Migration with Removal of Hitachi Dynamic Link Manager” (page 44),steps 8–10 Update path configurations.
4
“Online Migration with Linux Native Device-Mapper” (page 50), step 9
“Online Data Migration with Removal of Hitachi Dynamic Link Manager” (page 44),step 11 Using the HP 3PAR Online Import
Utility, start the migration with the startmigration) command. 5
“Viewing Migration Status” (page 80)
“Viewing Migration Status” (page 80)
Monitor migration with the HP 3PAR Online Import Utility until completion.
6
Post-Migration
Table 4 Post-migration checklist—online Step
Number
Optional: Remove the migration definition when the migration has completed. 1
“removedestination” (page 97)
Optional: When all migrations are complete, remove the source HDS Storage system. 2
Optional: When all migrations are complete, remove the source HDS Storage system and the destination HP 3PAR StoreServ Storage from the HP 3PAR Online Import Utility, using the removesourceandremovedestinationcommands.
Reconfigure peer ports to host ports. 3
Minimally Disruptive Migration
Prerequisite Component Installation
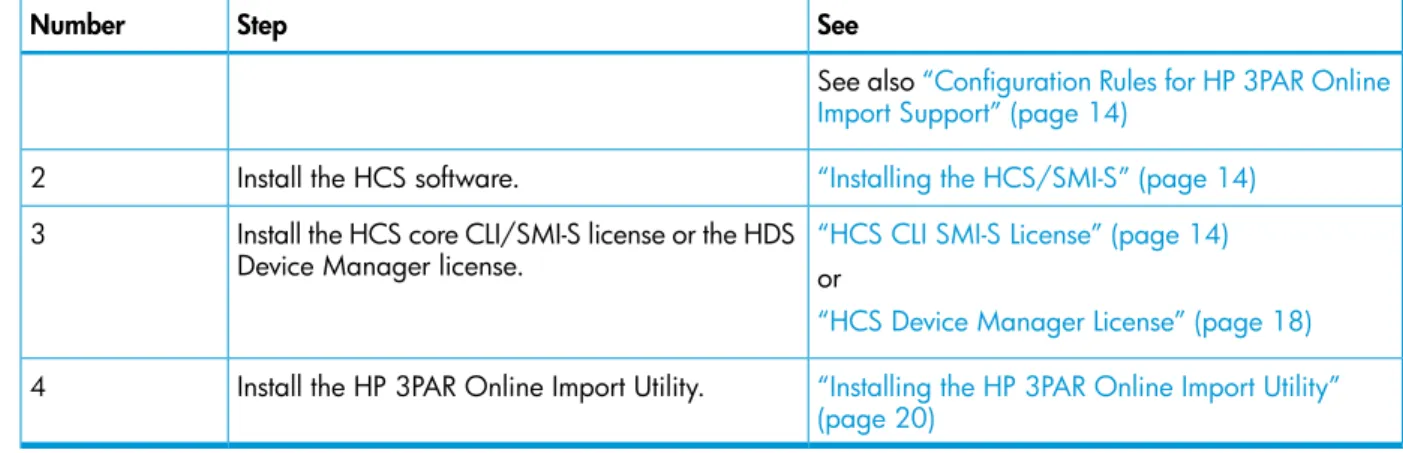
Table 5 Prerequisite component installation—MDM
See Step
Number
HP SPOCK(http://www.hp.com/storage/spock) Check the HP SPOCK website to confirm proper
configuration. 1
Table 5 Prerequisite component installation—MDM(continued)
See Step
Number
See also“Configuration Rules for HP 3PAR Online Import Support” (page 14)
“Installing the HCS/SMI-S” (page 14) Install the HCS software.
2
“HCS CLI SMI-S License” (page 14) Install the HCS core CLI/SMI-S license or the HDS
Device Manager license. 3
or
“HCS Device Manager License” (page 18) “Installing the HP 3PAR Online Import Utility” (page 20)
Install the HP 3PAR Online Import Utility. 4
Premigration
Table 6 Premigration checklist—MDM
See Step
Number
“Zoning the Source HDS Storage to the Destination HP 3PAR StoreServ Storage System” (page 36) Zone the HDS Storage system and the HP 3PAR
StoreServ Storage system as peers. 1
“Adding the Source Storage System” (page 38) Using the HP 3PAR Online Import Utility, add the
source storage system with theaddsource command.
2
“Adding the Destination Storage System” (page 38)
Using the HP 3PAR Online Import Utility, add the destination storage system with the
adddestinationcommand. 3
Validate connections by using the HP 3PAR Online Import Utilityshowconnection command.
“Preparing the Host for Data Migration” (page 39)
Stop all server applications. Offline/unmount LUNs. Stop cluster service, if applicable. 4
“Creating the Data Migration Task” (page 41) Create migration (HP 3PAR Online Import Utility:
createmigrationcommand) 5
Migration
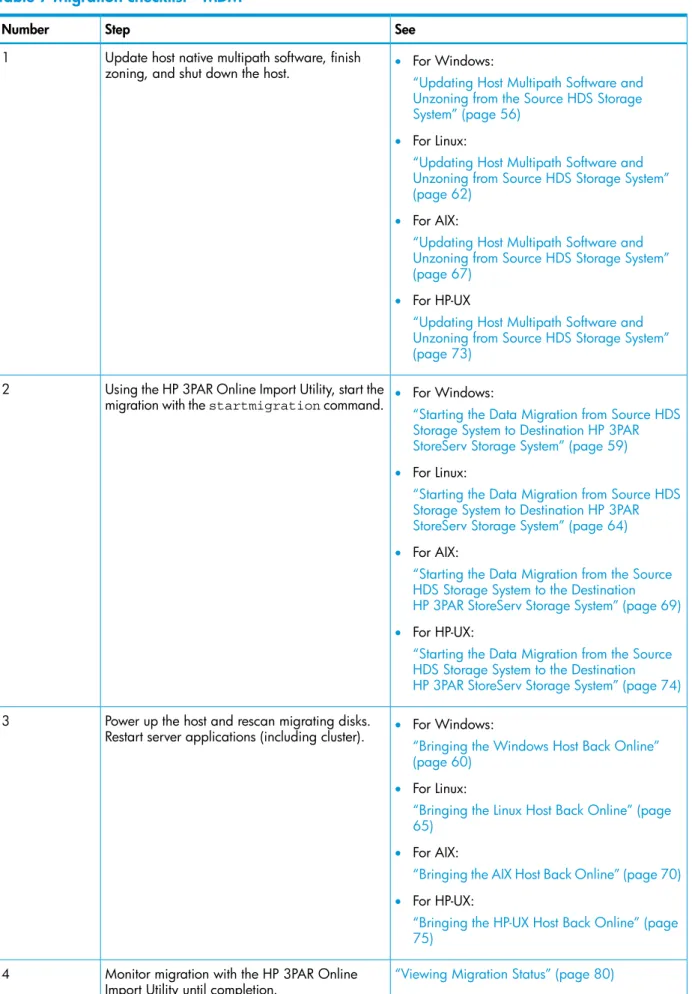
Table 7 Migration checklist—MDM
See Step
Number
Update host native multipath software, finish zoning, and shut down the host.
1 • For Windows:
“Updating Host Multipath Software and Unzoning from the Source HDS Storage System” (page 56)
• For Linux:
“Updating Host Multipath Software and Unzoning from Source HDS Storage System” (page 62)
• For AIX:
“Updating Host Multipath Software and Unzoning from Source HDS Storage System” (page 67)
• For HP-UX
“Updating Host Multipath Software and Unzoning from Source HDS Storage System” (page 73)
Using the HP 3PAR Online Import Utility, start the migration with thestartmigrationcommand.
2 • For Windows:
“Starting the Data Migration from Source HDS Storage System to Destination HP 3PAR StoreServ Storage System” (page 59) • For Linux:
“Starting the Data Migration from Source HDS Storage System to Destination HP 3PAR StoreServ Storage System” (page 64) • For AIX:
“Starting the Data Migration from the Source HDS Storage System to the Destination HP 3PAR StoreServ Storage System” (page 69) • For HP-UX:
“Starting the Data Migration from the Source HDS Storage System to the Destination HP 3PAR StoreServ Storage System” (page 74) Power up the host and rescan migrating disks.
Restart server applications (including cluster).
3 • For Windows:
“Bringing the Windows Host Back Online” (page 60)
• For Linux:
“Bringing the Linux Host Back Online” (page 65)
• For AIX:
“Bringing the AIX Host Back Online” (page 70) • For HP-UX:
“Bringing the HP-UX Host Back Online” (page 75)
“Viewing Migration Status” (page 80) Monitor migration with the HP 3PAR Online
Import Utility until completion. 4
Post-Migration
Table 8 Post-migration checklist—MDM Step
Number
Optional: Remove the migration definition when the migration has completed. 1
See“removemigration” (page 97).
Remove zoning between the HDS Storage system and HP 3PAR StoreServ Storage system after all migrations from the HDS Storage system are complete.
2
Optional: When all migrations are complete, remove the source HDS Storage system and the destination HP 3PAR StoreServ Storage from the HP 3PAR Online Import Utility, using the removesourceandremovedestinationcommands.
3
Reconfigure peer ports to host ports. 4
Offline Migration
Prerequisite Component Installation
Table 9 Prerequisite component installation—offline
See Step
Number
HP SPOCK(http://www.hp.com/storage/spock) Check the HP SPOCK website to confirm proper
configuration. 1
See also“Configuration Rules for HP 3PAR Online Import Support” (page 14)
“Installing the HCS/SMI-S” (page 14) Install the HCS.
2
“HCS CLI SMI-S License” (page 14) Install the HCS core CLI/SMI-S license or the HDS
Device Manager license. 3
or
“HCS Device Manager License” (page 18) “Installing the HP 3PAR Online Import Utility” (page 20)
Install the HP 3PAR Online Import Utility. 4
Premigration
Table 10 Premigration checklist—offline
See Step
Number
“Zoning the Source HDS Storage to the Destination HP 3PAR StoreServ Storage System” (page 36) Zone the HDS Storage system and the HP 3PAR
StoreServ Storage system as peers. 1
“Preparing the Host for Data Migration” (page 39)
Stop all server applications; offline/unmount LUNs.
2
“Identifying the Source and Destination Storage Systems” (page 37)
Using the HP 3PAR Online Import Utility, add the source storage system with theaddsource command).
3
“Identifying the Source and Destination Storage Systems” (page 37)
Add destination storage system (HP 3PAR Online Import Utility:adddestinationcommand). 4
Validate connections by using the HP 3PAR Online Import Utilityshowconnection command.
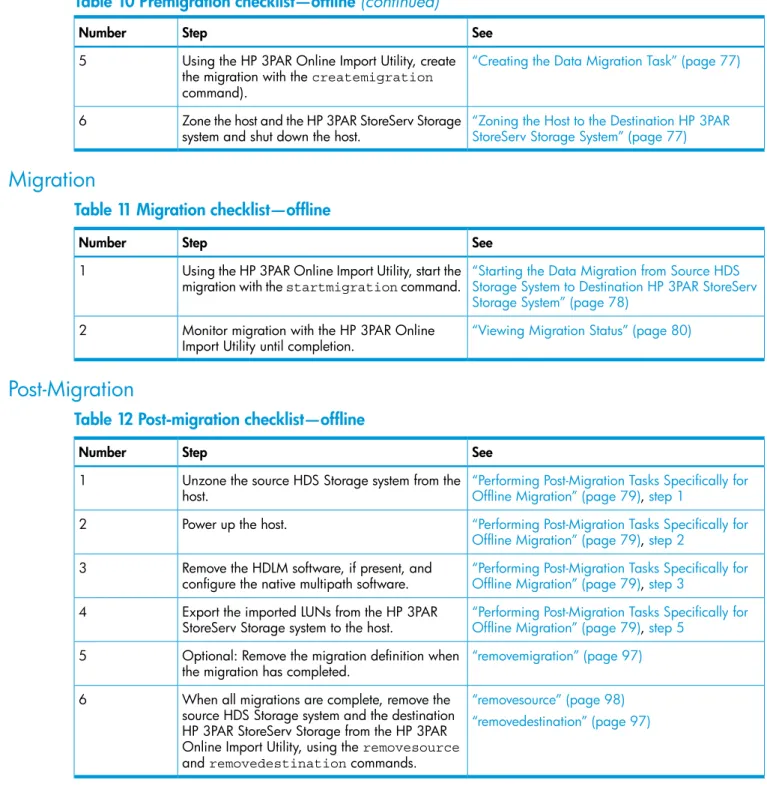
Table 10 Premigration checklist—offline (continued)
See Step
Number
“Creating the Data Migration Task” (page 77) Using the HP 3PAR Online Import Utility, create
the migration with thecreatemigration command).
5
“Zoning the Host to the Destination HP 3PAR StoreServ Storage System” (page 77) Zone the host and the HP 3PAR StoreServ Storage
system and shut down the host. 6
Migration
Table 11 Migration checklist—offline
See Step
Number
“Starting the Data Migration from Source HDS Storage System to Destination HP 3PAR StoreServ Storage System” (page 78)
Using the HP 3PAR Online Import Utility, start the migration with thestartmigrationcommand. 1
“Viewing Migration Status” (page 80) Monitor migration with the HP 3PAR Online
Import Utility until completion. 2
Post-Migration
Table 12 Post-migration checklist—offline
See Step
Number
“Performing Post-Migration Tasks Specifically for Offline Migration” (page 79),step 1
Unzone the source HDS Storage system from the host.
1
“Performing Post-Migration Tasks Specifically for Offline Migration” (page 79),step 2
Power up the host. 2
“Performing Post-Migration Tasks Specifically for Offline Migration” (page 79),step 3
Remove the HDLM software, if present, and configure the native multipath software. 3
“Performing Post-Migration Tasks Specifically for Offline Migration” (page 79),step 5
Export the imported LUNs from the HP 3PAR StoreServ Storage system to the host. 4
“removemigration” (page 97) Optional: Remove the migration definition when
the migration has completed. 5
“removesource” (page 98) When all migrations are complete, remove the
source HDS Storage system and the destination 6
“removedestination” (page 97) HP 3PAR StoreServ Storage from the HP 3PAR
Online Import Utility, using theremovesource andremovedestinationcommands.
3 Installation and Setup for Data Migration
This chapter describes requirements for data migration using the HP Online Import Utility.
Configuration Rules for HP 3PAR Online Import Support
For detailed information about ensuring that the source HDS Storage system and the destination HP 3PAR StoreServ Storage system are configured properly for data migration, see the HP SPOCK website:
HP SPOCK(http://www.hp.com/storage/spock)
The HP SPOCK website lists the supported system environment, including:
• The supported source HDS Storage systems and their associated firmware levels.
• The supported destination HP 3PAR StoreServ Storage systems and their associated HP 3PAR OS levels.
• The supported host operating systems.
• The supported HBAs and the associated BIOS/firmware/driver versions to allow HP 3PAR StoreServ Storage and HDS Storage coexistence.
• The supported configuration environments for installing HP 3PAR Online Import.
Installing the HCS/SMI-S
To access the SMI-S portion of the HCS, full implementation of the HCS is not required. The SMI-S functionality can be obtained from either of the following licenses:
1. HCS CLI SMI-S license
2. HCS Device Manager license
NOTE: If you do not have either of these licenses, contact your HDS representative.
HCS CLI SMI-S License
The HCS CLI SMI-S license entitles you to use the SMI-S provider and the core CLI of HCS software. To install the HCS CLI SMI-S License, first obtain a license key using the registration number from the HCS CLI SMI-S License entitlement certificate. Follow these steps:
1. Install the HCS Device Manager by selecting default settings. When you install the HCS, the SMI-S component is installed and enabled by by-default.
NOTE: See HP SPOCK for supported versions of the HCS:
HP SPOCK(http://www.hp.com/storage/spock)
2. After successful installation, the HCS program appears under WindowsStartprograms as
Hitachi Command Suite.
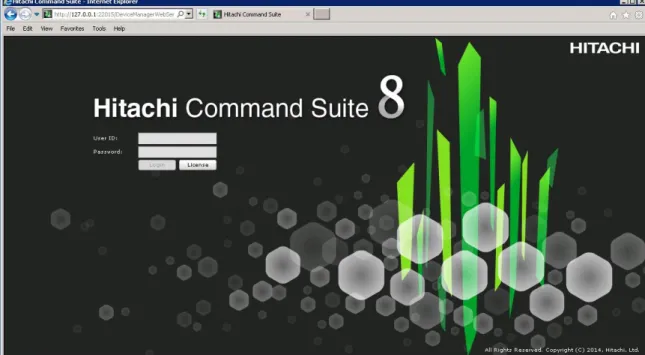
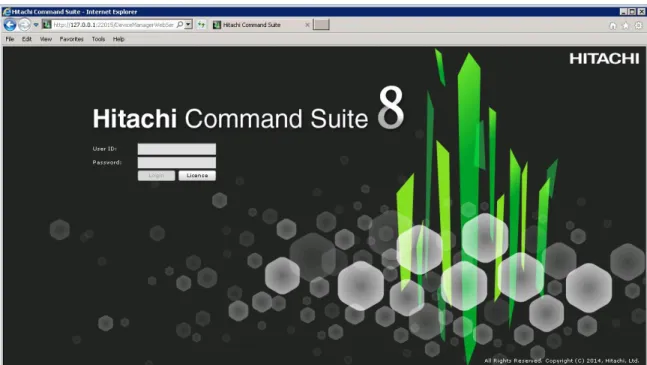
3. From the Hitachi Command Suiteprogram, selectLogin - HCS. TheHitachi Command Suite
login screen appears (Figure 1 (page 15))
Figure 1 Hitachi Command Suite login screen
4. Click theLicensebutton and browse to the license file.
5. Apply the HCS CLI SMI-S license, and then clickSave.
6. Validate the license key by inspecting theDevice Manager License Informationscreen (Figure 2 (page 15))
Figure 2 HCS core license
7. Log into the HCS, using the following credentials: User system
Password: manager
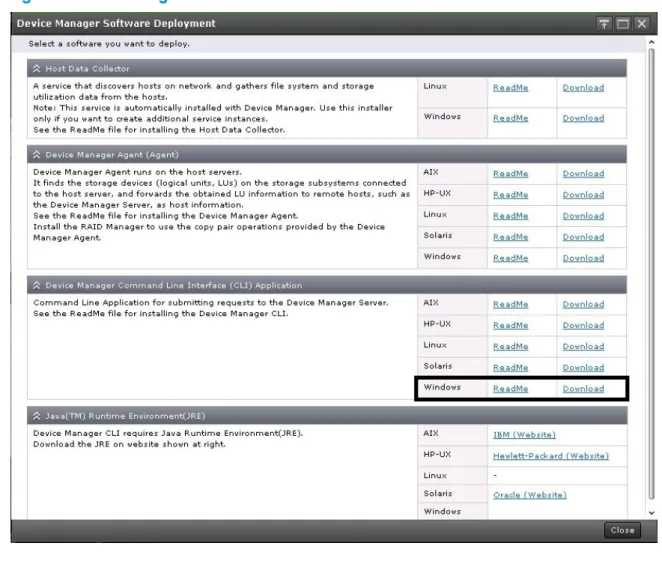
8. Download the HCS by selectingHitachi Command Suite→Tools→Download
In theDevice Manager Software Deploymentdialog box, selectDevice Manager Command Line Interface (CLI) Applicationand download the Windows edition (see Figure 3 (page 16)).
Figure 3 Downloading the Windows edition of the HCS CLI
9. Move the HCS CLI download to a directory of your choice, and double-click the file to install the application.
10. To configure the HCS CLI, editHiCommandCLI.propertiesin the directory where the
HCS CLI was installed, using the following settings:
hdvmcli.serverurl = http://127.0.0.1:2001/service user = system
password = manager
NOTE: For this configuration, it is assumed that the HCS CLI application is installed in the same system as the HCS and uses the default login credentials. If any of these have been modified, updateHiCommandCLI.propertiesaccordingly.
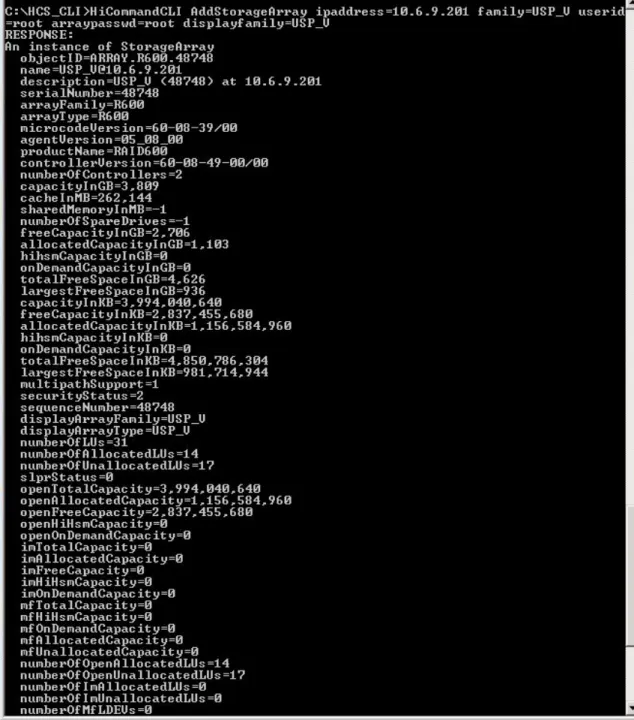
11. Add the HDS USP_VM, HDS USP_V, HDS USP, or HDS NSC to the HCS, using the HCS CLI. Follow these steps:
a. Open a Windows command prompt and change the path to the location where the HCS CLI was installed.
b. Issue theAddStorageArraycommand to register the HDS USP_VM, HDS USP_V, HDS
USP, or HDS NSC with the HCS (seeExample 1 “AddStorageArraycommand”).
Example 1AddStorageArraycommand
HiCommandCLI AddStorageArray ipaddress=x.x.x.x family=USP_V userid=******** arraypasswd=****** displayfamily=USP_V
where:
• ipaddress: The IP address or host name of the HDS Storage system.
• userid: The user ID used to access the storage system (a user ID for the HDS Storage Navigator for the HDS Storage array)
• arraypasswd: The user password used to access the storage system (a password for the HDS Storage Navigator for the HDS Storage array)
Figure 4AddStorageArraycommand and output
NOTE:
• When the HDS Storage system is being added, the service processor must be in
View Mode.
• Adding the storage system might take up to 3 minutes.
HCS Device Manager License
To install the HCS Device Manager License, first obtain a license key using the registration number from the HCS Device Manager License Entitlement Certificate. Follow these steps:
1. On the HCS login screen, click theLicensebutton and browse to the license file (see
Figure 5 (page 18)).
Figure 5 Hitchi Command Suite login screen
2. Apply the HCS Device Manager license, and then clickSave. .
3. Validate the license key by inspecting theDevice Manager License Informationscreen (Figure 6 (page 19)).
Figure 6 HCS Device Manager license
4. Log into the HCS, using the following credentials: User system
Password: manager
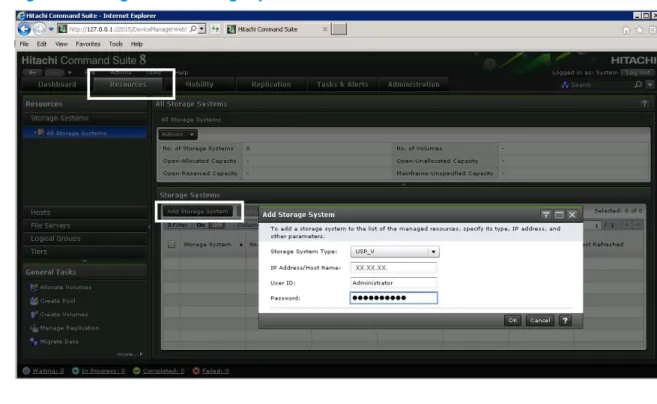
5. Using the HCS, add the HDS Storage system. Follow these steps:
a. ClickHitachi Command Suite, click theResourcestab, and then, underStorage Systems, selectAdd Storage System(see Figure 7 (page 19)).
Figure 7 Adding an HDS Storage system
b. Use the following settings:
• Storage System Type: USP or USP_V
• IP Address/Host Name: The IP address or host name of the target storage system.
• User ID: The user ID used to access the storage system (a user ID for the HDS Storage Navigator for the HDS Storage array)
• Password: The user password used to access the storage system (a password for the HDS Storage Navigator for the HDS Storage array)
NOTE:
• When the HDS Storage system is being added, the service processor must be in
View Mode.
• Adding the storage system might take up to 3 minutes.
Installing the HP 3PAR Online Import Utility
These steps describe the process for installing the HP 3PAR Online Import Utility. The default directories and options are shown below:
• Default installation directory:
C:\Program Files (x86)\Hewlett-Packard\hp3paroiu
• Default log file name :
C:\Program Files (x86)\Hewlett-Packard\hp3paroiu\OIUTools\ tomcat\32-bit\apache-tomcat-7.0.37\logs\hpoiu.log
• Default port numbers: Service port: 2370
◦
◦
Shutdown port: 23711. Double-click the installer package image icon to begin the installation process.
The HP 3PAR Online Import Utility splash screen appears with the InstallShield Wizard.
2. When the Welcome screen appears, click Next.
3. Accept the end user license agreement and clickNext.
TheCustom Setupdialog box appears.
4. To choose the default setup (installation of the HP 3PAR Online Import Utility server and client on this machine), clickNext.
Otherwise, select the component that you want to omit from this installation. Use this option if you want to install the HP 3PAR Online Import Utility server and client on separate machines, 22 Installation and Setup for Data Migration
and then clickNext to continue.
5. ClickYesif you have a CA signed certificate, or clickNoto generate a certificate from the installer.
NOTE: After the certificate installation dialog box is passed, the installer checks whether the default ports are already in use on this machine. If they are, another dialog box will be displayed, prompting you to specify available ports to use for this installation. This is not a common occurrence.
If there was a conflict with the default port numbers and different port numbers were supplied to the installation process, the following steps must be taken after installation is complete to properly use the new ports:
a. EditOIUCli.bat, located at:
<Install location>\Hewlett-Packard\hp3paroiu\CLI
b. If port 2396 was chosen as the alternative to 2370, make the change in the OIUCli.bat file, as shown in the following example:
Example 2 Editing the service port in theOIUCli.batfile
java -jar ..\CLI\oiucli-1.0.0-jar-with-dependencies.jar %* -port
2396
6. ClickInstall.
7. Monitor the progress of the installation. When complete, clickNext.
8. Tomcat services will begin installation. When complete, clickNext.
IMPORTANT: The installer does not support doing a close, cancel, or kill action during the Tomcat Installation. If the installation of Tomcat is interrupted, the software installation is not fully cancelled and is left in an indeterminate state. Do not click theCancelbutton or close the window by clicking the X in the upper-right corner.
9. Select theShow the Windows Installer logcheck box, and then clickFinish.
10. After you click theFinish button, the log appears in a separate window. Save the log in a location of your choice.
11. The HP 3PAR Online Import Utility shortcut is installed on your desktop.
12. After successful installation, verify that the following groups have been created:HP Storage Migration Adminsgroup has been created.
• HP Storage Migration Admins
• HP Storage Migration Users
13. Add theAdministratoraccount or another account with administrator privileges as a member ofHP Storage Migration Adminsgroup. This is the USERNAME that will be used in starting the HP 3PAR Online Import Utility.
14. To start the utility, double-click theHP 3PAR Online Import Utilitydesktop icon, and provide local credentials as stated in the note below.
NOTE: If the client and server components have been installed on the same machine, you can use the keyword LOCALHOST to connect to the local server. Otherwise, use the IP address or the DNS hostname of the machine where the server is located.
Migrations Supported by HP 3PAR Online Import Utility
For migration types supported by the HP 3PAR Online Import Utility for the HDS USP_VM, the HDS USP_V, the HDS Tagmastore USP, and the HDS Tagmastore NSC, see Table 14 (page 27). SeeTable 13 (page 26)for a legend for the migration-type tables.
Table 13 Legend for the migration support tables LUN
Host
Table 13 Legend for the migration support tables(continued)
Host group
Item selected by user input on the HP 3PAR Online Import Utility
Migrations Supported for HDS USP_VM, HDS USP_V, HDS USP, and HDS NSC
Migrations supported by the HP 3PAR Online Import Utility for HDS USP_VM, HDS USP_V, HDS USP, and HDS NSC are shown inTable 14 (page 27).Table 14 Migration supported by the HP 3PAR Online Import Utility Description
Supported Configuration
Single LUN, single host
The host is selected in the HP 3PAR Online Import Utility.
Single LUN, single host
The LUN is selected in the HP 3PAR Online Import Utility.
Multiple LUNs, single host
The host is selected in the HP 3PAR Online Import Utility.
Multiple LUNs, single host
All LUNs are selected in the HP 3PAR Online Import Utility.
Table 14 Migration supported by the HP 3PAR Online Import Utility(continued)
Description Supported Configuration
Multiple LUNs, single host
Not all LUNs are selected in the HP 3PAR Online Import Utility. All LUNs will be migrated.
Single LUN, multiple hosts
The host is selected in the HP 3PAR Online Import Utility.
Single LUN, multiple hosts
The LUN is selected in the HP 3PAR Online Import Utility.
Multiple LUNs, multiple hosts
The host is selected in the HP 3PAR Online Import Utility.
Multiple LUNs, multiple hosts
All LUNs are selected in the HP 3PAR Online Import Utility.
Multiple LUNs, multiple hosts
Not all LUNs are selected in the HP 3PAR Online Import Utility.
Single LUN, multiple hosts
The host is selected in the HP 3PAR Online Import Utility.
Table 14 Migration supported by the HP 3PAR Online Import Utility(continued)
Description Supported Configuration
Single LUN, multiple hosts
The LUN is selected in the HP 3PAR Online Import Utility.
Multiple LUNs, multiple hosts
One of the hosts is selected in the HP 3PAR Online Import Utility.
Multiple LUNs, multiple hosts
All LUNs are selected in the HP 3PAR Online Import Utility.
Multiple LUNs, multiple hosts
Not all LUNs are selected in the HP 3PAR Online Import Utility.
Single LUN, multiple hosts
One of the hosts is selected in the HP 3PAR Online Import Utility.
Single LUN, multiple hosts
The LUN is selected in the HP 3PAR Online Import Utility.
Table 14 Migration supported by the HP 3PAR Online Import Utility(continued)
Description Supported Configuration
Multiple LUNs, multiple hosts
One of the hosts is selected in the HP 3PAR Online Import Utility.
Multiple LUNs, multiple hosts
All LUNs are selected in the HP 3PAR Online Import Utility.
Multiple LUNs, multiple hosts
Not all LUNs are selected in the HP 3PAR Online Import Utility.
4 Preparing for Data Migration
Use the information in this chapter to ensure all necessary tasks are performed and considerations are understood before beginning a migration.
Data Migration Considerations
Before migrating data using 3PAR Online Import for HDS Storage, be aware of the following general considerations, system requirements, and other tasks associated with planning, host configuration, and network and zoning requirements.
General Considerations
• LUNs and hosts can be implicitly added to the migration, even if they are not specified by the input.
• Only LDEVs presented to Fibre Channel hosts can be migrated. LDEVs presented to iSCSI hosts cannot be migrated.
• Only LUNs presented to Open-x systems are supported.
• All LUNs present in a host group are migrated, even if only one was selected. When a host is selected for migration, all LUNs presented to that host are migrated to the same CPG. • When a cluster is being migrated, all the hosts in the cluster must be migrated at once. • LDEVs identified for migration should not be part of any current replication or backup jobs. • The LDEV limit for offline migrations is 25. The maximum number of LDEVs that can be migrated
with MDM or online migration is 255.
• Acreatemigrationcommand cannot simultaneously contain a host and a LUN for migration.
• Only onecreatemigration is allowed at a time because 3PAR Peer Ports can be in only one HDS Storage host group at a time.
• When an LDEV on the source HDS Storage system is migrated, a SCSI-3 reservation is issued to prevent any unwanted management changes to the LDEV during the migration. The SCSI-3 reservation is removed after the migration.
• Only one HDS Storage system at a time can be attached as a source to the destination HP 3PAR StoreServ Storage system.
• HDS LDEVs cannot be migrated if they are less than 256 MB, the minimum volume size on the HP 3PAR StoreServ Storage systems. The HP 3PAR StoreServ Storage is 256 MB
boundary-based. An LDEV, even one that is not a multiple of 256 MB, can still be migrated, provided that the LDEV is not smaller than 256 MB.
• HDS LDEVs cannot be migrated if they are larger than 16 TB, the maximum volume size on the HP 3PAR StoreServ Storage system.
For more information, see the appropriate HP 3PAR implementation guide. Implementation guides are available at the following website:
HP Storage Information Library(http://www.hp.com/go/storage/docs)
System Requirements
NOTE: For detailed information about ensuring the source HDS Storage system and the destination HP 3PAR StoreServ Storage system are configured properly for data migration, see the HP SPOCK website:
HP SPOCK(http://www.hp.com/storage/spock)
Before migrating data from an HDS Storage system to an HP 3PAR StoreServ Storage system using HP 3PAR Online Import for HDS Storage, the system environment must meet the following
requirements:
• Source HDS Storage system must be running a supported firmware level. See the HP SPOCK website for supported firmware versions:
HP SPOCK(http://www.hp.com/storage/spock)
• The destination HP 3PAR StoreServ Storage system must have a valid HP 3PAR Online Import or HP 3PAR Peer Motion license installed.
• The destination HP 3PAR StoreServ Storage system must be at a supported HP 3PAR OS level. See HP SPOCK:
HP SPOCK(http://www.hp.com/storage/spock)
Planning for Migration
Advanced planning ensures that you achieve the desired results when migrating data. • It is a recommended best practice to make a backup of your host/data before starting a
migration.
• A maintenance window is required for the removal of the HDLM, if present.
• Identify which LDEVs and/or hosts will be migrated. If you do not want to migrate all the LDEVs presented to a host, you must unpresent the LDEVs that you do not want migrated. Otherwise, all the LDEVs will be implicitly included in the migration.
• When you migrate TPVVs from the HDS Storage system, only those volumes can be migrated where the TPVV pool size is greater than or equal to the total size of the volumes selected for migration.
NOTE: Volume size is the actual size, not merely the space used by the TPVV.
• Determine whether you will be using dynamic, full, or dedupe provisioning on the destination storage system. This decision impacts the amount of capacity needed on the destination storage system.
• Because there is some impact on performance, you may want to schedule migrations during off-peak hours, if possible. Hosts with a lighter load/less data should be migrated first. • If you are using any LUNs larger than 2 TB on an HDS USP, then before performing a migration,
set the system option mode to enable the 16 byte commands for LUNs larger than 2 TB. Setting this system option mode does not change the behavior on the host side, so it can be set at any time before migration. See HDS documentation for more information. The system option mode need not be specially set for an HDS USP_V or an HDS USP_VM.
Network and Fabric Zoning Requirements
Data migration requires zoning operations to create paths between the source and destination storage systems and any hosts involved in the migration. The data paths used are shown in . A blue line indicates a peer link between the HP 3PAR StoreServ Storage and the HDS Storage system. A red line indicates a data link.
Figure 8 Data migration zoning
• Two unique paths must be zoned between the source and destination storage systems. To create two paths, two controller ports on the source HDS Storage system must be connected to two peer ports on the destination HP 3PAR StoreServ Storage system. See “Zoning the Source HDS Storage to the Destination HP 3PAR StoreServ Storage System” (page 36). • Paths between the host and the source HDS Storage system are unzoned before the data
migration starts. The timing for this depends on the operating system of the host and the migration type.
• During data migration, paths must be zoned between the host and destination HP 3PAR StoreServ Storage system. The time at which these paths are created is determined by the operating system of the host and the migration type.
Reconfiguring the Host Multipath Solution
Data migration may involve reconfiguring the host multipath solution from an HDS multipath solution to one supported by an HP 3PAR Storage system. For the supported multipath solutions for HP 3PAR StoreServ Storage systems, see HP SPOCK:
HP SPOCK(http://www.hp.com/storage/spock)
After the migration preparation phase is complete, the host must be reconfigured to use the multipath software for the HP 3PAR StoreServ Storage system.
The HDS multipath software installed on the host can stay present until the last HDS LDEVs are migrated. The HDS multipath software can be removed at the next maintenance window, but this is not required.
For MDM, the host must be shut down for the zoning changes and multipath reconfiguration. While the host is down, data transfer is started, after which the host is brought back online. This process ensures that the host is never multipathing between the source HDS Storage system and the destination HP 3PAR StoreServ Storage system. Even if the native multipath software is already configured, it is necessary to restart the host after unzoning the source HDS Storage system from the host.
NOTE: After the migration has completed, if the host connects to another HDS Storage array, the HDS multipathing software must remain installed on the host. If no other HDS arrays are connected, then optionally, the HDS multipathing software may be uninstalled.
Working with Consistency Groups
The optional HP 3PAR Consistency Group feature allows you create and consistently migrate dependent volumes of applications. I/O that is issued to volumes that are members of a consistency group is mirrored to the source array until all members are completely migrated to the destination array, keeping the source volumes in a consistent state.
NOTE:
• A consistency group can be created for “all volumes” of a host or a “subset of volumes” of a host. The HP 3PAR Consistency Group feature can be used for host-based migration.
A consistency group can be created for “all volumes” of a host or a “subset of volumes” of a host. The HP 3PAR Consistency Group feature can be used for host-based migration.
• For consistent imports, HP recommends that you limit the number of volumes in a consistency group to 20.
• To avoid long switch-over times at the end of imports, HP recommends that you limit the total size of volumes in a set to 40 TB.
Creating a Consistency Group
Consistency groups are defined in thecreatemigrationcommand. The following parameters are available to create consistency groups:
• cgvolmap: Defines the consistency groups and their member LDEVs.
• allvolumesincg: All volumes (including implicit volumes) will be migrated consistently.
Example 3 Volume-based migration with specified volumes in consistency groups
# createmigration -sourceuid AF0002AC001BA1 -srcvolmap "[{vol1, thin, testcpg},{vol2, thin, testcpg},{vol3, thin, testcpg}]" -destcpg testcpg -destprov testcpg -cgvolmap{“values":{"cg1": ["vol1","vol2]}} —migtype online -persona “RHEL_5_6”
Three volumes (vol1,vol2andvol3) are chosen for migration. A consistency group named cg1will be created, containingvol1andvol2. When astartmigrationcommand is issued, I/O to bothvol1andvol2will be mirrored to both the source storage array and the HP 3PAR StoreServ Storage until bothvol1andvol2import tasks are complete. After bothvol1and
vol2import tasks are complete, I/O for both volumes will cut over to the HP 3PAR StoreServ Storage.
Example 4 Volume-based migration with all volumes in a consistency group
# createmigration -sourceuid AE0002AC001BA2 -srcvolmap "[{vol1, thin, testcpg},{vol2, thin, testcpg},{vol3, thin, testcpg}]" -allvolumesincg -destcpg testcpg -destprov testcpg —migtype online -persona “RHEL_5_6”
All volumes (including implicit volumes) will be placed in a single consistency group. When a
startmigrationcommand is issued, I/O to all volumes will be mirrored to both the source storage array and the HP 3PAR StoreServ Storage until all import tasks complete. After all import tasks are complete, I/O for all volumes will cut over to the HP 3PAR StoreServ Storage.
Example 5 Host-based migration with specified volumes in consistency groups
# createmigration -sourceuid 8F0002AC001BA4 -srchost "hostname" -migtype online -destcpg testcpg -destprov thin -cgvolmap{“values":{"cg1":["vol1","vol2","vol3"],"cg2":["vol4","vol5","vol6"]}} —migtype online -persona “RHEL_5_6”
All volumes (including implicit volumes) presented to the host are chosen for migration. Two consistency groups will be created:
• cg1, containingvol1,vol2, andvol3
• cg2, containingvol4,vol5, andvol6
Any other LDEV that was defined explicitly in thecreatemigrationcommand, or that was added implicitly, will be migrated, but not as a part of a consistency group. When a
startmigrationcommand is issued, I/O for volumes in bothcg1andcg2will be mirrored to both the source storage array and the HP 3PAR StoreServ Storage until allcg1orcg2import tasks
are complete. Aftercg1orcg2import tasks are complete, I/O to the respective consistency group volumes will cut over to the HP 3PAR StoreServ Storage.
Example 6 Host-based migration with all volumes in a consistency group
# createmigration -sourceuid 8F0002AC001BA3 -srchost "hostname" -migtype online -destcpg cpg1 -allvolumesincg —migtype online -persona “RHEL_5_6”
NOTE: HP recommends that only allvolumesincgbe used with Oracle RAC.
All LDEVs (including implicit volumes) presented to the host will be placed in a single consistency group. When a startmigrationcommand is issued, I/O to all LDEVs will be mirrored to both the source storage array and the HP 3PAR StoreServ Storage until all import tasks are complete. After all import tasks complete, I/O for all volumes will cut over to the HP 3PAR StoreServ Storage.
5 Premigration Steps
Perform these steps to prepare for migration.
Zoning the Source HDS Storage to the Destination HP 3PAR StoreServ
Storage System
The correct zoning must be present between the source HDS Storage system and destination HP 3PAR StoreServ Storage system at every stage of the migration operation. The following zoning rules apply:
• There must be two unique paths between the source and destination storage systems. To create two paths, the two controller host ports on the source HDS Storage system must be zoned to two peer ports on the destination HP 3PAR StoreServ Storage system. The peer ports on the destination HP 3PAR StoreServ Storage system must be on adjacent nodes: 0/1, 2/3, 4/5, or 6/7.
• Zone the source and destination systems together and make sure they are visible to each other before zoning hosts to the destination system.
• Do not unzone the source and destination systems from each other until the data migration is complete.
To create the zoning:
1. On the destination HP 3PAR StoreServ Storage system, configure two free ports as peer ports using adjacent nodes: 0/1, 2/3, 4/5, or 6/7.
a. Set the port connection type topoint.
b. Set the port connection mode topeer.
Example 7 HP 3PAR CLIcontrolportcommand # controlport offline n:s:p
# controlport config peer -ct point n:s:p # controlport rst n:s:p
2. Create two zones between the source HDS Storage system and the destination HP 3PAR StoreServ Storage system, ensuring that one HDS host port is in the same zone with one HP 3PAR peer port.
NOTE: The WWN of a host port changes when it is set to become a peer port. Use the new WWN of the peer port in the zoning.
Each zone should contain only two ports: one from each storage system. Adjacent HP 3PAR peer nodes should be zoned to an HDS CHA board in separate array power domains in a one-to-one mapping. For example, zone the peer port on node 0 on the HP 3PAR StoreServ Storage system to a CHA in domain 1 on the HDS Storage system, and zone the peer port
on node 1 on the HP 3PAR StoreServ Storage system to a CHA in domain 2 on the HDS Storage system.
3. Verify that the HDS Storage system can detect both ports on the HP 3PAR StoreServ Storage system.
Ensure that the peer port WWNs appear in the discovered port list.
• To check peer port connections from the HP 3PAR StoreServ Storage, issue the
showportdevcommand. SeeExample 8 “Checking peer port connections using the showportdevcommand”
Example 8 Checking peer port connections using theshowportdevcommand
Identifying the Source and Destination Storage Systems
This section provides information on how to identify and add the source and destination storage systems for migration. Before beginning, prerequisites must be met and information about the source and destination systems must be gathered.
Prerequisites
• The HiCommand Suite is installed and licensed with either the CLI/SMI-S or the Device Manager license.
• The source HDS Storage system must be registered in the HiCommand Suite application. • The source HDS system has one or more host groups configured with the hosts and volumes
to be migrated.
• The HP 3PAR Online Import Utility is installed and operational with access to the HiCommand Suite server managing the source HDS Storage system and the destination HP 3PAR StoreServ Storage system.
• The source HDS Storage system and destination HP 3PAR StoreServ Storage system are zoned to each another.
• After all changes, refresh your HDS Storage array in the HiCommand Suite, using the HiCommand Suite Device Manager or the HDS Storage CLI.
Required Information
HDS Storage source system:
• IP address of the HiCommand Suite server that is managing the source HDS Storage system from which the volumes are being migrated and the serial number of the source HDS Storage system.
• User name and password for the HiCommand Suite. • Port access to the HiCommand Suite.
Secure port default 5989.
◦
◦
Non-secure port default 5988.Destination HP 3PAR StoreServ Storage system
• IP address of the destination HP 3PAR StoreServ Storage system.
• User name and password for the HP 3PAR management application with Super user permission.
Adding the Source Storage System
To identify the source storage system, follow these steps:
1. From the HP 3PAR Online Import Utility, issue theaddsource command.
NOTE: Use local user credentials to log into the HP 3PAR Online Import Utility.
Example 9addsourcecommand
# addsource -type HDS -mgmtip XX.XX.XX.XX -user admin -password adminpw —uid
xxxxx
# SUCCESS: Added source storage system
whereXX.XX.XX.XXis the IP address of the HiCommand Suite server, andxxxxxis the 5-digit serial number of the HDS Storage system.
2. Issue theshowsourcecommand to verify the source storage system information.
Example 10showsourcecommand # showsource –type HDS
NAME TYPE UNIQUE_ID FIRMWARE MANAGEMENT_SERVER OPERATIONAL_STATE USP_V.48748 48748 50-09-98 XX.XX.XX.XX Good
Adding the Destination Storage System
To add the destination storage system, follow these steps:
1. From the HP 3PAR Online Import Utility, issue theadddestinationcommand.
Example 11adddestinationcommand
# adddestination –mgmtip XX.XX.XX.XX –user 3paradm –password 2Password # SUCCESS: Added destination storage system
whereXX.XX.XX.XXis the HP 3PAR management port IP address.
If a certificate validation error occurs on theadddestinationcommand (see
Example 12 “Certificate validation error”), first run theinstallcertificatecommand (seeExample 13 “Installcertificate command”), then run theadddestination
command again.
Example 12 Certificate validation error
# adddestination -mgmtip xx.x.xx.xx -user 3paradm -password ******* -port 5783
# ERROR: OIUERRDST0010 Unable to validate certificate. C:\\InFormMC\security\HP-3PAR-MC-TrustStore
Example 13Installcertificatecommand
# installcertificate –mgmtip xx.xx.xx.xx
TParCertifacteVO [issuedTo=HP 3PAR HP_3PAR 7400 1645897, commonName=null, issuedByOrganization=null, issuedToOrganization=null, serialNo=null, issedBy=HP 3PAR HP_3PAR 7400 1645897,
fingerprint=89:E5:D0:13:6F:D1:07:80:70:76:5C:FE:5B:65:E5:54:C0:18:21:2F, signatureAlgo=SHA1withRSA, version=v1,validFrom=08/14/2014, validTo=08/11/2024. issuedOn=null, expiresOn=null, validDateRange=true] Do you accept the certificate? Y/YES Y
# SUCCESS: Installed certificate successfully.
2. Issue theshowdestination command to verify the destination storage system information.
Example 14showdestinationcommand
# showdestination
NAME TYPE UNIQUE_ID FIRMWARE MANAGEMENT_SERVER OPERATIONAL_STATE PEER_PORTS
3par_7200_DCB_01 3PAR 2FF70002AC005F91 3.2.1 (MU3)
XX.XX.XX.XX Normal 2021-0202-AC00-5F91(0:2:1) 2121-0202-AC00-5F91(1:2:1)
Preparing the Host for Data Migration
NOTE: This section does not apply to online migration. To prepare for a successful migration:
• Stop all applications on the host that may be accessing the LUNs to be migrated. This also includes any replication and backup applications on the LUNs.
• Set the LUNs to be migrated to an offline/unmounted state.
NOTE: Modify the startup scripts for all applications and services that are using the migrating LUNs to prevent them from starting at the next reboot. They should remain disabled until after the migration has started and documentation instructs you to bring your host back online.
Preparing Windows Clusters for Migration
When a Windows cluster is migrated, the cluster must first be disabled so that any SCSI reservations in use are released. For active/passive cluster running Windows Server 2008 or Windows Server 2008 R2 , this can be achieved by stopping all applications running on the cluster, then stopping the cluster service on all nodes.
For Hyper-V running on Windows Server 2008 R2, follow these steps to stop the cluster:
1. Set the quorum disk toOffline, CSV disksinMaintenancemode.
2. Using the Failover Cluster Manager, selectShutdown Cluster.
3. Clear the cluster reservation, if present, by following the appropriate Microsoft documentation about Hyper-V clusters.
For Windows Server 2003 or Windows Server 2003 R2, stop the cluster service on each cluster node.
For more information, see Microsoft documentation on how to start/stop the cluster services.
Preparing HP-UX Clusters for Migration
For HP-UX 11i v3, the Serviceguard cluster must be stopped gracefully before the node is shut down during MDM. For active/active clusters, offline all disks. For more information, see HP Serviceguard documentation. See the following website:
HP-UX ServiceGuard (http://www.hp.com/go/hpux-SG-Docs)
Preparing Veritas Clusters for Migration
NOTE:
On Veritas clusters, stop the clusters by issuing the following command: # /opt/VRTSvcs/bin/hastop -all
Then verify cluster status by issuing the following command: # /opt/VRTSvcs/bin/hastatus
When the clusters are down, messages like the following will appear: attempting to connect....
VCS ERROR V-16-1-10600 Cannot connect to VCS engine attempting to connect....not available; will retry
To verify that a reservation is clear after stopping a cluster, follow these steps:
1. Issue the following command to get a list of all LDEVs used in the cluster:
Example 15 Listing LDEVs in a cluster # vxdisk list
DEVICE TYPE DISK GROUP STATUS hitachi_usp0_1000 auto:cdsdisk - - online hitachi_usp0_1001 auto:cdsdisk - - online hitachi_usp0_1002 auto:cdsdisk - - online hitachi_usp0_1003 auto:cdsdisk - - online hitachi_usp0_1004 auto:cdsdisk - - online hitachi_usp0_1005 auto:cdsdisk - - online hitachi_usp0_1006 auto:cdsdisk - - online hitachi_usp0_1007 auto:cdsdisk - - online hitachi_usp0_1008 auto:cdsdisk - - online
2. Create atmpfilein the/rootdirectory with all the LDEVs. thetmpfile will be similar to
the following example:
Example 16tmpfile with LDEVs /dev/vx/rdmp/hitachi_usp0_1000 /dev/vx/rdmp/hitachi_usp0_1001 /dev/vx/rdmp/hitachi_usp0_1002 /dev/vx/rdmp/hitachi_usp0_1003 /dev/vx/rdmp/hitachi_usp0_1004 /dev/vx/rdmp/hitachi_usp0_1005 /dev/vx/rdmp/hitachi_usp0_1006 /dev/vx/rdmp/hitachi_usp0_1007 /dev/vx/rdmp/hitachi_usp0_1008
3. Issue the following command to verify that the reservation keys are clear:
Example 17 Verifying that reservation keys are clear # vxfenadm -s all -f tmpfile
Device Name: /dev/vx/rdmp/hitachi_usp0_1000 Total Number Of Keys: 0
No keys...
Device Name: /dev/vx/rdmp/hitachi_usp0_1002 Total Number Of Keys: 0
No keys...
Device Name: /dev/vx/rdmp/hitachi_usp0_1001 Total Number Of Keys: 0
No keys...
Device Name: /dev/vx/rdmp/hitachi_usp0_1004 Total Number Of Keys: 0
No keys...
Device Name: /dev/vx/rdmp/hitachi_usp0_1003 Total Number Of Keys: 0
No keys...
Device Name: /dev/vx/rdmp/hitachi_usp0_1005 Total Number Of Keys: 0
No keys...
Device Name: /dev/vx/rdmp/hitachi_usp0_1007 Total Number Of Keys: 0
No keys...
Device Name: /dev/vx/rdmp/hitachi_usp0_1006 Total Number Of Keys: 0
No keys...
Device Name: /dev/vx/rdmp/hitachi_usp0_1008 Total Number Of Keys: 0
No keys...
4. If the reservation keys are not clear, issue the following commands on any one cluster node to clear them:
# vxfenadm -a -k 111111 -f tmpfile # vxfenadm -c -k 111111 -f tmpfile
The reservation keys are clear when each device in thetmpfileindicatesNo keys.
Creating the Data Migration Task
The data migration task performs the following actions in the preparation required for data migration:
Required Information
HDS Storage source system
• The serial number of the source HDS Storage system from which the volumes are being migrated.
• The list of one or more LDEV names that are being migrated, or the host name of the host that is being migrated. As a best practice, all LDEVs should be in the same host group, or in different host groups with identical LDEV membership.
Destination HP 3PAR StoreServ Storage system
• Provisioning type for the volumes being created on the destination storage system (thin, full, or dedupe).
• The name of the CPG on the destination storage system where the volumes are being migrated.
Issuing the
createmigration
Command
The data migration task performs the following actions in the preparation required for data migration:
• On an HDS Storage system source, the HP 3PAR Online Import Utility creates two host groups containing the HP 3PAR Peer port initiators. The host group name format isHCMDXXXX. • For online migration and MDM, the host or hosts that are being migrated are created on the
destination storage system. A host set is also created on the destination storage system. For offline migration, the host definitions must be created by the storage administrator.
• For online migration, the LDEVs being migrated are admitted to the destination system and exported to the host. For MDM, the LDEVs are admitted to the destination storage system but are not exported to the host.
• If thecreatemigration calls for using consistency groups, then VV sets are created on the destination storage system. The VV sets will be removed from the destination storage system after migration completed.
• Thecreatemigrationcommand performs the following checks before creating the migration:
◦
No migration task for the specified source storage system exists. Only one migration ata time can be provisioned for a given source HDS Storage system.
◦
The source storage system group configuration is valid.– The volumes or hosts specified in thecreatemigrationcommand are mapped to a host group on the associated source HDS Storage system. All LUNs and all hosts in the mapped host group will be migrated even if only a subset are entered in the
createmigration command.
To determine whether your configuration is valid, see“Migrations Supported by HP 3PAR Online Import Utility” (page 26).
◦
LUN migration eligibility:Protocol must be Fibre Channel. –
– A LUN under replication cannot be migrated.
To create the migration for a given migration type using thecreatemigrationcommand,
see:
◦
Online migration, if the HDLM is installed:“Online Data Migration with Removal of Hitachi Dynamic Link Manager” (page 44),steps 5–8Online migration, if the HDLM is not installed:“Online Migration with Linux Native Device-Mapper” (page 50),step 3
◦
MDMLinux:“Creating the Data Migration Task” (page 62)
–
– Windows:“Creating the Data Migration Task” (page 56)
– AIX:
“Creating the Data Migration Task” (page 67)
– HP-UX:
“Creating the Data Migration Task” (page 73)
◦
Offline migration:“Creating the Data Migration Task” (page 77)6 Performing Data Migration for Red Hat Linux, Oracle RAC,
ESXi 5.5, and HP-UX 11 v3
If Hitachi Dynamic Link Manager (HDLM) is installed, it must be uninstalled, and the native Linux device-mapper must be used to configure multipathing before migrating the data. Follow the online data migration procedure in“Online Data Migration with Removal of Hitachi Dynamic Link Manager” (page 44).
If HDLM is not installed, follow the online data migration procedure in“Online Migration with Linux Native Device-Mapper” (page 50).
Online Data Migration with Removal of Hitachi Dynamic Link Manager
To perform online data migration when the HDLM is present, follow these steps.
NOTE: A maintenance window is required to complete an online data migration with removal of the HDLM.
NOTE: Before migrating a SAN-based Oracle RAC cluster using the HP 3PAR Online Import Utility, it is critical to understand whether and how the Oracle RAC cluster registry (CRS), voting disks, and data disks are distributed across the source arrays, and to plan migrations accordingly. Since the HP 3PAR Online Import Utility is currently designed to execute a migration exclusively from one source array at a time, multiple migrations must be executed serially in order to transfer all the Oracle-based disks from multiple source arrays to a single destination HP 3PAR StoreServ Storage. This use-case scenario is described in detail in“Appendix E: Use Case: Data Migration for an Oracle RAC Cluster” (page 112).
At the time of this publication, the coexistence or distribution of Oracle RAC disks is supported across the HP 3PAR StoreServ Storage and HDS Storage arrays listed in HP SPOCK:
HP SPOCK(http://www.hp.com/storage/spock)
NOTE: For ASM-based Oracle RAC configurations, the persistent device names that are used by the ASMlib to label ASM disks must be modified. With the HDLM, the devices get a
/dev/sddlm*name, whereas with Linux native device-mapper multipath software, the devices get a/dev/mapper/mpath*name. To ascertain whether the current ASMlib is using the HDLM-based names, issue the following command:
# oracleasm querydisk -p /dev/sddlm*
HDLM-based-device names are being used if the output is similar to the following example: Device "/dev/sddlmaa1" is marked as an ASM disk with the label "ASM_DISK01" 1. Zone the host to the destination HP 3PAR StoreServ Storage system to establish communication.
2. Uninstall the HDLM by following these steps:
CAUTION: The HDLM must not be present during the migration process. The native Linux device-mapper multipath must be managing the paths.
Stop all applications before removing the HDLM. For cluster configurations, also stop the cluster services and the cluster. Applications should be restarted after migration has started.
a. Close all applications on the host.