Ontrack
®
PowerControls
™
User Guide
|
Version 7.3
.1
Instructions for operating Ontrack PowerControls
in Microsoft
®Exchange Server Environments
Ontrack® PowerControls™ software has been developed, copyrighted, and licensed by Kroll Ontrack Inc. Use of the software is governed by the terms and conditions of the end user license agreement contained within the software.
This manual should not be construed as any representation or warranty with respect to the software named herein. Occasionally, changes or variations exist in the software that are not reflected in the manual.
Generally, if such changes or variations are known to exist and affect the product significantly, a release note or Read Me file will accompany the User Guide, or will be available on the Ontrack PowerControls website. In that event, please read the release notes or Read Me file before using the product.
TRADEMARKS
Kroll Ontrack, Ontrack, PowerControls, and other Kroll Ontrack brand and product names referred to herein are trademarks or registered trademarks of Kroll Ontrack Inc., and/or its parent company, Kroll Inc., in the United States and/or other countries. All other brand and product names are trademarks of their respective owners.
Microsoft, Exchange, SharePoint, Windows and other Microsoft brand and product names referred to herein are either registered trademarks or trademarks of Microsoft Corporation in the United States and/or other countries.
All other brand and product names are trademarks of their respective owners.
COPYRIGHTS
Copyright © 2016 Kroll Ontrack Inc. All rights reserved. Copyright 1991-2016 dtSearch Corp. All Rights Reserved.
The software is based in part on the work of the Independent JPEG Group. Document version number: 7.3.1.0.2
No part of this publication may be reproduced, transmitted, transcribed, stored in a retrieval system, or translated into a language or computer language, in any form by any means, electronic, mechanical, optical, chemical, manual or otherwise, without the express written consent of Kroll Ontrack Inc.
CONTACT INFORMATION
For contact information for our worldwide locations, see www.krollontrack.com/company/contact-us/
Contents
Contents
i
Introduction
1
Overview 1
Five Major Reasons for Using Ontrack PowerControls 1
About the Free Trial 2
Readme File 2
About the Microsoft Exchange Server Database 2
Organizing the Microsoft Exchange Server Database Files for Ontrack PowerControls 3
Getting Help 3
Online Help 4
Technical Support 4
Chapter 1: Looking at the Interface
6
Overview 6
Main Window 6
Source Pane 7
Source Message List 8
Target Pane 9
Target Message List (Restored Messages) 10
Menu Bar 11
Toolbar 11
Shortcut Menu 12
Changing the View 13
Viewing or Hiding the Toolbar and Status Bar 14
Resizing Panes Separated by a Split Bar 14
Sorting Messages in the Message Lists 15
Refreshing the Screen 15
Opening Attachments 16
Saving Attachments 16
Viewing the Properties of an EDB File, PST File, CAS File, CAS Profile Folder, Folder, or Mailbox 17
Performing an Integrity Check 20
Viewing Deleted Messages 20
Viewing Deleted Items in Microsoft Exchange Server Databases 21
Setting Preferences 21
General Tab 22
Target Options Tab 23
Security Tab 24
Warnings Tab 26
Chapter 2: Using Ontrack PowerControls
28
Overview 28
Mailbox Criteria 28
Multi-Tenancy Support 28
Outlook Anywhere and Autodiscover 29
Connecting to Office 365 31
Credentials and Permissions 31
Using the Data Wizard 34 Configuring Ontrack PowerControls for Microsoft Exchange Server 34
Before You Use the Data Wizard 35
Opening the Data Wizard 36
Data Wizard: Source Selection 36
Guidelines for Selecting a Microsoft Exchange Server Database 41
Data Wizard: Target Selection 41
Data Wizard: Outlook Anywhere 48
Data Wizard: Connection Settings 49
Data Wizard: Now Processing Data File 51
Results of Data Wizard 51
Opening the Source Database and Target Mailboxes from the Main Window 52
Before You Proceed 53
Opening a Source and a Target from the Main Window 53
Opening Multiple Sources and Targets 56
Closing Sources and Targets 56
Deleting Items in the Target Pane 57
Creating New Mailboxes 57
User Permission 57
Preference Settings 58
Creating Mailboxes 58
Creating Mailboxes Using the Mailbox Creation Wizard 59
Creating Mailboxes Using Copy and Paste 65
Licensing Information 76
Chapter 3: Finding Messages
77
Overview 77
Guidelines for Using the Find Window 77
Searching Sources 78
Searching Embedded Message Items 81
Searching Within Results 81
Searching Microsoft Exchange Server Target 83
Managing Message Items 83
Saving and Using Search Profiles 85
Using Multiple Search Windows 86
Searching Within Attachments 86
Exceptions When Searching Within Attachments 87
Other Ontrack PowerControls Features Available Through the Find Window 88
Opening and Saving Attachments in the Find Window 88
Exporting Message Items from the Find Window 88
Restoring Message Items from the Find Window 88
Performing an Integrity Check on Message Items in the Find in Source Window 89
Search Results Report 89
Save Report 89
Chapter 4: Exporting Messages
91
Overview 91
General Information about Exporting Messages 91
About Message (.msg), Text (.txt), and PST Export 92
Exporting to PST 99
Exporting Organizational Forms 106
About the Export Progress Window 107
Saving and Printing the Report 108
Chapter 5: Restoring Microsoft Exchange Server Data
109
Overview 109
Quick Look at Restoring Your Microsoft Exchange Server Data 109 Restoring Your Microsoft Exchange Server Data in Three Easy Steps 110
Limits for PST and Folder Targets 111
About Restoring Messages to a Microsoft Exchange Server 111
About the Copy Progress Window 112
Creating, Renaming, and Deleting Folders in the Target Pane 112
Copying and Pasting or Dragging 113
Examples of Restoring Your Microsoft Exchange Server Data 114
Restoring Messages with Copy-Paste 114
Restoring Messages with Paste Special 115
Restoring a Folder 118
Restoring a Mailbox 119
Restoring an EDB File 120
Restoring to Public Folders 121
Chapter 6: Using the Command Line
124
Overview 124
Command Line Syntax 124
Chapter 7: Reporting
138
Overview 138
Creating Reports 138
Viewing Reports 141
Single Instance Storage (SIS) vs. Cumulative Counts 141
Attachment Statistics Report 142
Domain Statistics Report 143
Messages by Database Report 144
Messages by Mailbox Report 146
Messages by Date Report 147
Messages by Profile Folder 148
Sorting Reports 150
Saving Reports 150
Chapter 8: Content Analysis Store
151
Overview 151
Creating a Content Analysis Store 151
Creating a Content Analysis Store with Microsoft Exchange Server 2010 and 2013 Data 153 Creating and Processing Content Analysis Store Profile Folders 154 Suspending and Resuming Content Analysis Store Profile Folders 158
Adding Sources to Content Analysis Stores 159
Editing and Deleting Profiles 160
Closing a Content Analysis Store 161
Opening a Content Analysis Store as Source 161
Creating Reports in Content Analysis Store 163
Viewing Profiles in Content Analysis Store 163
Missing Database Files 164
Wrong Database Files 166
Chapter 9: Message Views
167
Overview 167
Message Views Menus and Toolbars 168
Message Views Menus 168
Message Views Toolbar Icons 168
Message View Shortcut Menu 168
Message View Pane 169
Other Options Available in the Message View 169
Message View Options 170
Message Table View 170
Attachment Table View 171
Conversation View 173
Opening a View for the First Time 175
Find in Source Window in Message Views 176
Glossary
178
Overview
Welcome to Ontrack® PowerControls™ 7.3.1, the mailbox recovery software that saves time, money, and resources when recovering Microsoft® Exchange Server data.
Ontrack PowerControls works with your existing Microsoft Exchange Server backup architecture and procedures to recover individual mailboxes, folders, messages, attachments, calendar items, notes, and tasks directly to your production Microsoft Exchange Server or any Personal Folders (PST) file. This eliminates time-consuming and expensive single mailbox (brick-level) backups. This powerful software also lets you search and create a copy of all archived email that matches a given keyword or criteria.
Five Major Reasons for Using Ontrack
PowerControls
There are five primary ways you can benefit from using Ontrack PowerControls:
1. Minimize the time to restore an individual mailbox.
Ontrack PowerControls can slash restore time, making it possible to restore mail items from a previous full backup directly into your production Microsoft Exchange Server, or directly into a new or existing PST file. This eliminates the need for a recovery server and the extra steps required to separately import mail back into Microsoft Exchange Server or Microsoft® Office Outlook®.
2. Eliminate backups of an individual mailbox.
Ontrack PowerControls eliminates the need to back up individual mailboxes because they can be restored directly from a Microsoft Exchange Server Database (EDB) file.
3. Minimize the time to locate all email matching specific criteria.
Ontrack PowerControls includes an Advanced Find feature that can search across all mailboxes in an archive EDB file, rather than searching one mailbox at a time or bringing an old backup back online for analysis. And you can search by a variety of criteria, including keywords, subject, date and specific users.
4. Minimize storage space and the cost required to store and archive your backups.
Because you do not need to back up mailboxes individually doing a brick-level backup, you eliminate the backup space, cost, and time associated with performing brick-level backups.
5. Minimize the time to back up all mailboxes.
Ontrack PowerControls eliminates the need to back up mailboxes individually. Normally, companies do a full Microsoft Exchange Server backup, and then run a second process to back up "Very Important Mailboxes" (VIMs) individually as well. Ontrack PowerControls eliminates this second process.
About the Free Trial
After installation, Ontrack PowerControls operates as a Free Trial by default until a license file is applied. The Free Trial of Ontrack PowerControls is limited in functionality and time-limited to 30 days of use.
With the Free Trial, you can:
n Open sources n Open targets n Perform searches
n Perform integrity checks n Generate reports
If you would like to have full functionality, or learn more about the purchasing options and product information for Ontrack PowerControls, visit our website at www.krollontrack.com.
Readme File
The Ontrack PowerControls Readme file contains additional information about the Ontrack PowerControls, including:
n Supported environments n Licensing
n Limitations
n Technical support
The Ontrack PowerControls Readme file is included in the electronic package.
About the Microsoft Exchange Server Database
The Microsoft Exchange Server database consists of the following files:
n .edb file (rich text database file)contains data placed in the store through Messaging Application Programming Interface (MAPI), as well as all the database tables that define mailboxes, messages, folders, and attachments.
n .stm file (streaming database file)contains common Internet formatted content, such as
Multipurpose Internet Mail Extensions (MIME) content, that protocols other than the MAPI protocol place in the store.
Note:The .stm file is new to Microsoft Exchange Server 2000. Microsoft Exchange Server 5.5 does not contain .stm files.
n .log files (transaction logs)are history files recording server activity used in restoring and
backing up Microsoft Exchange Server data. Transaction logs for Microsoft Exchange Server 5.5, 2000, and 2003 are 5 MB in size. Transaction logs for Microsoft Exchange Server 2007 and later are 1 MB in size.
Each storage group uses its own set of transaction log files. For example, if a storage group contains five stores, all transactions for all five stores are recorded in a single series of transaction log files. You can determine where to locate the transaction log files for each storage group.
n .chk (check) filesare checkpoint files used for recovering (playing) data from transaction
logs into EDB files. The checkpoint is the place marker in the EDB.CHK file that indicates which transactions have been performed. Whenever data is written to an EDB file from the transaction log, the EDB.CHK file is updated with information specifying that the
transaction was successfully committed to the respective EDB file. Separate EXX.CHK files are maintained for each storage group using ESE (Extensible Storage Engine).
n .pat (patch) filesare used to record information on page splits in Microsoft Exchange
Server 5.5 through Microsoft Exchange Server 2000 (SP1). In Microsoft Exchange Server 2000 (SP2) and later, the functionality provided by .pat files is incorporated into Microsoft Exchange Server log files.
Organizing the Microsoft Exchange Server Database Files for
Ontrack PowerControls
For best results when using an online incremental or differential backup
n Put the .edb, .stm, and .pat files in one directory.
n Put the associated log files (for example, .log, .chk) in one directory.
Note:The two directories can be different.
Ontrack PowerControls does not require .stm or .log files, but you should include them to ensure that all email data is recovered. You may get corruption errors if these files are not present.
If you are using an offline backup
You need to use the .edb and .stm files for offline backups. To ensure that all email data is recovered, you should also include all .log files, and, if they exist, .pat and .chk files. Ontrack PowerControls performs its own verification process and includes the .log and .pat files to determine if it needs them to recover the data.
n Online Help n Technical Support
Online Help
Online Help includes all of the information in the user guide. You can quickly access this information using the following online Help tabs:
n Contents: Displays a hierarchical view, similar to the Contents of the user guide. n Index: Provides a list of key words to locate specific topics.
n Search: Offers a full-search of the Help file.
To start online Help
Do one of the following:
n On theHelpmenu, clickContents. n Click on the toolbar.
n Press theF1key.
Context Sensitive Help
You can click the Help button that appears on many of the dialog boxes when using Ontrack PowerControls to open the online Help topic related to the current task.
Tooltip
When you position the pointer over a tool or control and pause, a message box appears with a definition of your selected item.
Technical Support
If you have questions or problems not answered in the user guide or the online Help (F1), call our Technical Support group. When reporting an issue, please include any information that might help us diagnose the problem. The following details are often the most helpful:
n The version of Ontrack PowerControls you are using (on theHelpmenu, clickAbout). n The versions of the Windows® operating systems and Microsoft Office Outlook that you are
running.
n The version of Microsoft Exchange Server that contained the source EDB file. n The circumstances and sequence of steps that led to the problem.
n The text of the error messages (if any appeared), and the contents of theDetailswindow. n A list of other Windows-based programs that you were running when the error occurred.
See Also:
Chapter 1: Looking at the Interface
Overview
This chapter describes the parts of the main window of Ontrack PowerControls and shows you how to preview messages, view details of an EDB, PST, or CAS file, and change the view.
Main Window
The main window is where you do most of your work. This window displays the source EDB or PST file(s) or Content Analysis Store (CAS), as well as the target PST file(s), Microsoft Exchange Server, or CAS. The target acts as a container for the restored files. The various work areas and controls are described in the following sections.
Note:In the illustration below, the Target pane displays a PST that acts as a container for restored files. Keep in mind that the Target pane could just as easily display a Microsoft Exchange Server.
Figure 1-1: The main window with four panes
Key items on the Ontrack PowerControls main window: 1. Menu Bar
3. Source Location 4. Source Pane
5. Source Message List 6. Target Location 7. Target Pane
8. Target Message List 9. Status Bar
Source Pane
The Source pane displays the data you intend to recover, such as the EDB file(s) or a content analysis store (CAS). If you have not yet extracted Microsoft Exchange Server data from a backup tape or disk, see theOntrack PowerControls ExtractWizard User Guide.
Note:In the above illustration, the Source pane displays an EDB file, but it could just as easily display a PST file, CAS, or even multiple EDB and PST files.
Figure 1-2: Example of Source pane (description of icons in table below)
Icon Description
Sources Root Nodecontains one or more source data stores that are pre-pended with a "SourceX" where X is a number starting with 1 and is incremented for each additional source opened. You can select the sources root node as your search source.
Source EDB File(for example, ) contains the Microsoft Exchange Server Information Store data. Click the plus sign (+) next to an EDB file to expand its contents.
Icon Description
Mailbox(for example, , Archive, and Public Folder) contain the Microsoft Office Outlook folders. Click the plus sign (+) next to a mailbox to expand its contents.
Microsoft Office Outlook Folders(for example, Inbox, Contacts, Tasks) contain Microsoft Office Outlook message items. Select a folder to view its contents in the Source Message list.
Source CAS File(for example, ) contains the content analysis store data created to analyze content based on certain criteria.
CAS Profile Folder(for example, ) contains the results of a content analysis.
Inaccessible Mailboxwhich displays if a mailbox is inaccessible. An inaccessible mailbox presents no visible content.
Source mailbox access is controlled by Ontrack PowerControlsAgent for
Administrative Services. If Ontrack PowerControls Agent for Administrative Services in enabled and Kroll Ontrack Administrative Services Mailbox Permissions Control functionality is active, source mailbox accessibility is controlled through this
functionality. Otherwise, source mailbox access is always permitted. Target mailbox access is controlled by the target Microsoft Exchange Server.
Status indicator noting that Ontrack PowerControls is licensed for the Agent for Administrative Services and that it is connected to Kroll Ontrack Administrative Server. This icon is located in the Status Bar of the Ontrack PowerControls main window.
Status indicator noting that Ontrack PowerControls is either not licensed for the Agent for Administrative Services or it is licensed but not connected to the Kroll Ontrack Administrative Server. This icon is located in the Status Bar of the Ontrack PowerControls main window.
Source Message List
The Source Message list displays the message items in the Microsoft Office Outlook folder that you selected in the Source pane. This folder is one of the Microsoft Office Outlook folders (for example, Inbox, Contacts, Tasks).
Figure 1-3: The Source Message list (displaying messages in an Inbox)
The Source Message list displays metadata about the message items in six columns. The
metadata includes file type; attachments, if any; message sender; subject; date; and status. The Sent Items folder also displays the "To" column. For more information on the message list, see "Sorting Messages in the Message Lists" on page 15.
The source content analysis store message list includes file type; Database #, Database, and Path. The source content analysis store profile folder message list includes file type; Attachment, if any; From; Subject; Create Date; Database #; Folder, and Status. For more information on content analysis stores, see"Content Analysis Store" on page 151.
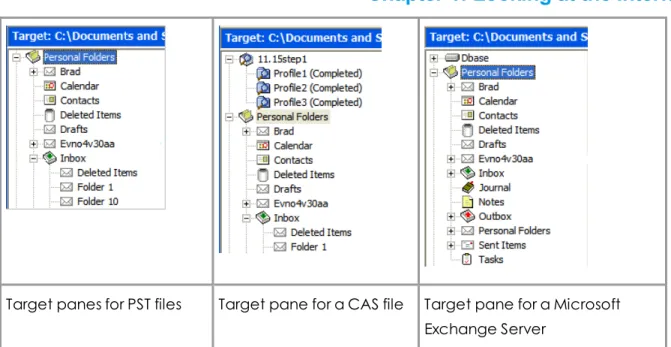
Target Pane
The Target pane can display one or more target PST files and/or one target mailbox, public folders and mailboxes from a Microsoft Exchange Server, and content analysis stores (CAS) with profile folders. The target acts as a container for your restored files. If a target is a newly created PST file, it defaults to Microsoft Office Outlook folders. If a target is an existing PST file or Microsoft Exchange Server, it shows whatever folders are in the target. It is into these folders that you paste and restore your message items. For information on restoring message items, see"Restoring Microsoft Exchange Server Data" on page 109.
Target panes for PST files Target pane for a CAS file Target pane for a Microsoft Exchange Server
Figure 1-4: Target panes with PST, CAS, and Microsoft Exchange Server files
Target Message List (Restored Messages)
The Target Message list displays the message items in the Microsoft Office Outlook folder that you selected in the Target pane. If the target is a newly created PST file or CAS, the Outlook folders and message list will be empty. If the target is an existing PST file, CAS file, or Microsoft Exchange Server, or if you have restored message items to a newly created PST file, you can select a folder in the Target pane to display messages in the Target Message list.
Figure 1-5: Target Message list displaying restored messages
The Target Message list displays metadata about the message items in five columns (instead of six columns in the Source Message list). The metadata includes file type; attachments, if any; message sender; Subject; and Create Date. The Sent Items folder also displays the "To" column. For more information on the message list, see"Sorting Messages in the Message Lists" on page 15.
The target content analysis store message list includes file type; Database #, Database, and Path. The target content analysis store profile folder message list includes file type; attachment, if any; From; Subject; Create Date; Database #; Folder; and Status. For more information on content analysis stores, see"Content Analysis Store" on page 151.
Menu Bar
Figure 1-6: The menu bar in the main window
The menu bar contains all of the commands for Ontrack PowerControls. The menu commands, submenu commands, and resulting windows are discussed fully in the chapters that focus on those specific commands. See the Index to quickly locate the pages on which a menu command is discussed.
Help Menu - Administrative Services
The Administrative Services option is available in the Help menu when the Kroll Ontrack Administrative Server for Administrative Services is active. It displays information regarding the Kroll Ontrack Administrative Server that Ontrack PowerControls is connected to and the services that are being used.
Note:During normal operation, the auditing service (if activated) does not alter the behavior of Ontrack PowerControls.
Toolbar
Figure 1-7: The Button Toolbar in the main window
The buttons on the toolbar perform the following functions:
Toolbar
Button Function
Open Sourceopens the Source Selection page of the Data Wizard, where you can navigate to and select a source Microsoft Exchange Server Database (EDB), PST, or CAS file. The EDB, PST, or CAS file contains the message items you want to restore.
Open Target PSTopens the Open Target PST dialog box, where you can navigate to and select a target Personal Folders (PST) file. The target PST file is a container for restored message items.
Open Target Microsoft Exchange Serveropens the Target Selection page of the Data Wizard, where you select the type and path of the target location for the data you want to restore.
Create/Open Content Analysis Storedisplays the Create Content Analysis File window, where you can open an existing content analysis store or to create a new one in the Target pane.
Toolbar
Button Function
Copycopies into the Clipboard the selected message(s) in the Source Message list; or the selected folder, mailbox, or EDB file in the Source pane.
Pasteinserts the items from the Clipboard into the selected folder in the Target pane. If you want to retain the directory structure of the restored messages, you must use the Paste Special command instead of the Paste command or Paste button.
Exportdisplays the Export window, where you can export messages to a local or network drive destination. You can choose to save exported messages as plain text files (.txt), Microsoft Office Outlook files (.msg), or Outlook Data files (.pst).
Searchdisplays the Find window, where you can specify the desired search criteria for finding messages in the Source pane.
Preview Panedisplays the Preview pane on the Ontrack PowerControls main window, where you can read a message without opening it.
View Helpdisplays Ontrack PowerControls Online Help, which includes all of the information in this user guide. You can quickly access the Online Help information using its Contents, Index, Search, and Favorite tabs.
Message Table Viewis only available when a message in the Source Message list is highlighted. It opens a Message Table View of that message and any message related to it.
Attachment Table Viewis only available when a message with an attachment in the Source Message list is highlighted. It opens an Attachment Table View of that
message and attachment and all related messages and attachments.
Conversation Viewis only available when a message in the Source Message list is highlighted. It shows the thread of that message with indentations to indicate the responses to each e-mail.
Shortcut Menu
You can access many of the same commands available on the menu bar and toolbar by right-clicking the mouse to view a shortcut menu. The contents of the shortcut menu depend on whether you right-click in the Source or Target pane. This manual explains how to use commands on the menu bar and toolbar, and does not always specify when you can use the shortcut menu. Once you become familiar with Ontrack PowerControls, the commands available to you on the shortcut menu should become apparent.
Previewing and Opening Messages
In the Preview pane, you can read the contents of a message item and open attachments. You can preview a message located in either the Source Message list or the Target Message list. The information displayed in the Message Header is different for messages, calendars, contacts, tasks, and distribution lists.
To open the preview pane
Do one of the following:
n On theViewmenu, clickPreview Pane.
n On the toolbar, click thePreview Paneicon in the toolbar.
To hide the preview pane
n Repeat one of the previous steps.
Tip:Hiding the Preview pane will allow you to scroll through messages faster.
To display a message in the preview pane
1. In the Source or Target Message list, select a message.
2. Open the Preview pane by clicking on thePreview Paneicon in the toolbar.
Figure 1-8: Preview pane for a message
To open a message in its own window
n In the Source or Target Message list, double-click a message.
Changing the View
You can change the view in the Ontrack PowerControls window by hiding the toolbar or status bar, by using split bars; by sorting message lists; and by refreshing the screen.
Viewing or Hiding the Toolbar and Status Bar
The toolbar and status bar appear by default in the main Ontrack PowerControls window, but you can easily hide them.
To hide the toolbar or status bar
n On theViewmenu, clickToolbar or Status Bar. The check mark no longer appears next to the name of the toolbar or status bar.
To view the toolbar or status bar
n On theViewmenu, clickToolbar or Status Bar. The check mark appears next to the name
of the toolbar or status bar.
Resizing Panes Separated by a Split Bar
You can use a split bar (the horizontal or vertical double line that separates two panes) to
increase the area within one pane while simultaneously decreasing the area within the adjacent pane. The Source pane, Source Message list, Target pane, Target Message list, and Preview pane all border a split bar.
To resize panes separated by a split bar
1. Position the pointer over a split bar between the two panes on either the vertical or horizontal split bar.
Figure 1-9: Before dragging the split bar between the Target Message list and the Preview pane
Sorting Messages in the Message Lists
You can sort messages in the Source and Target Message lists based on attachments, message sender, subject, date, and status. In addition, the Source Message list lets you sort messages based on status, and the Sent Items folder lets you sort items based on the "To" heading. Sorting messages on the From column, for example, can help to identify messages from a specific sender.
To sort a message list
1. Click a column heading to sort the messages based on that heading. For most headings, an arrow appears indicating the sort direction. An up arrow indicates that the messages appear in ascending (A-Z) order. A down arrow indicates that the messages appear in descending (Z-A) order.
2. To reverse the order of the messages based on that column heading, click the column heading again. Notice the arrow reverses directions.
An example of sorting messages:
l If you click the attachment column heading, messages are sorted in ascending order based on this heading, even though no arrow appears. This means that
messages with attachments appear at the top of the message list, while messages with no attachments appear at the bottom of the document list. If you click the attachment column heading again, the order is reversed.
Note:The view settings (sort order and column width) for a folder or mailbox are saved until you close the data store.
Refreshing the Screen
You may want to refresh the screen occasionally when you are connected to a target Microsoft Exchange Server. That is because the information on the server may change while you are connected.
To refresh the screen
Do one of the following:
n On theViewmenu, clickRefresh. n Press theF5key.
Opening Attachments
If you have the appropriate program installed on your computer, Ontrack PowerControls loads the application to view the selected attachment (for example, to view an .xls file attachment, Ontrack PowerControls will launch Microsoft® Excel®).
If no associated program is available for the attachment's file type, Ontrack PowerControls presents a message window saying the attachment cannot be viewed.
Note:Ontrack PowerControls cannot view attached embedded graphics in HTML messages.
To open an attachment in an open message
1. In the message list, double-click a message that has the Attachment icon next to its name.
2. Click theAttachmenticon on the right side of the message header. A pop-up window lists the attachments for the selected message.
3. Click the name of the attachment you want to view.
To open an attachment in the preview pane
1. In the message list, select a message that has the Attachment icon next to its name. 2. Open the Preview pane. In the Ontrack PowerControls main window, click thePreview
Paneicon . In theFindwindow, select thePreviewcheck box.
3. Click theAttachmenticon on the right side of the message header in the Preview pane. A pop-up window lists the attachments for the selected message.
4. Click the name of the attachment you want to view.
Saving Attachments
A "save attachments" option is available on the File menu and paperclip menu of an open message, as well as on the paperclip menu of the Preview pane. The Save Attachments window lists the attachments for the selected message and lets you select the attachments you want to save.
To save attachments in an open message
1. In the Source or Target Message list, double-click a message that has the Attachment icon next to its name.
2. In the open message, do one of the following: l On theFilemenu, clickSave Attachments.
l Click theAttachmenticon on the right side of the message header, and then click Save Attachments.
3. In theSave Attachmentswindow, select one or more attachments, and clickOK. 4. In theBrowse For Folderwindow, select a location for the attachment(s), and clickOK.
To save attachments in the preview pane
1. In the Source or Target Message list, select a message that has the Attachment icon next to its name.
2. In the Preview pane, click theAttachmenticon on the right side of the message header, and then clickSave Attachments.
3. In theSave Attachmentswindow, select one or more attachments, and clickOK. 4. In theBrowse For Folderwindow, select a location for the attachment(s), and clickOK.
Viewing the Properties of an EDB File, PST File,
CAS File, CAS Profile Folder, Folder, or Mailbox
Ontrack PowerControls makes it easy to view the properties of a source PST file, EDB file, CAS file, CAS profile folder, mailbox, or folder.
Note:Only accessible mailboxes can produce property reports. For CAS files, inaccessible mailboxes within that data store are not included in the totals.
Note:When theShow Recoverable Itemspreference is enabled, theRecoverable Itemsfolder, subfolders, and messages will appear in the folder and message counts in the EDB properties. If the preference is cleared, theRecoverable Itemsfolders and messages are not included in the folder and message counts.
To view the properties
1. In the Source pane, right-click an EDB file, PST file, CAS file, CAS profile folder, mailbox, or folder.
2. On the shortcut menu, clickProperties. One of the following Properties dialog boxes appears:
Figure 1-10: EDB File Properties dialog box
Note:The Save button is only available for Microsoft Exchange Server 2010 and earlier databases. ClickSaveto save the Microsoft Exchange Server name to your hard drive.
Figure 1-12: Content Analysis Store (CAS) File dialog box
Figure 1-13: Content Analysis Store (CAS) Profile Folder dialog box
Figure 1-14: Properties of a Mailbox dialog box
An alternate way to view the properties of an EDB or PST file
Once you have viewed the properties of the source EDB or PST file as described above, you can then display the properties in the Preview pane.
1. Open the Preview pane by clicking thePreview Paneicon on the toolbar or by clicking theViewmenu and pointing toPreview Pane.
2. Right-click on the source EDB or PST file in thesourcepane and clickProperties.
Figure 1-15: Properties of an EDB File
Performing an Integrity Check
You can perform an integrity check on messages, folders, mailboxes, PST files, CAS files, CAS profile folders, EDB files, and live Microsoft Exchange Server target search results. During the integrity check, Ontrack PowerControls verifies that it can read all folder and message properties from the selected source.
To perform an integrity check
1. In the Source pane, select an EDB file, PST file, CAS file, CAS profile folder, mailbox, folder, or message(s).
2. Do one of the following:
l On theToolsmenu, clickIntegrity Check. TheIntegrity Checkwindow appears. l Right-click the item and clickIntegrity Checkin the shortcut menu.
3. ClickPrintto print a copy of the integrity check.
4. ClickSaveto save a copy of the integrity check to file.
Viewing Deleted Messages
Ontrack PowerControls can view and restore deleted messages that are held in the EDB file. These messages appear under the Status column in the Source Message list. If deleted messages have been purged from the EDB file due to the deleted retention schedule, Ontrack
Content analysis store deleted messages in both the Source and Target panes also appear under the Status column in the message list.
Viewing Deleted Items in Microsoft Exchange Server
Databases
Deleted items do not have the same functionality as items from earlier databases. Instead of being stored in the folder they were deleted from, they are stored in a separate "Recoverable Items" folder.
Note:The Recover Items folder only appears when using Microsoft Exchange Server 2010 databases and later.
By default, this separate folder does not appear in the source tree under the mailbox. A preference setting allows you to view this folder in the source tree, making the deleted items accessible to you. For more information, see Setting Preferences in the"Security Tab" on page 24.
Recoverable Items Folder
When the Recoverable Items folder is visible to you, the subfolders are accessible as well, including:
n Deletions:Holds messages that have been removed from the Inbox using the Delete key, menu item, or shortcut key.
n Purges:Holds messages that have been removed from a mailbox via the "Recover Deleted Items" tool in Microsoft Office Outlook when a legal hold is set for a mailbox.
n Versions:Holds sent and received messages that were edited by a user in a mailbox for which a legal hold was set.
You can perform source operations on the messages in these folders, including copying and exporting. The messages in Recoverable Items and its subfolders are also included in searching, creating reports, integrity checks, and property counts.
Note:Viewing the Recoverable Items folder applies to sources only. It is not visible in target mailboxes.
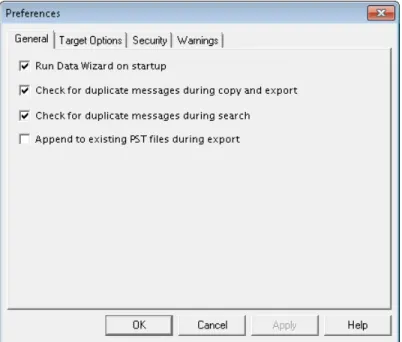
Setting Preferences
The Preferences dialog box allows you to streamline Ontrack PowerControls operations. Most of the preference settings in the four tabs are selected by default. There are two exceptions: the "Display new PST when PST limit is reached" setting in the Target Options tab, and the "Enable Tamper-Proof Target" setting in the Security tab. If you change the settings, they are stored and reloaded on the next run of Ontrack PowerControls.
General Tab
The General tab governs the tasks that Ontrack PowerControls performs and the location of the license file.
Figure 1-16: The General tab in the Preferences dialog box
To change the General preference settings
1. On theEditmenu, clickPreferences, then clickGeneral. 2. Select or clear the following check boxes as desired:
n Run Data Wizard on startup:The Data Wizard will launch every time you open Ontrack
PowerControls.
n Check for duplicate messages during copy and export:When restoring Microsoft
Exchange Server data, Ontrack PowerControls does not copy duplicates of a message to the destination folder if a message already exists in the destination folder. Selecting this preference setting results in slower copy performance.
n Check for duplicate messages during search:Ontrack PowerControls will not return duplicates of a message during a search. For example, if the same message exists in two or more data stores, only the first message found is listed in the search results. Selecting this preference setting results in slower search performance.
n Append to existing PST files during export:If selected, Ontrack PowerControls updates
previously exported PST files with new messages from the export process. If cleared, a new PST file is created when exporting data.
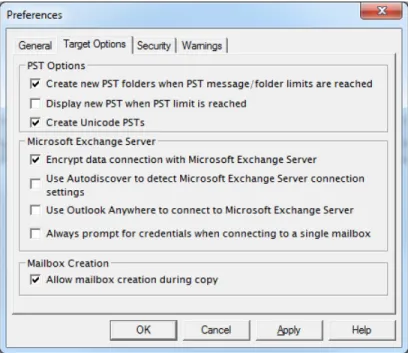
Target Options Tab
The Target Options tab governs the target-related tasks that Ontrack PowerControls performs.
Figure 1-17: The Target Options tab in the Preferences dialog box
To change the Target Options preference settings
1. On theEditmenu, clickPreferences, then clickTarget Options.
2. In the PST Options group, select or clear the following check boxes as desired:
n Create new PST folders when PST message/folder limits are reached:Ontrack
PowerControls automatically creates new folders (for example, Inbox) when the 16,383 messages/folder limit is reached. After Ontrack PowerControls creates a new folder, it continues to restore Microsoft Exchange Server data where it left off. For more information, see"Limits for PST and Folder Targets" on page 111.
n Display new PST when PST limit is reached:When the limit for a PST is reached in the Target pane, Ontrack PowerControls automatically displays the overflow PST.
n Create Unicode PSTs: If selected, Ontrack PowerControls always creates Unicode PSTs. If cleared, Ontrack PowerControls creates non-Unicode PSTs.
Note:By default, the limit for a Unicode PST file in Microsoft Office Outlook 2003 and later is configured to be 20 GB. As a result, exporting Unicode PST files larger than 20 GB is not supported.
3. In the Microsoft Exchange Server group, select or clear the following check boxes as desired:
n Encrypt data connection with Microsoft Exchange Server:If selected, Ontrack
PowerControls will use an encrypted connection to send data to the Microsoft Exchange Server. Clear this if you are using an unencrypted connection.
n Use Autodiscover to detect Microsoft Exchange Server connection settings:If
selected, Ontrack PowerControls attempts to use Autodiscover to detect profile settings for connecting to the target Microsoft Exchange Server.
n Use Outlook Anywhere to connect to Microsoft Exchange Server:If selected, Ontrack PowerControls uses Outlook Anywhere settings to connect to the target Microsoft Exchange Server. For more information, see"Outlook Anywhere and Autodiscover" on page 29.
n Always prompt for credentials when connecting to a single mailbox:If selected,
Ontrack PowerControls requests a username and password each time it connects to a mailbox on a Microsoft Exchange Server. This option requires a user to provide credentials when connecting to a single mailbox, even when the logged in user is connecting to their own mailbox, or when managed passwords are set up for the Microsoft Exchange Server.
4. In the Mailbox Creation group, select or clear the following check boxes as desired:
n Allow mailbox creation during copy:If selected and a mailbox copy is initiated by
you, mailboxes can be created during a mailbox copy. If it is cleared, mailbox creation cannot take place during copy. This setting has no effect on manual mailbox creation.
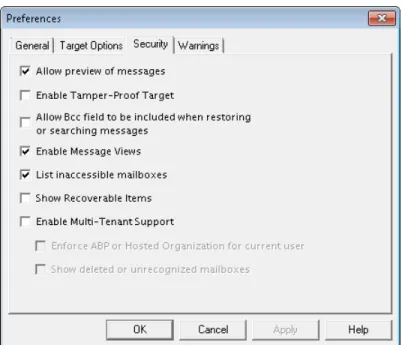
Security Tab
The Security tab controls the level of information available to the user when using the application and governs the tasks that person can perform.
The options in the Security tab are modifiable by default only by users that belong to the Administrator Group. The options are stored in the registry: HKEY_LOCAL_
MACHINE\software\ontrack\powercontrols.
The Ontrack PowerControls Installation program sets this registry key to have read/write access to users in the Administrators group and read-only access to any user in the Users group.
The settings on the Security tab can also be set and managed by an Administrator using the Settings service on the Kroll Ontrack Administrative Server (KOAS). In that situation, you need to contact your Kroll Ontrack Administrative Server (KOAS) administrator to change the settings on the Security tab.
Figure 1-18: The Security tab in the Preferences dialog box
To change the security preference settings
1. On theEditmenu, clickPreferences, then clickSecurity. 2. Select or clear the following check boxes as desired:
n Allow preview of messages:If this option is not selected, you will not have the ability to
open or preview messages in the source or target.
n Enable Tamper-Proof Target:If this option is selected, Ontrack PowerControls does not
allow you to delete messages or folders in the target or have the ability to rename folders in the target. You only have the ability to add (copy) to the target.
n Allow Bcc field to be included when restoring or searching messages:If this option is selected, Ontrack PowerControls includes Bcc information when restoring or searching messages. This means that a recipient is able to see Bcc recipients that he or she was not intended to see. It also means that searching with the "Sent to" option returns messages for Bcc recipients.
n Enable Message Views:If this option is selected, it makes the Message Views available. n List inaccessible mailboxes:When Ontrack PowerControls connects to a Microsoft
Exchange Server, it can display both accessible and inaccessible mailboxes. If this option is selected, the inaccessible mailboxes listed in the directory appear and are display-only.
n Note:Clearing this option while you have mailboxes open refreshes the mailbox list and no
n Show Recoverable Items:Selecting this option allows the "Recoverable Items" folder to be
displayed under your mailbox, enabling you to have access to any deleted items. It also provides access to the "Purges" and "Versions" folders, which are also sub-folders of "Recoverable Items."
Note:This setting only applies to Microsoft Exchange Server 2010 and later.
Important:Selecting the Show Recoverable Items preference causes your
Microsoft Exchange Server 2010 and later EDB sources to close. A warning message appears giving you the option to cancel or continue changing the setting.
n Enable Multi-Tenant Support:If this option is selected, multi-tenant support is enabled. This allows you to filter a source or target from a list of Microsoft Exchange Server 2010 through SP3 hosted organizations or Microsoft Exchange Server 2010 SP2 and later Address Book Policies (ABPs). It also selects and opens all mailboxes or displays mailboxes not contained in any hosted organization (hosted environment only).
l Enforce ABP or Hosted Organization for current user:If this option is selected, you cannot select from a list of hosted organizations or Address Book Policies (ABPs) from source or target dialog boxes. Rather, you are limited to opening only the mailboxes included in the Global Address List (GAL) of your assigned ABP or mailboxes contained in the hosted organization to which you belong.
Note:This option is only available when Enable Multi-tenant Support is selected.
l Show deleted or unrecognized mailboxes:When this option is selected, Ontrack PowerControls opens mailboxes not found in the current environment. These
unrecognized mailboxes may have been previously present in the environment and were deleted or are mailboxes from a different environment. Unrecognized mailboxes are opened and displayed in the source tree, in conjunction with the selected ABP or organization mailboxes. This option only applies to the opening of source EDBs.
Note:This option is only available when Enable Multi-tenant Support is selected.
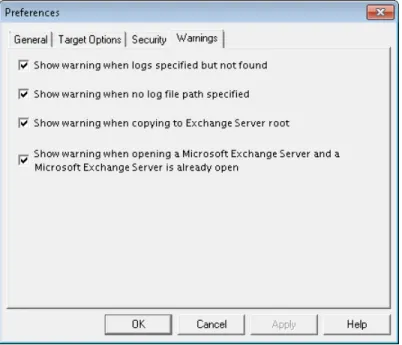
Warnings Tab
The Warnings tab controls whether or not warning messages appear when various tasks are performed.
Figure 1-19: The Warnings tab in the Preferences dialog box
To change the security preference settings
1. On theEditmenu, clickPreferences, then clickWarnings. 2. Select or clear the following check boxes as desired:
n Show warning when logs specified but not found:Ontrack PowerControls warns you when
opening an EDB file if no .log files were found at the specified directory.
n Show warning when no log file path specified:Ontrack PowerControls warns you when
opening an EDB file if a .log file path has not been specified.
n Show warning when copying to Microsoft Exchange Server root:Ontrack PowerControls
warns you when you are about to copy a large amount of data to the Microsoft Exchange Server root.
n Show warning when opening a Microsoft Exchange Server and a Microsoft Exchange
Server is already open:This warning appears when you attempt to connect to either a single mailbox or all mailboxes on a Microsoft Exchange Server when a target Microsoft Exchange Server connection is already open in Ontrack PowerControls.
Chapter 2: Using Ontrack
PowerControls
Overview
You can open a source Microsoft Exchange Server Database (EDB) file or PST file and specify a target PST file or target Microsoft Exchange Server by using one of the following methods:
n Use the Data Wizard.
n Open the source database and target mailboxes from the Ontrack PowerControls main
window.
Note:You cannot open the same PST file as both source and target.
Mailbox Criteria
When selecting the EDB Source Files, you can use the "Mailbox Criteria (optional)" box to limit the number of mailboxes that are opened and displayed in the Source pane. This box appears on the Select Source Files dialog box (opened by clicking File then Open Source) or the Source Selection page of the Data Wizard.
When you enter a string in the Mailbox Criteria box, Ontrack PowerControls matches your entry against the display name and alias of the mailboxes to select data in the source database. Only mailboxes matching your entries are displayed on the Source pane.
Note:With Microsoft Exchange Server 2013 and later, Ontrack PowerControls matches your Mailbox Criteria box string entry against the display name only.
le "string contains" match and is not case sensitive. You can use a semi-colon to separate and enter multiple strings. If you want to include a semi-colon in one of your entries, use double quotes around that entry.
Mailbox criteria only works with mailbox stores, it does not work with public folder stores. If you use mailbox criteria on a public folder store, it is not used and all public folders are opened.
Note:Any mailboxes which do not match the entered string do not appear in the Source pane and are not included in any subsequent tasks, such as searching, copying, and exporting of the entire database.
Multi-Tenancy Support
Microsoft Exchange Server 2010 and later includes features that aid multi-tenancy deployments. Ontrack PowerControls provides support for the Exchange Hosted Organizations feature
When selecting the Microsoft Exchange Server 2010 and later EDB Source File or Target Server, you can use the Multi-Tenancy Criteria box to limit the number of mailboxes that are opened and displayed in the Source and Target panes. The Multi-Tenancy Criteria box appears on the following pages of the Data Wizard:
n Source Selection page n Target Selection page
When Multi-Tenancy Support is enabled, you can filter a source or target from a list of hosted organizations or Address Book Policies (ABPs), as well as select and open all mailboxes or view mailboxes not contained in any hosted organization (hosted environment only).
Activate Multi-Tenancy Support using the Security tab on the Preferences dialog box. For more information, see"Security Tab" on page 24.
Outlook Anywhere and Autodiscover
In Microsoft Exchange Server, the Outlook Anywhere feature (also known as RPC over HTTP) allows clients to connect using HTTP. This enables users outside of an organization's network to connect to the Microsoft Exchange Server without having to use a VPN. Outlook Anywhere is supported by Microsoft Outlook 2003 and later, and Microsoft Exchange Server 2007 and later.
Note:Microsoft Outlook 2003 is not supported for Microsoft Exchange Server 2013 or later.
With Microsoft Exchange Server 2013 and later, Direct RPC access to the Microsoft Exchange Server is no longer supported, so Outlook Anywhere is required to connect to the server. Ontrack PowerControls supports connecting to a Microsoft Exchange Server target using Outlook Anywhere
Autodiscover simplifies the process of connecting to a Microsoft Exchange Server by returning the connection settings when requested by a client application. Clients such as Microsoft Outlook can retrieve the connection settings by issuing a request to Autodiscover with the user's SMTP email address. These settings are then used to configure the user's profile and connect. Autodiscover is supported by Microsoft Outlook 2007 and later, and Microsoft Exchange Server 2007 and later.
Ontrack PowerControls supports using Autodiscover when connecting to a Microsoft Exchange Server target.
If you are using Outlook Anywhere to connect to a target Microsoft Exchange Server, Ontrack PowerControls uses Autodiscover to determine the correct connection policies. If Autodiscover is not in use or cannot determine the connection polices, the Outlook Anywhere page appears. The Outlook Anywhere page follows the Target Selection page on the Data Wizard and records the protocol and verification method used when Ontrack PowerControls connects to a target Microsoft Exchange Server. The Outlook Anywhere page displays the values from the most recent successful connection using Outlook Anywhere. The values are empty if no previous
You can configure Ontrack PowerControls to use Outlook Anywhere and Autodiscover on the Target Options tab of the Preference dialog box, where the Microsoft Exchange Server group contains the following check boxes:
n Use Autodiscover to detect Microsoft Exchange Server connection settings n Use Outlook Anywhere to connect to Microsoft Exchange Server
The following table explains the actions Ontrack PowerControls performs based on the possible combinations of selecting or clearing these two check boxes.
Use Autodis-cover to detect
Microsoft Exchange Server con-nection settings Use Outlook Anywhere to connect to Microsoft Exchange Server Action Selected (and Autodiscover response successful) Selected
Ontrack PowerControls connects to the target Microsoft Exchange Server with Outlook Anywhere using the settings returned by Autodiscover.
Selected (and Autodiscover not contacted)
Selected
If a server name was entered on the Target Selection page, Outlook Anywhere page appears. If no server name was entered, an error message appears and the wizard stays on the Target Selection page.
Selected (and Autodiscover
response successful)
Cleared
Ontrack PowerControls connects to the target Microsoft Exchange Server with RPC over TCP/IP using the server returned by Autodiscover.
Selected (and Autodiscover not contacted)
Cleared
If a server name was entered on the Target Selection page, Ontrack PowerControls connects to the target Microsoft Exchange Server with RCP over TCP/IP. If no server name was entered, an error message appears and the wizard stays on the Target Selection page.
Cleared Selected The Outlook Anywhere page appears.
Cleared Cleared Ontrack PowerControls connects to the target Microsoft Exchange Server with RCP over TCP/IP.
Connecting to Office 365
When connecting to a hybrid environment (where both on-premise and Office 365 mailboxes are present), the following apply:
n Selecting Connect to all (target) filters out Office 365 mailboxes and displays only
on-premise mailboxes.
n Mailbox creation creates mailboxes in the on-premise environment, but only if connecting
to on-premise mailboxes. This includes connect-to-all.
n Copy edb to root of sever (with mailbox creation) "Creates mailboxes in the on-premise
environment, but only if connecting to on-premise mailboxes. This includes connect-to-all.
n Copy mailbox to root of server (with mailbox creation) "Creates mailboxes in the
on-premise environment, but only if connecting to on-on-premise mailboxes. This includes connect-to-all
n Multi-tenancy filters out Office 365 mailboxes and displays only on-premise mailboxes. If the
ABP contains both on-premise and Office 365, only on-premise mailboxes are displayed. If ABP contains only Office 365 mailboxes, no mailboxes are displayed.
Credentials and Permissions
With the exception to connecting a single target mailbox in Ontrack PowerControls, the credentials (username and password) used to log into the Windows system running Ontrack PowerControls must have the permissions and rights to perform the following Ontrack PowerControls tasks:
n Connect to target Microsoft Exchange servers (all mailboxes) n Create users/mailboxes
n Use multi-tenancy information when opening a source or target
If the credentials do not have the correct permissions, you cannot complete the tasks. During the following tasks, if the credentials do not have the correct permissions, you are prompted to enter a username and password with the correct permissions:
n Connect to target mailboxes (single mailbox)
n Connect to target public folders (when connecting to a single mailbox)
Keyboard Shortcuts
The following table contains keyboard shortcuts for many of the common tasks performed when using Ontrack PowerControls.
Menu Bar Keyboard Shortcut
File Menu
Open Source Ctrl+S
Open Target PST Ctrl+T
Open Target Microsoft Exchange Server Ctrl+E
Close Store Ctrl+L
Use Data Wizard Ctrl+W
Exit Alt+F4
Edit Menu
Copy Selection to Clipboard Ctrl+C
Paste Copied Item(s) Ctrl+V
Paste Special Ctrl+Y
Delete DEL
Rename Ctrl+R
New Folder Ctrl+N
New Mailbox Ctrl+M
Move To Folder (Microsoft Exchange Server as a target - Find window) Ctrl+Shift+V Cut (Microsoft Exchange Server as a target - Find window) Ctrl+X
View Menu
Refresh Screen F5
Tools Menu
Export Ctrl+P
Export Organizational Forms Ctrl+G
Integrity Check Ctrl+I
Create Reports Ctrl+Q
Find F3
Online Help
Opening a Microsoft Exchange Server as a Target
You can open live Microsoft Exchange Servers as a target within Ontrack PowerControls using the Data Wizard or Main Window. This means you can connect to one live Microsoft Exchange Server at a time, establishing a single mailbox connection or connecting to all accessible mailboxes and displaying a list of the mailboxes found in that Microsoft Exchange Server. A status indicator tells you if you have permission rights to view a mailbox.
Note:The Microsoft Exchange Server as a target feature is only supported if the system running Ontrack PowerControls is on the same domain as the Microsoft Exchange Server.
Recommendation: If connecting to a Microsoft Exchange Server 2010 CAS Array, use the fully qualified domain name of the CAS Array for the Server Name (for example,
casarray.domain.name).
Mailbox Access
When connecting to a single mailbox, the Target pane populates with only the specified single mailbox. When connecting to all mailboxes on a Microsoft Exchange Server, the Target pane populates with the list of mailboxes found in that Microsoft Exchange Server.
Note:You can connect to only one live Microsoft Exchange Server at a time. If you attempt to connect to an additional live Microsoft Exchange Server while a server is already open, the current server connection closes.
If your Administrator is running Kroll Ontrack Administrative Server (KOAS) and has the Mailbox Permission plug-in activated, your access to mailboxes within a mailbox store (private EDB file) may be affected depending on the permission settings.
If permission to access a mailbox is denied, you are not able to access the contents of that specific mailbox. The inaccessible mailbox either in the Source or Target pane displays with an inaccessible icon , or is hidden depending on your Preference setting. For more information, see"Setting Preferences" on page 21.
Note:Contact your Kroll Ontrack Administrative Server systems administrator if you need access to inaccessible mailboxes.
An EDB file that is denied access through the KOAS Mailbox Permission setting affects:
n Find Window:An inaccessible mailbox's contents cannot be processed during a search. n Message Views:Any message items in an inaccessible mailbox are not displayed in a
Conversation Table View or an Attachment Table View.
n CAS as a Target:Only accessible mailbox messages in the EDB source are processed when populating a CAS profile.
n Exporting:Inaccessible mailboxes cannot be exported.
n Integrity Checking:Inaccessible mailboxes cannot have an Integrity Check performed on
them.
n Properties:An inaccessible mailbox's properties cannot be viewed. n Reports:Reports cannot be generated for inaccessible mailboxes.
Connection Interruption
If errors are encountered that interrupt the communication between Ontrack PowerControls and the Kroll Ontrack Administrative Server, an error appears. You can choose to retry the failed communication attempt. If the error is transient (for example, a temporary network failure) and has been addressed, retrying allows Ontrack PowerControls to continue.
Note:If the error cannot be overcome, or more than 8 minutes has passed since the fault occurred, a successful retry is not possible.
Mailbox Functions
Paste, Paste Special, folder creation, folder renaming, and the search functions are available for the accessible mailboxes. A mailbox or server cannot be renamed.
Using the Data Wizard
The Data Wizard guides you through the loading of the Microsoft Exchange Database (EDB), PST files, or content analysis store (CAS) files into Ontrack PowerControls, and shows you how to specify the target PST file or Microsoft Exchange Server.
Configuring Ontrack PowerControls for Microsoft Exchange
Server
If Kroll Ontrack Administrative Server is connected and activated, you may have to manually locate a server if Ontrack PowerControls cannot locate one automatically. By default, the automatic location is attempted. If it fails, an error message appears.
If you select "No," Ontrack PowerControls closes. If you select "Yes," the Connection Point Manager window appears.
Figure 2-1: Connection Point Manager
To add a server
1. ClearUse Active Directory to locate serverif it is selected. 2. ClickAdd. TheServer Informationwindow appears.
Figure 2-2: Enter Server Information
3. Enter theServer addressname or IP address and clickOK.
Before You Use the Data Wizard
Use the Ontrack PowerControls ExtractWizard if you have not yet restored backed-up Microsoft Exchange Server Information Store data. The Ontrack PowerControls ExtractWizard reads previous Microsoft Exchange Server backups and restores EDB files to any machine, volume, or folder. For more information, see theOntrack PowerControls ExtractWizard User Guide.
Opening the Data Wizard
The first time you start Ontrack PowerControls, the Data Wizard opens at the Source Selection page.
When working in the main window, you can return to the Data Wizard at any time.
To manually start the Data Wizard
n On theFilemenu, clickUse Wizard.
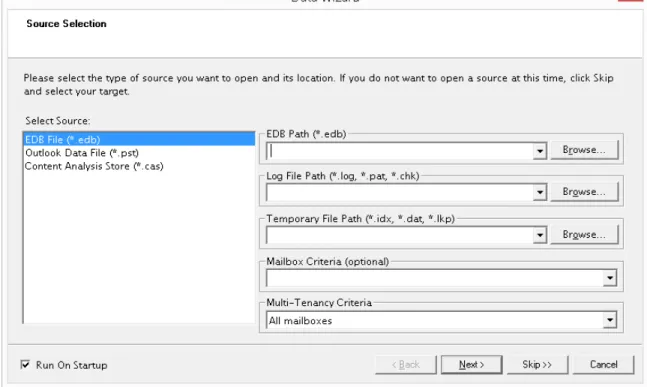
Data Wizard: Source Selection
On the Source Selection page of the Data Wizard, specify the type and path of the source from the following options:
n A PST file n An EDB file
n A Content Analysis Store
Note:
n If you do not want to select a source file at this time, clickSkip.
n If you do not want to run the Data Wizard every time you start Ontrack PowerControls,
clear theRun on Startupcheck box.
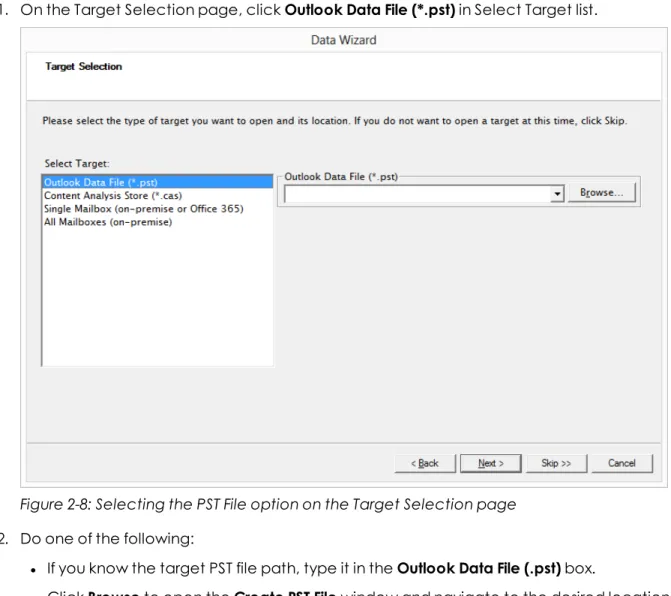
To specify a PST file as the source
1. On the Source Selection page, clickOutlook Data File (*.pst)inSelect Sourcelist.
Note:You can also open Microsoft Explorer, click the PST file you want to open as the source, then drag it to the Select Source list and skip the next step.
Figure 2-3: Selecting a PST file as the source
2. In theOutlook Data File (*.pst)box, clickBrowseto open the Create PST File window and locate the source PST file.
3. ClickNext.
To specify an EDB file as the source
1. On the Source Selection page, clickEDB File (*.edb)inSelect Sourcelist.
Note:You can also open Microsoft Explorer, click the EDB file you want to open as the source, then drag it to the Select Source list and skip to step 6.
Figure 2-4: Selecting an EDB file as the source
2. In theEDB Path (*.edb)box, clickBrowseand use the Open window to locate the source EDB file.
3. In theLog File Path (*.log, *.pat, *.chk)box, clickBrowseto and use the Browse For Folder window to choose the log files associated with the source EDB file.
Important:After you select an EDB file, the Log File Path box defaults to the source EDB file path, even if the log files are not in the same directory as the source EDB file. Therefore, make sure you enter the correct log file path in the Log File Path box.
4. In theTemporary File Path (*.idx, *.dat, *lkp)box, accept the default location for .idx and .dat files, or specify a new location if they require more hard drive space. For more
information, see"Guidelines for Selecting a Microsoft Exchange Server Database" on page 41.
5. If you want to view a filtered display of mailboxes in the Source pane, use theMailbox Criteria (optional)box. For more information, see"Mailbox Criteria" on page 28.
6. If multi-tenancy support is enabled, do one of the following in theMulti-Tenancy Criteria
box:
n If "Enforce ABP or Hosted Organization for current user" is not selected on the
Security tab on the Preferences dialog box, use the Multi-Tenancy Criteria box to select hosted organizations or Address Book Policies from source or target dialog boxes.
n If "Enforce ABP or Hosted Organization for current user" is selected on the Security
tab on the Preferences dialog box, use the Multi-Tenancy Criteria box to view the organization or assigned address book policy.
Figure 2-5: Selecting an EDB file as the source with multi-tenancy support
7. ClickNext.
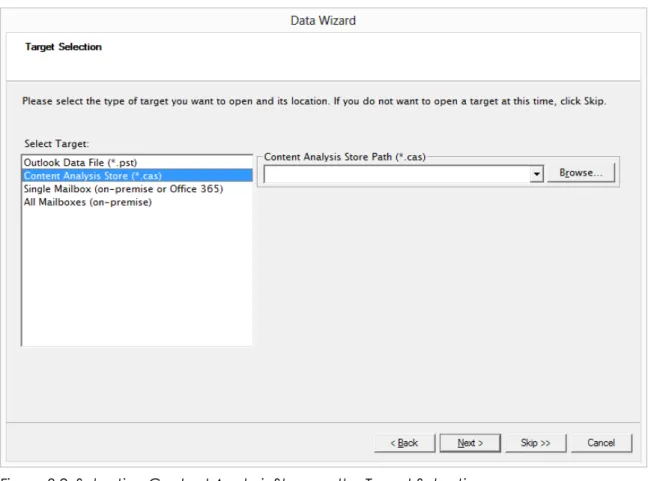
To specify a Content Analysis Store the source
1. On the Source Selection page, clickContent Analysis Store (*.cas)inSelect Sourcelist.
Note:You can also open Microsoft Explorer, click the CAS you want to open as the source, then drag it to the Select Source list and skip the next step.
Figure 2-6: Selecting a CAS as the source
2. In theContent Analysis Store Path (*.cas)box, clickBrowseto open the Create Content Analysis File window and locate the source CAS.
3. ClickNext.
The EDB or PST file appears in the Single Mailbox Recovery Source pane.
Figure 2-7: Source pane for an EDB file
Tip:You can use Windows Explorer to open an EDB, PST, or CAS file. In Windows Explorer, double-click the file or drag into the Ontrack PowerControls Source pane.