Applications
SAP Mobile Platform 2.3 SP02
Copyright © 2013 by Sybase, Inc. All rights reserved.
This publication pertains to Sybase software and to any subsequent release until otherwise indicated in new editions or technical notes. Information in this document is subject to change without notice. The software described herein is furnished under a license agreement, and it may be used or copied only in accordance with the terms of that agreement.
Upgrades are provided only at regularly scheduled software release dates. No part of this publication may be reproduced, transmitted, or translated in any form or by any means, electronic, mechanical, manual, optical, or otherwise, without the prior written permission of Sybase, Inc.
Sybase trademarks can be viewed at the Sybase trademarks page at http://www.sybase.com/detail?id=1011207. Sybase and the marks listed are trademarks of Sybase, Inc. ® indicates registration in the United States of America.
SAP and other SAP products and services mentioned herein as well as their respective logos are trademarks or registered trademarks of SAP AG in Germany and in several other countries all over the world.
Java and all Java-based marks are trademarks or registered trademarks of Oracle and/or its affiliates in the U.S. and other countries.
Unicode and the Unicode Logo are registered trademarks of Unicode, Inc.
All other company and product names mentioned may be trademarks of the respective companies with which they are associated.
Use, duplication, or disclosure by the government is subject to the restrictions set forth in subparagraph (c)(1)(ii) of DFARS 52.227-7013 for the DOD and as set forth in FAR 52.227-19(a)-(d) for civilian agencies.
Getting Started with Android Development ...1
Object API Applications ...1
Best Uses for Object API Applications ...2
Cache Synchronization ...2
Client Runtime Architecture ...3
Documentation Roadmap for SAP Mobile Platform ...4
Development Task Flow for Object API Applications ...5
Installing the Android Development Environment ...6
Installing the Android SDK ...7
Installing ADT in SAP Mobile WorkSpace ...7
Installing X.509 Certificates on Android Devices
and Emulators ...7
Generating Java Object API Code ...8
Generating Java Object API Code Using SAP
Mobile WorkSpace ...9
Generating Java Object API Code Using the
Code Generation Utility ...13
Generated Code Location and Contents ...14
Validating Generated Code ...14
Creating a Project ...15
Creating a Project in SAP Mobile WorkSpace ...15
Downloading the Latest Afaria Libraries ...18
Importing Libraries and Code ...18
Development Task Flow for DOE-based Object API
Applications ...19
Installing the Android Development Environment ...20
Installing the Android SDK ...20
Installing X.509 Certificates on Android Devices
and Emulators ...21
Generating Java Object API Code ...22
Creating a Project ...23
Creating a Project in SAP Mobile WorkSpace ...24
Downloading the Latest Afaria Libraries ...26
Importing Libraries and Code ...26
Developing the Application Using the Object API ...29
Initializing an Application ...29
Initially Starting an Application ...29
Subsequently Starting an Application ...44
Accessing MBO Data ...45
Object Queries ...45
Dynamic Queries ...46
MBOs with Complex Types ...47
Relationships ...48
Manipulating Data ...49
Creating, Updating, and Deleting MBO Records
...49
Other Operations ...50
Using submitPending and
submitPendingOperations ...51
Shutting Down the Application ...52
Closing Connections ...52
Debugging Runtime Errors and Performance Analysis
...52
End to End Tracing ...52
Tracking KPI ...54
Uninstalling the Application ...56
Deleting the Database and Unregistering the
Application ...56
Testing Applications ...57
Testing an Application Using a Emulator ...57
Client-Side Debugging ...58
Server-Side Debugging ...59
Improve Synchronization Performance by Reducing
the Log Record Size ...60
Reducing the Log Record Size ...64
Localizing Applications ...67
Packaging Applications ...69
Signing ...69
Client Object API Usage ...71
Client Object API Reference ...71
Application APIs ...71
Application ...72
ConnectionProperties ...84
ApplicationSettings ...93
ConnectionPropertyType ...97
Afaria APIs ...102
Using Afaria to Provision Configuration Data ....102
Using Certificates from Afaria for Authentication
...104
Connection APIs ...106
ConnectionProfile ...106
Set Database File Property ...108
Synchronization Profile ...109
Connect the Data Synchronization Channel
Through a Relay Server ...109
Asynchronous Operation Replay ...110
Authentication APIs ...110
Logging In ...111
Sample Code: Setting Up Login Credentials ...111
Single Sign-On With X.509 Certificate Related
Object API ...112
Personalization APIs ...113
Type of Personalization Keys ...113
Getting and Setting Personalization Key Values
...114
Synchronization APIs ...114
Managing Synchronization Parameters ...115
Performing Mobile Business Object
Synchronization ...115
Message-Based Synchronization APIs ...116
Push Synchronization Applications ...120
Retrieving Information about Synchronization
Groups ...121
Log Record APIs ...121
LogRecord API ...122
Logger APIs ...124
Change Log API ...124
getEntityType ...124
getOperationType ...125
getRootEntityType ...125
getRootSurrogateKey ...126
getSurrogateKey ...126
Methods in the Generated Database Class ...127
Code Samples ...128
Security APIs ...129
Encrypt the Database ...129
End to End Encryption and Compression
Support APIs ...130
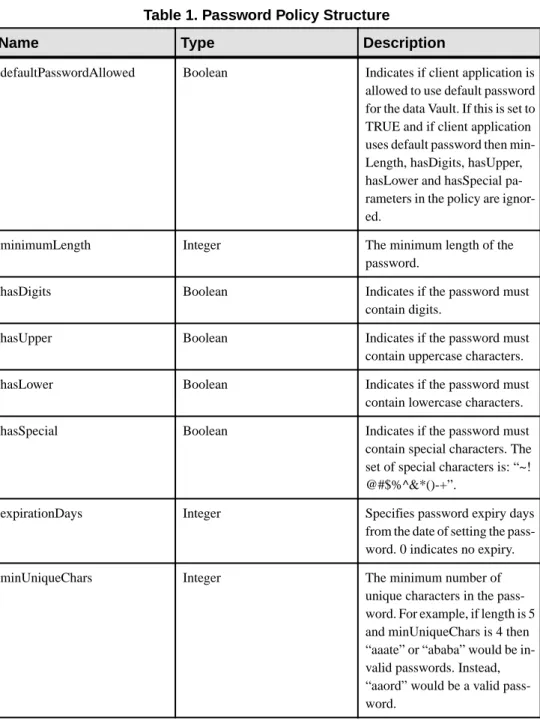
DataVault ...131
Callback and Listener APIs ...150
CallbackHandler API ...150
ApplicationCallback API ...157
SyncStatusListener API ...159
Query APIs ...160
Retrieving Data from Mobile Business Objects . 161
Retrieving Relationship Data ...169
Back-end Search ...170
Persistence APIs ...171
Operations APIs ...171
Object State APIs ...176
Generated Package Database APIs ...182
Large Attribute APIs ...182
MetaData API ...192
DatabaseMetaData ...192
ClassMetaData ... 192
EntityMetaData ... 192
AttributeMetaData ...193
Exceptions ... 193
Exception Handling ...193
Exception Classes ... 196
Error Codes ... 197
Index
...201
Getting Started with Android Development
Use advanced SAP® Mobile Platform features to create applications for Android devices. The audience is advanced developers who may be new to SAP Mobile Platform.
This guide describes requirements for developing a device application for the platform, how to generate application code, and how to customize the generated code using the Client Object API. Also included are task flows for the development options, procedures for setting up the development environment, and Client Object API documentation.
Companion guides include:
• SAP Mobile WorkSpace - Mobile Business Object Development • Supported Hardware and Software
• Troubleshooting.
• A complete Client Object API reference is available in SMP_HOME \MobileSDK23\ObjectAPI\apidoc\android
• Fundamentals contains high-level mobile computing concepts, and a description of how SAP Mobile Platform implements the concepts in your enterprise.
• Developer Guide: Migrating to SAP Mobile SDK contains information for developers who are migrating device applications to a newer software version, and changes to MBOs, projects, and the SAP Mobile Server.
Object API Applications
Object API applications are customized, full-featured mobile applications that use mobile data model packages, either using mobile business objects (MBOs) or Data Orchestration Engine, to facilitate connection with a variety of enterprise systems and leverage
synchronization to support offline capabilities.
The Object API application model enables developers to write custom code — C#, Java, or Objective-C, depending on the target device platform — to create device applications. Development of Object API applications provides the most flexibility in terms of leveraging platform specific services, but each application must be provisioned individually after being compiled, even for minor changes or updates.
Development involves both server-side and client-side components. SAP Mobile Server brokers data synchronization and transaction processing between the server and the client components.
• Server-side components address the interaction between the enterprise information system (EIS) data source and the data cache. EIS data subsets and business logic are
encapsulated in artifacts, called mobile business object packages, that are deployed to the SAP Mobile Server.
• Client-side components are built into the mobile application and address the interaction between the data cache and the mobile device data store. This can include synchronizing data with the server, offline data access capabilities, and data change notification. These applications:
• Allow users to connect to data from a variety of EIS systems, including SAP® systems. • Build in more complex data handling and logic.
• Leverage data synchronization to optimize and balance device response time and need for real-time data.
• Ensure secure and reliable transport of data.
Best Uses for Object API Applications
Synchronization applications provide operation replay between the mobile device, the middleware, and the back-end system. Custom native applications are designed and built to suit specific business scenarios from the ground up, or start with a bespoke application and be adapted with a large degree of customization.
Cache Synchronization
Cache synchronization allows mapping mobile data to SAP Remote Function Calls (RFCs) using Java Connector (JCO) and to other non-SAP data sources such as databases and Web services. When SAP Mobile Platform is used in a stand-alone manner for data
synchronization (without Data Orchestration Engine), it utilizes an efficient bulk transfer and data insertion technology between the middleware cache and the device database.
In an SAP Mobile Platform standalone deployment, the mobile application is designed such that the developer specifies how to load data from the back end into the cache and then filters and downloads cache data using device-supplied parameters. The mobile content model and the mapping to the back end are directly integrated.
This style of coupling between device and back-end queries implies that the back end must be able to respond to requests from the middleware based on user-supplied parameters and serve up mobile data appropriately. Normally, some mobile-specific adaptation is required within SAP Business Application Programming Interfaces (BAPI). Because of the direct nature of application parameter mapping and RBS protocol efficiencies, SAP Mobile Platform cache synchronization deployment is ideal:
• With large payloads to devices (may be due to mostly disconnected scenarios) • Where ad hoc data downloads might be expected
• For SAP® or non-SAP back ends
Large payloads, for example, can occur in task worker (service) applications that must access large product catalogs, or where service occurs in remote locations and workers might
synchronize once a day. While SAP Mobile Platform synchronization does benefit from middleware caching, direct coupling requires the back end to support an adaptation where mobile user data can be determined.
Client Runtime Architecture
The goal of synchronization is to keep views (that is, the state) of data consistent among multiple tiers. The assumption is that if data changes on one tier (for example, the enterprise system of record), all other tiers interested in that data (mobile devices, intermediate staging areas/caches and so on) are eventually synchronized to have the same data/state on that system.
The SAP Mobile Server synchronizes data between the device and the back-end by maintaining records of device synchronization activity in its cache database along with any cached data that may have been retrieved from the back-end or pushed from the device. The SAP Mobile Server employs several components in the synchronization chain.
Mobile Channel Interfaces
Two main channel interfaces provide notifications and data transport to and from remote devices.
• The messaging channel serves as the abstraction to all device-side notifications (BlackBerry Enterprise Service, Apple Push Notification Service, and others) so that when changes to back-end data occur, devices can be notified of changes relevant for their application and configuration.
The messaging channel sends these types of communications:
• Application registration - the messaging channel is used for application registration before establishing a connection to the SAP Mobile Server.
• Change notifications - when the SAP Mobile Server detects changes in the back-end EIS, the SAP Mobile Server can send a notification to the device. By default, sending change notifications is disabled, but you can enable sending change notifications per synchronization group.
To capture change notifications, you can register an onSynchronize callback. The synchronization context in the callback has a status you can retrieve.
• Operation replay records - when synchronizing, these records are sent to the SAP Mobile Server and the messaging channel sends a notification of replayFinished. The application must call another synchronize method to retrieve the result.
• SAP Data Orchestration Engine (DOE) application synchronization - the messaging channel is used for synchronization for DOE applications.
• The synchronization channel sends data to keep the SAP Mobile Server and client synchronized. The synchronization is bi-directional.
Mobile Middleware Services
Mobile middleware services (MMS) arbitrate and manage communications between device requests from the mobile channel interfaces in the form that is suitable for transformation to a
common MBO service request and a canonical form of enterprise data supplied by the data services.
Data Services
Data services is the conduit to enterprise data and operations within the firewall or hosted in the cloud. Data services and mobile middleware services together manage the cache database (CDB) where data is cached as it is synchronized with client devices.
Once a mobile application model is designed, it can be deployed to the SAP Mobile Server where it operates as part of a specialized container-managed package interfacing with the mobile middleware services and data services components. Cache data and messages persist in the databases in the data tier. Changes made on the device are passed to the mobile middleware services component as an operation replay and replayed against the data services interfaces with the EIS. Data that changes on the EIS as a result of device changes, or those originating elsewhere, are replicated to the device database.
Documentation Roadmap for SAP Mobile Platform
SAP® Mobile Platform documents are available for administrative and mobile development user roles. Some administrative documents are also used in the development and test environment; some documents are used by all users.
See Documentation Roadmap in Fundamentals for document descriptions by user role. Check the Product Documentation Web site regularly for updates: http://sybooks.sybase.com/ sybooks/sybooks.xhtml?id=1289&c=firsttab&a=0&p=categories, then navigate to the most current version.
Development Task Flow for Object API
Applications
Describes the overall development task flow for Object API applications, and provides information and procedures for setting up the development environment, and developing device applications.
This diagram illustrates how you can develop a device application directly from mobile business objects (MBOs), using the Object API and custom device application coding. This is how you create device applications with sophisticated UI interaction, validation, business logic, and performance.
The Object API provides the core application services described in the diagram.
The Authentication APIs provide security by authenticating the client to the SAP Mobile Server.
The Synchronization APIs allow you to synchronize mobile business objects (MBOs) based on synchronization parameters, for individual MBOs, or as a group, based on the group's synchronization policy.
The Application and Connection APIs allow clients to register with and connect to the SAP Mobile Server. The Callback Handler and Listener APIs, and the Target Change Notification APIs provide notifications to the client on operation success or failure, or changes in data. With non-DOE-based applications, connectivity uses the MobiLink™ channel and notifications use the Messaging channel.
1. Installing the Android Development Environment
Install the Android development environment, and prepare Android devices for authentication.
2. Generating Java Object API Code
Generate object API code containing mobile business object (MBO) references, which allows you to use APIs to develop device applications for Android devices. You can generate code either in SAP Mobile WorkSpace, or by using a command line utility for generating code.
3. Creating a Project
Build a device application project.
4. Developing the Application Using the Object API
Use the Object API to develop the application. An application consists of building blocks which the developer uses to start the application, perform functions needed for the application, and shutdown and uninstall the application.
5. Testing Applications
Test native applications on a device or simulator. 6. Localizing Applications
Localize an Android application by creating default and alternate resources. 7. Packaging Applications
Package applications according to your security or application distribution requirements.
Installing the Android Development Environment
Install the Android development environment, and prepare Android devices for authentication.
1. Installing the Android SDK Install the Android SDK.
2. Installing ADT in SAP Mobile WorkSpace
Install the supported version of Android Development Tools (ADT) directly in the SAP Mobile WorkSpace Eclipse environment.
3. Installing X.509 Certificates on Android Devices and Emulators
Install the .p12 certificate on the Android device or emulator for authentication. A certificate provides an additional level of secure access to an application, and may be required by an organization's security policy.
See also
Installing the Android SDK
Install the Android SDK.1. Confirm that your system meets the requirements at http://developer.android.com/sdk/ requirements.html.
2. Download and install the supported version of the Android SDK starter package. See the Google Android Versions topic for your platform in Supported Hardware and Software at http://sybooks.sybase.com/sybooks/sybooks.xhtml?
id=1289&c=firsttab&a=0&p=categories. Select the appropriate version of the SAP Mobile Platform document set.
3. Launch the Android SDK Manager and install the Android tools (SDK Tools and SDK Platform-tools) and the Android API.
4. Launch the Android Virtual Device Manager, and create an Android virtual device to use as your emulator.
Installing ADT in SAP Mobile WorkSpace
Install the supported version of Android Development Tools (ADT) directly in the SAP Mobile WorkSpace Eclipse environment.
Follow the instructions for installing the ADT Plugin for Eclipse at http:// developer.android.com/sdk/installing/installing-adt.html.
Installing X.509 Certificates on Android Devices and Emulators
Install the .p12 certificate on the Android device or emulator for authentication. A certificate provides an additional level of secure access to an application, and may be required by an organization's security policy.Prerequisites
• Java SE Development Kit (JDK) must be installed. • The Android SDK must be installed.
Task
1. Connect the Android device to your computer with the USB cable. 2. To install using Eclipse with the ADT plugin:
Note: USB debugging must be enabled.
a) Open the Windows File Explorer view. From the menu bar, navigate to Window > Show View > Other.
b) In the Show View dialog, expand the Android folder and select File Explorer. c) Expand mnt > sdcard and select the sdcard folder.
d) In the top right of the File Explorer view, click Push a file onto the device. e) In the Put File on Device dialog, select the certificate and click Open. 3. To install using Windows Explorer:
Note: USB debugging must be disabled. a) Open Windows Explorer
b) Under your computer, click the Android device to expand the folder. c) Click Device Storage, navigate to and select the certificate.
d) Import the certificate to the Device Storage folder. 4. To install using the Android Debug Bridge (adb):
Note: USB debugging must be enabled. You can enable USB debug mode from the device menu by selecting Settings > Application > USB Debugging.
a) Open the command line directory to the adb.exe file, for example, C:\Program Files\android-sdk-windows\tools, or C:\Program Files
\android-sdk-windows\platform-tools
b) Run the command: adb push %PathToCert%\MyCert.p12 /sdcard/ MyCert.p12
Generating Java Object API Code
Generate object API code containing mobile business object (MBO) references, which allows you to use APIs to develop device applications for Android devices. You can generate code either in SAP Mobile WorkSpace, or by using a command line utility for generating code. Generated code can be used to leverage SAP Mobile Platform capabilities and services, and access MBO-related data: calling the mobile business object operations, object queries, and so on. This code can then be imported into an integrated development environment (IDE) of your choice to create the device application (define the user interface, application logic, and so on.
See also
• Installing the Android Development Environment on page 6 • Creating a Project on page 15
Generating Java Object API Code Using SAP Mobile WorkSpace
Use SAP Mobile WorkSpace to generate object API code containing mobile business object (MBO) references.Prerequisites
Develop the MBOs that will be referenced in the device applications you are developing. A mobile application project must contain at least one non-online MBO. You must have an active connection to the datasources to which the MBOs are bound.
Task
SAP Mobile Platform provides the Code Generation wizard for generating object API code. Code generation creates the business logic, attributes, and operations for your mobile business object.
1. Launch the Code Generation wizard.
From Action
Mobile Application Diagram
Right-click within the Mobile Application Diagram and select Generate Code.
WorkSpace Navigator
Right-click the Mobile Application project folder that contains the mobile objects for which you are generating API code, and select Generate Code.
2. (Optional; this page of the code generation wizard is seen only if you are using the Advanced developer profile). Enter the information for these options, then click Next:
Option Description
Code generation configuration
A table lists all existing named configurations plus the most recently used configuration. You can select any of these, click Next, and proceed. Ad-ditionally, you can:
• Create new configuration – click Add and enter the Name and optional
Description of the new configuration and click OK to save the
con-figuration for future sessions. You can also select Copy from to copy an existing configuration which can then be modified.
• Most recent configuration – if you click Next the first time you gen-erate code without creating a configuration, the configuration is saved and displays as the chosen configuration the next time you invoke the code generation wizard. If the most recent configuration used is a named configuration, it is saved as the first item in the configuration table, and also "Most recent configuration", even though it is still listed as the original named configuration.
4. In Select Mobile Objects, select all the MBOs in the mobile application project or select MBOs under a specific synchronization group, whose references, metadata, and dependencies (referenced MBOs) are included in the generated device code.
Dependent MBOs are automatically added (or removed) from the Dependencies section depending on your selections.
SAP Mobile WorkSpace automatically computes the default page size after you choose the MBOs based on total attribute size. If an MBO's accumulated attribute size is larger than the page size setting, a warning displays.
5. Enter the information for these configuration options:
Option Description
Language Select Java.
Platform Select the platform ( target device) for which the device client code is intended.
• Java • Android
SAP Mobile Server Specify a default SAP Mobile Server connec-tion profile to which the generated code con-nects at runtime.
Server domain Choose the domain to which the generated code will connect. If you specified an SAP Mobile Server to which you previously connected suc-cessfully, the first domain in the list is chosen by default. You can enter a different domain man-ually.
Note: This field is only enabled when an SAP
Option Description
Page size (Optional) Select the page size for the gener-ated client code. If the page size is not set, the default page size is 4KB at runtime. The default is a proposed page size based on the selected MBO's attributes.
The page size should be larger than the sum of all attribute lengths for any MBO that is inclu-ded with all the MBOs selected, and must be valid for the database. If the page size is changed, but does not meet these guidelines, object queries that use string or binary attrib-utes with a WHERE clause may fail. See MBO Attributes in Mobile Data Models: Using Mo-bile Business Objects for more information. A binary length greater than 32767 is converted to a binary large object (BLOB), and is not in-cluded in the sum; a string greater than 8191 is converted to a character large object (CLOB), and is also not included). If an MBO attribute's length sum is greater than the page size, some attributes automatically convert to BLOB or CLOB, and therefore cannot be put into a
WHERE clause.
Note: This field is only enabled when an SAP
Mobile Server is selected.
Package, Namespace, or Name Prefix • Package – enter a package name for Java. The package name must follow Java nam-ing conventions for packages. For example, no leading or trailing spaces and no special characters such as §&/, except that the first letter may be upper-case.
Option Description
Destination Specify the destination of the generated device client files. Enter (or Browse) to either a
Project path (Mobile Application project)
lo-cation or File system path lolo-cation. Select
Clean up destination before code generation
to clean up the destination folder before gener-ating the device client files.
Note: If you select Java as the language, enter a
project path, specify a mobile application project folder, and select Generated
Code as the destination. JAR files are auto-matically added to the destination for the plat-form that supports compiling of the generated client code.
Third-party jar file Enter or browse to the location of the third party jar file. For example, net_rim_api.jar for BlackBerry, or android.jar for An-droid.
If you select Java as the language, and if the BlackBerry or Android third-party JAR file has not been added, the warning The
depend-ent third-party class 'net.rim.device.api.sys-tem.ApplicationDescriptor' cannot be found or The
depend-ent third-party class 'an-droid.content.Context' can-not be found displays.
6. The check box for "Generate metadata classes" is automatically selected as read only for Android, and the "Including object manager classes" checkbox is de-selected.
7. Select Including object manager classes to generate both the metadata for the attributes and operations of each generated client object and an object manager for the generated metadata.
The Including object manager classes option is enabled only for BlackBerry and C# if you select Generate metadata classes. The object manager allows you to retrieve the metadata of packages, MBOs, attributes, operations, and parameters during runtime using the name instead of the object instance.
Note: When generating code for Android, "Generate metadata classes" is automatically selected and cannot be unselected. The "Including object manager classes" option is unavailable and unsupported.
8. Click Finish.
9. Examine the generated code location and contents. 10. Validate the generated code.
Generating Java Object API Code Using the Code Generation Utility
Use the Code Generation Utility to generate object API code containing mobile business object (MBO) references. This method of generating code allows you to automate the process of code generation, for example through the use of scripts.Prerequisites
• Use SAP Mobile WorkSpace to develop and package your mobile business objects. See SAP Mobile WorkSpace - Mobile Business Object Development > Develop > Developing a Mobile Business Object.
• Deploy the package to the SAP Mobile Server, creating files required for code generation from the command line. See SAP Mobile WorkSpace - Mobile Business Object Development > Develop > Packaging and Deploying Mobile Business Objects >Automated Deployment of SAP Mobile WorkSpace Projects.
Task
1. Locate <domain name>_package.jar in your mobile project folder. For the SMP101 example, the project is deployed to the default domain, and the deploy jar file is in the following location: SMP101\Deployment\.pkg.profile
\My_SAP_Mobile_Server\default_package.jar. 2. Make sure that the JAR file contains this file:
• deployment_unit.xml
3. Use a utility to extract the deployment_unit.xml file to another location. 4. From SMP_HOME\MobileSDK23\ObjectAPI\Utils\bin, run the
codegen.bat utility, specifying the following parameters:
codegen.bat -java -client -android -ulj deployment_unit.xml [-output <output_dir>] [-doc]
• The -output parameter allows you to specify an output directory. If you omit this parameter, the output goes into the SMP_HOME\MobileSDK23\ObjectAPI \Utils\genfiles directory, assuming codegen.bat is run from the
SMP_HOME\MobileSDK23\ObjectAPI\Utils\genfiles directory.
• The -doc parameter specifies that documentation is generated for the generated code. Ignore these warnings:
log4j:WARN No appenders could be found for logger ... log4j:WARN Please initialize the log4j system properly.
Generated Code Location and Contents
If you generated code in SAP Mobile WorkSpace, generated object API code is stored by default in the "Destination" location you specified during code generation. If you generated code with the Code Generation Utility, generated object API code is stored in the SMP_HOME
\MobileSDK23\ObjectAPI\Utils\genfiles folder after you generate code. The contents of the folder is determined by the options you selected in the Generate Code wizard in SAP Mobile WorkSpace, or specified in the Code Generation Utility. The contents include generated class files that contain:
• MBO – class which handles persistence and operation replay of your MBOs.
• DatabaseClass – package level class that handles subscription, login, synchronization, and other operations for the package.
• Synchronization parameters – any synchronization parameters for the MBOs. • Personalization parameters – personalization parameters used by the package. • Metadata – Metadata class that allow you to query meta data including MBOs, their
attributes, and operations, in a persistent table at runtime.
Validating Generated Code
Validation rules are enforced when generating client code. Define prefix names in the Mobile Business Object Preferences page of the Code Generation wizard to correct validation errors. SAP Mobile WorkSpace validates and enforces identifier rules and checks for keyword conflicts in generated code, for example, by displaying error messages in the Properties view or in the wizard. Other than the known name conversion rules (converting '.' to '_', removing white space from names, and so on), there is no other language-specific name conversion. For example, cust_id is not changed to custId.
You can specify the prefix string for mobile business object, attribute, parameter, or operation names from the Mobile Business Object Preferences page. This allows you to decide what prefix to use to correct any errors generated from the name validation.
1. Select Window > Preferences.
2. Expand SAP AG > Mobile Development. 3. Select Mobile Business Object.
4. Add or modify the Naming Prefix settings as needed.
The defined prefixes are added to the names (object, attribute, operation, and parameter) whenever these are autogenerated, for example, when you drag and drop a data source onto the Mobile Application Diagram.
Creating a Project
Build a device application project.
1. Creating a Project in SAP Mobile WorkSpace
Create a project for your Android device application in SAP Mobile WorkSpace. 2. Downloading the Latest Afaria Libraries
Afaria® provides provisioning of configuration data and certificates for your SAP Mobile Platform client application. Afaria libraries are packaged with SAP Mobile Platform, but may not be the latest software available. To ensure you have the latest Afaria libraries, download Afaria software.
3. Importing Libraries and Code
Create a package with the same name as the package of the code generated in SAP Mobile Workspace.
See also
• Generating Java Object API Code on page 8
• Developing the Application Using the Object API on page 29
Creating a Project in SAP Mobile WorkSpace
Create a project for your Android device application in SAP Mobile WorkSpace.
1. In SAP Mobile WorkSpace, select File > New > Project. 2. Select Android > Android Application Project.
3. In the New Android Project wizard, enter these values and click Finish: • Application Name: – enter the name of the application.
• Project Name: – enter a unique project name in Eclipse. This can be the same as the application name.
• Package Name: – enter the name of the package as a unique identifier for the application. Must be a valid Java package.
• Minimum Required SDK: – enter the lowest version of the SDK that the application supports.
• Target SDK: – enter the highest API level that the application is known to work with. • Compile With: – choose a target API to compile your code against, from your
installed SDKs.
4. Add the following user permissions in AndroidManifest.xml: <uses-permission android:name="android.permission.INTERNET"></ uses-permission> <uses-permission android:name="android.permission.READ_PHONE_STATE"></uses-permission> <uses-permission android:name="android.permission.ACCESS_WIFI_STATE"></uses-permission> <uses-permission android:name="android.permission.ACCESS_NETWORK_STATE"></uses-permission> <uses-permission android:name="android.permission.WRITE_EXTERNAL_STORAGE"></uses-permission>
a) Open the manifest file. b) Select the Permissions tab. c) ClickAdd.
d) Select Uses Permission and click OK.
e) In the Name field, enter the name of the permission. In this case, add five Uses Permission entries and name them:
android.permission.INTERNET
android.permission.READ_PHONE_STATE android.permission.ACCESS_WIFI_STATE android.permission.ACCESS_NETWORK_STATE android.permission.WRITE_EXTERNAL_STORAGE
f) Save your changes.
Downloading the Latest Afaria Libraries
Afaria® provides provisioning of configuration data and certificates for your SAP Mobile Platform client application. Afaria libraries are packaged with SAP Mobile Platform, but may not be the latest software available. To ensure you have the latest Afaria libraries, download Afaria software.
1. Navigate to the Mobile Enterprise Technical Support website at http:// frontline.sybase.com/support/downloads.aspx.
2. If not registered, register for an account. 3. Log into your account.
4. Select Software Updates and download the latest Static Link Libraries. 5. Extract the contents of the downloaded zip file.
6. Copy the Afaria library files into the Android development environment. 7. Include the Afaria library into your project.
Importing Libraries and Code
Create a package with the same name as the package of the code generated in SAP Mobile Workspace.
1. In your SAP Mobile WorkSpace project, create a libs directory. 2. Copy the following library and JAR files from SMP_HOME
\MobileSDK23\ObjectAPI\Android into the libs directory within your project, retaining the same structure:
Location Files • SMP_HOME \MobileSDK23\Ob-jectAPI\Android • AfariaSSL.jar • ClientLib.jar • sup-client.jar • UltraLiteJNI12.jar • SMP_HOME \MobileSDK23\Ob-jectAPI\Android\armeabi • libmlcrsa12.so • libultralitej12.so
3. Select Project > Properties > Java Build Path. On the Libraries tab, add the libraries to the project.
Development Task Flow for DOE-based Object
API Applications
Describes the overall development task flow for DOE-based native applications, and provides information and procedures for setting up the development environment, and developing DOE-based device applications.
This diagram illustrates how you can develop a device application directly from mobile business objects (MBOs), using the Object API and custom device application coding. This is how you create device applications with sophisticated UI interaction, validation, business logic, and performance.
The Object API provides the core application services described in the diagram.
The Authentication APIs provide security by authenticating the client to the SAP Mobile Server.
The Synchronization APIs allow you to synchronize mobile business objects (MBOs) based on synchronization parameters, for individual MBOs, or as a group, based on the group's synchronization policy.
The Application and Connection APIs allow clients to register with and connect to the SAP Mobile Server. The Callback Handler and Listener APIs, and the Target Change Notification APIs provide notifications to the client on operation success or failure, or changes in data. With DOE-based applications, connectivity and notifications use the Messaging channel. 1. Installing the Android Development Environment
Install the Android development environment, and prepare Android devices for authentication.
2. Generating Java Object API Code
Use the Code Generation Utility to generate object API code, which allows you to use APIs to develop device applications for Android devices.
3. Creating a Project
Build a device application project.
4. Developing the Application Using the Object API
Use the Object API to develop the application. An application consists of building blocks which the developer uses to start the application, perform functions needed for the application, and shutdown and uninstall the application.
5. Testing Applications
Test native applications on a device or simulator. 6. Localizing Applications
Localize an Android application by creating default and alternate resources. 7. Packaging Applications
Package applications according to your security or application distribution requirements.
Installing the Android Development Environment
Install the Android development environment, and prepare Android devices for authentication.
1. Installing the Android SDK Install the Android SDK.
2. Installing X.509 Certificates on Android Devices and Emulators
Install the .p12 certificate on the Android device or emulator for authentication. A certificate provides an additional level of secure access to an application, and may be required by an organization's security policy.
See also
• Generating Java Object API Code on page 22
Installing the Android SDK
Install the Android SDK.1. Confirm that your system meets the requirements at http://developer.android.com/sdk/ requirements.html.
2. Download and install the supported version of the Android SDK starter package. See the Google Android Versions topic for your platform in Supported Hardware and Software at http://sybooks.sybase.com/sybooks/sybooks.xhtml?
id=1289&c=firsttab&a=0&p=categories. Select the appropriate version of the SAP Mobile Platform document set.
3. Launch the Android SDK Manager and install the Android tools (SDK Tools and SDK Platform-tools) and the Android API.
4. Launch the Android Virtual Device Manager, and create an Android virtual device to use as your emulator.
Installing X.509 Certificates on Android Devices and Emulators
Install the .p12 certificate on the Android device or emulator for authentication. A certificate provides an additional level of secure access to an application, and may be required by an organization's security policy.Prerequisites
• Java SE Development Kit (JDK) must be installed. • The Android SDK must be installed.
Task
1. Connect the Android device to your computer with the USB cable. 2. To install using Eclipse with the ADT plugin:
Note: USB debugging must be enabled.
a) Open the Windows File Explorer view. From the menu bar, navigate to Window > Show View > Other.
b) In the Show View dialog, expand the Android folder and select File Explorer. c) Expand mnt > sdcard and select the sdcard folder.
d) In the top right of the File Explorer view, click Push a file onto the device. e) In the Put File on Device dialog, select the certificate and click Open. 3. To install using Windows Explorer:
Note: USB debugging must be disabled. a) Open Windows Explorer
b) Under your computer, click the Android device to expand the folder. c) Click Device Storage, navigate to and select the certificate.
d) Import the certificate to the Device Storage folder. 4. To install using the Android Debug Bridge (adb):
Note: USB debugging must be enabled. You can enable USB debug mode from the device menu by selecting Settings > Application > USB Debugging.
a) Open the command line directory to the adb.exe file, for example, C:\Program Files\android-sdk-windows\tools, or C:\Program Files
\android-sdk-windows\platform-tools
b) Run the command: adb push %PathToCert%\MyCert.p12 /sdcard/ MyCert.p12
Generating Java Object API Code
Use the Code Generation Utility to generate object API code, which allows you to use APIs to develop device applications for Android devices.
Prerequisites
• Generate and download the ESDMA bundle for you application.
• Run the ESDMA Converter utility to turn your ESDMA into an SAP Mobile Platform package.
• Deploy the package to the SAP Mobile Server.
See Create, Generate, and Download the ESDMA Bundle, Convert the ESDMA Bundle into an SAP Mobile Platform Package, and Deploy the SAP Mobile Platform Package in Mobile Data Models: Using Data Orchestration Engine.
Task
1. Locate <domain name>_package.jar in your mobile project folder. For the SMP101 example, the project is deployed to the default domain, and the deploy jar file is in the following location: SMP101\Deployment\.pkg.profile
\My_SAP_Mobile_Server\default_package.jar. 2. Make sure that the JAR file contains this file:
• deployment_unit.xml
3. From SMP_HOME\MobileSDK23\ObjectAPI\Utils\bin, run the codegen.bat utility, specifying the following parameters:
codegen -android -client -doe -java -ulj
[-output <output_dir>] [-doc] <ESDMA_dir>\META-INF\sup-db.xml • The -output parameter allows you to specify an output directory. If you omit this
parameter, the output goes into the SMP_HOME\MobileSDK23\ObjectAPI \Utils\genfiles directory, assuming codegen.bat is run from the SMP_HOME \MobileSDK23\ObjectAPI\Utils\bin directory.
• The -doc parameter specifies that documentation is generated for the generated code. Ignore these warnings:
log4j:WARN No appenders could be found for logger ... log4j:WARN Please initialize the log4j system properly.
See also
• Installing the Android Development Environment on page 20 • Creating a Project on page 23
Generated Code Location and Contents
The location of the generated Object API code is the location you specified when you generated the code using codegen.bat at the command line.
The contents of the folder is determined by the parameters you pass to codegen.bat in the command line, and include generated class files that contain:
• DatabaseClass – package level class that handles subscription, login, synchronization, and other operations for the package.
• MBO – class which handles persistence and operation replay of your MBOs. • Personalization parameters – personalization parameters used by the package. • Metadata – Metadata class that allows you to query meta data including MBOs, their
attributes, and operations, in a persistent table at runtime.
Creating a Project
Build a device application project.
1. Creating a Project in SAP Mobile WorkSpace
Create a project for your Android device application in SAP Mobile WorkSpace. 2. Downloading the Latest Afaria Libraries
Afaria® provides provisioning of configuration data and certificates for your SAP Mobile Platform client application. Afaria libraries are packaged with SAP Mobile Platform, but may not be the latest software available. To ensure you have the latest Afaria libraries, download Afaria software.
3. Importing Libraries and Code
Create a specific directory structure, within your Eclipse project, containing the library resources needed to compile your Android client code.
See also
• Generating Java Object API Code on page 22
Creating a Project in SAP Mobile WorkSpace
Create a project for your Android device application in SAP Mobile WorkSpace.
1. In SAP Mobile WorkSpace, select File > New > Project. 2. Select Android > Android Application Project.
3. In the New Android Project wizard, enter these values and click Finish: • Application Name: – enter the name of the application.
• Project Name: – enter a unique project name in Eclipse. This can be the same as the application name.
• Package Name: – enter the name of the package as a unique identifier for the application. Must be a valid Java package.
• Minimum Required SDK: – enter the lowest version of the SDK that the application supports.
• Target SDK: – enter the highest API level that the application is known to work with. • Compile With: – choose a target API to compile your code against, from your
• Theme: – choose the base theme to use for the application.
4. Add the following user permissions in AndroidManifest.xml:
<uses-permission android:name="android.permission.INTERNET"></ uses-permission> <uses-permission android:name="android.permission.READ_PHONE_STATE"></uses-permission> <uses-permission android:name="android.permission.ACCESS_WIFI_STATE"></uses-permission> <uses-permission android:name="android.permission.ACCESS_NETWORK_STATE"></uses-permission> <uses-permission android:name="android.permission.WRITE_EXTERNAL_STORAGE"></uses-permission>
a) Open the manifest file. b) Select the Permissions tab. c) ClickAdd.
d) Select Uses Permission and click OK.
e) In the Name field, enter the name of the permission. In this case, add five Uses Permission entries and name them:
android.permission.INTERNET
android.permission.READ_PHONE_STATE android.permission.ACCESS_WIFI_STATE android.permission.ACCESS_NETWORK_STATE android.permission.WRITE_EXTERNAL_STORAGE
f) Save your changes.
Downloading the Latest Afaria Libraries
Afaria® provides provisioning of configuration data and certificates for your SAP Mobile Platform client application. Afaria libraries are packaged with SAP Mobile Platform, but may not be the latest software available. To ensure you have the latest Afaria libraries, download Afaria software.
1. Navigate to the Mobile Enterprise Technical Support website at http:// frontline.sybase.com/support/downloads.aspx.
2. If not registered, register for an account. 3. Log into your account.
4. Select Software Updates and download the latest Static Link Libraries. 5. Extract the contents of the downloaded zip file.
6. Copy the Afaria library files into the Android development environment. 7. Include the Afaria library into your project.
Importing Libraries and Code
Create a specific directory structure, within your Eclipse project, containing the library resources needed to compile your Android client code.
1. In your SAP Mobile WorkSpace project, create a libs directory. 2. Copy the following library and JAR files from SMP_HOME
\MobileSDK23\ObjectAPI\Android into the libs directory within your project, retaining the same structure:
Location Files • SMP_HOME \MobileSDK23\Ob-jectAPI\Android • AfariaSSL.jar • ClientLib.jar • sup-client.jar • UltraLiteJNI12.jar • SMP_HOME \MobileSDK23\Ob-jectAPI\Android\armeabi • libmlcrsa12.so • libultralitej12.so
3. Select Project > Properties > Java Build Path. On the Libraries tab, add the libraries to the project.
4. Click on the active target, and modify the Header Search Path from Building Settings. Specify the path to the location where you copied the include files, and select the Recursive checkbox. The header files in the client library are grouped into subdirectories public and internal, so the recursive option is required.
Developing the Application Using the Object
API
Use the Object API to develop the application. An application consists of building blocks which the developer uses to start the application, perform functions needed for the application, and shutdown and uninstall the application.
See also
• Creating a Project on page 15 • Testing Applications on page 57 • Creating a Project on page 23
Initializing an Application
Initialize the application when it starts the first time and subsequently. • Initially Starting an Application
Starting an application the first time. • Subsequently Starting an Application
Subsequent start-ups are different from the first start-up.
Initially Starting an Application
Starting an application the first time.1. Setting Up Application Properties
The Application instance contains the information and authentication credentials needed to register and connect to the SAP Mobile Server.
2. Registering an Application
Each device must register with the server before establishing a connection. 3. Setting Up the Connection Profile
The Connection Profile stores information detailing where and how the local database is stored, including location and page size. The connection profile also contains UltraLite®J runtime tuning values.
4. Setting Up Connectivity
Store connection information to the SAP Mobile Server data synchronization channel. 5. Creating and Deleting a Device's Local Database
There are methods in the generated package database class that allow programmers to delete or create a device's local database. A device local database is automatically created
when needed by the Object API. The application can also create the database
programatically by calling the createDatabase method. The device's local database should be deleted when uninstalling the application.
6. Logging In
Use online authentication with the server. 7. Turn Off API Logger
In production environments, turn off the API logger to improve performance. 8. Setting Up Callbacks
When your application starts, it can register database and MBO callback listeners, as well as synchronization listeners.
9. Connecting to the Device Database
Establish a connection to the database on the device. 10. Synchronizing Applications
Synchronize package data between the device and the server. 11. Specifying Personalization Parameters
Use personalization parameters to provide default values used with synchronization, connections with back-end systems, MBO attributes, or EIS arguments. The PersonalizationParameters class is within the generated code for your project. 12. Specifying Synchronization Parameters
Use synchronization parameters within the mobile application to download filtered MBO data.
See also
• Application APIs on page 71 • Connection APIs on page 106
Setting Up Application Properties
The Application instance contains the information and authentication credentials needed to register and connect to the SAP Mobile Server.
The following code illustrates how to set up the minimum required fields:
// Initialize Application settings
Application app = Application.getInstance();
// The identifier has to match the application ID deployed to the SAP Mobile Server
app.setApplicationIdentifier("SMP101");
// Set the android.content.Context for the application app.setApplicationContext(context); // context is the android.content.Context
// ConnectionProperties has the infomation needed to register // and connect to SAP Mobile Server
connProps.setServerName("server.mycompany.com");
// if you are using Relay Server, then use the correct port number for the Relay Server.
// if connecting using http without a relay server, use the messaging administration port, by default 5001.
// if connecting using https without a relay server, then use a new port for https, for example 9001.
connProps.setPortNumber(5001);
// if connecting using https without a relay server, set the network protocol
connProps.setNetworkProtocol("https");
// Set FarmId and UrlSuffix when connecting through the Relay Server.
// Provide user credentials
LoginCredentials loginCred = new LoginCredentials("supAdmin", "supPwd");
connProps.setLoginCredentials(loginCred);
// Initialize generated package database class with this Application instance
SMP101DB.setApplication(app);
Note: setApplicationIdentifier and setApplicationContext must be called in the user interface thread.
If you are using a Relay Server, specify the connection as follows:
// specify Relay Server Host
connProps.setServerName("relayserver.mycompany.com"); // specify Relay Server Port (port 80 by default) connProps.setPortNumber(80);
// specify the Relay Server MBS Farm, for example MBS_Farm connProps.setFarmId("MBS_FARM");
Optionally, you can specify the Relay Server URL suffix.
See also
• Application APIs on page 71
Registering an Application
Each device must register with the server before establishing a connection. To register the device with the server during the initial application startup, use the registerApplication method in the com.sybase.mobile.Application class. You do not need to use the registerApplication method for subsequent application start-ups. The registerApplication method automatically starts the connection to complete the registration process.
Call the generated database's setApplication method before starting the connection or registering the device.
The following code shows how to register the application and device.
// Initialize Application settings
Application app = Application.getInstance();
// The identifier has to match the
// application ID deployed to the SAP Mobile Server app.setApplicationIdentifier("SMP101");
ApplicationCallback appCallback = new MyApplicationCallback(); // MyApplicationCallback implements ApplicationCallback
app.setApplicationCallback(appCallback); // optional app.setApplicationContext(myAndroidContext); // required
// use the android.content.Context for the application // set connection properties, login credentials, etc
...
SMP101DB.setApplication(app);
if (app.getRegistrationStatus() != RegistrationStatus.REGISTERED) {
// If the application has not been registered to the server, // register now
app.registerApplication(<timeout_value>); }
else {
// start the connection to server app.startConnection(<timeout_value>); }
See also
• Application APIs on page 71
Setting Up the Connection Profile
The Connection Profile stores information detailing where and how the local database is stored, including location and page size. The connection profile also contains UltraLite®J runtime tuning values.
Set up the connection profile before the first database access, and check if the database exists by calling the databaseExists method in the generated package database class. Any settings you establish after the connection has already been established will not go into effect. The generated database class automatically contains all the default settings for the connection profile. You may add other settings if necessary. For example, you can set the database to be stored in an SD card or set the encryption key of the database.
Use the com.sybase.persistence.ConnectionProfile class to set up the locally generated database. Retrieve the connection profile object using the SAP Mobile Platform database's getConnectionProfile method.
// Initialize the device database connection profile (if needed) ConnectionProfile connProfile = SMP101DB.getConnectionProfile();
// Store the database in an SD card connProfile.setProperty("databaseFile",
android.os.Environment.getExternalStorageDirectory().getPath() + "/ SMP1011_0.ulj");
// encrypt the database
connProfile.setEncryptionKey("your encryption key"); //Encryption key can be of arbitary length, but generally the longer, the better. // You can also automatically generate a encryption key and store it inside a data vault.
// use 100K for cache size
connProfile.setCacheSize(102400);
An application can have multiple threads writing to the database during synchronization by enabling the connection profile property, allowConcurrentWrite. Setting the property to "true" allows multiple threads to perform create, read, update, or delete operations at the same time in a package database. For example:
SMP101DB.getConnectionProfile().setProperty("allowConcurrentWrite", "true");
Note: Multiple threads are allowed to write to the database at the same time. However, there will be errors when multiple threads write to the same row of one MBO. Avoid writing to the same MBO row in your application.
See also
• ConnectionProfile on page 106
Setting Up Connectivity
Store connection information to the SAP Mobile Server data synchronization channel.
See also
• Creating and Deleting a Device's Local Database on page 34
Setting Up the Synchronization Profile
You can set SAP Mobile Server synchronization channel information by calling the synchronization profile's setter method. By default, this information includes the server host, port, domain name, certificate and public key that are pushed by the message channel during the registration process.
Settings are automatically provisioned from the SAP Mobile Server. The values of the settings are inherited from the application connection template used for the registration of the application connection (automatic or manual). You must make use of the connection and security settings that are automatically used by the Object API.
Typically, the application uses the settings as sent from the SAP Mobile Server to connect to the SAP Mobile Server for synchronization so that the administrator can set those at the
application deployment time based on their deployment topology (for example, using Relay Server, using e2ee security, or a certificate used for the intermediary, such as a Relay Server Web server). See the Applications and Application Connection Templates topics in System Administration.
When the client registers and starts the application, the certificate is downloaded to the client, so that the client can be assigned the trusted certificate.
Set up a secured connection using the ConnectionProfile object.
1. Retrieve the synchronization profile object using the SAP Mobile Platform database's getSynchronizationionProfile method.
ConnectionProfile cp = SMP101DB.getSynchronizationProfile();
2. Set the connection fields in the ConnectionProfile object.
cp.setServerName("SAP_Mobile_Platform_Host"); cp.setPortNumber(2481); cp.getStreamParams().setTrusted_Certificates(appname +"_trustedCertificates.crt"); cp.setNetworkProtocol("https"); See also
• Synchronization Profile on page 109
Creating and Deleting a Device's Local Database
There are methods in the generated package database class that allow programmers to delete or create a device's local database. A device local database is automatically created when needed by the Object API. The application can also create the database programatically by calling the createDatabase method. The device's local database should be deleted when uninstalling the application.
1. Connect to the generated database by calling the generated database instance's openConnection method.
SMP101DB.openConnection();
If the database does not already exist, the openConnection method creates it. 2. Optionally, you can include code in your application to check if an instance of the
generated database exists by calling the generated database instance's databaseExists method.
If an instance of the generated database does not exist, call the generated database instance's createDatabase method.
if (!SMP101DB.databaseExists()) {
SMP101DB.createDatabase(); }
3. When the local database is no longer needed, delete it by calling the generated database instance's deleteDatabase method.
SMP101DB.deleteDatabase();
See also
• Setting Up Connectivity on page 33
Logging In
Use online authentication with the server.
Authenticate the user for data synchronization by calling the generated database API onlineLogin method.
Use the SynchronizationProfile to store the username and password.
ConnectionProfile syncProfile = SMP101DB.getSynchronizationProfile(); syncProfile.setUserName("user"); syncProfile.setPassword("password"); SMP101DB.onlineLogin();
Turn Off API Logger
In production environments, turn off the API logger to improve performance.
SMP101DB.getLogger().setLogLevel(LogLevel.OFF);
Setting Up Callbacks
When your application starts, it can register database and MBO callback listeners, as well as synchronization listeners.
Callback handler and listener interfaces are provided so your application can monitor changes and notifications from SAP Mobile Platform:
• The com.sybase.mobile.ApplicationCallback class is used for monitoring changes to application settings, messaging connection status, and application registration status.
• The com.sybase.persistence.CallbackHandler interface is used to monitor notifications and changes related to the database. To register callback handlers at the package level, use the registerCallbackHandler method in the generated database class. To register for a particular MBO, use the
registerCallbackHandler method in the generated MBO class.
• The com.sybase.persistence.SyncStatusListener class is used for debugging and performance measures when monitoring stages of a synchronization session, and can be used in the user interface to indicate synchronization progress.
See also
• Connecting to the Device Database on page 41 • Callback and Listener APIs on page 150
Setting Up Callback Handlers
Use the callback handlers for event notifications.
Use the com.sybase.persistence.CallbackHandler API for event notifications including login for synchronization and replay. If you do not register your own
implementation of the com.sybase.persistence.CallbackHandler interface, the generated code will register a new default callback handler.
1. The generated database class contains a method called
registerCallbackHandler. Use this method to install your implementation of CallbackHandler.
For example:
SMP101DB.registerCallbackHandler(new MyCallbackHandler());
2. Each generated MBO class also has the same method to register your implementation of the CallbackHandler for that particular type. For example, if Customer is a generated MBO class, you can use the following code:
Customer.registerCallbackHandler(new MyCustomerMBOCallbackHandler());
Create a Custom Callback Handler
If an application requires a callback (for example, to allow the client framework to provide notification of synchronization results) create a custom callback handler.
import com.sybase.persistence.DefaultCallbackHandler; ……
public class Test {
public static void main(String[] args) { SMP101DB.registerCallbackHandler(new MyCallbackHandler()); GenericList<SynchronizationGroup> sgs = new GenericList<SynchronizationGroup>(); sgs.add(SMP101DB.getSynchronizationGroup("sg1")); sgs.add(SMP101DB.getSynchronizationGroup("sg2"));
SMP101DB.beginSynchronize(sgs, "my test synchronization context");
} }
class MyCallbackHandler extends DefaultCallbackHandler {
//The onSynchronize method overrides the
//onSynchronize method from DefaultCallbackHandler. public int onSynchronize(GenericList<SynchronizationGroup> groups, SynchronizationContext context)
{
if ( context == null ) {
return SynchronizationAction.CANCEL; }