Salters-Nuffield Advanced Biology Resources
Activity 7.1 Student SheetANTAGONISTIC MUSCLES AND MOVEMENT
Purpose
To recall the way in which muscles, tendons, the skeleton and ligaments interact to enable movement.
Flexion and extension of the knee
Use the knee flexion and extension tutorial that accompanies this activity to see the action of muscles. Notice the colour changes in the muscles as the joint moves. Explain what the colour changes
represent.
Use the images and Student Book 2 to produce a short, illustrated account of movement of the knee joint. Your account should use the terms antagonistic muscles, flexor, extensor, tendons and
ligaments. The names of individual muscles are not required. Label the diagrams in Figure 1 below before you start.
Salters-Nuffield Advanced Biology Resources
Activity 7.1 Student SheetDissection of a pig’s trotter
Dissecting a pig’s trotter allows you to identify bones, tendons, ligaments and cartilage. You can also relate their properties to their role in movement at a joint.
Read the procedure through carefully. Identify any safety issues and write a risk assessment including strategies to minimise any risk before you start the practical work.
YOU NEED
● Pig’s trotter
● Dissecting board or tray
● Dissecting instruments ● Plastic apron
SAFETY
Wash your hands thoroughly after completing the dissection and before leaving the laboratory, once all the equipment has been placed ready to be disinfected. Take care with sharp dissecting instruments.
Disinfect work surfaces with Virkon™ solution (leave in place for 10 minutes).
Procedure
1 Before starting the dissection, examine the outside of the trotter. Identify:
a two central toes
b the side toes
c the metatarsus (hind trotter) or metacarpus (front trotter); these correspond to the sole of your foot or palm of your hand.
Figure 2 A pig’s trotter.
2 Hold the trotter so that you are looking at the side of it, with the toes underneath, as shown in Figure 2. Move the toes; you should see a ‘bump’ above the joint near the base of each toe.
3 Turn the trotter the other way up and bend the toes downwards. You should see a second joint further away from the toe, rather like a human knuckle. These joints are also called ‘knuckle’ joints.
4 Use a sharp scalpel to cut vertically down the ‘front’ surface of the trotter. Cut from about 5 cm above the second joint to 5 cm below it. Take care to cut only about 1 mm deep. If you cut too deeply, you risk cutting the tendons below.
Salters-Nuffield Advanced Biology Resources
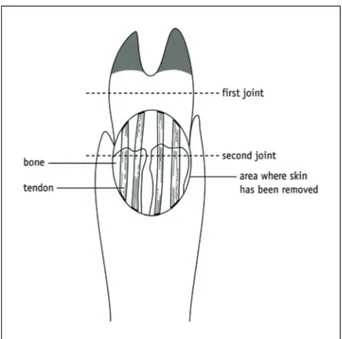
Activity 7.1 Student Sheet6 Use a scalpel (and/or sharp scissors) and forceps to peel the skin back in all directions, so that you have a roughly circular area exposed. See Figure 3.
7 Cut off the peeled-back skin.
8 Over the top of the joint, you should see four white tendons running down the foot.
Q1 a Describe the texture of the tendon.
b Relate the tendons’ texture to their role in the joint.
9 Bend the toes down. This lets you see the exposed knuckle joint more easily.
10 Use a scalpel to cut across the knuckle, as shown in Figure 4. Carefully cut through tendons and any other tissue. Remember to bend the trotter at the joint – this makes the dissection easier. Underneath the tendons, close to the bone, you should find a membrane, which is usually a little loose. This is the synovial membrane of the joint.
Figure 3 Remove the skin to expose the tendons.
Figure 4 Keep the trotter bent at the joint to make the dissection easier.
11 Cut through the synovial membrane. You should notice some synovial fluid dribbling out. As long as you wash your hands well afterwards, it is worth feeling the texture of this fluid without gloves.
Salters-Nuffield Advanced Biology Resources
Activity 7.1 Student Sheet12 Still pressing the toes downwards, cut further into the joint, towards the toes, in the direction of the arrows in Figure 5. You should see a shiny, white surface on the lower part of the joint.
Figure 5 Cutting through the joint capsule.
13 Continue cutting, but cut sideways. This will cut through the fibrous joint capsule and the ligaments, which hold the bones together.
Q3 a What is the role of the fibrous joint capsule?
b If a joint possesses a capsule, what further information does this give you about the joint?
14 You should now see the ‘articulating surfaces’ of the joint. These are covered in very white cartilage.
Q4 What do you think is meant by ‘articulating surfaces’?
15 Press a seeker (mounted needle) into the cartilage.
Q5 Describe the appearance and texture of the cartilage.
16 Slice off a small piece of cartilage. You should see pink bone underneath. Feel the texture of the bone by pressing a seeker into it.
17 There are very obvious ligaments on either side of the knuckle joints. Try dissecting one of these out. Now try pulling along the ligament lengthwise. You should feel a little bit of ‘give’.
Q6 Why are ligaments slightly elastic?
Extension
1 Make a table to compare the appearance, texture, properties and functions of bone, cartilage, tendons, ligaments and synovial fluid.
2 Write an account comparing the structure of either your hand or foot with the structure of a pig’s trotter. What features are the same and what differences are there?
Footnote
Salters-Nuffield Advanced Biology Resources
Activity 7.1 Teacher SheetANTAGONISTIC MUSCLES AND MOVEMENT
Purpose
To recall the way in which muscles, tendons, the skeleton and ligaments interact to enable movement.
Flexion and extension of the knee
The online tutorial that accompanies this activity provides images of a flexed and extended joint. Students’ accounts of how a knee joint works could include a sequence of images, which use colour to show muscle contraction during flexion and extension. The terms antagonistic muscles, flexor,
extensor, tendons and ligaments should be correctly used within the account.
Dissection of a pig’s trotter
Dissecting a pig’s trotter allows students to identify bones, tendons, ligaments and cartilage. Questions relate the properties of the various features to their role in movement at a joint.
There are a number of virtual dissection sites available online as an alternative to carrying out a real dissection (though none that show dissection of a pig’s trotter that are recommended).
Salters-Nuffield Advanced Biology Resources
Activity 7.1 Teacher SheetSAFETY
Wear eye protection.
Wash your hands thoroughly after completing the dissection and before leaving the laboratory, once all the equipment has been placed ready to be disinfected. Take care with sharp dissecting instruments.
Wash down the bench afterwards with disinfectant.
Notes on the procedure
It may be helpful to warn students in advance of this activity in case of any religious objections to handling pig tissue. Dissection of a chicken foot is an alternative.
This dissection is reasonably easy and very effective. It is quite straightforward to trace the tendons, make the joint move, cut through the ligaments and expose the articulating surfaces, etc., although sharp instruments are needed. It almost works on a ‘peel the skin back and explore’ basis without using the detailed procedure.
One trotter for every two students is probably ideal, but it would also work well with one for larger groups.
Students should be encouraged to prepare their own risk assessments before seeing the Student Sheet, to reinforce practical skills. If help is needed, refer them back to the heart dissection in Activity 1.4. Removing the skin can take a long time. Trotters could be de-skinned in advance of the lesson – see the Technician Sheet.
It is a good idea to leave at least one trotter intact, for comparison with the dissected specimens. CLEAPSS has two guides on dissection: G268 A Guide to Safe Practice in Dissection, and G267 Dissection: A Starter’s Guide to Health and Safety.
Answers
Q1 a Tough and non-elastic.
b The contraction of muscle pulls bone. Tendons join muscle to bone. Non-elastic tendons allow the full transmission of the force of the muscle to the bone. If tendons were elastic, the tendon would stretch when a muscle pulled on it and the bone would not move or not move as much.
Q2 Synovial fluid acts as a shock absorber and as a lubricant to reduce friction between the bones of the joint. It is thick and viscous; this makes it hard to compress and therefore good at absorbing shocks. It is also very slimy, which makes it a good lubricant.
Q3 a The fibrous joint capsule contains the synovial fluid.
b A capsule tells you that it must be a moveable synovial joint.
Q4 Articulating surfaces are the points of contact between bones. They fit together closely, but do not normally touch due to synovial fluid within the joint capsule. The degree of movement at a joint is determined by the shape of the articulating surfaces.
Q5 The cartilage is very white and very shiny. It is very smooth and reasonably firm, but not as hard as bone.
Salters-Nuffield Advanced Biology Resources
Activity 7.1 Technician SheetANTAGONISTIC MUSCLES AND MOVEMENT
Purpose
To recall the way in which muscles, tendons, the skeleton and ligaments interact to enable movement.
SAFETY
You should wash your hands after handling the trotters. Work surfaces should be disinfected after the practical with 1% Virkon™, and dissecting instruments should be washed. See CLEAPSS G268 A Guide to Safe Practice in Dissection, and G267 Dissection: A Starter’s Guide to Health and Safety.
Requirements per student or
group of students Notes
Pig’s trotter Pig’s trotters can be obtained from most butchers if you give plenty of notice. Smaller trotters tend to be less tough and so easier to dissect. Some butchers charge little or nothing for trotters. Some students may not be able to work with pig's trotters due to religious beliefs. Chicken feet can be used as an alternative. It might be helpful to pre-skin most of the trotters as this can be time-consuming in class. This can be done by blanching them briefly in boiling water (for 30 seconds) then rinsing them with cold water. This makes it easier to peel the skin off.
Once finished with, the trotter and any dissected parts should be wrapped in an opaque plastic bag and disposed of as normal waste, placing in refuse on day of refuse collection. Storage prior to disposal should be in a fridge or freezer.
Dissecting board or tray Enamel trays or dissecting boards work well. Using newspaper underneath the dissecting tray is effective, since it can be thrown away afterwards. After use, clean thoroughly with detergent. Dissecting instruments Scalpel, scissors, seekers and forceps. Instruments need to be
sharp and the scissors need to be good, strong ones. After use, clean thoroughly with detergent.
Disinfectant For cleaning benches.
1% Virkon™ can be used for general disinfection. Allow 10 minutes disinfection time. (NB: Virkon™ is not recommended for soaking metal instruments.)
Cloth For cleaning benches. Handwash and paper towels For washing hands. Access to a sink
Salters-Nuffield Advanced Biology Resources
Activity 7.2 Student SheetMUSCLE STRUCTURE AND FUNCTION
Purpose
To recall the way in which muscles, tendons, the skeleton and ligaments interact to enable movement.
To consider the structure of muscles and how they contract in terms of the sliding filament theory.
Movement by contraction of skeletal muscles
Work through the interactive tutorial that accompanies this activity or use Student Book 2 to complete the questions below.
Questions
Q1 a The muscle that flexes the elbow joint is shown in Figure 1. In both diagrams of Figure 1, draw in the antagonistic muscle that extends the joint. The points of attachment of the muscle are shown with arrows.
Figure 1 Flexor muscle at the elbow joint.
b Explain why muscles are arranged in antagonistic pairs.
……….……….…
Salters-Nuffield Advanced Biology Resources
Activity 7.2 Student SheetQ2 Annotate Figure 2 to explain the relationship between a muscle, muscle fibres, myofibrils, actin and myosin filaments and a sarcomere.
Figure 2 The different parts of a muscle.
Q3 a In the space provided in Figure 3, draw a diagram to show the two sarcomeres when contracted.
b Label the diagrams in Figure 3 to show actin, myosin and a sarcomere.
Salters-Nuffield Advanced Biology Resources
Activity 7.2 Student Sheetc Explain why the width of the stripes visible on micrographs of skeletal muscle change when the muscle contracts.
……….……….…
……….……….…
……….……….…
……….……….…
Q4 a Explain why calcium ions are essential for muscle contraction.
……….……….…
……….……….…
……….……….…
b Figure 4 shows an outline of the sliding filament theory. To complete the diagram you should:
i colour in the key first, then colour the same parts in the main diagram (the colour codes are given for each molecule or part involved in the cycle)
ii annotate the diagram with notes, explaining what is happening at each stage
Salters-Nuffield Advanced Biology Resources
Activity 7.2 Student SheetSalters-Nuffield Advanced Biology Resources
Activity 7.2 Teacher SheetMUSCLE STRUCTURE AND FUNCTION
Purpose
To recall the way in which muscles, tendons, the skeleton and ligaments interact to enable movement.
To consider the structure of muscles and how they contract in terms of the sliding filament theory.
Movement by contraction of skeletal muscles
The interactive tutorial that accompanies this activity guides the student through both the action of antagonistic muscles and the sliding filament theory. If this activity is set for completion out of class, understanding can be confirmed using the model-building in Activity 7.3.
Answers
Q1 a
b Muscles can only contract, so can pull, but not push. In order to flex and extend a joint, two muscles that pull the joint in opposite directions are needed.
Salters-Nuffield Advanced Biology Resources
Activity 7.2 Teacher SheetQ3 a and b
c The actin and myosin filaments slide over each other during muscle contraction. The actin filaments are pulled towards the centre of the sarcomeres. The effect of this is to shorten the sarcomeres, which appear shorter in a micrograph. The dark stripes produced by regions of overlapping actin and myosin will be wider, as there is more overlap during contraction. The stripe of just the myosin filaments will appear narrower.
Q4 a When calcium ions bind with the protein troponin, a change in shape of the protein results in movement of the tropomyosin, which reveals the myosin-binding sites on the actin. This allows cross-bridge formation between actin and myosin, which is essential for muscle contraction.
Salters-Nuffield Advanced Biology Resources
Activity 7.3 Student SheetMUSCLE MODEL
Purpose
To confirm the understanding of the sliding filament theory.
Modelling a sarcomere
In this activity you will work in pairs to make a model of the sliding filaments in a muscle sarcomere, and use this model to explain orally to other members of the class what happens as the muscles contract and relax. The model must be able to survive at least one contraction, in which the filaments actually slide. You will be evaluating each other’s models and explanations using a mark scheme of your own devising.
Making the model
You will be provided with materials for model-building. Try to make your model as detailed as possible.
Mark scheme
Salters-Nuffield Advanced Biology Resources
Activity 7.3 Teacher SheetMUSCLE MODEL
Purpose
To confirm the understanding of the sliding filament theory.
Modelling a sarcomere
In this activity, students work in pairs to make a model of one muscle sarcomere. If students have already used the interactive tutorial that accompanies Activity 7.2, this activity can be used to confirm their learning. There is a Student Sheet, but oral instructions may be all that are required. The students should be encouraged to make their models as detailed as possible to ensure that the role of actin, myosin, troponin, tropomyosin, Ca2+, ATP and ATPase, as required in the specification, are all
illustrated in either their model or the explanation of how it works (preferably both).
Students can just be given modelling clay, or they can be given a wider range of materials from which to make a selection. At a SNAB workshop, larger groups (four to five people in a group) were
successfully used and one group produced a short play rather than a physical model. However, the potential for individuals to avoid engaging with the task increases with larger groups.
While students build the model, or on completion, they produce a mark scheme that is then used for peer assessment of the models made by other pairs.
Possible mark scheme
Clear difference between actin and myosin filaments 1 mark
Correct arrangement of actin and myosin filaments 1 mark
The actin and myosin can move relative to each other to make the sarcomere contract 1 mark
Model includes tropomyosin 1 mark
Model or explanation includes: troponin; Ca2+; ATP and ATPase 3 marks
Clear explanation 1 mark
Quality of model construction 2 marks
Salters-Nuffield Advanced Biology Resources
Activity 7.3 Technician SheetMUSCLE MODEL
Purpose
To confirm the understanding of the sliding filament theory.
Modelling a sarcomere
A variety of materials could be provided to allow students to select what they want to use.
Requirements per student or
group of students Notes
Some sort of modelling clay Plasticine® or Play-Doh®. Access to several colours allows the different molecules to be colour coded. A model using only modelling clay with all molecules in the sarcomere included would need six colours.
Wool or string
Straws Coloured, bendy straws work well. A piece of card or thick paper
Beads or round-headed map pins ‘Poppit’ beads or other round-shaped beads are suitable. Scissors
Sticky tape
Glue Coloured crayons or felt pens
Salters-Nuffield Advanced Biology Resources
Activity 7.4 Student SheetAEROBIC RESPIRATION
Purpose
To summarise aerobic respiration.
Reacting with oxygen
In aerobic respiration, glucose is completely oxidised through a series of reactions, each controlled by a specific intracellular enzyme. Hydrogen removed from the glucose eventually joins with oxygen to form water; and carbon dioxide is released as a waste product. The input of energy needed to break the bonds in glucose and in oxygen is not as great as the energy released when the bonds in carbon
dioxide and water are formed. Overall, there is therefore a release of energy and this can be used to generate ATP.
Watch the video clip in the interactive tutorial that accompanies this activity to see the explosive reaction between hydrogen and oxygen as hydrogen is burned in air. Use Student Book 2 to help you answer the questions below and then complete the rest of the interactive tutorial to check your understanding.
Questions
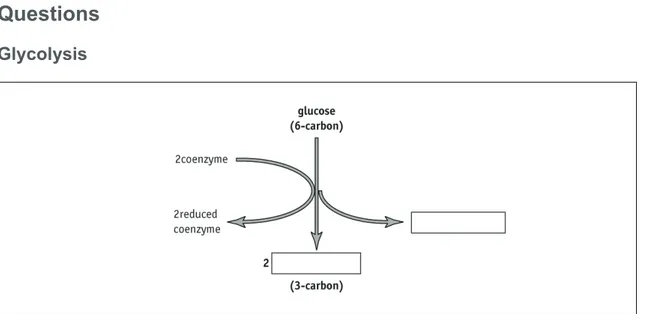
Glycolysis
Figure 1 Glycolysis. The coenzyme is NAD.
Q1 Fill in the blank boxes in Figure 1 to show the net production of ATP in glycolysis and the end product of glycolysis. Add an arrow showing where you would have to add ATP to start the reaction.
Q2 Where does glycolysis take place?
Aerobic respiration
Q3 Fill in the blanks in the diagram of aerobic respiration (Figure 2).
Q4 Colour the ATPs yellow.
Q5 Highlight the decarboxylation arrows in another colour and colour the carbon dioxide boxes in the same colour.
Q6 Using a third colour, highlight the dehydrogenation arrows and hydrogen boxes.
Salters-Nuffield Advanced Biology Resources
Activity 7.4 Student SheetQ8 Annotate the diagram to show which reactions form (a) the link reaction and (b) the Krebs cycle.
Figure 2 The link reaction and Krebs cycle.
Q9 Where in the cell do the Krebs cycle and link reaction take place?
……….……….…
Q10 Add the number of carbons to the pyruvate and acetyl CoA boxes on the diagram.
Q11 Using Figure 1 and Figure 2, how many ATP molecules will be produced, in theory, from one molecule of glucose in aerobic respiration?
……….……….…
……….……….…
Salters-Nuffield Advanced Biology Resources
Activity 7.4 Teacher SheetAEROBIC RESPIRATION
Purpose
To summarise aerobic respiration.
The interactive that accompanies this activity could be completed before or after the activity sheet; both summarise respiration.
Answers
Glycolysis
Q1Q2 Cytoplasm.
Aerobic respiration
Q3–Q8 Students fill in the boxes and colour ATP, decarboxylation and dehydrogenation reactions to emphasise the pattern. Answers are in italics on the diagram on page 2. Colours used are arbitrary.
Q9 Mitochondrial matrix.
Salters-Nuffield Advanced Biology Resources
Activity 7.4 Teacher SheetQ11 38 for each glucose assuming 3ATP from each reduced NAD and 2ATP from each reduced FAD.
Glycolysis – 2ATP by substrate level phosphorylation;
2NAD produces 6ATP by oxidative phosphorylation. Link reaction – 2NAD produces 6ATP by oxidative phosphorylation. Krebs cycle – 2ATP by substrate level phosphorylation;
Salters-Nuffield Advanced Biology Resources
Activity 7.5 Student SheetMITOCHONDRIAL DISEASES
Purpose
To confirm the role of the electron transport chain and chemiosmosis in respiration.
To apply knowledge of cellular respiration to mitochondrial diseases.
To identify trends and patterns in data, and use appropriate scientific knowledge to explain conclusions.
Formation of ATP by oxidative phosphorylation
Read Student Book 2 Section 7.2 and go through the interactive tutorial that accompanies this activity before you start. It shows the role of the mitochondrial electron transport chain and chemiosmosis in the formation of ATP by oxidative phosphorylation.
Salters-Nuffield Advanced Biology Resources
Activity 7.5 Student SheetCytochrome oxidase
When cells break down carbohydrates, amino acids and fats, electrons are removed from the molecules in these foods and channelled along the mitochondrial electron transport chain. Energy is released during electron transport and converted to chemical potential energy in the form of ATP, the energy currency of all cells. Cytochrome oxidase is a protein that spans the inner mitochondrial membrane. It is the final protein of the electron transport chain. This enzyme is where the electrons meet molecular oxygen and hydrogen ions to form water.
Cytochrome oxidase abnormality or deficiency means less ATP production and also higher levels of circulating radicals. When cytochrome oxidase does not work properly, the electrons passing down the electron transport chain are passed to oxygen to form superoxide radicals. These highly reactive molecules can cause cell and genetic damage.
Questions
Q1 a What are Georgina’s main symptoms?
b Which tissues are most affected?
Q2 The data in the table below show the oxygen consumption of some tissues and organs.
Organ or tissue Oxygen consumption per mass of tissue/cm3 g−1 h−1
Brain 30
Bone 2
Heart 42
Skeletal muscles 2.3/30
Skin 2
Use the data in the table to explain Georgina’s symptoms as described by her GP.
Q3 Georgina’s consultant needs to explain to the first year medical students she teaches why Georgina is not able take part in sport. Annotate Figure 2 to explain the role of cytochrome oxidase in ATP production, which is necessary for muscle contraction. The interactive tutorial that accompanies this activity shows the events on the mitochondrial inner membrane.
Q4 Georgina’s blood tests show that the levels of pyruvate and lactate in her body are higher than normal. Use your knowledge of the pathways involved in cellular respiration to explain these results.
Q5 Georgina’s consultant describes how high levels of oxygen radicals can result from
Salters-Nuffield Advanced Biology Resources
Activity 7.5 Student SheetQ6 Read the three statements below:
A Mutations in mitochondrial DNA leading to defects in cytochrome oxidase have been associated with Alzheimer’s disease and ‘normal’ ageing processes.
B Curcumin, a chemical in the spice turmeric that is present in most curries, has been shown to neutralise radicals.
C Some studies show that the incidence of Alzheimer’s disease in the ageing population of India is lower than in the West.
a Suggest a theory that could link statements A, B and C.
b What advice would you give to Georgina’s mother about Georgina’s diet?
Salters-Nuffield Advanced Biology Resources
Activity 7.5 Teacher SheetMITOCHONDRIAL DISEASES
Purpose
To confirm the role of the electron transport chain and chemiosmosis in respiration.
To apply knowledge of cellular respiration to mitochondrial diseases.
To identify trends and patterns in data, and use appropriate scientific knowledge to explain conclusions.
Formation of ATP by oxidative phosphorylation
Students view the interactive tutorial that accompanies this activity before applying their knowledge of cellular respiration to mitochondrial diseases. The ‘talking heads’ give background information about Georgina’s condition, Leigh’s syndrome, and the animation shows the events on the mitochondrial inner membrane.
Answers
Q1 a Tiredness, weak muscles, problems with balance and coordination.
b Muscles and nerves.
Q2 Skeletal muscle and brain tissue are highly active, consuming a large amount of oxygen in respiration. Because of the high energy demands of these tissues, mitochondrial diseases lead to weakness and wasting of nerves and muscles before other tissues. Many of the symptoms of Leigh’s disease are due to degeneration of nerve and muscle tissue, as a result of insufficient ATP production.
Q3 To help with annotation of Figure 2, students can use the animation and Student Book 2 for information. This should draw together the sequence of events involved in ATP synthesis. Possible annotations are shown on page 2.
Q4 Reduced coenzyme produced in glycolysis cannot be oxidised via the electron transport chain, so pyruvate, the final product of glycolysis, will be reduced to lactate in anaerobic respiration.
Salters-Nuffield Advanced Biology Resources
Activity 7.5 Teacher SheetQ6 a Radicals can cause mutations in mitochondrial DNA. This can increase the likelihood of developing Alzheimer’s disease. Curcumin in turmeric is widely consumed in India and neutralises radicals. This may account for the low incidence of Alzheimer’s disease in the ageing population of India, compared with the West.
Salters-Nuffield Advanced Biology Resources
Activity 7.6 Student SheetRESPIRATION AND OTHER METABOLIC
PATHWAYS
Purpose
To reinforce understanding of the reactions of respiration.
To know how the reactions of respiration fit into the overall metabolic pathways inside a cell.
To develop online research skills.
The metabolic pathways chart
All known reactions in living cells have been drawn on a single diagram. Each reaction is linked to the other reactions it interacts with; the whole is known as the ‘metabolic pathways chart’. The chart is somewhat mind-boggling the first time you see it and you do not need to know the detail. But with careful study it begins to make sense.
Q1 What is meant by:
a metabolism
b metabolic pathways?
The chart used today is built on many years’ work. The current chart, at the time of writing, is the 22nd edition, published in 2003. The chart is largely the work of one man, Donald Nicholson. Born in 1916, Donald Nicholson graduated in Chemistry in 1936. In 1946, after working for a large pharmaceutical firm, he moved to Leeds School of Medicine where he taught the metabolic reactions of bacteria. In the 1950s about 20 different pathways were known and Dr Nicholson realised that it was only when the pathways were put together that they really make sense.
Dr Nicholson drew the first chart by hand in 1955. It was rather like putting the pieces of a jigsaw together. The first printed copies of his metabolic pathways chart appeared in 1961 and were enthusiastically received. Since then millions of copies of the chart have been printed and the charts are now freely available on the Internet for anyone to download.
At the age of 80, Dr Nicholson bought a computer and created the first page-size ‘Minimaps’ of individual pathways. They show where in the cell the metabolic processes in the pathway occur. They are a popular format as they are A4 size.
He also worked on ‘Animaps’, animated maps showing what happens to molecules when they enter the active sites of enzymes, and how bonds break and are formed. Dr Nicholson died in 2012. Go to the interactive metabolic pathways map on the Sigma-Aldrich website; the weblink
accompanies this activity. This may take a few moments, but when it downloads you will have the full and latest metabolic pathways chart on your screen. When the chart is sized so that the information is legible, you will need to move the chart around the screen to see all of it; holding down the left hand mouse button will drag the chart.
Q2 Different groups of molecules on the metabolic pathways chart are shown in different colours. What colour are the saccharides, including the hexoses and pentoses? You will find them in the top left corner of the chart. Hint: increasing the viewing size makes it easier to see the text colour.
Q3 State the colour given to amino acids by finding ornithine and glycine. They are in the lower right-hand corner of the chart.
Salters-Nuffield Advanced Biology Resources
Activity 7.6 Student SheetQ5 Reduce the size of your view of the metabolic pathways chart so that you can see the complete chart on the screen. Locate glucose again (you should just about be able to see it). Notice how the three main stages of respiration form the backbone of all the reactions taking place inside a cell. Suggest why this might be so.
Q6 The oxygen that combines with hydrogen to form water sits at the end of a long arrow on the chart. Follow this back and:
a name the molecule that the oxygen has been produced from
b name the overall process in which the oxygen is produced.
Extension
1 Go to the home page of the Sigma-Aldrich website Metabolic Pathways section which can be found in the Life Science Learning Center. Select Minimaps – Table of contents. Notice that the first 16 out of a total of 35 minimaps in the contents list focus on respiration; this again highlights the importance of respiration in the cell’s activities. Explore the minimaps connected with respiration.
Salters-Nuffield Advanced Biology Resources
Activity 7.6 Teacher SheetRESPIRATION AND OTHER METABOLIC
PATHWAYS
Purpose
To reinforce understanding of the reactions of respiration.
To know how the reactions of respiration fit into the overall metabolic pathways inside a cell.
To use online research skills.
The metabolic pathways chart
In this activity students use the metabolic pathways chart to pick out some of the key parts of respiration. Individual or paired access to a computer is needed, but it could also be done as a class activity using a projector.
Part of the extension work requires Adobe Shockwave to be installed. This can be done for free via the Macromedia® site.
Paper copies of Nicholson’s metabolic pathways chart can be bought from Sigma-Aldrich. Two sizes are available. Details are on the Sigma-Aldrich website; go to the Life Science Learning Centre and find the link to the Metabolic Pathways Chart.
Answers
Q1 a ‘Metabolism’ can mean all the chemical and physical processes that take place within a living organism. However, the term is usually used to refer to just the chemical,
enzymatic reactions.
b Sequences of reactions, each catalysed by a different enzyme, that lead to the formation of a product or products. Pathways can be linear (e.g. glycolysis) or cyclical (e.g. the Krebs cycle).
Q2 Green.
Q3 Red.
Q4 Purple.
Q5 The reactions of respiration lead to the synthesis of ATP by ATP synthase. ATP is the source of most of the energy required for all other reactions.
Q6 a Water.
Salters-Nuffield Advanced Biology Resources
Activity 7.7 Student Sheet Core PracticalMEASURING THE RATE OF OXYGEN UPTAKE
Purpose
To investigate the uptake of oxygen in respiration.
To measure the rate at which an organism respires.
To develop practical skills.
SAFETY
Wear eye protection and disposable gloves when handling soda lime.
Soda lime is corrosive. Do not handle directly; use a spatula. See CLEAPSS Student Safety Sheet 31 for further details.
Write a risk assessment including any safety precautions. Discuss this with your teacher before starting.
Wash your hands thoroughly after handling living organisms.
YOU NEED
● Respirometer (see Figures 1 and 2)
● 5 g of actively respiring organisms
● Soda lime
● Coloured liquid
● Dropping pipette
● Fine permanent marker pen (as lines must be very thin)
● Solvent (to remove the marker)
● Cotton wool
● Stopclock
Respirometers
Respirometers range from relatively simple pieces of equipment used in school science labs with seeds or invertebrates, to elaborate devices the size of a room used to measure respiration rates in humans living near-normal lives over a period of several days. In this practical you will be using a very simple respirometer, while considering the advantages of some of the slightly more complex ones.
1 Scientific questions and information research
Before you start the experiment you should:
Research relevant information about the design and use of respirometers.
Look at the respirometer in Figure 1. Annotate the diagram to show what each component does or make a list of the components shown for this respirometer and suggest their functions.
Figure 1 A very simple respirometer.
Study Figure 2 on page 2, and Figure 7.31 on page 149 of Student Book 2 that show two other types of respirometer. Make a table to compare the advantages and disadvantages of the three types of
Salters-Nuffield Advanced Biology Resources
Activity 7.7 Student Sheet Core PracticalFigure 2 A simple respirometer using a boiling tube.
Research relevant information about factors that will affect the rate of respiration.
State what you are going to investigate. You should express this as a question to answer, a problem to investigate or a hypothesis to test.
2 Planning and experimental design
1 Find out what living organisms you will be using and investigate the temperature range of their normal environment. This will allow you to consider temperature as a possible variable to investigate or to control.
2 Find out the dimensions of the apparatus that you will be using, and the size and mass of the organisms; this will allow you to consider the mass or numbers of organisms as possible variables to investigate or to control.
3 Find out the dimensions of the capillary tube, pipette or other glass tube that your apparatus uses. Check if it has a scale associated with it, and what units of length and volume you will be working with.
4 Read through the steps in the given procedure. This procedure uses the type of respirometer shown in Figure 2. If you use a different design you may need to modify the procedure.
a State what you expect to happen to the drop of liquid and why. In your answer, explain in detail what happens to the oxygen molecules, the carbon dioxide molecules and the pressure in the tube containing the liquid.
b For the variable you will be investigating decide how you will modify the procedure to test your hypothesis. Predict what you expect to happen to the oxygen uptake as the independent variable is changed.
c Decide if all the other variables have been identified and, where possible, controlled or allowed for.
d Write a risk assessment for the practical work and make sure you consider how you will handle the living organisms to avoid stress (even rough handling of germinating seeds could affect their respiration) and what will happen to organisms, such as woodlice, after the investigation.
Salters-Nuffield Advanced Biology Resources
Activity 7.7 Student Sheet Core PracticalProcedure
1 Assemble the apparatus as shown in Figure 2.
2 Place 5 g of maggots, woodlice, or germinating peas or seeds into the boiling tube and replace the bung. Handle live animals with care to avoid harming them.
3 Introduce a drop of marker fluid into the pipette using a dropping pipette. Open the connection (three-way tap) to the syringe and move the fluid to a convenient place on the pipette if needed (i.e. towards the end of the scale that is furthest from the test tube).
4 Mark the starting position of the fluid on the pipette with a fine permanent pen.
5 Isolate the respirometer by closing the connection to the syringe and the atmosphere, and
immediately start the stopclock. Mark the position of the fluid on the pipette at 1 minute intervals for 5 minutes.
6 At the end of 5 minutes open the connection to the outside air.
7 Measure the distance travelled by the liquid during each minute (the distance from one mark to the next on your pipette).
8 If your tube does not have volumes marked onto it you will need to convert the distance moved into volume of oxygen used. (Remember the volume used = πr2 × distance moved, where r = the
radius of the hole in the pipette.)
9 Record your results in a suitable table.
10 Calculate the mean rate of oxygen uptake during the 5 minutes.
11 Collect mean rate of oxygen uptake results from other groups in the class. Note the range of data recorded for mean oxygen uptake.
4 Analysis and interpretation of data
Draw a graph that shows the mean rate of oxygen taken up against the variable you have investigated, for example the mass (or numbers) of organisms or temperature. Take care to use appropriate units. A scatter diagram may be the best choice to present your data; you should be able to justify why this might be the best choice.
Decide if any correlation, positive or negative, is evident between your two variables and use a statistical test to determine if the correlation is significant.
5 Conclusion and evaluation
Explain any correlation evident from the analysis using your biological knowledge.
State a clear conclusion and comment on the validity of your conclusion. In your discussion, you may wish to suggest:
– why a range of mean oxygen uptake results were obtained if more than one group used the same mass or number of organisms, or temperature
– why a mean was calculated and the significance of any variation within the data from which the mean was calculated
Salters-Nuffield Advanced Biology Resources
Activity 7.7 Teacher Sheet Core PracticalMEASURING THE RATE OF OXYGEN UPTAKE
Purpose
To investigate the uptake of oxygen in respiration.
To measure the rate at which an organism respires.
To develop practical skills.
SAFETY
Review students’ risk assessments and discuss any safety considerations.
Ensure students wear eye protection and disposable gloves when handling soda lime. Soda lime is corrosive. Do not handle directly; use a spatula. See CLEAPSS Student Safety Sheet 31 for further details.
Ensure students wash their hands thoroughly after handling living organisms.
Notes on the procedure
The respirometer shown in Figure 1 on the Student Sheet is a very simple one; more complex ones (for example, U-tubes) can be used if available.
The choice of what respiring organisms to put into the tubes is left to you. Germinating peas, maggots or woodlice are commonly used.
The choice of which independent variable to use is also left to you. Investigating the variation in temperature on the rate of oxygen uptake is likely to provide more interesting biological explanations than change in mass/number, though the latter could provide good discussion points about the effects of surface area to volume ratios. If temperature is used as the independent variable then the range 5–35 °C is suggested as suitable, with 5 °C increments and ideally 3 repeats at each temperature. If you are using pipettes there is no need to do any volume calculations; students just read the change in volume off the scale on the pipettes. If you are using thick-walled capillary tubing it is worth reminding students of the formula for working out the volume of oxygen used:
volume of air used = πr2 × distance moved
where r = the radius of the hole in the pipette
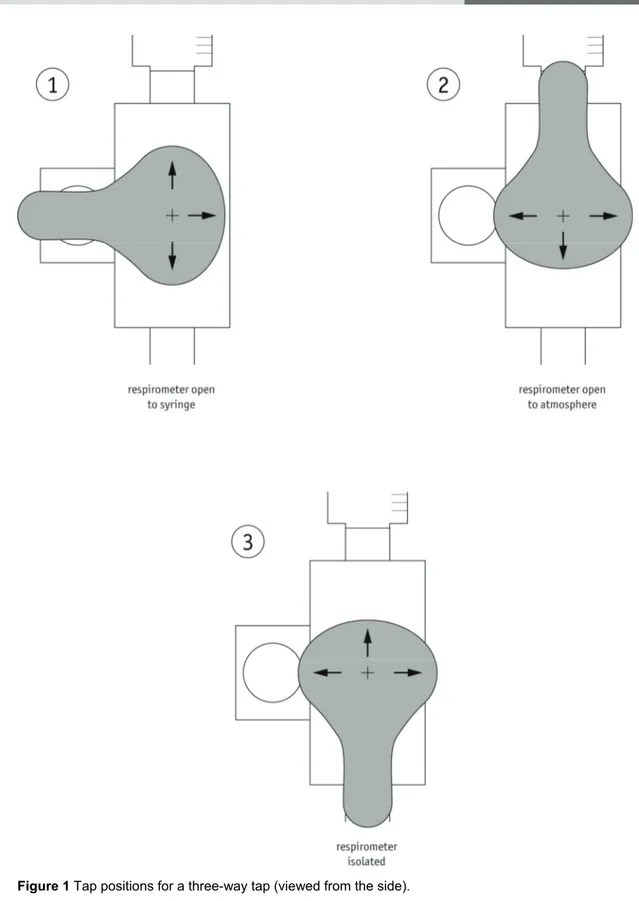
Three-way taps can cause confusion with some students. A diagram of how the three-way tap works is shown in Figure 1 on page 4 of this sheet. Projecting this diagram during the practical can help.
1 Scientific questions and information research
Students might include the following in their response to explaining the components of the respirometer in Figure 1.
Soda lime – absorbs carbon dioxide released in respiration from the living organisms being studied.
Wire mesh – prevents organisms being studied coming into contact with the soda lime, which is both corrosive and an irritant.
Organisms – take up oxygen in respiration.
Capillary tube – allows small changes in the movement of the drop of liquid to be measured and volume changes to be calculated.
Salters-Nuffield Advanced Biology Resources
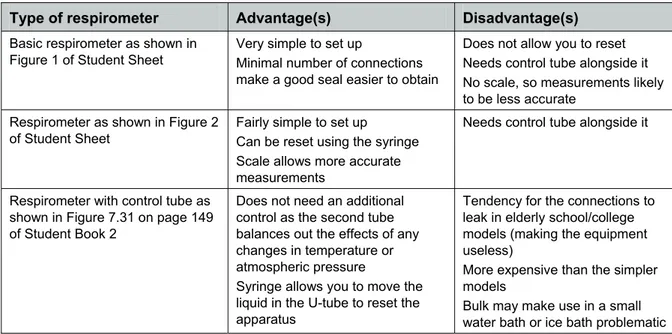
Activity 7.7 Teacher Sheet Core PracticalA comparison of the three types of respirometer might include some of the following points:
Type of respirometer Advantage(s) Disadvantage(s)
Basic respirometer as shown in Figure 1 of Student Sheet
Very simple to set up
Minimal number of connections make a good seal easier to obtain
Does not allow you to reset Needs control tube alongside it No scale, so measurements likely to be less accurate
Respirometer as shown in Figure 2 of Student Sheet
Fairly simple to set up
Can be reset using the syringe Scale allows more accurate measurements
Needs control tube alongside it
Respirometer with control tube as shown in Figure 7.31 on page 149 of Student Book 2
Does not need an additional control as the second tube balances out the effects of any changes in temperature or atmospheric pressure
Syringe allows you to move the liquid in the U-tube to reset the apparatus
Tendency for the connections to leak in elderly school/college models (making the equipment useless)
More expensive than the simpler models
Bulk may make use in a small water bath or ice bath problematic
2 Planning and experimental design
1–3 Students are asked to find out information about the apparatus and living organisms that they are going to be using. It might be helpful to have at least one set of apparatus ready for them to explore how the set up works and also the living organisms that they are going to be using.
4 a Simple answer: Oxygen molecules are absorbed by the organism and used in respiration. The same number of carbon dioxide molecules are released, but these are absorbed by the soda lime. This reduces the pressure inside the test tube (fewer molecules = lower
pressure). Atmospheric pressure pushes the liquid along the tube, until the pressure inside and outside the tube is equal.
Detailed respiration review answer: As above, but should include reference to the role of oxygen as the final electron acceptor and the fact that it eventually combines with hydrogen to make water. The carbon dioxide comes from the link reaction and the Krebs cycle, as the carbohydrate is broken down.
b How much choice you give your students over the independent variable may depend upon your class size and the time that you have. You do need as much data as possible for a scatter diagram, so it could work best to have one independent variable and different groups investigating different values of the same variable. If using temperature, obviously it is sensible and responsible to keep within the possible environmental range of the living organisms that you are using.
c Possible other variables and their control:
• Environmental temperature – could be controlled via a water bath or monitored to check for any change.
• Number of organisms – controlled by careful counting/double-checking numbers.
• Mass of organisms – controlled by weighing. To keep both number and mass the same, using organisms of similar size will be helpful.
• Mass of soda lime – this should be weighed out.
• Activity and age of organisms – partly controlled by choosing organisms of the same age (days germinated/same length of maggot, etc.)
• Species – there may be variation in metabolic rates in organisms of different species, so the same species organisms should be used. If woodlice are collected from school/college grounds, they may well be different species.
Salters-Nuffield Advanced Biology Resources
Activity 7.7 Teacher Sheet Core Practicalboth maggots and woodlice; germinating seeds need no special measures apart from gentle handling, though disposable gloves may be used.
After the investigation, effective hand-washing procedures should be used. Living animals should be returned to the environment that they were taken from.
e Tables – if students are going to share data, it might help if they use similar tables for recording their data.
Graphs – students are asked to consider the best way to present their data graphically. It might help to remind them about the various types of graphs and the reasons for choosing particular graphs, including scatter diagrams.
5 Conclusion and evaluation
Students are asked to comment on the validity of their conclusion. It is suggested that they discuss:
– why a range of mean oxygen uptake results were obtained if more than one group used the same mass or number of organisms, or temperature
This may be due to a number of factors that cannot be controlled, for example, organisms having different metabolic activities; fluctuations in environmental temperature (whether or not this is the independent variable); variation in equilibration times; variation in mass, as it is difficult to get exact masses of living organisms, etc.
– why a mean was calculated and the significance of any variation within the data from which the mean was calculated
Answers might include that taking several readings over five minutes is equivalent to carrying out repeated measurements and that using a mean value is more accurate than individual values. Each reading within the five minutes may be different; this could be due to the organism still acclimatising or the apparatus still equilibrating, as well as changes in activity of the organism, etc.
Salters-Nuffield Advanced Biology Resources
Activity 7.7 Teacher Sheet Core PracticalSalters-Nuffield Advanced Biology Resources
Activity 7.7 Technician Sheet Core PracticalMEASURING THE RATE OF OXYGEN UPTAKE
Purpose
To investigate the uptake of oxygen in respiration. To measure the rate at which an organism respires. To develop practical skills.
SAFETY
Soda lime is corrosive, but much less of a hazard than solutions of potassium or sodium hydroxide. Even so, eye protection is needed when handling the soda lime. Do not handle directly; use a spatula and wear disposable gloves. Avoid exposing invertebrates to corrosive soda lime dust.
Respirometers
Requirements per student or group of students
Notes
Respirometer See Figure 2 on the Student Sheet. If a pipette is used, the scale shown on Figure 2 will not be needed. Ideally, the syringes are attached with a three-way tap. If these are not available, a rubber tube and clip can be used. See also section 15.10 Respirometers in the CLEAPSS Laboratory Handbook for details of other (bulk) suppliers. U-tube respirometers would be even better, if there is a class set available.
5 g of actively respiring organisms Use actively germinating peas, beans or other seeds, or maggots or woodlice.
Roughly a tablespoon of soda lime To absorb the carbon dioxide.
About 2 cm3 of coloured liquid e.g. water and food colouring or equivalent. Dropping pipette
Permanent marker, or chinagraph pencils (fine, to make lines as thin as possible)
For marking the position of the coloured liquid.
Solvent to remove the marker Small amount of cotton wool to wipe pipette
Stopclock Eye protection
Disposable teaspoon or fine brush/disposable gloves
For handling organisms.
Soap/water For hand-washing after handling organisms.
A respirometer is shown in Figure 1 on the Student Sheet. Many schools and colleges have at least one U-tube respirometer (Figure 7.31 on page 149 of Student Book 2). These can be used, but can be a lot more fiddly and the connections often leak. Ensure rubber bungs and connecting tubing are not
perished. A thin layer of petroleum jelly can be used in emergencies to try to seal leaky equipment, but may cause the rubber to perish more quickly when removed thoroughly afterwards. If the apparatus works, the respiring organisms use up the oxygen and give off CO2. The CO2 is absorbed by the soda
Salters-Nuffield Advanced Biology Resources
Activity 7.8 Student SheetANAEROBIC RESPIRATION
Purpose
To look at the detailed reactions involved in anaerobic respiration.
Glycolysis
Living organisms carry out respiration to make ATP, the energy currency of the cell. Glycolysis (Figure 1) involves the oxidation of glucose to pyruvate and is carried out by all living organisms, whether or not oxygen is present. The glycolysis reactions release energy, which is used to make ATP. Transfer of electrons from the glucose reduces
coenzymes as hydrogen is removed during the reaction.
Questions
Q1 ADP is recycled when ATP is used as an energy source for reactions in the cell. Name two processes that use ATP.
Q2 Explain what needs to happen to the reduced coenzyme so that it can be recycled.
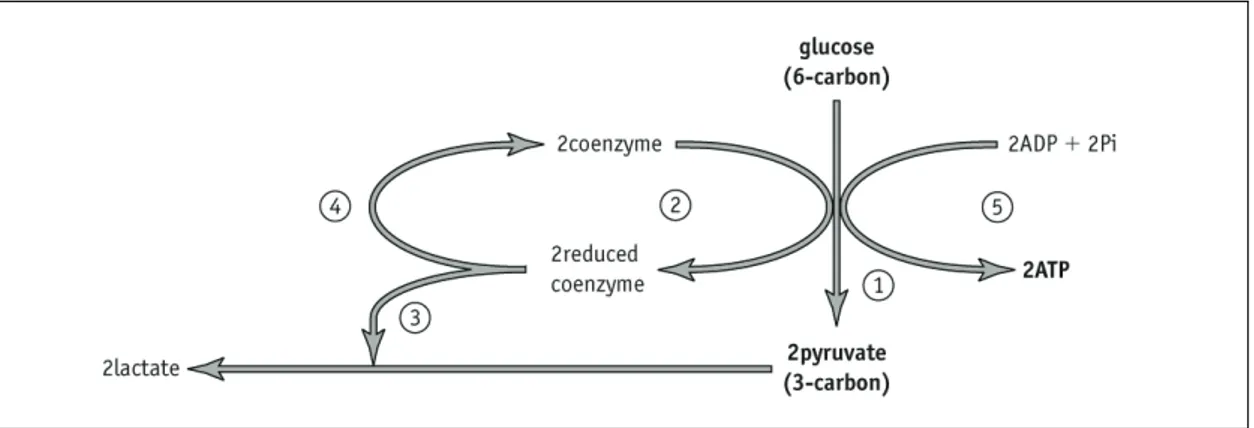
Q3 In anaerobic respiration in animals pyruvate is reduced to lactate by the reduced coenzyme, allowing recycling of the coenzyme (Figure 2).
Figure 2 Anaerobic respiration in animals.
Write a simple explanation for what is happening at each of the stages labelled 1–5 in Figure 2.
Q4 Lactate is not a waste product; it can be converted back into glucose in the liver, or can be broken down completely to CO2 and H2O in aerobic respiration. Suggest why lactate causes
problems if allowed to build up in cells.
Salters-Nuffield Advanced Biology Resources
Activity 7.8 Teacher SheetANAEROBIC RESPIRATION
Purpose
To look at the detailed reactions involved in anaerobic respiration.
Glycolysis
Students use their Student Book 2 to help them complete this worksheet, or it could be used to check learning.
Answers
Q1 Muscle contraction/active transport/synthesis of large molecules, etc.
Q2 It needs to be oxidised – electrons need to be removed.
Q3
1 Glucose is split to form two pyruvate molecules. 2 Hydrogen removed from glucose reduces coenzyme. 3 Pyruvate is reduced to form lactate.
4 Reduced coenzyme is oxidised and so recycled.
5 Substrate-level phosphorylation. ATP is made using energy released when two molecules of pyruvate are made from the splitting of one molecule of glucose.
Salters-Nuffield Advanced Biology Resources
Activity 7.9 Student SheetAEROBIC CAPACITY
Purpose
To introduce the idea of V̇O2(max), aerobic capacity, and the need for efficient delivery of oxygen
to tissues and removal of carbon dioxide from them. To develop practical skills.
Determine your own V
̇
O
2(max)
V̇O2(max) is a measure of maximum oxygen consumption per minute and gives an indication of
aerobic capacity, the maximum capacity for aerobic respiration. It requires efficient uptake of oxygen by the lungs, efficient transport by the cardiovascular system and efficient use by muscles. As an individual gets fitter their V̇ O2(max) increases.
Direct measurement of V̇ O2(max) requires sophisticated physiological laboratory equipment and a real
commitment on the part of the participant, who must perform maximal exercise to the point of
exhaustion. Because of these limitations, a number of tests have been developed to allow a reasonable estimate of V̇O2(max) to be made under more everyday conditions. This activity uses one of these
indirect measurements to determine your V̇ O2(max).
Predicting V
̇
O
2(max) from pulse rate after a step test
The rate at which your heart rate slows to normal after performing a step test for 4 minutes can be used to predict your V̇ O2(max) with reasonable accuracy.
Planning and experimental design
You or a partner are going to step up and down on a bench step for 4 minutes, at 22–24 steps per minute. At the end of the exercise, the person who has been exercising will have their pulse counted. This heart rate will be used to predict V̇O2(max). Use this information to identify and discuss any
safety or ethical issues, and complete a suitable risk assessment that includes how risk will be minimised.
Read the detailed procedure below and the information about what V̇ O2(max) means. Decide if it is
valid and ethical to use the data collected by members of the class to investigate if fitter individuals have a higher V̇O2(max). If you think it is valid and ethical you need to decide what additional data
you will require to complete the investigation before starting the practical work.
YOU NEED
● A bench step (height 35–36 cm) ● A metronome
● A stopclock
SAFETY
Students with circulatory or breathing problems should not participate in this activity. (Asthma sufferers may wish to take part and should be allowed to do so if they feel able. Their inhalers should be available in case of need.) The bench step should be securely fixed and participants should wear suitable footwear.
Passageways, stairs and spaces in front of fire exits should not be used.
Procedure
Salters-Nuffield Advanced Biology Resources
Activity 7.9 Student Sheet2 The subject should step on and off the bench step with a regular up (first foot) – up (second foot) – down (first foot) – down (second foot) rhythm for 4 minutes. Females should step at a rate of 22 complete steps a minute and males at a rate of 24 steps per minute. Keeping the rate steady is made easier if you use a metronome. Set the metronome at 88 beats per minute for females and 96 beats per minute for males. Have a practice before you take the actual measurement to get used to the rhythm.
3 At the end of the 4 minutes, the subject should remain standing, and their partner should measure their pulse over a period of 15 seconds, beginning within 5–20 seconds of stopping stepping. Multiplying the 15 second count by 4 gives you a ‘recovery heart rate’ in beats per minute. A recovery heart rate is the beats per minute within 5–35 seconds of completing exercise. For individuals aged between 18 and 24, V̇ O2(max) can be predicted from the following equations:
male V̇O2(max) = 111.33 – (0.42 × recovery heart rate)
female V̇O2(max) = 65.81 – (0.185 × recovery heart rate)
V̇O2(max) is measured in cm3 kg−1 min−1. It has been estimated that the V̇O2(max) of an untrained
healthy male will be about 35 cm3 kg−1 min−1, and for a untrained healthy female it is likely to be about
30 cm3 kg−1 min−1. Elite athletes can have a V̇O
2(max) of 80 cm3 kg−1 min−1 or more.
What does V
̇
O
2(max) mean?
The value of V̇ O2(max) gives a measure of the maximal rate of oxygen uptake for the individual. It is
tempting to use it as a measure of aerobic fitness. However, V̇ O2(max) is affected by a number of
other factors too, including the type of exercise used in the test, the level of training of the person, their gender, their age and their genes. It is not a useful way to compare the fitness of different individuals unless other factors are controlled or taken into account.
Exercise type: In general, treadmills and bench-stepping give higher values of V̇O2(max) than
cycling, but this depends on the individual and what type of exercise they usually take.
Gender: In general, women have a V̇ O2(max) that is 15–30% lower than men, even after you take
differences in weight into account. This is partly because women have more body fat – around 25% of body weight in untrained women as opposed to 15% in untrained men. Men also have a higher concentration of haemoglobin, which increases the amount of oxygen they can carry. Age: V̇O2(max) declines steadily once an individual has reached their mid-20s, though this is
affected by the individual’s level of activity as much as chronological age.
Level of training: A person’s V̇O2(max) can increase by between 6% and 20% with training. The
largest improvements will be found in people who were most sedentary at the start.
Heredity: Research has shown that about 20–30% of the variation in individuals’ V̇O2(max) is
attributable to their genes.
Questions
Q1 The V̇O2(max) of trained athletes is higher than that of untrained individuals. What
physiological reasons are there for this?
Q2 V̇O2(max) values are given per kg of body mass, as cm3 kg–1 min–1. This corrects
(approximately) for differences in a person’s general size. Imagine a heavyweight (80 kg) and a bantamweight (52 kg) boxer; both are very fit but the heavyweight has a higher V̇ O2(max) if
measured in cm3 min–1. Why does size make this difference?
Q3 V̇O2(max) is usually measured on a treadmill. Discuss the problems you might encounter
Salters-Nuffield Advanced Biology Resources
Activity 7.9 Teacher SheetAEROBIC CAPACITY
Purpose
To introduce the idea of V̇ O2(max), aerobic capacity, and the need for efficient delivery of oxygen
to tissues and removal of carbon dioxide from them.
To develop practical skills.
SAFETY
Students with circulatory or breathing problems should not participate in this activity. (Asthma sufferers may wish to take part and should be allowed to do so if they feel able. Their inhalers should be available in case of need.)
The bench step should be securely fixed and participants should wear suitable footwear.
Notes on the procedure
In this activity students make an indirect determination of their own V̇ O2(max). V̇O2(max) is the
maximum capacity for aerobic respiration – it is a measurement of the capacity of the body’s systems to deliver oxygen to respiring cells. The method described on the Student Sheet is based on 4 minutes of bench-stepping. Note that a step of 35–36 cm is needed. Most bench steps tend to be 15–19 cm high and will give false high levels of fitness. If a 15–19 cm step is used, students will have to compensate by stepping up and down at twice the rate suggested on the Student Sheet.
The results are potentially embarrassing to very unfit students so allowing students to choose to take part or not is recommended. It may be worth stressing that about 20–30% of the differences in V̇O2(max) are genetically determined.
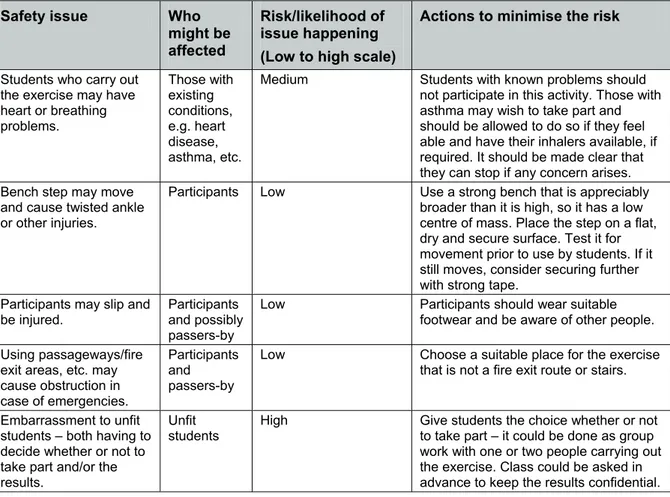
Students are asked to prepare a risk assessment that includes how to minimise any risks identified. Although their risk assessment may be in any format, it should cover most of the points in Table 1.
Safety issue Who
might be affected
Risk/likelihood of issue happening (Low to high scale)
Actions to minimise the risk
Students who carry out the exercise may have heart or breathing problems. Those with existing conditions, e.g. heart disease, asthma, etc.
Medium Students with known problems should not participate in this activity. Those with asthma may wish to take part and should be allowed to do so if they feel able and have their inhalers available, if required. It should be made clear that they can stop if any concern arises. Bench step may move
and cause twisted ankle or other injuries.
Participants Low Use a strong bench that is appreciably broader than it is high, so it has a low centre of mass. Place the step on a flat, dry and secure surface. Test it for movement prior to use by students. If it still moves, consider securing further with strong tape.
Participants may slip and be injured.
Participants and possibly passers-by
Low Participants should wear suitable footwear and be aware of other people.
Using passageways/fire exit areas, etc. may cause obstruction in case of emergencies.
Participants and passers-by
Low Choose a suitable place for the exercise that is not a fire exit route or stairs.
Embarrassment to unfit students – both having to decide whether or not to take part and/or the results.
Unfit students
High Give students the choice whether or not to take part – it could be done as group work with one or two people carrying out the exercise. Class could be asked in advance to keep the results confidential.
Salters-Nuffield Advanced Biology Resources
Activity 7.9 Teacher SheetStudents are also asked to consider if it is valid and ethical to use the data collected by members of the class to investigate if fitter individuals have a higher V̇ O2(max). Some students may not wish to
participate in the activity so they are unlikely to consider it appropriate to use the class data.
Using pairs with only one person doing the exercise or getting volunteers who participate in different sports or undertake no sport to be the test subjects would avoid potential embarrassment and would allow a more investigative approach to be used.
Answers
Q1 Reasons for higher V̇O2(max) in trained athletes:
larger heart stroke volume
increased maximum cardiac output
more capillarisation of lungs and muscles
a lower fat-to-muscle ratio
increased size and number of mitochondria
increased vital capacity and number of breaths that can comfortably be taken in a minute
any other appropriate change with exercise that increases the supply of oxygen and food materials to tissues for respiration. This also includes increased red blood cell production and increased blood volume.
Q2 The mass of respiring tissues will affect the amount of oxygen taken up, as will the surface area of the lungs. Both of these will increase with increasing body size.
Q3 Athletes will be adapted to their chosen sport and will under-perform using other apparatus. The muscles they have trained may be used little if at all. (Interestingly, cycling and hand cranking give lower estimates of V̇ O2(max) than treadmills or bench-stepping. Swimming
Salters-Nuffield Advanced Biology Resources
Activity 7.9 Technician SheetAEROBIC CAPACITY
Purpose
To introduce the idea of V̇ O2(max), aerobic capacity, and the need for efficient delivery of oxygen
to tissues and removal of carbon dioxide from them.
To develop practical skills.
This is a slightly more reliable version of the bench-stepping practical, which is often done at KS3 or KS4. Students perform this experiment in pairs or small groups.
SAFETY
Students with circulatory or breathing problems should not participate in this activity. (Asthma sufferers may wish to take part and should be allowed to do so if they feel able. Their inhalers should be available in case of need.)
The bench step should be securely fixed and participants should wear suitable footwear. Passageways, stairs and spaces in front of fire exits should not be used.
Apparatus per student or group
of students Notes
Stopclock
Bench for bench-stepping Height 35–36 cm. Note that most bench steps available from the PE department are only 15–19 cm high. If these lower benches are used a higher step rate is required.
Metronome One for the class is fine. Usually available from the music
department or available online, for example, at Metronome Online.
Salters-Nuffield Advanced Biology Resources
Activity 7.10 Student SheetEFFECT OF EXERCISE ON CARDIAC OUTPUT
Purpose
To look at the various ways that exercise can affect cardiac output, both in the short and long term.
The heart and cardiac output
First, recall that the cardiac output is the amount of blood pumped by the left ventricle in one minute. This can be affected both by the number of times the heart beats per minute and by the stroke volume, i.e. the amount of blood pumped out in each contraction. The relationship is:
cardiac output = stroke volume × heart rate
Changes in cardiac output enable the efficient delivery of oxygen to tissues and removal of carbon dioxide from them.
Questions
Q1 Label the diagram of the heart in Figure 1.