GFI Product Guide
The information and content in this document is provided for informational purposes only and is provided "as is" with no warranty of any kind, either express or implied, including but not limited to the implied warranties of merchantability, fitness for a particular purpose, and non-infringement. GFI Software is not liable for any damages, including any consequential damages, of any kind that may result from the use of this document. The information is obtained from publicly available sources. Though reasonable effort has been made to ensure the accuracy of the data provided, GFI makes no claim, promise or guarantee about the completeness, accuracy, recency or adequacy of information and is not responsible for misprints, out-of-date information, or errors. GFI makes no warranty, express or implied, and assumes no legal liability or responsibility for the accuracy or completeness of any information contained in this document.
If you believe there are any factual errors in this document, please contact us and we will review your concerns as soon as practical.
All product and company names herein may be trademarks of their respective owners. Microsoft and Windows are either registered trademarks or trademarks of Microsoft Corporation in the United States and other countries.
GFI MailArchiver®is copyright of GFI SOFTWARE Ltd. - 1999-2014 GFI Software Ltd. All rights reserved.
Contents
1 About GFI MailArchiver® 5
1.1 Introduction to GFI MailArchiver 5
1.2 How does GFI MailArchiver work? 5
1.3 GFI MailArchiver licensing 6
1.4 Legal compliance 7
2 Installing GFI MailArchiver 7
2.1 Before you install 8
2.2 System requirements 9
2.3 Where should I install GFI MailArchiver? 14
2.4 Setting up a journaling mailbox 15
2.5 Choosing and preparing a database 34
2.6 Installing GFI MailArchiver 38
2.7 Removing email from Microsoft® Exchange 39
3 GFI MailArchiver Post-install Wizard 48
3.1 License configuration 48
3.2 Configuring New Archive Store Settings via Post Install Wizard 48 3.3 Configuring Archiving Method via Post Install Wizard 55
3.4 Finalizing the Post Install setup 60
3.5 Test your setup 61
3.6 Using the Port Change Tool 63
4 Upgrading from previous versions 65
4.1 Why upgrade to GFI MailArchiver 2013? 65
4.2 Upgrading from versions earlier than GFI MailArchiver 2012 65
4.3 Before you upgrade 67
4.4 Upgrading GFI MailArchiver 67
4.5 Post upgrade actions 68
5 Using GFI MailArchiver 68
5.1 Logging in to GFI MailArchiver 69
5.2 Using the Home tab 69
5.3 Browsing Archived items 73
5.4 Working with archived items 75
5.5 Searching archived emails 78
5.6 Accessing multiple mailboxes 85
5.7 GFI MailInsights® 86
5.8 Changing user preferences 107
6 Achieving results 107
6.1 Achieving results with GFI MailArchiver - How to archive your company's email 107 6.2 Achieving results with GFI MailArchiver - Importing and exporting emails 109 6.3 Achieving results with GFI MailArchiver - Analyze your archived emails 109
7.1 Settings overview 111
7.2 Configuring Archiving Method 112
7.3 Managing the Mail Servers to Archive 114
7.4 Configuring Archiving Rules 118
7.5 Mailbox Archive Restrictions 121
7.6 Managing the Archiving Scope 125
7.7 Configuring Mailbox Folder Structure Retrieval 125
7.8 Importing Emails and Calendar Items via the GFI MailArchiver Archive Assistant 132
7.9 Managing Archive Stores 137
7.10 Configuring Roles and Permissions 158
7.11 Email Access Control 165
7.12 Configuring IMAP Server 166
7.13 Retention Policies 169
7.14 Classification Rules 175
7.15 Configuring Auditing 176
7.16 Configuring Email Deletion 180
7.17 Viewing and editing license keys 182
7.18 Configuring General Settings 182
7.19 Changing General Settings 182
7.20 Changing version check settings 184
7.21 Configure the Fax Archiving search tab 185
7.22 Configuring Archiving status notification 185
8 Configuring Email Client Access 185
8.1 Installing GFI MailArchiver Outlook Connector 185
8.2 Configuring the Archive Assistant 194
8.3 Configuring GFI MailArchiver IMAP Client Access 202
9 Using the GFI MailArchiver Import Export Tool 211
9.1 Import Emails From Microsoft® Exchange Mailboxes 212
9.2 Import emails from PST files locally 221
9.3 Export emails from GFI MailArchiver Archive Stores 226
10 Restoring Mailboxes 232
11 Troubleshooting and support 233
11.1 Introduction 233
11.2 GFI SkyNet 233
11.3 Web Forum 233
11.4 Request technical support 233
11.5 Documentation 234
11.6 Installation problems 235
11.7 General Issues 237
11.8 Import Export Problems 242
11.9 Outlook® Connector Issues 244
GFI MailArchiver 1 About GFI MailArchiver®|5
1 About GFI MailArchiver
®
1.1 Introduction to GFI MailArchiver
GFI MailArchiver is an email archiving solution that can archive all internal and external email into a central Archive Store. You can then easily manage the email Archive Stores from the web-based configuration of GFI MailArchiver. You can also allow users to browse and search old emails via the web-based interface. GFI MailArchiver also provides Microsoft Outlook®integration.
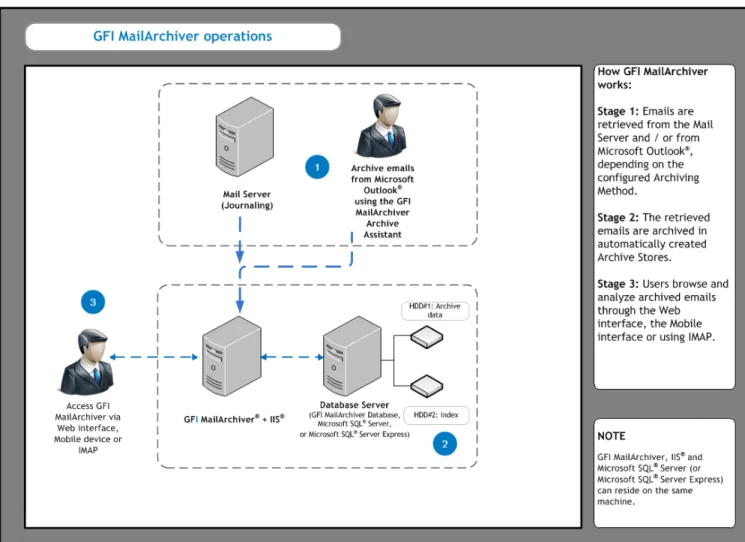
1.2 How does GFI MailArchiver work?
GFI MailArchiver operations can be classified in three stages as described below:
Figure 1: Typical GFI MailArchiver installation diagram.
Stage 1: Retrieve items to archive
GFI MailArchiver retrieves emails, calendar items or files depending on the configured Archiving Method as described in the table below:
OPTION DESCRIPTION
Manual Archiving This method enables users to manually archive messages, calendar items or files from their Microsoft Outlook®client into GFI MailArchiver. Users need to deploy GFI MailArchiver Archive Assistant to archive items manually. For more information, refer toConfiguring the Archive Assistant(page 194).
OPTION DESCRIPTION
Auto-Archiving (Journaling) GFI MailArchiver uses Microsoft®Exchange Server journaling to retrieve items to archive in a single mailbox. A Journaling mailbox (configured in Microsoft Exchange) is required for the Auto-Archiving (Journaling) method and is configured through the post-install wizard. This enables you to start archiving items from a Microsoft® Exchange Server. For more information, refer toSetting up a journaling mailbox(page 57).
If Auto-Archiving (Journaling) method is enabled, select one of the following options: All Emails- select to archive all emails that pass through your configured mail servers. For more information, refer toManaging the Mail Servers to Archive(page 114).
Rule-Based Archiving- archive emails based on criteria specified in the configured Archiving Rules. For more information, refer toConfiguring Archiving Rules(page 118).
Optionally, emails and calendar items can also be imported into GFI MailArchiver through the GFI MailArchiver Import Export Tool. For more information, refer toUsing the GFI MailArchiver Import Export Tool(page 211).
Stage 2: Archive retrieved items
GFI MailArchiver stores collect items in Archive Stores created automatically based on the configured
New Archive Store Settings. Items are archived according to their received date. If an Archive Store does not exist for the period that matches the date of the item, a new Archive Store is automatically created. For more information, refer toConfiguring New Archive Store Settings(page 139).
NOTE
When Rule-based method of archiving is selected, GFI MailArchiver only archives items that match criteria specified in the configured Archiving Rules. For more information, refer toConfiguring Archiving Rules(page 118).
Stage 3: Browse and analyze archived items
Users can browse, search and analyze archived items using the GFI MailArchiver web interface or from within Microsoft Outlook®using the GFI MailArchiver Outlook Connector. For more information, refer toBrowsing Archived items(page 73).
Additionally, use GFI MailInsights to analyze information related to email usage and trends. Use this feature to generate management and HR reports that provide insight on email and resource use or misuse. For more information, refer toGFI MailInsights®(page 86).
1.3 GFI MailArchiver licensing
GFI MailArchiver requires a license for every mailbox. You may need to exclude certain mailboxes from archiving while including specific ones. This can be achieved by configuring Mailbox Archive Restrictions and determines the number of licensed mailboxes counted by the product. For more information, refer toMailbox Archive Restrictions(page 121).
For general information on GFI MailArchiver licensing, refer to:http://go.gfi.com/?pageid=MAR_ Licensing
GFI MailArchiver 2 Installing GFI MailArchiver|7 1.3.1 Terms and conventions used in this guide
Term Description
Additional information and references essential for the operation of GFI MailArchiver.
Important notifications and cautions regarding potential issues that are commonly encountered.
> Step by step navigational instructions to access a specific function. Bold text Items to select such as nodes, menu options or command buttons.
Italics text Parameters and values that you must replace with the applicable value, such as custom paths and file names.
Code Indicates text values to key in, such as commands and addresses.
1.4 Legal compliance
Ensure that by enabling the Rule-based method of archiving or the Email deletion feature you are not breaching your company policy or any laws and regulations related to email storage in your
jurisdiction. For more information refer toConfiguring Archiving Rules andEmail Deletionchapters.
2 Installing GFI MailArchiver
The following sections provide you with information about how to successfully deploy a fully functional instance of GFI MailArchiver:
SECTION DESCRIPTION
Installation notes Follow a detailed checklist to
ensure that your envir-onment meets the necessary requirements.
System requirements Browse information related
to software and hardware requirements and other important settings such as Port Settings, ASP.NET Set-tings and Database SetSet-tings.
Environment considerations Find information related to
the environment where you are going to install GFI MailArchiver.
Preparing a journaling mailbox Create a journaling mailbox
on Microsoft Exchange from where GFI MailArchiver retrieves items to archive.
Choosing and preparing a database Configure the database
infrastructure to ensure the best performance for data archival and retrieval processes.
Installation procedure Follow the steps to install GFI
SECTION DESCRIPTION
Removing emails from Microsoft Exchange Server Once GFI MailArchiver is configured and items are being archived correctly, create a mailbox
management policy to free up space on the Microsoft Exchange server by deleting email that has been
archived.
Post-installation tasks After GFI MailArchiver is
suc-cessfully installed, follow the post install wizard that assists in setting up GFI MailArchiver .
2.1 Before you install
The following checklist ensures that you have all the necessary requirements in place before going through the installation process:
1. Ensure that you are logged on as Administrator or using an account with administrative privileges. 2. Install .NET Framework 4.0 or 4.5.
3. Set up IIS (SMTP/World Wide Web Services). For more information, refer toASP.NET® settings
(page 12).
4. Enable .NET Framework 3.5. For more information, refer toHow to install/enable .Net 3.5 SP1 on Windows Server 2008 R2(page 14).
5. Install Microsoft Exchange Server MAPI Client and Collaboration Data Objects. 6. Ensure screen resolution is 1024 x 768 or higher.
7. Ensure ports used by GFI MailArchiver are free. For more information, refer toConnections estab-lished from the GFI MailArchiver Server(page 11).
8. Check that the machine on which you are installing GFI MailArchiver meets the system and hard-ware requirements specified inSystem Requirements.
9. Check the Microsoft®Exchange Server role. GFI MailArchiver cannot be installed on the Microsoft® Exchange Server 2007/2010 Edge Role, since such a server is typically deployed on a DMZ using ADAM (Active Directory®Application Mode)/AD LDS (Lightweight Directory Services) instead of Active Dir-ectory.
10. Ensure to enable IMAP if installing on the Microsoft®Exchange Server 2007/2010 Client Access Role.
11. (Optional) Install Microsoft SQL Server®or Microsoft SQL Server®Express. For more information, refer toChoosing your database type(page 34).
12. Save any pending work and close all open applications on the machine.
13. Run the GFI MailArchiver installer to install GFI MailArchiver and missing pre-requisites. For more information, refer toInstalling GFI MailArchiver(page 38).
14. Follow the post-install wizard to configure GFI MailArchiver and its operating environment. For more information, refer toGFI MailArchiver Post-install Wizard(page 48).
GFI MailArchiver 2 Installing GFI MailArchiver|9
2.2 System requirements
Use the following links to find information related to software and hardware requirements and other important settings to ensure a successful deployment of GFI MailArchiver.
Software requirements Supported operating systems
Supported mail servers Supported databases Other required components
Hardware requirements Processor
Memory Physical storage
Important Settings Antivirus software
Firewall Port settings Database settings ASP.NET®settings
NOTE
The recommended software and hardware specifications depend on the number of users, settings enabled, email flow and message sizes.
2.2.1 Software requirements
Supported operating systems
GFI MailArchiver can be installed on all the operating systems listed below: OS VERSION SUPPORTED OPERATING SYSTEM
32 BIT Windows®SBS 2003 & SBS 2011
Windows®2003 Standard & Enterprise with SP2 Windows®2008 Standard & Enterprise
64 BIT Windows®SBS 2008 Standard & SBS 2011 Windows®2003 Standard & Enterprise with SP2
Windows®2008 Standard, Enterprise, Datacentre & Hyper-V®Environments
Windows®Server 2008 R2 Enterprise & Hyper-V®Environments Windows®Server 2012
NOTE
The server on which to install GFI MailArchiver must have access to Active Directory®.
Supported Mail Servers
Microsoft®Exchange Server 2003 or later.
IMAP compatible mail servers (with journaling-like feature)
Supported Databases
GFI MailArchiver supports the database back-ends listed below:
SUPPORTED DATABASE DESCRIPTION
SQL Server®2005 or later
(including SQL Server®Express editions)
Microsoft SQL Server or Microsoft SQL Server Express are recommended for all organizations. Microsoft SQL Server (or Microsoft SQL Server Express) is not included with the GFI MailArchiver installation and needs to be installed as a sep-arate process. For more information refer to: Using Microsoft SQL ServerandUsing Microsoft SQL Express.
Firebird-for evaluation purposes only An open source database used for evaluation purposes bundled with GFI MailArchiver. Recommended for evaluation purposes only for organizations with less than 50 email users and with an average mail flow of up to 2500 per day.
Other required components OTHER COMPONENTS
Microsoft .NET®Framework 4.0 or 4.5. Download .NET Framework 4.5 from:
http://www.microsoft.com/visualstudio/eng/downloads#d-net-45
NOTE
Microsoft .NET®Framework 4.5 is not supported on Microsoft Server 2003.
Access to Microsoft®Active Directory ASP.NET®4.0 or 4.5
Internet Information Services (IIS®) 6.0 or later - SMTP & World Wide Web services Internet Explorer®8 or later, Mozilla Firefox, Google Chrome, Safari®
Microsoft®Data Access Components (MDAC) 2.6 or higher
Microsoft®Exchange Server MAPI Client and Collaboration Data Objects 1.2.1 - Required (unless Outlook®2003 32-bit or later is installed or unless GFI MailArchiver is installed with Microsoft®Exchange Server 2003). Clickhereto download. Domain functional level: 2003 onwards
NOTE
Minimum supported screen resolution is 1024 x 768.
IMPORTANT
After installing Microsoft .NET®Framework 4.0 or 4.5 restart the machine.
2.2.2 Hardware requirements
Processor
REQUIREMENT DESCRIPTION
Minimum Intel Pentium or compatible - 2GHz 32 bit processor.
GFI MailArchiver 2 Installing GFI MailArchiver|11
Memory
REQUIREMENT DESCRIPTION
Minimum 1GB RAM (dedicated to GFI MailArchiver)
Recommended 3GB RAM (dedicated to GFI MailArchiver)
Physical storage
REQUIREMENT DESCRIPTION
Minimum 400MB physical disk space (NTFS) for GFI MailArchiver installation. More space is required for the database (Firebird or Microsoft®SQL server). Storage space depends on mail volume to archive.
Recommended Server with 4 physical drives, with the ability to increase storage space on demand when required. Refer toDatabase Settingssection for more information on how to configure your database.
NOTE
It is highly recommended that you store databases and Index files on separate, appropriately sized hard disks. SAS hard disks are highly recommended.
2.2.3 Connections established from the GFI MailArchiver Server
PORT DESCRIPTION
PRO- TOC-OL
25 Used by GFI MailArchiver when an email needs to be restored to a user’s mailbox or a noti-fication is sent to the GFI MailArchiver administrator.
SMT-P
80 Used by the GFI MailArchiver user interface and web services.
HTT-P 135 Enable this port when GFI MailArchiver is installed on the same machine as Microsoft®
Exchange Server and configured to use ExOLEDB to retrieve emails.
MAPI- /RP-C 143 Enable this port to retrieve emails when GFI MailArchiver is not installed on the same server
as Microsoft®Exchange Server.
IMAP 1443 Enable this port when GFI MailArchiver is configured to archive emails to a SQL Server®
Data-base. Micr-osoft SQL Serv-er® 3268 Used for connections done from the GFI MailArchiver Server to the Domain Controller which
stores the Microsoft®Global Catalog.
Micr-osoft Glob-al Cata-log 8017, 8018, 8019, 8020, 8022
Used for communication between GFI MailArchiver components and services. Ensure these ports are available and free.
44143 Default port assigned to GFI MailArchiver IMAP Service. IMAP Service enables users to access archived email via IMAP from 3rd party email clients such as Thunderbird, Microsoft
Outlook®, Apple Mail, Android, iOS and others.
NOTE
Use the Port Changing Tool to easily change port numbers. For more information, refer toUsing the Port Change Tool(page 63).
2.2.4 Excluding folders from antivirus scanning
Antivirus software may cause GFI MailArchiver to malfunction. This occurs when such software denies access to certain files required by GFI MailArchiver.
It is recommended to exclude the following folders and subfolders from antivirus software (on-access and on demand) running on the GFI MailArchiver server:
GFI MailArchiver FOLDERS
<GFI MailArchiver Installation folder> and subfolders. <..\Program Files\Common Files\GFI>
Also, exclude the index and the Archive Store locations from antivirus scans. The default Index and Archive Store locations are:
GFI MailArchiver DEFAULT INDEX AND ARCHIVE STORE LOCATIONS
<GFI MailArchiver Installation folder>\Indexes\default <GFI MailArchiver Installation folder>\Databases\default\>
NOTE
You can change the Index and Archive Store locations after installing GFI MailArchiver. For information, refer to theConfigure New Archive Store SettingsandConfigure search indexessections in this manual.
2.2.5 Database settings
GFI MailArchiver requires SQL Server®(if used as the archival database) to be installed in case insensitive mode. This is the default installation setting of SQL Server®. The SQL Server®collation modes apply to all SQL Server®objects including login names. In such cases if a user changes a property in the name and does not make EXACT character case matches, GFI MailArchiver will fail since it would not find the resources required.
Once installed, it is not possible to change the SQL Server®collation mode easily. It requires a rebuild of the master database using advanced Microsoft®SQL tools or methods. The best solution is to install another instance of SQL Server®(set to operate in insensitive collation mode).
IMPORTANT
Ensure SQL Server®is installed in case insensitive mode if SQL Server®is used as the archival database.
2.2.6 ASP.NET®settings
GFI MailArchiver 2 Installing GFI MailArchiver|13
Register ASP.NET®With IIS®
If the Microsoft®.NET framework is installed after IIS is installed this is automatically registered. Else, register ASP.NET®with IIS®by following these steps:
1. From command prompt, navigate to:
<WindowsDirectory>\Microsoft.NET\Framework\<v4.0.xxxxx>\
NOTE
Replace <v4.0.xxxxx> with the folder name of Microsoft®.NET Framework version number.
For example: C:\Windows\Microsoft.NET\Framework\v4.0.30319\
Screenshot 1: Registering ASP.NET with IIS
2. Key inaspnet_regiis.exe -iand press Enter.
Enable ASP.NET®From IIS®
NOTE
Ensure that ASP.NET®is allowed by Internet Information Services (IIS®) Manager.
IIS 6
1. Navigate toControl Panel > Administrative Tools > Internet Information Services (IIS) Manager. 2. Expand the local computer node and selectWeb Service Extensions.
3. In the right pane, right clickASP.NET v4.0.xxxxxand select Allow. IIS 7
1. Navigateto Control Panel > Administrative Tools > Internet Information Services (IIS) Manager. 2. Select the local computer node and from the Features View pane launchISAPI and CGI
Restrictions.
2.2.7 How to install/enable .Net 3.5 SP1 on Windows Server 2008 R2
The .NET Framework 3.5 SP1 is a prerequisite for SQL Server 2008. In Windows Server 2008 R2, the .NET Framework is a feature that can be enabled as follows:
1. ClickStart > Administrative Toolsand selectServer Manager.
2. In the Server Manager interface, clickFeaturesto display all the installed Features in the right hand pane.
3. If .NET Framework 3.5.1 feature is not listed, clickAdd Features. 4. Locate .NET Framework 3.5.1 Features and select checkbox. 5. ClickNext.
6. Confirm installation selections, then clickInstall.
NOTE
SQL Server 2008 Setup for standalone instance will install the .NET Framework 3.5 SP1 if it is not already installed.
2.3 Where should I install GFI MailArchiver?
Install GFI MailArchiver on any machine that meets the system requirements and is part of an Active Directory®domain. Before proceeding with the installation, first consider the details listed below:
CONSIDERATION DESCRIPTION
Email volume on your servers
Installing GFI MailArchiver on a mail server where a high volume of emails is received and processed will invariably put more load on server resources. This can cause these servers to become
unresponsive and not process mail in a timely fashion. Hardware and
software spe-cifications of your servers
The hardware and software specifications listed in the System requirements section above should be considered to be over and above the requirements of other software installed on the same server. Servers which are nearing their capacity in terms of resources should not be used to install GFI MailArchiver.
Need to archive email from mul-tiple sources con-currently
Installing GFI MailArchiver on a server which is not granted access to multiple sources creates a problem in the centralization efforts of email data archival.
If all of the above details are considered not to be of significant issues then you can consider installing GFI MailArchiver on the mail server.
For example:
If you need to archive items from one Microsoft®Exchange Server, and the server is handling the email flow on your network and still has spare processing capacity, then you can consider installing GFI MailArchiver directly on the Microsoft®Exchange Server machine.
If you want to archive items from multiple Microsoft®Exchange Servers using IMAP, it is recom-mended that you install GFI MailArchiver on a separate server.
GFI MailArchiver does not require a dedicated machine when it is not installed on the mail server. GFI MailArchiver can be installed in the following virtual environments:
GFI MailArchiver 2 Installing GFI MailArchiver|15
Microsoft Hyper-V®Server
Microsoft Virtual Server®(installed on a 32 bit guest operating system)
2.4 Setting up a journaling mailbox
If you have selected theAuto-Archiving (Journaling)method of archiving, you need to create a journaling mailbox. Journaling is a feature that enables the recording of email in an organization. Through Microsoft®Exchange Server journaling, you can channel the items to archive into a single mailbox. Emails and calendar items are then retrieved by GFI MailArchiver for archiving.
To create the journaling mailbox on Microsoft®Exchange Server, perform one of the following actions:
Automatically create a journaling mailbox via the post install wizard Manually set up a journal mailbox for Microsoft®Exchange Server 2003 Manually set up a journal mailbox for Microsoft® Exchange Server 2007 Manually set up a journal mailbox for Microsoft® Exchange Server 2010 Manually set up a journal mailbox for Microsoft® Exchange Server 2013
IMPORTANT
If journaling is not set up correctly,Auto-archiving (journaling)method of archiving will NOT work.
2.4.1 Creating a Journal Mailbox in Microsoft®Exchange Server 2003
Configuring a Microsoft®Exchange Server journaling mailbox for use within GFI MailArchiver requires you to create a new journal mailbox and to configure Microsoft Exchange to archive items to the journal mailbox. Then you are also to configure whether to journal just the BCC information or all the header information.
Step 1: Create a New Journaling Mailbox.
Screenshot 2: Add new user in Microsoft®Exchange Server 2003
GFI MailArchiver 2 Installing GFI MailArchiver|17
3. Key in a relevant ‘User logon name’ (For example journal), fill in other new user details, and click
Next.
4. Key in a password, unselectUser must change password at next logonoption and enableUser cannot change passwordandPassword never expiresoptions. ClickNextto continue setup.
NOTE
Ensure that the password keyed in meets the password complexity requirements setup for your Active Directory®users.
5. ClickNextand review the new user details. ClickFinishto create new user.
Step 2: Configure Email Archival to Journaling Mailbox
1. SelectStart > Programs > Microsoft Exchange > System Manager.
Screenshot 4: Mailbox store node properties
2. ExpandServers > <Your Server name> > Storage group, right click Mailbox Store node and select Properties.
Screenshot 5: Enabling journaling on a Microsoft®Exchange Server mailbox store
3. From theGeneraltab, selectArchive all messages sent or received by mailboxes on this store
check box and clickBrowsebutton.
4. Select the journaling mailbox name you created in step one, for example ‘journal’, and clickOK. 5. Close theMailbox Store Propertiesdialog and theExchange System ManagerManagement console.
Step 3: Enable BCC Information Journaling
IMPORTANT
It is highly recommended that you DO NOT enable this option but enableenvelope journalinginstead. Envelope journaling journals all the header information, not just the BCC data. For more information on envelope journaling refer toStep 4: Enable Envelope Journaling
On Microsoft®Exchange Server 2003 systems, BCC information is not by default included in the journaled message. To enable BCC information journaling:
1. From command prompt, typeregedit.exe
2. Add the following registry key:
HKEY_LOCAL_
GFI MailArchiver 2 Installing GFI MailArchiver|19
HKEY_LOCAL_
MACHINE\System\CurrentControlSet\Services\MSExchangeTransport\Parameters\
Key name: JournalBCC Data type: Dword Data value: 1
4. Close Registry editor and from command prompt typeservices.msc. RestartSimple Mail
Transport Protocoland theInformation Storeservices.
Step 4: Enable Envelope Journaling
Envelope Journaling enables the archival of email header information and can be switched on using: Microsoft®Exchange Server Email Journaling Advanced Configuration (exejcfg.exe), or
ADSI Editor Management console. Using the exejcfg.exe tool
1. Download the exejcfg.exe tool from:
http://www.microsoft.com/downloads/details.aspx?familyid=E7F73F10-7933-40F3-B07E-EBF38DF3400D&displaylang=en
2. From the command prompt, navigate to the folder in which you copied the exejcfg.exe tool. 3. Typeexejcfg -eand pressEnter.
NOTE
exejcfg -ddisables Envelope Journaling for that organization.
Step 5: Using the ADSI Editor
1. Locate theadsiedit.msctool from the Windows®2000 Server resource kit or the Windows® 2003 Server support tools.
2. From command prompt, navigate to the folder whereadsiedit.mscis stored, type
Screenshot 6: ADSI Edit
3. ExpandADSI Edit > Configuration > <CN=Configuration> > <CN=Services> > <CN=Microsoft Exchange>node.
GFI MailArchiver 2 Installing GFI MailArchiver|21
Screenshot 7: Heuristics attribute
5. Selectheuristicsattribute from theAttributeslist and clickEdit.
Screenshot 8: Editing the heuristics attribute value 6. Key in ‘512’ and clickOK.
7. ClickOKto save and close theADSIEditconsole.
NOTE
A value of 512 enables Envelope Journaling, and a value of 0 disables Envelope Journaling.
2.4.2 Preparing the Journal Mailbox in Microsoft®Exchange Server 2007/2010/2013
OPTION DESCRIPTION
Standard journaling:
This feature enables the configuration of a Mailbox store that enables the recording of email in an organ-ization. GFI MailArchiver can use Microsoft®Exchange Server journaling to centralize all the emails to archive in a single mailbox for archival. This type of journaling is also called per-mailbox database journ-aling.
Premium journaling:
Only available with the Microsoft®Exchange Server Enterprise client access license. It enables an
admin-istrator to setup custom journaling rules such as Archive only incoming emails, Archive only outgoing emails or Archive emails for a particular group. This journaling is also called per-recipient journaling. GFI MailArchiver utilizes this type of journaling by detecting and displaying these rules in the Data Sources Configuration Wizard.
Choosing a Journaling Method
Choose standard journaling to archive all emails (inbound and outbound) for all users in your organ-ization.
Choose premium journaling of you want more control over the emails to archive (e.g. only for spe-cific users or for inbound or outbound only).
NOTE
Premium journaling requires a Microsoft®Exchange Enterprise client access license.
Enabling Journaling for Microsoft®Exchange Server 2007, 2010 or 2013
For Microsoft®Exchange Server 2007 pre-service pack 2 installations, journal mailbox creation should be created using the instructions listed in:
Creating a Journaling Mailbox in Microsoft Exchange Server 2007
Installations running Microsoft®Exchange Server 2007 SP2 or Microsoft®Exchange Server 2010 can: Use the GFI MailArchiver Post-Installation wizard to automatically create the required journal mailbox, or
Manually create a Journaling Mailbox in Microsoft Exchange Server 2007 Manually create a Journal Mailbox in Microsoft Exchange Server 2010 Manually create a Journaling Mailbox in Microsoft Exchange 2013
2.4.3 Creating a Journal Mailbox in Microsoft®Exchange Server 2007
Setting up standard journaling
Step 1: Create a new journaling mailbox
1. SelectStart > All Programs > Microsoft Exchange Server 2007 > Microsoft Exchange Management Console.
2. ExpandRecipient Configurationnode and click onMailboxnode. 3. SelectNew Mailbox…from theActionspane.
4. SelectUser Mailboxoption and clickNext. 5. SelectNew useroption and clickNext.
GFI MailArchiver 2 Installing GFI MailArchiver|23
Screenshot 9: New user mailbox details
6. Key in theUser informationdetails and clickNext.
7. In theMailbox Settingswindow, select aMailbox databaseand clickNext. 8. Review theNew Mailboxsummary for the new journaling mailbox and clickNew.
Step 2: Configure standard journaling
1. SelectStart > All Programs > Microsoft Exchange Server 2007 > Microsoft Exchange Management Console.
Screenshot 10: Configuring a Mailbox Database
2. Expand MicrosoftExchange > Server Configuration > Mailbox nodeand clickPropertiesfrom the
GFI MailArchiver 2 Installing GFI MailArchiver|25
Screenshot 11: Mailbox Database properties
3. SelectJournal Recipientoption, clickBrowse, and select mailbox previously configured from the Active Directory®.
4. ClickOKto finalize setup. Setting up premium journaling
Step 1: Create a new journaling mailbox
1. SelectStart > All Programs > Microsoft Exchange Server 2007 > Microsoft Exchange Management Console.
2. ExpandRecipient Configurationnode and click onMailboxnode. 3. SelectNew Mailbox…from theActionspane.
4. SelectUser Mailboxoption and clickNext. 5. SelectNew useroption and clickNext.
Screenshot 12: New user mailbox details
6. Key in the ‘User information’ details for the new user to which the new journaling mailbox will be assigned and clickNext.
7. Ensure that the mailbox settings are correct and clickNext.
8. Review the new mailbox summary for the new mailbox to create and clickNew.
Step 2: Configure Premium journaling
1. SelectStart > All Programs > Microsoft Exchange Server 2007 > Microsoft Exchange Management Console.
GFI MailArchiver 2 Installing GFI MailArchiver|27
Screenshot 13: Configuring Journaling rules
2. ExpandOrganization Configuration > Hub Transportnode and selectJournalingtab. 3. From theActionstab and click onNew Journaling Rule.
Screenshot 14: Creating a new Journaling rule
4. Key in a name for the new rule and clickBrowse. Select theJournal e-mail address, preferably a mailbox within the existing Microsoft®Exchange organization, from Active Directory®.
5.<Optional>Configure:
Scope- Select whether to journal all email (Global), internal or external email.
Journal e-mail for recipient- Select specific recipient(s) for which this journaling rule applies. 6. Ensure that theEnable Ruleoption is enabled and clickNew.
NOTE
In Microsoft®Exchange Server 2007, envelope journaling is automatically enabled by default.
2.4.4 Creating a Journal Mailbox in Microsoft®Exchange Server 2010
Microsoft®Exchange Server 2010 supports two types of journaling:
Standard journaling: Configure a Mailbox store that enables the recording of email in an organ-ization. GFI MailArchiver can use Microsoft®Exchange Server journaling to centralize all the emails in a single mailbox for archival. This type of journaling is also called per-mailbox database journaling.
Premium journaling: Only available with Microsoft®Exchange Enterprise client access license. It enables an administrator to setup custom journaling rules such as:
GFI MailArchiver 2 Installing GFI MailArchiver|29
Archive only incoming emails Archive only outgoing emails
Archive emails for a particular group.
GFI MailArchiver utilizes this type of journaling by detecting and displaying these rules in the Data Sources Configuration Wizard.
Which journaling method shall I use?
Choosestandard journalingto archive all emails (inbound and outbound) for all users in your organization.
Choosepremium journalingif you want more control over the emails to archive (For example, only for specific users or for inbound or outbound only).
NOTE
Premium journaling requires a Microsoft®Exchange Enterprise client access license.
2.4.5 Set up standard journaling
Step 1: Create a new journaling mailbox
1. Launch Microsoft Exchange Management Console.
2. ExpandRecipient Configurationnode and click onMailboxnode. 3. SelectNew Mailbox…from theActionspane.
4. SelectUser Mailboxoption and clickNext. 5. SelectNew useroption and clickNext.
Screenshot 15: New user mailbox details
6. Key in the ‘User information’ details for the new user to which the new journaling mailbox will be assigned and clickNext.
7. Enter an ‘Alias’ for the journaling mailbox and clickNext.
8. Click Next and review the new mailbox summary for the new mailbox to create and clickNew.
Step 2: Configure standard journaling
GFI MailArchiver 2 Installing GFI MailArchiver|31
Screenshot 16: Configuring a Mailbox Database
2. ExpandMicrosoft Exchange > Organization Configuration > Mailbox node. Right-click the Mailbox database and selectProperties.
Screenshot 17: Mailbox Database properties
3. From the mailbox database properties dialog, select theMaintenancetab and select theJournal Recipientcheckbox. ClickBrowse, and select the journaling mailbox previously configured.
4. ClickOKto finalize setup.
2.4.6 Set up premium journaling
Set up premium journaling
1. LaunchMicrosoft Exchange Management Console.
2. ExpandOrganization Configuration > Hub Transportnode and selectJournalingtab. 3. From theActionstab, clickNew Journal Rule.
GFI MailArchiver 2 Installing GFI MailArchiver|33
Screenshot 18: Creating a new Journaling rule 4. Key in a name for the new rule
5. ClickBrowseto select the journaling mailbox where to send journal reports. 6.<Optional>Configure:
Scope - Select whether to journal all email (Global), internal or external email. Journal messages for recipient - Select specific recipient(s) for this journaling rule. 7. Ensure that the Enable Rule option is enabled and click New.
NOTE
In Microsoft®Exchange Server 2010, envelope journaling is automatically enabled by default.
2.4.7 Creating a Journal Mailbox in Microsoft®Exchange 2013
Step 1: Create a new Journal recipient
2. Clickrecipientsnode.
3. Undermailboxes, selectNewfrom the toolbar.
4. SelectNew userand enter the required mailbox details. 5. Clicksave.
Step 2: Create a new Journaling mailbox
1. Launch Microsoft®Exchange admin center. 2. Clickserversnode, then click ondatabasesnode.
3. Select an existing Mailbox Database and clickEditfrom the toolbar. 4. Click maintenance node.
5. In theJournal recipientfield, clickbrowseand select theJournal recipientcreated in Step 1 above.
6. Clicksave.
2.5 Choosing and preparing a database
As an archiving solution, GFI MailArchiver is highly dependent on your database infrastructure setup for high performance of data archival and retrieval processes.
The following sections help you to understand the following options:
Choosing your database type
GFI MailArchiver Database (For evaluation purposes) Microsoft SQL Server Express (Recommended)
Microsoft SQL Server
NOTE
It is highly recommended to use Microsoft®SQL Server Express or Microsoft®SQL Server as your database. The Firebird database included in the GFI MailArchiver installation is intended for evaluation purposes only.
2.5.1 Choosing your database type
GFI MailArchiver can be configured to run in various hardware setups and combinations. The table below shows the typical recommended configurations. These guidelines and configurations may vary according to user activity and daily email flow.
NUMBER OF MAILBOXES TO ARCHIVE RECOMMENDED DATABASE TYPE
DESCRIPTION WHERE EACH COMPONENT IS STORED
50 mailboxes or less Evaluation ONLY
GFI MailArchiver data-base
Email headers – Fire-bird database
Metadata – Firebird database
GFI MailArchiver 2 Installing GFI MailArchiver|35
NUMBER OF MAILBOXES TO ARCHIVE RECOMMENDED DATABASE TYPE
DESCRIPTION WHERE EACH COMPONENT IS STORED
150 mailboxes or less
Average mail flow of up to 6000 emails/day
SQL Server®Express with File Storage
Email headers – SQL Server®Express
Metadata – SQL Server®Express
Email data – On disk 50 mailboxes or more
Average mailflow of more than 8000/day
SQL Server® Email headers – SQL Server®
Metadata – SQL Server®
Email data – SQL Server®
500 mailboxes or more
Average mailflow of more than 8000/day
SQL Server®with File
Storage
Email headers – SQL Server®
Metadata – SQL Server®
Email data – On disk
NOTE
Email metadata is the information about emails archived within GFI MailArchiver.
NOTE
It is highly recommended to use Microsoft®SQL Server Express or Microsoft®SQL Server as your database. The Firebird database included in the GFI MailArchiver installation is intended for evaluation purposes only.
2.5.2 Using GFI MailArchiver Database
GFI MailArchiver ships with a Firebird database that is recommended for evaluation purposes.
NOTE
Ensure that the size of each Firebird database never exceeds 2GB.
To minimize any potential performance issues, the following setup is strongly recommended when using the Firebird database:
Physical HDD 1: Operating system and GFI MailArchiver installation.
Physical HDD 2: Firebird database data store.
Physical HDD 3: Mail database indexes.
The above setup reduces data read/write operations on the same physical hard disk drive to improve performance.
IMPORTANT
Failing to follow the above recommendations may result in substantial performance degradation.
NOTE
Archive email auditing feature is only available when emails are archived in SQL Server®. Microsoft®SQL Server with File Storage option is not supported.
2.5.3 Using SQL Server®Express
SQL Server®Express is recommended for medium sized organizations (approximately 1-100 email users) with an average mail flow of up to 6000 emails/day.
The recommended setup for GFI MailArchiver using a SQL Server®Express 2000/2005/2008 database is as follows:
Physical HDD 1:Operating system and GFI MailArchiver installation.
Physical HDD 2:Microsoft®SQL Server data file (.mdf).
Physical HDD 3:Microsoft®SQL Server log file (.ldf)
Physical HDD 4:Mail database indexes.
IMPORTANT
Ensure that the .mdf and .ldf files are stored in a folder on the destination drive and not in the root directory.
This configuration ensures that different processes are distributed to distinct physical hard disk drives, where email metadata (information about the email) is stored in the database while the actual email content resides as files on separate disk. This eliminates performance loss due to excessive data read/write operations on the same physical hard disk drive. For more information on how to install different versions of Microsoft SQL Server Express visitthe Microsoft SQL Server
website.
NOTE
Archive email auditing feature is only available when emails are archived in SQL Server®. Microsoft®SQL Server with File Storage option is not supported.
There are however a number of SQL Server®Express limitations to consider: Database size has a limit of 4GB (10GB for SQL Server®Express 2008 R2) It uses 1 CPU only
GFI MailArchiver 2 Installing GFI MailArchiver|37
OPTION DESCRIPTION
SQL Server Express and file system are used as the back-end database.
This method uses SQL Server®Express as the backend database and a separate location (not a database) for the binary sources files. This saves up on the SQL Server®Express space required for archiving. For example, an email of 5MB is stored by saving the email header (60kb in size) in the database and the actual email content (5MB) in the separate location. Consider using the
Archive Store Sched-ule to automatically start archiving emails to a new Archive Store.
After the first month of archiving, note the database data file size. With this value, estimate the archive database size after six months, for example. If you estimate that your archive database will be larger than 20 GB, you should consider using theArchive Store Scheduleto automatically start archiving emails to a new Archive Store. For more information, refer to
Scheduling Archive Stores(page 147).
NOTE
If an Archive Store exceeds the maximum database size, GFI MailArchiver automatically creates a new Archive Store based on the configuredNew Archive Store Settings. This feature is only available for Archive Stores based on SQL Server®Express databases.
IMPORTANT
Configure Microsoft®SQL Server®Express to use Mixed Authentication mode for use with GFI MailArchiver.
2.5.4 Using Microsoft®SQL Server
Microsoft®SQL Server is recommended for larger organizations (100+ email users) with a substantial volume of emails to archive (more than 6000 email per day). For organizations with more than 500 email users (or more than 8000 emails per day) to archive emails for, it is highly recommended to use Microsoft®SQL Server with File Storage option. This substantially increases the archival capacity of GFI MailArchiver. For more information on how to install different versions of Microsoft SQL Server visitthe Microsoft Developer Network website.
NOTE
Archive email auditing feature is only available when emails are archived in Microsoft® SQL Server. For Microsoft®SQL Server with File Storage option you can use the GFI MailArchiver Auditing features instead. For more information, refer toConfiguring Auditing(page 176).
The recommended setup for GFI MailArchiver using a Microsoft®SQL Server 2000/2005/2008 database is as follows:
Physical HDD 1:Operating system and GFI MailArchiver installation.
Physical HDD 2:Microsoft®SQL Server data file (.mdf).
Physical HDD 3:Microsoft®SQL Server log file (.ldf)
IMPORTANT
Ensure that the .mdf and .ldf files are stored in a folder on the destination drive and not in the root directory.
This configuration ensures that different processes are distributed to distinct physical hard disk drives. This eliminates performance loss due to excessive data read/write operations on the same physical hard disk drive.
NOTE
After the first month of archiving, note the database data file size. With this value, estimate the archive database size after six months, for example. If you estimate that your archive database will be larger than 20 GB, you should consider configuring the Archive Stores management feature of GFI MailArchiver.
IMPORTANT
Configure Microsoft®SQL Server to use Mixed Authentication mode for use with GFI MailArchiver.
To change to Mixed Authentication mode:
1. Right-click on theSQL Server node > Propertiesfrom the Enterprise Manager 2. Access Security tab and selectSQL Server and Windowsunder Authentication. 3. Save settings.
2.6 Installing GFI MailArchiver
To install GFI MailArchiver: 1. Double-click on:
Mailarchiver.exeto install GFI MailArchiver on 32-bit systems
Mailarchiver_x64.exeto install GFI MailArchiver on 64-bit systems
2. In theChoose Setup Languagedialog, select the language you want to use during installation and clickOK.
3. On theWelcomepage, clickNext.
4. (Optional) If the Installation Wizard detects any required missing components, the prerequisites are listed in the Installation Requirements window. ClickInstall Componentsto let the Wizard install the components for you or click cancel to install them manually. ClickNext.
NOTE
If all installation requirements are met this step is skipped. For more information, refer toSystem requirements(page 9).
GFI MailArchiver 2 Installing GFI MailArchiver|39
5. If you want GFI MailArchiver to check for a newer build other than the one being installed, select
Check for a newer build of GFI MailArchiver on the GFI web siteand clickNext. Otherwise, select
Do not check for a new buildand clickNext.
NOTE
Checking for a newer build requires an active Internet connection.
6. Read the license agreement and selectI accept the terms in the license agreementoption. Click
Nextto continue.
7. ClickNextto continue by installing GFI MailArchiver to the default folder. For an alternative location, clickChangeand select a new installation path.
8. If you want to change the default values for the Website and Virtual Directory Alias, modify the values in theWebsiteandVirtual Directory Aliasfields. These values define which URL you use to access GFI MailArchiver. ClickNext.
9. (Optional) If User Account Control (UAC) is enabled on the server where you are installing GFI MailArchiver, the installation Wizard warns you to disable UAC or launch Internet Explorer with 'Run as Administrator'. For more information refer to the following SkyNet
article: http://go.gfi.com/?pageid=MAR_UserAccountsControl. 10. ClickInstall.
11. On completion, clickFinishto close the installation wizard.
2.7 Removing email from Microsoft
®Exchange
Once GFI MailArchiver is configured and your organization's email is being archived correctly, you may want to create a mailbox management policy to free up space on the Microsoft Exchange server by deleting email that has been archived. This can be accomplished by using the GFI MailArchiver Archive Assistant or using the Microsoft Exchange retention policy.
2.7.1 Remove emails from Exchange Server using GFI MailArchiver Archive Assistant
Configure GFI MailArchiver to archive emails from user mailboxes and remove emails from Microsoft Exchange as soon as they are archived. This process helps free up space and increase performance of your Microsoft Exchange server.
To configure GFI MailArchiver Archive Assistant:
1. EnableAuto-Archiving (Journaling) All Emails. For more information, refer toConfiguring Archiving Method(page 112).
2. Configure the GFI MailArchiver Archive Assistant toCheck for new emails everyX hours. This ensures that emails are archived continuously. In theDelete Policywindow, select thePermanently delete archived emails immediatelyoption to free up space on the Microsoft Exchange server. For more information, refer toConfiguring Default Import Settings(page 133).
3. Emails are archived only once with aid of the Single Instance Storage. The GFI MailArchiver Archive Assistant then checks that the email is archived and removes it from the mailbox.
2.7.2 Removing email from Microsoft®Exchange Server 2003
Once GFI MailArchiver is configured and your organization's email is being archived correctly, you may want to create a Mailbox Management Recipient Policy in Microsoft Exchange to free up space on the Exchange server by deleting email.
NOTE
Before you create a new recipient mailbox management policy, you must determine the following:
What limits you want the policy to enforce The group you want the policy to control
How you want the policy to handle messages that go past policy limits.
Create a mailbox management recipient policy
1. Go toStart > Programs > Microsoft Exchange, and then clickSystem Manager.
2. In the left pane ofExchange System Manager, expandRecipients, right-clickRecipient Policies, point to New, and then clickRecipient Policy. TheNew Policydialog box appears.
3. Click to select theMailbox Manager Settingscheck box, and then clickOK.
NOTE
If you do not see the option forMailbox Manager Settings, reapply the Exchange service pack. It may not have been correctly applied.
4. ThePropertiesdialog box appears. Type a name for the recipient policy in theNamebox.
NOTE
We recommend that you use a descriptive name, such as "Accounts Department Mailbox Settings."
5. ClickModify. TheFind Exchange Recipientsdialog box appears.
6. Click theGeneraltab. In this example, mailbox management settings apply only to accounts that have an Exchange mailbox. Select only theUsers with Exchange mailbox.
7. ClickStorageto configure mailbox management recipient policies that are specific to a particular Exchange 2003 computer. Then, do one of the following:
ClickMailboxes on this server, and then clickBrowse. TheSelect Exchange Serverlist box appears. Select the server that you want to use, and then clickOK.
ClickMailboxes in this mailbox store, clickBrowseto search for a store, and then clickOK. 8. Click theAdvancedtab, and then clickField. You can now select any of the following options:
User Contact Group Public Folder
GFI MailArchiver 2 Installing GFI MailArchiver|41 NOTE
Points 8-11 are optional if you want to be specific for a particular mailbox/user/group/folder
9. For this example, clickUser, and then clickDepartmentto selectDepartmentin the fieldValue. 10. UnderCondition, click any of the following:
Starts with Ends with Is (exactly) Is not Present Not present
11. If you clickStarts with, Ends with,Is (exactly), orIs notas your condition, type a value in the
Valuefield. For example, clickIs (exactly), and then typeAccountsto find all employees who work for the accounts department.
12. ClickAddto add the condition to the list.
NOTE
You can add additional conditions, but all conditions must be true for a match to be displayed.
13. After you have finished adding conditions, clickFind Now.
NOTE
Any matches to the conditions are displayed in the new list that appears in theFind Exchange Recipientsdialog box.
14. If the list displays the correct users for this recipient policy, clickOK. If not, revise the search conditions until your search displays the correct users for this recipient policy.
15. ClickOK. You receive the following message:
When a recipient policy filter changes it does not mean that proxy addresses for recipients who may no longer be under the control of the policy will be automatically re-evaluated. For these recipients to receive proxies from the new policies that they belong to, use 'Apply this policy now' on the policies that now affect these recipients.
This message does not affect mailbox management recipient policies. ClickOK.
16. UnderFilter rules, the LDAP filter statement shows the current filter rule. Click theMailbox Manager Settings (Policy)tab.
17. UnderWhen processing a mailbox, click one of the following options for handling messages that go past the policy limits:
Generate report only
Move items to Deleted Items folder Move to System Cleanup folder Delete immediately
NOTE
Use caution when you use theDelete the message immediatelyoption on folders, because users may have to recover their messages.
18. In the list of folders, select the folder that you want to configure, and then clickEdit. 19. In theFolder Retention Settingsdialog box, type an age limit when you want the selected
processing action to occur, specify a size limit for the messages that you want the action to apply to, and then clickOK.
For example, if you type 90 and 2048, all messages that are older than 90 days and over 2 megabytes (MB) are processed. It is suggested to use a size of 1 KB if you want to remove even smaller messages. 20. Repeat steps 18 and 19 for each folder in the list that you want to configure.
21. ClickSend notification mail to users after processingif you want to send users an e-mail message notifying them when their mailboxes have been processed.
22. ClickMessageto edit the notification message. Click theInsert the number of messages
processedcheck box if you want a summary of the number of oversize messages processed. ClickOK
to return to thePropertiesdialog box.
23. (Optional) If you want to exclude certain message classes (for example, to prevent the processing task reports), click theExclude specific message classesbox, and then clickCustomize. TheMessage Classesdialog box appears. Type a message class in theExclude Message Classesfield. For example, type IPM. Task, and then click Add. Add all the classes you want to exclude.
Message class types include: Calendar IPM.Appointment Contacts IPM.Contact Inbox IPM.Note Journal IPM.Activity Notes IPM.StickyNote Tasks IPM.Task
Meeting Requests IPM.Schedule.Meeting.Request
For a full list of message classes, visit the following Microsoft Web site:
http://msdn2.microsoft.com/en-us/library/aa262246(office.10).aspx
24. After you have finished adding message classes, clickOKto return to thePropertiesdialog box. 25. ClickOKto close thePropertiesdialog box.
GFI MailArchiver 2 Installing GFI MailArchiver|43
The new mailbox management recipient policy is displayed in the right pane inExchange System Manager.
Configure mailbox management at the server level
To schedule the day and time when a policy will run, change the settings at a server level. To do this, follow these steps:
1. ClickStart > Programs > Microsoft Exchange, and then clickSystem Manager. 2. In the left pane ofExchange System Manager, expand theServersobject. 3. Right-click the computer that you want to configure, and then clickProperties. The<Servername> Propertiesdialog box appears.
4. Click theMailbox Managementtab to display the current settings. 5. UnderStart mailbox management process, do one of the following:
Click the drop-down list to select a time for the mailbox management to run.
ClickCustomize, click a day in the left column, and then click a time on the top row. After you select the times that you want, click OK.
6. Click Reporting to select the type of report (either a detailed report or a summary) to create when mailboxes are processed. You must also select a recipient to receive the reports. Click Browse, select a recipient, and then clickOK.
NOTE
You cannot send reports to distribution lists.
7. ClickOKto accept the mailbox management settings
NOTE
Further information on how to use System Policies to configure mailbox storage limits in Exchange Server 2003 is available here: http://support.microsoft.com/kb/822938
2.7.3 Removing email Microsoft®Exchange Server 2007
Once GFI MailArchiver is configured and your organization's email is being archived correctly, you may want to create a Mailbox Management Recipient Policy in Microsoft Exchange to free up space on the Exchange server by deleting email.
NOTE
Before you create a new recipient mailbox management policy, you must determine the following:
What limits you want the policy to enforce The group you want the policy to control
To use the Microsoft®Exchange Management Console to create new managed content set-tings:
1. Open the Exchange Management Console.
2. In the console tree, expandOrganization Configuration, and then clickMailbox.
3. In the result pane, click theManaged Default Folderstab (or theManaged Custom Folderstab), then select the managed folder for which you want to create managed content settings.
4. In the action pane, clickNew Managed Content settings. The New Managed Content Settings wizard appears.
5. On theIntroductionpage, in theName of the managed content settings to be displayed in the Exchange Management Consolebox, enter the name for the new settings (for example, Accounts Department Retention Policy).
6. In theMessage typebox, you can select the type of message for which you want to create managed content settings. If you selectAll Items, the managed content settings that you create will apply to all the items in the managed folder (except for message types for which you have created separate content settings).
NOTE
You can use the New Managed Content Settings wizard repeatedly to create additional, separate content settings for different message types. When there are multiple content settings, specific settings always supersede general settings. For example, if there is a setting forAll Mailbox Contentand one forVoicemail, the Voicemail policy is applied to voice mail, but theAll Mailbox Contentpolicy applies to all other items.
7. To set message retention, select theLength of retention period (days)check box. The following options become active:
a) In the box to the right of theLength of retention period (days)check box, type the number of days after which the message is to expire.
b) In theRetention period startslist, select from the following options:
When delivered, end date for calendar and recurring tasksThe retention period for mail starts when it is delivered. The retention period for calendar items and recurring tasks starts at their end date.
c) In theAction to take at end of retention periodlist, select from the following options:
Permanently deleteMessages are permanently deleted and not recoverable by the user.
Mark as past retention dateMessages are displayed in a shaded, strikethrough font in Outlook, but no other action is taken. This expiration action is used to prompt the user to take some kind of action.
8. ClickNext.
9. TheNew Managed Content Settingspage provides a summary of the settings that you have applied.
10. To complete the New Managed Content Settings wizard, clickNew.
GFI MailArchiver 2 Installing GFI MailArchiver|45
12. To view the new managed content settings, in the result pane of the Exchange Management Console, expand the managed folder to which you applied the settings.
13. To edit a managed content setting that you have created, right-click it, and then clickProperties.
NOTE
Further information on how to create an email retention policy in Exchange Server 2007 is available here:http://technet.microsoft.com/en-us/library/aa996014
(EXCHG.80).aspx
2.7.4 Removing email from Microsoft®Exchange Server 2010
Once GFI MailArchiver is configured and your organization's email is being archived correctly, you may want to create a Mailbox Management Recipient Policy in Microsoft®Exchange to free up space on the Exchange server by deleting email.
NOTE
Before you create a new recipient mailbox management policy, you must determine the following:
What limits you want the policy to enforce The group you want the policy to control
How you want the policy to handle messages that go past policy limits.
Use the Exchange Management Console to create a retention policy
1. Open the Exchange Management Console.
2. In the console tree, expand the forest you want, and then navigate toOrganization Configuration > Mailbox.
3. In the action pane, clickNew Retention Policy.
4. On theIntroductionpage, complete the following fields: OPTION DESCRIPTION
Name Use this box to type a name for the retention policy.
Add Click this button to add retention tags to the policy. To remove a tag from the policy, click the tag name, and then click Remove.
5. On theSelect Mailboxespage, clickAddto select the mailboxes to which you want to apply the retention policy.
NOTE
You can create a retention policy without applying it to any mailboxes. You can also apply the policy to mailboxes at a later time.
6. On theNew Retention Policypage, review your configuration settings. To make any configuration changes, clickBack.
7. To create the retention policy, clickNew.
8. On theCompletionpage, review the following, and then clickFinishto close the wizard: A status ofCompletedindicates that the wizard completed the task successfully.
A status ofFailedindicates that the task wasn't completed. If the task fails, review the summary for an explanation, and then clickBackto make any configuration changes.
Use the EMC to apply a retention policy to a mailbox
1. In the console tree, expand the forest you want, and then navigate toRecipient Configuration > Mailbox.
2. In the result pane, select the mailbox to which you want to apply the retention policy. You can select multiple mailboxes by using the Shift or Ctrl keys.
3. In the action pane, clickProperties.
4. InMailbox User> Properties, on theMailbox Settingstab, selectMessaging Records Management, and then clickProperties.
5. InMessaging Records Management, select theApply Retention Policycheck box, and then click
Browseto select the retention policy you want to apply to the mailbox. 6. ClickOK, and then in<Mailbox User> Properties, clickApply.
NOTE
Further information on how to create a new retention policy in Exchange Server 2010 is available here:http://technet.microsoft.com/en-us/library/ff625224.aspx
2.7.5 Removing email from Microsoft®Exchange Server 2013
Once GFI MailArchiver is configured and your organization's email is being archived correctly, you may want to create a Mailbox Management Recipient Policy in Microsoft®Exchange to free up space on the Exchange server by deleting email.
NOTE
Before you create a new recipient mailbox management policy, you must determine the following:
What limits you want the policy to enforce The group you want the policy to control
How you want the policy to handle messages that go past policy limits.
Step 1: Create a retention tag
Use the Microsoft®Exchange admin center to create a retention tag 1. Selectcompliance management > retention tagsand clickNew. 2. Select one of the following options: