Ontrack
®
PowerControls
™
for Exchange
. . . . .
N
OTICETOU
SERSOntrack® PowerControls™is a software application that has been developed, copyrighted, and licensed by Kroll Ontrack Inc. Use of the software is governed by the terms and conditions of the end user license agreement contained within the software.
This manual should not be construed as any representation or warranty with respect to the software named herein. Occasionally, changes or variations exist in the software that are not reflected in the manual.
Generally, if such changes or variations are known to exist and affect the product significantly, a release note or Read Me file will accompany the User Guide, or will be available on the Ontrack PowerControls web site. In that event, please read the release notes or Read Me file before using the product.
T
RADEMARKSKroll Ontrack, Ontrack, PowerControls, and other Kroll Ontrack brand and product names referred to herein are trademarks or registered trademarks of Kroll Ontrack Inc., and/or its parent company, Kroll Inc., in the United States and/or other countries. All other brand and product names are trademarks of their respective owners.
C
OPYRIGHTSCopyright © 2007-08 Kroll Ontrack Inc. All Rights Reserved.
Outside In® Content Access © 1991-2006 Stellent Chicago, Inc. All rights reserved.
No part of this publication may be reproduced, transmitted, transcribed, stored in a retrieval system, or translated into a language or computer language, in any form by any means, electronic,
mechanical, optical, chemical, manual or otherwise, without the express written consent of Kroll Ontrack Inc.
U.S. C
ONTACTI
NFORMATION 9023 Columbine RoadEden Prairie, MN 55347
Toll Free: 800-872-2599
Phone: 952-937-5161
Web: http://www.ontrackpowercontrols.com
Software Sales
Toll Free: (800) 645-3649
Email: [email protected]
Technical Support
Phone: 952-937-2121
Email: [email protected]
Web: http://www.ontrackpowercontrols.com/support
. . . . .
I
NTERNATIONALC
ONTACTI
NFORMATIONCanada
Australia
155 Gordon Baker Road Suite 210 Toronto, Ontario M2H 3N7 Canada
Web: http:www.ontrackpowercontrols.ca
28 Donkin Street, Suite #8 West End, QLD 4101 Australia
Web: http://www.ontrackpowercontrols.com.au
Software Sales
Toll Free: 800-645-3649
Email: [email protected]
Software Sales
Freephone: 1800 872 259
Email: [email protected]
Technical Support
Phone: 952-937-2121
Email: [email protected]
Web:
http://www.ontrackpowercontrols.ca/support
Technical Support
Phone: +61 7 3255 1199
Email: [email protected]
Web:
http://www.ontrackpowercontrols.com.au/support
United Kingdom
France
The Pavilions, 1 Weston Road Kiln Lane, Epsom
Surrey KT17 1JG United Kingdom
Web: http://www.ontrackpowercontrols.co.uk
2, impasse de la Noisette
91371 Verrières-le-Buisson Cedex 413 France
Web: http://www.ontrackpowercontrols.fr
Software Sales
Tel: +44 (0)1372 741 999
Email: [email protected]
Support Commercial
Tél: +33 (0)1 69 53 66 92
Email: [email protected]
Technical Support
Tel: +44 (0)1372 744 422
Email: [email protected]
Web:
http://www.ontrackpowercontrols.co.uk/support
Support Technique
Tél: 0820 09 87 72
Email: [email protected]
Web:
Software Sales
Tel: +49 (0)7031/644-0
Email: [email protected]
Venta de Licencias
Tel: 900 112 012
Email: [email protected]
Technical Support (available in German and English)
Tel: +49 (0)7031/644-244
Email: [email protected]
Web:
http://www.ontrackpowercontrols.de/support
Soporte técnico
Tel: 900 112 212
Email: [email protected]
Web: http://www.ontrackpowercontrols.es/soporte
Norway*
Italy
Postboks 1250 Arkoveien 14 2206 Kongsvinger NorgeWeb: http://www.ontrackpowercontrols.no
Via Lario, 1
I - 22070 Fenegró (CO) Italia
Web: http:// www.ontrackpowercontrols.it
Software Sales Software Sales
Toll-free: 810 10 100
Phone: +47 62 81 01 00
Fax: +47 62 81 01 10
Email: [email protected]
Numero Verde: 800 44 00 33
Tel: +39 02 96943211
Fax: +39 02 96943221
Email: [email protected]
Technical Support (available in English) Technical Support
Phone: +47 62 81 01 00
Email: [email protected]
Web: http://www.ontrackpowercontrols.no
Tel: +49 7031/644-244
Email: [email protected]
Web: http://www.ontrackpowercontrols.it/support
Sweden*
Denmark*
Drottninggatan 7 753 10 Uppsala Sverige
Web: http://www.ontrackpowercontrols.se
H. P. Christensensvej 1 3000 Helsingør Danmark
Web: http://www.ontrackpowercontrols.dk
Software Sales
Tel: +46 (0)18 10 44 40
Fax: +46 (0)18 10 99 20
Email: [email protected]
Software Sales
Tel: +45 70 22 34 00
Fax: +45 70 22 34 01
. . . . .
* These locations are currently operating under the Ibas brand, which was acquired by Kroll Inc in 2006.
Technical Support
Phone: +47 62 81 01 00
Email: [email protected]
Web: http://www.ontrackpowercontrols.se
Technical Support
Phone: +47 62 81 01 00
Email: [email protected]
Web: http://www.ontrackpowercontrols.dk
Finland*
Singapore
Norman Ibas Oy Läkkisepäntie 11 00620 Helsinki Finland
Web: http://www.ontrackpowercontrols.fi
Nordic European Centre 3, International Business Park #02-17 Singapore 609927 Web: http://www.ontrackdatarecovery.com.sg/email-recovery-software Software Sales
Tel: +358 9 2727 210
Fax: +358 9 2727 2121
Email: [email protected]
Software Sales
Phone: +65 6296 5131
Email: [email protected]
Technical Sales
Tel: +358 9 2727 210
Email: [email protected]
Web: http://www.ontrackpowercontrols.fi
Technical Support
Phone: +1 952-937-2121
Email: [email protected]
Web:
http://www.ontrackdatarecovery.com.sg/software-support/
CONTENTS
TABLEOF CONTENTS
Introduction . . . 1
Overview... 1
Five Major Reasons for Using Ontrack PowerControls for Microsoft Exchange Server. 1
Ontrack PowerControls 5.1 Enhancements ... 2
System Requirements... 2
Ontrack PowerControls for Exchange... 2
Mailbox Creation Wizard ... 4
Configuring Microsoft® Office Outlook® ... 5
Installing Ontrack PowerControls... 5
Uninstalling Ontrack PowerControls ... 5
Keyboard Shortcuts... 6
Enabling the Licensed Agents... 7
The License File ... 9
About the Exchange Database ... 11
Organizing the Exchange Database Files for Ontrack PowerControls ... 11
Updating Ontrack PowerControls ... 12
Upgrading Ontrack PowerControls... 12
Getting Help ... 12
Online Help ... 12
Technical Support... 13
Conventions in this Manual ... 13
Menu Commands and Shortcuts... 13
Shortcut Menu ... 14
C
ONTENTSToolbar ... 21
Previewing and Opening Messages... 22
Opening Attachments... 23
Saving Attachments ... 23
Changing the View... 24
Viewing or Hiding the Toolbar and Status Bar ... 24
Resizing Panes Separated by a Split Bar... 24
Sorting Messages in the Message Lists ... 25
Refreshing the Screen... 25
Viewing the Properties of an EDB File, PST File, CAS File, CAS Profile Folder, Folder, or
Mailbox... 26
Performing an Integrity Check... 29
Viewing Deleted Messages ... 29
Setting Preferences... 30
Options Tab... 30
Security Tab... 32
Warnings Tab ... 33
Chapter 2: Using Ontrack PowerControls for Exchange . . . 35
Overview... 35
Running the Data Wizard... 35
Configuring Ontrack PowerControls for Exchange ... 35
Before You Use the Data Wizard ... 37
Data Wizard: Welcome Page... 37
Data Wizard: Source Path Selection... 38
Guidelines for Selecting an Exchange Database ... 39
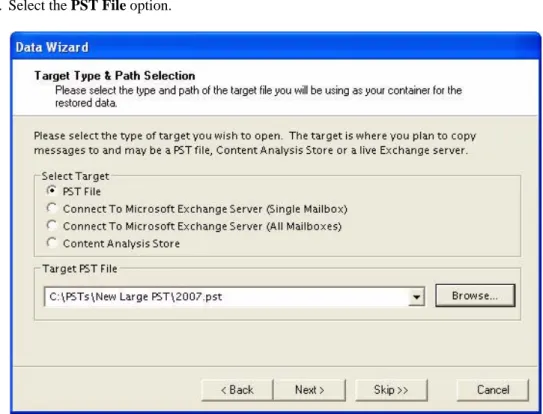
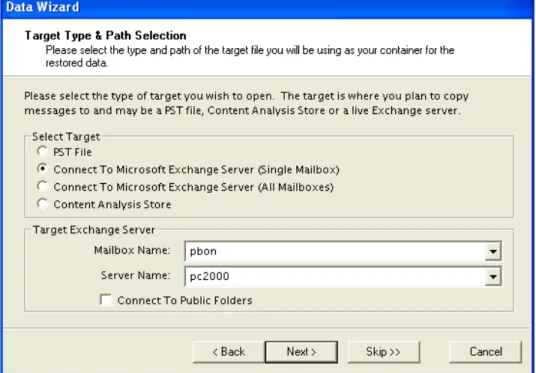
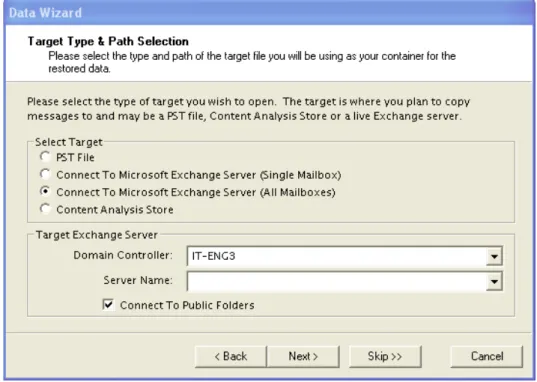
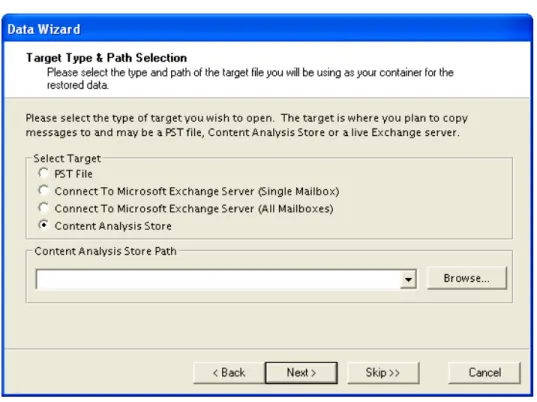
Data Wizard: Target Type and Path Selection ... 40
Data Wizard: Now Processing Data File... 43
Data Wizard: Completing the Data Wizard... 44
Looking at the Main Window after Using the Data Wizard ... 45
Returning to the Data Wizard... 45
Opening the Source Database and Target Mailboxes from the Main Window ... 46
Before You Proceed ... 46
Opening Source and Target Files ... 48
Opening a Live Microsoft® Exchange Server as a Target... 51
. . . . .
TA B L E O F C O N T E N T SUser Permission... 58
Creating Mailboxes ... 58
Preference Settings ... 65
Auditing Failure ... 65
Chapter 3: Finding Messages . . . 67
Overview... 67
Guidelines for Using the Find Window ... 67
Searching Sources ... 68
Searching Embedded Message Items ... 71
Searching Within Results ... 71
Searching Microsoft® Exchange Server Target ... 73
Managing Message Items ... 73
Saving and Using Search Profiles ... 75
Using Multiple Search Windows ... 77
Searching Within Attachments ... 77
Exceptions When Searching Within Attachments ... 78
Other Ontrack PowerControls Features Available Through the Find Window... 78
Opening and Saving Attachments in the Find Window ... 78
Exporting Message Items from the Find Window ... 78
Restoring Message Items from the Find Window ... 79
Performing an Integrity Check on Message Items in the Find in Source Window .. 79
Search Results Report ... 79
Save Report ... 79
Chapter 4: Exporting Messages . . . 81
Overview... 81
C
ONTENTSChapter 5: Restoring Exchange Data . . . 89
Overview... 89
Quick Look at Restoring Your Exchange Data ... 89
Restoring Your Exchange Data in Three Easy Steps ... 89
Limits for PST and Folder Targets ... 90
About Restoring Messages to an Exchange Server... 91
About the Copy Progress Window ... 91
Creating, Renaming, and Deleting Folders in the Target Pane ... 92
Copying and Pasting or Dragging and Dropping ... 93
Examples of Restoring Your Exchange Data ... 94
Restoring Messages with Copy-Paste ... 94
Restoring Messages with Paste Special... 95
Restoring a Folder ... 100
Restoring a Mailbox ... 102
Restoring an EDB File... 103
Restoring to Public Folders ... 104
Chapter 6: Using the Command Line . . . 107
Overview... 107
Command Line Syntax... 107
Examples of Using the Command Line ... 109
Chapter 7: Reporting . . . 115
Overview... 115
Creating Reports ... 115
Viewing Reports ... 118
Single Instance Storage (SIS) vs. Cumulative Counts ... 118
Attachment Statistics Report ... 119
Domain Statistics Report... 119
Messages by Database Report ... 120
Messages by Mailbox Report ... 121
Messages by Date Report ... 122
Messages by Profile Folder ... 123
Sorting Reports ... 123
. . . . .
TA B L E O F C O N T E N T SCreating a Content Analysis Store ... 126
Creating and Processing Content Analysis Store Profile Folders ... 128
Suspending and Resuming Content Analysis Store Profile Folders ... 133
Adding Sources to Content Analysis Stores... 135
Editing and Deleting Profiles ... 136
Closing a Content Analysis Store... 136
Opening a Content Analysis Store as Source ... 137
Viewing Properties of a Content Analysis Store... 138
Creating Reports in Content Analysis Store... 139
Viewing Profiles in Content Analysis Store... 139
Missing Database Files... 140
Wrong Database Files... 141
Chapter 9: Message Views . . . 143
Overview... 143
Message Views Menus and Toolbars... 144
Message Views Menus ... 144
Message Views Toolbar Icons... 144
Message View Shortcut Menu... 144
Message View Pane ... 146
Other Options Available in the Message View ... 146
Message View Options ... 147
Message Table View ... 147
Attachment Table View... 148
Conversation View ... 149
Opening a View for the First Time... 150
Find in Source Window in Message Views ... 152
INTRODUCTION
INTRODUCTION
. . . .
Overview
Welcome to Ontrack® PowerControls™ 5.1, the mailbox recovery software that saves time, money, and resources when recovering Microsoft® Exchange Server data.
Ontrack PowerControls for Exchange works with your existing Exchange Server backup architecture and procedures, and allows you to recover individual mailboxes, folders, messages, attachments, calendar items, notes, and tasks directly to your production Exchange Server or any PST file. This eliminates time-consuming and expensive single mailbox (brick-level) backups. This powerful software also lets you search and create a copy of all archived email that matches a given keyword or criteria.
This user guide provides step-by-step instructions for completing specific tasks on the Microsoft® Windows®-based platform. See the Table of Contents or the Index to locate the pages on which particular topics are discussed.
Use Adobe® Acrobat® to open the PDF version of this user guide. After you open the PDF file, click the Hand tool to view the Table of Contents hyperlinks in layout view. Then click a hyperlink to jump to a specific topic in the manual.
Five Major Reasons for Using Ontrack PowerControls for
. . . .
Microsoft Exchange Server
There are five primary ways you can benefit from using Ontrack PowerControls for Exchange:
Minimize the time to restore an individual mailbox. Ontrack PowerControls can slash restore time, making it possible to restore mail items from a previous full backup directly into your production Exchange Server, or directly into a new or existing PST file. This eliminates the need for a recovery server and the extra steps required to separately import mail back into Exchange Server or Microsoft® Office Outlook®.
I N T R O D U C T I O N
Ontrack PowerControls 5.1 Enhancements
I
NTRODUCTION. . . .
Ontrack PowerControls 5.1 Enhancements
Ontrack PowerControls 5.1 contains all the features and benefits of Ontrack PowerControls 5.0 plus these exciting new and improved features:
• Support for Windows Server® 2008 Standard, Windows Server 2008 Data Center, and Windows Server 2008 Enterprise
• Support for running Ontrack PowerControls 5.1 in 32-bit and 64-bit environments • Support for Microsoft® Hyper-V™ virtualization platform.
. . . .
System Requirements
This section covers System Requirements for Ontrack PowerControls for Exchange and the minimum software requirements for Mailbox Creation Wizard.
Ontrack PowerControls for Exchange
To use Ontrack PowerControls for Exchange on your computer, you need the following hardware and software:
• One of the following operating systems: • Windows® 2000
• Windows 2000 Professional • Windows® XP Professional • Windows Server® 2003
• Windows Server® 2008 Standard • Windows Server 2008 Data Center • Windows Server 2008 Enterprise • Windows Vista® Business • Windows Vista Ultimate • Windows Vista Enterprise
Note: Ontrack PowerControls in Windows Vista can only be run by users with
administrative privileges and in administrative mode.
Note: 32-bit and 64-bit versions of the above operating systems are supported.
Note: The HASP HL override key functionality does not work on Windows Vista operating
. . . . .
I N T R O D U C T I O NSystem Requirements
• Microsoft® Virtual Server 2005 R2 • Microsoft® Hyper-V™
• Microsoft® Virtual PC 2007
Note: Virtual operation of tape devices may have restrictions imposed by virtual operating
systems.
Note: HASP key operation is validated in environments that support USB attached devices
and support the Kroll Ontrack distributed HASP drivers only.
• Microsoft® Office Outlook 2000 or later. Machine must have Outlook 2000 or greater installed and Outlook must have been run at least once to configure settings in Outlook. Additionally, those versions of Outlook that make a distinction between “Internet Email” and “Corporate Email” need to be configured for the latter.
• For Microsoft® Exchange Server 5.5: Outlook 2000 or Office Outlook® 2003 is required.
Note: Office Outlook® 2007 cannot connect to an Exchange Server 5.5. However, Outlook
2007 can be used with Ontrack PowerControls to access an .edb file originating from an Exchange Server 5.5 environment.
• For Microsoft® Exchange Server 2000 and Microsoft® Exchange Server 2003:
Outlook 2000 or later is required.
• For Microsoft® Exchange Server 2007: Outlook 2003 or Outlook 2007 is required.
Note: The operating systems listed above and Office Outlook® are required to have the latest
service packs installed.
• Microsoft® .NET Framework 2.0 • Intel® Pentium® compatible processor • 1024 MB RAM minimum
• 200 MB of free hard disk space for the installation. More disk space will be needed for processing log files when opening an EDB file.
• Monitor with 800 x 600 or higher screen resolution
• USB port (for Ontrack PowerControls product licenses requiring HASP key dongle to run application)
I N T R O D U C T I O N
System Requirements
I
NTRODUCTIONWhile Ontrack PowerControls is designed to run from a Windows-based workstation, Exchange Server 2007 installation configuration is supported. If running Ontrack PowerControls on Exchange Server 2007, Outlook 2003 or Outlook 2007 must be installed and configured on the Exchange Server. Ontrack PowerControls does not support other Exchange Server installation configurations.
Mailbox Creation Wizard
To use Mailbox Creation Wizard on your computer, you need these minimum software requirements.
The Exchange Management Tools can be installed on Windows® XP Professional, Windows® 2000 Professional, Windows 2000 Server; Windows 2000 SP3, or Windows Server® 2003. To see additional supported operating system and prerequisite requirements, please refer to the Exchange Management Tools documentation for your specific version.
*The Exchange 2000 Management Tools can only be used on Exchange Server 2000 and can be installed on Windows XP Professional, Windows 2000 Professional, Windows 2000 Server, Windows 2000 SP3, or Windows Server 2003.
**The Exchange 2003 Management Tools can be used on Exchange Server 2000 or 2003 and can be installed on Windows XP Professional, Windows 2000 Professional, Windows 2000 Server SP3, or Windows Server 2003.
***The Exchange 2007 Management Tools can only be used on Exchange Server 2007 and can be installed on Windows XP Professional, Windows 2000 Professional, Windows 2000 Server SP3, or Windows Server 2003.
Exchange Server Software Required Prerequisites
Exchange Server 2000
Exchange Server 2000 Management Tools*
Windows® 2000 Administrative Tools
Exchange Server 2003
Exchange Server 2003 Management Tools**
Internet Information Server (IIS) Windows Server® 2003 SP1 Administrative Tools Pack Exchange Server
2007
Exchange Server 2007 Management Tools*** (64-bit: CD; 32-bit: download)
IIS
Microsoft® .NET Framework 2.0
Microsoft® Management Console (MMC 3.0)
. . . . .
I N T R O D U C T I O NConfiguring Microsoft® Office Outlook®
. . . .
Configuring Microsoft® Office Outlook®
Ontrack PowerControls requires that Microsoft® Messaging API (MAPI) be installed on your computer. To get full MAPI functionality, do the following before installing Ontrack
PowerControls for Exchange:
1. Make sure that Office Outlook® is installed and has been run once. 2. Set up an email account on an Exchange Server.
3. For those versions of Outlook that distinguish between “Internet Email” and “Corporate Email,” use “Corporate Email” when configuring Outlook.
4. Run Outlook again, and connect to the Exchange Server.
. . . .
Installing Ontrack PowerControls
Follow these steps to install Ontrack PowerControls for Exchange:
1. Install and configure Outlook as described in “Configuring Microsoft Office Outlook.” 2. Turn off any disk utility or antivirus program running in the background.
3. Insert the Ontrack PowerControls CD-ROM into your CD-ROM drive.
4. The installation program automatically starts. If it does not, click Run on the Start menu, and type D:\autorun.exe or D:\bin\setup.exe, where D is the drive letter of your CD-ROM drive. Click OK.
5. Follow the on-screen instructions.
. . . .
Uninstalling Ontrack PowerControls
You can uninstall Ontrack PowerControls for Exchange by running the uninstall program. 1. Click Start and then click Control Panel. (In Windows 2000 and earlier, you point to
Settings before you click Control Panel.)
2. In Control Panel, click the Add or Remove Programs icon.
I N T R O D U C T I O N
Keyboard Shortcuts
I
NTRODUCTION. . . .
Keyboard Shortcuts
Menu Bar Keyboard Shortcut File Menu
Open Source Ctrl+S
Open Target PST Ctrl+T
Open Target Exchange Server Ctrl+E
Close Store Ctrl+L
User Data Wizard Ctrl+W
Exit Alt+F4
Edit Menu
Copy Selection to Clipboard Ctrl+C
Paste Copied Item(s) Ctrl+V
Paste Special Ctrl+Y
Delete DEL
Rename Ctrl+R
New Folder Ctrl+N
New Mailbox Ctrl+M
Move To Folder (Microsoft Exchange Server as a target - Find window)
Ctrl+Shift+V
Cut (Microsoft Exchange Server as a target - Find window)
Ctrl+X
View Menu
Refresh Screen F5
. . . . .
I N T R O D U C T I O NEnabling the Licensed Agents
. . . .
Enabling the Licensed Agents
Each edition of Ontrack PowerControls software for Exchange is distributed with nine Ontrack PowerControls ExtractWizard Agents and three Ontrack PowerControls Agents for Exchange. The Ontrack PowerControls ExtractWizard Agent for Windows® NT Backup is included with the program at no extra cost, and is enabled by default. All other Agents are shipped with all Ontrack PowerControls editions in disabled conditions and require a new license file to enable them. See the
Ontrack PowerControls ExtractWizard User Guide for more information.
Create Reports Ctrl+O
Find F3
Online Help
View Help F1
Ontrack PowerControls ExtractWizard Agent
Versions
Supported Disk Backup Tape Backup
Agent for Windows® NT Backup
All Versions .BKF Files Microsoft Tape Format (MTF) Agent for Symantec™
Backup Exec™
8.x, 9.x, 10.1, and 11.d
.BKF Files Microsoft Tape Format (MTF) Agent for EMC®
NetWorker®
6.x and 7.0 through 7.43
.0 Files NetWorker Tape
Format Agent for CA
ARCserve® Backup
9.x, 11.52, and 11.5 2,5
.CTF (ARCserve) Files
ARCserve Tape Format
I N T R O D U C T I O N
Enabling the Licensed Agents
I
NTRODUCTION1) For NetBackup 6.x backups created using Bare Metal Restore™ or Off-Host Backup, Ontrack recommends the Advanced Method for extraction.
2) For CA ARCserve 11.5 multiplexed backup tapes, Ontrack recommends the Advanced Method for extraction.
3) For EMC NetWorker 7.2, 7.3, and 7.4 backups created using Advanced File Backups, Ontrack recommends the Advanced Method for extraction.
4) For IBM Tivoli Storage Manager 5.3 and 5.4 backups created using Export mini format, Ontrack recommends the Advanced Method for extraction.
5) For CA ARCserve 11.5 SP3 backups of Exchange Server 2007 created using Advanced Mode, Ontrack recommends the Direct method for extraction.
In addition to Ontrack PowerControls ExtractWizard Agents, Ontrack PowerControls users also have the option to purchase other unique add-on features for enhanced search and analysis capabilities for Exchange.
To view the currently enabled Agents
• On the Help menu, click About and then click License Info. Agent for CommVault
Galaxy® Backup & Recovery
5.0, 5.9, 6.1, and 7.0 Backup Path CommVault Galaxy Tape Format
Agent for UltraBac 7.1 and 8.0 Magnetic Library UltraBac Software Tape Format Agent for Native
SharePoint Backups
STSADM and Site Administrator
.BAK Files Microsoft Tape Format (MTF)
Ontrack PowerControls Agent Version Supported
Agent for PST as Exchange Source Microsoft® Office Outlook 97 or later
Agent for Advanced Searching Not applicable
Agent for Content Analysis Store Not applicable Agent for Administrative Services Not applicable
Ontrack PowerControls ExtractWizard Agent
Versions
. . . . .
I N T R O D U C T I O NEnabling the Licensed Agents
To enable an Agent
1. Contact a sales representative and specify which agent you wish to purchase. A license file containing the newly enabled agent will be sent to you.
Note: To contact a sales representative, see U.S. Contact Information.
2. Replace the existing .ini file with the new .ini file. The default location for this file is in the Ontrack PowerControls directory for Exchange.
The License File
All Ontrack PowerControls editions for Exchange require a license file. The purpose of this file is to let you buy only those features you need. Before Ontrack PowerControls for Exchange is enabled, it checks the .ini file for five things:
• The license file must be valid for Ontrack PowerControls 5.1. • Mailbox limit if applicable.
• Server name enforcement if applicable. Allows users to open EDB files only from the licensed server names.
• Subscription length if applicable.
• Enabled Agents (Ontrack PowerControls ExtractWizard Agents, Ontrack PowerControls Agents for Exchange)
Tip: If you have the Ontrack PowerControls Standard Edition (100 mailboxes), and you attempt to
open an EDB file with 101 mailboxes, Ontrack PowerControlsfor Exchangewill not open the file.
Note: To view and/or change the location of the license file, see “Setting Preferences” on page 30.
In the Ontrack PowerControls Preferences window, click the Options tab and read the instructions for the “License file name” preference.
Example of a license file: Ontrack PowerControls license file for Exchange - Universal Edition with 10 Agents enabled
;================================================================== ;Kroll Ontrack Inc. License File
;Any modification will invalidate this file ;Copyright(c) 2007-08 Kroll Ontrack Inc.
I N T R O D U C T I O N
Enabling the Licensed Agents
I
NTRODUCTION[SLN]
SLN=Unlimited
[Licensed Agents]
PCA5132-45C7N3=rbT/dktaiQFN6+vD54/EVwS92vfszxQECFqV3VYj PCA5142-2D3AWF=rbT/dktaiQFN6+zD54/EVwK9q/ecz2IEEVrg3VYj PCA5152-W5229N=rbT/dktaiQFN6+3D54/EV2e92vedzxEEf1ro3VYj PCA5162-2CD5U5=rbT/dktaiQFN6+7D54/EVwK9rPfrzxYEE1qT3VYj PCA5172-75XC37=rbT/dktaiQFN6+/D54/EVwe92vf3z2AEdVqR3VYj PCA5182-83BXSW=rbT/dktaiQFN6+DD54/EVwi93Pftz3sEFVrx3VYj PCA5192-9A562W=rbT/dktaiQFN6+HD54/EVwm9rveazxUEdFrx3VYj PCA51A2-E93WV6=rbT/dktaiQFN65nD54/EV3W91vecz3QEEFqQ3VYj PCA51B2-5E3F4J=rbT/dktaiQFN65rD54/EVwW9qvecz2UEclrs3VYj PCA51C2-582W9K=rbT/dktaiQFN65vD54/EVwW91/edz3QEf1rt3VYj PCA51D2-3EAD54=rbT/dktaiQFN65zD54/EVwO9qvfuz2cEc1qS3VYj PCA51E2-BCA52R=rbT/dktaiQFN653D54/EV3K9rPfuzxYEdFr03VYj PCA51G2-533ATU=rbT/dktaiQFN65/D54/EVwW93Pecz2IEElrz3VYj PCA51H2-E3F2MW=rbT/dktaiQFN65DD54/EV3W93PfpzxEEC1rx3VYj PCA5123-D528HT=rbT/dktaiQFN6+rD5o/EV3S92vedzxsEDlry3VYj PCA5133-4955B5=rbT/dktaiQFN6+vD5o/EVwS91veazxYEBFqT3VYj ;PCA51D2-3EAD54 = Agent for Advanced Searching for Exchange ;PCA51G2-533ATU = Agent for Exchange
;PCA51H2-E3F2MW = Agent for SharePoint
;PCA5123-D528HT = Agent for Advanced Searching for SharePoint ;PCA5133-4955B5 = Agent for Native SharePoint Backups
;PCA51E2-BCA52R = Agent for Content Analysis for Exchange ;PCA5192-9A562W = Agent for PST as Exchange Source ;PCA5162-2CD5U5 = Agent for CA ARCServe for Exchange
;PCA51B2-5E3F4J = Agent for CommVault Galaxy backup & Recovery for Exchange ;PCA51A2-E93WV6 = Agent for HP Storage Data Protector for Exchange
;PCA5182-83BXSW = Agent for IBM Tivoli Storage Manager for Exchange ;PCA5152-W5229N = Agent for EMC NetWorker for Exchange
. . . . .
I N T R O D U C T I O NAbout the Exchange Database
;
[AUTHENTICATION] Checksum=1311b
. . . .
About the Exchange Database
The Exchange database consists of the following files:
• .edb file (rich text database file) contains data placed in the store through Messaging Application Programming Interface (MAPI), as well as all the database tables that define mailboxes, messages, folders, and attachments.
• .stm file (streaming database file) contains common Internet formatted content, such as Multipurpose Internet Mail Extensions (MIME) content, that protocols other than the MAPI protocol place in the store.
Note: The .stm file is new to Exchange 2000. Exchange 5.5 does not contain .stm files.
• .log files (transaction logs) are history files recording server activity. These files are useful in restoring and backing up Exchange data. Transaction logs for Exchange Server 5.5, 2000, and 2003 are 5 MB in size. Transaction logs for Exchange Server 2007 are 1 MB in size. Each storage group uses its own set of transaction log files. For example, if a storage group contains five stores, all transactions for all five stores are recorded in a single series of transaction log files. You can determine where to locate the transaction log files for each storage group.
• .chk (check) files are checkpoint files used for recovering (playing) data from transaction logs into EDB files. The checkpoint is the place marker in the EDB.CHK file that indicates which transactions have been committed. Whenever data is written to an EDB file from the transaction log, the EDB.CHK file is updated with information specifying that the
transaction was successfully committed to the respective EDB file. Separate Exx.chk files are maintained for each storage group using ESE (Extensible Storage Engine).
• .pat (patch) files are used to record information on page splits in Exchange 5.5 through Exchange 2000 (SP1). In Exchange 2000 (SP2) and later, the functionality provided by .pat files is incorporated into Exchange log files.
I N T R O D U C T I O N
Updating Ontrack PowerControls
I
NTRODUCTIONIf you are using an offline backup
You need to use the .edb and .stm files for offline backups. To ensure that all email data is recovered, you should also include all .log files, as well as .pat and .chk files if they exist. Ontrack PowerControls for Exchange performs its own verification process and includes the .log and .pat files to determine if it needs them to recover the data.
. . . .
Updating Ontrack PowerControls
Kroll Ontrack periodically improves Ontrack PowerControls—adding features, making changes based on customer requests, and fixing problems. When these updates (also known as patches) are available to you, EasyUpdate can download and install them in minutes.
If there are multiple components for updating, EasyUpdate provides you with a list of options—you can update everything, or select a subset of options.
We recommend running EasyUpdate as soon as you purchase and install Ontrack PowerControls for Exchange, just in case there is a program patch that was not included with your version.
To run EasyUpdate
1. Do one of the following:
• In Ontrack PowerControls for Exchange: On the Help menu, click EasyUpdate. • In Windows: Click Start, and then point to Programs. Point to KrollOntrack and
then click EasyUpdate. 2. Follow the on-screen instructions.
. . . .
Upgrading Ontrack PowerControls
If Ontrack PowerControls 5.0 has been previously installed, is active, and you are upgrading to Ontrack PowerControls 5.1, you will not be able to reuse the existing Ontrack PowerControls 5.0 license file with Ontrack PowerControls 5.1.
. . . .
Getting Help
Kroll Ontrack provides you with the following ways to get help with Ontrack PowerControls: “Online Help” and “Technical Support”.
. . . . .
I N T R O D U C T I O NConventions in this Manual
To start online Help
Do one of the following:
• On the Help menu, click Contents. • Click on the toolbar.
• Press the F1 key.
To identify a tool or control
• Position the pointer over a tool or control, and then pause. A tool tip shows the name of the item.
Technical Support
If you have questions or problems not answered in the user guide or the online Help (F1), call our Technical Support group. When reporting an issue, please include any information that might help us diagnose the problem. The following details are often the most helpful:
• The version of Ontrack PowerControls you are using (on the Help menu, click About). • The versions of Windows operating systems and Outlook that you are running.
• The version of Exchange that contained the source EDB file. • The circumstances and sequence of steps that led to the problem.
• The text of the error messages (if any appeared), and the contents of the Details window. • A list of other Windows-based programs that you were running when the error occurred. See “U.S. Contact Information” and “International Contact Information” at the beginning of this user guide.
. . . .
Conventions in this Manual
This manual uses guidelines for documenting menu commands and shortcuts; commands available on shortcut menu; and notes and tips.
Menu Commands and Shortcuts
I N T R O D U C T I O N
Conventions in this Manual
I
NTRODUCTIONShortcut Menu
You can access many of the same commands available on the menu bar and toolbar by right-clicking the mouse to display a shortcut menu. The contents of the shortcut menu depend on whether you right-click in the source or target pane. This manual seeks to teach you how to use commands on the menu bar and toolbar, and doesn’t always specify when you can use the shortcut menu. Once you become familiar with Ontrack PowerControls for Exchange, the commands available to you on the shortcut menu should become apparent.
Notes and Tips
The notes and tips in this user guide follow the guidelines offered in the Microsoft Manual of Style for Technical Publications, 3rd Edition. Redmond, WA: Microsoft Press, 2004.
CHAPTER 1
. . . .
. . . .
L
OOKING
AT
THE
I
NTERFACE
C
HAPTER
3 :
. . . .
Overview
This chapter describes the parts of the main Ontrack® PowerControls™ window for Exchange, and shows you how to preview messages, view details of an EDB, PST, or CAS file, and change the view.
. . . .
Ontrack PowerControls Main Window for Exchange
The Ontrack PowerControls main window for Exchange is where you do most of your work. This window displays the source EDB, PST, or CAS file(s) as well as the target PST file(s), Exchange Server or CAS. The target acts as a container for the restored files. The various work areas and controls are described in the following sections.
Note: In the illustration below, the target pane displays a PST that acts as a container for restored
L O O K I N G A T T H E I N T E R F A C E
Ontrack PowerControls Main Window for Exchange
C
HAPTER1
Figure 3-1. The main window with four panes
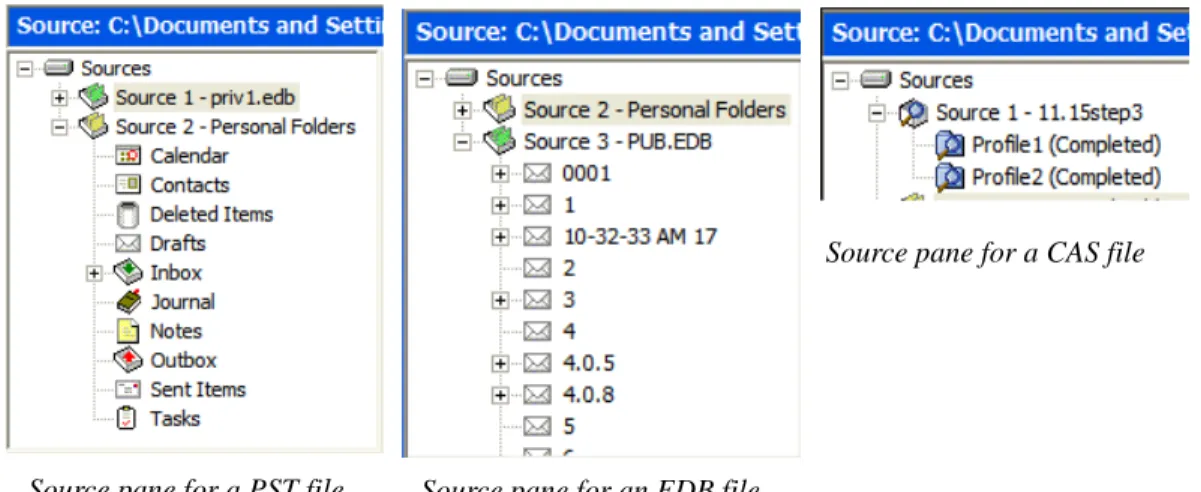
Source Pane
The source pane displays the EDB file(s) that you extracted from a disk or tape backup. The source pane can also display one or more PST files if you have purchased the “PST as Source File” agent. It also displays a content analysis store (CAS) as source. If you have not yet extracted Exchange data from a backup tape or disk, see the Ontrack PowerControls ExtractWizard User Guide.
. . . . .
L O O K I N G A T T H E I N T E R F A C EOntrack PowerControls Main Window for Exchange
Figure 3-2. Sample icons with descriptions below
Sources Root Node contains one or more source data stores that are pre-pended with a “SourceX” where X is a number starting with 1 and is incremented for each additional source opened. You can select the sources root node as your search source.
Source EDB File (e.g., ) contains the Exchange Information Store data that you extracted from a tape or disk backup. Click the plus sign (+) next to an EDB file to expand its contents.
Mailbox (e.g., ) contains the Outlook folders. Click the plus sign (+) next to a mailbox to expand its contents.
Outlook Folders (e.g., Inbox, Contacts, Tasks) contain Outlook message items. Select a folder to view its contents in the source message list.
Source CAS File (e.g., ) contains the content analysis store data created to analyze content based on certain criteria.
CAS Profile Folder (e.g., ) which contains the results of a content analysis.
L O O K I N G A T T H E I N T E R F A C E
Ontrack PowerControls Main Window for Exchange
C
HAPTER1
Note: In the above illustration, the source pane displays an EDB file, but it could just as easily
display a PST file, CAS, or even multiple EDB and PST files.
Source Message List
The source message list displays the message items in the Outlook folder that you selected in the source pane. This folder is one of the Outlook folders (e.g., Inbox, Contacts, Tasks). In the illustration below, the source message list displays the messages in an Inbox.
Figure 3-3. The Source Message List
The source message list displays metadata about the message items in six columns. The metadata includes file type; attachments, if any; message sender; subject; date; and status. The Sent Items folder also displays the “To” column. For more information on the message list, see “Sorting Messages in the Message Lists” on page 25.
The source content analysis store message list includes file type; Database #, Database, and Path. The source content analysis store profile folder message list includes file type; Attachment, if any; From; Subject; Create Date; Database #; Folder, and Status. For more information on content analysis stores, see “Content Analysis Store” on page 125.
Target Pane
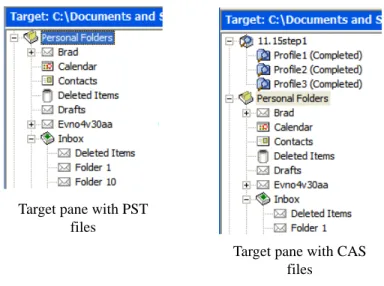
The target pane can display one or more target PST files and/or one target mailbox, public folders and mailboxes from an Exchange Server, and content analysis stores (CAS) with profile folders. The target acts as a container for your restored files. If a target is a newly created PST file, it defaults to 10 Outlook folders. If a target is an existing PST file or Exchange Server, it shows whatever folders are in the target. It is into these folders that you paste and restore your message
Status indicator which indicates that Ontrack PowerControls is either not licensed for the Agent for Administrative Services or it is licensed but not connected to the Kroll Ontrack Administrative Server. This icon is located in the Status Bar of the Ontrack PowerControls main window.
. . . . .
L O O K I N G A T T H E I N T E R F A C EOntrack PowerControls Main Window for Exchange
Figure 3-4. Target panes with PST, CAS, and Exchange Server files
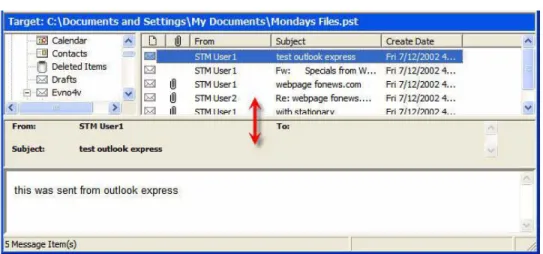
Target Message List (Restored Messages)
The target message list displays the message items in the Outlook folder that you selected in the target pane. If the target is a newly created PST file or CAS, the Outlook folders and message list will be empty. If the target is an existing PST file, CAS file, or Exchange Server, or if you have restored message items to a newly created PST file, you can select a folder in the target pane to display messages in the target message list.
Figure 3-5. Target Message List Displaying Restored Messages
Target pane with PST files
Target pane with CAS
files Target pane with Exchange Server
L O O K I N G A T T H E I N T E R F A C E
Ontrack PowerControls Main Window for Exchange
C
HAPTER1
Menu Bar
Figure 3-6. The Menu Bar in the main window
The menu bar contains most of the Ontrack PowerControls commands for Exchange. The menu commands, submenu commands, and resulting windows are discussed fully in the chapters that focus on those specific commands. See the Index to quickly locate the pages on which a menu command is discussed.
H
ELPM
ENU- A
DMINISTRATIVES
ERVICESThe Administrative Services option is available in the Help menu when the Ontrack PowerControls Agent for Administrative Services is active. It displays information regarding the Kroll Ontrack Administrative Server that Ontrack PowerControls is connected to and the services that are being used.
Note: During normal operation, the auditing service (if activated) does not alter the behavior of
Ontrack PowerControls.
. . . . .
L O O K I N G A T T H E I N T E R F A C EOntrack PowerControls Main Window for Exchange
Toolbar
Figure 3-8. The Button Toolbar in the main window
The buttons on the toolbar perform the following functions:
Open Source displays the Open window, which lets you navigate to and select a source Exchange Database (EDB), PST, or CAS file. The EDB, PST, or CAS file contains the message items you want to restore.
Open Target PST displays the Open window, which lets you navigate to and select a target Personal Folders (PST) file. The target PST file is a container for restored message items.
Open Target Exchange Server displays the Connect to Exchange Server window, which lets you connect to a target Exchange Server. The target Exchange Server is a container for restored message items.
Create/Open Content Analysis Store displays the Create Content Analysis File window which allows you to open an existing content analysis store or to create a new one in the target pane.
Copy copies into the Clipboard the selected message(s) in the source message list; or the selected folder, mailbox, or EDB file in the source pane.
Paste inserts the items from the Clipboard into the selected folder in the target pane. If you wish to retain the directory structure of the restored messages, you must use the Paste Special command instead of the Paste command or Paste button.
Export displays the Export window, which lets you export messages to a local or network drive destination. You can choose to save exported messages as plain text files (.txt) or as Microsoft Outlook files (.msg). You can also export EDBs to a PST.
Search displays the Find window, which lets you specify the desired search criteria for finding messages in the source pane.
L O O K I N G A T T H E I N T E R F A C E
Ontrack PowerControls Main Window for Exchange
C
HAPTER1
Previewing and Opening Messages
In the Preview pane, you can read the contents of a message item and open attachments. You can preview a message located in either the source message list or the target message list. The information displayed in the Message Header is different for messages, calendars, contacts, tasks, and distribution lists.
To open the preview pane
Do one of the following:
• On the View menu, click Preview Pane.
• On the toolbar, click the Preview Pane icon in the toolbar.
To hide the preview pane
• Repeat one of the previous steps.
Tip: Hiding the Preview pane will allow you to scroll through messages faster.
To display a message in the preview pane
1. In the source or target message list, select a message.
2. Open the Preview pane by clicking on the Preview Pane icon in the toolbar.
Figure 3-9. Preview pane for a message
To open a message in its own window
• In the source or target message list, double-click a message.
Attachment Table View is only available when a message with an attachment in the source message list is highlighted. It opens an Attachment Table View of that message and attachment and all related messages and attachments.
Conversation View is only available when a message in the source message list is highlighted. It shows the thread of that message with indentions to indicate the responses to each e-mail.
Ontrack Web Site takes you to the Ontrack Web site (www.ontrack.com), providing you with additional information on products and services by Kroll Ontrack.
. . . . .
L O O K I N G A T T H E I N T E R F A C EOpening Attachments
. . . .
Opening Attachments
If you have the appropriate program installed on your computer, Ontrack PowerControls will load the application to view the selected attachment (e.g., to view an .xls file attachment, Ontrack PowerControls will launch MS Excel).
If no associated program is available for the attachment’s file type, Ontrack PowerControls presents a message window saying the attachment cannot be viewed.
Note: Ontrack PowerControls cannot view attached embedded graphics in HTML messages.
To open an attachment in an open message
1. In the message list, double-click a message that has the Attachment icon next to its name.
2. Click the Attachment icon on the right side of the message header. A pop-up window lists the attachments for the selected message.
3. Click the name of the attachment you want to view.
To open an attachment in the preview pane
1. In the message list, select a message that has the Attachment icon next to its name. 2. Open the Preview pane. In the Ontrack PowerControls main window, click the Preview
Pane icon . In the Find window, select the Preview check box.
3. Click the Attachment icon on the right side of the message header in the Preview pane. A pop-up window lists the attachments for the selected message.
4. Click the name of the attachment you want to view.
. . . .
Saving Attachments
A “save attachments” option is available on the File menu and paperclip menu of an open message, as well as on the paperclip menu of the Preview pane. The Save Attachments window lists the attachments for the selected message and lets you select the attachments you want to save.
To save attachments in an open message
L O O K I N G A T T H E I N T E R F A C E
Changing the View
C
HAPTER1
2. In the Preview pane, click the Attachment icon on the right side of the message header, and then click Save Attachments.
3. In the Save Attachments window, select one or more attachments, and click OK. 4. In the Browse For Folder window, select a location for the attachment(s), and click OK.
. . . .
Changing the View
You can change the view in the Ontrack PowerControls window by hiding the toolbar or status bar, by using split bars; by sorting message lists; and by refreshing the screen.
Viewing or Hiding the Toolbar and Status Bar
The toolbar and status bar appear by default in the main Ontrack PowerControls window, but you can easily hide them.
To hide the toolbar or status bar
• On the View menu, click Toolbar or Status Bar. The check mark no longer appears next to the name of the toolbar or status bar.
To view the toolbar or status bar
• On the View menu, click Toolbar or Status Bar. The check mark appears next to the name of the toolbar or status bar.
Resizing Panes Separated by a Split Bar
You can use a split bar (the horizontal or vertical double line that separates two panes) to increase the area within one pane while simultaneously decreasing the area within the adjacent pane. The source pane, source message list, target pane, target message list, and Preview pane all border a split bar.
To resize panes separated by a split bar
1. Position the cursor over a split bar between two panes until a double arrow appears. A vertical double arrow appears if you position the cursor over a horizontal split bar.
. . . . .
L O O K I N G A T T H E I N T E R F A C EChanging the View
Figure 3-10. Before dragging the split bar between the target message list and the Preview pane
2. Drag the split bar until the two panes are the desired size.
Sorting Messages in the Message Lists
You can sort messages in the source and target message lists based on attachments, message sender, subject, date, and status. In addition, the source message list lets you sort messages based on status, and the Sent Items folder lets you sort items based on the “To” heading. Sorting messages on the From column, for example, can help to identify messages from a specific sender.
To sort a message list
1. Click a column heading to sort the messages based on that heading. For most headings, an arrow appears indicating the sort direction. An up arrow indicates that the messages appear in ascending (A-Z) order. A down arrow indicates that the messages appear in descending (Z-A) order.
2. To reverse the order of the messages based on that column heading, click the column heading again. Notice the arrow reverses directions.
An example of sorting messages
• If you click the attachment column heading, messages are sorted in ascending order based on this heading, even though no arrow appears. This means that messages with
L O O K I N G A T T H E I N T E R F A C E
Viewing the Properties of an EDB File, PST File, CAS File, CAS Profile Folder, Folder, or Mailbox
C
HAPTER1
To refresh the screen
Do one of the following:
• On the View menu, click Refresh. • Press the F5 key.
Viewing the Properties of an EDB File, PST File, CAS File,
. . . .
CAS Profile Folder, Folder, or Mailbox
Ontrack PowerControls makes it easy to view the properties of a source PST file, EDB file, CAS file, CAS profile folder, mailbox, or folder.
Note: Only accessible mailboxes can produce property reports. For CAS files, inaccessible
mailboxes within that data store are not included in the totals.
To view the properties
1. In the source pane, right-click an EDB file, PST file, CAS file, CAS profile folder, mailbox, or folder.
2. On the shortcut menu, click Properties. A Properties window appears.
. . . . .
L O O K I N G A T T H E I N T E R F A C EViewing the Properties of an EDB File, PST File, CAS File, CAS Profile Folder, Folder, or Mailbox
Figure 3-12. Properties of a PST File
Figure 3-13. Properties of a Mailbox
L O O K I N G A T T H E I N T E R F A C E
Viewing the Properties of an EDB File, PST File, CAS File, CAS Profile Folder, Folder, or Mailbox
C
HAPTER1
Figure 3-15. Properties of a content analysis store file
Figure 3-16. Properties of a content analysis store profile folder
An alternate way to view the properties of an EDB or PST file
Once you have viewed the properties of the source EDB or PST file as described above, you can then display the properties in the Preview pane.
1. Open the Preview pane by clicking the Preview Pane icon on the toolbar or by clicking the View menu and pointing to Preview Pane.
. . . . .
L O O K I N G A T T H E I N T E R F A C EPerforming an Integrity Check
. . . .
Performing an Integrity Check
You can perform an integrity check on messages, folders, mailboxes, PST files, CAS files, CAS profile folders, EDB files, and live Exchange Server target search results. During the integrity check, Ontrack PowerControls verifies that it can read all folder and message properties from the selected source.
To perform an integrity check
1. In the source pane, select an EDB file, PST file, CAS file, CAS profile folder, mailbox, folder, or message(s).
2. Do one of the following:
• On the Tools menu, click Integrity Check. The Integrity Check window appears. • Right-click the item and click Integrity Check in the shortcut menu.
3. Click Print to print a copy of the integrity check. 4. Click Save to save a copy of the integrity check to file.
Figure 3-18. An integrity check of an EDB file
. . . .
L O O K I N G A T T H E I N T E R F A C E
Setting Preferences
C
HAPTER1
. . . .
Setting Preferences
The Preferences window allows you to streamline Ontrack PowerControls operations. Most of the preference settings in the three tabs are selected by default. There are two exceptions: the “Display new PST when PST limit is reached” setting in the Options tab, and the “Enable Tamper-Proof Target” setting in the Security tab. If you change the settings, they are stored and reloaded on the next run of Ontrack PowerControls.
To change preference settings
1. On the Edit menu, click Preferences.
2. Select or deselect the check boxes in the three tabs, as desired.
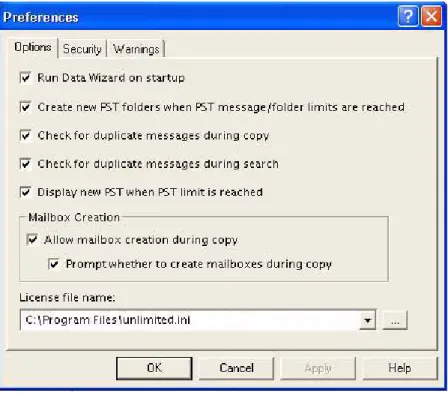
Options Tab
Figure 3-19. The Options Tab in Preferences
• Run Data Wizard on startup: The Data Wizard will launch every time you open Ontrack PowerControls.
• Create new PST folders when PST message/folder limits are reached: Ontrack PowerControls will automatically create new folders (e.g., Inbox) when the 16,383 messages/folder limit is reached. After Ontrack PowerControls creates a new folder, it continues to restore Exchange data where it left off. For more information, see “Limits for PST and Folder Targets” on page 90.
. . . . .
L O O K I N G A T T H E I N T E R F A C ESetting Preferences
• Check for duplicate messages during search: Ontrack PowerControls will not return duplicates of a message during a search. For example, if the same message exists in two or more data stores, only the first message found is listed in the search results. Selecting this preference setting results in slower search performance.
• Display new PST when PST limit is reached: When the limit for a PST is reached in the target pane, Ontrack PowerControls automatically displays the overflow PST.
• Allow mailbox creation during copy: If this option is selected and a mailbox copy is initiated by you, mailboxes can be created during a mailbox copy. If it is deselected, mailbox creation cannot take place during copy. This setting has no effect on manual mailbox creation.
• Prompt whether to create mailboxes during copy: If this option is selected, you are prompted at the beginning of a copy and are asked if mailboxes should or should not be created. When it is deselected, mailbox creation occurs automatically. This setting is only in effect when Allow mailbox creation during copy is enabled. This setting has no effect on manual mailbox creation, or during a single mailbox copy.
• License file name: This box displays the current location of the license file. To put this file in a different location, click Browse and navigate to the desired location. There are two ways to manage the location of the license file:
• Multiple Copies of Ontrack PowerControls: Put one license file in the Ontrack PowerControls program directory of each Ontrack PowerControls installation. • Single Copy of Ontrack PowerControls: Put one license file in a single network
folder to which all Ontrack PowerControls installations make reference.
L O O K I N G A T T H E I N T E R F A C E
Setting Preferences
C
HAPTER1
Security Tab
The options in this tab are modifiable by default only by users that belong to the Administrator Group. The options are stored in the registry:
HKEY_LOCAL_MACHINE\software\ontrack\powercontrols.
The Ontrack PowerControls Installation program sets this registry key to have read/write access to users in the Administrators group and read-only access by any user in the Users group.
Figure 3-20. The Security Tab in Preferences
• Allow preview of messages: If this option is not selected, you will not have the ability to open or preview messages in the source or target.
• Enable Tamper-Proof Target: If this option is selected, Ontrack PowerControls does not allow you to delete messages or folders in the target or have the ability to rename folders in the target. You only have the ability to add (copy) to the target.
• Allow Bcc field to be included when restoring or searching messages: If this option is selected, Ontrack PowerControls includes Bcc information when restoring or searching messages. This means that a recipient is able to see Bcc recipients that he or she was not intended to see. It also means that searching with the “Sent to” option returns messages for Bcc recipients.
• Enable Message Views: If this option is selected, it makes the Message Views available. • List inaccessible mailboxes: If this option is selected, the inaccessible mailboxes listed in
. . . . .
L O O K I N G A T T H E I N T E R F A C ESetting Preferences
Warnings Tab
Figure 3-21. The Warnings Tab in Preferences
• Show warning when logs specified but not found: Ontrack PowerControls warns you when opening an EDB file if no .log files were found at the specified directory.
• Show warning when no log file path specified: Ontrack PowerControls warns you when opening an EDB file if a .log file path has not been specified.
• Show warning when copying to Exchange Server root: Ontrack PowerControls warns you when you are about to copy a large amount of data to the Exchange Server root. • Show warning when opening an Exchange Server and an Exchange Server is already
open: This warning appears when you attempt to connect to either a single mailbox or all mailboxes on an Exchange Server when a target Exchange connection is already open in Ontrack PowerControls.
L O O K I N G A T T H E I N T E R F A C E
Setting Preferences
CHAPTER 2
U
SING
O
NTRACK
P
OWER
C
ONTROLS
FOR
. . . .
. . . .
E
XCHANGE
C
HAPTER
4 :
. . . .
Overview
You can open a source Exchange Database (EDB) file or PST file and specify a target PST file or target Exchange Server by using one of the following methods:
• Use the Data Wizard.
• Open the source database and target mailboxes from the Ontrack® PowerControls™ main window.
Note: You cannot open the same PST file as both source and target.
. . . .
Running the Data Wizard
The first time you start Ontrack PowerControls, the Data Wizard starts. The Data Wizard guides you through the loading of the Exchange Database (EDB), PST files, or content analysis store (CAS) files into Ontrack PowerControls, and shows you how to specify the target PST file or Exchange Server.
U S I N G O N T R A C K P O W E R C O N T R O L S F O R E X C H A N G E
Running the Data Wizard
C
HAPTER2
Figure 4-1. Automatic Server Connection message
If you select “No,” Ontrack PowerControls closes. If you select “Yes,” the following window is displayed:
Figure 4-2. Connection Point Manager
To add a server
1. Deselect Use Active Directory to locate server if it is selected. 2. Click Add. The Server Information window appears.
. . . . .
U S I N G O N T R A C K P O W E R C O N T R O L S F O R E X C H A N G ERunning the Data Wizard
Figure 4-3. Enter Server Information
3. Enter the Server address name or IP address and click OK.
Before You Use the Data Wizard
Use the Ontrack PowerControls ExtractWizard if you have not yet restored backed-up Exchange Information Store data. The Ontrack PowerControls ExtractWizard reads previous Exchange Server backups and restores EDB files to any machine, volume, or folder. For more information, see the Ontrack PowerControls ExtractWizard User Guide.
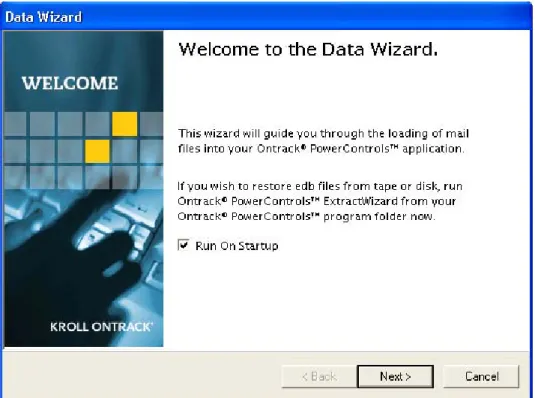
Data Wizard: Welcome Page
Click Start, and then point to Programs. Point to KrollOntrack, point to Ontrack PowerControls, and then click Ontrack PowerControls for Exchange. The Data Wizard
appears.
1. If you do not want to run the Data Wizard every time you start Ontrack PowerControls, deselect the Run On Startup check box. Click Next.
U S I N G O N T R A C K P O W E R C O N T R O L S F O R E X C H A N G E
Running the Data Wizard
C
HAPTER2
Figure 4-4. Opening page of the Data Wizard
Data Wizard: Source Path Selection
On the Source Path Selection page of the Data Wizard, specify the source EDB file path along with its log file path and temporary file path; or specify the source PST file or CAS file path. If you do not want to open a source EDB, PST, or CAS file at this time, click Skip.
Note: Due to the database nature of the PST file and MAPI subsystem, PSTs opened as source are
modified.
To specify a source file
1. In the Source File box, click Browse to find the source EDB file, source PST file, or source CAS file.
2. If you specified a PST or CAS file path, proceed to step 5. PST files do not require log file or temporary file paths.
3. In the Log File Path box, click Browse to find the log files associated with the source EDB file.
Important: After you select an EDB file, the Log File Path box defaults to the source EDB
file path, even if the log files are not in the same directory as the source EDB file. Therefore, make sure you enter the correct log file path in the Log File Path box.
. . . . .
U S I N G O N T R A C K P O W E R C O N T R O L S F O R E X C H A N G ERunning the Data Wizard
Figure 4-5. Browse to the EDB or PST file to use as source
5. Click Next.
Guidelines for Selecting an Exchange Database
1. For the best results when using an online incremental or differential backup:
• Put the .edb, .stm, and .pat files in one directory.
• Put the associated log files (e.g., .log, .chk) in one directory.
Note: The two directories can be different.
Note: Ontrack PowerControls does not require .stm or .log files, but you should include
them to ensure that all email data is recovered.
2. If you are using an offline backup: You need to use the .edb and .stm files. To ensure that all email data is recovered, you should also include all .log files, as well as .pat and .chk files if they exist. Ontrack PowerControls performs its own verification process and will