Mastering phpMyAdmin 2.8
for Effective MySQL Management
Increase your MySQL productivity and control by
discovering the real power of phpMyAdmin 2.8
Marc Delisle
Management
Copyright © 2006 Packt Publishing
All rights reserved. No part of this book may be reproduced, stored in a retrieval system, or transmitted in any form or by any means, without the prior written permission of the publisher, except in the case of brief quotations embedded in critical articles or reviews.
Every effort has been made in the preparation of this book to ensure the accuracy of the information presented. However, the information contained in this book is sold without warranty, either express or implied. Neither the author, Packt Publishing, nor its dealers or distributors will be held liable for any damages caused or alleged to be caused directly or indirectly by this book.
Packt Publishing has endeavored to provide trademark information about all the companies and products mentioned in this book by the appropriate use of capitals. However, Packt Publishing cannot guarantee the accuracy of this information.
First edition: April 2004 Second edition: October 2004 Third edition: October 2006 Production Reference: 2290906
Published by Packt Publishing Ltd. 32 Lincoln Road
Olton
Birmingham, B27 6PA, UK. ISBN 1-847191-60-6
www.packtpub.com
Credits
Author
Marc Delisle
Reviewers
Garvin Hicking Alexander Turek
Development Editor
Louay Fatoohi
Technical Editor
Saurabh Singh
Editorial Manager
Dipali Chittar
Indexer
Mithil Kulkarni
Proofreaders
Martin Brooks Chris Smith
Layouts and Illustrations
Shantanu Zagade
Cover Designer
About the Author
Marc Delisle
started to contribute to phpMyAdmin in December 1998, when hemade the first multi-language version. He has been actively involved since May 2001
as a developer and project administrator. phpMyAdmin is now a part of his life. He has worked since 1980 at Collège de Sherbrooke, Québec, Canada, as an application programmer and network manager. He has also been teaching
networking, security, Linux servers, and PHP/MySQL application development. In one of his classes, he was pleased to meet a phpMyAdmin user from Argentina.
I am truly grateful to Louay Fatoohi, my editor, who approached me for this book project, and accompanied me during the production; his sound comments were greatly appreciated. My thanks also go to Garvin Hicking, a member of the phpMyAdmin's development team and the reviewer for this book. Garvin's sharp eye helped in making this book clearer and more complete.
Finally, there would be no book about phpMyAdmin without phpMyAdmin (the software). I wish to thank all contributors to the source code and documentation; the time they gave to the software project still inspires me and continues to push me forward.
About the Reviewers
Garvin Hicking
is a German web developer working for Faktor E GmbH. He creates web applications using PHP and MySQL, and in his free time enjoys working on open-source projects like phpMyAdmin or Serendipity. When he's away from the computer, he likes going to the movies with his girlfriend and friends, blogging, and taking pictures. What he enjoys most about his work in Open Source is making people's everyday life easier, by giving them free, but powerful, tools to play with.Receiving feedback from satisfied users is one of the fundamental give and get principles he likes to live by.
Alexander Marcus Turek
was born on June 2nd, 1984 in Düsseldorf, the capital of the German province Northrhine-Westphalia. Currently, he's studying Information Engineering and Management at the University of Karlsruhe, but his origin is Mülheiman der Ruhr, the home of his family. He first got in touch with the Web in 1998, when
he won a 28.8k modem at the CeBit Home in Hannover, Germany. A few months
later, he learned HTML and started his first Web project, a German game patch
archive called Rabus' Update Site, which he renamed to bugfixes.info, when the .info domains became available. In the meantime, he switched from static HTML to
PHP in order to be able to manage the growing archive more efficiently. He kept on
learning PHP when trying to extend the portal.
Because the flatfile-based database system became too slow when searching the
still growing archive, he also switched to MySQL in 2001. This is when he got in touch with phpMyAdmin and the project. He started with revising its language
files because they were a bit outdated and inconsistent. He had fun doing so, and
continued with grabbing some bug reports and submitting patches for them. Loïc Chapeaux, one of the two co-maintainers at that time, added him to the developers list and gave him a CVS account in March 2002, so he could merge his patches by himself. Since then, he has mainly worked on the compatibility with MySQL 4.0, reworked the server administration area, developed a simple abstraction layer in
order to support MySQLi, and continued with compatibility fixingâthis time for
Table of Contents
Preface
1
Chapter 1: Introducing phpMyAdmin
7
PHP and MySQL: The Leading Open-Source Duo 8
What is phpMyAdmin? 8
History 9
Awards 12
phpMyAdmin Features Summary 13
Summary 14
Chapter 2: Installing phpMyAdmin
15
System Requirements 15
Downloading the Files 16
Installation 16
Installation on a Remote Server Using a Windows Client 16 Installation on a Local Linux Server 17 Installation on Local Windows Servers (Apache, IIS) 18
First Connection Configuration 18
Configuration Principles 18
Web-Based Setup Script 19
Manual Creation of config.inc.php 24
Tips for Editing config.inc.php on a Windows Client 24
The config.inc.php File 24
PmaAbsoluteUri 25
Server-Specific Sections 25
extension 26
PersistentConnections 26
connect_type, socket and port 26
compress Configuration 27
Authentication Type: config 27
Multi-Server Configuration 28
Servers Defined in the Configuration File 29
Arbitrary Server 29
Advanced Authentication 30
Authentication Types Offered 30
The Control User 31
HTTP Authentication 31
Cookie Authentication 32
Security 34
Directory-Level Protection 34
IP-Based Access Control 34
Rules 35
Order of Interpretation for Rules 36
Simplified Rule for Root Access 36
Restricting the List of Databases 37
Protecting In-Transit Data 37
Upgrading phpMyAdmin 38
Summary 38
Chapter 3: Interface Overview
39
Panels and Windows 39
Login Panels 39
Left and Right Panels 39
Home Page 40
Views 40
Query Window 40
Starting Page 40
Window Titles Configuration 41
General Icon Configuration 41
Natural Sort Order for Database and Table Names 41
Language Selection 42
Themes 43
Theme Configuration 43
Theme Selection 44
Left Panel 44
Database and Table List 45
Light Mode 46
Full Mode 48
Table Short Statistics 48
Quick-Browsing a Table 49
Nested Display of Tables within a Database 49
Right Panel 51
Home Page 52
Database View 53
Table View 54
Server View 55
Icons for Home Page and Menu Tabs 56
Query Window 56
Site-Specific Header and Footer 57
MySQL Documentation Links 58
Summary 58
Chapter 4: First Steps
59
Database Creation 59
No Privileges? 59
First Database Creation Is Authorized 60
Creating Our First Table 61
Choosing the Fields 62
Table Creation 62
Choosing Keys 64
Manual Data Insertion 66
Data Entry Panel Tuning for CHAR and VARCHAR 68
Browse Mode 69
SQL Query Links 70
Navigation Bar 71
Sorting Results 74
Color-Marking Rows 75
Limiting the Length of Each Column 75 Browsing Distinct Values 76 Browse-Mode Customization 77
Creating an Additional Table 77
Summary 78
Chapter 5: Changing Data
79
Edit Mode 79
Moving to Next Field with the Tab Key 80
Moving with Arrows 80
Handling NULL Values 81 Applying a Function to a Value 81 Duplicating Rows of Data 82
Multi-Row Editing 83
Deleting Data 85
Deleting a Single Row 85
Deleting Many Rows 86
Deleting All the Rows in a Table 86 Deleting All Rows in Many Tables 87
Deleting Tables 87
Deleting Databases 88
Summary 88
Chapter 6: Changing Table Structures
89
Adding a Field 89
Vertical Mode 90
Editing Field Attributes 91
TEXT 91
BLOB (Binary Large Object) Fields 92
Binary Contents Uploads 93
ENUM and SET 94
DATE, DATETIME, and TIMESTAMP 96
Calendar Popup 96
TIMESTAMP Options 97
Index Management 98
Single-Field Indexes 98 Multi-Field Indexes and Index Editing 99
FULLTEXT Indexes 100
Table Optimization: Explaining a Query 101
Detection of Index Problems 103
Summary 103
Chapter 7: Exporting Structure and Data
105
Dumps, Backups, and Exports 105
Database Exports 106
The Export Sub-Panel 107
SQL 107
SQL Options 109
The Save as file Sub-Panel 113
File Name Template 114
Compression 114
Choice of Character Set 115
CSV 116
CSV for MS Excel 117
PDF 117
LaTeX 120
XML 122
Native MS Excel (pre-Excel 2000) 123
Table Exports 124
Split-File Exports 125
Selective Exports 125
Exporting Partial Query Results 125
Exporting and Checkboxes 127
Multi-Database Exports 127
Saving the Export File on the Server 128
User-specific Save Directories 129
Memory Limits 130
Summary 130
Chapter 8: Importing Structure and Data
131
Limits for the Transfer 131
Time Limits 132
Other Limits 132
Partial Imports 133
Importing SQL Files 133
Importing CSV Files 135
Differences between SQL and CSV Formats 135 Exporting a Test File 135
CSV 136
CSV Using LOAD DATA 137
Requirements 138
Using the LOAD DATA Interface 138
Web Server Upload Directories 139
Summary 140
Chapter 9: Searching Data
141
Single-Table Searches 141
Daily Usage of phpMyAdmin 141
Entering the Search Sub-Page 141
Selection of Display Fields 142 Search Criteria by Field: Query by Example 143
Print View 144
Complete Database Search 148
Summary 149
Chapter 10: Table and Database Operations
151
Table Maintenance 152
Changing Table Attributes 152
Table Type 153
Table Comments 153
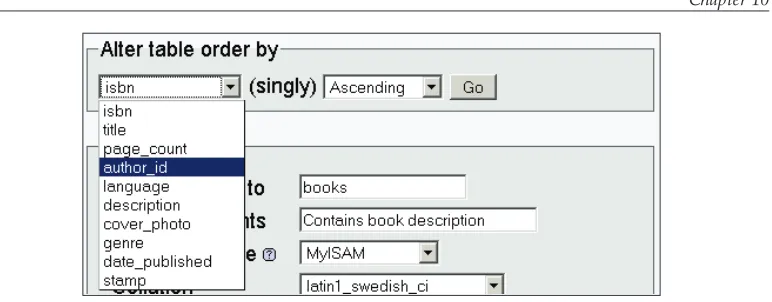
Table Order 154
Table Options 155
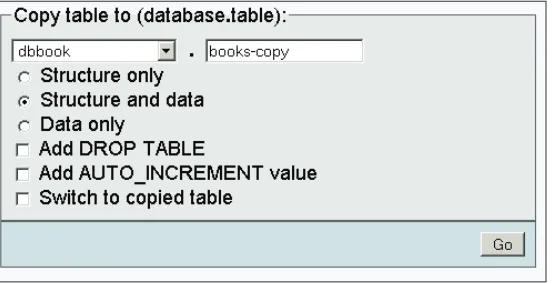
Renaming, Moving, and Copying Tables 156
Appending Data to a Table 157
Multi-Table Operations 157
Repairing an "in use" Table 157
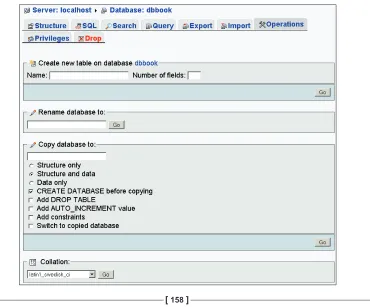
Database Operations 158
Renaming a Database 159 Copying a Database 159
Summary 159
Chapter 11: The Relational System
161
Relational MySQL? 161
InnoDB 162
Linked-Tables Infrastructure 162
Location of the Infrastructure 162
Installing Linked-Tables Infrastructure
163
Multi-User Installation 164
Single-User Installation 166
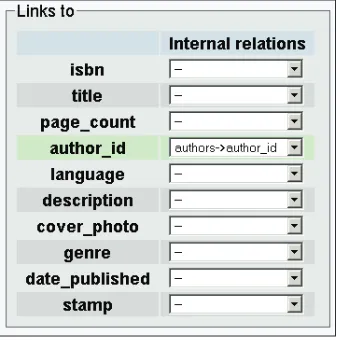
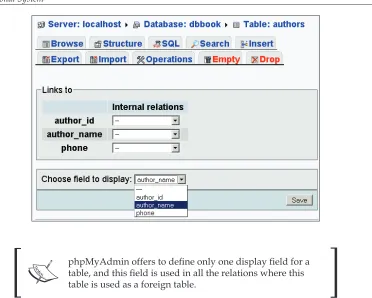
The Relation View 167
Internal phpMyAdmin Relations 168
Defining the Relation 168
Defining the Display Field 169
InnoDB Relations 170
InnoDB Tables without Linked-Tables Infrastructure 173
Benefits of the Defined Relations 174
Foreign Key Information 174 The Drop-Down List of Foreign Keys 175 The Browseable Foreign-Table Window 176 Referential Integrity Checks 177 Automatic Updates of Metadata 178
Column-Commenting 178
Automatic Migration 180
Chapter 12: Entering SQL Commands
181
The SQL Query Box 181
The Database View 181
The Table View 182
The Fields Selector 183
Clicking Into the Query Box 183
The Query Window 183
Query Window Options 184 JavaScript-Based SQL History 185
Database-Based SQL History (Permanent) 185
Editing Queries in the Query Window 186
Multi-Statement Queries 186
Pretty Printing (Syntax-Highlighting) 188
Views 190
Creating a View 190
Operations on Views 191
The SQL Validator 192
System Requirements 192 Making the Validator Available 192
Validator Results 193
Standard-Conforming Queries 193
Non Standard-Conforming Queries 194
Summary 195
Chapter 13: The Multi-Table Query Generator
197
Choosing Tables 198
Column Criteria 199
Field Selector: Single-Column or All Columns 199
Sorts 199
Showing a Column 200
Updating the Query 200
Criteria 201
Adjusting the Number of Criteria Rows 204
Adjusting the Number of Criteria Columns 206
Automatic Joins 207
Executing the Query 207
Summary 208
Chapter 14: Bookmarks
209
Creating a Bookmark after a Successful Query 209
Storing a Bookmark before Sending a Query 211
Recalling from the Bookmarks List 213
Bookmark Execution 213 Bookmark Manipulation 214
Public Bookmarks 214
The Default Initial Query for a Table 215
Bookmark Parameters 216
Creating a Parameterized Bookmark 216
Passing a Parameter Value to a Bookmark 217
Executing Bookmarks from the pma_bookmark Table 218
Summary 218
Chapter 15: System Documentation
219
The Database Print View 219
The Selective Database Print View 220
The Table Print View 221
The Data Dictionary 222
Relational Schema in PDF 223
Adding a Third Table to Our Model 223
Editing PDF Pages 225
Page Planning 225
Creating a New Page 225
Editing a Page 225
Displaying a Page 227
A Note about Fonts Used 229
Summary 229
Chapter 16: MIME-Based Transformations
231
The MIME Column's Settings 232
MIME Types 232
Browser Transformations 232 Transformation Options 233
Requirements for Image Generation 233
The GD2 Library 233
The JPEG and PNG Libraries 234
Memory Limits 234
Examples of Transformations 235
Clickable Thumbnail (.jpeg or .png) 235
Links to an Image 236
Date Formatting 236
Links from Text 237
text/plain: link 237
Preserving the Original Formatting 238
Displaying Parts of a Text 239
Download Link 239
Hexadecimal Representation 240
SQL Pretty Printing 240
External Applications 240
External Application Example: In-Cell Sort 241
Summary 242
Chapter 17: Character Sets and Collations
243
Language Files and UTF-8 243
Versions of MySQL Prior to 4.1.x 244
Data Recoding 244
Character Sets 245
Choosing the Effective Character Set 246 The Impact of Switching 246 Importing and Exporting with Character Sets 247
MySQL 4.1.x and Later 248
Collations 249
The Home Page 249
Creating a Database 250
Available Character Sets and Collations 250
Effective Character Sets and Collations 251
The Database View 252
The Table View 252
Importing and Exporting with Character Sets 253
Server View 254
Kanji Support 254
Summary 254
Chapter 18: MySQL Server Administration with phpMyAdmin
255
Entering the Server View 255
User and Privileges Management 256
The User Overview 256
Adding a User 257
User Name 258
Host 258
Password 258
Global Privileges 258
Resource Limits 258
Editing a User 259
Edit Privileges 259
Changing the Password 262
Changing Login Information or Copying a User 262
Removing a User 263
Database Information 264
Enabling Statistics 265 Sorting Statistics 265
Checking the Database Privileges Check 265
Dropping Selected Databases 266
Server Operations 266
Server Status Verification 266
The General Status Page 266
InnoDB Status 267
Server Variables 268
Server Processes 269
Storage Engines 270
The Binary Log 271
Summary 272
Chapter 19: Troubleshooting and Support
273
System Requirements 273
Base Configuration 274
Solving Common Errors 274
Error Messages 274
Cannot Load MySQL Extension 274
MySQL Said: Can't Connect to Local MySQL Server 275
Socket Problem (Linux/UNIX) 275
Named Pipe Problem (Windows) 275
Error # 2003: The Server is not Responding 275
MySQL Said: Access Denied 275
When Using http Authentication 276
When Using http, cookie, or config Authentication 276
Access Denied ... "using password: NO" 276
Access Denied ... "using password: YES" 276
Warning: Cannot Add Header Information 276
MySQL Said: Error 127, Table Must Be Repaired 276
BLOB Column Used in Key Specification without a Key Length 276
IIS: No Input File Specified 277
A "404: page not found" Error when Modifying a Row 277
Other Problems 277
Blank Page or Weird Characters 277
Not Being Able to Create a Database 277
Problems Importing Large Files or Uploading Large BLOB Files 278
MySQL Root Password Lost 278
Duplicate Field Names when Creating a Table 278
Authentication Window Displayed more than Once 279
Seeing many Databases that Are Not Ours 279
Not Being Able to Store a Value Greater than 127 279
Seeking Support 279
FAQs 280
Help Forums 280
Creating a SourceForge Account 280
Choosing the Thread Title 280
Reading the Answers 280
Support Tracker 280
Bug Tracker 281
Environment Description 281
Bug Description 281
Contributing to the Project 281
The Code Base 281
Translation Updates 282
Patches 282
Future phpMyAdmin Versions 282
Summary 282
Preface
Used by millions of developers, MySQL is the most popular Open Source database, supporting numerous large dynamic websites and applications. MySQL has acquired this wide popularity by virtue of its open source nature, reliability, robustness, and support for various platforms.This popularity has also been aided by the existence of phpMyAdmin, the industry-standard administration tool that makes database management easy for both the experienced developer and novice. The powerful graphical interface that it provides to MySQL has made phpMyAdmin an indispensable tool for MySQL and Web developers.
This book is a comprehensive tutorial to phpMyAdmin, demonstrating the full
potential of this tool. It shows how to configure, activate, and use phpMyAdminâs
myriad features, both basic and advanced.
What This Book Covers
This is a quick review of the nineteen chapters of the book.
Chapter 1 is an introduction to phpMyAdmin, its history, and main features. Chapter 2 provides detailed coverage of the different installation and configuration
options, including installing one copy of phpMyAdmin for multiple users, and
configuring it to manage many servers. Security issues are also discussed in
this chapter.
In Chapter 5 we cover deleting single and multiple rows, tables, and databases. This chapter also covers data-editing operations, such as handling Null values and applying MySQL functions to data.
Chapter 6 focuses on the various options of phpMyAdmin for changing table
structure. These include adding field types such as TEXT, BLOB, ENUM, and SET, uploading binary data into BLOB fields, and managing indexes. phpMyAdmin can
be used to backup data and take intermediary snapshots during development and production phases.
Chapter 7 shows how to perform these tasks using the export feature of
phpMyAdmin. The various data formats that can be exported are also explained. The focus of Chapter 8 is that phpMyAdmin can also import data. Importing SQL
and CSV files, and phpMyAdminâs handing of compressed files are covered here.
In addition to its user friendly browsing features, phpMyAdmin allows us to easily search through our data.
Chapter 9 covers searching databases and single tables. The previous chapters dealt
mostly with table fields.
Chapter 10 focuses on operations that affect tables or databases as a whole. Repairing and optimizing tables, changing the various table attributes, and copying and
moving tables to another database are all explained here, as well as database renaming or copying.
In Chapter 11, we start reading about phpMyAdminâs more advanced features. We
see how to install the linked-tables infrastructure, which is required for using various
advanced features. Both single- and multi-user installations are covered. Defining
inter-table relations is also explained.
In addition to letting us perform various database operations through its graphical interface, phpMyAdmin also allows us to run complex SQL commands for tasks that cannot be performed through the graphical interface. This feature is covered in Chapter 12.
Chapter 13, which covers multi-table search, complements Chapter 9 and shows how to search single tables and a whole database.
Chapter 14 covers phpMyAdminâs powerful feature of query bookmarks, which is
one of the linked-tables features that were covered in Chapter 11. The chapter shows how to record, manipulate, and pass parameters to bookmarks.
lists, use data dictionaries for complete column lists, and generate custom-made relational schema for tables in the PDF format.
phpMyAdmin can perform MIME-based transformation on column contents. Transformation of both text and images is covered in Chapter 16.
Chapter 17 covers character sets and collations in detail.
Chapter 18 shows how system administrators can use phpMyAdmin for user account
and privileges management and server status verification. The chapter also covers
how non-administrators can obtain information about the server.
Chapter 19, the last chapter of the book, covers various troubleshooting and support
issues. It covers the most common error messages and configuration problems. The
chapter also includes information on how and where you can get technical support.
What You Need for This Book
You need to have access to a server or workstation that has the following installed: MySQL
PHP
Apache or IIS Web server
Conventions
In this book, you will find a number of styles of text that distinguish between
different kinds of information. Here are some examples of these styles, and an explanation of their meaning.
There are three styles for code. Code words in text are shown as follows: "The $cfg['PropertiesIconic'] parameter can have the values TRUE, FALSE, or 'both'".
A block of code will be set as follows:
$cfg['PropertiesIconic'] = TRUE; $cfg['ModifyDeleteAtLeft'] = TRUE; $cfg['ModifyDeleteAtRight'] = FALSE;
When we wish to draw your attention to a particular part of a code block, the relevant lines or items will be made bold:
CREATE TABLE books (
isbn varchar(25) NOT NULL default '',
author_id int(11) NOT NULL default '0',
PRIMARY KEY (isbn), KEY author_id (author_id)
) TYPE=MyISAM COMMENT='Contains book description';
Any command-line input and output is written as follows:
c:\packt>mysqladmin ping mysqld is alive
New terms and important words are introduced in a bold-type font. Words that you see on the screen, in menus or dialog boxes for example, appear in our text like this: "clicking the Next button moves you to the next screen".
Warnings or important notes appear in a box like this.
Tips and tricks appear like this.
Reader Feedback
Feedback from our readers is always welcome. Let us know what you think about this book, what you liked or may have disliked. Reader feedback is important for us to develop titles that you really get the most out of.
To send us general feedback, simply drop an email to [email protected], making sure to mention the book title in the subject of your message.
If there is a book that you need and would like to see us publish, please send us a note in the SUGGEST A TITLE form on www.packtpub.com or
email [email protected].
If there is a topic that you have expertise in and you are interested in either writing or contributing to a book, see our author guide on www.packtpub.com/authors.
Customer Support
Downloading the Example Code for the Book
Visit http://www.packtpub.com/support, and select this book from the list of titles
to download any example code or extra resources for this book. The files available
for download will then be displayed.
The downloadable files contain instructions on how to use them.
Errata
Although we have taken every care to ensure the accuracy of our contents, mistakes
do happen. If you find a mistake in one of our booksâmaybe a mistake in text or codeâwe would be grateful if you would report this to us. By doing this you can
save other readers from frustration, and help to improve subsequent versions of this
book. If you find any errata, report them by visiting http://www.packtpub.com/ support, selecting your book, clicking on the Submit Errata link, and entering the
details of your errata. Once your errata have been verified, your submission will be
accepted and the errata added to the list of existing errata. The existing errata can be viewed by selecting your title from http://www.packtpub.com/support.
Questions
Introducing phpMyAdmin
Welcome to the evolved Web! In the last few years, the Web has changed
dramatically. In its infancy, the Web was a medium used mainly to convey static information ("Look, my home page is on the Web!"). Now, large parts of the Web carry information that is dynamically generated by application programs, on which enterprises and even individuals rely for their intranets and public websites.
Because of the clear benefits of databases (better accessibility and structuring of
information), web applications are mostly database driven. The front-end used is the well known (and quickly deployed) web browser, and there is a database system at the back-end. Application programs provide the interface between the browser and the database.
Those who are not operating a database-driven website today are not using the medium to its fullest capability. Also, they could be lagging behind competitors who have made the switch. So it is not a question of whether we should implement a database-driven site, but it is more about when and mostly how to implement it. Why web applications? They improve user experience and involve them in the process by opening up possibilities such as:
Gathering feedback about the site
Letting users communicate with us and with each other through forums Ordering goods from our e-commerce site
Enabling easily editable web-based information (content management) Designing and maintaining databases from the Web
Nowadays, WWW might stand for World-Wide Wave, a big wave that profoundly
modifies the way developers think about user interface, data presentation, and most
of all, the way data reaches users and comes back to the data center. â¢
PHP and MySQL: The Leading
Open-Source Duo
This chapter describes the place of phpMyAdmin in the context of PHP/MySQL, explains phpMyAdmin's history, and summarizes its features. Let us look at the solutions currently offered by host providers. The most prevalent is the PHP/MySQL combination.
Well supported by their respective home sites, http://www.php.net and http://www.mysql.com, this duo has enabled developers to offer a lot of
ready-made open-source web applications, and most importantly, enabled in-house developers to quickly put in place solid web solutions.
MySQL, which is mostly compliant with the ANSI-92 SQL standard, is a database system well known for its speed, robustness, and small connection overhead, which is important in a web context where pages must be served as quickly as possible. PHP, installed as a module inside the web server, is a popular scripting language in which applications are written to communicate with MySQL on the back-end, and
browsers on the front-end. Ironically, the acronym's signification has evolved itself
along with the Web evolution, from Personal Home Page to Professional Home Page to its current recursive definition: PHP: Hypertext Processor. Available on millions of Web domains, it drives its own wave of quickly developed applications.
What is phpMyAdmin?
phpMyAdmin is a web application written in PHP and containsâlike most web
applicationsâXHTML, CSS, and JavaScript client code. It provides a complete web
interface to administering MySQL databases and is widely recognized as the leading
application in this field.
Being open source since the start of its existence, it has enjoyed support from
numerous developers and translators world wide (being translated into 50 languages at the time of going to press). The project is currently hosted on SourceForge.
Host providers everywhere have shown their trust in phpMyAdmin (official home
History
The first internal version (0.9.0) was coded by Tobias Ratschiller and bears the
date 1998-09-09. He then released version 1.0.1 on 1998-10-26. The early versions were offered on Tobias's site: http://www.phpwizard.net (This site is no longer associated with him.) Tobias wrote in the accompanying notes:
"This work is based on Peter Kuppelwieser's MySQL-Webadmin. It was his idea to create a web-based interface to MySQL using PHP3. Although I have not used any of his source-code, there are some concepts I've borrowed from him. phpMyAdmin was created because Peter told me he wasn't going to further develop his (great) tool."
Compared to today's version (eight years after the original), the first version was
tables, edit their structure, and enter and retrieve data. Notice in the figure that
follows that the left frame was already there to list database names (not table names yet), and the right frame was the workspace to manage a database or table. This is what the interface for databases looked like in version 1.3.0:
To work on a table, you had the following screen:
I started using phpMyAdmin at version 1.2.0 (released 1998-11-29) and was immediately hooked on the idea of being able to use a web application to maintain a remote database. However, students at Collège de Sherbrooke where I work in Québec, Canada, are French-speaking folks, so I contacted Tobias and offered to
In 1999 and the first half of 2000, Tobias improved the navigation system, added features, and merged more language files. His project site maintained a discussion
forum, so new ideas came along and patches were discussed. Version 2.1.0 was released on 2000-08-06, which was the last version released by Tobias, who had no more time to devote to this project.
However, users were already numerous and asked more of the product. Patches
were floating on the Internet, with no way of coordinating them. A security alert (and fix) had been published, but no new version was being released. On
2001-03-31, Olivier Müller registered the phpMyAdmin project on SourceForge. net, and released a 2.2.0pre1 version. At this time, this was called the unofficial version. This restart of the project attracted some developers, who now had the SourceForge infrastructure (CVS server, forums, bug trackers, mailing lists) to help speed up the development. I personally "re-joined" the project in May 2001 and
started fixing and improving the code, as my co-developers were doing.
We became "official" on 2001-05-28, as Tobias accepted our new version as the new official one. I remember those months of very intense development effort, with daily improvements and bug fixes, along with new documentation sections. This effort
culminated on 2001-08-31 with the release of version 2.2.0. Here's an excerpt from the announcement file for 2.2.0:
"After 5 months, 5 beta releases, and 4 release candidate versions, the phpMyAdmin developers are pleased to announce the availability of phpMyAdmin 2.2.0. [...] on 31st March 2001, Olivier Müller (Switzerland), supported by Marc Delisle (Québec), Loïc Chapeaux (France) and a team of 8 other developers re-started the phpmyadmin project on SourceForge.net, with the authorization of the original package maintainer. Now, after 5 months of
patches, bug fixes, new features and testing, the version 2.2.0 is finally ready."
This version had security fixes, seven new languages (with dynamic
language-detection), and the code had been reworked to be CSS2 and XHTML 1.0
compliant, and follow the PEAR coding guidelines. The bookmarks feature appeared in this version.
On 2002-08-11, version 2.3.0 was released. There had been so many new features that the pages were getting vertically too big, so this version was the "great split version", displaying sub-pages for each table and database group of features.
The team started a new schedule of releasing a new minor version (2.3.1, 2.3.2 ...) every two months. On 2003-02-23, version 2.4.0 included a new server/user management facility. Then on 2003-05-11, version number jumped to 2.5.0 to mark the new MIME-type cell transformation system.
Version 2.6.0 â released on 2004-09-27 â added support for the new mysqli extension available in PHP 5 for better performance and improved security. The interface for this version has been redesigned, including new icons and a theme manager. All these features are explained in this book. On 2005-04-16, version 2.6.2 was born, adding basic support for MySQL's VIEWs.
In June 2005, the first meeting of phpMyAdmin's development team took place
in Karlsruhe, Germany during LinuxTag 2005. Six members of the team from Switzerland, Germany, Czech Republic, and Canada were present, displaying phpMyAdmin and discussing its features with the event's attendees. We also celebrated PHP's and MySQL's tenth anniversary on the same occasion.
On 2005-12-04, version 2.7.0 was released. With this version, we ended support for
older configuration files â those before phpMyAdmin 2.3.0. Also, in 2.7.0 a new
plug-in-based import module made its debut.
Version 2.8.0 was made available on 2006-03-06. It included a new web-based setup mechanism. With 2.8.0 the team started a new numbering scheme for version
releases. The 2.8 family contains only fixes for the features already present in 2.8.0.
Thus, after 2.8.0, here are some examples of the versions that can be released:
2.8.0.1, for anything urgent like a security fix 2.8.1, containing normal fixes for the 2.8 family
2.9.0, with new features
In 2006, phpMyAdmin continues to be popular; the cumulative downloads since April 2001 have reached an impressive count of more than 10300 000 in June 2006 at the time of press.
Awards
phpMyAdmin has also won some awards, as can be seen in the Awards section of the project's home page. First, it was awarded "Project of the Month" for December 2002 by the administrators of SourceForge. In the interview-style document we prepared to put on the SourceForge POTM page, I wrote that I was impressed by the
download rate of our product, which was three per minute at that time. (Since then we have reached ten per minute on peak days.)
phpMyAdmin received 75% of the votes from the readers of both the German PHP Magazin and its international version, in the category "Best PHP Application/Tool"
for 2003. This award was officially presented at the International PHP Conference
held at Frankfurt in November 2003 to two members of the team. The German PHP Magazin hosted the readers choice again in 2005 and 2006; phpMyAdmin won for both years in the same category.
SourceForge.net hosted its Community Choice Awards for the first time in 2006 and
phpMyAdmin won in two categories: Databases and System Administration. I represented the team at LinuxWorld, Boston in April for the Awards presentation.
The project also won "Best PHP Application of the Year" at the fifth Annual OS/2
World Awards.
phpMyAdmin Features Summary
The goal of phpMyAdmin is to offer complete web-based management of MySQL servers and data, and to keep up with MySQL and web standards evolution. While the product is not perfect, it currently includes the most commonly requested features and lots of extra features as well.
The development team constantly develops the product based on the reported bugs and requested features, regularly releasing new versions.
phpMyAdmin offers features that cover basic MySQL database and table operations. It also has an internal relational system that maintains metadata to support advanced features. Finally, system administrators can manage users and privileges from phpMyAdmin. It is important to note that phpMyAdmin's choice of available
operations depends on the rights the user has on a specific MySQL server.
The basic features consist of:
Database creation, deletion, renaming, and attribute change Table creation, renaming, copying, and deletion
Table structure maintenance, including indexes
Special table operations (repair, optimization, changing type)
Data insertion, modification, deletion
Data display in horizontal/vertical mode, and Print view Data navigation and sorting
Data search (table or database) Querying by example (multi-table) Batch-loading of data (import)
Exporting structure and data in various formats, with compression Multi-user and multi-server installation with web-based setup The advanced features include:
Field-level comments
Foreign keys (with or without InnoDB) Browse foreign table
Bookmarks of queries Data dictionary
PDF relational schema and dictionary SQL queries history
Connection to MySQL using either the traditional mysql extension or the new mysqli extension (in PHP 5)
Character-set support for databases, tables, and fields (with MySQL 4.1)
Column contents transformation based on MIME type Theme management to customize the interface's look The server administration features consist of:
User and privileges management Database privileges check
Verify server's runtime information and obtain configuration hints
Full server export
Summary
In this chapter we saw how the web has evolved as a means to deliver applications and why we should use PHP/MySQL to develop these applications. We also took a look at how phpMyAdmin is recognized as a leading application to interface MySQL from the Web, the history of phpMyAdmin, and a brief list of its features.
Installing phpMyAdmin
It's time to install the product and to configure it minimally for first-time use.
Our reason for installing phpMyAdmin could be one of the following: Our host provider did not install a central copy.
Our provider installed it, but the version installed is not current. We are working directly on our enterprise's web server.
Some host providers offer an integrated web panel where we can manage accounts,
including MySQL accounts, and also a file manager that can be used to upload web
content. Depending on this, the mechanism we use to transfer phpMyAdmin to
our web space will vary. We will need some specific information before starting
the installation:
The web server's name or address. Here, we will assume it is www.mydomain.com.
Our web server's account information (username, password), which will be used either for FTP or SFTP transfer, SSH login, or web control panel login. The MySQL server's name or address. Often this is localhost, which means it is located on the same machine as the web server. We will assume this to be mysql.mydomain.com.
Our MySQL server's account information (username, password).
System Requirements
The up-to-date requirements for a specific phpMyAdmin version are always stated
in the accompanying Documentation.html. We have noted in Chapter 1 â in the What Is phpMyAdmin section â the minimum PHP and MySQL versions. It is strongly recommended that the PHP mcrypt extension be present for improved performance in cookie authentication mode â more on this in the present chapter.
On the browser side, cookie support must be activated, whatever authentication mode we use.
Downloading the Files
There are various files available in the Downloads section of
http://www.phpmyadmin.net. There might be more that one version offered here;
always download the latest stable version. We only need to download one file, which includes all the language files and works regardless of the platform (browser, web
server, MySQL, or PHP version). If we are using a server supporting only PHP3, the latest stable version of phpMyAdmin is not a good choice to download. I recommend using version 2.2.7-pl1, which is the latest version that supports PHP3. Thus we
will have to download a file with .php3 in its name. In this case, while following the
present instructions, we will have to transpose to .php3 each time we talk about
.php files.
The files offered have various extensions: .zip, .tar.bz2, .tar.gz. Download a
file having an extension for which you have the corresponding extractor. .zip is the
most universal file format in the Windows world, although it is bigger than .gz or .bz2 (common in the Linux/Unix world). In the following examples, we will assume
that the chosen file was phpMyAdmin-2.8.2.zip.
After clicking on the appropriate file, we will have to choose the nearest mirror. The file will start to download, and we can save it on our computer.
Installation
The next step depends on the platform you are using; the coming sections detail the procedure for some common platforms. You may proceed directly to the relevant section.
Installation on a Remote Server Using a
Windows Client
Using the File explorer, we double-click the phpMyAdmin-2.8.2.zip file we just downloaded on the Windows machine; a file extractor should start, showing us all
Use whatever mechanism your file extractor offers to save all the files, including
subdirectories, to some location on your workstation. Here, we have chosen c:\, so a c:\phpMyAdmin-2.8.2 directory has been created for extraction.
Now it's time to transfer the whole directory structure c:\phpMyAdmin-2.8.2 to the web server in our web space. We use our favorite FTP software or the web control panel for the transfer.
The exact directory under which we transfer phpMyAdmin may vary: It could be our public_html directory or another directory where we usually transfer web documents. For further instructions about the exact directory to be used or the best way to transfer the directory structure, we can consult our host provider's help desk.
After the transfer is complete, these files are no longer needed on our Windows
client; so we can remove them.
Installation on a Local Linux Server
Let's say we chose phpMyAdmin-2.8.2.tar.gz and downloaded it directly to some directory on the Linux server. We move it to our web server's document root directory (for example, /var/www/html) or to one of its subdirectories (for example, /var/www/html/utilities). Then we extract it with the following shell command
We ensure that the permissions and ownership of the directory and files are
appropriate for our web server; the web server user or group must be able to read them.
Installation on Local Windows Servers
(Apache, IIS)
The procedure here is similar to that described in the Installation on a Remote Server Using a Windows Client section, except that the target directory will be under our DocumentRoot (for Apache) or our wwwroot (for IIS). Of course, we do not need to
transfer anything after the modifications of config.inc.php, as the directory is already on the web space.
Apache is usually run as a service, so we have to ensure that the user under which the service is running has normal read privileges to access our newly created directory. The same principle applies to IIS, which uses the IUSR_machinename
user. This user must have read access to the directory. You can adjust permissions in the Security/permissions tab of the directory's properties.
First Connection Configuration
Here we learn how to prepare and use the configuration file which contains
the parameters to connect to MySQL and which can be customized as per our requirements. In this chapter, we will concentrate on the parameters that deal with connection and authentication. Other parameters will be discussed in the chapters where the corresponding features are explained.
Before configuring, we can rename the directory
phpMyAdmin-2.8.2 to something easier to remember, like phpMyAdmin, phpmyadmin, admin, or whatever. This way, we or our users will be able to visit an easily remembered URL to start phpMyAdmin. We can also use a symbolic link if our server supports this feature.
Configuration Principles
In versions before 2.8.0, a generic config.inc.php file was included in the
downloaded kit. Since 2.8.0, this file is no longer present in the directory structure. Note that phpMyAdmin looks for this file in the first level directory â the same one
Without a configuration file, phpMyAdmin uses its default settings as defined
in libraries/config.default.php and tries to connect to a MySQL server on localhost, the same machine where the web server is running, with user root and password NO. This is the default setup produced by most MySQL installation procedures, even though it is not really secure. However, if our freshly installed MySQL server still has the default root account, we will be able to login easily and see a warning given by phpMyAdmin about such lack of security.
We can verify this fact by opening our browser and visiting
http://www.mydomain.com/phpmyadmin â substituting the proper values for the domain part and the directory part. If we see phpMyAdmin's home page â as
described in Chapter 3 â it means the MySQL server is still configured by default. If it's not the case, we should see these messages in the default language defined in
our browser:
Error. MySQL said: Access denied for 'root'@'@localhost' (password: NO) Probably reason of this is, that you did not create configuration file.
At this point we have two choices:
Use the web-based setup script to generate a config.inc.php file
Manually create a config.inc.php file
These options are presented in the following sections. We should note that, even if we use the web-based setup script, we should familiarize ourselves with the config.inc.php file format, because the setup script does not cover all the possible
configuration options.
Web-Based Setup Script
The web-based setup mechanism is strongly recommended in order to avoid syntax
errors that could result from the manual creation of the configuration file. Indeed, since this file must respect PHP's syntax, it's common for new users to experience
problems in this phase of the installation.
A warning is in order here: even if phpMyAdmin contains translations for the user interface, the current version does not have a translation for the setup itself.
To access the setup script, we can click on the link available in the message we received previously, which points to http://www.mydomain.com/phpmyadmin/ scripts/setup.php. Here is what appears on the initial execution:
There are two warnings here. We will first deal with the second one â Not secure connection. This message appears if we are accessing the web server over HTTP, an
insecure protocol. Since we are possibly going to input confidential information like
the user name and password in the setup phase, it's recommended to communicate over HTTPS at least for this phase. HTTPS uses SSL(Secure Socket Layer) to encrypt the communication and make eavesdropping impossible on the line. If our web server supports HTTPS, we can simply follow the proposed link which will restart the setup process, this time over HTTPS. Our example supposes we do so.
The first warning tells us that phpMyAdmin did not find a writable directory with
the name config and this is normal since it was not present in the downloaded kit. Since the directory is not yet there, we observe that the Save and Load buttons in the interface are grey. In this config directory we can:
Save the working version of the configuration file during the setup process
Load a previously prepared config.inc.php file
It's not absolutely necessary that we create this configuration directory, since we
could download to our client machine the config.inc.php file produced by the setup procedure, then upload it to phpMyAdmin in the first-level directory via the
same mechanism (say FTP) that we used to upload phpMyAdmin itself. However, we'll nonetheless create this directory.
The principle here is that the web server must be able to write to this directory. There is more than one way to achieve this. Here is one that would work on a Linux server, assuming that the installation is done by user marc and that the web server is not running under the group users:
cd phpMyAdmin mkdir config
chown marc.users config chmod o+rwx config
Having done that, we refresh the page in our browser and we see:
A single copy of phpMyAdmin can be used to manage many MySQL servers.
We will now define parameters describing our first MySQL server. In the Servers
A complete explanation of these parameters can be found in the following sections of this chapter and in Chapter 11. For now, we notice that the setup process has detected that PHP supports the mysqli extension, so this is the one that is chosen by default. This extension is the programming library used by PHP to communicate with MySQL.
Let's enter the minimum parameters required for a first connection. We assume that
our MySQL server is located on localhost, so we keep this value and all the proposed values intact, except for the following:
User for config auth: we enter our user name, marc Password for config auth: we enter our password, bingo
We then click Add, and we get the New server added message. Now our setup process knows about one MySQL server, and there are sections of the interface that enable us to Edit or Delete these server settings:
We can have a look at the generated configuration lines by using the Configuration/ Display buttonâthen we can analyze these parameters using the explanations given
in The config.inc.php File section later in this chapter.
At this point, this configuration is still just in memory, so we need to save it.
This is done via the Configuration/Save button. It saves config.inc.php in the special config directory we created previously. This is a directory strictly used for
configuration purposes.
The last step is to move config.inc.php from the config directory to the top-level directory â the one that contains index.php. This can be done via FTP or by commands such as
cd config
mv config.inc.php ..
As a security measure, it's recommended to change the permission on the config directory â for example, with the chmod o-rwx config command. This is to block any non-authorized writing in this directory.
Other configuration parameters can be set with these web-based setup pages. To do
so, we would have to:
1. Enable read and write access to the config directory 2. Copy the config.inc.php there
3. Start the web-based setup tool
Manual Creation of config.inc.php
We can create this text file from scratch using our favorite text editor. The exact
procedure depends upon which client operating system we are using; we can refer to the Tips for Editing config.inc.php on a Windows Client section for further information.
The default value of all the possible configuration parameters that can be located
inside config.inc.php is defined in libraries/config.default.php. We can take
a look at this file to see the syntax used and further comments about configuration. See the important note about this file in the Upgrading phpMyAdmin section of this chapter.
Tips for Editing config.inc.php on a Windows
Client
This file contains special characters (Unix-style end of lines), so we must open it with a text editor that understands this format. If we use the wrong text editor, this file
will be displayed with very long lines.
The best choice is a standard PHP editor. Another choice would be WordPad,
MetaPad or UltraEdit, but we should be careful not to add any characters (even
blank lines) at the beginning or end of the file. This would disturb the execution of
phpMyAdmin and generate the Cannot send header output... error message. If this happens, refer to Chapter 19, Troubleshooting and Support.
Each time the config.inc.php file is modified, it will have to be transferred again to our web space. This transfer might have to be done explicitly with a specific transfer
program, or it might be done by a feature of an editor like HomeSite, Komodo, or PHPEdit, which can save directly via FTP.
The config.inc.php File
This file contains valid PHP code, defining the majority of the parameters (expressed
by PHP variables) that we can change to tune phpMyAdmin to our own needs. There are also normal PHP comments in it, and we can comment our changes.
Be careful not to add any blank line at the beginning
or end of the file; this would hamper the execution of
Starting with phpMyAdmin 2.6.0, there is another configuration file:
layout.inc.php. As this version offers theme management, this file contains
the theme-specific colors and settings. There is one layout.inc.php per theme, located in themes/themename, for example, themes/original. We will cover the
modification of some of those parameters in Chapter 4 under the First Steps section.
PmaAbsoluteUri
The first parameter to have a look at is $cfg['PmaAbsoluteUri'] = '';
In most cases we can leave this one empty, as phpMyAdmin tries to auto-detect the correct value. If we browse a table later and then edit a row and click Save, we will receive an error message from our browser â for example, This document does not exist. This means that the absolute URI that phpMyAdmin built in order to reach the intended page was wrong, indicating that we must manually put the correct value in this parameter.
For example, we would change it to:
$cfg['PmaAbsoluteUri'] = 'http://www.mydomain.com/phpMyAdmin_2.8.2/';
Server-Specific Sections
The next section of the file contains server-specific configurations, each starting with: $i++;
$cfg['Servers'][$i]['host'] = '';
If we examine only the normal server parameters (other parameters will be covered starting with Chapter 11), we see a section like the following for each server:
$i++;
$cfg['Servers'][$i]['hide_db'] = ''; $cfg['Servers'][$i]['verbose'] = '';
In this section, we have to enter in $cfg['Servers'][$i]['host'] the hostname or IP address of the MySQL server â for example, mysql.mydomain.com or localhost.
If this server is running on a non-standard port or socket, we fill in the correct values
in $cfg['Servers'][$i]['port'] or $cfg['Servers'][$i]['socket']. See the section on connect_type for more details about sockets.
The displayed server name inside phpMyAdmin's interface will be the one entered in 'host' (unless we enter a non-blank value in the following parameter). For example:
$cfg['Servers'][$i]['verbose'] = 'Test server';
This feature can thus be used to hide the real server hostname as seen by the users.
extension
The traditional mechanism by which PHP can communicate with a MySQL server, as available in PHP before version 5, is the mysql extension. This extension is still available in PHP 5, but a new one called mysqli has been developed and should be preferred for PHP 5, because of its improved performance and its support of the full functionality of MySQL family 4.1.x. This extension is designed to work with MySQL version 4.1.3 and higher.
In phpMyAdmin version 2.6.0, a new library has been implemented, making possible the use of both extensions â choosing either for a particular server. We indicate the extension we want to use in $cfg['Servers'][$i]['extension'].
PersistentConnections
Another important parameter (which is not server-specific but applies to all server definitions) is $cfg['PersistentConnections']. For all servers to which we connect using the mysql extension, this parameter, when set to TRUE, instructs PHP to keep the connection to the MySQL server open. This speeds up the interaction between PHP and MySQL. However, it is set to FALSE by default in config.inc. php, because persistent connections are often a cause of resource depletion on servers â MySQL refusing new connections. For this reason, the option is not even available for the mysqli extension, so setting it to TRUE here would have no effect if you are connecting with this extension.
connect_type, socket and port
$cfg['Servers'][$i]['host'] = 'localhost'; $cfg['Servers'][$i]['port'] = '';
$cfg['Servers'][$i]['socket'] = ''; $cfg['Servers'][$i]['connect_type'] = 'tcp'; $cfg['Servers'][$i]['extension'] = 'mysql';
The default value for connect_type is tcp. However, the extension will use a socket
because it concludes that this is more efficient as the host is localhost, so in this case, we can use tcp or socket as the connect_type. To force a real tcp connection, we can specify 127.0.0.1 instead of localhost in the host parameter. Because the socket parameter is empty, the extension will try the default socket. If this default
socket, as defined in php.ini, does not correspond to the real socket assigned to the MySQL server, we have to put the socket name (for example, /tmp/mysql.sock) in
$cfg['Servers'][$i]['socket'].
If the hostname is not localhost, a tcp connection will occur â here, on the special port 3307. However, leaving the port value empty would use the default 3306 port:
$cfg['Servers'][$i]['host'] = 'mysql.domain.com'; $cfg['Servers'][$i]['port'] = '3307';
$cfg['Servers'][$i]['socket'] = ''; $cfg['Servers'][$i]['connect_type'] = 'tcp'; $cfg['Servers'][$i]['extension'] = 'mysql';
compress Configuration
Starting with PHP 4.3.0 and MySQL 3.23.49, the protocol used to communicate between PHP and MySQL allows a compressed mode. Using this mode provides
better efficiency. To take advantage of this mode, simply specify: $cfg['Servers'][$i]['compress'] = TRUE;
Authentication Type: config
For our first test, we will use the config authentication type, which is easy to understand. However, in the Multi-User Installation section, we will see more powerful and versatile ways of authenticating.
Using the config authentication type leaves our phpMyAdmin open to intrusion, unless we protect it as explained in the Security section of this chapter.
Here we enter our username and password for this MySQL server:
$cfg['Servers'][$i]['user'] = 'marc'; $cfg['Servers'][$i]['password'] = 'bingo';
We can then save the changes we made in config.inc.php.
Testing the First Connection
Now it's time to start phpMyAdmin and try connecting for the first time. This will
test the following:
The values we entered in the config file or on the web-based setup
The setup of the PHP component inside the web server â if we did a manual
configuration
Communication between web and MySQL servers
Due to a problem in phpMyAdmin 2.8.0 to 2.8.2, for these versions we should close all windows of our browser at this point.
We start our browser and point it to the directory where we installed phpMyAdmin, as in http://www.mydomain.com/phpMyAdmin. If this does not work, we try
http://www.mydomain.com/phpMyAdmin/index.php. (This would mean that our
web server is not configured to interpret index.php as the default starting document.) If you still get an error, refer to Chapter 19, Troubleshooting and Support. We should now see phpMyAdmin's home page. Chapter 3 gives an overview of the panels seen now.
Multi-Server Configuration
The config.inc.php file contains at least one server-specific section but we can add
more, enabling a single copy of phpMyAdmin to manage many servers. Let us see
how to configure more servers.
⢠â¢
Servers Defined in the Configuration File
In the server-specific sections of the config.inc.php file, we see lines referring to $cfg['Servers'][$i] for each server. Here, the variable $i is used so that one
can easily cut and paste whole sections of the configuration file to configure more
servers. While copying such sections, we should take care that the $i++; instruction that precedes each section and is crucial to delimit the server sections is also copied. Then, at the end of the sections, the following line controls what happens at startup:
$cfg['ServerDefault'] = 1;
The default value, 1, means that phpMyAdmin will connect by itself to the first server defined or present this server choice by default when using advanced
authentication â more on this later in this chapter. We can specify any number, for
the corresponding server-specific section. We can also enter the value 0, signifying no default server, in which case phpMyAdmin will present a server choice:
Arbitrary Server
Another mechanism can be used if we want to be able to connect to an undefined
MySQL server. First, we have to set the following parameter:
$cfg['AllowArbitraryServer'] = TRUE;
Then, we need to use the cookie authentication type, explained in the next section. We will be able to choose the server and enter a username and a password.
As seen here, we still can choose one of the defined servers in Server Choice, but we can enter an arbitrary server name, a username, and a password:
Advanced Authentication
We might want to allow a single copy of phpMyAdmin to be used by a group of persons, each having their own MySQL username and password and seeing only the databases they have rights to. Or we might prefer to avoid having our username and password in clear text in config.inc.php.
Authentication Types Offered
Instead of relying on a username/password pair stored in config.inc.php,
phpMyAdmin will communicate with the browser and get authentication data from it. This enables true login for all users defined in a specific MySQL server, without having to define them in the configuration file. There are two modes offered that
allow a controlled login to MySQL via phpMyAdmin: http and cookie. We will
The Control User
To be able to use authentication types for every kind of MySQL user (in MySQL, user
privileges may be expressed in various ways), we should define a control user and password in the server-specific section of a server. If we do not define one, users who have been defined in MySQL with a syntax of 'user'@'hostname' or 'user'@'%' will be able to function normally with phpMyAdmin's features like creating a database, and others won't.
The control user is a special user (the usual name we choose for it is pma, a familiar
abbreviation for phpMyAdmin) who has the rights to read some fields in the special
mysql database (which contains all the user definitions). phpMyAdmin sends queries with this special control user only for the specific needs of authentication,
and not for normal operation. The commands to create the control user are available in phpMyAdmin's Documentation.html and may vary from version to version. This documentation contains the most current commands.
There is another reason to define a control user: to be able to use the advanced
relational features of phpMyAdmin.
When our control user is defined, we fill in the parameters as in the following
example:
$cfg['Servers'][$i]['controluser'] = 'pma'; $cfg['Servers'][$i]['controlpass'] = 'bingo';
I use the bingo password when I teach phpMyAdmin; it is recommended to avoid using the same password for your own installation.
HTTP Authentication
This mode, http, is the traditional mode offered in HTTP, in which the browser asks for the username and password, sends them to phpMyAdmin, and keeps sending them until all the browser's windows are closed.
To enable this mode, we simply use the following line:
This mode has some limitations:
PHP, depending on the version, might not support HTTP authentication. It works when PHP is running as a module under Apache; for other cases, we should consult the PHP documentation for our version.
If we want to protect phpMyAdmin's directory with a .htaccess file (see the
Security section in this chapter), this will interfere with HTTP authentication type; we cannot use both.
There is not a true logout; we will have to close all browser windows to be able to login again with the same username. Even considering those limitations, this mode may be a valuable choice for the following reasons:
Some browsers (like Mozilla) can store the authentication information in an encrypted form.
It is a bit faster than cookie processing.
Cookie Authentication
The cookie authentication mode is superior to http in terms of the functionalities offered. It offers true login and logout, and can be used with PHP running on any
kind of web server. It presents a login panel (see the following figure) from within
phpMyAdmin. This can be customized since we have the application source code. However, as you may have guessed, for cookie authentication, the browser must accept cookies coming from the web server â but this is true for all authentication modes starting with phpMyAdmin 2.8.0:
â¢
â¢
â¢
This mode stores the username typed in the login screen into a permanent cookie in our browser. The password is stored as a temporary cookie. In a multi-server
configuration, the username/password pair corresponding to each server is stored
separately. To protect the username/password secrecy against some attack methods
that target cookie content, they are encrypted using the Blowfish mechanism. So, to use this mode, we have to define (once) in config.inc.php a secret password that will be used to securely encrypt all passwords stored as cookies from this phpMyAdmin installation.
This is done by putting a secret password here:
$cfg['blowfish_secret'] = 'SantaLivesInCanada'; Then, for each server-specific section, use the following:
$cfg['Servers'][$i]['auth_type'] = 'cookie';
The next time we start phpMyAdmin, we will see the login panel.
By default, phpMyAdmin displays (in the login panel) the last username for which a successful login was achieved for this particular server, as retrieved from the permanent cookie. If this behavior is not acceptable (if we would prefer that someone else who logs in from the same workstation should not see the previous username), we can set the following parameter to FALSE:
$cfg['LoginCookieRecall'] = FALSE;
A security feature was added in phpMyAdmin 2.6.0: a time limit for the validity of the entered password. This feature helps to protect the working session. After a successful login, our password is stored in a cookie, along with a timer. Every action in phpMyAdmin resets the timer. If we stay inactive a certain number of seconds, as
defined in $cfg['LoginCookieValidity'], we are disconnected and have to