ISA Server Plugin
s
Setup Guide
Secure Web
(Webwasher)
i
Copyright
© 2008 Secure Computing Corporation. All rights reserved. No part of this publication may be reproduced, transmitted, transcribed, stored in a retrieval system, or translated into any language in any form or by any means without the written permission of Secure Computing Corporation.
Trademarks
© 2008 Secure Computing Corporation. All Rights Reserved. Secure Computing, SafeWord, Sidewinder, Sidewinder G2, Sidewinder G2 Firewall, SmartFilter, Type Enforcement, CipherTrust, IronMail, IronIM, SofToken, Enterprise Strong, Mobile Pass, G2 Firewall, PremierAccess,
SecureSupport, SecureOS, Bess, Cyberguard, SnapGear, Total Stream Protection, Secure Web (Webwasher), Strikeback and Web Inspector are trademarks of Secure Computing Corporation, registered in the U.S. Patent and Trademark Office and in other countries. G2 Enterprise Manager, Secure Web Reporter, SecurityReporter, Application Defenses, Central Management Control, RemoteAccess, SecureWire, TrustedSource, On-Box, Securing connections between people, applications and networks and Access Begins with Identity are trademarks of Secure Computing Corporation.
Technical Support information
Secure Computing works closely with our reseller partners to offer the best worldwide Technical Support services. Your Secure Computing reseller is the first line of support when you have questions about our products and services; however, if you require additional assistance, contact us directly.
• To contact Secure Computing Technical Support directly, telephone +1.800.700.8328 or +1.651.628.1500. • To inquire about obtaining a support contract, refer to our "Contact Secure" Web page for the latest information at
www.securecomputing.com.
• To use our web support site, point your browser to support.securecomputing.com. This site allows you to submit support issues and to monitor, edit, and set the severity of issues 24 hours a day.
• To use the Secure Knowledge Base, go to kb.securecomputing.com. Enter your company ID.
Customer Advocate information
To suggest enhancements in a product or service, or to request assistance in resolving a problem, please contact a Customer Advocate at +1.877.851.9080. If you prefer, send an e-mail to [email protected].
If you have comments or suggestions you would like to make regarding this document or any other Secure Computing document, please send an e-mail to [email protected].
Publishing history
Date Part number Software release
iii
About this guide . . . 1
About ISA Server and Webwasher ISA Server Plugins . . . 2
ISA Server . . . 2
Webwasher ISA Server Plugins . . . 2
Requirements . . . 3
System requirements . . . 3
License requirements . . . 3
Installing the plugins . . . 4
Before you begin . . . 4
Install plugins . . . 4
Configuring the plugins . . . 5
ICAP Plugin . . . 5
Configure Webwasher ICAP(S) Server . . . 9
Enable Webwasher to log REQMOD and RESPMOD . . . 9
Proxy Chaining Plugin . . . 11
Configuring ISA Server for proxy chaining . . . 14
About this guide
ISA Server Plugin Setup Guide ■1
About this guide
This guide explains how to install and configure the Webwasher ISA Server Plugins. This guide is intended for administrators and assumes you have a working knowledge of:
■ Secure Web (Webwasher) (hereafter referred to as “Webwasher”) ■ Microsoft ISA Server (hereafter referred to as “ISA Server”)
■ Microsoft Windows operating system on which the ISA Server and Webwasher ISA Server Plugins
are installed
■ ICAP and proxy chaining
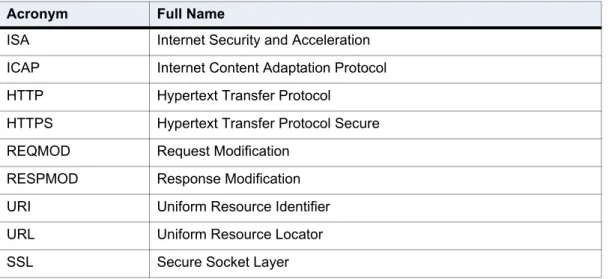
The following table lists the acronyms and the corresponding full names used through this guide.
Table 1: Table of Acronyms
Acronym Full Name
ISA Internet Security and Acceleration ICAP Internet Content Adaptation Protocol HTTP Hypertext Transfer Protocol
HTTPS Hypertext Transfer Protocol Secure
REQMOD Request Modification
RESPMOD Response Modification
URI Uniform Resource Identifier
URL Uniform Resource Locator
About ISA Server and Webwasher ISA Server Plugins
ISA Server
ISA Server provides an extensible enterprise firewall and a scalable Web cache server, acting as an Internet gateway for securing connections and optimizing network performance.
For more information about ISA Server, visit these Web sites:
■ www.isaserver.org
■ www.microsoft.com/technet/prodtechnol/isa/default.mspx
For information about authentication configuration methods for ISA Server, see
www.isaserver.org/tutorials/Configuring_authentication_methods_for_ISA.html
Webwasher ISA Server Plugins
The Webwasher ISA Server Plugins include:
■ Webwasher ISA Server ICAP Plugin (hereafter referred to as “ICAP Plugin”)
■ Webwasher ISA Server Proxy Chaining Plugin (hereafter referred to as “Proxy Chaining Plugin”)
ICAP Plugin
The ICAP Plugin is an ICAP client that enables an ISA Server to use a compatible ICAP server to filter Web content. When used with Webwasher, all Webwasher HTTP filters are supported except for the SSL Scanner.
ICAP is a standard Internet content filtering protocol that provides simple object-based content vectoring for HTTP services. The protocol allows ICAP clients to pass HTTP messages to ICAP servers for scanning, transformation, or other processing.
An ICAP server executes its transformation service on messages and sends back responses to the ICAP client, usually with modified messages. Typically, the adapted messages are either HTTP request modifications (REQMOD) or HTTP response modifications (RESPMOD). For more information on REQMOD and RESPMOD, see “About REQMOD” on page 10.
Proxy Chaining Plugin
The Proxy Chaining Plugin allows you to use Webwasher as an upstream proxy server in a proxy chaining environment. During proxy authentication, the ISA Server obtains user and group information, then forwards that information to Webwasher using the Proxy Chaining Plugin. For configuration information, see “Proxy Chaining Plugin” on page 11.
The proxy chaining method allows you to forward Web proxy connections from one proxy to another, each proxy acting as a link in the chain. For example, you can forward Web proxy connections from one ISA Server to another in order to reduce bandwidth use. The chain consists of upstream and downstream proxies—proxies closer to the Internet connection are upstream, and proxies farther away from the Internet connection are downstream. Downstream proxies forward requests to upstream proxies.
Tip: Secure Computing recommends running Webwasher and the ISA Server on separate machines.
Caution: When using the Proxy Chaining Plugin with caching enabled on the ISA Server, all requests may not be forwarded from ISA to Webwasher for additional filtering. Because of this, if you enable user-based policies on Webwasher, then we recommend disabling caching on the ISA Server.
Requirements
ISA Server Plugin Setup Guide ■3
Requirements
System requirements
The system requirements are listed below:
■ Microsoft ISA Server 2004 Service Pack 1 for:
•
Windows 2000 Server with Service Pack 4•
Windows Server 2003 with Service Pack 1■ Microsoft ISA Server 2006 for:
•
Windows 2000 Server with Service Pack 4•
Windows Server 2003 with Service Pack 1■ A currently supported version of Webwasher
Please see the Webwasher Installation Guide for more information about installing Webwasher.
License requirements
Use your existing Webwasher license to enable the Webwasher ISA Server Plugins.
If you have questions regarding your Webwasher license, please contact Secure Computing Customer Service:
■ Online – support.securecomputing.com ■ Telephone (Europe) – +49.5251.8717.660 ■ Telephone (Americas) – +1.800.700.8328 ■ International – +1.651.628.1500
Note: The ICAP Plugin has been successfully tested on stand-alone and array-configured ISA servers.
Installing the plugins
Use the following information to download and install the Webwasher ISA Server Plugins.
Before you begin
Before you install the plugins, complete the following steps:
1. Log into the operating system as an administrator.
2. Download the Webwasher ISA Server Plugins software from the Webwasher extranet,
https://extranet.webwasher.com.
3. Open Control Panel > Administrative Tools > Services.
4. Select Microsoft Firewall and click Stop the service You can now install the plugins.
Install plugins
Use the following steps to install the plugins:
1. Run the installation program. The Welcome window appears.
2. Click Next. The License Agreement window appears.
3. Select I accept the terms of the license agreement and click Next. The Information window appears.
4. Review the information, click Next. The installer looks for an existing version of the plugin software: • If an older version is found, the Upgrade window appears.
• If the same version is found, the Reinstall window appears. • If no previous installation is found, the Install window appears.
5. Click Next. The Summary window appears.
6. Click Install. The Installation Complete window appears.
7. Click Finish to exit the installation wizard. The plugins are installed and are disabled.
8. Restart the Microsoft Firewall service.
The Webwasher ISA Server Plugins installer automatically installs both the ICAP Plugin and the Proxy Chaining Plugin. By default, both plugins are disabled. Use the sections on the following pages to enable and configure the plugins:
■ For the ICAP Plugin, see “ICAP Plugin” on page 5.
■ For the Proxy Chaining Plugin, see “Proxy Chaining Plugin” on page 11.
Important: If you have an array environment, install the Webwasher ISA Server Plugins on each member of the array.
Configuring the plugins
ISA Server Plugin Setup Guide ■5
Configuring the plugins
ICAP Plugin
Use the instructions on the following pages to enable and configure the ICAP Plugin.
Enable the ICAP Plugin
Follow these steps to enable the ICAP Plugin:
1. Open the ISA Server Management console, go to <server name> > Configuration > Add-ins and click on the Web Filters tab.
2. Enable the ICAP Plugin:
a. Right-click the Webwasher ISA Server ICAP Plugin and select Enable.
b. Click Apply. The Saving Configuration Changes window appears with a progress bar. Click OK when the changes are complete. The ICAP Plugin is enabled.
General options
Follow these steps to configure the General options:
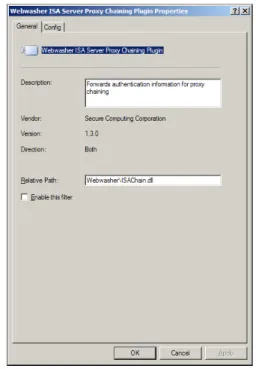
1. Right-click the Webwasher ISA Server ICAP Plugin and select Properties. The Webwasher ISA Server ICAP Plugin Properties window appears with the General tab open.
Figure 1: General options
2. In the Relative Path field, verify the path is Webwasher\ISAIcapClient.dll. The path is set during installation and is relative to the ISA Server root path.
Important: The Relative Path must be relative to the ISA Server root path in order for the ICAP Plugin to function.
Config options
Follow these steps to configure the Config options:
1. Select the Config tab.
Figure 2: Config options
2. Configure the ICAP Server URI options:
a. REQMOD:
– Select the REQMOD check box to filter outgoing HTTP(S) requests and replace the default value (seeFigure 2) with yourWebwasher ICAP Server URI.
– Select the Bypass on failure check box to continue allowing user HTTP(S) requests when the Webwasher ICAP Server is unable to respond.
b. RESPMOD:
– Select the RESPMOD check box to filter incoming HTTP(S) responses and replace the default value (see Figure 2) with your WebwasherICAP Server URI.
– Select the Bypass on failure check box to continue allowing user HTTP(S) responses when the Webwasher ICAP Server is unable to respond.
For more information about REQMOD and RESPMOD, see “About REQMOD” on page 10.
Important: For array environments: The ICAP Server URI entered on one member is not shared across all members of an array. You must configure the ICAP Plugin and enter the appropriate Webwasher ICAP Server URI on each member of the array.
All other configuration options are shared across array members. Default REQMOD value Default RESPMOD value
Configuring the plugins
ISA Server Plugin Setup Guide ■7
3. Verify that you have a valid license; see “License requirements” on page 3. To import a license:
a. Click Import and browse to the location of the text file containing your Webwasher license.
b. Select the text file and click Open. Your Webwasher license is imported.
4. [Optional] Select the Modify ‘cs-uri’ field check box to write category information to the ISA Server access log file. If you enable this option, the category information is appended to the ISA Server access log files cs-uri field. Category information is obtained through Webwasher from the TrustedSource Web Database.
Example modified cs-uri ISA Server log field:
x-attr:"bu" x-filter-result:0 http://www.sampleurl.com
where:
x-attr:”bu” = category information
“bu” = the category (which is Business)
x-filter-result:0 = the action taken
0 = there was no action taken (such as block, warn, or allow)
5. Configure authentication options:
•
Select the Do not attempt to get groups from Domain Controller check box to prevent retrieving the following:– A list of global (domain) groups from the domain controller. – A list of local groups from the domain controller.
•
Clear the Do not attempt to get groups from Domain Controller check box to retrieve domain groups, then complete the following:a. From the Select what groups to get from Domain Controller list, select Global, Local, or Both.
b. In the Default Domain field, enter the appropriate domain to attach to user names sent without a domain.
6. Select the Send X-Request-URL on ICAP Requests check box to send the requested URL as part of the REQMOD or RESPMOD request to the ICAP server. This is required if using Webwasher policy mapping based on destination and path of the request.
7. Select Trace connections under Debugging to trace and log connection debugging information. The output directory is c:\Documents and Settings\<username or NetworkService>\Local Settings\Temp\WWTraces.
Note: You also need to configure Webwasher to send categories to the ICAP client; see “Configure Webwasher ICAP(S) Server” on page 9.
Note: For more information about categories, including category codes, refer to the
TrustedSource Web Database Reference Guide. You can download the reference guide from www.securecomputing.com/goto/resourcecenter.
Statistics
Follow these steps to view statistics and configure options:
1. Select the Statistics tab.
Figure 3: Statistics
2. Click in the Update Interval field to change the value; click Reset to clear the statistics information. The default Update Interval is 5 seconds.
As background information, the Statistics tab displays a variety of statistics for both REQMOD and RESPMOD requests that have been issued to the Webwasher ICAP Server. The following table provides a description for each statistic.
3. Click OK to complete the configuration.
After the ICAP Plugin is functional, you need to enable the Webwasher ICAP(S) Server and configure the ICAP(S) Sever to send category information; see “Configure Webwasher ICAP(S) Server” on page 9. Additionally, you can have Webwasher log REQMOD and RESPMOD requests; see “Enable Webwasher to log REQMOD and RESPMOD” on page 9.
Table 2: Statistics description
Statistic Name Description
Requests Number of REQMOD or RESPMOD requests made ICAP 200/204/400 Number of ICAP status code requests made Last OPTIONS request Most recent OPTIONS request made
Connect Failures Number of times a connection could not be made to the ICAP server due to the server being down
Connect Delays Number of times a connection was delayed because of too many concurrent connections
Connections Broken Number of times a connection was broken during ICAP communication due to unavailable data
Configuring the plugins
ISA Server Plugin Setup Guide ■9
Configure Webwasher ICAP(S) Server
After the ICAP Plugin is enabled and configured, enable the Webwasher ICAP(S) Server (which will allow Webwasher to accept incoming ICAP connections from the ICAP Plugin) and configure the ICAP(S) Server to return category information and header values.
Enable the Webwasher ICAP(S) Server
Follow these steps to enable the Webwasher ICAP(S) Server:
1. Login in to the Webwasher interface.
2. Go to Proxies > ICAP(S) Server. The ICAP(S) options open.
3. On the ICAP(S) Server tab, select the EnableICAP Server check box (if it is not already selected).
4. Click Apply Changes. The ICAP(S) Server is enabled.
Configure the Webwasher ICAP(S) Sever
Follow these steps to configure the Webwasher ICAP(S) Server to send category information and send range of values of the ‘X-Attribute’ header:
1. Go to Proxies > ICAP(S) Server > Server Settings tab.
2. Select one of the following:
• Send all categories to the ICAP client
• Send only the blocked categories to the ICAP client.
3. Select the Send range of values of the ‘X-Attribute’ header in OPTIONS response check box.
4. Click Apply Changes. The Webwasher ICAP(S) Server will send category information and ‘X-Attribute’ header range of values.
Enable Webwasher to log REQMOD and RESPMOD
You have the option to enable logging for REQMOD and RESPMOD requests on Webwasher. For more information about REQMOD and RESPMOD, see “About REQMOD” on page 10.
To enable REQMOD and RESPMOD logging on Webwasher:
1. Log in to the Webwasher interface.
2. Go to Reporting > Log File Management > Activate Log Files tab.
3. Select the HTTP Access Denied Log check box for: • Web Requests REQMOD
• Web Downloads RESPMOD.
About REQMOD
REQMOD describes aclient's request that is redirected to an ICAP server (Webwasher) that modifies the request before it can be fulfilled by the original server (Internet).
The ICAP server either sends a modified version of the request back to the ICAP client; a valid HTTP response, like an error message stating that access to a particular URL is not allowed; or a 204 response (if the client indicates that it supports 204 responses) indicating that no modification is required.
REQMOD is required in order to use the following Webwasher features:
■ All URL filters (URL Filter Database, Extended List, Shell Expression) ■ Some of the privacy filters (Referer Filter, Cookie Filter)
About RESPMOD
RESPMOD describes a client's request that is processed by the original server (Internet); in this case, the HTTP response (if available) and the original client request that triggered that response are redirected to the ICAP server (Webwasher) for modification prior to delivery to the client.
Similar to REQMOD, the response from the ICAP server can be an adapted HTTP response, an error, or a 204 response code indicating that no adaptation is required.
The adapted message or error indication returned by the ICAP server should be forwarded to the client or otherwise passed to the next downstream entity (another proxy server).
RESPMOD is required in order to use the following Webwasher features:
■ Anti Malware
■ Content Security filters
Configuring the plugins
ISA Server Plugin Setup Guide ■11
Proxy Chaining Plugin
Use the instructions on the following pages to enable and configure the Proxy Chaining Plugin.
Enable the Proxy Chaining Plugin
1. Open the ISA Server Management console, go to <server name> > Configuration > Add-ins, and select the Web Filters tab.
2. To enable the Proxy Chaining Plugin:
a. Right-click the Webwasher ISA Server Proxy Chaining Plugin and select Enable.
b. Click Apply. The Saving Configuration Changes window appears with a progress bar. Click OK when the changes are complete. The Proxy Chaining Plugin is enabled.
General options
Follow these steps to configure the General options:
1. Select the General tab.
2. Right-click the Webwasher ISA Server Proxy Chaining Plugin and select Properties. The Webwasher ISA Server Proxy Chaining Plugin Properties window appears with the General tab open.
Figure 4: General options
3. In the Relative Path field, verify the path is Webwasher\ISAChain.dll. The path is set during installation and is relative to the ISA Server root path.
Important: The Relative Path must be relative to the ISA Server root path in order for the Proxy Chaining Plugin to function.
Config options
Follow these steps to configure the Config options:
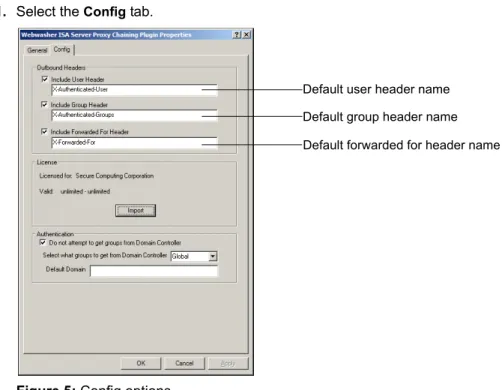
1. Select the Config tab.
Figure 5: Config options
2. Select or clear the options for outbound headers and verify or enter the header name. By default, all options are selected and default header names are entered (see Figure 5).
•
Include User Header – forwards the user name of the user making the request•
Include Group Header – forwards the groups the user belongs to•
Include Forwarded For Header – forwards the IP address of the machine making the request3. Verify that you have a valid license, see “License requirements” on page 3. To import a license:
a. Click Import and browse to the location of the text file containing your Webwasher license.
b. Select the text file and click Open. Your Webwasher license is imported.
4. Configure authentication options:
•
Select the Do not attempt to get groups from Domain Controller check box to prevent retrievingthe following:
– A list of global (domain) groups from the domain controller – A list of local groups from the domain controller
•
Clear the Do not attempt to get groups from Domain Controller check box to retrieve domain groups, then complete the following:a. From the Select what groups to get from Domain Controller list, select Global, Local, or Both.
b. In the Default Domain field, enter the appropriate domain you want attached to user names sent without a domain.
5. Click OK to complete setup.
Caution: The header names must match the Web Mappings header names configured on your Webwasher.
Default user header name Default group header name Default forwarded for header name
Configuring the plugins
ISA Server Plugin Setup Guide ■13
Once the Proxy Chaining Plugin is functional, you must configure the ISA Server to allow proxy chaining; see “Configuring ISA Server for proxy chaining” on page 14.
Configuring ISA Server for proxy chaining
Configure proxy chaining on the ISA Server by adding a Web Chaining rule. Create and configure a new Web Chaining rule by logging in to the ISA Server Management console and following the steps below:
1. Go to Arrays > <array name> > Configuration > Networks andselect the Web Chaining tab
2. Select the Tasks tab in the window on the right.
3. Select Create New Web Chaining Rule. The New Web Chaining Rule Wizard appears.
4. Enter a name in the Web chaining rule name field and click Next.
5. Click Add, select the appropriate network entities for the rule, then click Add >Close.
6. Click Next.
7. For the request action, select Redirect requests to a specified upstream server and click Next.
8. Configure the primary route:
•
Server – Enter the Webwasher IP address.•
Port – Enter the HTTP port used by the Webwasher proxy; the default is 9090.•
SSL Port – Enter the HTTPS port used by the Webwasher proxy; the default is 443.9. Click Next, select the desired backup action, and click Next again.
10.Click Finish. The new Web Chaining rule is created. The Proxy Chaining Plugin setup is complete.
ww
w.secur
ecomputing.c
om
Corporate Headquarters 55 Almaden Blvd., Suite 500 San Jose, CA 95113 USA Tel +1.800.379.4944 Tel +1.408.494.2020 European Headquarters Berkshire, UK
Tel +44.0.1344.312.600
Asia/Pacific Headquarters Wan Chai, Hong Kong Tel +852.2598.9280 Japan Headquarters Tokyo, Japan Tel +81.3.5339.6310
Worldwide, 24/7 Support Tel +1.800.700.8328 Tel +1+651.628.1500
© 2008 Secure Computing Corporation. All Rights Reserved. Secure Computing, SafeWord, Sidewinder, Sidewinder G2, Sidewinder G2 Firewall, SmartFilter, Type Enforcement, CipherTrust, IronMail, IronIM, SofToken, Enterprise Strong, Mobile Pass, G2 Firewall, PremierAccess, SecureSupport, SecureOS, Bess, Cyberguard, SnapGear, Total Stream Protection, Webwasher, Strikeback and Web Inspector are trademarks of Secure Computing Corporation, registered in the U.S. Patent and Trademark Office and in other countries. Secure Computing CommandCenter, G2 Enterprise Manager, SmartReporter, SecurityReporter, Application Defenses, Central Management Control, RemoteAccess, SecureWire, TrustedSource, On-Box, Securing connections between people, applications and networks and Access Begins with Identity are trademarks of Secure Computing Corporation. No part of this publication may be reproduced, transmitted, transcribed, stored in a retrieval system, or translated into any language in any form by any means without the written permission of Secure Computing Corporation.