Server Edition
Installation and
consent in writing from:
Cloudmark, Inc. 128 King Street, 2nd Floor, San Francisco, CA 94107
All examples with names, company names or companies that appear in this guide are fictitious and do not refer to, or portray, in name or substance, any actual names, organizations, entities or institutions. Any resemblance to any real person, organization, entity or institution is purely coincidental.
While every effort has been made to ensure technical accuracy, information in this document is subject to change without notice and does not represent a commitment on the part of Cloudmark, Inc. Cloudmark makes no warranties with respect to this documentation and disclaims any implied warranties of merchantability and fitness for a particular purpose. Cloudmark shall not be liable for any errors or for incidental or consequential damages in connection with the furnishing, performance or use of this manual or examples herein.
Cloudmark Server Edition version 2.0 Last modified: March 5, 2006
iii
C
ONTENTSCHAPTER 1
Introduction
. . . 1
What is spam?. . . . 2
What is the Cloudmark Collaborative Security Network? . . . . 3
How Cloudmark Server Edition Works . . . . 4
Where to Find More Information. . . . 5
CHAPTER 2
Installing Cloudmark Server Edition
. . . 7
System Requirements . . . . 7
System Requirements for CSE Server . . . . 7
System Requirements for the Administration Console . . . . 8
Client-side system requirements . . . . 8
Before You Install . . . . 9
Setting up a Windows User Account for CSE . . . . 9
Creating a new user for CSE . . . . 9
Adding the CSE user to the appropriate groups . . . 12
Granting Exchange Server Admin Rights to the CSE User Account . . . 14
Installing Cloudmark Server Edition. . . .16
Installing the Administration Console Separately . . . .21
Uninstalling CSE . . . .21
CHAPTER 3
Using the Administration Console
. . . . 23
Starting and stopping the CSE service . . . 25
Connecting to and disconnecting from CSE servers . . . 27
Configuring Global Options . . . 28
Configuring the connection to Exchange . . . . 28
Enabling spam checking . . . . 30
Enabling spam checking for new users and public folders . . . . 30
Enabling spam checking for local messages. . . . 31
Enabling troubleshooting event logs. . . . 31
Configuring spam-filtering actions . . . . 32
Configuring spam folder names . . . . 32
Specifying spam-filtering actions for users . . . . 33
Specifying spam-filtering actions for public folders . . . . 34
Configuring Connections . . . . 35
Managing Whitelists. . . . 36
Viewing and exporting spam statistics . . . . 39
Selectively Enabling and Disabling Spam-Checking . . . 40
Selectively enabling and disabling spam checking for users . . . . 40
Selectively enabling and disabling spam checking for public folders . . . 41
Assigning ownership of a public folder to the CSE user . . . . . 42
Enabling spam checking for a public folder. . . . 43
Disabling spam checking for a public folder . . . . 44
Accessing My Cloudmark . . . 44
Managing Subscriptions . . . 44
Purchasing A Subscription after The Trial Period . . . . 45
Adding Subscriptions . . . . 45
Renewing Subscriptions . . . . 45
CHAPTER 4
Configuring CSE for Mobile Spam Filtering
. . . 47
Configuring Microsoft Exchange ActiveSync for CSE . . . 47
Configuring Blackberry Enterprise Server (BES) for CSE . . . 49
Configuring BES 3.6 and below. . . . 49
Configuring BES 4.0 and above. . . . 49
v
APPENDIX A
Troubleshooting
. . . . 51
Errors Starting CSE . . . .51
Errors Stopping CSE. . . .52
Errors Opening the Administration Console . . . .52
CSE Runtime Errors . . . .52
APPENDIX B
Logs
. . . . 53
Event log messages . . . .53
Error log messages . . . .54
APPENDIX C
Trial Evaluation
. . . . 55
1
C
HAPTER1
Cloudmark Server Edition (CSE) is a server-side spam-filtering application that stops spam by connecting your Microsoft Exchange Server to the Cloudmark Collaborative Security Network. It includes the CSE
Administration Console—a Microsoft Management Console (MMC) snap-in—that can be installed on the CSE server and one or more administrative desktop computers. CSE does not require client-side software or
configuration of end-users’ computers.
This Installation and Administration Guide shows you how to add spam-filtering functionality to your email infrastructure, in the following chapters:
• Chapter 2, "Installing Cloudmark Server Edition", provides
instructions for preparing a Windows server for installation of CSE, which are followed by instructions for installing the CSE software.
• Chapter 3, "Using the Administration Console", shows how to use the CSE Administration Console to access CSE functions, such as
configuring spam handling policies, enabling spam-filtering for end-users, and more.
• Chapter 4, "Configuring CSE for Mobile Spam Filtering", explains how to configure your server for effective spam filtering for your users’ mobile devices.
• Appendix A, "Troubleshooting", contains CSE troubleshooting information, specifically for running the CSE service and using the Administration Console.
• Appendix B, "Logs", describes all events that are logged to the Windows Event Log.
• Appendix C, "Trial Evaluation", describes CSE’s trial evaluation period and provides instructions for purchasing subscriptions to CSE after it expires.
In order to use this guide, you should possess a working knowledge of Windows 2000 or 2003 and Microsoft Exchange Server.
Additionally, the User’s Quick Reference Guide is included with the software. You can distribute this guide to your end users to educate them about how CSE blocks spam and how to get the most from its features. The remainder of this chapter provides a conceptual overview of Cloudmark Server Edition.
What is spam?
Spam is unsolicited bulk email, usually for a commercial purpose. A spam message may have some or all of these characteristics:
• the sender is someone you do not know
Spammers make up fake names and email addresses to avoid getting caught. This is called “spoofing”.
• the message contains an advertisement
Usually, the advertisement comes from a merchant from whom you have never purchased products or services.
• the message or its Subject contains gibberish
The following is an example of gibberish that appeared in a spam message:
Subject: Re: Zdenko Cushing Check this Offr Hi Do AVE UP % on ons? CIAXanAmbLevVALVIA
LIS Now $axienitraIUM Now $GRA Now $
• the message asks you to click on a Web address
Spam usually points to a commercial Web site where the advertised products or services are sold.
• the message was sent to an email address that does not appear to be yours
Spammers sometimes send messages to an “alias”, that is, an email address that actually points to a list of many email addresses. Not all messages with these characteristics are spam. For example, a message that you receive from one of your favorite merchants may contain
What is the Cloudmark Collaborative Security Network? 3 advertising and a Web address, sent from an email account that you may not immediately recognize. Because there is no rigid definition for spam, email users decide what is spam and what is not.
What is the Cloudmark Collaborative Security
Network?
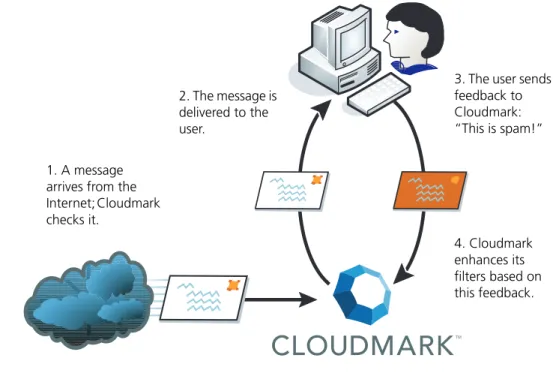
The Cloudmark Collaborative Security Network consists of many email users, all sending feedback to Cloudmark about which messages are spam and which ones are legitimate. This information will helps everyone in the network.
When a user drags a message out of the Inbox and into the Spam folder, Cloudmark compares this feedback with feedback from other users. If other users in the network also consider the message to be spam or fraud, then similar messages are automatically blocked in the future, for all users in the network.
Likewise, if a user drags a message out of the Spam folder, Cloudmark compares this feedback with that of other users. If they agree, the message is unblocked throughout the Cloudmark network.
Figure 1 Cloudmark Collaborative Security Network
`
1. A message arrives from the Internet; Cloudmark checks it.
3. The user sends feedback to Cloudmark: “This is spam!” 4. Cloudmark enhances its filters based on this feedback. 2. The message is delivered to the user.
Because so many users are providing feedback, spam messages generally do not appear in your end users’ Inbox folders. Instead, CSE diverts them to the Spam Folder. CSE automatically creates a Spam Folder in each user’s mailbox.
The User’s Quick Reference Guide includes instructions for users who want to participate in the Cloudmark Collaborative Security Network. Distribute this guide to your users to educate them about spam and how to use the Spam Folder.
How Cloudmark Server Edition Works
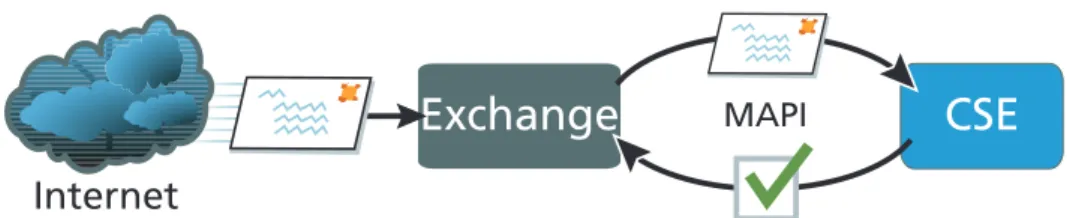
CSE communicates with the Microsoft Exchange Server through the Microsoft Messaging Application Programming Interface (MAPI) to receive notifications when messages arrive and to perform various pre-concerted actions on messages that are determined to be spam.
Figure 2, below, shows how CSE works with Exchange Server and the Cloudmark Collaborative Security Network to filter spam.
Figure 2 How Cloudmark Server Edition filters email
1. Email arrives at the Exchange Server.
2. CSE computes a unique fingerprint—which does not contain message content and cannot be decoded—for each message.
3. CSE sends the fingerprints to the Cloudmark Collaborative Security Network for evaluation.
4. The Cloudmark Collaborative Security Network sends a response to the CSE server indicating whether the message is spam or legitimate. 5. Depending on how you’ve configured CSE, it either tags the message as
spam, moves it to a designated Spam Folder, or deletes it.
Cloudmark Server Edition does not block the regular flow of messages, so its operation has no impact on throughput.
Exchange
CSE
Internet
Where to Find More Information 5
Where to Find More Information
There are several online resources available to support users of Cloudmark Server Edition:
• CSE support site
http://www.cloudmark.com/server/support
The support site provides the latest FAQs and technical documentation for CSE.
• Cloudmark store
https://store.cloudmark.com
The online store lets you purchase additional subscriptions and renew existing ones.
• My Cloudmark
https://my.cloudmark.com
My Cloudmark allows you to view your subscriptions, change your contact information and more. My Cloudmark is also accessible on the Administration Console, as described in “Accessing My Cloudmark” on page 44.
7
C
HAPTER2
Edition
This chapter provides hardware and software requirements and
installation instructions for Cloudmark Server Edition and the Cloudmark Server Edition Administration Console.
System Requirements
• “System Requirements for CSE Server” below
• “System Requirements for the Administration Console” on page 8
• “Client-side system requirements” on page 8
System Requirements for CSE Server
The following table lists minimum and recommended software and hardware requirements for Cloudmark Server Edition software. Table 1 CSE system requirements
Component Minimum Requirements
Processor Intel Pentium or compatible, 733 megahertz (MHz) or higher Memory 256 megabytes (MB) RAM; 512 MB recommended
Operating system Microsoft Windows 2000 Server or Microsoft Windows Server 2003, with the latest service packs installed
Mail server Microsoft Exchange 2000 Server or Microsoft Exchange Server 2003, with the latest service packs
Hard disk 20 MB for CSE software; 200 MB on the primary hard drive
Activation code Issued by either Cloudmark or your vendor when you acquired the CSE software
You can install Cloudmark Server Edition on the same computer as the Microsoft Exchange Server or on a separate computer. If you plan to install Cloudmark Server Edition on a computer other than the Microsoft Exchange Server (recommended for large deployments), you must install Extended MAPI. You can obtain Extended MAPI by installing Outlook 2000 or higher with the latest service packs, and setting up an email account with it.
!
CSE will install—but not run—on a mapped network drive.System Requirements for the Administration Console
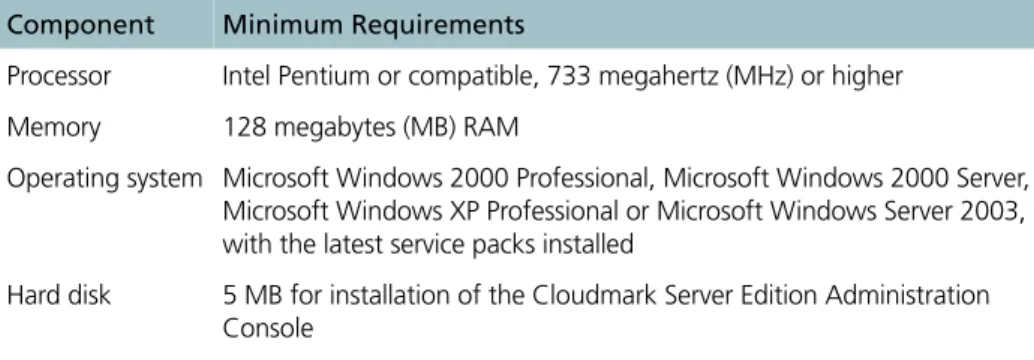
The following table lists minimum and recommended software and hardware requirements for computers running the Cloudmark Server Edition Administration Console.
To launch the Administration Console, you must be logged on as a user that is a member of Domain Admins group.
Client-side system requirements
CSE supports Outlook 2000 or higher. Outlook Express is not supported. Table 2-1 Administration Console system requirements
Component Minimum Requirements
Processor Intel Pentium or compatible, 733 megahertz (MHz) or higher Memory 128 megabytes (MB) RAM
Operating system Microsoft Windows 2000 Professional, Microsoft Windows 2000 Server, Microsoft Windows XP Professional or Microsoft Windows Server 2003, with the latest service packs installed
Hard disk 5 MB for installation of the Cloudmark Server Edition Administration Console
Before You Install 9
Before You Install
You must perform these tasks before installing CSE or the Administration Console:
• “Setting up a Windows User Account for CSE” below
• “Granting Exchange Server Admin Rights to the CSE User Account” on page 14
Setting up a Windows User Account for CSE
There are two steps for setting up the Windows user account for CSE:
• “Creating a new user for CSE” below
• “Adding the CSE user to the appropriate groups” on page 12
Creating a new user for CSE
TOCREATEANEW USERFOR CSE
1 From the Start menu, select Programs > Administrative Tools > Active Directory Users and Computers.
2 From the Action menu, select New > User. The New Object - User window appears:
3 Enter information for the new CSE user:
• first name
• last name
• full name, if different from first name plus last name
• logon name
It is suggested that you choose names that indicate that this is the CSE user.
Before You Install 11
4 Click Next.
The password screen appears:
5 Enter the new user’s password, twice.
6 Select “Password never expires”.
This prevents the server from suddenly failing to start due to an expired password.
!
Do not select “User must change password at next logon” or “Account is disabled”. These options are not compatible with CSE.8 Verify that the correct server and mailbox store are selected.
9 Click Next.
The next screen displays the information you entered.
10If the information you entered is correct, click Finish.
!
Exchange 2003 users only: Never enable the Hide from Exchange address list option (located in the Exchanged Advance tab of the User Properties window) for the CSE user account. This option prevents CSE from functioning.Adding the CSE user to the appropriate groups
This procedure varies, depending on whether CSE is running on a domain controller. Follow one of these procedures:
• “To add the CSE user” below
• “To add the CSE user on a domain controller” on page 13
TOADDTHE CSE USER
1 From the Start menu, select Settings > Control Panel.
Before You Install 13
3 Open the Computer Management tool.
4 In the left-hand pane, expand the Local Users and Computers tool.
5 Select Groups.
6 Double-click the Power Users group.
The Power Users Properties window appears.
7 Click the Add... button.
The Select Users, Groups, or Computers window appears.
8 Enter the name of the new CSE user.
Optionally, click Check Names to verify that you have entered the username correctly.
9 Click OK.
The CSE user now appears in the Power Users list.
10Click OK.
11Close the Computer Management tool and the control panel.
TOADDTHE CSE USERON ADOMAINCONTROLLER
1 From the Start menu, select Programs > Administrative Tools > Active Directory Users and Computers.
The Active Directory Users and Computers window appears.
2 In the Users list, double-click the CSE user. The Properties window appears.
3 Click the Member Of tab:
4 Click Add.
The Select Groups window appears.
5 Select the Enterprise Admins group.
6 Click Add.
7 Select the Domain Admin group.
8 Click Add.
9 Click OK in the Select Groups window.
10Click OK in the Properties window.
Granting Exchange Server Admin Rights to the CSE User
Account
The CSE user account must have administrative rights to the Exchange Server.
Before You Install 15
TOGRANT EXCHANGE SERVERADMINISTRATIVERIGHTSTOTHE CSE USER ACCOUNT
1 From the Start menu, select Programs > Microsoft Exchange > System Manager.
2 Right-click the name of the Exchange server to display the pop-up menu.
The default name of the server is First Organization, but your server name may vary.
3 Select Delegate Control to launch the Exchange Administration Delegation Wizard.
4 Click Next.
5 On the Users or Groups page, click Add. The Delegate Control window appears:
6 In the Group or User text box, specify the name of the CSE user account.
7 From the Role list, select Exchange Administrator.
8 Click OK.
9 Click Next.
10Click Finish to exit the wizard.
When you exit the wizard, a dialog box notifies you that, to fully administer an Exchange server, the CSE user account must be an administrator of the local machine.
Installing Cloudmark Server Edition
The installer program is available on a CDROM or by downloading it, from Cloudmark or a vendor. It installs CSE and the Administration Console. You must install at least one instance of the Administration Console in order to operate CSE.
!
If you are upgrading a previous version, be sure to shut down CSE before running the new installer.TOINSTALL CSE SOFTWARE
1 Log on to the server with a Windows user account with domain administrator privileges.
2 Double-click the CSE installation program icon. The installation wizard appears.
3 Click Next.
4 Read the terms and conditions of the license agreement. If you agree with them, click I Accept.
5 On the Select Features page, choose the software components to install: Cloudmark Server Edition and/or the Administration Console.
6 Click Next.
Installing Cloudmark Server Edition 17
8 Click Next.
The My Cloudmark window appears, allowing you to log on with your existing account credentials or to register your contact information (if you are new to CSE):
9 Enter your username and password.
10Click “Log in”.
My Cloudmark displays a message confirming that the product has been activated.
11Click Continue.
The installer program reappears.
12Click Next.
13Enter the name of your Exchange Server.
14Enter the username, password and domain of the Windows user account you created for the CSE service.
15Click Next.
The Private Spam Actions window appears:
16Optionally, select “Enable mail checking for new users automatically”. This initially enables spam filtering for all users on this server.
Thereafter, spam filtering is also enabled for any new users you add. You can disable this option later; see “Enabling spam checking for new users and public folders” on page 30.
17Select the action CSE should apply to spam messages when delivering to the recipient:
• Move to local folder
This option moves spam to the user’s Spam Folder. If the Spam Folder does not exist, it is created automatically in the user’s mailbox. To create a folder for spam with a different name, enter a new name next to this option.
• Move to public folder
This option moves spam to a public Spam Folder. If the public Spam Folder does not exist, it is created automatically. To create a public folder for spam with a different name, enter a new name next to this option.
Installing Cloudmark Server Edition 19
• Tag Subject
Places the text you specify in the text box adjacent to the Tag Subject option to the beginning of the message subject line and then delivers the message to the user’s Inbox. The default tag is “[SPAM].”
• Move to Deleted Items Folder
Places spam in the Deleted Items folder.
!
Feedback will not be sent to Cloudmark if you select “Move to Deleted Items Folder”. This option is not recommended.Regardless of which option you choose, you can mark spam as read by selecting the Mark Spam as Read When Detected check box. You can change these options later; see “Enabling spam checking” on page 30.
18Click Next.
The Public Spam Actions window appears:
19Optionally, select “Enable spam checking for new Public Folders automatically”.
20Select the action that CSE should take when it detects spam being delivered to a public folder:
• Move to Public Folder
The default public folder for spam is called Spam. Enter a different folder name if desired. If you select this option, see “Assigning ownership of a public folder to the CSE user” on page 42.
• Tag Subject (Leave Messages in Inbox)
This option places a [SPAM] tag in the subject line of suspected spam messages but does not move them.
21Click Next.
22Enter the HTTP proxy support settings (if any).
23Click Next.
24Specify the SOCKS proxy support settings (if any).
25Click Next.
26Determine which port to use to connect to the Cloudmark Network— either port 2703 or 80—and click the corresponding option.
By default, port 2703 is used. This is the preferred option of the two because it is faster than port 80. If you cannot open this port on your firewall, use port 80.
27If your server is unable to resolve Internet DNS addresses, do one of the following:
• Contact Cloudmark Support to obtain an alternative discovery server IP address.
• Browse to http://www.cloudmark.com/desktop/kb/?article=kb-sbol-fd5cylnw. Select the Enable DNS Proxy Support check box and type the IP address in the text box.
28Click Next to review your installation wizard settings.
29If they are correct, click Next again; otherwise, click Back to make changes.
30Click Next.
The wizard installs the CSE software components you selected.
31Click Finish to exit the wizard when all files have been successfully copied.
Installing the Administration Console Separately 21
Installing the Administration Console Separately
Optionally, the CSE Administration Console can be installed on another computer besides the Exchange Server, using the CSE installation wizard. To install the Administration Console separately, follow the instructions in “Installing Cloudmark Server Edition” on page 16. When you reach step 5, select the Cloudmark Server Edition Administration Console as the only software component to install.
Uninstalling CSE
You can remove CSE using the Add/Remove Programs Control Panel.
TOREMOVETHE CSE PROGRAM
1 Close all open Microsoft Management Consoles. This includes the Services Administration Tool.
2 Open the Windows Control Panel.
3 Open the Add/Remove Programs control panel.
4 From the program list, select CSE.
5 Click Remove.
23
C
HAPTER3
Console
All Cloudmark Server Edition administration functions are performed using the Administration Console, a MMC snap-in that allows you to configure how CSE handles spam and more.
This chapter explains how to perform the following tasks:
• “Launching the Administration Console” below
• “Starting and stopping the CSE service” on page 25
• “Connecting to and disconnecting from CSE servers” on page 27
• “Selectively Enabling and Disabling Spam-Checking” on page 40
• “Configuring Global Options” on page 28
• “Accessing My Cloudmark” on page 44
• “Managing Subscriptions” on page 44
Launching the Administration Console
Normally, you run the Administration Console as a member of the Domain Admins group, as explained in the procedure below. See the procedures that follow it for instructions on running it as a member of another group.
TOLAUNCHTHE ADMINISTRATION CONSOLE
2 In the Start menu, select Programs, then Cloudmark Server Edition, then Cloudmark Server Edition Administration Console.
The Cloudmark Admin Console appears:
If you are logged on as a user belonging to a different group, you can still run the Administration Console by pointing to the Cloudmark Server Edition. Administration Console in the Start menu and following the instructions for your operating system:
TOLAUNCHTHE ADMINISTRATION CONSOLE INANOTHER GROUPON
WINDOWS 2000
1 In the Start menu, navigate to Programs, then Cloudmark Server Edition, then Cloudmark Server Edition Administration Console.
!
Do not click Administration Console yet.2 Right-click Administration Console.
3 In the pop-up menu that appears, select Run As....
4 Enter the username and password of the Windows user account that you set up for CSE.
Starting and stopping the CSE service 25
TOLAUNCHTHE ADMINISTRATION CONSOLEINANOTHERGROUPON
WINDOWS XP
1 In the Start menu, navigate to Programs, then Cloudmark Server Edition, then Cloudmark Server Edition Administration Console.
!
Do not click Administration Console yet.2 Right-click Administration Console.
3 In the pop-up menu that appears, select Properties.
4 On the Shortcut tab, click the Advanced button.
5 Select the “Run with different credentials” check box.
6 Click OK.
7 Click OK again.
After you apply this change, you will be prompted to choose a user every time you click the menu item.
The remaining sections of this chapter explain how to use the Administration Console.
Starting and stopping the CSE service
If you get an error attempting to start or stop the Cloudmark Server Edition service, refer to Appendix A, "Troubleshooting".
TOSTART CSE
1 In the left pane of the Administration Console, expand the Cloudmark Server Edition folder.
2 Right-click the name of the CSE server to display the pop-up menu:
3 Select Start.
TOSTOP CSE
1 In the left pane of the Administration Console, expand the Cloudmark Server Edition folder.
2 Right-click the name of the CSE server to display the pop-up menu:
Connecting to and disconnecting from CSE servers 27
Connecting to and disconnecting from CSE
servers
The Administration Console automatically connects to the CSE server you specified during installation; however, you can connect to another CSE server in the same domain.
TOCONNECTTOANOTHER CSE SERVERINTHESAMEDOMAIN
1 In the left pane of the Administration Console, right-click Cloudmark Server Edition.
2 Click Connect.
The Connect window appears:
3 Choose whether to connect to a server running on the local computer or a server running elsewhere in the domain:
• To connect to a CSE server running on the local computer, click Local computer.
• To connect to another CSE in the domain, click Another computer, then enter the name of the computer. Click Browse to find the CSE server on the network.
4 Click OK.
The Administration Console is now connected to the specified CSE server.
TODISCONNECTFROMA CSE SERVER
1 In the left pane of the Administration Console, right-click the name of the server from which you want to disconnect.
Configuring Global Options
You can configure global options using the Server Configuration window of the Administration Console.
TOOPENTHE SERVER CONFIGURATION WINDOW
1 In the left pane of the Administration Console, right-click a CSE server to display the pop-up menu.
2 Click Server Configuration.
The Server Configuration window appears.
You can perform the following configuration tasks in this window:
• “Configuring the connection to Exchange” below
• “Enabling spam checking” on page 30
• “Enabling troubleshooting event logs” on page 31
• “Configuring spam-filtering actions” on page 32
• “Configuring Connections” on page 35
• “Managing Whitelists” on page 36
• “Configuring Connections” on page 35
Configuring the connection to Exchange
Each instance of Cloudmark Server Edition can connect to exactly one instance of Exchange.
Configuring Global Options 29
TOCONFIGURE CSE’SCONNECTIONTO EXCHANGE
1 Open the Server Configuration window. By default, the General tab appears:
2 In the Connection to Exchange Server area of the General tab, enter the following information:
• In the Exchange Server field, enter the IP address or hostname of the Exchange server to which to connect.
• In the MAPI Profile field, enter the name of the MAPI profile to use for this connect.
Enabling spam checking
The General tab of the Server Configuration window allows you to specify how CSE automatically filters spam. You can perform the following spam-handling configuration tasks in this tab:
• “Enabling spam checking for new users and public folders” on page 30
• “Enabling spam checking for local messages” on page 31
To enable or disable spam checking selectively instead of globally, see “Selectively Enabling and Disabling Spam-Checking” on page 40.
Enabling spam checking for new users and public
folders
You can enable automatic spam filtering for new users and for new public folders.
TOENABLEAUTOMATICSPAMFILTERINGFORNEW USERS
1 Open the Server Configuration window.
2 In the Enable Mail Checking area of the General tab, select “Enable mail checking for new users automatically”.
3 Click OK.
With this option selected, spam filtering will be enabled for each new user you add to the system. If you prefer to enable and disable spam filtering selectively, see “Selectively Enabling and Disabling Spam-Checking” on page 40.
!
If you enable this option before the first time that you run CSE, all users are enabled for spam filtering.TOENABLEAUTOMATICSPAMFILTERINGFORNEW PUBLICFOLDERS
1 Open the Server Configuration window.
2 In the Enable Mail Checking area of the General tab, select “Enable mail checking for new public folders automatically”.
Configuring Global Options 31
3 Click OK.
With this option selected, spam filtering will be enabled for each new public folder that is created.
!
If you enable this option before the first time that you run CSE, all public folders are enabled for spam filtering.Enabling spam checking for local messages
By default, messages originating from the local domain are not checked for spam. You may choose to enable this option to prevent local users from sending spam or fraud.
TOENABLEAUTOMATICSPAMFILTERINGFOR LOCALMESSAGES
1 Open the Server Configuration window.
2 In the Mail Origin area of the General tab, select “Check messages originating from the local domain”.
3 Click OK.
Enabling troubleshooting event logs
Troubleshooting event logs help you determine the cause of problems you may encounter with CSE and is needed by Cloudmark when contacting technical support. The log file is written to:
Program Files\Cloudmark\Cloudmark Server Edition\log\cloudmark.log
TOENABLETROUBLESHOOTINGEVENTLOGGING
1 Open the Server Configuration window.
2 In the Troubleshooting Log area of the General tab, select the “Enable troubleshooting log” box.
3 Optionally, you can also select “Append Cloudmark headers to messages”.
This option provides more useful information with which Cloudmark can improve its accuracy.
Configuring spam-filtering actions
The Spam tab of the Server Configuration window allows you to configure the actions that CSE takes when it detects spam or fraud messages.
• “Configuring spam folder names” below
• “Specifying spam-filtering actions for users” on page 33
• “Specifying spam-filtering actions for public folders” on page 34
Configuring spam folder names
You can configure the names of the folders to which spam and fraud are automatically sent.
TOCONFIGURE SPAMFOLDERNAMES
1 Open the Server Configuration window.
Configuring Global Options 33
3 In the Local Spam Folder Name field, enter the name of the local spam folder.
This folder will be automatically created in users’ local mailboxes.
4 In the Public Spam Folder Name field, enter the name of the public spam folder.
This folder will be automatically created as a public folder.
5 Click OK.
Both the local folder and the public folder are available to users as
feedback folders; that is, users can drag spam messages into either of these folders in order to automatically send feedback to the Cloudmark
Collaborative Security Network.
Separately, you can choose to have CSE send the spam and fraud that it detects to either a local spam folder or a public spam folder, as explained in the following topics:
• “Specifying spam-filtering actions for users” below
• “Specifying spam-filtering actions for public folders” on page 34
Specifying spam-filtering actions for users
You can configure the action that CSE takes when it automatically detects a spam or fraud message being delivered to a user’s mailbox.
TOCONFIGURESPAM-FILTERINGACTIONSFOR USERS
1 Open the Server Configuration window.
2 Click the Spam tab.
3 In the Spam Detected Action for Users area, select one of these actions:
• Move to local folder
This option moves spam to the user’s local spam folder. If the folder does not exist, it is created automatically in the user’s mailbox. The name of this folder is configured in the Spam Folders area of this tab, as explained in “Configuring spam folder names” on page 32.
• Move to public folder
This option moves spam to a public spam folder. If the public folder does not exist, it is created automatically. The name of this folder is configured in the Spam Folders area of this tab, as explained in “Configuring spam folder names” on page 32.
• Tag Subject
Places the text you specify in the text box adjacent to the Tag Subject option to the beginning of the message subject line and then delivers the message to the user’s Inbox. The default tag is “[SPAM].”
• Move to Deleted Items Folder
Places spam in the Deleted Items folder.
!
Feedback will not be sent to Cloudmark if you select “Move to Deleted Items Folder”. This option is not recommended.4 Optionally, you can also select “Mark Spam as Read when detected”. This option marks spam as read when it is delivered.
5 Click OK.
Specifying spam-filtering actions for public folders
The Spam Detected Action for Public Folders area allows you to specify the action that CSE automatically takes when it detect spam or fraud being delivered to a public folder.TOCONFIGURE SPAM-FILTERINGACTIONS FORPUBLICFOLDERS
1 Open the Server Configuration window.
2 Click the Spam tab.
3 In the Spam Detected Action for Public Folders area, select one of these actions:
• Move to public Spam Folder
This option moves spam to a public Spam Folder. If the public Spam Folder does not exist, it is created automatically. To create a public folder for spam with a different name, enter a new name next to this option.
• Tag Subject
This option inserts the specified text at the beginning of the message subject line, then delivers the message as usual. The default tag is “[SPAM].”
Configuring Global Options 35
Configuring Connections
The Connection tab is where you enter the settings that connect the CSE service to your Exchange server.
TOCONFIGURETHECONNECTIONTAB
1 Open the Server Configuration window.
2 Click the Connection tab:
3 In the Connection to Cloudmark Service area, make sure that Port 2703 is selected.
This is the recommended setting and will yield the fastest connection speeds. If this port is not available to you, select “Port 80 over HTTP” instead.
• Enable HTTP Proxy Support
Check this box if you use an HTTP proxy on your network and use port 80 as your Connection to Cloudmark Services.
Specify an IP address or hostname in the Address field and a port number in the Port field. The native Cloudmark Collaborative Security Network protocol is encapsulated in HTTP requests to comply with the HTTP 1.0 specification.
• Enable SOCKS Proxy Support
Check this box if you use a SOCKS proxy on your network and use port 2703 as your connection to Cloudmark. The SOCKS port is set to 1080; the final destination port must be 2703. Communication to port 80 through SOCKS proxy is not supported and is considered to be mutually exclusive with HTTP proxy support or when using port 80.
• Enable DNS Proxy Support
It is normally not necessary to enable DNS proxy support because Cloudmark Server Edition automatically switches to IP-based discovery mode to connect to the Cloudmark Collaborative Security Network.
If you experience “Unable to connect” errors, check Enable DNS Proxy Support and type in an Alternate Discovery Server IP address in the text box. The IP address is available here:
http://www.cloudmark.com/desktop/kb/?article=kb-sbol-fd5cylnw
5 Click OK.
Managing Whitelists
On the Whitelist tab, you can create and edit a list of email addresses and domains which are exempt from spam filtering. CSE will not filter
messages that are sent from these sources.
You can add any domain or part of a domain, IP address or part of an IP address, or a full email address to the whitelist.
TOADDAN ITEMTOTHEWHITELIST
Configuring Global Options 37
2 Click the Whitelist tab:
3 Click the Add button.
The Whitelist - Add window appears.
4 Enter one of the following:
• an email address For example: [email protected] • a hostname For example: mail.domain.com
• a full or partial domain name For example:
domain.cx
or
• an IP address For example:
64.236.16.20
• a partial IP address
A partial IP address consists of one or more of the beginning segments of an IP address. For example:
64.236
!
CSE’s whitelist feature does not support wildcards.5 Click OK.
TOMODIFY AWHITELISTITEM
1 Open the Server Configuration window.
2 Click the Whitelist tab.
3 Select the whitelist item in the Email Addresses table.
4 Click the Edit button.
5 Edit the item as desired.
6 Click OK.
TOREMOVEAWHITELISTITEM
1 Open the Server Configuration window.
2 Click the Whitelist tab.
3 Select the whitelist item in the Email Addresses table.
4 Click the Remove button.
5 To clear the entire whitelist, click Remove All.
6 Click OK.
TOEMPTY THEWHITELIST
Configuring Global Options 39
2 Click the Whitelist tab.
A prompt appears, asking you to verify that you want to remove all entries in the whitelist.
!
This operation cannot be undone.3 Click OK to close the prompt. The whitelist entries disappear.
4 Click OK to close the whitelist window.
Viewing and exporting spam statistics
The Statistics area of the General tab shows the following data:
• how many messages were checked
• how much spam was caught
• how many messages were manually blocked by users
• how many messages were manually unblocked by users
• estimated time and money saved
Time saved is calculated by dividing the average amount of time spent on each spam message by the amount of spam that was filtered. Money saved is calculated by the average amount of money spent per hour on spam (based on an average salary) multiplied by the time saved. You can change the variables used to calculate these figures by entering new ones in the text fields.
You can export statistics according to the instructions below:
TOVIEWSPAMSTATISTICS
2 Click the Statistics tab:
To export the statistics to a CSV-formatted file, click Export.
Selectively Enabling and Disabling
Spam-Checking
You can enable and disable spam-checking for individual users or groups of users, and for public folders. To automatically enable or disable spam-checking for new users and public folders, see “Enabling spam spam-checking” on page 30.
Selectively enabling and disabling spam checking for users
TOENABLESPAM-CHECKINGFORA USERORGROUPSelectively Enabling and Disabling Spam-Checking 41
2 Click the Users folder.
The list of users appears in the right pane.
3 Select one or more users.
4 Right-click the selection to display the pop-up menu:
5 Click Enable.
The selected users are now marked “Enabled”.
TODISABLESPAM-CHECKINGFORA USERORGROUP
1 In the left pane of the Administration Console, expand the CSE server.
2 Click the Users folder.
The list of users appears in the right pane.
3 Select one or more users.
4 Right-click the selection to display the pop-up menu.
5 Click Disable.
The selected users are now marked “Disabled”.
Selectively enabling and disabling spam checking for public
folders
In order to control spam-checking for a public folder, the CSE user must be the owner of the public folder. The following topics explain how to manage public folders with CSE:
• “Enabling spam checking for a public folder” on page 43
• “Disabling spam checking for a public folder” on page 44
Assigning ownership of a public folder to the CSE user
TOASSIGN OWNERSHIPOFAPUBLICFOLDERTOTHE CSE USER
1 From the Start menu, select Programs > Microsoft Exchange > System Manager.
The System Manager appears.
2 In the left pane, select the Folders item.
3 In the right pane, right-click the public folder for which you want to control spam filtering.
A menu appears.
4 Select Properties.
The Properties window appears.
5 Click the Permissions tab.
6 Click the Client Permissions button. The Client Permissions window appears:
Selectively Enabling and Disabling Spam-Checking 43
7 Click the Add... button.
The Select Users, Computers, or Groups window appears.
8 Select the CSE user you created when you installed the server.
9 Click OK.
10In the Roles field, select Owner.
11Make sure that all possible permissions are selected in the Permissions area.
12Click OK.
13Click OK to close the Properties window.
Enabling spam checking for a public folder
TOENABLESPAMCHECKINGFOR APUBLICFOLDER
1 In the left pane of the Administration Console, expand the CSE server.
2 Click Public Folders.
The list of public folders appears in the right pane.
3 Select one or more public folders.
4 Right-click the selection to display the pop-up menu:
5 Click Enable.
Disabling spam checking for a public folder
TODISABLE SPAMCHECKINGFORA PUBLICFOLDER
1 In the left pane of the Administration Console, expand the CSE server.
2 Click the Public Folders folder.
The list of public folders appears in the right pane.
3 Select one or more public folders.
4 Right-click the selection to display the pop-up menu.
5 Click Disable.
The selected public folders are now marked “Disabled”.
Accessing My Cloudmark
My Cloudmark is your interface to your Cloudmark account. Here you can view your statistics, change your account information or password, and view or update your subscription. You can also download software and technical documentation. My Cloudmark is secure; your account information is received only by Cloudmark.
There are two ways to access My Cloudmark:
• In the Administration Console, click My Cloudmark.
• Use your web browser to go to https://my.cloudmark.com.
Managing Subscriptions
After your initial trial period, you must purchase a subscription to the Cloudmark Service for each CSE end user.
• “Purchasing A Subscription after The Trial Period” below
• “Adding Subscriptions” on page 45
Managing Subscriptions 45
Purchasing A Subscription after The Trial Period
Cloudmark notifies you before your CSE trial period expires, you are notified by Cloudmark, allowing you sufficient time to complete your evaluation and address any issues you may have. You can also use the Administration Console to view the number of days remaining in your trial period.
Once the trial period ends, click Purchase on the Administration Console. You are then directed to Cloudmark’s or your vendor’s web site to
purchase a subscription.
Adding Subscriptions
To add a subscription, right-click the name of the CSE server you want to activate the subscription on, and then click Activate. Enter your activation code obtained from either Cloudmark or your vendor.
Renewing Subscriptions
If you have existing subscriptions, you can purchase additional subscriptions or renew existing ones from the My Cloudmark page (described in “Accessing My Cloudmark” on page 44).
47
C
HAPTER4
Spam Filtering
There is a short delay between the time at which a spam message arrives at the Exchange server and the time at which it is filtered out of the mailbox by CSE.
• For mobile devices that receive messages by “server push” technology, the server should be configured to delay the push so that spam can be filtered before messages are delivered to the device.
• For mobile devices that receive messages by “client pull” technology, server configuration is not relevant. These devices can be configured to check for new messages at an interval that will generally accommodate spam filtering. On rare occasions, spam message may arrive at or about the moment at which the mobile device pulls new messages. In this case, the spam messages may be delivered to the device, unfiltered.
This chapter explains how to perform server-side configuration to
introduce a message synchronization delay for mobile devices using server push technology. This delay allows CSE to filter spam before messages are delivered to mobile devices.
• “Configuring Microsoft Exchange ActiveSync for CSE” below
• “Configuring Blackberry Enterprise Server (BES) for CSE” on page 49
• “Configuring GoodLink for CSE” on page 50
Configuring Microsoft Exchange ActiveSync for
CSE
Although ActiveSync uses server push technology, the synchronization interval is set by the client device and not the server. This topic explains how to enable ActiveSync on the server side.
TOENABLE EXCHANGE ACTIVESYNC
1 On the Exchange server, start the System Manager.
2 Expand the Global Settings folder.
3 Right-click Mobile Services.
4 Select Properties.
The Mobile Services Properties dialog appears:
5 Select “Enable user initiated synchronization”.
6 Optionally, enable other Exchange ActiveSync features as appropriate for your organization.
For more information about these features, see the Microsoft Exchange Server documentation, available at http://www.microsoft.com/.
Configuring Blackberry Enterprise Server (BES) for CSE 49
Configuring Blackberry Enterprise Server (BES)
for CSE
When using CSE and Exchange in conjunction with Blackberry Enterprise Server, you can configure a 45-second synchronization delay in order to allow CSE to filter spam before messages are delivered to users’ Blackberry devices.
Configuring BES 3.6 and below
TOCONFIGURE BES 3.6 ANDBELOW
1 On the BES server, run Regedit.
2 Navigate to the following key:
HKEY_LOCAL_MACHINE > SOFTWARE > Research In Motion > BlackBerry Enterprise Server > Servers > <ServerName>
For example, <ServerName> might be “BESSERVER”.
3 Locate the following DWORD value:
ProcessMailDelay
If this value does not exist, create it.
4 Set the value of ProcessMailDelay to 45 (or your preferred value).
5 Save the new value.
6 Restart BES.
Configuring BES 4.0 and above
TOCONFIGURE BES 4.0 ANDABOVE
1 On the BES server, run Regedit.
2 Browse to the following key:
HKEY_LOCAL_MACHINE > SOFTWARE > Research In Motion > BlackBerry Enterprise Server > Agents
3 Locate the following DWORD value:
ProcessMailDelay
If ProcessMailDelay does not exist, create it.
4 Set the value of ProcessMailDelay to 45 (or your preferred value).
6 Restart BES.
Configuring GoodLink for CSE
GoodLink does not provide a method for configuring a delay in mail synchronization. Spam messages may initially appear on users’ mobile devices. However, these spam messages disappear after CSE performs spam filtering, when the mobile device re-synchronizes with the GoodLink server.
51
A
PPENDIXA
This appendix contains troubleshooting information for starting and stopping the CSE service and the Administration Console, as well as correcting errors that occur while running the service.
Errors Starting CSE
If you are unable to start Cloudmark Server Edition from the
Administration Console, try to start it manually using the Services tool (Control Panel, Administrative Tools). On the tool, locate and right-click the Cloudmark Server Edition service and then click Start.
If the service still does not start, verify that the CSE user account information is set up correctly.
!
The Services tool can be used to grant “Log on as a service” rights, as well.TOVERIFY CSE USERACCOUNTINFORMATIONANDSETUPUSING THE
SERVICESTOOL
1 On the Services tool, right-click the Cloudmark Server Edition service and then click Properties.
2 On the Log On tab, select Local Systems Account and click Apply.
3 Select This account and then type the CSE user account name and password if it is incorrect. Click OK.
4 If a prompt informs you that the CSE user account is granted “Log on as a service” rights, click OK.
You should now be able to start Cloudmark Server Edition from the Cloudmark Server Edition Administration Console or from the Services tool.
Errors Stopping CSE
If you are unable to stop CSE, use the Task Manager to end the cloudmarkse.exe process.
Errors Opening the Administration Console
If you receive an error message when trying to open the Cloudmark Server Edition Administrative Console, ensure that the CSE user account is a member of the Domain Admins group, as described in “Setting up a Windows User Account for CSE” on page 9.
CSE Runtime Errors
If CSE stops unexpectedly or displays abnormal behavior when running and you are using Exchange 2003, make sure the Hide from Exchange address lists option is disabled. This option is located in the Exchange Advanced tab of the User Properties window in the Active Directory Users and Computers tool.
If spam is not being moved to public folders designated for spam, check for the following log message:
WARN: Failed to open message [MAPI_E_NO_ACCESS] ERROR: [xid=7] newmail: failed to open message
If this error appears, public folder permissions are not set correctly. See “Assigning ownership of a public folder to the CSE user” on page 42.
53
A
PPENDIXB
Event log messages
The following table lists the event log messages that Cloudmark Server Edition can output to the Windows Event Log.
Table 1 Event log messages
Event Log Message Description
Cloudmark Server Edition has started INFO – Indicates that the service has successfully started and Cloudmark Server Edition will now begin to initialize.
Cloudmark Server Edition has shutdown INFO – Indicates that the service has been stopped.
Cloudmark Server Edition failed to connect to the Exchange server
WARNING – Indicates that there was a connection error attempting to connect to the Microsoft Exchange server. Cloudmark Server Edition will try again.
Cloudmark Server Edition failed to connect to the SpamNet Network
WARNING – Indicates that there was a connection error attempting to connect to the Cloudmark Collaborative Security Network. Cloudmark Server Edition will try again. Check that a mailbox has been created
for the Cloudmark Server Edition service account
ERROR – could prevent Cloudmark Server Edition from properly connecting to the Microsoft Exchange server. Verify that the user that the Cloudmark Server Edition service runs as has a mailbox on the Exchange server.
Cloudmark Server Edition exceeded user limit
ERROR – An attempt has been made to enable more users than the license allows.
Cloudmark Server Edition failed to startup ERROR – Cloudmark Server Edition could not start. Refer to Appendix A, "Troubleshooting" for more instructions.
Cloudmark Server Edition failed to initialize
Error log messages
The following table lists installation and operation error messages and possible causes. Make a note of the error messages and associated error codes you receive before contacting Cloudmark Technical Support (http:// www.cloudmark.com/support/exchangeedition).
Table 2 Error log messages
Error Message Possible Causes
An error occurred attempting to load the settings for the Cloudmark Server Edition at the computer name specified. Ensure that you have a connection to the server, the appropriate administrative privileges and that Cloudmark Server Edition is installed correctly on the server.
This error is likely caused either by a connection problem or by incorrect permissions. Verify that the computer you are on is on the same network as Cloudmark Server Edition and is able to access it. Verify that you have given a correct computer name to connect to. Verify that all permissions are set correctly, as specified in “System Requirements for CSE Server” on page 7.
The Cloudmark Server Edition
Administration Console failed to start the Cloudmark Server Edition service.
Refer to Appendix A, "Troubleshooting", for steps to resolve issues starting or stopping the service.
You must have administrative permissions on Cloudmark Server Edition in order to Start or Stop the Cloudmark Server Edition service.
Verify that all permissions are set correctly, as specified in “System Requirements for CSE Server” on page 7.
The Cloudmark Server Edition service is in an unknown state. Check for additional status in the Services management console on the server.
Refer to Appendix A, "Troubleshooting", for steps to resolve issues starting or stopping the service.
55
A
PPENDIXC
Cloudmark offers a free trial evaluation period. You start your trial period when installing the product by selecting the appropriate option, as
described in “Installing Cloudmark Server Edition” on page 16.
When the evaluation period ends, spam filtering is immediately disabled. An entry is logged in the Windows Event Log, indicating the end of the trial period, as well. An email is then sent to postmaster that provides purchasing information for Cloudmark Server Edition.
You can purchase a subscription to Cloudmark Server Edition by clicking Purchase in the Administration Console, which directs your to either the Cloudmark web site or your vendor, depending on who issued your activation code. When purchased, Cloudmark Server Edition is reactivated without the need to install and configure new software, or remove any existing software first.
57
I
NDEXA
ActiveSync 47 Administration Console 1, 23 installing 21 launching 23 requirements 8 troubleshooting 52B
Blackberry Enterprise Server (BES) 49
C
Cloudmark Collaborative Security Network 1, 3, 4
configuration 28
connections
Admin Console to CSE 27
CSE to Exchange 28 to Cloudmark 35
D
disconnecting 27 DNS proxy 36E
errors 52 Extended MAPI 8F
feedback 33 filtering automatic 30for mobile devices 47
selective 40
G
GoodLink 50H
HTTP proxy 36I
installation 7, 16L
logs 53 enabling 31M
Microsoft Exchange 7 ActiveSync 47Microsoft Management Console (MMC) 1
Microsoft Messaging Application Programming Interface (MAPI) 4
Microsoft Outlook 8
Microsoft Outlook Express 8
mobile messaging 47
My Cloudmark 5