Marketplace
Plug-in User
Guide
A guide to using
Marketplace plug-in
interface
Last Updated: September 30, 2014
Version 1.0
©2013-2004 Cybage. All rights reserved.
The information contained in this document represents the current view of Cybage on the issues
discussed as of the date of publication. Because Cybage must respond to changing market conditions, it should not be interpreted to be a commitment on the part of Cybage, and Cybage cannot guarantee the accuracy of any information presented after the date of publication.
This document is for informational purposes only. Cybage MAKES NO WARRANTIES, EXPRESS OR IMPLIED, IN THIS DOCUMENT.
Complying with all applicable copyright laws is the responsibility of the user. Without limiting the rights under copyright, no part of this document may be reproduced, stored in or introduced into a retrieval system, or transmitted in any form or by any means (electronic, mechanical, photocopying, recording or otherwise) or for any purpose, without the express written permission of Cybage
Marketplace plug-in is a registered trademark of Cybage. Microsoft and Windows are registered
trademarks of Microsoft Corporation. All other company, product and brand names are trademarks of their respective owners.
Contact Cybage:
Cybage Software Pvt. Ltd. Cybage Towers
Survey No 13A/ 1+2+3/1 Vadgaon Sheri
Pune 411014
Ph: 91-20-66041700 Fax: 91-20-66041701
Technical Support:
For technical queries, write to: [email protected] General Enquiries:
Marketplace Plug-in
User Guide
Abstract
This user guide addresses end user interaction with
the Marketplace plug-in. It provides help for using
the Marketplace plug-in.
Table of Contents
About This Guide ... 1
Chapter 1.
Introduction ... 3
About Marketplace plug-in ... 3
Features ... 3
Benefits ... 3
Chapter 2.
Administration Management ... 4
Back up ... 4
Clearing cache ... 4
Compiling Magento ... 5
Uninstall Plug-in ... 5
Theme Support ... 6
Configuring Marketplace plug-in ... 6
Enabling a category ...10
Managing sellers ...11
Generating seller reports ...12
Managing seller payments ...13
Chapter 3.
Seller Management ... 14
Creating an account ...14
Seller information ...17
Viewing Marketplace Dashboard ...18
Viewing My Questions ...19
Viewing customer ratings ...19
Chapter 4.
Product Management ... 20
Adding a product ...21
To add a product ...21
Importing products...23
To import products ...23
Editing the product information ...24
To edit the product information ...24
Deleting a product ...25
To delete a product ...25
Deleting an image ...25
To delete an image ...25
Approving a product ...26
To approve a product ...26
To do a mass product approval ...26
Asking a question ...27
Viewing my questions ...29
Sending a reply ...30
Viewing Marketplace orders ...31
Managing orders ...32
Buyer-seller communication ...34
Ask Question ...34
Send Reply ...36
Past Comments ...37
About This Guide
About Marketplace plug-in
About This Guide
This user guide explains the features and functionalities of Marketplace plug-in. It also provides steps to configure Marketplace plug-in and use the features of Magento store.
Release history
Table 1. Release history
Release Version Release Date Sections Affected Description
1.0 June, 2014 All Final version of Marketplace Plug-in User Guide
Intended audience
This user guide is primarily intended for administrators responsible for integration of Marketplace plug-in with Magento.
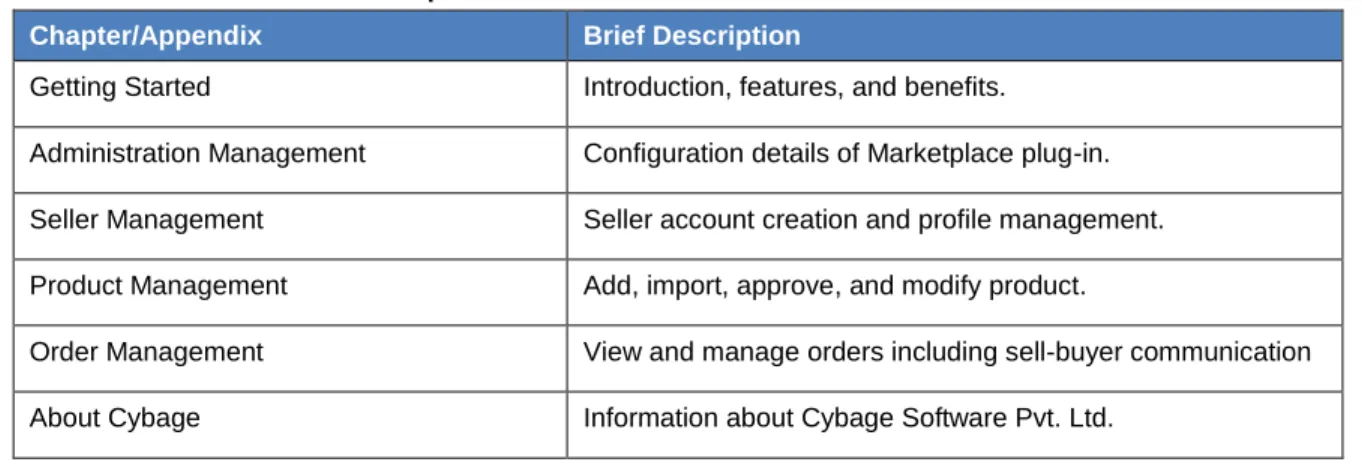
How this guide is organized?
The user guide is divided into the following sections: Table 2. Contents and description
Chapter/Appendix Brief Description
Getting Started Introduction, features, and benefits. Administration Management Configuration details of Marketplace plug-in. Seller Management Seller account creation and profile management. Product Management Add, import, approve, and modify product.
Order Management View and manage orders including sell-buyer communication About Cybage Information about Cybage Software Pvt. Ltd.
Conventions used in this guide
The conventions used throughout this guide are as follows: Table 3. Guide Conventions
About This Guide About Marketplace plug-in Abbreviated menu command Menu commands in text may be abbreviated rather than full. For
example, the text may ask you to click Download, and the screen may show a Download Now button.
Successive menu choices Successive menu choices may appear with a greater than sign (>) between the items that you will select consecutively.
Bold text This shows the names of menu items, dialog boxes, dialog box elements, and commands.
Text in italics Reference to other documents.
Note Notes contain additional useful information. Pay special attention to
information highlighted this way.
Send us your comments
Send us your comments on Marketplace Plug-in User Guide, version 1.0.
Cybage welcomes your comments and suggestions on the quality and usefulness of this publication. Your feedback is an important part of the information used for updating documentation. Please send us your input regarding any of the following:
Did you find any errors?
Is the information clear?
Do you need more information? If so, where should it be?
Are the examples correct? Do you want more examples?
What features of this manual did you like?
If you find any errors or have any other suggestions to improve the quality of this publication, please indicate the chapter, section, and page number (if available).
You can submit comments to us at: [email protected]
If you would like a reply, please include your email ID or your name, address, and telephone number.
Printing this guide
This guide is optimized for printing on Letter page size (8.5 inches by 11 inches). If you would like to print on any other page size, select the Fit to page check box in the Print window before you print this guide.
Introduction
About Marketplace plug-in
Chapter 1.
Introduction
This chapter provides a general description of Marketplace plug-in and its features and benefits.
About Marketplace plug-in
Marketplace plug-in helps the site administrator convert their Magento store to a perfect marketplace. This plug-in provides seller easy steps to register themselves, add products, manage order processing, and provides a platform to communicate between a seller and buyers.
Marketplace plug-in provides the functionality for the small sellers to sell their products on the existing site. After approval from the Magento store administrator, sellers can add products and manage order processing on their own. Also, it enables buyer-seller communication for products and ordering.
Features
Marketplace plug-in comes with the following set of exciting features:
Easy management of seller’s profile.
Customized store information such as banner logo, name, and description.
Product feedback and seller ratting based on the seller products rating.
Product and order based buyer-seller communication.
Easy product image (thumbnail, base and large image) manipulation
Order history and comment management.
Open source implementation
Benefits
Small users can sell their products without setting up an ecommerce site.
Sellers can add products easily using the add products screen.
Sellers can effectively manage their orders.
Admin can set commission percentage for every seller and manage payment information for accounting purpose.
Administration Management Back up
Chapter 2.
Administration Management
This chapter provides configuration details of Marketplace plug-in on Magento. It describes the following administrative tasks:
Back up Configuring Marketplace plug-in
Clearing cache Enabling a category
Compiling Magento Managing sellers
Uninstall Plug-in Generating seller reports
Theme Support Managing seller payments
Back up
Always take back up of your files and database before installing this extension. It is advisable to test this extension on your development environment in order to detect any conflicts with your existing extensions.
Clearing cache
After installation of Marketplace plug-in, clear the Magento cache. Logout of admin and re login otherwise you may get 404 errors in admin.
To clear Magento cache
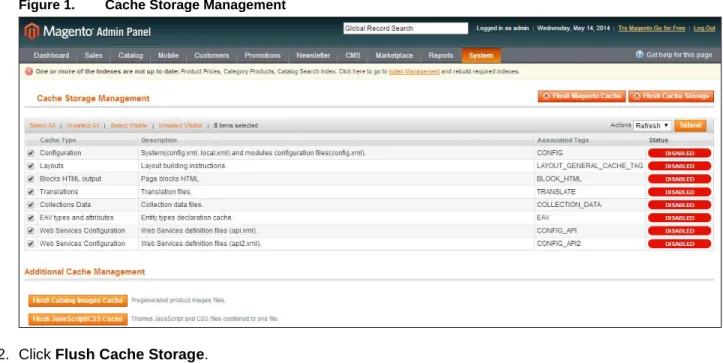
1. On the System menu, click Cache Management. The Cache Storage Management page opens.
Administration Management Compiling Magento
Figure 1. Cache Storage Management
2. Click Flush Cache Storage.
3. In the Cache Storage Management toolbar, click Select All. 4. In the Actions list, click Refresh.
5. Click Submit. The cache is cleared.
Compiling Magento
The Compilation feature allows you to increase the performance of Magento.
Note: Before making any changes to your Magento installation, you must disable the compilation.
To compile Magento
1. On the System menu, point to Tools, and click Compilation. The Compilation page opens.
2. On the Compilation page, click Run Compilation Process.
Disable compilation
(go to System > Tools > Compilation and select Disable) and refresh cache (go to System > Cache Management and select Refresh)Uninstall Plug-in
You may uninstall the Marketplace module from Magento Connect. After that you have to manually, run the following queries on the database to delete the database table entries made by the plugin. We would recommend that an experienced Mysql developer does this. Before you uninstall the plug-in, take back up of your database.
Administration Management Theme Support Note: If you have used tables prefix then replace <PREFIX> with your database table prefix otherwise remove <PREFIX> from the above queries.
ALTER TABLE `<PREFIX>sales_flat_order_item` DROP `seller_id`, DROP `shipping_charges`; ALTER TABLE `<PREFIX>sales_flat_quote_item` DROP `seller_id`, DROP `shipping_charges`; DROP TABLE `<PREFIX>marketplace_buyersellercomm_notifications`,
`<PREFIX>marketplace_logging`, `<PREFIX>marketplace_commission`,
`<PREFIX>marketplace_askquestion_reply`, `<PREFIX>marketplace_askquestion_question`; DELETE FROM `<PREFIX>eav_attribute` WHERE `attribute_code` IN ('category_marketplace', 'seller_id', 'delivery_time', 'shipping_charges', 'marketplace_state', 'seller_commission',
'seller_product_state', 'seller_product_status', 'company_banner', 'company_logo', 'company_locality', 'company_name', 'company_description', 'seller_subscriber');
DELETE FROM `<PREFIX>eav_attribute` WHERE `attribute_code` = 'status' AND `entity_type_id` = (SELECT `entity_type_id` FROM `<PREFIX>eav_entity_type` WHERE `entity_type_code` = 'customer'); DELETE FROM `<PREFIX>core_resource` WHERE `code` = 'marketplace_setup';
DELETE FROM `<PREFIX>core_config_data` WHERE `path` LIKE '%marketplace%';
Theme Support
This plug-in is developed based on the default Magento theme. Any customized theme may not be supported by this plug-in. If you need any support for the theme related issue, please contact us at:
[email protected]
Configuring Marketplace plug-in
After successful installation of Marketplace plug-in, administrator or seller (based on the seller privileges) can configure Marketplace plug-in in Magento.
To configure Marketplace plug-in
1. On the System menu, click Configuration.
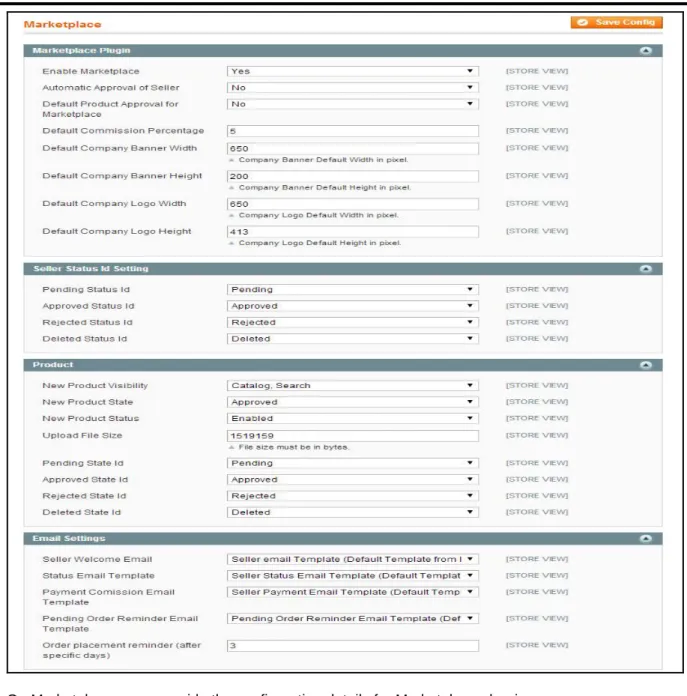
2. In the left navigation pane, under Cybage, click Marketplace. The Marketplace page opens.
Administration Management Configuring Marketplace plug-in
3. On Marketplace page, provide the configuration details for Marketplace plug-in. The following table describes the fields that you can view on Marketplace page. Table 4. Configure Marketplace plug-in
Field Action
Marketplace plug-in
Enable Marketplace To enable Marketplace plug-in on Magento, click Yes.
Automatic Approval of Seller To enable the administrator to approve a seller, click No.
Administration Management Configuring Marketplace plug-in
Field Action
Default Product Approval for Marketplace To enable the administrator to approve a product, click No.
Default Commission Percentage Type a percentage value to set commission as the percentage of the product selling price.
Note: Commission calculation will have to be manually calculated.
Default Company Banner Width Type a value for the banner width (pixel) of a company.
Default Company Banner Height Type a value for the banner height (pixel) of a company.
Default Company Logo Width Type a value for the logo width (pixel) of a company Default Company Logo Height Type a value for the logo height (pixel) of a company Seller Status Id Setting
Pending Status Id Click the status to map the status ID used for pending status.
Approved Status Id Click the status to map the status ID used for approved status.
Rejected Status Id Click the status to map the status ID used for rejected status.
Deleted Status Id Click the status to map the status ID used for deleted status.
Product
New Product Visibility Select the area where you want to display the products.
New Product State Select the state for a product when it is newly added in Marketplace.
New Product Status Select the default status for the newly products. Upload File Size Define the maximum size (bytes) for uploading a file. Pending State Id Click the status to map the product ID used for
pending status.
Approved State Id Click the status to map the product ID used for approved status.
Administration Management Configuring Marketplace plug-in
Field Action
Rejected State Id Click the status to map the product ID used for rejected status.
Deleted State Id Click the status to map the product ID used for deleted status.
Email Settings
Seller Welcome Email Select an email template to send welcome message to a seller.
Status Email Template Select an email template to send status details to a seller.
Payment Commission Email Template Select an email template to send commission details to a seller.
Pending Order Reminder Email Template Select an email template to send a reminder email for a pending order to a seller.
Order placement reminder (after specific days) Type a value in days after which the seller receives an email on placement of an order by a customer. 4. Click Save Config.
Administration Management Enabling a category
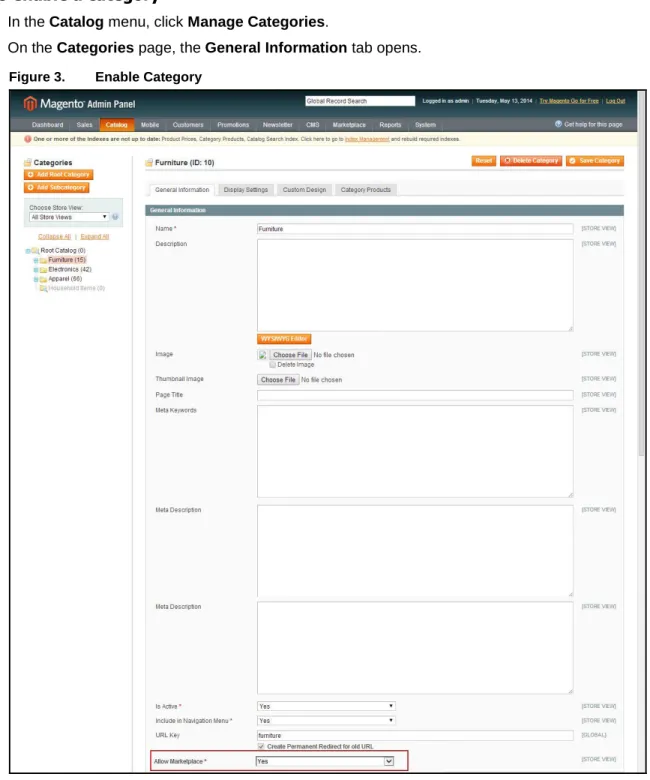
Enabling a category
You can enable a category for Magento store where sellers can classify their products.
To enable a category
5. In the Catalog menu, click Manage Categories.
On the Categories page, the General Information tab opens.
Figure 3. Enable Category
6. Select a category that you want to enable for Magento store and in the Allow Marketplace list, click
Yes.
Administration Management Managing sellers
Managing sellers
Marketplace plug-in saves the details of sellers. You can update the sellers’ profile.
To manage a seller
1. On the Marketplace menu, click Manage Sellers. The Manage Sellers page opens.
Figure 4. Manage Seller
2. To update the status of sellers, select the check boxes of sellers.
a. In the Manage Sellers toolbar, under the Actions list, click an appropriate status. b. Click Submit.
An email notification is sent to the sellers about the status update.
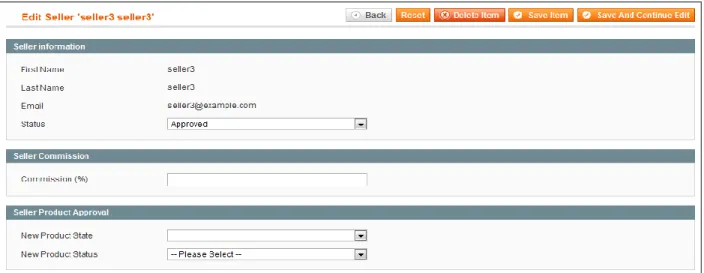
3. In the Action column, in the row corresponding to the sellers whose information you want to update, click Edit.
The Edit Seller page opens.
Figure 5. Edit Seller
Administration Management Generating seller reports
Generating seller reports
You can filter the list of sellers based on the filtering criteria. You can also export seller details to CVS and XML formats.
To generate seller reports
1. On Marketplace menu, click Orders By Each Sellers. The Orders By Each Seller page opens.
Figure 6. Order By Each Seller
2. On the Orders By Each Seller page, use the filtering criteria to narrow down the sellers search result. The following table describes the fields that you can view on the Orders By Each Seller page. Table 5. Orders By Each Seller
Field Action
Marketplace Seller Click the seller name for which you want to generate a report. Period Click the period.
From Select a start date.
To Select an end date.
Order Status Click a status. 3. Click Show Report.
Administration Management Managing seller payments
Managing seller payments
You can manage the payment details of sellers.To manage seller payments
1. On Marketplace menu, click Mange Payments. The Manage Sellers Payment page opens.
Figure 7. Manage Sellers Payment
2. In the Action column, in the row corresponding to the seller(s) whose payment information you want to view, click Pay.
The Seller Payment Information page opens.
Figure 8. Pay Seller
3. To make payment to the seller, in the Pay box, type the amount. 4. Click Pay.
To view the past payment details, in the left navigation pane, click Payment History. The Payment History pane opens.
Seller Management Creating an account
Chapter 3.
Seller Management
This chapter provides account creation and profile management of a seller on Magento store. It describes the following seller tasks:
Creating an account
Viewing Marketplace Dashboard
Viewing My Question
Viewing customer ratings
Creating an account
A seller can create an account on Magento store and sign up as a seller.
To create an account
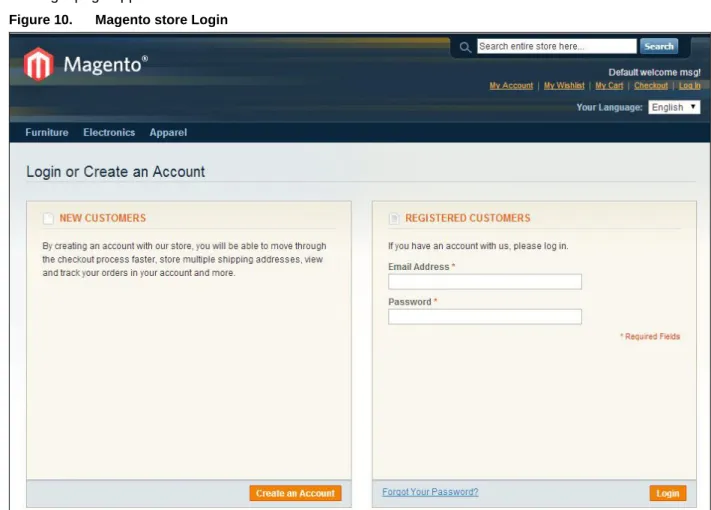
1. On upper-right of Magento store home page, click Log In. The login page appears.
Seller Management Creating an account
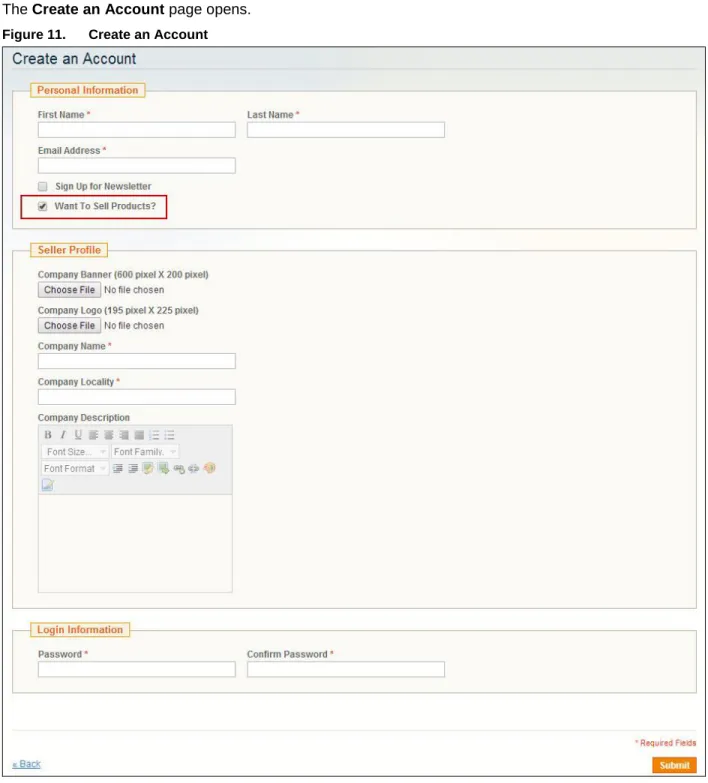
2. In the NEW CUSTOMER section, click Create an Account. The Create an Account page opens.
Figure 11. Create an Account
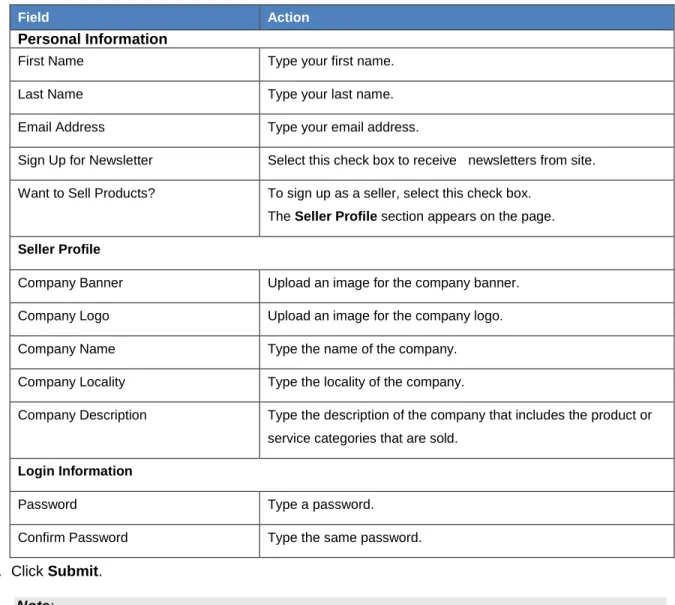
Seller Management Creating an account The following table describes the fields that you can view on the Create an Account page.
Table 6. Create an Account
Field Action
Personal Information
First Name Type your first name.
Last Name Type your last name.
Email Address Type your email address.
Sign Up for Newsletter Select this check box to receive newsletters from site. Want to Sell Products? To sign up as a seller, select this check box.
The Seller Profile section appears on the page. Seller Profile
Company Banner Upload an image for the company banner. Company Logo Upload an image for the company logo. Company Name Type the name of the company. Company Locality Type the locality of the company.
Company Description Type the description of the company that includes the product or service categories that are sold.
Login Information
Password Type a password.
Confirm Password Type the same password. 4. Click Submit.
Note:
- If the Automatic Approval of Seller feature is disabled, the administrator must approve the registration of the seller on Magento store.
- Email notifications are sent to the seller and administrator when a new seller is created on Magento store.
Seller Management Seller information
Seller information
After approval of the seller account by the administrator, the Account Information page displays the details of the seller.
Seller Management Viewing Marketplace Dashboard
Viewing Marketplace Dashboard
The Marketplace Dashboard page provides the details of sold products. The product with highest number of ordered quantity is selected as a best seller. Seller can view the list of ordered products, questions related to the product posted on Magento store, and notifications.
Seller Management Viewing My Questions
Viewing My Questions
The My Questions feature displays the list of questions that the seller has posted for other products and questions that are raised by other sellers.
Figure 14. My Questions
Viewing customer ratings
Seller can view the customer ratings of his products on a single page. This page can be access from the seller’s profile page. The customer ratings can also be viewed by visitors under the respective products.
Product Management Viewing customer ratings
Chapter 4.
Product Management
This chapter provides information on how to manage products on Magento store. It describes the following seller tasks and features of the Marketplace plug-in:
Adding a product Approving a product
Importing products Asking a question
Editing the product information Viewing my questions
Deleting a product Sending a reply
Product Management Adding a product
Adding a product
You can add products under selected categories and define attribute data or product descriptors. This helps you to distinguish variants of a product.
To add a product
1. On the My Account navigation pane, click Marketplace Product Add. The Product – Add page is displayed.
Product Management Adding a product 2. On the My Product – Add page, provide the attribute values to the fields described in the following
table.
Table 7. My Products - Add
Field Action
Product Category Click the category from the list. Product Name Type the product name.
Description Type a complete description of the product including specifications, if applicable.
Short Description Type a short description to go along with the product name on the product listing.
Delivery Time Type the number of days in which the product can be delivered. Shipping Charges Type the shipping charges.
SKU Type the SKU number.
Price Type the unit price.
Stock Type the number of available units.
Upload Image Upload images to serve as base image, small image, and thumbnail image.
Note: The zoom feature is used on the base image to view the product from the available angles during roll-over. The thumbnail is used to depict the available products aspects (angles). The small image is used on the product listing page.
Note: The fields indicated by (*) are mandatory. 3. Click Save.
Product Management Importing products
Importing products
Using the product import feature, you can add multiple products at one go. A sample CSV file is available for download. The sellers can update the product information in the CSV file and import it into the
Magento store.
To import products
1. On the My Account navigation pane, click Marketplace Product Import. The Product Import page is displayed.
Figure 17. Product Import
2. Click Download Sample CSV, update the CSV file with valid product information, and save the file. 3. Click Browse and select the saved CSV file.
4. Click Save.
The newly added products are listed in the Marketplace – My Products page.
On successful import, a message is displayed. If errors occur during the import and the import fails, an error message is displayed.
Product Management Editing the product information
Editing the product information
You can edit the information of a product and upload images.To edit the product information
1. On the Marketplace – My Products page, in the row corresponding to the product whose attributes you want to modify, click Edit.
The Product – Add page opens and displays the fields attribute values.
Figure 19. My Product - Edit
2. Modify the required fields. 3. Click Save.
Product Management Deleting a product
Deleting a product
You can delete a product when it is no more available on Magento.
To delete a product
1. On the Marketplace – My Products page, in the row corresponding to the product that you want to delete, click Delete.
A confirmation box is displayed.
Figure 20. Delete product
2. Click OK to confirm deletion. The product is deleted.
Deleting an image
You can delete the image of a product whenever applicable.
To delete an image
1. On the Marketplace – Edit page, in the row corresponding to the product image that you want to delete, click Delete.
A confirmation box is displayed.
Figure 21. Image management
2. Click OK to confirm deletion. The product is deleted.
Product Management Approving a product
Approving a product
Every time the seller adds a product to the Magento store, based on the configuration the administrator needs to approve the product or product will automatically approved.
To approve a product
1. Go to Magento Admin Panel > Catalog > Manage Product.
On the Manage Products page, the list of seller products is displayed. 2. In the row corresponding to the product you want to approve, click Edit.
The product details page is displayed.
Figure 22. Approve a product
3. In the Status list, click Enabled.
4. In the Marketplace State list, click Approved.
The approved product is displayed in the catalog on the frontend.
To do a mass product approval
1. Go to Magento Admin Panel > Catalog > Manage Product.
On the Manage Products page, the list of seller products is displayed.
2. On the left-most of the Manage Products page, select the check box corresponding to products that you want to mass approve.
3. In the Actions list, click Change status and state.
Product Management Asking a question
4. In the Status and state list, click Enabled. 5. Click Submit.
The status of all the selected products is changed to enable and the state is changed to approve.
Asking a question
The visitors of Magento store can ask questions related to the products and sellers can reply to the questions.
Note: The Ask Question link is enabled for Marketplace products, except for the products added by the seller.
To ask a question
1. On Magento store, open a product for which you want to ask a question.
Figure 23. Ask Question (Product)
Product Management Asking a question The Ask Question dialog box is displayed.
Figure 24. Ask Question
3. In the Ask Question dialog box, type your question related to the product.
Note: To receive email notification of this question, click the Notify by email check box. 4. Click Submit.
A success message is displayed.
Product Management Viewing my questions
Viewing my questions
All product-related questions and replies are displayed in My Account > My Question. It also displays questions related to seller’s own products.
Product Management Sending a reply
Sending a reply
The Send Reply feature allows you to post a reply to a question. On the My Questions page, click the
View/Reply link. The question-answer thread is displayed. You can type your reply and click Submit.
Order Management
Viewing Marketplace orders
Chapter 5.
Order Management
This chapter describes order management processing in Magento store. It describes the following seller tasks:
Viewing Marketplace orders
Managing orders
Buyer-seller communication
Viewing Marketplace orders
The Marketplace Orders page provides the details of products that are ordered by the customers. A seller can use the filter criteria to narrow down product search results and export order details to CVS and XML.
Order Management Managing orders
Managing orders
Seller can manage products that are already ordered by customer.
To manage orders
1. In the left navigation pane, click Marketplace Orders.
The Marketplace Orders page appears. For more information, see Viewing Marketplace Orders. 2. In the row corresponding to the order you want to update, click View Order.
The Order page of the product opens.
Order Management Managing orders
3. In the Orders page, complete the information listed in the following table:. Table 8. Product Orders
Field Action
Comment Type a comment. This is useful when reviewing the order in future. Track Order Type a value using which the customer can track the order.
Notify Customer by Email Select this check box to notify the customer through email when the order status is updated.
Status When the order placed, the order status defaults to processing. You can cancel the order when the status is processing.
Note:
- When administrator approves the order, the order status changes from Pending to Complete.
- You cannot cancel an order whose status is Complete. 4. Click Save.
Order Management Buyer-seller communication
Buyer-seller communication
After placing an order on Magento store, customer can ask question regarding the product. Customer and seller can communicate with each other.
Ask Question
The Ask Question link enables visitors to ask questions related to the product. The question can be answered by the site administrator or by other visitors.
The Ask Question link is enabled for Marketplace products, except for the products added by the seller.
To ask a question
1. In the left navigation pane, click My Orders. The My Orders page opens.
Figure 30. My Orders
The My Orders page displays the list of orders that are placed by a customer. 2. In the My Orders page, click View Order.
Order Management
Buyer-seller communication The Order page opens.
Figure 31. Ask Question
3. In the Orders page, click Ask Question. The Ask Question dialog box is displayed.
Order Management Buyer-seller communication 4. In the Ask Question dialog box, type your question related to the product.
Note: To receive email notification of this question, click the Notify by email check box. 5. Click Submit.
The seller receives notifications on Magento store at two locations:
The Marketplace Orders page. For more information, see Viewing Marketplace orders.
The Marketplace Dashboard page. For more information, see Viewing Marketplace Dashboard.
Send Reply
The Send Reply feature allows you to post reply to questions or to replies to those questions. On the Viewing my questions page, click the View/Reply link. The question-answer thread is displayed. You can type your reply and click Submit.
Order Management
Buyer-seller communication
Past Comments
A seller can view the past comments on an order. On the Marketplace Orders page, click the notification link. For more information, see Viewing Marketplace orders.
About Cybage
Chapter 6.
About Cybage
Cybage has a dedicated Center of Excellence (CoE) for E-commerce, carved out of years of extensive experience.
• More than 15 key clients spread across the globe
• A team of more than 540 domain experts, comprising Solution Architects, Business Analysts, • and Functional Experts
• Strong knowledge of the domain, business processes, and industry best practices • Expertise in multi-tenant, hosted e-commerce solutions
• Strong organizational, technical, engineering, process, and project management maturity
Platform expertise
• Magento
• Intershop
• Hybris
• Broadleaf Commerce
• IBM WebSphere Commerce
Integration services
• Search
• Payments and security • Logistics
• Recommendation
• Social commerce
• ERP
Omnichannel
• Unification and centralization of data
• Development of Omnichannel-ready services • Seamless user experience across all channels