Avaya Interaction Center
Database Designer Application
Reference Guide
Release 7.3.x
May 2015
© 2015 Avaya Inc. All Rights Reserved. Notice
While reasonable efforts have been made to ensure that the information in this document is complete and accurate at the time of printing, Avaya assumes no liability for any errors. Avaya reserves the right to make changes and corrections to the information in this document without the obligation to notify any person or organization of such changes.
Documentation disclaimer
"Documentation" means information published by Avaya in varying mediums which may include product information, operating instructions and performance specifications that Avaya may generally make available to users of its products and Hosted Services. Documentation does not include marketing materials. Avaya shall not be responsible for any modifications, additions, or deletions to the original Published version of documentation unless such modifications, additions, or deletions were performed by Avaya. End User agrees to indemnify and hold harmless Avaya, Avaya's agents, servants and employees against all claims, lawsuits, demands and judgments arising out of, or in connection with, subsequent modifications, additions or deletions to this documentation, to the extent made by End User.
Link disclaimer
Avaya is not responsible for the contents or reliability of any linked websites referenced within this site or documentation provided by Avaya. Avaya is not responsible for the accuracy of any information, statement or content provided on these sites and does not necessarily endorse the products, services, or information described or offered within them. Avaya does not guarantee that these links will work all the time and has no control over the availability of the linked pages.
Warranty
Avaya provides a limited warranty on Avaya hardware and software. Refer to your sales agreement to establish the terms of the limited warranty. In addition, Avaya's standard warranty language, as well as information regarding support for this product while under warranty is available to Avaya customers and other parties through the Avaya Support website:
http://support.avaya.com or such successor site as designated by Avaya. Please note that if you acquired the product(s) from an authorized Avaya Channel Partner outside of the United States and Canada, the warranty is provided to you by said Avaya Channel Partner and not by Avaya. "Hosted Service" means a hosted service subscription that you acquire from either Avaya or an authorized Avaya Channel Partner (as applicable) and which is described further in Hosted SAS or other service description documentation regarding the applicable hosted service. If you purchase a Hosted Service subscription, the foregoing limited warranty may not apply but you may be entitled to support services in connection with the Hosted Service as described further in your service description documents for the applicable Hosted Service. Contact Avaya or Avaya Channel Partner (as applicable) for more information.
Hosted Service
THE FOLLOWING APPLIES IF YOU PURCHASE A HOSTED SERVICE SUBSCRIPTION FROM AVAYA OR AN AVAYA CHANNEL PARTNER (AS APPLICABLE), THE TERMS OF USE FOR HOSTED SERVICES ARE AVAILABLE ON THE AVAYA WEBSITE, HTTP://SUPPORT.AVAYA.COM/ LICENSEINFO UNDER THE LINK "Avaya Terms of Use for Hosted Services" OR SUCH SUCCESSOR SITE AS DESIGNATED BY AVAYA, AND ARE APPLICABLE TO ANYONE WHO ACCESSES OR USES
THE HOSTED SERVICE. BY ACCESSING OR USING THE HOSTED SERVICE, OR AUTHORIZING OTHERS TO DO SO, YOU, ON BEHALF OF YOURSELF AND THE ENTITY FOR WHOM YOU ARE DOING SO (HEREINAFTER REFERRED TO INTERCHANGEABLY AS "YOU" AND "END USER"), AGREE TO THE TERMS OF USE. IF YOU ARE ACCEPTING THE TERMS OF USE ON BEHALF A COMPANY OR OTHER LEGAL ENTITY, YOU REPRESENT THAT YOU HAVE THE AUTHORITY TO
BIND SUCH ENTITY TO THESE TERMS OF USE. IF YOU DO NOT HAVE SUCH AUTHORITY, OR IF YOU DO NOT WISH TO ACCEPT THESE TERMS OF USE, YOU MUST NOT ACCESS OR USE THE HOSTED SERVICE OR AUTHORIZE ANYONE TO ACCESS OR USE THE HOSTED SERVICE. YOUR USE OF THE HOSTED SERVICE SHALL BE LIMITED BY THE NUMBER AND TYPE OF LICENSES PURCHASED UNDER YOUR CONTRACT FOR THE HOSTED SERVICE, PROVIDED, HOWEVER, THAT FOR CERTAIN HOSTED SERVICES IF APPLICABLE, YOU MAY HAVE THE OPPORTUNITY TO USE FLEX LICENSES, WHICH WILL BE INVOICED ACCORDING TO ACTUAL USAGE ABOVE THE CONTRACT LICENSE LEVEL. CONTACT AVAYA OR AVAYA'S CHANNEL PARTNER FOR MORE INFORMATION ABOUT THE LICENSES FOR THE APPLICABLE HOSTED SERVICE, THE AVAILABILITY OF ANY FLEX LICENSES (IF APPLICABLE), PRICING AND BILLING INFORMATION,
Licenses
THE SOFTWARE LICENSE TERMS AVAILABLEON THE AVAYA WEBSITE, HTTP://SUPPORT.AVAYA.COM/LICENSEINFO OR SUCH SUCCESSOR SITE AS DESIGNATED BY AVAYA, ARE APPLICABLE TO ANYONE WHO DOWNLOADS, USES AND/OR INSTALLS AVAYA SOFTWARE,
PURCHASED FROM AVAYA INC., ANY AVAYA AFFILIATE, OR AN AVAYA CHANNEL PARTNER (AS APPLICABLE) UNDER A COMMERCIAL AGREEMENT WITH AVAYA OR AN AVAYA CHANNEL PARTNER. UNLESS OTHERWISE AGREED TO BY AVAYA IN WRITING, AVAYA DOES NOT EXTEND THIS LICENSE IF THE SOFTWARE WAS OBTAINED FROM ANYONE OTHER THAN AVAYA, AN AVAYA AFFILIATE OR AN AVAYA CHANNEL PARTNER; AVAYA RESERVES THE RIGHT TO TAKE LEGAL ACTION AGAINST YOU AND ANYONE ELSE USING OR SELLING THE SOFTWARE WITHOUT A LICENSE. BY INSTALLING, DOWNLOADING OR USING THE SOFTWARE, OR AUTHORIZING OTHERS TO DO SO, YOU, ON BEHALF OF YOURSELF AND THE ENTITY FOR WHOM YOU ARE INSTALLING, DOWNLOADING OR USING THE SOFTWARE
(HEREINAFTER REFERRED TO INTERCHANGEABLY AS "YOU" AND "END USER"), AGREE TO THESE TERMS AND CONDITIONS AND CREATE A BINDING CONTRACT BETWEEN YOU AND AVAYA INC. OR THE APPLICABLE AVAYA AFFILIATE ("AVAYA").
License type(s) Copyright
Except where expressly stated otherwise, no use should be made of materials on this site, the Documentation, Software, or hardware provided by Avaya. All content on this site, the documentation and the Product provided by Avaya including the selection, arrangement and design of the content is owned either by Avaya or its licensors and is protected by copyright and other intellectual property laws including the sui generis rights relating to the protection of databases. You may not modify, copy, reproduce, republish, upload, post, transmit or distribute in any way any content, in whole or in part, including any code and software unless expressly authorized by Avaya. Unauthorized reproduction, transmission, dissemination, storage, and or use without the express written consent of Avaya can be a criminal, as well as a civil offense under the applicable law.
Third party components
"Third Party Components" mean certain software programs or portions thereof included in the Software or Hosted Service may contain software (including open source software) distributed under third party agreements ("Third Party Components"), which contain terms regarding the rights to use certain portions of the Software ("Third Party Terms"). As required, information regarding distributed Linux OS source code (for those Products that have distributed Linux OS source code) and identifying the copyright holders of the Third Party Components and the Third Party Terms that apply is available in the Documentation or on Avaya's website at:
http://support.avaya.com/Copyright or such successor site as designated by Avaya. You agree to the Third Party Terms for any such Third Party Components.
THIS PRODUCT IS LICENSED UNDER THE AVC PATENT PORTFOLIO LICENSE FOR THE PERSONAL USE OF A CONSUMER OR OTHER USES IN WHICH IT DOES NOT RECEIVE REMUNERATION TO (i) ENCODE VIDEO IN COMPLIANCE WITH THE AVC STANDARD ("AVC VIDEO") AND/OR (ii) DECODE AVC VIDEO THAT WAS ENCODED BY A CONSUMER ENGAGED IN A PERSONAL ACTIVITY AND/OR WAS OBTAINED FROM A VIDEO PROVIDER LICENSED TO PROVIDE AVC VIDEO. NO LICENSE IS GRANTED OR SHALL BE IMPLIED FOR ANY OTHER USE. ADDITIONAL INFORMATION MAY BE OBTAINED FROM MPEG LA, L.L.C. SEE HTTP://WWW.MPEGLA.COM.
Note to Service Provider
The Product or Hosted Service may use Third Party Components subject to Third Party Terms that do not allow hosting and require a Service Provider to be independently licensed for such purpose. It is your responsibility to obtain such licensing.
Preventing Toll Fraud
"Toll Fraud" is the unauthorized use of your telecommunications system by an unauthorized party (for example, a person who is not a corporate employee, agent, subcontractor, or is not working on your company's behalf). Be aware that there can be a risk of Toll Fraud associated with your system and that, if Toll Fraud occurs, it can result in substantial additional charges for your telecommunications services.
Avaya Toll Fraud intervention
If you suspect that you are being victimized by Toll Fraud and you need technical assistance or support, call Technical Service Center Toll Fraud
Suspected security vulnerabilities with Avaya products should be reported to Avaya by sending mail to: [email protected].
Trademarks
The trademarks, logos and service marks ("Marks") displayed in this site, the Documentation, Hosted Service(s), and Product(s) provided by Avaya are the registered or unregistered Marks of Avaya, its affiliates, or other third parties. Users are not permitted to use such Marks without prior written consent from Avaya or such third party which may own the Mark. Nothing contained in this site, the Documentation, Hosted Service(s) and Product(s) should be construed as granting, by implication, estoppel, or otherwise,
any license or right in and to the Marks without the express written permission of Avaya or the applicable third party.
Avaya is a registered trademark of Avaya Inc.
All non-Avaya trademarks are the property of their respective owners. Linux® is the registered trademark of Linus Torvalds in the U.S. and other countries.
Downloading Documentation
For the most current versions of Documentation, see the Avaya Support website: http://support.avaya.com or such successor site as designated by Avaya.
Contact Avaya Support
See the Avaya Support website: http://support.avaya.com for Product or Hosted Service notices and articles, or to report a problem with your Avaya Product or Hosted Service. For a list of support telephone numbers and contact addresses, go to the Avaya Support website: http://support.avaya.com (or such successor site as designated by Avaya), scroll to the bottom of the page, and select Contact Avaya Support.
Chapter 1: Introduction . . . 12
Purpose. . . 12
Intended audience . . . 12
Document changes since last issue . . . 12
Related resources . . . 13
Documentation. . . 13
Training. . . 16
Viewing Avaya Mentor videos . . . 16
Support . . . 17
Chapter 2: Database Designer fundamentals . . . 18
Prerequisites . . . 19
Overview of Database Designer . . . 20
Tree view . . . 21
Properties tab and Children tab . . . 22
Menus. . . 23
Database configuration . . . 26
Overview of the ADL file. . . 27
How to open an ADL file. . . 28
How to set the in-house version . . . 28
System IC Scripts . . . 29
How to delete the include paths for system IC Scripts . . . 30
How to find items in the tree view . . . 30
How to view messages . . . 31
How to set permissions . . . 31
Chapter 3: Application design . . . 32
Application design files . . . 32
Application components . . . 33
The application component hierarchy . . . 34
Overview of focuses . . . 38
Overview of Applications . . . 39
How to modify application behavior . . . 39
How to customize an application . . . 40
Chapter 4: Physical DB connections and DB connection sets . . . 42
Overview of Physical DB connections . . . 42
The role of the Data server . . . 43
Supported databases . . . 44
How to create a physical DB connection. . . 45
General physical database connection parameters . . . 45
Database-specific connection parameters. . . 46
Overview of DB connection sets . . . 51
How to create a DB connection set. . . 52
How to add Logical DB connections . . . 53
How to delete Logical DB connections. . . 53
How to configure a DB connection set for IC Repository. . . 54
How to configure a primary logical DB connection . . . 54
Overview of secondary logical DB connections. . . 55
How to configure a secondary logical DB connection in the same database instance 55 How to configure a secondary logical DB connection in a different database instance 57 How to delete a DB connection set . . . 58
How to change a DB connection set . . . 58
Chapter 5: Tables and fields . . . 60
Overview of database tables . . . 60
Relationship between tables in Database Designer and the application database . 61 Table properties . . . 61
How to create a table . . . 64
How to change a table . . . 65
How to delete a table . . . 66
Overview of database fields. . . 67
Data types . . . 67
Field properties . . . 68
How to create a field . . . 73
How to change a field . . . 75
How to delete a field . . . 75
Overview of database keys . . . 75
How to create a key . . . 77
How to change a key . . . 77
How to delete a key . . . 78
Chapter 6: Table sets and table aliases . . . 80
How to create a table set . . . 80
How to change a table set. . . 81
How to view table properties for a table alias . . . 81
How to create a table alias . . . 82
How to change a table alias . . . 84
How to delete a table alias . . . 84
Chapter 7: Application browsers . . . 86
Overview of search browsers . . . 86
Search browser properties . . . 87
How to create a search browser . . . 88
How to change a search browser. . . 88
How to delete a search browser . . . 89
Overview of search browser columns . . . 89
Search browser column properties. . . 89
How to create a search browser column . . . 91
How to change a search browser column . . . 91
How to delete a search browser column . . . 92
Overview of in-form browsers . . . 92
In-form browser properties . . . 93
How to create an in-form browser . . . 94
How to change an in-form browser. . . 95
Overview of in-form browser columns . . . 95
In-form browser column properties . . . 96
How to create an in-form browser column . . . 100
How to change an in-form browser column . . . 101
How to delete an in-form browser column . . . 101
Chapter 8: Forms, groups, and objects . . . 102
Overview of forms . . . 103
Form properties . . . 103
How to create a form . . . 105
How to change a form . . . 106
How to delete a form. . . 106
Overview of groups . . . 106
Group properties. . . 107
How to create a group . . . 109
How to delete a group . . . 110
How to change a group . . . 110
How to create right-click menus . . . 111
How to delete a right-click menu item . . . 112
How to change a right-click menu item . . . 112
Overview of objects . . . 113
How to constrain user access to an object . . . 114
How to automatically create objects . . . 114
Common properties for most non button objects . . . 115
Check box objects . . . 116
How to create a check box object . . . 117
Combo box objects . . . 117
How to create a box object . . . 119
How to set box values for multilanguage usage. . . 119
Date time objects . . . 120
How to create a date time object . . . 122
Label objects . . . 122
Long text objects . . . 122
How to create a long text object . . . 124
Text box objects . . . 125
How to create a text box object . . . 128
In-form browser objects . . . 129
How to create an in-form browser object . . . 132
1 to N link objects . . . 132
How to create a foreign field using a 1 to N link object . . . 137
M to N link objects . . . 138
How to create a foreign field using an M to N link object . . . 140
ActiveX control objects . . . 140
How to create an ActiveX control object . . . 142
Standard button objects. . . 142
How to create a standard button . . . 146
Custom button objects . . . 147
How to create a custom button . . . 148
How to change an object . . . 148
How to delete an object . . . 149
Chapter 9: Layout Editor for form design . . . 150
Overview of the Layout Editor . . . 151
How to change Layout Editor modes. . . 151
How to view forms . . . 151
How to view invisible controls . . . 151
How to use the grid . . . 152
Overview of modifying groups and controls. . . 153
How to move groups and controls . . . 154
How to align groups and controls . . . 154
How to space controls evenly . . . 154
How to center groups and controls in view . . . 155
How to size groups and controls . . . 155
How to change the caption . . . 156
How to change the accelerator keys for buttons . . . 156
How to set the tab order. . . 156
How to change only part of the tab order . . . 157
How to revert to the saved tab order . . . 157
How to set form dimensions . . . 158
How to specify the application GUI colors . . . 158
How to test the layout . . . 158
Chapter 10: Modules and relations . . . 160
Overview of modules . . . 160
Module properties . . . 161
How to create a module . . . 165
How to change a module . . . 166
How to delete a module . . . 167
Overview of relations . . . 167
Overview of 1 to N relations. . . 167
1 to N relation properties . . . 168
How to create a 1 to N relation . . . 169
How to change a 1 to N relation . . . 170
How to delete a 1 to N relation . . . 170
Overview of M to N relations . . . 170
M to N relation properties . . . 171
How to create an M to N relation . . . 173
How to change an M to N relation . . . 174
How to delete an M to N relation . . . 174
Overview of relation sets . . . 174
Fill direction . . . 175
Relation set properties . . . 175
How to create a relation set . . . 176
How to change a relation set . . . 177
Chapter 11: IC Scripts . . . 178
How to organize IC Scripts . . . 179
How to use IC Scripts in IC applications . . . 179
Overview of the IC Script Editor . . . 180
How to search in an IC Script . . . 180
How to insert text . . . 181
Text selection . . . 181
Keyboard shortcuts . . . 181
How to manage IC Scripts. . . 182
IC Script components . . . 183
How to automatically load IC Script files. . . 183
How to save IC Scripts . . . 184
How to edit an IC Script . . . 184
How to add comments to IC Scripts . . . 185
How to break an IC Script statement across multiple lines. . . 185
How to create an IC Script . . . 185
Overview of IC Script string table messages . . . 186
Guidelines for using string table messages . . . 187
Example: Error message in ActionUpdate IC Script . . . 187
How to create string table messages. . . 189
How to delete string table messages. . . 190
How to check the syntax of IC Scripts . . . 190
Uploading IC Scripts. . . 191
Chapter 12: Script Debugger . . . 192
Overview of the Script Debugger . . . 192
Keyboard shortcuts . . . 193
Overview of the Script Debugger . . . 194
How to run IC Scripts . . . 194
How to pause an IC Script. . . 195
How to stop an IC Script . . . 195
How to trace IC Script execution . . . 195
How to determine procedure calls by an IC Script . . . 196
Overview of breakpoints . . . 196
Start Debugging Partway through an IC Script . . . 196
Continue debugging outside the current subroutine . . . 197
Debug selected portions of an IC Script . . . 197
To add watch variables . . . 199
How to delete watch variables . . . 199
How to modify the value of a watch variable . . . 200
Chapter 13: Database configuration . . . 202
Overview of database configuration . . . 203
Overview of stored procedures . . . 203
q_create_lock . . . 204
q_drop_lock . . . 204
q_refresh_locks . . . 204
q_clean_locks (LockLife) . . . 205
q_next_key . . . 205
How to configure a database . . . 205
Configuration for Japanese databases. . . 206
Special considerations for DB2. . . 206
How to use Configure with Run. . . 206
How to use Configure with Test . . . 207
How to configure multiple DB2 databases . . . 209
How to import seed data . . . 210
Overview of reconfiguring a database . . . 210
How to use Reconfigure with Run . . . 211
How to use Reconfigure with Test . . . 212
How to verify a database . . . 212
How to copy a database . . . 213
How to drop a database . . . 214
How to associate a database with a client application . . . 215
Chapter 13: Generating an IC application . . . 216
Overview of IC applications . . . 216
IC Application properties . . . 217
How to create an IC application. . . 218
How to change IC application settings . . . 219
How to delete an IC application. . . 219
Overview of application focuses . . . 219
How to specify an IC Script . . . 220
How to update application information in the database . . . 220
Dynamic form generation . . . 220
Shortcut operators for the application icon . . . 221
Appendix A: Naming requirements and restricted names . . . 224
Requirements for names . . . 224
Summary of restricted names . . . 224
Appendix B: Localization requirements . . . 226
How to enable Database Designer for localization . . . 226
How to customize a localized IC application. . . 228
How to localize the money field. . . 229
How to translate string table messages . . . 229
How to translate forms . . . 231
How to translate search browsers . . . 233
How to translate in-form browser. . . 234
How to translate enumeration field labels . . . 235
Chapter 1: Introduction
Purpose
The purpose of this guide is to provide detailed information about Avaya Interaction Center (IC). This guide describes the prerequisites for installing and configuring Avaya IC.
Intended audience
This guide is for the customers using Avaya Interaction Center. You must use this guide for adding, modifying, deleting, and monitoring Avaya IC servers on your IC system.
The audience for this guide includes: ● Application consultants. ● Integration consultants. ● Avaya Business Partners. ● Customers.
Document changes since last issue
Related resources
Documentation
See the following related documents at http://support.avaya.com.
Title Use this document to: Audience
Avaya Interaction Center and Avaya Operational Analyst Overview and Specification
get information about the new features and enhancements in Avaya Interaction Center.
Sales Engineers Supervisors Business Partners Customers
IC Installation Planning and
Prerequisites get information about the planning and third-party software required to deploy an Avaya Interaction Center system.
Business partners Customers
Implementation engineers IC Installation and Configuration get information about how to
install and configure an out-of-the-box Avaya Interaction Center. Sales Engineers Supervisors Business Partners Customers
IC Administration Guide get information about Avaya Interaction Center (Avaya IC). This guide describes domain and server administration using Avaya IC Manager.
Sales Engineers Supervisors Administrators Business Partners Customers
IC Client SDK Programmer
Guide get information about the Client Software Development Kit (Client SDK) for Avaya Interaction Center. Sales Engineers Business Partners Implementation engineers Customers
IC Client and Server
Programmer Design Guide get information about Avaya Interaction Center (Avaya IC). The purpose of this guide is also to provide an overview of the Avaya IC ORB Toolkit, and a list of components in the Avaya IC product set.
Sales Engineers Business Partners Implementation engineers Customers Agent Web Client Customization get information about how to
customize Avaya Agent Web Client.
Supervisors Administrators Business Partners Administrators IC Workflow Designer User
Guide get information about Avaya Workflow Designer and how to use Workflow Designer to create and customize workflows for Avaya Interaction Center.
Supervisors Administrators Business Partners Administrators Agent Script Workflow Reference get information about the
blocks you can use with agent script workflows and other reference information to help you understand and create agent script workflows for Avaya Interaction Center.
Supervisors Administrators Business Partners Administrators Implementation engineers Customers IC Workflow API Reference get information about the
extensions and methods specific to the Application Programming Interface (API) for workflow blocks in Avaya Interaction Center. Supervisors Administrators Business Partners Administrators Implementation engineers Agent Data Unit Server
Programmer Guide get information about configuring and managing the Agent Data Unit (ADU) server, which is responsible for tracking the state of agents at the contact center.
Supervisors Administrators Business Partners Administrators Implementation engineers
Finding documents on the Avaya Support website
Use this procedure to find product documentation on the Avaya Support website.
1. Use a browser to navigate to the Avaya Support website at http://support.avaya.com. 2. At the top of the screen, enter your username and password and click Login.
3. Click Documents.
4. In the Enter your Product Here search box, type the product name and then select the product from the drop-down list.
5. If there is more than one release, select the appropriate release number from the Choose Release drop-down list.
6. Use the Content Type filter on the left to select the type of document you are looking for, or click Select All to see a list of all available documents.
For example, if you are looking for user guides, select User Guides in the Content Type
filter. Only documents in the selected category will appear in the list of documents. 7. Click Enter.
Core Services Programmer
Guide get information for programming and changing the configuration of your IC Core Services.
Supervisors Administrators Business Partners Administrators Implementation engineers Electronic Data Unit Server
Programmer Guide get detailed information about the Electronic Data Unit (EDU) server, which was previously named the Voice Data Unit (VDU) server, the EDU server configuration, the alarms, and the event monitoring.
Supervisors Administrators Business Partners Administrators
IC Telephony Connectors
Programmer Guide get information on the Avaya Telephony Connector server. SupervisorsAdministrators Business Partners Administrators
Training
The following courses are available on the Avaya Learning website at www.avaya-learning.com. In the Search field, enter the course code, and click Go to search for the course.
Viewing Avaya Mentor videos
Avaya Mentor videos provide technical content on how to install, configure, and troubleshoot Avaya products.
Videos are available on the Avaya Support website, listed under the video document type, and on the Avaya-run channel on YouTube.
● To find videos on the Avaya Support website, go to http://support.avaya.com and perform one of the following actions:
- In Search, type Avaya Mentor Videos to see a list of the available videos.
- In Search, type the product name. On the Search Results page, select Video in the Content Type column on the left.
● To find the Avaya Mentor videos on YouTube, go to www.youtube.com/AvayaMentor and perform one of the following actions:
- Enter a key word or key words in the Search Channel to search for a specific product or topic.
- Scroll down Playlists, and click the name of a topic to see the available list of videos posted on the website.
Note:
Note: Videos are not available for all products.
Course Code Course Title
ATC01175WEN IC and OA Overview
ATC01176IEN Interaction Center Administration and Configuration AUCC100010695 IC-Siebel Integration
Support
Go to the Avaya Support website at http://support.avaya.com for the most up-to-date
documentation, product notices, and knowledge articles. You can also search for release notes, downloads, and resolutions to issues. Use the online service request system to create a service request. Chat with live agents to get answers to questions, or request an agent to connect you to a support team if an issue requires additional expertise.
Chapter 2: Database Designer
fundamentals
CCQ and repository are two databases within Avaya Interaction Center (IC). These databases store:
● All the contact data collected by agents using Avaya Agent or the Avaya Agent Web Client. Storing this information in the database has all agents see the history for all customers and customer contacts in the IC system. For more information about these agent applications, see the Avaya Agent User Guide and the online help included with the Avaya Agent Web Client.
● All agent property settings. Properties control such things as which Avaya Agent layout to use when the agent uses Avaya Agent and what filters to apply when the agent opens the
Address Book in the Avaya Agent Web Client. For more information, see IC Administration Guide.
● The GUI definition for the out-of-the-box Report Wizard application. If you change the GUI for either of these applications, you can save the changes to the database and all users will see the new GUI the next time they log into the application. For more information, see IC Administration Guide.
Database Designer facilitates you to:
● Customize the out-of-the-box database structure by creating and modifying tables, fields, table sets, relations, modules, and other application components.
● Implement business rules within an IC application by creating, editing, and then uploading IC Scripts that determine how the application responds when a user selects a button or enters a value in a field.
● Set user-level access. ● Generate search constraints.
● Configure, reconfigure, and administer your databases. ● Generate the Report Wizard.
Note:
Note: Some of the terminology such as table, browser, or group has unique definitions
in Database Designer. These definitions are discussed in this manual and the Avaya IC Glossary.
This section contains the following topics:
● Overview of Database Designeron page 20
● Overview of the ADL fileon page 27
● System IC Scriptson page 29
● How to find items in the tree viewon page 30
● How to view messageson page 31
● How to set permissionson page 31
Prerequisites
To use Database Designer:
● Your Windows logon ID must have administrator privileges on the machine running Database Designer. If your ID does not have administrator privileges, see your System Administrator.
● With languages other than English, enable it for localization as described in How to enable
Database Designer for localizationon page 226.
!
Important:Important: You do not have to be a Database Administrator (DBA) to use Database
Designer. However, a DBA must be involved in the creation, deployment, and support of any IC application and the environment.
Overview of Database Designer
The definition of every IC application is stored in four application files: <appname>.ADL, <appname>.ADF, <appname>.ADC, and <appname>.ALM file. These files contain:
File Extension Contains Comments
ADL (Application
Design Language) Data model information, including tables, table sets, browsers, and modules, and the GUI.
This file is the main application file. When you open an ADL file, Database Designer automatically reads the information in the
associated ADF and ALM files.
When you save an ADL file, Database Designer
automatically updates the information in the ADF and ALM files.
ADF (Application
Design Forms) Definitions for the application GUI elements, including forms, groups, and objects such as buttons, text boxes, and check boxes.
For more information, see
Chapter 9: Layout Editor for
form design.
ADC (Application
Database Connection) Details about the connections between the application databases to both Database Designer and any IC
applications defined in the ADL file.
The information in this file is based on the DB Connection and DB Connection Set information.
For more information, see
Chapter 4: Physical DB connections and DB
connection sets.
ALM (Application
Language Messages) IC Script string table entries, including error messages and warnings.
The default filename for the English version of an ALM file is <appname>.ALM, but you can add as many ALM files as you need. For more
information, see Overview of IC Script string table
CAUTION:
!
CAUTION: Always use Database Designer to make changes to the ADL file. Serious
problems will occur if you make changes to the ADL file in a text editor.
When you open an ADL file, Database Designer parses that file along with the associated ADF and ALM files, and then displays the application components in the tree view in the left-hand pane. The ADL file also displays the properties of the selected component in the Properties tab in the right-hand pane.
Depending on which IC components are in your system and the level of customization, you might use one or more of the following components of Database Designer:
Tree view
The application ADL file is the root of the tree view in the left pane. When you expand the tree view, the second level consists of placeholders for applications and components.
The Applications placeholder contains placeholders for the IC applications. Each application placeholder contains placeholders for all focuses in the application.
The Components placeholder contains placeholders for Tables, Table Sets, Browsers,
Forms, Modules, Physical DB Connections, DB Connection Sets, and IC Scripts. These placeholders contain the related child elements used by all applications.
To expand or contract the tree view, double-click an element on the tree in the left pane.
Component Location and Purpose
Tree view In the left-hand pane of the Database Designer window. Displays a tree view of the components associated with the application. For more information, see Tree viewon page 21.
Properties tab
and Children tab In the right-hand pane of the Database Designer window.● Properties tab. Provides information about the properties and settings of the selected component and lets you modify them. ● Children tab. Shows the next level of hierarchy beneath the
selected component. For more information, see Properties tab
and Children tabon page 22.
Layout Editor Available through the Edit menu. Lets you specify and rearrange the placement of groups, fields, buttons, and other elements of the out-of-the-box IC applications. For more information, see Layout
Editor for form designon page 150.
IC Script Editor Available through the Edit menu. Lets you create new IC Scripts and modify existing IC Scripts to add business rules to your IC
The following is a typical Database Designer window with the tree view expanded and the
Activity table selected:
Properties tab and Children tab
When you select an ADL file element in the tree view, the following tabs in the right pane display information about that element:
● Properties tab: Displays the associated properties of the ADL file element.
● Children tab: Displays the next level of elements beneath the selected tree view element, but provides more information about the children than double-clicking the element in the tree view.
To display the properties of an element, select the element in the tree view and select the
Properties tab in the right pane.
To display the children of an element, select the element in the tree view and select the
Children tab in the right pane.
For many items, you can move from the Properties tab of one item to the Properties tab of an associated item. When you move within the Properties tab, the selected item in the tree view changes appropriately.
Menus
The tasks performed when you select some menu options are unique to Database Designer.
File menu
Edit menu
Unique Options Task Performed
Save Saves the ADL and all supporting files. For example ADF, ADC, ALM.
Save As Saves the ADL file in the chosen directory with the chosen name. Also saves the supporting files in the same directory with the same name as the ADL file.
For example, if you rename the ADL file to george.adl, the supporting files are saved as george.adf, george.adc, and george.alm.
Revert To Saved Rejects all changes made to the ADL and supporting files since the last save.
Generate Windows
Application Displays the that facilitates you to save all changes to the application Generate Windows application dialog box, forms, IC Scripts, the messages and the help files to the database.
For more information, see How to update application
information in the databaseon page 220.
Database Administration Configures and administers the database from Database Designer. For more information, see Overview of database
configurationon page 203.
Unique Options Meaning
IC Scripts Opens the IC Script Editor. For more information, see How to
edit an IC Scripton page 184.
Permissions For tables, for table fields, and for modules, the options opens the Permissions dialog box. For more information, see How
to set permissionson page 31.
New menu
Select an option from the New menu to create a new:
● Component such as Physical DB Connection, DB Connection Set, Table, Table Set, Search Browser, In-Form Browser, Form, or Module.
● Application ● Field ● Relation ● Relation Set ● Group ● Object
● Search Browser Column ● In-Form Browser Column
View menu
Localize Money Fields Opens the New money symbol and the scale dialog box that lets you set a new default currency symbol and scale. For more information, see Currency symbol and money scaleon page 71.
Find Opens the Find dialog box. For more information, see How to
find items in the tree viewon page 30.
Unique Options Meaning
Option Meaning
Children View Displays the Children tab for the selected component or application.
Property View Displays the Property tab for the selected component or application.
Error Message Opens the Error Message window. For more information,
Tools menu
Generating Cognos catalogs
CAUTION:
!
CAUTION: In Avaya Operational Analyst, if a new Catalog (for repository, ccq, or oadb) is
generated using Database Designer, some of the preexisting reports that use the catalog will not work. Either the data shown on the report is incorrect or the user gets an error message saying, "This report will result in a 'cross product' query. This User Profile prevents the use of 'cross product' reports."
Therefore, Avaya recommends that you make minor changes using the Impromptu
Administrator. If the need to generate a new catalog using Database Designer occurs, you might have to redo the data queries in the existing reports. You might have to redo the existing reports to make the reports work with the newly generated catalog. You can generate new reports for the new catalog without any problems.
Before you can use the Export for Cognos catalog option:
● Cognos Impromptu must be installed on the same machine as Database Designer ● The database for the ADL must exist in the database
● A logical database name must be created in Impromptu.
For more information, see the Operational Analyst Release 7.0 Reports Reference.
To create a Cognos catalog, select Tools > Export for Cognos catalog and select a name and location for the catalog. If you generate a Cognos catalog with the same name as an existing
Option Meaning
Export for Cognos
catalog Generates a Cognos catalog by entering the catalog name, the Cognos database name, and your user name and password.
For more information, see Generating Cognos catalogs
Print Data model
information Outputs data model information for the application to either datamodel.htm or datamodel.txt, depending on whether you select HTML format or Text format.
Migrate IC Scripts Updates IC Scripts that were created in an older version of IC to the new IC Script standards.
Database Migration Merges an existing ADL file with the current out-of-the-box ADL file when you are migrating from an older release of IC. For more information about using this functionality, see IC/OA Software Upgrade and Data Migration.
CAUTION:
!
CAUTION: If you get an error during the catalog generation, such as "Database value is not
defined" or "Error in Catalog Generation", the Cognos catalog is not properly generated even if displays in the directory. Ensure that you have created the database definition in Impromptu Administrator, then regenerate the catalog.
Database configuration
Database Designer generates all application data needed to configure your application databases. Perform the following:
1. Open the application ADL file.
2. Modify the Physical DB Connection and DB Connection Set with the required information about your database. For more information, see Chapter 4: Physical DB connections and
DB connection setson page 42.
3. Configure your database with the data model information from the ADL file. For more information, Chapter 13: Database configurationon page 202.
4. Upload any changes to the database and, optionally, generate an IC application. For more information, see How to update application information in the databaseon page 220. You can customize the out-of-the-box Report Wizard application to meet the needs of your company. For more information, see Application designon page 32.
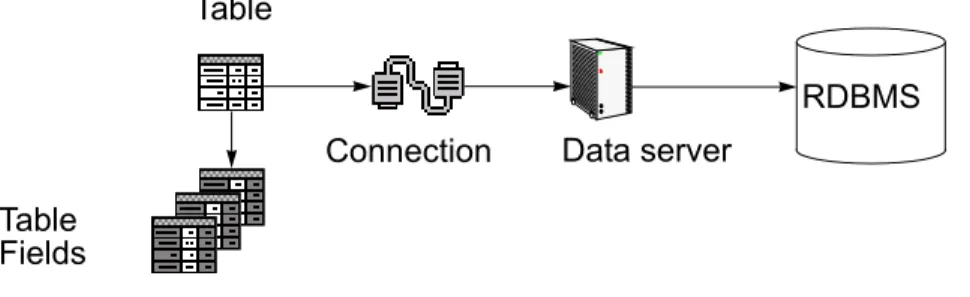
The following diagram shows how Database Designer works with the other Avaya Interaction Center (IC) components:
Note:
Note: Different applications can use different connection sets. However, a connection
set specified for an application is overridden if the same application is regenerated with a different connection set.
Overview of the ADL file
When you open an ADL file, the Properties tab displays properties that apply to the ADL file, instead of individual components.
This tab displays the following fields:
● File Name: Name of the ADL file that is currently open. ● File Path: Path of the directory where the ADL file is located.
● Upload scripts from these directories: The directories that Database Designer searches for IC Script files that end with the extension QSC, when you generate an application and push the scripts to the database. Ensure that all system script file paths are in this property. The default system paths are IC_INSTALL_DIR\IC73\design\common and
IC_INSTALL_DIR\IC73\design\qconsole. For more information, see System IC
Scriptson page 29.
Tip:
Tip: When you push the IC Scripts to the database, Database Designer loads all the
QSC files from the directories. If you want to modify an out-of-the-box IC Script file and also keep both versions in the same directory, ensure you change the out-of-the-box file extension to be .old or anything other than .qsc.
● Script files available for uploading. Shows the names of all IC Scripts in the directories specified above. System IC Scripts are used by the application, but are not specifically associated with an ADL or ADF file component.
● In-house Version. The number or letter assigned by your company to the current version of your IC application. The in-house version is an optional property that companies use that might have multiple versions of a customized application, or release the application to users in various stages of customization. For more information, see How to set the
in-house versionon page 28.
Note:
Note: Before you make any changes to the ADL file, Avaya recommends that you make
a backup copy of the out-of-the-box application design folder. Default location:
IC_INSTALL_DIR\IC73\design.
How to open an ADL file
To open one of the out-of-the-box ADL files: 1. Select File > Open.
2. Select one of the following:
● design\CallCenterQ\ccq.adl for the ccq database.
● design\repository\repository.adl for the repository database, the Report Wizard application, Avaya Agent, Routing Engine, and Prompter
How to set the in-house version
The in-house version is an optional alphanumeric value that companies use that might have multiple versions of a customized application, or release the application to users in various stages of customization.
To set an in-house version number for your ADL file: 1. Select the ADL file at the top level of the tree view.
2. In the Properties tab of ADL, enter the version code in the In-house Version field. 3. Select File > Save to save your updated ADL file.
System IC Scripts
IC system uses System IC ScriptIC ScriptsIC, but are not specifically associated with an ADL or ADF component. To use a system IC Script with your application, you must specify the directory path for the IC Script in the Script files available for uploading field.
Note:
Note: The default system paths are IC_INSTALL_DIR\IC73\design\common and
IC_INSTALL_DIR\IC73\design\qconsole.
The IC Script directory list must include all directories where system IC Scripts are located to ensure each IC Script is:
● Visible in the IC Script Editor
● Pushed to the database when you generate the application
Note:
Note: If an IC Script is located in more than one of the included directories, Database
Designer pushes the version from the directory listed first in the Upload scripts section.
To specify an include path for a system IC Script:
1. Select the ADL file at the top level of the tree view to open the Properties tab of ADL. 2. Select the … (ellipsis) button next to the Script files available for uploading field. 3. In the ADL Include Path dialog box, select Add.
4. In the Browse for Folder dialog box, navigate to the folder where the IC Script is located, then select OK.
5. Repeat step 4 for each directory that you want to include. 6. In the ADL Include Path dialog box, select OK.
7. Select File > Save to save the updated ADL file.
8. Select File > Close to close the ADL file, and then File > Open to reopen it using the new include paths.
How to delete the include paths for system IC Scripts
To delete an include path for a system IC Script:
1. Select the ADL file at the top level of the tree view to open the ADL’s Properties tab. 2. Select the … (ellipsis) button next to the Script files available for uploading field. 3. In the ADL Include Path dialog box, select the directory that you remove, then select
Remove.
4. Repeat step 3 for each directory that you want to remove. 5. In the ADL Include Path dialog box, select OK.
6. Select File > Save to save the updated ADL file.
How to find items in the tree view
If you are looking for a lower level component, such as an object or a table alias, but cannot find the component, you can use the Find tool.
Note:
Note: Find does not cycle through the tree view, or through the properties of each
component.
To find an item in the tree view:
1. Select Edit > Find to open the Find dialog box.
2. Enter the name you want to find from the String to Find list.
3. Check the type of component you want to find from the Type of Components to Find list box.
4. In the Find dialog box, select one or more options: ● Visible only. Finds items only if currently displayed. ● Match case. Makes search case sensitive.
● Match whole word. Finds item only if item name matches search text letter-for-letter. 5. Select:
● Next to display the next occurrence of the component.
● Previous to display the previous occurrence of the component. ● Done to end the search.
How to view messages
You might see the following message types:
● Error. Displays severe errors in your ADL file. You cannot load an ADL file that contains errors.
● Warning. Displays less severe messages that can affect the stability and predictability of your application.
● Report. Displays informational messages only.
● Debug. Displays detailed messages designed to help you identify error conditions. All message types are enabled by default.
To view messages:
1. Select View > Error Message to open the Error Message window
2. Select a message type from the Message Type list. Database Designer displays the selected type of error messages in the dialog box.
To disable messages for a reporting level: 1. Select View > Error Message.
2. In the Error Message window, select a message type from the Message Type list. 3. Clear the Enable Messages of this Type check box.
How to set permissions
Database Designer uses the Avaya Login user ID and password, as defined in IC Manager, to define permissions within applications. When an application starts, the application uses the Avaya Login to authenticate the identity of the user and then set permissions. The Directory server does the authentication by comparing it against the user name or password specified in the employee table. The application then retrieves the list of roles to which the user belongs to as defined in IC Manager, based on the group membership of the employee. The DCO checks all the permissions by comparing the permissions assigned to the table, module, and field in Database Designer against this list.
When the permissions are defined in Database Designer, the group names are typed in or selected from a list of names used previously. Database Designer assumes these names are already defined in IC Manager. Users are added to the groups as appropriate. During
Configure/Reconfigure Database Designer also generates the necessary GRANT/REVOKE statements to apply the specified permissions directly in the database. Therefore, even if the
Chapter 3: Application design
You can create an IC application to automate contact centers for sales, service, and customer complaints. Each application can collect information about customers, products, fulfillment packages, and about other agent tasks. The application can then organize and store the raw information in the database and make it available to users and for management reports. For example, an agent in a contact center takes an order from a customer. The agent records the name, address, and the products that the customer ordered. The order is filled and shipped. One product does not work, so the customer returns it to the service center. A few weeks later, when the customer has not received a replacement, then the customer calls the contact center. The agent can pull up the original order of the customer, to determine if the return was received, and provide information about the status.
An IC application consists of components that define the data model, the application interface, and the business logic. You customize the application by modifying the components while maintaining the component relationships.
Many application components are part of other components. For example, tables contain fields, and forms contain groups. Some application components are used with other components, such as IC Scripts attached to forms, and foreign field links between components. Therefore,
changing one component can affect the functionality of another component.
Note:
Note: Some of the terminology such as table, browser, or group might seem familiar.
However, those words have unique definitions in Database Designer and IC applications which are discussed in this manual and the Avaya IC Glossary. This section contains the following topics:
● Application design fileson page 32
● Application componentson page 33
● How to modify application behavioron page 39
Application design files
As described in Overview of Database Designeron page 20, Database Designer uses an ADL, ADF, and one or more ALM files to define an IC application.
The ADF file contains the form information needed to run your IC application. Database Designer generates and loads these files into the application database.
For more information about generating and uploading files to the database, see How to update
application information in the databaseon page 220.
Application components
The tree view in the left pane of Database Designer displays the components of the ADL file and the hierarchy under the following placeholders:
● Applications. Includes all IC applications that can be generated from the ADL file, the focuses, the modules, and the relations.
● Components. Includes the data model, application interface, Physical DB Connection, and business logic components, such as tables, table sets, browsers, forms, modules, Physical DB Connections, DB Connection Sets, IC Scripts, and the children.
Whether you are using an out-of-the-box IC application or creating one, you begin by updating the Physical DB Connections and DB Connection Sets with connection information for your database, as described in Chapter 4: Physical DB connections and DB connection setson page 42. Then, if you are creating or customizing the application, you start with the tables and work up the hierarchy to the modules.
The following figure shows the parent and child relationships between components in the tree view:
The application component hierarchy
When you create or customize an IC application, you must work with the components in the order shown in this section.
Physical DB connections and DB connection sets
Physical DB Connections and DB Connection Sets provide your IC application with information about a database instance and the Data server. The application uses this information to access tables in a database on the Data server. For more information, see Chapter 4: Physical DB
Tables
The tables, table fields, and table relations in an application are defined by the data model, which is contained in the application ADL file. Each table contains:
● Rows that are unique and hold a single database record.
● Columns that are unique and identify a specified segment of the record such as the last name or the phone number.
● Fields where a row and a column intersect. Each field contains the segment of a database record that matches a column heading. For more information, see Fieldson page 35. ● Keys that identify the database records and segments, define 1 to N relations between
tables, and improve search performance. For more information, see Keyson page 35. For more information, see Overview of database tableson page 60.
Fields
In your database, the tables consist of rows, columns, and fields. A field is the intersection of a row and a column. Each field contains the piece of the database record in the row that is identified by the column. For more information, see Overview of database fieldson page 67.
Keys
Each table can contain one or more keys that are associated with fields. The keys identify data in database records for searches and links between tables. A table can contain one or more primary, foreign, unique, or index keys. For more information, see Overview of database keyson page 75.
Table aliases
Table aliases establish a link between groups in the GUI and tables in the database. Each group in a GUI form is anchored by a table alias, known as the anchor table alias. If objects in the group are linked to table fields, those fields must be in the table represented by the anchor table alias.
A table alias can, and often has the same name as the table. However, tables can have more than one alias, so that the table can be used in different ways by different components. For example, two groups in a form can update two different records in the same table if the groups use different table aliases. In the same way, two IC Scripts can use the same table
simultaneously if the IC Scripts refer to different table aliases.
By using multiple table aliases to address a single database table, you can implement different business rules for a table that is used in several places and ways throughout the application. You create table aliases through the Table Set Properties tab. For more information, see How to
Table sets
A table set is a group of table aliases that constrains the tables that can be displayed and updated in a form or browser.
A form contains groups and browsers, which are linked to a table by an anchor table alias. The table set for a form must contain every table alias linked to a group or browser in the form. The table set, the form, and browsers are then included in the same module. If a table alias is not included in the table set, then that group cannot retrieve or display information from the anchor table alias.
For more information, see How to create a table seton page 80.
Browsers
Browsers are search tools that gather records from a database table for an IC application. Two types of browsers are as follows: search browsers and in-form browsers. You can use browsers in two ways:
● A Search button in the GUI activates a browser search based on constraints that is set by the application user. The browser returns the search results in the GUI form. This form is known as a front-end browser and is in most common use.
● An IC Script activates a browser search. The browser holds the search results. The search results are known as a back-end browser. This works like a declared buffer.
For information on, see Chapter 7: Application browserson page 86.
Forms
Forms define the workflow of your application and provide the users with the sequence of steps needed to perform a task. For example, in the Contact form, an agent can search for and enter all the information needed when a customer calls in to the contact center, including the name and the contact information of the customer. The agent can also search the information by which product related is the customer calling about, and the date, time, issues, and other details about the specific contact.
In the background, each form sets the GUI layout through groups and the objects, and connects to the application database through the associated table set. As a result, each form must:
● Contain one or more groups ● Be associated with a table set
For more information, see Overview of formson page 103.
Groups
Forms must contain one or more groups. Each group must:
● Be associated with a browser, that is, to search against the database table. ● Contain one or more objects.
For more information about, see Overview of groupson page 106.
Objects
Groups can contain several different objects, depending on the type of data. These objects has users edit and adds link to database records with standard interface controls.
You can set the data displayed in objects so the user can: ● Edit the information
● Add to the information which is either append or prepend ● Only read the information
Each object is associated with a field in the database table that corresponds to the group’s anchor table alias. To search for records in the anchor table alias, the user enters values in one or more objects to constrain the search. The search results appear in the browser associated with the group.
For more information, see Overview of objectson page 113.
Modules
Modules package lower-level components together into a building block for your IC application. You create one or more modules to define a focus in your application. A focus combines one or more forms and creates a task workflow for the users.
For more information, see Overview of moduleson page 160.
Relations
A relation module defines the database relation between tables and lets you create objects that agents can use to link records in two database tables. You can link database tables in the following relations:
● 1 to N (one-to-many) ● M to N (many-to-many)
For more information, see Overview of relationson page 167.
Relation sets
Relation sets declare a list of existing relations between table aliases in a module. Relation sets can only include relations that are defined within the table set relation module.
You must specify a relation set for every search function to constrain the search to a subset of tables and, therefore, reduce the amount of time needed to perform a database search. A relation set also constrains the tables that is backfilled when the user selects a browser record. For example, a user searches for contacts from a particular customer. The search browser checks the anchor table alias of the group and any related field information in the tables included in a relation set with the anchor table alias. When the user selects a record from the search browser, the objects in the group are backfilled with data from the table and the related tables.
For more information, see Overview of relation setson page 174.
Overview of focuses
A focus module packages other modules and can contain one or more nested modules. For information about how a module is constructed, see Overview of moduleson page 160.
A focus defines a workflow. Each workflow is a related sequence of activities that an application user is expected to perform. In an IC application, a focus appears in a window with one or more buttons that has the user access the forms in the focus.
Unlike other modules, focus modules are displayed beneath the Focuses placeholder under the application component in the Database Designer tree view.
In Database Designer, when you open the Focuses placeholder beneath each application, the tree view displays all focus (f_) modules that make up the application. The tree view displays the Avaya (q_) and IC Script (qsc_) modules which are not really focus modules together with the (f_) modules.
For each focus (f_) module beneath the Focuses placeholder, the Properties tab of the focus in the right pane displays:
● Label, that is, the name of the focus in the application interface ● Description of the focus
● List of the nested modules that make up the focus
Tip:
Tip: The name of the focus is visible in the Properties tab of the focus, but is greyed
out and unavailable. However, if you select the Go To button, the Properties tab of the focus module opens where you can access and modify all of the properties of the focus module.
If, when you test a focus in the application, a GUI component is missing or does not work, you must check the nested module that includes that GUI item and the components of the module. For more information about how a module is constructed, see Moduleson page 37.