LonMaker
User’s Guide
Release 3.1
Revision 2
@
ECHELON
®
C o r p o r a t i o n
Echelon, LON, LONWORKS, LonTalk, Neuron, LONMARK,
3120, 3150, NodeBuilder, the LonUsers logo, the Echelon logo, and the LONMARK logo are registered trademarks
of Echelon Corporation. LonPoint, LonPoint Schedule Maker, LonMaker and LonSupport are trademarks of Echelon Corporation.
Other brand and product names are trademarks or registered trademarks of their respective holders. NeuronChips, LonPoint Modules, and other OEM Products were not designed for use in equipment or systems which involve danger to human health or safety or a risk of property damage and Echelon assumes no responsibility or liability for use of the NeuronChips or LonPoint Modules in such applications.
Parts manufactured by vendors other than Echelon and referenced in this document have been described for illustrative purposes only, and may not have been tested by Echelon. It is the responsibility of the customer to determine the suitability of these parts for each application.
ECHELON MAKES NO REPRESENTATION, WARRANTY, OR CONDITION OF ANY KIND, EXPRESS, IMPLIED, STATUTORY, OR OTHERWISE OR IN ANY COMMUNICATION WITH YOU, INCLUDING, BUT NOT LIMITED TO, ANY IMPLIED
WARRANTIES OF MERCHANTABILITY, SATISFACTORY QUALITY, FITNESS FOR ANY PARTICULAR PURPOSE, NONINFRINGEMENT, AND THEIR EQUIVALENTS.
No part of this publication may be reproduced, stored in a retrieval system, or transmitted, in any form or by any means, electronic, mechanical, photocopying,
recording, or otherwise, without the prior written permission of Echelon Corporation.
Model Number 39510
Printed in the United States of America. Copyright ©1997-2003 by Echelon Corporation.
Echelon Corporation www.echelon.com
Welcome
Welcome to the LonMaker™ Integration Tool Release 3.1—a software package for designing, installing, and maintaining multi-vendor, open, interoperable LONWORKS® control networks. Based on Echelon's LNS™ network operating system, the LonMaker tool combines a powerful, client-server architecture with an easy-to-use Visio user interface. The result is a tool that is sophisticated enough to design, commission, operate, and maintain a control network, yet economical enough to be left behind as an operation and maintenance tool. The LonMaker tool complies with the LNS in standard, making it compatible with the wide variety of LNS plug-ins that are available from Echelon and many other vendors.
Purpose
The LonMaker User’s Guide and Help files describe how to design, commission, manage, and maintain a network using the LonMaker Integration Tool. It also outlines the new features in Releases 3.13, 3.1, and 3.
Audience
The LonMaker User’s Guide and Help files are intended for system designers and integrators with an understanding of control networks. LonMaker users should also be familiar with Visio 2002.
Related Reading
i.LON™ 1000 Internet Server User's Guide - Describes how to install, configure, use, and manage the i.LON 1000 server as a router and Web server.
i.LON 100 Internet Server User’s Guide - Describes how to install, configure, use, and manage the i.LON 100 server as a Web server, network interface, and LONWORKS device.
Introduction to the LONWORKS System - Introduces the basics of the LONWORKS system.
LNS Utilities and LONMARK Reference Help File - Describes the LNS utilities included with the LonMaker tool and provides reference documentation on LONMARK resource files, device interface files, and standard network variable and configuration property type definitions. NodeBuilder User’s Guide – Describes how to use the NodeBuilder tool in concert with the LonMaker tool to develop and test device applications.
Microsoft Visio Professional Edition User’s Guide, Version 2002 - Describes how to use Visio 2002 Professional Edition.
Microsoft Visio Standard Edition User’s Guide, Version 2002 - Describes how to use Visio Standard 2002.
Developing Visio Solutions for Microsoft Visio 2002 - Describes how to customize Visio 2002. Go to the LonMaker home page at www.echelon.com/lonmaker for the latest versions of
documentation and any available updates for your software. Go to types.lonmark.org for updated resource file documentation.
Content
• Introduction: Provides an introduction to the LonMaker tool, new features in LonMaker 3.13, 3.1, and 3, LonMaker network designs, LONWORKS Basics, and Visio Basics.
• Getting Started: Provides information on hardware requirements, installation of the various LonMaker tool components, a quick-start tutorial, the LonMaker Design Manager, creating and opening a LonMaker network design, using the LonMaker tool remotely, and backing up and restoring LonMaker Networks.
• Designing Networks: Provides information on designing networks, optimizing network performance, navigating the subsystem hierarchy, next steps, and controlling access with user profiles.
• Creating Networks: Includes information on creating networks (such as creating a LonMaker drawing, subsystems, devices, i.LON Internet Server, supernodes, channels, functional blocks, and connections); working with LonMaker shapes and layers; customizing the LonMaker user interface; using LonMaker demo mode and using LonMaker with AutoCAD drawings.
• Installing Networks: Covers commissioning devices and routers, and creating a network service device.
• Maintaining Networks: Describes loading devices, replacing devices and routers, using LonMaker styles, and merging LonMaker networks.
• Managing Networks: Provides information on managing devices, functional blocks, routers, and subsystems.
• LonMaker Credits: Provides information on licensing; using, viewing and adding LonMaker credits; and transferring a LonMaker license.
• Using LNS Plug-ins: Provides an overview of LNS plug-ins and then describes starting a plug-in, getting plug-in information, and re-registering plug-ins.
• Monitoring and Controlling Devices: Provides an overview of monitor and control functions with LonMaker and then gives directions on setting browser options, changing types and formats, monitoring connections, and binding network variables to the host.
• Creating and Using LonMaker Shapes and Stencils: Describes LonMaker stencils and the process to create them; creating and usingcustom master shapes for devices, functional blocks, subsystems, and connections; additional user cells for devices, functional blocks, and routers; and setting user-defined functional block modes and types.
• Creating HMI Applications: Describes using the LonMaker tool for human machine interface (HMI) applications, the LNS text box, third-party ActiveX controls, and custom LNS-based ActiveX controls.
• Appendices: Include the LonMaker Credits Order Form, instructions for installing network drivers, the LonMaker Software License Agreement, LonMaker License Transfer Agreement, and a Glossary.
For More Information and Technical Support
See the LonMaker User’s Guide, the LonMaker for Windows help file, the LonPoint Application and Plug-In Guide, and the LonPoint Plug-In help file for detailed information on using the LonMaker tool and the LonPoint plug-in. Adobe Acrobat versions of the LonMaker User’s Guide and LonPoint Application and Plug-In Guide are also included in LonMaker and LonPoint program folders when you install the LonMaker and LonPoint software. You’ll need the Adobe Acrobat reader that is optionally installed by the LonMaker setup application to view these files. See the LonMaker and LonPoint Plug-In ReadMe files for descriptions of known problems and workarounds. To view the LonMaker ReadMe file, click the Windows Start button, point to
Programs, select the Echelon LonMaker for Windows folder, then select Read Me First. To view the LonPoint ReadMe file, click the Windows Start button, point to Programs, select the Echelon LonPoint Device Software folder, then select Read Me First.
You can also find additional LonMaker and LonPoint information at the LonMaker Home Page at www.echelon.com/lonmaker.
If you have technical questions that are not answered by the documentation, on-line help, or LonMaker home page, you can get technical support from Echelon. Your LonMaker distributor may also provide customer support. You can also enroll in training classes at Echelon to learn more about how to use the LonMaker tool To receive technical support from Echelon for the LonMaker tool, you must register your copy with Echelon and you must purchase one of Echelon’s incident-based support services. Detailed information about Echelon’s support and training services may be found on the Echelon Support home page at www.echelon.com/support. There is no charge for software installation-related questions during the first 30 days after you receive the LonMaker CD. You can obtain technical support via phone, fax, or email from your closest Echelon support center. The contact information is listed in the following table.
Caution The support programs and the information in the following table are subject to change.
See the Echelon Services home page at www.echelon.com/support for a description of the current offerings and support contracts. Your LonMaker distributor may provide you with alternate contacts for support.
London San Jose Tokyo
Language English/French/
German/Italian English Japanese
Hours (Mon-Fri*)
0900-1700 London Time 8:30am-4:30pm PDT 0900-1700 Tokyo Time
Telephone +44 (0) 1923 430200 +1-408-938-5200 +1-888-ECHELON (888-324-3566; US and Canada only)
+81 3 3440 7781
Fax +44 (0) 1923 430300 +1-408-328-3801 +81 3 3440 7782
Email [email protected] [email protected] [email protected] *Excluding holidays at center location
Echelon will provide Visio support only for those Visio features that are required for use of the LonMaker tool. To receive support for Visio from Microsoft, you must separately purchase a retail version of the Microsoft Visio Professional or Standard 2002 drawing application. Echelon will not support use of the LonMaker tool with versions of Visio other than the version included on the LonMaker CD.
Your suggestions on how to improve the product’s functionality and documentation are always welcome. Please send your comments to [email protected] (please do not use this address for technical support questions; technical support questions should be sent to
Table of Contents
Welcome... i
Purpose ... i
Audience... i
Related Reading... i
Content ... i
For More Information and Technical Support... ii
Table of Contents ... iv
1 Introduction
1-1
Introduction to the LonMaker Tool...1-2 New Features in Release 3.13 ...1-3 Professional, Standard, and Trial Editions...1-3 Professional Edition...1-3 Standard Edition ...1-3 Trial Edition...1-3 xDriver Support ...1-3 New Features in Release 3.1 ...1-4 LONMARK Enhancements...1-4 Performance Improvements...1-4 Network Design Improvements...1-4 Other New Features...1-4 New Features in Release 3 ...1-4 Design Automations...1-5 User Efficiency Improvements ...1-5 Network Recovery...1-5 Network Merge...1-6 HMI Support ...1-6 Other New Features...1-6 New Plug-ins ...1-7 LonMaker Network Designs ...1-7 LONWORKS Basics ...1-8 LONWORKS Networks...1-8 Channels...1-8 Applications ...1-9 Subsystems ...1-10 Network Channels...1-10 LonMaker Client Types ...1-10 Visio Basics ...1-11
2 Getting Started
2-1
What's Included with this Release...2-2 Hardware Requirements...2-2 Installing the LonMaker Integration Tool ...2-3 Installing Visio ...2-5 Installing the LonMaker Tool...2-5 Installing the LonPoint Applications, Plug-in, and Utilities ...2-6 Installing Network Drivers ...2-7 Installing Adobe Acrobat Reader ...2-7 LonMaker Design Manager Overview ...2-7 LonMaker Quick Start Tutorial...2-11 Setting Up a Network Interface...2-22 Creating and Using a LonMaker Network Design ...2-24
Creating a LonMaker Network Design...2-25 Working with Digital Signatures...2-30 Creating a Drawing for an Existing LNS Database...2-30 Recovering a Network...2-31 Opening an Existing LonMaker Network Design ...2-39 Opening a Copy of an Existing LonMaker Network ...2-41 Using a Local Client...2-43 Using a Remote Client...2-44 Remote Full Client...2-45 Remote Lightweight Client ...2-47 Starting the LNS Server ...2-48 Using the LonMaker Tool on a Remote Full Client ...2-49 Using the LonMaker Tool on a Remote Lightweight Client ...2-51 Using the LonMaker Tool with Multiple Users ...2-55 Giving Write-Access to LonMaker Drawings ...2-55 Using LonMaker Backup Files...2-56 Backing Up a LonMaker Network ...2-56 Restoring a LonMaker Network ...2-58
3 Designing Networks
3-1
Design Overview ...3-2 Designing LonMaker Networks ...3-2 Network Installation Scenarios ...3-3 Engineered System Scenario ...3-3 Ad-Hoc Scenario ...3-3 Optimizing LonMaker Network Performance...3-3 Using Multiple Drawing Files...3-3 Making Numerous Network Changes ...3-4 Using Connections...3-4 Sharing the LNS Interface with the LNS DDE Server...3-4 Using Functional Blocks for Optimization ...3-5 Using Subsystems for Optimization ...3-5 Navigating the Subsystem Hierarchy ...3-5 Navigating using the Network Explorer...3-6 Using Network Navigators ...3-7 Controlling Access to LonMaker Network Designs ...3-8 User Profiles...3-8 Modifying and Deleting User Profiles as the Administrator...3-8 Creating a New User Profile ...3-10 Changing Passwords ...3-12 Using the LonMaker Tool Remotely with User Profiles ...3-12 Next Steps ...3-12
4 Creating Networks
4-1
Creating a LonMaker Drawing...4-2 Using The LonMaker and NodeBuilder Basic Shapes Stencils ...4-2 Creating a Subsystem ...4-3 Creating a Supernode...4-4 Accessing Subsystem Commands ...4-5 Updating Multiple Subsystem Devices...4-6 Copying a Subsystem or Supernode ...4-8 Creating a Device ...4-9 Creating an i.LON 1000 Internet Server...4-14 Creating a Channel...4-15 Using LonMaker Layers...4-17 Using Functional Blocks Overview ...4-17
Creating a Functional Block ...4-18 Adding Network Variable and Message Tag Shapes ...4-20 Dynamically Creating Network Variables...4-21 Removing Network Variable and Message Tag Shapes ...4-23 Configuring a Functional Block ...4-24 Copying a Functional Block Configuration...4-25 Creating a Connection Overview...4-25 Creating a Connection with the Connector Shape...4-26 Creating a Connection with the Connect Command...4-27 Using Reference Connections ...4-29 Using Connection Descriptions...4-30 Using Functional Blocks or Supernodes in Different Subsystems...4-31 Creating Additional Channels ...4-31 Creating a Router ...4-33 Working With LonMaker Shapes...4-38 Viewing and Setting LonMaker Shape Properties ...4-38 Moving a LonMaker Shape ...4-39 Changing Channels...4-39 Moving Devices, Routers, and i.LON 1000 Servers...4-39 Deleting a LonMaker Shape ...4-41 Copying a LonMaker Shape ...4-42 Using Device Templates ...4-42 Customizing the User Interface Overview ...4-43 Editing the Title Block ...4-43 Setting the LonMaker User Interface ...4-44 Using LonMaker Demo Mode...4-44 Using AutoCAD Drawings Overview ...4-44 Importing from AutoCAD...4-44 Exporting to AutoCAD...4-45
5 Installing Networks
5-1
Network Installation Overview ...5-2 Commission Devices and Routers Overview ...5-2 Commissioning Devices and Routers ...5-3 Loading an Application Image...5-3 Setting the Initial State: Devices and Routers ...5-5 Device Initial State Window...5-5 Router Initial State Window ...5-7 Installing Devices or Routers ...5-9 Manual or Neuron ID Method for Multiple Devices and Routers...5-10 Service Pin Method ...5-10 Discovering Devices...5-12 Commissioning Using Bar Codes ...5-17 Introducing Network Service Device Shapes ...5-17 Listing Network Service Devices...5-18 Upgrading Network Service Device Shapes...5-19 Replacing a Local Network Service Device ...5-19
6 Maintaining Networks
6-1
Maintaining Networks Overview ...6-2 Loading New Applications Overview ...6-2 Loading a New Application into a Device or Devices ...6-2 Replacing Devices and Routers Overview ...6-4 Replacing Devices and Routers...6-4 Decommissioning Devices and Routers...6-5 Resynchronizing Configuration Properties ...6-6
Recommissioning a Network After Restore...6-7 Resynchronizing the Drawing, Database, and Network...6-8 Using LonMaker Styles Overview ...6-17 Using LonMaker Device Styles ...6-17 Using LonMaker Functional Block Styles ...6-17 Using LonMaker Connector Shape Styles...6-18 Using Network Variable and Message Tag Shape Styles ...6-18 Modifying LonMaker Styles...6-19 Merging LonMaker Networks Overview ...6-19 Network Merge Considerations Overview ...6-19 Merge Limitations ...6-19 Information Loss ...6-20 Merging Two LonMaker Networks ...6-21
7 Managing Networks
7-1
Managing Networks Overview...7-2 Managing Devices...7-2 Managing Functional Blocks ...7-4 Managing Routers...7-5 Device Manager Settings...7-7 Status Summary ...7-8 Introducing the LNS Report Generator...7-12 Generating a Report...7-12
8 LonMaker Credits
8-1
Licensing with the LonMaker Tool...8-2 Using LonMaker Credits ...8-2 Viewing LonMaker Credits ...8-2 Using Deficit Credits ...8-3 Licensing Remote Clients...8-4 Adding LonMaker Credits ...8-5 Transferring a LonMaker License...8-7
9 Using LNS Plug-ins
9-1
Using LNS Plug-in Overview ...9-2 Starting a Plug-in ...9-2 Viewing Plug-in Information...9-3 Re-Registering Plug-ins...9-4 Refreshing the LonMaker Network...9-4
10 Monitoring and Controlling Devices
10-1
Monitoring and Controlling Overview ...10-2 Changing Types and Formats ...10-5 Monitoring Connections...10-6 The LonMaker Browser ...10-6 The LonMaker Browser Toolbar ...10-8 Monitoring Network Variables ...10-9 Using Bound Updates ...10-10 Modifying Network Variable and Configuration Property Values...10-10 Modifying Network Variable and Configuration Property Properties .10-11 Displaying Error Messages ...10-11 Managing Functional Blocks ...10-12 Network Variable/Configuration Property Details ...10-12 Configuration Property Table ...10-12 Changing Network Variable Type ...10-12 Changing Network Variable/Configuration Property Format ...10-13
Customizing the Browser ...10-14 Customizing Browser Columns ...10-14 Customizing Browser Rows...10-14 Saving Browser Customization ...10-15 Setting Browser Options ...10-15 Browser Options: General ...10-15 Browser Options: Messaging...10-16 Browser Options: Configuration Properties ...10-16 Browser Options: Network Variables...10-16 Browser Options: Remote Lightweight Client Properties ...10-16 Binding Network Variables to the Host...10-17 Using the LNS Text Box Overview ...10-17
11 Creating and Using Custom LonMaker Shapes and Stencils11-1
LonMaker Stencils ...11-2 Creating a Custom LonMaker Stencil...11-2 Creating Custom LonMaker Master Shapes ...11-2 Using Custom LonMaker Master Shapes...11-3 Device Master Shapes...11-3 Functional Block Master Shapes ...11-4 Subsystem or Supernode Master Shapes ...11-5 Connection Master Shapes...11-5 Editing Master Shape User Defined Cells ...11-7 Additional Device User Cells...11-8 Additional Functional Block User Cells ...11-11 Additional Router Shape User Cells ...11-12 Setting User Functional Block Scopes and Types ...11-12 Adding a Bitmap to the Device Master Shape...11-13 Viewing and Editing VBA Code Associated with
a LonMaker Network Drawing ...11-13
12 Creating HMI Applications
12-1
Using the LonMaker Tool for HMI Applications ...12-2 Using the LNS Text Box ...12-3 Adding an LNS Text Box...12-3 Creating an LNS Text Box Custom Master Shape ...12-5 Monitoring a Value with the LNS Text Box ...12-5 Updating a Value with the LNS Text Box...12-5 Deleting an LNS Text Box...12-6 Using a Third-Party ActiveX Control...12-6 Inserting a Third-Party ActiveX Control...12-7 Monitoring a Value with a Third-Party ActiveX Control...12-7 Updating a Value with a Third-Party ActiveX Control ...12-8 Copying LNS Text Box and Third-Party ActiveX Controls ...12-9 Creating a Custom LNS-Based ActiveX Control ...12-9 Registering an LNS-Based ActiveX Control ...12-10 Establishing LNS ActiveX Control Properties ...12-11 Custom LNS-Based ActiveX Control Example ...12-12
A LonMaker Credits Order Form
A-1
LonMaker Credits Order Form... A-2
B Installing the PCLTA-10, PCLTA-20, or PCC-10 Drivers
B-1
Installing the PCLTA-10, PCLTA-20, and PCC-10 Drivers ... B-2 PCLTA-10 Adapter Hardware Installation Procedure ... B-5 PCLTA-10 Configuration Procedure ... B-5
PCC-10 Card Hardware Installation... B-7 PCC-10 Configuration Procedure ... B-8
C LonMaker Software License Agreement
C-1
LonMaker Software License Agreement ... C-2
D Software License Transfer Agreement
D-1
Software License Transfer Agreement... D-2
E Glossary
E-1
1
Introduction
This chapter provides an introduction to the LonMaker tool; describes new
features in LonMaker 3.13, LonMaker 3.1, and LonMaker 3; and introduces
LonMaker network designs, L
ONW
ORKSbasics, and Visio basics.
Introduction to the LonMaker Tool
The LonMakerTM Integration Tool is a multipurpose LONWORKS ® network tool that runs on a
computer under the Windows XP, Windows 2000, and Windows 98 operating systems and uses Microsoft Visio® Professional or Standard 2002 as a graphical interface. The LonMaker tool
functions as the following:
• Network Design Tool – The LonMaker tool allows you to design a network without being connected to it. This allows network design to be done off site (engineered system
installation scenario). The LonMaker tool also allows network design to take place on site (ad-hoc installation scenario), which may be desirable for smaller networks or networks in which the network topology is unknown until on-site. The LonMaker tool can learn the design from an existing network; this process is called recovery. The LonMaker tool also enables an engineered, ad-hoc, or recovered network to be changed at any time.
• Network Installation Tool – The LonMaker tool allows an engineered network to be rapidly installed once the network design is brought on site. The engineered device definitions can be quickly and easily associated with their corresponding physical devices to reduce on-site commissioning time. The LonMaker Browser provides complete access to all network variables and configuration properties.
• Network Documentation Tool – Since the LonMaker tool creates a Visio drawing in parallel with the network design and installation process, this drawing accurately represents the installed network, making it an essential component of as-built reports.
• Network Operation Tool – The LonMaker tool supports the operation of a network using operator interface pages contained within the LonMaker drawing.
• Network Maintenance Tool – The LonMaker tool allows devices, routers, channels, subsystems, and connections to be easily added, tested, removed, modified, or replaced to support system maintenance.
This versatility allows the LonMaker tool to be used as a single-tool solution for all phases of a network’s life cycle: from initial design and commissioning to ongoing operation and
maintenance.
The LonMaker tool runs on the LNS™ network operating system. LNS provides the essential directory, installation, management, monitoring, and control services required for open
LONWORKS networks. LNS is a standard platform that allows multiple LNS applications such as the LonMaker tool, LNS plug-ins, and the LNS DDE Server to interoperate on the same computer or on multiple computers on the same network.
LNS is a client-server operating system with a single LNS Server that supports many
interoperating client applications. You can run the LNS Server as a standalone application on a computer attached to the network, or you can run the LNS Server on the same computer with the LonMaker tool. Clients on other computers (called remote clients) can log into the LNS Server to access the shared LNS database.
The LonMaker tool uses the client-server capabilities of LNS to allow multiple LonMaker tools running on different computers to simultaneously access the same LNS Server. This capability allows multiple users to work at the same time on a single network. For more information, see Using the LonMaker Tool Remotely.
LonMaker Network Designs provides an overview of the components of a LonMaker network design: an LNS network database and a LonMaker drawing.
LONWORKS Basics provides an important introduction to the structure of a LONWORKS network, the channels connecting it to an LNS Server, the LonMaker computer, LonMaker client types, and related terms.
Visio Basics provides an introduction to the powerful graphical interface used in creating a LonMaker drawing.
New Features in Release 3.13
Release 3.13 of the LonMaker Integration Tool includes enhancements to the following areas:
• Support for three editions of the LonMaker tool—Professional, Standard, and Trial.
• xDriver support.
Professional, Standard, and Trial Editions
Starting with release 3.13 of the LonMaker tool, three editions are available—Professional, Standard, and Trial. These editions differ in what edition of Visio 2002 is included, how many LonMaker credits are included, and how long the software functions.
Professional Edition
• Ships with Visio Professional 2002 with Service Release 1. This version of Visio includes all the features of Visio Standard with the addition of support for engineering drawings; building space, and floor plans; network diagrams; directory services diagrams; Web site maps; and software/database diagramming with reverse engineering. Drawings created with Visio Professional 2002 can be opened by Visio Standard 2002. See the Visio Professional documentation for more details on these features.
• Comes with 64 LonMaker credits. You can purchase additional credits as described in Chapter 8.
• No time limit on operation.
Standard Edition
• Ships with Visio Standard 2002 with Service Release 1.
• Comes with 5 LonMaker credits. Additional credits can be purchased as described in Chapter 8.
Trial Edition
• Ships with Visio Professional Trial 2002 with Service Release 1. This version of Visio includes all the features of Visio Professional 2002, but expires after 30 days.
• All drawings created with this version include the words “LonMaker Demonstration Network” in large gray letters in the background.
• Networks are limited to 6 devices maximum. You cannot order LonMaker credits.
• Quits functioning after 30 days. To continue using the LonMaker tool after 30 days, you must license the LonMaker Professional or Standard Edition.
xDriver Support
Version 3.13 includes the LNS xDriver, which allows you to use i.LON 10 and i.LON 100 Internet Servers as LONWORKS remote network interfaces. This allows you to use the LonMaker tool remotely from your network, using an Internet connection to your network via the i.LON 10 or i.LON 100. See the documentation for these devices for more information. As with LonMaker 3, LonMaker 3.13 can also be used with the i.LON 1000 Internet Server, which functions as a router instead of a remote network interface, providing a higher performance interface.
New Features in Release 3.1
Release 3.1 of the LonMaker Integration Tool includes enhancements in the following areas. These are described in the following sections.
• Enhancement to support more LONMARK® features.
• Performance improvements.
• Network design improvements.
L
ON
M
ARK
Enhancements
New features include the following:
• You can add dynamic network variables to any functional block, for devices that support this feature.
• Improved support for changeable network variable type and size using the new SCPTnvType configuration property.
• Color coding in the LonMaker browser to show what values can be edited.
• LonMaker browser support for long configuration property types.
Performance Improvements
New performance improvements include the following:
• Large drawing resynchronization is much faster.
• You can suppress address table and network variable configuration table updates to the source device for a connection, making the device responsible for managing the destination addresses and allowing more complex connection topologies.
Network Design Improvements
New network design features include the following:• You can automatically add network variable shapes to a functional block when you create the functional block.
• You can now change alias options for a connection.
Other New Features
Other new features include the following:
• You can refresh a drawing to support plug-ins modifying the LNS database.
New Features in Release 3
Release 3 of the LonMaker Integration Tool includes enhancements in the following areas. These are described in the following sections.
• Design automations reduce engineering time
• User efficiency improvements reduce installation time
• Network recovery reduces maintenance costs for legacy systems
• Human-machine interface (HMI) support provides a single tool solution for network design, installation, and operation
Design Automations
New features and the resulting benefits in design automation include the following:
• Supernode master shapes simplify reuse of frequently used designs
• Batch operations eliminate repetitive operations
• Create up to 64 devices of the same type with one operation
• Create up to 64 functional blocks of the same type with one operation
• Create peer-to-peer connections, fan-in/fan-out connections, and configuration changes as a batch operation
• New and enhanced solutions in Visio 2002 reduce time to create common drawings (these are only available with the LonMaker Professional Edition)
• Improved HVAC control logic diagrams
• Improved facilities diagrams
• Improved plant layouts, network diagrams, piping and instrumentation diagrams, plumbing and piping plans, floor plans, and more
• LonMaker Network Explorer simplifies navigation through large systems
• Visio pan and zoom window simplifies navigation within pages These new features reduce engineering time and cost.
User Efficiency Improvements
New features that improve user efficiency include the following:
• Multi-device operations reduce time required to commission, replace, and upgrade related devices
• New i.LON™ 1000 shape reduces time required to commission and replace i.LON 1000
devices
• Enhanced shape styles simplify diagnostics and reduce time to bring up subsystems
• Batch commissioning plug-in available for free download as described under New Plug-Ins below
These enhancements reduce installation time and cost.
Network Recovery
The LonMaker tool now includes network recovery that allows you to do the following:
• Use the LonMaker tool with legacy networks installed with previous generation tools and networks that do not have a network database
• Automatically create both an LNS database and a LonMaker drawing
• Automatically create an LNS database from an existing network
• Recover device names from a LonManager API database
• Automatically create a LonMaker drawing from an LNS database Network recovery reduces maintenance costs for legacy systems.
Network Merge
With the new network merge feature, you can do the following:
• Create a single LonMaker network from two independent networks. The new network contains all the devices, connections, and configuration of the two networks.
• Independently engineer, install, and verify independent systems. After verification, these systems can be merged into a single network for ease of system operation, data sharing, and maintenance.
Network merge facilitates faster installation of large systems.
Examples of using the network merge capability include the following:
• Multiple-story building
Step 1: Independently commission and verify each floor as a separate network Step 2: Merge the floors to create a single network
• Building with multiple independent integrators
Step 1: Independently commission and verify each system (HVAC, lighting, and security, for example) as a separate network
Step 2: Merge the subsystems to create a single network
The above examples can be combined for a building with multiple stories and multiple integrators.
HMI Support
• Used to create HMI applications. This capability is not a replacement for high-end HMI tools, such as Wonderware InTouch, but it is adequate for many systems.
• Use the following HMI tools with the LonMaker tool:
• Visio supports ActiveX controls
• Visual Basic for Applications (VBA) scripting language is included with Visio
• LNS Text Box (new release) is an ActiveX control that can display and update any network variable, any configuration property, and any functional block override (new)
• Optional third-party ActiveX controls, such as National Instruments ComponentWorks, and link to LNS Text Box using VBA
Benefits of the enhanced LonMaker HMI capabilities include the following:
• Use a single tool to design, commission, and operate a network, which results in lower cost and is easier to learn.
• Can be left behind to support both system operation and on-site maintenance. LonMaker user profiles can be used to control access to the LonMaker tool. Therefore, operators can interact with the HMI, but cannot change the network design or installation. Integrators can maintain full access.
Other New Features
The LonMaker tool version 3 includes many other new features, such as the following:
• LNS 3 enhancements reduce design, commissioning, and maintenance time and improves monitoring and control performance
• Optional graphics on device shapes, which supports differentiation by original equipment manufacturers (OEMs)
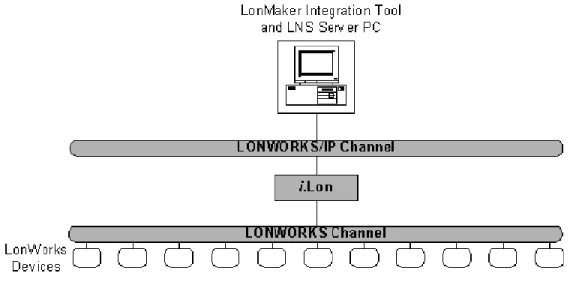
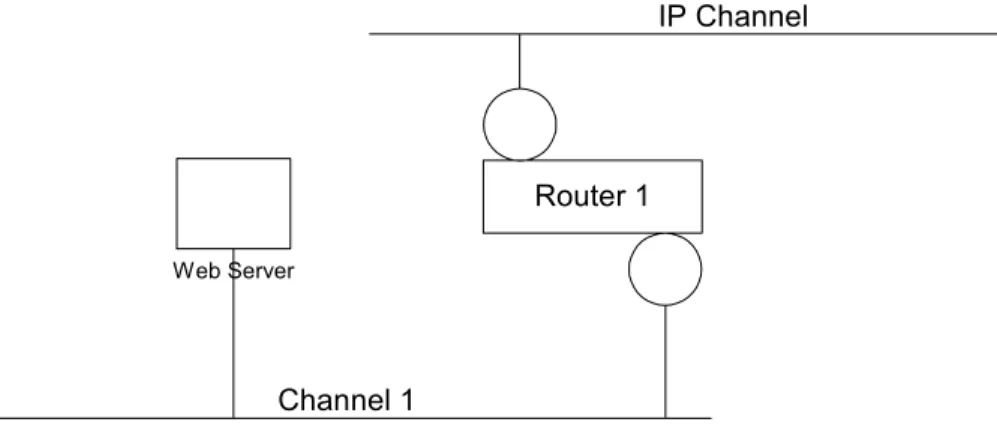
• LNS 3 combined with the i.LON 1000 Internet Server creates many possibilities. The graphic below shows one example.
New Plug-ins
Although not part of the LonMaker 3 product, a number of new plug-ins are available that are compatible with LonMaker 3. For a complete list of available plug-ins, see
www.echelon.com/plugins. Many of the plug-ins listed here are available for free download. Besides the many device plug-ins listed, there are several new general-purpose plug-ins.
LonMaker Network Designs
You will use the LonMaker tool to create, install, document, operate, and maintain LonMaker network designs. A LonMaker network design consists of an LNS network database and a LonMaker drawing.
An LNS network database contains definitions of the devices contained within a LonMaker network, including information such as name, address, application configuration, and network connections for each device. Whenever you change to a LonMaker drawing, the LonMaker tool automatically uses LNS services to update the information in the LNS network database associated with the LonMaker drawing.
There is only one LNS network database per network, and the LNS network database is always located on the computer with the LNS Server. You can maintain backup copies of the LNS network database, and you can move the LNS Server and LNS network database to a backup computer. See Using LonMaker Backup Files for more information.
A LonMaker drawing contains the graphical representation of the LonMaker network. A LonMaker drawing consists of one or more drawing files; each drawing file consists of one or more pages, each page represents an LNS subsystem. One drawing file is designated as the top-level drawing file; this drawing file is the one created when you create a new LonMaker network design.
A LonMaker drawing is always located on the computer running the LonMaker tool. If you are running multiple LonMaker tools on the same LonMaker network, each computer running a
LonMaker tool must have a copy of the LonMaker drawing. Multiple-user operation is described under Using the LonMaker Tool with Multiple Users.
L
ON
W
ORKS
Basics
This section provides an overview of the following topics and defines related terms:
• LONWORKS networks
• Network channels
• LonMaker client types
The Glossary in Appendix E provides a quick reference for specific terms.
L
ONW
ORKSNetworks
A LONWORKS network consists of intelligent devices (such as sensors, actuators, and controllers) that communicate with each other using a common protocol over one or more communications channels. Network devices are sometimes called nodes.
Each device includes one or more processors that provide its intelligence and implement a communications protocol. Each device also includes a component called a transceiver to provide its electrical interface to the communications channel.
A device publishes information as appropriate to the application that it is running. The
applications on different devices are not synchronized, and it is possible that multiple devices may all try to talk at the same time. Meaningful transfer of information between devices on a network, therefore, requires organization in the form of a set of rules and procedures. These rules and procedures are the communication protocol, often called the protocol. The protocol defines the format of the messages being transmitted between devices and defines the actions expected when one device sends a message to another. The protocol normally takes the form of embedded software or firmware code in each device on the network. The protocol used on LONWORKS networks is defined by the ANSI/EIA/CEA-709.1 standard. Echelon’s implementation of this standard is called the LonTalk® protocol.
A device template is a template used by LNS that defines the information published and consumed by a given device type (functional blocks, network variables, configuration properties, and so on). For example, the Echelon LonPoint™ devices all have associated device templates. When you drag a LonPoint device shape to a LonMaker drawing, the LonMaker tool creates the new device according to that device template.
Channels
The path between devices exhibits various physical characteristics and is called the
communications channel, or simply channel. Different transceivers may be able to interoperate on the same channel, so channels are categorized by channel type, and every type of transceiver must identify the channel type or types that it supports. The choice of channel type affects transmission speed and distance as well as the network topology.
Multiple channels can be connected using routers. Routers are used to manage network message traffic, extend the physical size of a channel (both length and number of devices attached), and connect channels that use different media (transceiver types) together. Unlike other devices, routers are always attached to two channels.
Applications
Every device must contain an application. The application may be in a device when you purchase it, or you may load it into the device from application files (.apb and .nxe extensions) using the LonMaker tool. The application helps determine how a device functions.
Applications may contain the following variables and properties, which are defined in the device template:
Network variables Data items (such as temperature, switch value, or actuator position setting) that a particular device application program expects to receive from other devices on the network (an input network variable) or expects to make available to other devices on the network (an output network variable). Network variables allow a device to send and receive data over the network to and from other devices.
Configuration properties Data items that define configuration options for a device application. The application reads the values from the network variables and configuration properties and performs functions upon them. For example, an
application may allow an arithmetic function (add, subtract, multiply, or divide) to be performed on two values received from two network variables. The function to be performed could be determined by a configuration property.
Every network variable and configuration property has a type, which determines the content and structure of the data. The LONMARK Interoperability Association defines the following types: Standard Configuration
Property Types (SCPTs, pronounced skipits)
Contain many common configuration data types. For example, SCPT_location is a configuration property type for configuration properties containing the device location as a text string
Standard Network Variable Types (SNVTs, pronounced snivits)
Contain many common operational data types. For example, SNVT_temp_f is a network variable type for network variables containing temperature as a floating-point number
See types.lonmark.org for a list and description of all SNVTs and SCPTs.
Applications may use manufacturer-defined non-standard types — user network variable types (UNVTs) and user configuration property types (UCPTs) — which are defined in user resource files.
Device manufacturers may provide additional resource files that define these types. See types.lonmark.org for additional information on creating or using these files.
Applications in devices are divided into one or more functional blocks. A functional block is a collection of network variables and configuration properties, which are used together to perform one task. For example, a LonPoint DI-10 module has four digital input functional blocks that contain the configuration properties and output network variable for each of the four hardware digital inputs on the DI-10 device.
The application program in a device does not need to know anything about where input network variables come from or where output network variables go. When the application program has a changed value for an output network variable, it simply passes the new value to the device firmware. Through a process called binding that takes place during network design and
installation, the device firmware is configured to know the logical address of the other device or group of devices in the network expecting that network variable. It assembles and sends the appropriate packets to these devices. Similarly, when the device firmware receives an updated value for an input network variable required by its application program, it passes the data to the application program. The binding process thus creates logical connections between an output
network variable in one device and an input network variable in another device or group of devices. Connections may be thought of as “virtual wires.”
Subsystems
Devices, routers, and functional blocks are contained in subsystems. With the LonMaker tool, each subsystem corresponds to one page within a LonMaker drawing. Subsystems allow you to place devices, routers, and functional blocks onto separate pages for organizational purposes. You may also place subsystems in other subsystems, allowing you to create a subsystem hierarchy for large networks. For example, a network may consist of HVAC, lighting, security, and operator subsystems. These may be further divided into subsystems for each floor, and each floor divided into subsystems for each room.
Using the LonMaker tool, you can also use subsystems to create supernodes. A supernode is a subsystem with its own network variable interface. Supernodes may be used to organize groups of devices into logical units and to hide complex subsystem details, exposing only the most important network variables. This structure reduces errors and decreases the time required for network engineering and commissioning. A network variable interface for a supernode may contain any network variable on any device found within the supernode or its nested subsystems.
Network Channels
The physical or LONWORKS network, an LNS Server computer, and a computer running the LonMaker tool can communicate with each other using the following network channels:
• LONWORKS channel
• LONWORKS/IP channel
• LNS/IP channel
A LonWorks channel is a communication medium that carries LonTalk packets, as defined by the ANSI/EIA/CEA-709.1 standard. When attach to a LONWORKS channel, the LNS Server computer or the computer running the LonMaker tool (LonMaker computer) must contain an LNS network interface, which is used to communicate with the physical network.
IP is an acronym for Internet Protocol. IP is part of TCP/IP (Transmission Control
Protocol/Internet Protocol) protocol suite, the basic programming foundation that carries computer messages around the globe on the Internet and across many Local Area Networks (LANs) and Wide Area Networks (WANs)
A LONWORKS/IP channel is a communication medium that carries IP packets containing LonTalk
packets. When attached to a LONWORKS/IP channel, the LNS Server computer and the LonMaker computer must contain an IP network interface, (such as an Ethernet network interface card or a modem with IP point-to-point protocol [PPP] software) that is used to communicate with the physical network.
An LNS/IP channel is a communication medium that carries IP packets containing LNS packets. An LNS/IP channel is only used for communication between an LNS Serve and remote
lightweight LNS clients.
The LNS Server computer and the LonMaker computer may be on separate channels.
LonMaker Client Types
The LonMaker client type determines the location of the LonMaker tool in relation to the LNS server. The LonMaker tool has the following three client types:
• Local Client
• Remote Lightweight Client
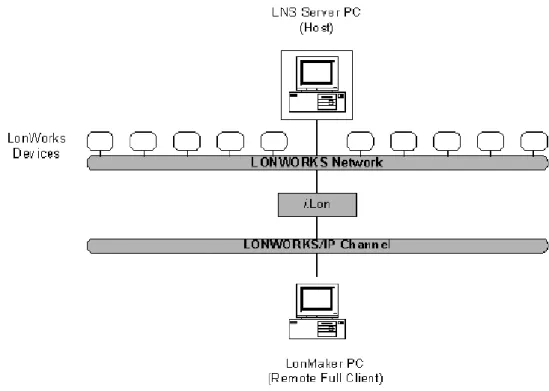
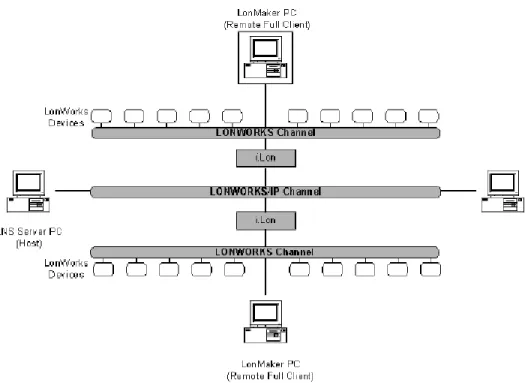
Local Client means the LonMaker tool is running on the same computer as the LNS Server. Remote Full Client indicates the LonMaker tool is running on a different computer than the LNS Server and communicates with the LNS Server over LONWORKS or LONWORKS/IP channels. Remote Lightweight Client indicates the LonMaker tool is running on a different computer than the LNS Server and communicates with the LNS Server over an LNS/IP channel.
More details are provided in the Using the LonMaker Tool Remotely.
Visio Basics
The LonMaker tool is built on the Visio 2002 drawing tool to provide a robust technical drawing environment for network design. A LonMaker drawing consists of one or more drawing files, each containing multiple subsystems, each on one Visio page. See the Visio documentation for a detailed description of Visio commands and capabilities. This section describes several key Visio concepts and functions that are integral to the use of the LonMaker tool.
Two key Visio concepts are shapes and stencils. Shapes are reusable drawing objects. A shape may represent a simple drawing object such as a line, arc, circle, or square. A shape may represent a complex drawing object with special behavior such as a LonMaker Device shape or Functional Block shape.
To simplify finding and reusing shapes, Visio defines a special type of drawing called a stencil. Stencils contain shapes that may be reused in your drawings. A shape contained on a stencil is called a master shape. When you drag a master shape from a stencil to one of your drawing pages, Visio automatically makes a copy of the master shape on your drawing and leaves the master shape unchanged on the stencil.
To open a stencil, click Visio Open Stencil and select a stencil. The LonMaker Basic Stencil contains shapes for all the basic components of a LONWORKS network (see LonMaker Stencils for more information on this and other stencils). When you drag a shape to a drawing, the LonMaker tool creates an instance of the network component represented by that shape and prompts you for information about that component.
Custom master shapes and stencils may be created for any set of devices and functional blocks. For example, the LonMaker tool includes custom master shapes and a custom stencil for LonPoint devices and functional blocks. You may wish to create your own custom master shapes and stencils to speed up network design. See Creating Custom LonMaker Master Shapes and Creating a Custom LonMaker Stencil for more information.
To simplify access to your most commonly used stencils and drawing options, Visio defines another type of drawing called a template. Templates are drawings that may be used as the starting point when you create a new drawing. The LonMaker tool includes a LONWORKS template that is used automatically when you create a LonMaker drawing. If you wish, you can create your own custom LonMaker template and select it as the default template in the Options tab of the LonMaker Design Manager.
2
Getting Started
Provides information on hardware requirements, installation of the various
LonMaker tool components, a quick-start tutorial, the LonMaker Design
Manager, creating and opening a LonMaker network design, using the
LonMaker tool remotely, and backing up and restoring LonMaker
Networks.
What's Included with this Release
This release includes the following:
• LonMaker CD. This CD includes the LonMaker software with LNS Server, LonPoint Plug-In and Applications, Microsoft Visio Professional or Standard 2002, LNS drivers, and Adobe Acrobat Reader. An integrated installation program simplifies installation of all the component software.
• Registration Card. Return this card to register your copy of the LonMaker tool. You must register your software to be eligible for support, updates, and discounts on upgrades. You can also register on-line at www.echelon.com/register.html.
• LonMaker User’s Guide. Start here to learn how to install and use the LonMaker tool. Additional documentation is included in the on-line help files installed with the LonMaker tool. Updated documentation may be available at www.echelon.com/lonmaker.
Hardware Requirements
Hardware requirements and recommendations for the computer on which the LonMaker
Integration Tool will run are given below. If you are engineering a large network with 200 to tens of thousands of devices, see the additional recommendations for the LNS Server and for the computer running the LonMaker tool in Enhancements for Larger Networks.
Smaller Networks
The LonMaker Integration Tool requires a personal computer that meets the following requirements:
• Microsoft Windows XP, Windows 2000, or Windows 98; Windows XP or Windows 2000 recommended
• Pentium 200 MHz or faster (Pentium II 350 or better recommended)
• 350 megabytes (MB) free hard-disk space
• 128-MB RAM minimum
• CD-ROM drive
• Super VGA ((800 × 600) or higher-resolution display with 256 colors
• Mouse or compatible pointing device
The memory required is affected by the number of plug-ins, LNS applications, and other Windows applications that are running simultaneously. More than 128 MB may be required if you are running multiple plug-ins or applications.
A 100 MB or larger removable storage media drive, such as a Zip disk or a remote file server, is recommended for saving LonMaker backup files.
Enhancements for Larger Networks
High-performance hardware is essential when engineering large networks. The disk for the LNS Server should have a sustained transfer rate greater than a 20 MB per second with less than an 8 milliseconds (ms) average seek time. This transfer rate can be met with an IDE drive using an UltraDMA/33 or faster interface, or with a SCSI drive using a Fast Wide SCSI, Fast-20 SCSI, Ultra SCSI, or faster interface. You can further increase performance and reliability by using a redundant striped disk configuration such as a RAID 5 disk array.
For large networks, the computer for the LonMaker tool should be at least a 500MHz Pentium III running Windows XP or Windows 2000 with at least 256 MB of memory. You may need to increase your virtual memory also. The speed, operating system, and memory size is not as important for commissioning the network; therefore, a Windows 98 laptop with at least 128MB RAM will work fine for commissioning devices. A Windows 98 laptop is useful for
commissioning since the LonManager™ Protocol Analyzer, a tool very useful during commissioning, is not available on Windows XP or Windows 2000.
Installing the LonMaker Integration Tool
Each licensed copy of the LonMaker tool allows up to two installations, typically a primary installation on a desktop computer and a secondary copy on a laptop computer. The secondary copy must be for the exclusive use of the individual who is the primary LonMaker user on the primary computer; the LonMaker software may only be used on one computer at a time; and the secondary computer cannot be used to commission or recover LONWORKS devices. See the LonMaker license in Appendix C for additional restrictions. To begin your installation, follow these steps:
1. If you previously installed a LonMaker Trial Edition and you are now installing one of the full editions, you must first uninstall the Visio Trial software. If you do not uninstall the Visio Trial software first, the LonMaker software will be installed, but the full version of Visio will not.
2. If are installing the LonMaker Trial Edition and you already have the retail version of either the LonMaker Integration Tool or Microsoft Visio 2002, uninstall them and restart your computer before installing the LonMaker Trial Edition.
3. Close all running Windows applications. If you are running any 16-bit applications (including background applications), the LonMaker software may not install properly. 4. If you are running Windows XP or Windows 2000, disable any LONWORKS services. 5. Insert the LonMaker CD into your CD-ROM drive.
6. If the LonMaker setup application does not launch immediately, open the Windows Start menu and select Run. Browse to the LMWSetup application on the LonMaker CD and click Open. The LonMaker Setup window appears.
7. Select the components that you wish to install by setting the appropriate checkboxes on the
Select Components window.
Visio: If you have an existing installation of Visio, you must still install Visio from the LonMaker CD to use the LonMaker tool. Visio optionally uses Microsoft Internet Explorer 5.0 or later; so if this program is not already installed, you will be asked to install it during installation. Internet Explorer is not required for the LonMaker tool.
LonMaker Integration Tool: The LonMaker tool and the plug-ins must be the same version. If you reinstall a newer version of the LonMaker software, you must reinstall the newer version of the plug-ins.
Drivers: When used on LONWORKS channels, the LonMaker tool requires the use of an LNS network interface such as an i.LON 10, i.LON 100, PCLTA-10, PCLTA-20, PCC-10, PCNSI, SLTA-10, or PL-SLTA. When used on LONWORKS/IP or LNS/IP channels, the LonMaker tool requires any IP network interface (such as Ethernet) card or modem with PPP software. An IP interface is also required if you are using an i.LON 10 or i.LON 100 Internet Server as a remote network interface. Older network interfaces, such as the PCNSS and SLTA/2, are not LNS-compatible.
If you are using a PCLTA-10, PCLTA-20, or PCC-10, set the PCLTA- 10/PCC- 10/PCLTA- 20 checkbox. If you are using a PCNSI, set the PCNSI checkbox. If you are using an SLTA-10, set the SLTA-10 checkbox. If you are using an IP network interface, do not select any of the LNS network drivers.
If you are using another LNS or IP network interface, install the network interface hardware and driver following the instructions provided with the hardware. Most network interfaces include a Windows Control Panel application that handles network interface configuration. You must perform this configuration before you can use the LonMaker tool attached to a network. These control panels handle host details such as IRQ assignment and also manage network parameters such as buffer counts and transceiver types.
Adobe Acrobat Reader: Adobe Acrobat Reader is a free program that allows you to read Adobe Acrobat files (.pdf extension). An Acrobat version of a preliminary version of this
manual is included on the LonMaker CD (the final versoin of this manual, or a newer version, is available at www.echelon.com/lonmaker). Many of the LONMARK reference documents are exclusively in Acrobat format; and, therefore, they require Acrobat.
To install Adobe Acrobat Reader, ensure the Adobe Acrobat Reader checkbox is selected.
Click Install. The installation program installs the selected components sequentially, prompting you for required reboots.
8. If you are installing the LonMaker Trial Edition, you must activate Visio before you can use the LonMaker tool. To activate Visio, open the Windows Start menu and click Microsoft Visio. The Office Activation Wizard automatically appears. Follow the instructions to activate your copy of Visio. You must have an Internet connection to activate Visio. See the Microsoft READ THIS FIRST card included with you LonMaker Trial Edition CD for more information on activating Visio.
Installing Visio
1. If you selected the Visio component in the Select Components window, The Microsoft Visio setup wizard appears when you click Install. Before beginning the installation, Visio 2002 may install a system update, and will reset the computer before continuing the Visio 2002 installation.
2. Follow the instructions in the installation program to complete the Visio setup. You will be asked to enter a Product ID if you have not previously installed Visio 2002. If you are installing the LonMaker Professional or Standard Edition, enter the Product ID shown on the back of your LonMaker CD case. If there are two serial numbers on the back of your CD case, the top two lines are the Visio product ID. If you are installing the LonMaker Trial Edition, enter the Product Key on the back of the Microsoft READ THIS FIRST card included with your LonMaker Trial Edition CD. See your Visio documentation for more information on the Visio installation process.
The Visio installation may suggest that you exit LonMaker setup. You can safely disregard this message by clicking Ignore.
If you want to keep an existing Visio installation, install the Visio program on the LonMaker CD into a new directory.
Caution When you have multiple versions of Visio installed, theLonMaker tool uses the last
Visio program that you used. Therefore, if you use a Visio version other than the one supplied on the LonMaker CD, you must start and exit the LonMaker-supplied Visio program before you start the LonMaker tool.
If you do not have Microsoft Internet Explorer 5.0 or higher installed on your computer, you will be asked to install it while Visio is being installed. This is only necessary if you plan to use Visio’s Facilities Management Solution, which displays information in HTML format (see the Visio documentation for more information). Internet Explorer is not necessary for any LonMaker functionality.
Once Visio installation is complete, LonMaker installation automatically begins as described in Installing the LonMaker Tool.
Installing the LonMaker Tool
1. The LonMaker setup program begins automatically. Read the information on the Welcome window and click Next. The Software Licensing Agreement window appears.
2. Read the agreement and click Yes if you agree with the terms of the agreement. The Registration window appears.
3. Enter your name, company name, and the LonMaker serial number in the appropriate fields. If you did not license an upgrade version, the serial number is located on the back of your LonMaker CD case. If there are two serial numbers on the back of your CD case, the second number (on the third line) is the LonMaker serial number. Save this number. If you licensed an upgrade version, your serial number is located on the back of your original LonMaker CD case. It will be automatically displayed if you install your upgrade on the same computer as your original LonMaker software. If you are installing on a different computer, you must find the serial number that you saved from your original version of the LonMaker tool. Click Next. The Select Destination Directory window appears.
4. Choose a LonWorks folder in which you want the LonMaker software installed. The LonMaker software will be installed in a LonMaker folder below the LonWorks folder that you specify. If you installed other LONWORKS software on this computer, use the same LonWorks folder. The default folder is C:\LonWorks. If you previously installed other LONWORKS software on this computer, the last LonWorks folder that you selected will be displayed as the default, and you should not change this value. Click Next. The Select Program Folder window appears.
5. Choose a program folder for the LonMaker software. This folder is added to the Program folder of your Windows Start menu. The default is Echelon LonMaker for Windows. Click Next and the installation program installs the software.
6. A window appears which asks you if you want to view the Readme file. Select Yes and click
Finish. The Readme file appears.
7. When you finish reading the Readme file, close the window.
Caution When you install the LonMaker tool, you may get a “Your license has expired” error if
the LonMaker software was previously installed on the same computer and
subsequently uninstalled. Add LonMaker credits as described in Chapter 8 to update your license.
Installing the LonPoint Applications, Plug-in, and
Utilities
If you set the LonPoint Plug-in checkbox in the Select Components dialog, the LonPoint installation program automatically starts following the LonMaker installation. The LonPoint Installation window appears. Complete the following steps:
1. Read the information on the Welcome dialog, and click Next. A license agreement dialog appears.
2. Click Yes if you agree with the terms of the agreement. The Registration window appears. 3. Enter your name and company name, and click Next. The Choose Destination Directory
window appears.
4. Choose a LONWORKS folder for the plug-in. You must use the same LONWORKS folder in which you installed the LonMaker tool. The default is C:\LonWorks. Click Next. The Select Echelon Application Image Version window appears.
5. If this is a new installation, use LonPoint firmware version 3 instead of version 2. This window allows you to install a copy of version 2 firmware if you need the capability to install devices with this older firmware. Do not select the option to install Application Image Version 2 files unless you intend to install version 2 devices in new networks instead of upgrading to version 3. See the LonPoint Application and Plug-in help file for more information. Click Next. The select Program Folder window appears.
6. Select an existing LONWORKS program folder or type in the name of a new one. The default program folder name is Echelon LonPoint Software. Click Next.
7. The LonPoint applications, plug-in, and utilities install on your computer. View the Readme file when prompted to do so, and then click Finish.
Installing Network Drivers
If you are using an i.LON 10 or i.LON 100 as a network interface, configure the xDriver software as described in the manuals for those devices. If you are using a PCC-10, PCLTA-10, or
PCLTA-20 LONWORKS network interface, install the appropriate drivers as described below: 1. The LonMaker installation program automatically starts the appropriate installation program.
See the installation instructions in the LonMaker User’s Guide appendices for details. Be sure to install the driver software before you install the network interface hardware.
2. Configure the network driver you installed. (See the configuration procedure for your driver in Appendix B for instructions.)
Installing Adobe Acrobat Reader
If you set the Adobe Acrobat Reader checkbox in the Select Components dialog, the Adobe Acrobat Reader setup program begins automatically. Follow the instructions in the setup program to complete your Adobe Acrobat Reader installation.
LonMaker Design Manager Overview
The LonMaker Design Manager allows you to create, open, backup, restore, defragment, and delete LonMaker networks. You can also set the resource file languages and select the LonMaker template for new networks. To open the LonMaker Design Manager, click the Windows Start menu, point to Programs, then point to the Echelon LonMaker for Windows folder, and select LonMaker for Windows. The LonMaker Design Manager appears:
The LonMaker Design Manager General tab contains the following fields and buttons: Drawing Directory Selects a directory from all the subdirectories of the directory
indicated in Drawing Base Path. To work with an existing LonMaker network design, select the directory containing the design.
Drawing Name Selects a LonMaker drawing from all the LonMaker drawings contained in the selected drawing directory. Select the LonMaker drawing you want to open, delete, or backup. Database Name Selects an LNS database from all the LNS network databases
on this computer. Select the database you want to defragment, delete, or backup, or for which you want to start the LNS Server. This field is not used for the Open Network, Open Copy, and Restore operations.
Show all network option
dialogs If selected, all of the network option windows will be presented as the network is opened regardless of whether the Skip this Prompt option had been previously selected.
New Network Creates and opens a new LonMaker network design consisting of a new LNS database and a new LonMaker drawing. See Creating a LonMaker Network for details.
Open Network Opens the LonMaker drawing and associated LNS network database specified by the LonMaker drawing selected in the Drawing Name field. The Database Name field is ignored by this operation. See Opening an Existing LonMaker Network for details.
Drawing Name field, making a copy of the network
drawings and the associated LNS network database. This copy is created like a new network. (You will be prompted to choose a new top-level drawing name and database path. The Database Name field is ignored by this operation. See Opening a Copy of an Existing LonMaker Network for details). Delete Deletes the LonMaker drawing specified in the Drawing
Name field and the LNS network database specified in Database Name. To delete only one, specify <none> in the field you wish to keep.
Defragment Database Defragments and recreates the index for the LonMaker database specified in Database Name. This can reduce the size of and decrease the access time to a LonMaker database that has grown in size due to many changes. Backup the database before defragmenting it in case of an error while defragmenting.
Launch LNS Server Starts the LNS Server so that remote client computers can access the LNS network database. See Using the LonMaker Tool Remotely for more information.
Backup Backs up the LonMaker drawing specified in the Drawing Name field and the LNS network database specified in Database Name. See Backing Up a LonMaker Network for more information.
Restore Restores a LonMaker drawing and LNS network database from a LonMaker backup file. See Restoring a LonMaker Network for more information.
Drawing Base Path Determines the directory that will be used by the Drawing Directory list. All of the subdirectories in this directory will be listed in the Drawing Directory list. You may type in a new pathname or select one using the Browse button.
Exit Closes the LonMaker Design Manager. This does not close Visio or any open networks. To automatically exit the Design Manager after opening a LonMaker drawing, click the Options tab and select the Exit Design Manager After Launching Visio checkbox.
The LonMaker Design Manager’s Options tab (shown below) allows you to set a prioritized list of languages for LONMARK resource files and select the LonMaker template for new networks. When the LonMaker tool displays documentation for selected devices, functional blocks, and network variables, it uses the definitions contained in LONMARK resource files. You can display the LONMARK resource file information in different languages by specifying a prioritized list of languages for LONMARK resource files in the LonMaker tool.
You can set the resource file language for a specific network while in the LonMaker tool by selecting the Resource File Language tab in Network Properties for that network. To set the resource file language globally for new networks, select the Options tab in the LonMaker Design Manager: