ADH8066 Quad band GSM/GPRS
Module
Hardware Application Note
<V1.6>
ADH Technology Co.,LTD
Subject to changes in technology, design and availability URL: http://www.adh-tech.com.tw
Change History
Version Effective Date Description of ChangesV1.0 2009/8/7 Released
V1.1 2009/12/11 Update standby power consumption
V1.2 2010/6/25 Add ONKEY & DSR circuit recommendation V1.3 2010/8/30 Modify PWR ON/OFF sequence
Correct pin 26~30 input power
V1.4 2010/9/23 Modify the reference schematic of Microphone Input in page 13
V1.5 2011/ 06/28 Modify PWR ON/OFF sequence V1.6 2012/1/12 Amend typo in figure 17&18
Table of Contents
TABLE OF CONTENTS 3
LIST OF TABLES 4
LIST OF FIGURES 4
ADH8066 KEY FEATURES 5
SYSTEM ARCHITECTURE 6
POWER SUPPLY RECOMMENDATIONS 7
3.1 GROUND CONNECTIONS RECOMMENDATIONS 7
3.2 POWER SUPPLY GENERALITIES 7
3.3 VOLTAGE VERSUS DISTANCE 7
3.4 DESIGN RECOMMENDATION 8
3.4.1 POWER SUPPLY SELECTION 8
3.4.2 POWER SUPPLY CIRCUIT RECOMMENDATION 8 3.4.3 POWER ON & RESET CIRCUIT RECOMMENDATION 9
3.4.4 DECOUPLING CAPACITORS 9
INTERFACES 11
4.1 UARTINTERFACE 11
4.1.1 UART INTERFACE CHARACTERISTIC AND PIN OUT DESCRIPTION 11 4.1.2 UART0 INTERFACE REFERENCE CIRCUIT DESIGN 12
4.2 AUDIO INTERFACE 12
4.2.1 AUDIO TRACK AND PCB LAYOUT RECOMMENDATION 12
4.2.2 MICROPHONE INPUTS 13
4.3 SIMINTERFACE 14
4.3.1 SIM INTERFACE CIRCUIT DESIGN 14
4.3.2 SIM LAYOUT 15
4.3.3 SIM CARD INTERFACE 15
4.4 RF INTERFACE 16
4.5 LEDINDICATORS 17
5. POWER ON/OFF PROCEDURE 18
ELECTRICAL & ENVIRONMENTAL CHARACTERISTICS 20
APPENDIX 1. SUMMARY OF PIN OUT 21
APPENDIX 2. BOARD TO BOARD CONNECTOR DIMENSION 23
List of Tables
Table 1: ADH8066 key feature list ... 5
Table 2: UART Data configuration ... 11
Table 3: UART0 pin out description ... 11
Table 4: UART1 pin out connector ... 11
Table 5: Electrical characteristics ... 11
Table 6: SIM connector pin out ... 15
Table 7: MIC 1 audio input electrical requirements ... 20
Table 8: MIC1 audio output electrical information ... 20
Table 9: EAR 1 audio output electrical information ... 20
Table 10: EAR2 audio output electrical information ... 20
Table 11: Input power requirement ... 20
Table 12: Operation current requirement ... 20
List of Figures
Figure 1: ADH8066 system function block diagram ... 6Figure 2: Layout principle under GSM module ... 7
Figure 3: VBAT voltage drop ... 7
Figure 4: Voltage drop versus distance ... 8
Figure 5: Power supply reference circuit ... 9
Figure 6: Power on reference circuit ... 9
Figure 7: Value of decoupling capacitors ... 10
Figure 8: UART reference circuit design ... 12
Figure 9: Audio track design ... 13
Figure 10: Reference circuit for microphone inputs ... 13
Figure 11: Reference circuit for SIM interface ... 14
Figure 12: SIM connector layout reference ... 15
Figure 13: RF interface ... 16
Figure 15: PIN 13 for network ready indication ... 17
Figure 14: PIN 5 for system ready indication ... 17
Figure 16: Recommended ON_KEY circuit ... 18
Figure 17: Power ON sequence ... 18
Figure 18: Power OFF sequence ... 19
Figure 20: 50 pin board to board connector ... 23
ADH8066 Key Features
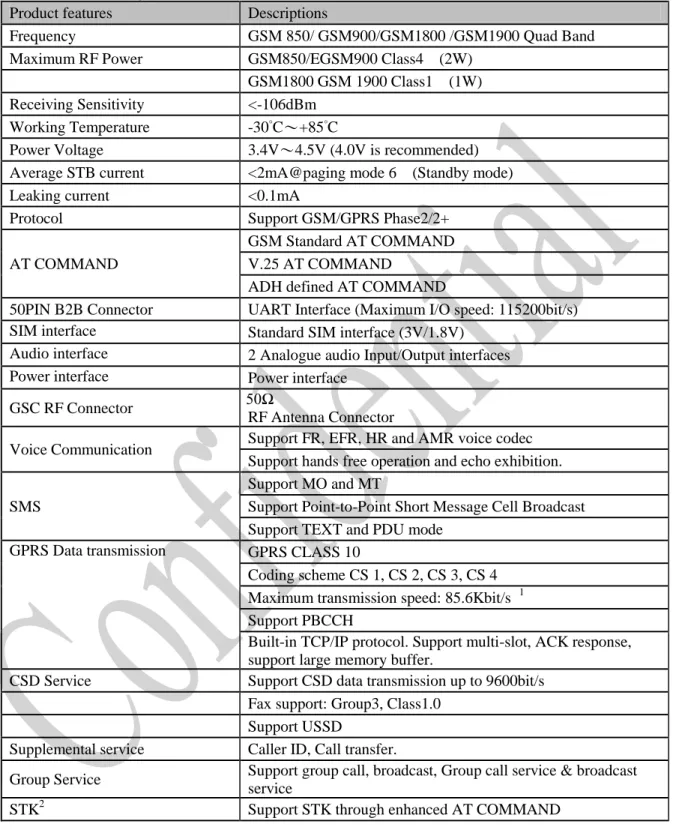
Table 1: ADH8066 key feature listProduct features Descriptions
Frequency GSM 850/ GSM900/GSM1800 /GSM1900 Quad Band
Maximum RF Power GSM850/EGSM900 Class4 (2W)
GSM1800 GSM 1900 Class1 (1W) Receiving Sensitivity <-106dBm
Working Temperature -30°C~+85°C
Power Voltage 3.4V~4.5V (4.0V is recommended)
Average STB current <2mA@paging mode 6 (Standby mode)
Leaking current <0.1mA
Protocol Support GSM/GPRS Phase2/2+
AT COMMAND
GSM Standard AT COMMAND V.25 AT COMMAND
ADH defined AT COMMAND
50PIN B2B Connector UART Interface (Maximum I/O speed: 115200bit/s)
SIM interface Standard SIM interface (3V/1.8V)
Audio interface 2 Analogue audio Input/Output interfaces
Power interface Power interface
GSC RF Connector 50Ω
RF Antenna Connector
Voice Communication Support FR, EFR, HR and AMR voice codec Support hands free operation and echo exhibition. SMS
Support MO and MT
Support Point-to-Point Short Message Cell Broadcast Support TEXT and PDU mode
GPRS Data transmission GPRS CLASS 10
Coding scheme CS 1, CS 2, CS 3, CS 4 Maximum transmission speed: 85.6Kbit/s 1 Support PBCCH
Built-in TCP/IP protocol. Support multi-slot, ACK response, support large memory buffer.
CSD Service Support CSD data transmission up to 9600bit/s
Fax support: Group3, Class1.0 Support USSD
Supplemental service Caller ID, Call transfer.
Group Service Support group call, broadcast, Group call service & broadcast service
STK2 Support STK through enhanced AT COMMAND
1
Depending on network condition
System Architecture
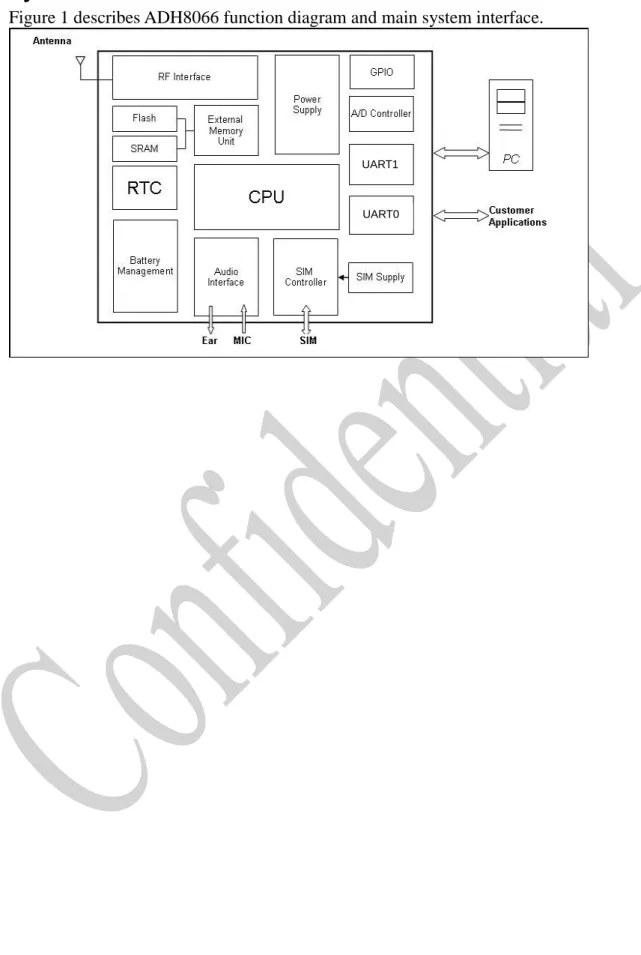
Figure 1 describes ADH8066 function diagram and main system interface.
Figure 1: ADH8066 system function block diagram UART1
Power Supply Recommendations
3.1
Ground Connections Recommendations
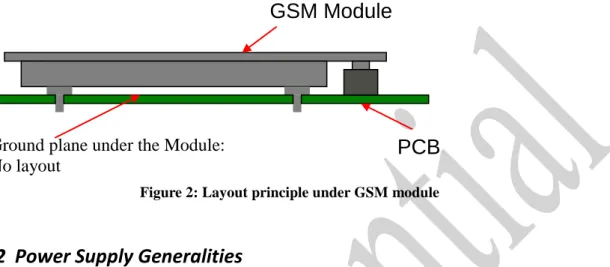
The PCB right under ADH8066 should be left as a ground plane which SHOULD NOT have any components or layout circuit in case of RF interference.
Figure 2: Layout principle under GSM module
3.2
Power Supply Generalities
Power supply design is critical to GSM module applications. The design guides should be strictly followed to ensure the performance of the module. The VBAT voltage limits must be at any time: 3.4V <VBAT< 4.5V. The worst condition is during the burst period transmission, when current consumption is at its highest. During this period, the VBAT voltage is reduced to the lowest level:
The output voltage of the power supply drops.
Voltage drop is present between the power supply output and the GSM module supply pins (VBAT).
Figure 3: VBAT voltage drop
3.3
Voltage Versus Distance
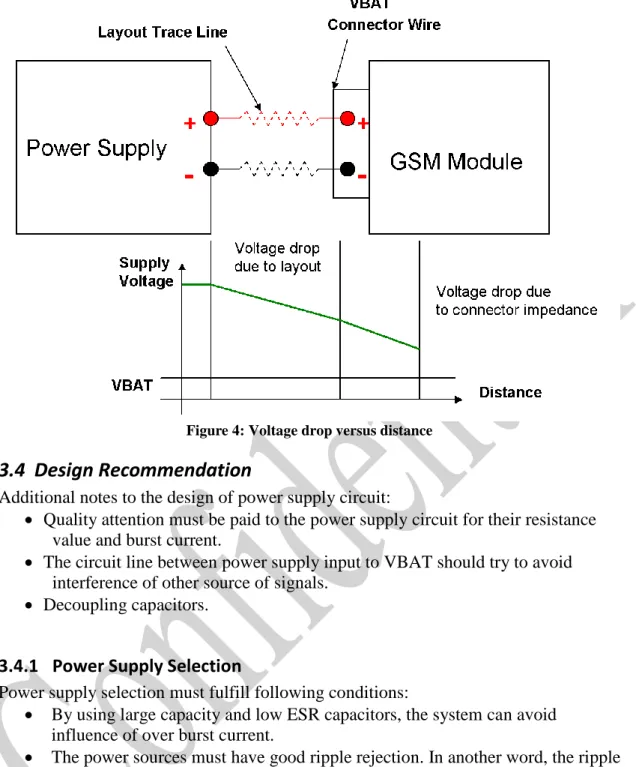
Depending on the distance between the power supply and the GSM module, behavior is described as figure 4:
VBAT
Current
Transmit burst 2A Transmit burst 2A Voltage minimum=3.4VGSM Module
Ground plane under the Module: No layout
PCB
Voltage Drop≦
Figure 4: Voltage drop versus distance
3.4
Design Recommendation
Additional notes to the design of power supply circuit:
Quality attention must be paid to the power supply circuit for their resistance value and burst current.
The circuit line between power supply input to VBAT should try to avoid interference of other source of signals.
Decoupling capacitors.
3.4.1 Power Supply Selection
Power supply selection must fulfill following conditions:
By using large capacity and low ESR capacitors, the system can avoid influence of over burst current.
The power sources must have good ripple rejection. In another word, the ripple value of current input to VBAT should be as low as possible.
Low output resistance.
3.4.2 Power Supply Circuit Recommendation
Interferences of other signal sources to the power supply must be avoided.
VBAT connection pins: Pins 26, 27, 28, 29, 30
Track line width between the power supply and GSM VBAT input should be 3mm.
The power circuit lines should be separated from other signal lines (e.g. Audio/SIM/UART… etc) by ground
D01 of the input side is used to avoid over voltage of burst current to damage internal circuit. It can also avoid wrong connection of positive and negative poles.
R02/R03 of the output side is to adjust output voltage
Value of C06/C07 is 330uF and needs to be Low ESR capacitors.
D01 B260A A C R02=200K R03=68K Vout=4.35V R02=200K R03=82K Vout=3.7V + C01 22uF_50V 1 2 +C07 33 0u F _1 0V 1 2 D02 RB050L-40 A C + C02 10uF_50V 1 2
Car Power (+9 ~ +24V) transfer to +4.2V
VSM4V2 DCIN L03 15uH_3A 1 2 C04 22 0p F _5 0V 1 2 F1 2920L200/24 1 2 C05 22nF_50V 1 2 U10 L5973D OUT 1 SY NC 2 INH 3 COMP 4 FB 5 VREF 6 G N D 7 VCC 8 R01 4.7k/1% 1 2 R02 200k/1% 1 2 R03 68k/1% 1 2 +C06 33 0u F _1 0V 1 2
Figure 5: Power supply reference circuit
3.4.3 Power ON & reset circuit recommendation
User can use ON_KEY (PIN 41) for system reset. Pull low for 300ms to active to re-power on the system.
Power on reset recommendation circuit works as follow principles: 1. Before power on, VDD_TOP=Low, ON_KEY=Low
2. When the power ON, VDD_TOP=High, ON_KEY=High
3. If the system crashes then the VDD_TOP is pulled low and ON_KEY is pulled high automatically to reset the system by software.
4. VDD_TOP is always high if system functions normally. User can use GPIO to detect VDD_TOP status. (VDD_TOP=PIN31, output voltage 1.8V)
Q3 MMBT3904 3 2 1 0603 R43 100K 0603 R45 10K 0603 C50 1uF 0603 R44 1K Q5 MMBT3904 3 2 1 0603 R46 0R ON_KEY VDD_TOP V3.0
Figure 6: Power on reference circuit
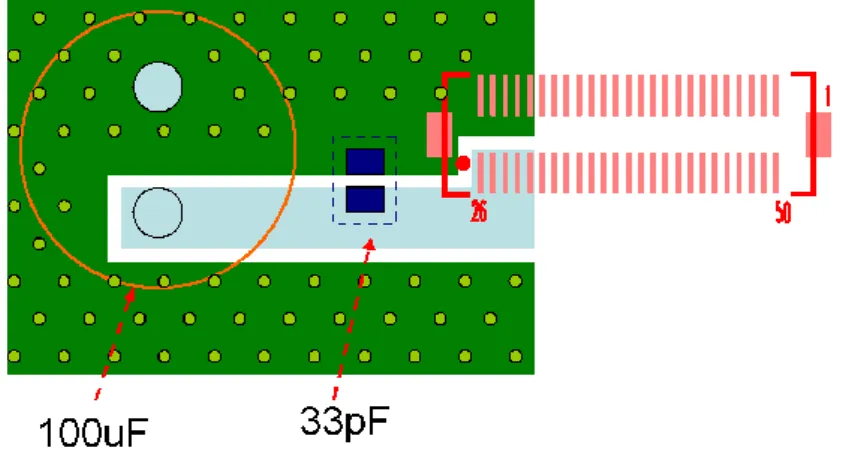
3.4.4 Decoupling capacitors
The value of decoupling capacitors is 33pF/100uF, and recommended location is close to the VBAT supply pins. The purpose of these decoupling capacitors is to avoid EMI interferences.
Interfaces
4.1
UART Interface
4.1.1 UART interface characteristic and pin out description
ADH8066 has two UARTs, both are available on the bottom connector.
UART0 is used to communicate with host systems, and to download the memory FLASH. The interface configuration is described as follow tables:
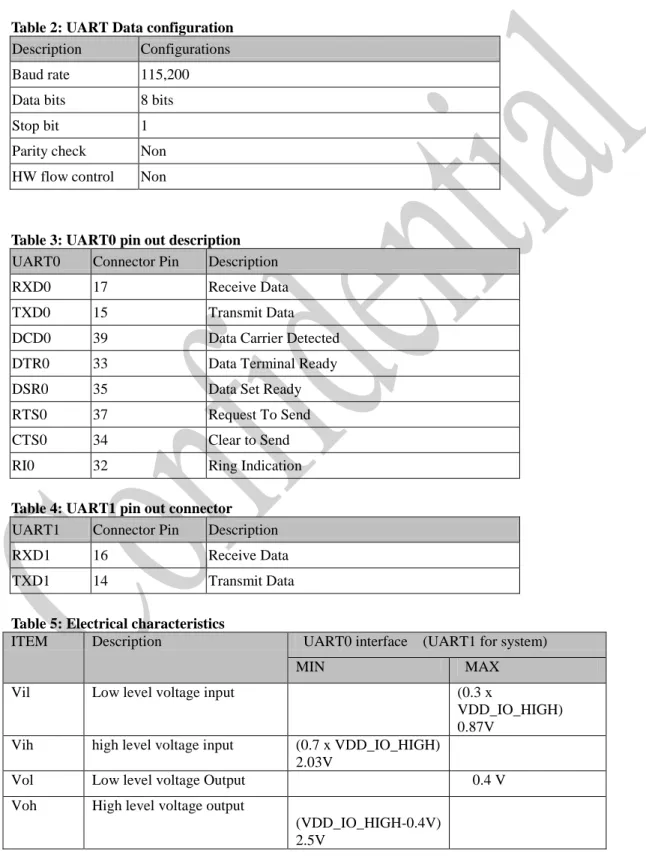
Table 2: UART Data configuration
Description Configurations Baud rate 115,200 Data bits 8 bits Stop bit 1 Parity check Non HW flow control Non
Table 3: UART0 pin out description
UART0 Connector Pin Description RXD0 17 Receive Data TXD0 15 Transmit Data DCD0 39 Data Carrier Detected DTR0 33 Data Terminal Ready DSR0 35 Data Set Ready RTS0 37 Request To Send CTS0 34 Clear to Send RI0 32 Ring Indication
Table 4: UART1 pin out connector
UART1 Connector Pin Description RXD1 16 Receive Data TXD1 14 Transmit Data
Table 5: Electrical characteristics
ITEM Description UART0 interface (UART1 for system)
MIN MAX
Vil Low level voltage input (0.3 x
VDD_IO_HIGH) 0.87V
Vih high level voltage input (0.7 x VDD_IO_HIGH) 2.03V
Vol Low level voltage Output 0.4 V Voh High level voltage output
(VDD_IO_HIGH-0.4V) 2.5V
Iih High level input current 1 µA
Iol Low level output current 4 mA
Ioh High level output current -4 mA
The ESD/EMI IC has internal resistors in the range of 72 W to 88W.
4.1.2 UART0 interface reference circuit design
Pull High to 3V3 0603 R36 27R 0603 R37 27R U2 100323 C2+ 1 GND 2 C2-3 V- 4 T1OUT 5 T2OUT 6 T3OUT 7 R1IN 8 R2IN 9 T4OUT 10 R3IN 11 T5OUT 12 EN_B 13 SHDN_B 14 MBAUD 15 R1OUTB 16 T5IN 17 R3OUT 18 T4IN 19 R2OUT 20 R1OUT 21 T3IN 22 T2IN 23 T1IN 24 C1-25 VCC 26 V+ 27 C1+ 28 0603 R38 27R CON1 CON9 DCD 1 RXD 2 TXD 3 DTR 4 GND 5 DSR 6 RTS 7 CTS 8 RI 9 G N D 10 G N D 11 0603 R30 100K 0603 R39 0R V3.0 0603 R40 0R 0603 R41 0R 0603 R26 100K 0603 R29 100K 0603 R27 100K 0603 R28 100K DCD0 TX0 0603 C18 220nF RTS0 DTR0 RI0 0603 C17 220nF RX0 CTS0 DSR0 0603 C19 220nF 0603 C16 220nF 0603 C20 220nF 0603 R23 10K 0603 R24 10K 0603 R25 10K V3.0 V3.0 0603 R31 27R 0603 R32 27R 0603 R33 27R 0603 R34 27R 0603 R35 27R
Figure 8: UART reference circuit design
4.2
Audio Interface
Two different microphone inputs and two speaker outputs are supported on ADH8066.
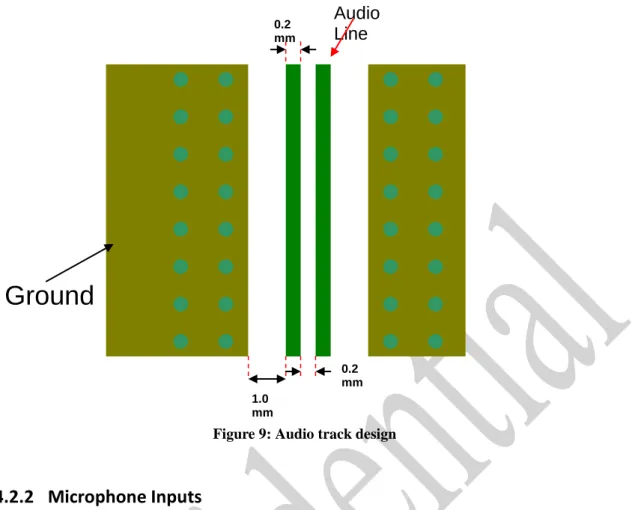
4.2.1 Audio track and PCB Layout Recommendation
Figure 9: Audio track design
4.2.2 Microphone Inputs
The MIC1 and MIC2 inputs already include the biasing for an electric microphone, allowing easy connection to a headset. The circuit design is as below picture. Please note that Audio_GND (Pin42) needs to be connected to Audio Jack GND.
Figure 10: Reference circuit for microphone inputs
Ground
Audio Line 1.0 mm 0.2 mm 0.2 mm4.3
SIM Interface
ADH8066 supports 1.8V and 3.3V SIM cards. SIM_VCC can be connected to 1.8V or 3.3V power source.
4.3.1 SIM interface circuit design
ADH8066 has with SIM holder without SIM holder version. If you chose to use ADH8066 without SIM holder, please pay attention to place two capacitors in the circuit design described as follows:
1. 10μF: close to the GSM module connector; 2. 100nF: close to the SIM connector.
These two capacitors are to avoid EMC problems. In addition, PESDXL4UW/TVSX4 connected to SIM track is to avoid ESD problem.
To implement SIM detection function, a resistor is required to add to the trace of PIN5. You need to select a SIM holder with the detection pin.
4.3.2 SIM Layout
It’s important to pay additional caution to the ESD component of SIM connector layout. Following are suggested guidelines for the layout of SIM holder.
1. The ESD component should be placed as close as possible to the SIM connector.
2. The ESD component should be connected to a clean ground to perform well.
3. Track between ESD to SIM connector should be 8mil wide.
4. Each signal track of SIM circuit needs to be surrounded by ground.
5. Tracks distance between SIM connector and GSM module connector should be below 10 cm.
Figure 12: SIM connector layout reference
4.3.3 SIM Card Interface
Table 6: SIM connector pin out
Pin number Schematics name Description
1 SIM_VCC Supply voltage (1.8 or 3V) 2 SIMRSCDn_ESD Reset for SIM card
3 SIMCKCDn_ESD Clock for SIM card
5 GND Ground
6 SIM_VCC Supply voltage (1.8 or 3V) 7 SIMIOCD_ESD I/O line to/from SIM card
ESD
SIM
1 2 3 5 6 7 Top
4.4
RF interface
When the antenna is connected to the module through a 50Ω coaxial cable, the coaxial cable must be connected to both the "Antenna pad" and the "Ground pad". It is recommended to use an RG178 coaxial cable with the following stripping and mounting guidelines. User needs to select RF cable with minimum signal loss at GSM 850/E-GSM 900Mhz and DCS 1800/PCS 1900Mhz.
Figure 13: RF interface Ground pad
4.5
LED Indicators
PIN 5 and PIN 13 can be used as system indicators (refer to enhanced AT command for function switch):
PIN 5: When the output is at high level, the system is ready to accept AT command.
PIN 13: When the output is at high level, the module had camped on the network.
Figure 15: PIN 13 for network ready indication
LPG_RED Q2 2N3904 LED2 RED R19 10K R61 10K R16 220R V4.0 LPG_GREEN Q1 2N3904 LED3 GREEN R18 10K R60 10K R15 220R V4.0
5. Power ON/OFF Procedure
ON_KEY: used for Power ON/OFF and this pin is active low. Please refer to the recommended circuit below.
Figure 16: Recommended ON_KEY circuit
For power on and off, it is recommended to follow the procedure and time interval as shown below:
Figure 17: Power ON sequence Power ONKEY DSR/ CTS 4V 0V ONKEY Circuit
MCU GPIO GSM Module
t1 t2 T t3 t4 T t1> 200 ms t2 > 2 s t3> 2.5 s t4 > 100 ms High Low High Low t1 t2 t3 t4
Figure 18: Power OFF sequence
Figure 19: GSM Standby Process t1 High Low T ONKEY Circuit T Power
MCU GPIO GSM Module
ONKEY DSR/ CTS t2 t3 t1 t2 t3 High Low 4V 0V t1> 200 m t2> 2 s t3>6 s
Electrical & Environmental Characteristics
Table 7: MIC 1 audio input electrical requirementsParameter Typical Value
Maximum input level (MIC+–MIC-) 32.5mVrms Differential input resistance (MICI+–MICI-) 220 KΩ MIC Skew voltage 1.9~2.1V
2.0~2.2V
Table 8: MIC1 audio output electrical information
Parameter Testing condition MIN TYP MAX Resistance (MIC+–MIC-) 4VPP Output 16Ω - -
3V 1KHz <1Ω - -
Table 9: EAR 1 audio output electrical information
Parameter Testing condition MIN TYP MAX EAR+ or EAR- maximum capacitance
differential Differentiate 4VPP
- - 1%
EAR+ or EAR- maximum output 16Ω 5% differential
3.1VPP - 43.92VPP 4Ω 5%
differential
1.2VPP - 1.5VPP
Table 10: EAR2 audio output electrical information
Parameter Testing condition MIN TYP MAX EAR+ or EAR- capacitance differential Differential 4VPP - - 1% EAR+ or EAR- maximum output 16Ω 5%
differential
3.1VPP - 43.92VPP 4Ω 5%
differential
1.2VPP - 1.5VPP
Table 11: Input power requirement
Parameter Min Typ Max Unit
VBat+ 3.4 4.0 4.5 V
Table 12: Operation current requirement
Operation mode Min TYP Max Unit
Standby mode - - 2 mA
Talking mode - 250 - mA
GPRS data transmission - 350(GPRS4+1) - mA
Appendix 1. Summary of Pin Out
The board to board connection pin definitions of ADH8066 are described as below table:
PIN.NO PIN.NAME Note
1 SIMCLK
SIM Card interface, supporting 1.8V/3V SIM card
2 SIMVDD
3 SIMIO
4 SIMRST
5 GPIO10 Default as ready for AT COMMAND, can be used as SIM detector
6 GND Ground
7 PCMDI PCM data input
8 PCMFSO PCM frame synchronization 9 PCMCLK PCM clk
10 PCMDO PCM data output
11 ADC1 Adc1
12 BATTEMP Adc2 (bat temp)
13 GPIO3 Default as GSM network indicator 14 TXD1 UART1 Data Output
15 TXD0 UART0 Data Output 16 RXD1 UART1 Data Input 17 RXD0 UART0 Data Input
18 VCHAGE Charging interrupt detection, also can be used as charging pin with current limit under 400Ma.
19 VCHAGE Charging interrupt detection, also can be used as charging pin with current limit under 400Ma.
20 CHV_DRV CHV_DRV charging control 21 GND Ground 22 GND 23 GND 24 GND 25 GND 26 VBAT
Power input positive, input voltage is limited to 3.4V~4.5V.
27 VBAT
28 VBAT
29 VBAT
30 VBAT
31 V1.8 1.8V Power output with load of 50mA
32 RI0 UART0 ring tone indicator output, can also be used as GPIO or interrupt. 33 DTR0 UART0 Ready to receive, can be used as GPIO
35 DSR0 UART0 Ready to receive, can be used as GPIO or interrupt
36 IICSCL NC
37 RTS0 UART0 Request to send (Output)
38 IICSDA NC
39 DCD0 UART0
40 CHV_MAX NC
41 ON_KEY Power On/OFF signal. Effective at low. Required 100ms above power level
42 GND
43 MIC1_P Mic 1 in positive 44 MIC1_N Mic 1 in negative 45 MIC2_P Mic 2 in positive 46 MIC2_N Mic 2 in negative 47 AUXOUTP AUX out 2 positive 48 AUXOUTN AUX out 2 negative 49 EARP Audio out 1 positive 50 EARN Audio out 1 negative
Appendix 2. Board to Board connector dimension
ADH8066 connector is a 50 Pin Board to Board connector with 0.5mm pitch as pig 2-1. The model number is Hirose’s DF12C(3.0)-50DS-0.5V. The connector is as figure 14.
Figure 19:50 pin board to board connector
14.6mm 12.0 mm
Appendix 3. Antenna Connector
Antenna interface of ADH8066 is GSC RF connector to be connected with an external antenna cable to the module. ADH8066 uses an ultra-miniature SMT antenna (Model Name: U.FL-R-SMT) connector from Hirose Ltd. The physical dimension of antenna connector is described in below figure.