Genesis Gradebook
User
Guide
2012-13
Table of Contents
Table of Procedures p. 3
I Introduction
The GradebookHome Course List Screen The GradebookGradebook Spreadsheet Screen Other Features of the Spreadsheet
p. 4 p. 5 p. 6 p. 7 II Setup
A. Setting Personal Preferences B. Merging Course Sections C. Setup Course Profiles
D. Assign Profiles to your Courses E. Color Schemes p. 10 p. 11 p. 11 p. 14 p. 31 III Class Rosters
A. Viewing your Roster B. Nicknames and Numbers C. Workgroups p. 32 IV Getting to Work A. Add an Assignment B. Modify an Assignment C. Grade an Assignment D. Grading Types
E. Grading with Workgroups F. Giving Extra Credit
p. 35 p. 35 p. 36 p. 42 p. 46 p. 47 p. 48 V Managing Assignments
A. The Assignment List Screen B. Mass Create Assignments C. Copy Assignments D. Delete Assignments
E. Retrieve Assignments from the Trash Can F. Copy Last Year’s Assignments to this Year
p. 49 p. 49 p. 50 p. 52 p. 55 p. 56 p. 58 VI Student Screens A. A Student’s Assignments B. Birthdays & Icons C. Marking Period Average D. Notes E. Contacts F. Discipline G. Assessments H. Scratch Pad p. 59 p. 59 p. 61 p. 62 p. 64 p. 65 p. 68 p. 69 p. 71
VII The Seating Chart Screen p. 73
VIII Taking Class Attendance p. 76
IX Posting Grades: Gradebook to Report Card p. 78 X Assessments in the Genesis Gradebook p. 80 XI Mass Emailing Student Contacts p. 81 XII Standards in the Genesis Gradebook
A. Standards on Assignments B. Student Progress vs Standards C. Coverage
p. 87
XIII Reports p. 90
Procedures
I.
Introduction
The Genesis Gradebook is a powerful Gradebook program that is fully integrated into the Genesis Student Information System.
The “integrated” nature of the Genesis Gradebook is designed to make your life easier:
You never have to enter your class rosters – Genesis Gradebook gets the list of students in your class from the Genesis Master Class Schedule file.
When students are added or dropped from your class, the updates to the Gradebook appear automatically (dropped students are never lost).
Grade Reporting (posting Marking Period grades) is simplified: there is ‘one click’ transfer of student grades from the class roster into the Report Card Grading module.
Student photos, if they exist, are automatically pulled into the Gradebook and displayed on the seating chart.
The Gradebook also includes a seating chart and class attendance functions.
This “Quick Start” Guide takes you on a quick tour of the Genesis Gradebook, showing you the following:
What you must do and what you can do to set up your Gradebook to work the way you want it to.
What you can do to set up your Class Rosters.
How to create Assignments
How to grade Assignments
How to modify Assignments
What individual student support tools there exist in the Gradebook.
How to use the seating chart
How to do class attendance
How to post grades to the Genesis Report Card Grading module.
The Class RostersAssignments Screen: the most basic Gradebook Screen
The Class RostersAssignments screen is the most important screen in the Gradebook. The next page will introduce you to the basics of this screen.
A.
Introduction to the Gradebook Home Screen
Gradebook
Home
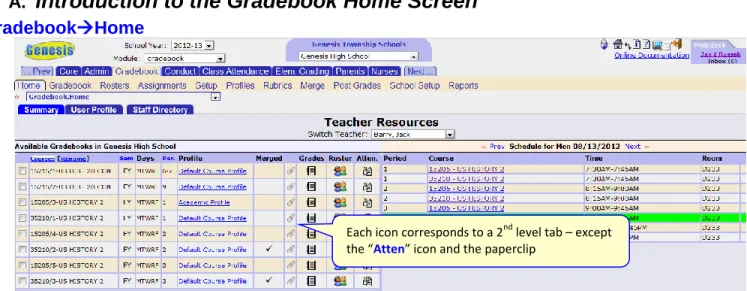
Figure 1 – The GradebookHome screen provides a list of all your course sections and icons to access and perform functions on them.
The Home Screen
The Home screen provides a list of your course sections, indicates which are merged with which and gives you a set of icons to access different functions.
- paperclip – A Lesson Book is attached. Click to go to the Lesson Book for this class.
- grades – Click to bring up the grading spreadsheet – the actual Gradebook – for this class.
- Roster – Click to bring up the GradebookRosterscreen for this class.
- Take Attendance – Click to bring up the GradebookClass Attenance screen for this class.
Home
Gradebook – The grading spreadsheet.
Rosters – Viewing your class rosters and setting nicknames, putting into work groups, and more.
Assignments – Managing Assignments: modifying, copying, deleting, retrieving, copying from year-to-year.
Setup – Viewing the Final Grade formula for a class, selecting Profiles for classes, sending mass emails.
Profiles – Creating grading schemes and selecting preferences for classes.
Rubrics – Creating rubric matrices.
Merge – Joining multiple classes into one roster
Post Grades – Posting Marking Period, Exam and Final Grades to the Report Card system.
Reports – Running Gradebook reports.
Each icon corresponds to a 2nd level tab – except the “Atten” icon and the paperclip
B.
Introduction to the Gradebook Spreadsheet Screen
Gradebook
Gradebook
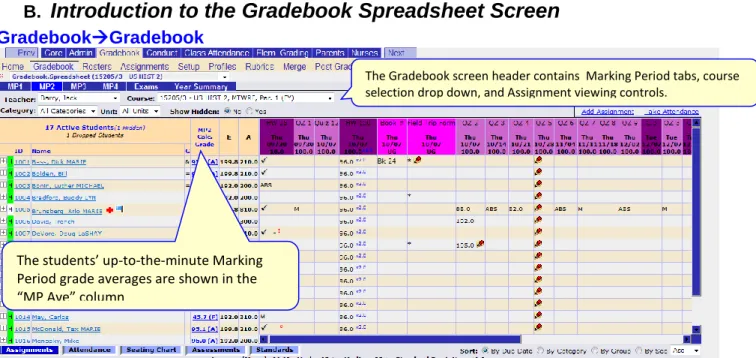
Figure 2 The ‘Assignment spreadsheet’ displays all Assignments for the Selected Marking Period
Modes of the GradebookGradebookSpreadsheet screen
The spreadsheet screen has multiple modes:
1. Assignments – This is the standard Gradebook “grading spreadsheet”. This is the usual mode.
2. Attendance – Class Attendance mode shows every day of a Marking Period as a column on the spreadsheet and allows you to see who has been absent/tardy on each day.
3. Seating Chart – Displays a seating chart that can be used to take attendance and can be printed. 4. Assessments – Shows Assessment scores for all students on your roster.
5. Standards – Displays how students are doing vs. specific Standards.
6. Documents – This is a non-student screen that lists curriculum documents stored in the class section.
The “Assignments” mode is the default for this screen. Class Attendance and the Seating Chart will be discussed in later sections of this guide.
Selecting the Marking Period and the Current Course
Selecting the ‘Current Marking Period’ – There are 4 Marking Period tabs (if you are on a 2 Semester/4
Marking Period year) and a ‘Year Summary’ tab. The Gradebook always starts on which ever Marking Period is the ‘current’ Marking Period. If today is in Marking Period 3, the Marking Period 3 tab will automatically be selected when you enter the Gradebook.
Selecting the Current Course – The ‘Course’ drop down allows you to pick the class you want to work on. The courses in this drop down will change depending on which Marking Period is selected.
Narrowing the set of Assignments being displayed
There are two drop downs which allow you to control which Assignments you see in the spreadsheet.
Categories – Categories are things like ‘Homework’, ‘Quiz’, ‘Test’, ‘Class Project’ – the types of Assignments you will give your students. These are setup on the GradebookProfilesCategories screens (see below).
o All your Categories are listed in the Categories drop down. o You can select one Category or all Categories
o If you select one Category:
The Gradebook screen header contains Marking Period tabs, course selection drop down, and Assignment viewing controls.
The students’ up-to-the-minute Marking Period grade averages are shown in the “MP Ave” column
Only the Assignments for that Category will be displayed in the spreadsheet.
The “MP Average” column will show the students’ averages for Assignments of that one Category.
Units –Class ‘units’, or the sections into which you divide your courses.
o The use of Units is not required.
o If you choose to use Units, you can create them, modify them and delete them via the GradebookProfilesUnitsscreens.
o Any Units you create will be listed in the ‘Units’ drop down on the GradebookGradebook(spreadsheet) screen.
o Selecting one Unit will show only the Assignments linked to that one Unit in the spreadsheet. When one Unit is selected, the “MP Average” column will show the MP average for that one Unit. That is, it will show an “MP Unit Average”.
C.
Screens of the Gradebook Spreadsheet
- Each Gradebook has one Marking Period tab for each Marking Period during which the class meets. If the class only meets for one Quarter (e.g. MP2), there will only be one Marking Period tab showing. If the class meets
for two Marking Periods, only two Marking Period tabs will show. If the class meets for the whole year, all 4 Marking Period tabs will show.
- If the school collects MidTerm, Final or other Exam grades and prints these on Report Cards, there will be an
Exams tab present.
- The Year Summary screen is always present and sums each student’s performance for the year. This screen has all of the Marking Period averages the student’s have been accumulating and all of the Report Card Marking Period grades you have posted. It also contains a Projected Final Grade for each student:
Each grading collection (e.g. MP1, MP2) has three pieces of data in it: The student’s Gradebook Marking Period average for the MP, the grade that was actually posted to the Report Card system, and the Comments that were posted to the Report Card.
The Year Summary Screen and Students Below Minimum Marking Period Grades
The GradebookGradebookYear Summaryscreen also indicates when students are below the minimum grade for
the Marking Period allowed by the school’s grading system. Minimum and maximum Marking Period grades for students are specified by the school. Students whose Marking Period average is currently below the school minimum for the Marking Period have their Marking Period displayed in red font on the Year Summary screen. The cursor tool tip placed on the average describes the issue:
D.
Other Features on the Gradebook Spreadsheet
Gradebook
Gradebook
Features on the GradebookGradebookSpreadsheet screens screen
Sorting the Students – there are 4 column headers that will sort the list of students in the roster. Repeatedly clicking the same column header toggles the direction of the sort. Whatever sort you choose, it is used on every screen for the rest of your Gradebook session.
“Show Hidden” allows you to temporarily display ‘hidden Assignments’
The sort for the Assignments can be changed on the fly with this ‘sort selector’ control. There is also an “Ascending”/”Descending” control. The spreadsheet screen has up to 6 modes
(depending on your permission): Assignments, Class Attendance, Seating Chart, Documents, Assessments, and Standards.
The blue highlighted column headers are buttons that will sort the students by the clicked column header: by Name, Id, Workgroup or MP Average.
MP averages can be color coded. Set this up in your Profile.
o The ‘Id’ column header – this sorts the student numerically by their id. This is whatever appears in their Gradebook id field of the Roster screen.
o The ‘Name’ column header – sorts the students alphabetically by their names. This is the usual, default sort. Click it repeatedly to change the direction of the sort (Ascending: A to Z or Descending: Z to A).
o ‘G’ column header – this column only appears if you have created Workgroups. It will sort the students by their Workgroups.
o MP Average – this column will sort the students by their current Marking Period averages. Click repeatedly to toggle the direction of the sort.
Sorting the Assignments – The Assignments are initially sorted by the sort you selected on your
GradebookSetupPreferencesscreen. You can change the sort ‘on the fly’ by clicking one of the 4 radio
buttons at the lower right of the screen. Sort by:
o Due Date – Sort by Due Dates without regard to any other information
o Categories and then due date – Sort by Category first and then due date. This groups the Assignments by Category.
o Workgroups and then due date
o Sequence #s – Sort by Sequence # without regard to due date. This is just an alternate way of ordering your Assignments.
Show Hidden Assignments – This allows you to temporarily display the Assignments you have flagged as not being ‘for the Gradebook’ (that is, those Assignments you have ‘hidden’ from yourself).
Spreadsheet Modes – The spreadsheet has various modes. The primary mode is the standard “Gradebook spreadsheet” module. There are other modes available, up to six of them:
o Regular Grading Spreadsheet – The normal spreadsheet
o Class Attendance - On this spreadsheet each column represents one day of attendance in the class. o Seating Chart – This is a configurable seating chart that also allows you to take Class Attendance. o Assessments – This displays “Data Views” of Assessment scores for the students on your roster.
o Standards
o Documents – This is a repository for curriculum documents associated with the course itself. It contains no student-specific information.
Each of these modes will be covered in a different section below. Sorting Assignments on the Spreadsheet
There are several ways that Assignments can be ordered, from left to right, on the Gradebook spreadsheet: - By Due Date – This is the default. Assignments are ordered only by their due dates.
o Ascending: More recent dates are added on the right. Newer Assignments are farther to the right. o Descending: More recent dates appear at the left, near the student names. Newer Assignments are
slotted in at left, pushing the older ones off to the right.
- By Category and Due Date – Assignments are grouped by Category and within the Category they are grouped by Due Date. They can also be ordered Ascending or Descending.
- By Workgroup and Due Date – Assignments are grouped by Workgroup linkage and then by Due Date.
- By Sequence number – You can give all your Assignments a sequence number and order them strictly by that. This gives you full control over the order in which the Assignments appear.
You can set your preferred sort order in your Gradebook Profile (See Section II D on Gradebook Profiles below). You can also select how to order the spreadsheet directly on the spreadsheet screen itself, in the lower right corner:
II.
Setup
Gradebook Setup consists of a small number of tasks:
1. If you have not ever done so, check your User Profile and make sure it is set correctly. 2. Determine whether or not to merge any of your class rosters:
You can “merge” two or more of your assigned course sections into a single class roster. 3. Setup your course Profiles. For each Profile, you can:
Choose your basic “Grading Style”: Total Points or Weighted Categories
Setup your Categories (e.g. Homework, Tests, Projects, etc.)
Adjust Grade Values so that they work for you
Create your class “Units” (e.g. ‘Chapter 1’, ‘Chapter 2’)
Optionally set up Workgroups so that you can divide your class rosters into non-overlapping sub-groups of students (this will allow you to create Assignments directed to just one Workgroup of students).
4. Determine which Profile to assign to which class section.
Gradebook Setup Checklist:
__ Merge course sections you wish to share one course roster of students
__ View your Default Course Profile. Make any changes you want to apply to all your courses __ Copy your Default Course Profile to make additional course profiles if you need to.
__ Make changes to your copied course profiles as appropriate (Preferences, Categories, Grade Values, Units and Workgroups)
__ Select the course profile you want for each course (use GradebookSetup)
A.
User Profile
GradebookHomeUser Profile
Your personal Gradebook User Profile must be set up once (and only once).
1. Go to the GradebookHomeUser Profile
screen.
2. Select your “Default Teacher”. 3. Make sure your Email Address is
correct. If it is not there, enter it. 4. All other information is optional. 5. Click Save.
Your “Default Teacher” must be set for the Gradebook to work efficiently. If more than one teacher is listed in the drop down, select the one which is the best match for you.
B.
Merging Course Sections into a Single Combined Roster
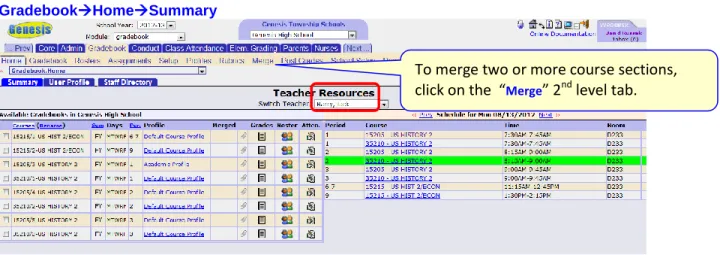
GradebookHomeSummary
Why Merge Rosters?
You will want to merge course rosters if you want two or more course sections to appear on one roster – one list of students – in your Gradebook. The reasons include the following:
Your inclusion students and your non-inclusion students are in two separate course sections and you want to view them as one, unified course roster.
You have two or more classes that you wish to treat as one (e.g. a science course section and its corresponding lab course section.Restrictions on Merging Rosters
Rosters can be merged as long as the following are true:
All the course sections you wish to merge have the same semester code (e.g. both are Full Year courses or both are Semester 1 courses, etc.).
You have not yet created Assignments in any of the course sections you wish to merge. You cannot merge course sections if you have already created Assignments.
All course sections you wish to merge use the same Course Profile. You cannot merge courses that are using different Course Profiles.Figure 3 – After a Merge, checkmarks indicate the merged classes on your GradebookHomeSummaryscreen
To merge two or more course sections, click on the “Merge” 2nd level tab.
GradebookMerge
Performing a Merge
To merge two or more classes, bring up the GradebookMerge screen:
1. Pick the “base course section” – this is the course section you will merge other course sections into. Which one you pick as the base truly does not matter – but to proceed, you must select one.
2. Select the course section(s) to merge into the base. These all must: a. Have the same semester code (e.g. “FY”) as the base
b. Use the same Course Profile (e.g. “Default Course Profile”) as the base c. Have no existing Assignments
d. Have mutually exclusive rosters (no student is in both/all classes to be merged). 3. Click “Save” to perform the merge
When the merge completes successfully, you will be shown the following confirmation dialog:
You can now view either the GradebookHomeor GradebookMergescreen to see the result of the merge.
If the merge failed because one or more of the classes already have Assignments, delete the Assignments. This puts them into the Trash Can. Now you must go to the Trash Can and delete them a second time:
Step 1: pick a “base” course section to merge other sections into
Step 2: Select one or more sections to merge into the pre-selected “base” course section.
Step 3: Scroll to the bottom of the screen and click Save to do the actual merge.
GradebookMerge
Breaking a Merge: Separating Merged Rosters
Merged rosters can be separated as long as you have not yet created Assignments in the combined course roster. You cannot break a merge if you have already created Assignments.
You have not yet created Assignments you can break the merge without any repercussions.
To break the merge, simply click on the “Break Merge” icon () at the far right. When the “break merge” operation completes successfully, you are shown the following confirmation dialog:
This course was merged with the current ‘base’ course.
C.
Setup Course Profiles
1. The Default Course Profile
GradebookProfiles
Introduction to Course Profiles
Course Profiles hold all the settings for your courses:
How to grade the course (basic grading preferences)
What the grades are worth (grade values)
What categories you use (Homework, Tests, Quizzes, Projects, etc.)
How the course is divided up (Course Units)
Whether or not to use Workgroups (sub-groups of students) You must set up your profiles and assign them to your classes.
The Default Course Profile
Initially, you have one course profile, the “Default Course Profile” and all your courses are assigned to use it. It contains all the basic settings specified for your school.
You can create as many additional profiles as you wish and alter any of the settings. To create a new course profile, you must copy an existing one. To create your first customized course profile, make a copy of the Default Course Profile.
2. Copying and Renaming (and Deleting) Course Profiles
GradebookProfilesFigure 4 – Course Profiles list after the first copy of the Default Course Profile
Copy (create a new) Course Profile
Rename Course Profile
Copy (create a new) Course Profile Delete Profile Open to Edit
Copying and Renaming Course Profiles
The only way to make a new course profile is to copy an existing one. The “Copy Profile” icon makes a copy of the profile. The name of the copied profile is always the name of the old profile with “(COPY)” tacked on to it. If you copy the Default Profile, the name of the copy is “Default Course Profile (COPY)” – as you can see in Figure X above. Of course you will want to rename your copied profiles.
Copy a Profile
To copy a profile, simply click on the “Copy Course Profile” icon button. The profile is immediately copied and the name of the copy is automatically assigned.
Renaming Copied Profiles
To rename a copied profile, click on the “Rename” icon button. This will bring up the Rename Profile screen.
Deleting a Profile
The Default Course Profile cannot be deleted, but all other Course Profiles can be. To delete a Course Profile, click on the Delete “trashcan” icon at the far right side of the line.
Rename a Profile
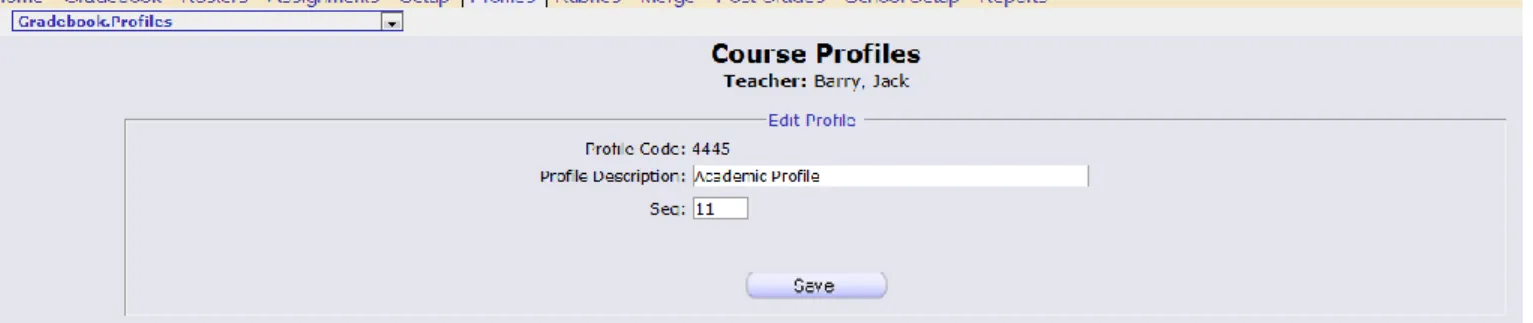
Figure 5 – The “Rename” Course Profile Screen
Renaming the Profile
To rename the profile, enter a new description. Then click Save. You can also edit the “Sequence number” of the course profile. The sequence number is used to sort the profiles in the list of course profiles. Changing it may change the position of this course profile in the list of profiles on the GradebookProfiles screen.
3. Editing Course Profile Settings
This is where you make the most important decisions about using your Gradebook: How to Grade your Courses
Choose your basic “Grading Style”: Total Points or Weighted Categories. Weighted Categories is the default.
Setup your Categories (e.g. Homework, Tests, Projects, etc.)
Adjust Grade Values so that they work for you
Create your class “Units” (e.g. ‘Chapter 1’, ‘Chapter 2’)
Set up Workgroups
i.
Choose Your Basic Grading Scheme
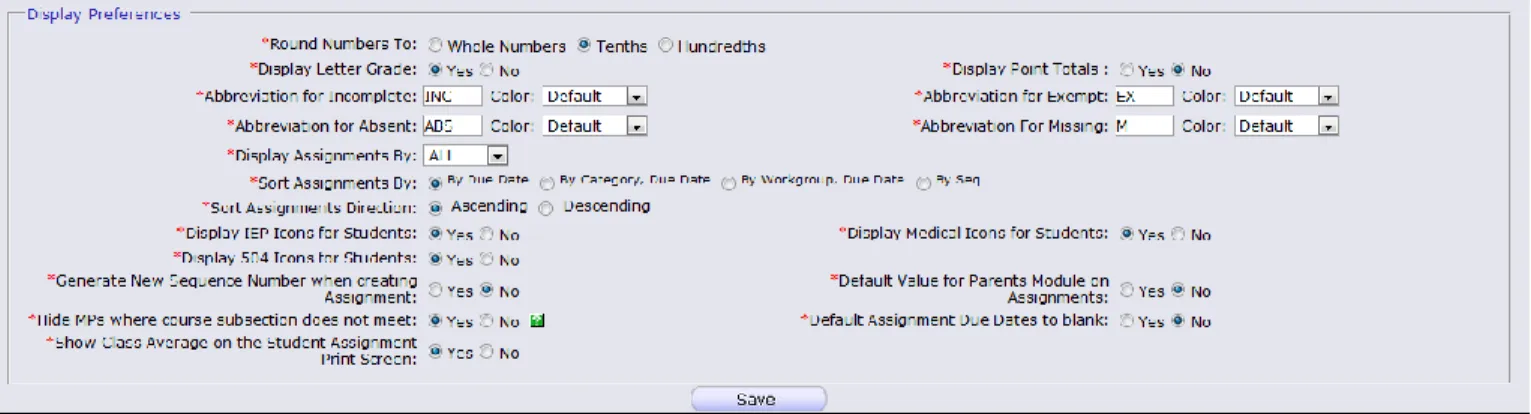
GradebookProfilesModify ProfilePreferencesFigure 6 – Top half of GradebookProfilesPreferences screen
Select Your Basic Grading Style
1. Click on the GradebookProfilestab
2. Click on the “P” icon for the Profile you wish to edit. This brings up the Preferences screen for the selected Profile.
3. Select the Grading Style – either “Total Points” or “Category Weights”
4. If you selected “Category Weights”, also select how to calculate the Category Averages: 5. Select “Calculate Category Averages by” either
a. Assignment Count– this means “Simple Score Average”
b. Total Points– Sum earned points and divide by the sum of attempted points. 6. Click Save (you will need to scroll to the bottom to find the Save button).
The default Grading Style is “Category Weights”. If you use Total Points, you must change the setting.
Select your Grading Style here and click Save
Select the Sort for your Assignments on the Class Roster Spreadsheet Screen
1. On the GradebookProfilesModify ProfilePreferencestab for the selected Profile, scroll to the bottom (see
Figure X below).
2. Select your choice of the four Sort Assignments options:
a. By Due Date, By Category
b. Due Date, By Workgroup
c. Due Date
d. By Seq
3. ClickSave.
The default sort is “By Due Date” (choice C above).
ii.
Setup Your Assignment Categories
GradebookProfilesModify ProfileCategoriesSetting Up Categories
You are initially given the 3 sample Categories of Homework, Test and Quiz. You may keep, modify or delete these as you like and add an unlimited number of additional Categories.
Categories must be setup regardless of whether you use Weighted Categories or Total Points as your basic grading scheme.
You can create absolutely any Categories you wish: The most common Categories include:
o Homework o Quizzes o Tests o Class Projects o Class Participation o Presentations
Categories can be color-coded – Color coding your Categories allows for easy, quick identification of
Assignments on the Class Rosters spreadsheet screen. For your convenience a color codes chart is included in this document.
a. Adding a Category
GradebookProfilesModify ProfileCategoriesAdd Category
Add a New Category
1. Click on the GradebookSetup tab 2. Click on the Categories 3rd level tab 3. Click on the Add 4th level tab 4. Fill in the required information:
Category Code – a short, unique abbreviation for the Category (e.g. “HW” for Homework or “PJ” for Projects)
Category Description – A brief description. E.g. “Homework”, “Projects”
Color Scheme:
o Background – 6 character hexadecimal code giving the color o Font – 6 color hexadecimal code giving the color
Select a default grading type. This is the grading type you would ordinarily use for Assignments in this Category.
Specify a default “maximum score” for Assignments of this Category. E.g. 25 points.
DO NOT put anything in the “Preset Earned Points” field. This is explained below.
Indicate whether or not to automatically drop up to the 5 worst scores that a student has for Assignments in this Category in any one Marking Period.
Choose a color scheme, or just use the default color scheme.
Select a “Sequence number” for the Category – this positions the Category in any list of Categories
If you are using Category Weights, specify how much this Category is worth in each Marking Period. 5. Click Save.
b. Remove a Category
GradebookProfilesModify ProfileCategories
Removing a Category
1. Open a Profile for editing and go to the Categories screen of the Profile. 2. Select the Category you want to remove (that is, permanently delete)
3. Click the “Delete” trashcan icon on the right side of the Category’s line. This brings up a warning and also tells you how many Assignments are using this Category:
4. Click “OK” to proceed and delete the Category – or click “Cancel” to abandon the delete There is no UNDO for removing a Category
Editing a Category
Editing a Category
To change any of the Category’s settings, including its Category Weight and color scheme, click on the “edit” icon for the Category.
To sub-divide the Category, click the “sub-divide” icon for the Category.
Delete Trashcan Icons – click to delete the Category
Sub-divide Icons – click to subdivide a Category and create sub-Categories
Click the edit icon to open the Category to modify it.
Editing Sub-Categories
Sub-Categories cannot be directly edited. They inherit the default Grading Type, maximum points and other settings of their parent Category. To change the name, percentages and color schemes for sub-Categories, click on the “Sub-Divide Category” icon for their parent Category.
Gradebook
Profiles
Categories
Modify Category
Modify a Category
1. Click on the GradebookProfilestab
2. Select a profile and click on the “P” (change settings) icon. 3. Click on the Categories 3rd level tab
4. Click on the Edit button for the Category you wish to modify 5. You may update any or all of the following fields:
Category Description – A brief description. E.g. “Homework”, “Projects”
Default grading type. This is the grading type you would ordinarily use for Assignments in this Category.
Default “maximum score” for Assignments of this Category. E.g. 25 points.
“Preset Earned Points” field. See “Preset Earned Points Categories” below. Leave this blank unless this is a “count down” Category
“Drop Worst” setting
The color scheme.
Sequence number of this Category – its position in any list of Categories
Category Weight of this Category in each Marking Period. 6. Click Save.
c.
“Countdown Categories” using Pre-Set Points
GradebookProfilesCategoriesAdd/Modify Category
Pre-Set Points Categories: Counting Down instead of Up
A “pre-set” points “countdown” Category lets you give students a fixed number of points – e.g. 100 – at the start of a Marking Period and to subtract – rather than add – points to that total.
This is the “take points away” or “count down” type of Category.
To create a “count down” Category you must do two things on the Category screen: 1. Set the Default Grade Type field to “Preset Points”.
2. Select the starting number of points each student will receive. This value is placed in the Preset Earned Points field.
3. Specify whether student’s total can go below zero for the Category. If the Allow preset points below 0 checkbox is checked, a student can lose an unlimited number of points and their total for the Marking Period can be negative (i.e. below zero):
These two settings change the Category from a normal “count up” Category to a “count down” Category. The “Pre-Set Points” grading type has 3 default grades (i.e. grades that are provided to get you started):
“Handed In” (defaults to a value of 0)
“Not Handed In” (defaults to a value of -5)
“Extra Credit” (defaults to a value of 5)
Pre-set Point grades can be added, changed and removed on the ProfilesEdit ProfileGrade Values screen
.
The Default Grade Type field must be set to “Preset Points”
The Preset Earned Points field is set to the starting # of points each student receives.
d. Sub-Divide a Category
Gradebook
Profiles
Categories
Modify Category (Sub-Divide)
Procedure to Sub-divide a Category
1. Click on the GradebookProfilestab
2. Select a profile and click on the “P” (change settings) icon. 3. Click on the Categories 3rd level tab
4. Click on the Subdivide icon for the Category you wish to sub-divide. This brings up the “Sub-divide Category” screen.
5. You may create one or more sub-divisions for a Category. The “Add Sub-Category” fields are found along the bottom of the screen. Fill in the fields:
a. Seq – Sequence # for this sub-category.
b. Code – Unique short code that identifies the sub-Category. This should be 2 to 4 characters in length. c. Description – Description of the sub-Category
d. MP1 to MP4 - % value of this Sub-Category. e. Color scheme – Font and Background colors. f. Click Add to create the new sub-Category.
6. Repeat all of Step 5 to add additional Sub-Categories
Rules for MP percentages for Sub-Categories: Sub-Category Marking Period percentages sub-divide the percentage value for the parent Category for each MP. For example, if the parent Category is work 50%, the total %s of the sub-Categories must add up to no more than 50% (and not 100%). This helps you understand what each subcategory is contributing to the Marking Period average.
View, Update and Delete Sub-Categories
The sub-Category maintenance screen gives you the ability to view the sub-Categories of a Category, change the % values for a sub-Category, and delete a sub-Category.
To Update the % values for a sub-Category:
1. On the on the Modify Sub-Categories screen, directly update the MP1, MP2, MP3, MP4 fields. 2. Click the “Save” icon for the sub-Category.
NOTE: Sub-Category percentage totals for a Marking Period (MP1, MP2, MP3, MP4) must add up to less than or equal to the percentage value of the parent Category. If the Category weight is 50%, the total of all sub-Category
percentages cannot exceed 50%. Invalid sub-Category percentages are shown in red font.
To Delete a sub-Category:
1. On the on the Modify Sub-Categories screen, click the “Delete” icon next to the sub-Category you wish to remove.
To Change a sub-Category’s Code, Description or Color Scheme
A Category’s code cannot be updated: to change it you must delete the Category and recreate it. A sub-Category’s Description and color scheme can be changed by re-entering data in the “Add a sub-Category” fields at the bottom, using the exact same Code, and clicking Add.
The red value here of 25% here indicates that something not accounted for and the % is either too high or too low.
When the total percentage of the sub-categories matches the percentage of the whole Category, everything is fine.
iii.
Setup Your Grade Values
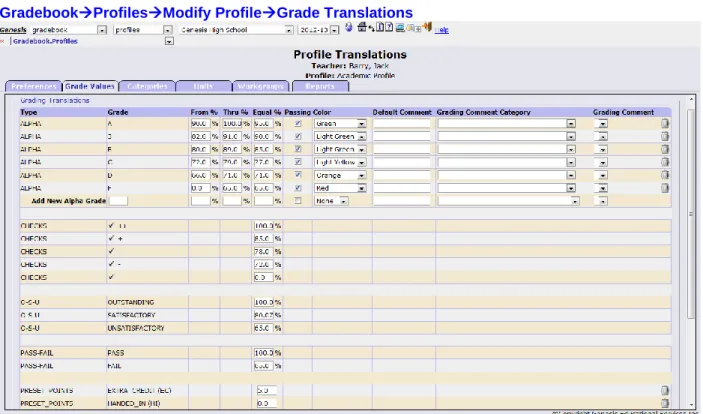
GradebookProfilesModify ProfileGrade Translations
Figure 7 – Sample of the Grade Values screen
The Grade Values Screen
This screen has 7 possible Grading Types:
Alpha or “letter” Grades – Usually A+, A, A-, B+, …, D-, F - This is setup by your school and should not be changeable by you.
Check Marks - ++, +, ,-, -- - Five grades from ++ to --. To “turn off” ++ and -- set them both to have 0 (zero) value. This moves them to the bottom of the list and you won’t need to look at them.
O-S-U grades – Outstanding, Satisfactory and Unsatisfactory – 3 grade grading type.
Pass/Fail – A two grade grading type. Pass should be 100% and Fail should be the highest “failure” numeric (e.g. 64.9).
Pre-set Points
Custom Grading Type
Setting Up Grade Values
1. Click on the GradebookProfilestab
2. Select a profile and click on the “P” (change settings) icon. 3. Click on the Grade Values 3rd level tab
4. Review all Grade Values:
a. Alpha Grades – You may add and delete Alpha Grade values b. “Checks” Grade Type
c. O-S-U Grade Type
d. Pass/Fail Grade Type (you might want to set “Pass” to 100). e. Pre-Set Grade Type: Handed In/Not Handed In/Extra Credit 5. Click on the Save button.
Adding, Deleting and Modifying Pre-set Points Grades
The Pre-set Points Grading Type comes with three ‘starter’ grades. You can delete these and create your own, just add new ones and change the value of the grades:
Deleting Grades: To delete a grade, just click the icon corresponding to it. You will get a confirmation dialog and you must click OK to delete the grade:
Change a Grade’s Value: To change a value, simply type the new value into the textbox, scroll to the bottom and click . Pre-set Point grades can be negative:
Adding a Grade: You must specify three things to add a grade and then click :
o The “name of the grade” - a string with no spaces that can be much larger than the little text field provided to hold it. E.g. VERY_LATE
o An Abbreviationfor the Grade. E.g. VL
o The valueof the grade: E.g. -9. Values can be positive, zero or negative. Note that the value is an
absolute value and not a Percentage. Note that all other Grading Types have % values.
Adding and Deleting and Modifying Custom Grades
If you are allowed to create a custom grading type for your Gradebooks, there will be a “Custom Grades” area at the bottom of your Grade Values screen. This area will not be present if you cannot create Custom grades:
Adding a Custom Grade: You must specify two things to add a grade and then click : o The “grade” - a string with no is usually a short grade: E or VG or N
Deleting Grades: To delete a grade, just click the icon corresponding to it. You will get a confirmation dialog and you must click OK to delete the grade:
Change a Grade’s Value: To change a value, simply type the new value into the textbox, scroll to the bottom
and click .
Interpreting the Alpha Grades on the Grade Values screen
The Grade Values screen includes an “alpha grades” area at the top. The “From” and “Thru” values of this scale are used to show the letter grade that corresponding to students’ Marking Period averages. It must take rounding into account.
From Value – This is the starting % for this grade. Note that it must take rounding into account. If a B is to start at a percentage of 80, the value that goes here, to account for rounding, is 79.5.
Through Value – This is the ending % of this grade – the highest percentage that equates to the grade. It must also take rounding into account. If the B goes to 89, the value that goes in, to account for rounding, is 89.4).
Notes on From and Through Values:
Failing grades (e.g. F) do not “round”, especially on the “Through” value. This must be the precise spot where the failure point ends. E.g. 65.
The first non-failing grade in the list (“D” is the above example), does not round, but begins immediately above the last failure point. E.g. 65.1
The highest grade in the list (A in the above example) also does not need to round on its Through value. This extends upward to infinity.
“Equal” - The “Equal” value for all grading types is what the corresponding non-numeric grade is translated to for the purpose of computing Marking Period Averages. All non-numeric grades, including checkmarks must be converted
to numeric equivalents to compute Marking Period averages. For all Grading Types except Pre-set Points, the “Equal”
value is a percentage of the number of point the Assignment is work. For Pre-set Point grades the “Equal” value is the true value of the grade. A “-9” is a “-9”.
Color coding Alpha grades: You can select a color for each alpha grade. Student’s Marking Period averages will then be color-coded correspondingly.
iv.
Units – Creating and Managing Course Units
GradebookProfilesModify ProfileUnitsUnits
Units are not required. You do not have to use them. If you choose to use them, you must create them yourself. Units are managed via theGradebookProfilesUnitsscreen.
To Manage Your Units:
1. Click on the GradebookProfilestab
2. Click on the 3rd level Units tab
3. Review any existing Units you have previously created. Initially this screen is empty. Genesis Gradebook does not give you any sample Units: it cannot, as Units are very specific to different courses. You must create all your own Units.
4. To add a new Unit, click the “Add Unit” tab
5. To delete an existing Unit, click the “Delete” trashcan icon corresponding to the Unit you want to delete. 6. To modify an existing Unit, click the “Edit” icon corresponding to the Unit you want to delete.
Add a New Unit
Figure 8 – Adding a New Course Unit
Procedure to Add a New Course Unit
1. Click on the GradebookProfilesUnitsAdd Unittab to bring up the ‘Add Unit’ screen. 2. Provide the following pieces of information for the new Unit:
a. Unit Code - A short, unique code for your set. This is used internally by the Gradebook. The key thing is that the code should be unique.
b. Unit Description – A description of the Set (or course unit).
The ‘delete’ trashcan icons
The ‘modify’ icons
Units are completely optional. There are no built-in Units. A Unit is essentially:
a Unit Code(for Genesis’ internal use),
a Descriptionof the Unit. E.g. Chapter 4
a Column Header(intended to be a brief
abbreviation of the Unit’s Description). E.g. CH4
the Sequencenumber for the Unit.
Genesis does very little with Units: they are “FYI” for you only. They are primarily an aid for you in organizing your classes in the Gradebook.
c. Unit Column Header - A short, abbreviated column header for the Unit. This will appear in the column header of Assignments on the GradebookGradebookspreadsheet screen. If the Column Header is
long, it will make your Assignment columns very wide.
d. Sequence # - The sequence number is used to place the Unit in any list of Units. That is, it is used to order your Units in drop down lists and on the Units screen itself.
3. Click on the Save button when you done to actually create the Unit.
v.
Workgroups
GradebookProfilesWorkgroups
Workgroups
Workgroups are not required. You do not have to use them. The Gradebook implements very loose linkages between students and Workgroups and Assignments and Workgroups. If you choose to use them, you must create them yourself. Workgroups are managed via the GradebookProfilesWorkgroupsscreen.
To Manage Your Workgroups:
1. Click on the GradebookProfiles tab
2. Click on the Workgroups 3rd level tab.
3. Review your existing Workgroups. Initially you will have no Workgroups. 4. To add a new Workgroup, click the “Add Workgroup” tab
5. To delete an existing Workgroup, click the “Delete” trashcan icon corresponding to the Workgroup you want to delete.
6. To modify an existing Workgroup, click the “Edit” icon corresponding to the Workgroup you want to delete. Add a New Workgroup
GradebookProfilesModify ProfileWorkgroups
Figure 9 – Creating a new Workgroup
Adding a New Workgroup
Workgroups have very few characteristics. They are identified by a 1-character name (e.g. ‘A’) and their most distinctive characteristic is their color scheme.
To create a new Workgroup:
1. Click on the GradebookProfilesWorkgroupsAdd Workgrouptab to bring up the ‘Add Workgroup’ screen.
2. Provide the following pieces of information for the new Workgroup:
a. Group Code- This is the one character name for the Workgroup. It is only 1 character, but it can be any character. There are 72 possible characters:
i. Capital or lower case letters ii. Numbers 0 - 9
iii. Punctuation: ~!@#$%^&*()_+=}][{\|’”;:/?.>,<` b. Description– A description of the Workgroup.
c. Color Scheme for the Workgroup. It is very important to select a distinctive color scheme for the Workgroup. Color schemes have two parts:
i. The Fontcolor – the color for the text itself
ii. Background color – the color of the background field.
The text must be easy to see and read against the background color. There are a small number of ‘pre-set’ colors available in both the ‘font’ and the ‘background’ drop downs. You can select a preset color or you can enter your own code.
d. Sequence #- The sequence number is used to place the Workgroup in the list of Workgroups. That is, it is used to order your Workgroups in drop down lists and on the Workgroups screen itself.
3. Click on the Save button when you done to actually create the Workgroup
vi.
Reports – Progress Report Settings
GradebookProfilesModify ProfileReports
Progress Report Settings
Progress Reports are sent from the Gradebook from two screens: - The Gradebook GradebookStudentContactsscreen - The GradebookSetupProgress Reportstab
In both cases, the report formats are controlled by the “Reports” screen of the Profile being used for the course. The Reports screens contain parameters which control the information included in the Progress Reports. These
parameters are similar but not identical the options on the 71910 Student Assignment Report. These control the formatting and data included on the Progress Reports that are emailed out of the Gradebook. The settings on the Reports screen of the Profile applies to all Progress Reports emailed from any course using the Profile.
The Progress Report options include:
- Only Show Graded Assignments – Only include Assignments that are graded for this student. - Show Teacher Signature Line – Add ‘teacher signature’ line at bottom where the teacher can sign. - Show Parent Signature Line – Add ‘parent signature’ line at bottom where the parent can sign.
- Show Class Average – Print the class’ average for each included Assignment. The parent can see how the child has done vs. the class average.
- Round Averages to two Decimal Places – All averages will have at most two decimal places.
- Show Extra Credit Total – Show the number of ‘brute force’ points that were added to the student’s Marking Period average.
- Translate Numeric Assignment Grades to Alpha - Show alpha (letter) grades for all Assignments.
- Include “Parent Comment” for Assignments – If you have left any comments for Parents when you graded Assignments, they will be included in the Progress Reports.
- Show Category Data – This option controls whether any Category data will be added to the Progress Reports. If it set to Yes, then a block of information about how the student is doing Category by Category is included. - Show Category Averages - If yes, Category averages are included.
- Show Category Weights – If yes, Category Weights are shown on the reports.
- Show Category Score – If yes, the student’s scores in the Categories are included in the reports.
To change any of these parameters, go to he Reports tab of the relevant Profile, select the settings you want and click Save. The changes take place immediately and will affect the next Progress Reports you send from the Gradebook.
D.
Assign Profiles to Your Courses
Gradebook
Setup
Course Profile
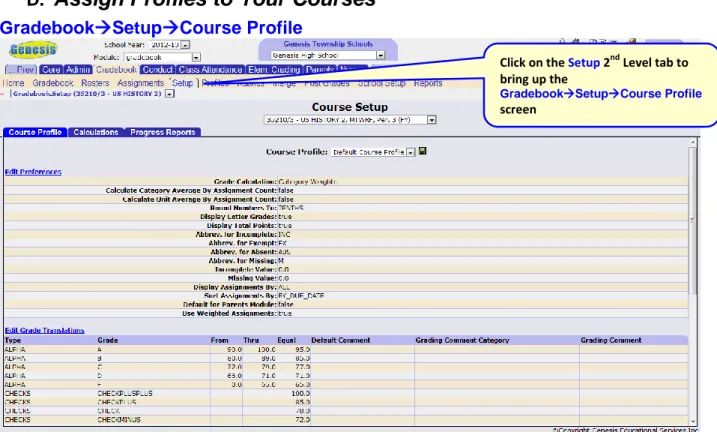
Figure 10 – GradebookSetupCourse Profile screen
At A Glance, Profile Setting Review and Select Screen
Selecting a New Profile
To choose a new profile, select your desired profile from the Course Profile drop down list. This will bring up the settings for the selected profile. To permanently choose this profile, click the “Save” icon (disc) next to the Course Profile drop down.
1. Go to the GradebookSetupscreen.
2. Select the Course Section shoes Profile you wish to set from the top drop down list. 3. Select the Course Profile you wish to assign to this class from the lower drop down list.
4. Click the floppy disk save icon. This assigns the selected Profile to the selected course section. Once you do this, the remainder of the screen shows all of the Profile settings for the selected Profile.
Basic Preferences
Grade Translations and values Categories
Units
Workgroups
5. Repeat steps 2 to 4 to set Profiles for additional course sections.
Click on the Setup 2nd Level tab to bring up the
GradebookSetupCourse Profile screen
III.
Class Rosters Setup (after Merging Rosters)
GradebookGradebook
Setting Up Class Rosters
There are 6 things you can do to set up each of your Class Rosters:
1. Turn off the New indicator that initially appears next to each student’s name.
2. Give each student a “Gradebook” (or ‘class’) Id to use in place of their District Student Id for this class only. 3. Give students a nickname for use on the Class Roster screen
4. Hide the dropped students (the students shown in red at the bottom of the class roster list). 5. If you are using Workgroups, assign students to their Workgroup.
6. If multiple teachers are teaching this class, determine which one has responsibility for each student. To go to the “Roster Setup” (or ‘Student Roster’) Screen click on the Active Students label. You can also click on the “Class Rosters” second level tab.
Gradebook Ids
Some teachers want to give students a ‘class id’ for use only in their class. These are called ‘Gradebook Ids’ and they can be assigned on theClass Roster setup screen. Gradebook ids can be 1 to 4 digits in length. You can assign them yourself randomly, or you can use the ‘Generate Ids Starting With’ function and generate ids sequentially, but starting with whatever number you supply.
“New” indicator
This is the “Active Students” label. Click this to get to the “roster setup screen”.
Any Students shown at the bottom in Olive background have been dropped from the class. If they are visible here, you may continue to post Assignment grades for them.
Class Roster Setup Screen
The Student Roster Setup Screen
This screen lets you set up your Class Roster:
Turn off the “New” marker next to all students in the class
Hide dropped students from the Class Roster screen
Give students nicknames for the Class
Give students “Gradebook Id” or class Id numbers.
Assign students to a Workgroup, if you are using and have setup Workgroups
If multiple teachers are responsible for a (combined) course roster, you can designate which students are the responsibility of which teacher.
Turn Off the “New” Indicators
1. Click the “Accepted” column header to toggle all the “Accepted” checkboxes to “checked” - or –
2. Check just the checkboxes in the “Accepted” column for the students whose “New” marker you wish to turn off.
3. Click “Save” to save the changes.
Hide Dropped Students on Gradebook Screen
If you hide a dropped student, you will not be able to enter grades for that student. If you allow a dropped student to remain visible, you will continue to be able to enter grades for them.
1. Uncheck the “Show” checkboxes for the students you want to hide. 2. Click “Save” to save the changes.
Give Students “Nicknames” for this Class
1. Edit the students’ “Gradebook Name” fields. For example:
a. Abbreviate extremely long names (especially if the names cause formatting problems on the Class Roster screen).
b. Record student’s preferred nicknames
c. Prefix student last names with a “z” to cause them to sort alphabetically to the bottom of the list 2. Click “Save” to save the changes.
The ‘Gradebook Id’ settings
The ‘Gradebook Name’ fields
The ‘Generate IDs starting at’ control
Controls the ‘New’
indicator The ‘Show’
Give Students “Class Ids” for this Class
1. Edit the students’ “Gradebook Id” fields. You can either: a. Pick numbers your self
b. Use the “Starting Ids Number” field at the upper right of the screen. Enter the starting Id number for the class and click “Go”
2. Click “Save” to save the changes.
To randomize the Gradebook Ids, do the following:
1. On the GradebookGradebookscreen, click the “Id” column header. This sorts the students by their District
Student Id – that is, it sorts them more or less randomly.
2. Then, click on the Active Students label to bring up the Class Roster screen.
3. Now, generate Id numbers using the “Starting Ids Number” field at the upper right of the screen. Enter the starting Id number for the class and click “Go”
3. Click “Save” to save the changes.
Assign Students to a Workgroup
1. First you must set up Workgroups on the GradebookProfilesWorkgroupscreen of the Profile assigned to this
class roster (see Pages below)
2. Assign students to a Workgroup in the “Group” column 3. Click “Save” to save the changes.
Assign Teachers Responsibility for Students in the Class Roster
If multiple teachers are assigned to a single class roster, you can (but do not have to) specify which teacher has responsibility to grade which students.
1. In the “Teacher Responsibility” column on the far right of the screen, select which teacher has grading responsibility for each student.
2. Click “Save” to save the changes.
Students appearing in olive background at the bottom have dropped the class.
IV.
Getting to Work
A. Add an Assignment
Adding an Assignment
1. Click on the “Add Assignment” Quick Link at the upper right of the Class Roster screen 2. The required fields are identified by a red asterisk (*).
3. Fill in the fields of the Assignment:
a. Assignment Name – Short name for the assignment
b. Column Header – Column header – controls width of the column. Appears in the spreadsheet. c. Sequence # -An optional 1 to 9 digit sequence number that you assign
d. Groups – If you are using Workgroups, you can choose a Workgroup for this Assignment.
e. Description – Optional description of the Assignment. Very large, useful field. Displays to Parents. f. Assigned Date –Date that the Assignment is “Assigned” to students – Optional.
g. Due Date – Due date for the Assignment – not required and not linked to the Assigned Date. h. Category – Select the Category for the Assignment (e.g. Homework). Notethat the *Extra Credit*
Category is NOT a regular Category – it is a “fudge factor” feature. See Extra Credit below. i. Grading Type – Select how the Assignment will be graded = or ungraded. See Grading Types.
j. Maximum Possible Score – Specify maximum point value. This is the ‘point value” of the Assignment. It is not available for the *Extra Credit* Category and ungraded Assignments.
k. Assignment Weight – Specify how to ‘count’ this Assignment. The default is to ‘count it once’. You can specify, for example, to count it ‘1.5’ times or ‘2.0’ times, etc. Do not update unless you want to
‘count an Assignment’ more than once.
l. Assignment Unit – If you have set up Units, select Unit of Assignment (e.g. “Chapter 1” or “American Revolution”)
m. Parent’s Module - If the Parent’s module is turned on, share this Assignment? n. For Gradebook – Hide or show Assignment on Class Roster screen?
o. Links to other classes – Specify which other of your classes to copy and link this Assignment to. 4. To stay on this page and create additional Assignments, check the “Add Assignment after this” checkbox –
otherwise you will be returned to the Class Roster screen. 5. Click “Save” to create the Assignment.
1 to 9 digit “seq #”
Creating Assignments – Notes
1.
Files can be uploaded into Assignments to be available, through the Parent/Student Access Module, to the students and their guardians at home. This cannot be done during “Create Assignment” function; it must be done during Modify Assignment.2.
Standards can also be attached to Assignments only during Modify Assignment, not during Create Assignment. This is true because of how the Assignments are stored internally in Genesis.3.
LINKING ASSIGNMENTS – When Assignments are linked, and a student switches sections of a class, their Assignment grades can transfer. Unlinked Assignments can never transfer grades.Deciphering the Assignment Column Header
The Column Header area of the spreadsheet provides information about each Assignment:
- The color of the header indicates the Category of the Assignment. Category colors can be set in your Gradebook Profile.
- The top line of the header contains the text from the Column Header field of the Assignment. It is clickable – always – and brings up the Modify Assignment screen.
- The second line either shows the Parent icon and/or the Unit’s column header OR the day of the week that the Assignment is due.
o The “parent” icon indicates the Assignment is visible in Parent/Student Access.
o If you are using Units, and the Assignment is linked to a Unit, the Unit column header is present. If you are not using Units then there is no Unit Column Header.
- Date, Day of the week and Cycle Day – If the Assignment has a Due Date set, the day of the week, date and cycle day (if your school uses cycle days) are all displayed in the header. - If the Assignment has “Maximum Points” set – and most(but not all) do – the number of points
is the bottom line of the column header. E.g. 100.0, 0.0.
- If the Assignment is NOT Graded (has one of the not-graded Grading Types), “UG” appears as the bottom line of the header.
- “Extra Credit” Assignments using the special ‘fudge factor’ *Extra Credit* Category are always shown in blue background and do not display any points:
- Assignments not linked to any Category are shown in red with a warning symbol: This means that you have deleted the Category they were previously linked to from their Profile. You must fix this situation ASAP.
Assignments that are not linked to any existing Category will not be counted. When is displayed in a column header, there is a missing or broken Category in the Gradebook’s assigned Profile. This must be fixed immediately.
B. Modify an Assignment Definition
Gradebook
Gradebook
Modifying the Definition of an Assignment
If you need to alter the Assignment:
To change the Assignment’s Category
To alter the number of points it is worth
To change its sequence #
Etc.
Click the highlighted top line of the Assignment’s column header. This will take you to the “Modify Assignment” screen.
Grading Type Cannot be Modified
WARNING: You cannot modify the Grading Type of an existing Assignment. To “modify” the Grading Type of an Assignment you must delete the Assignment and recreate it.
You can change non-numeric Grading Types to Numeric (e.g. Alpha to Numeric). You cannot change the Numeric Grading Type to anything else.
Workgroups and Assignments
To modify the definition of an Assignment, click on the top line of the Assignments’ header.
Workgroup association of an Assignment is indicated by dual coloring in the Assignment header. Workgroup linkages are very loose associations.
Modify the Definition of an Assignment, Cont.
Gradebook
Assignments
Modify Assignment
Modifying an Assignment
1. You can alter the following fields of the Assignment: a. Assignment Name – Name for the assignment
b. Column Header – Column header – controls width of the column c. Sequence # - a 1 to 7 digit sequence number that you assign
d. Groups – Change to which Workgroup this Assignment is associated. e. Strip Description – Optional description of the Assignment
f. Assigned Date – Required Date that Assignment is “Assigned” to students
g. Due Date – Due date for the Assignment – not required and not linked to the Assigned Date h. Category – Select the Category for the Assignment (e.g. Homework)
i. Marking Period – You can move the Assignment between Marking Periods
j. Maximum Possible Score – Specify maximum point value. If you change the Maximum Possible Score of an Assignment that has already been graded, all your grades will be recalculated based on the updated Max Possible Score. Student grade averages may change.
k. Assignment Weight – Specify how to ‘count’ this Assignment. The default is to ‘count it once’. You can specify, for example, to count it ‘1.5’ times or ‘2.0’ times, etc. Do not update unless you want to ‘count an Assignment’ more than once.
l. Assignment Set – If you have set up Units, select the Unit for the Assignment (e.g. “Chapter 1” or “American Revolution”)
m. Parent’s Module - If the Parent’s module is turned on, share this Assignment? n. For Gradebook – Hide or show Assignment on Class Roster screen?
2. Click “Save” to modify the Assignment Modifying the Maximum Possible Score
When you modify the Maximum Possible Score field, you are changing the number of points the Assignment is worth. Genesis Gradebook will automatically modify the values of any existing grades proportionally. Student grade averages may be adjusted.
You cannot add links
You cannot change the Grade Type.
You can link the Assignment to Standards. See below.
Modifying the Marking Period
When you modify the Marking Period field, you are forcibly moving the Assignment to a different Marking Period tab. Both the Assigned Date and Due Date fields will be checked to ensure that the dates have been changed to match the target marking period.
Uploading Documents
A Document (i.e. File) upload control is located on the upper right of the Modify Assignment screen:
. You can use this control to upload as many documents as you want into an Assignment: there is no limit.
Procedure to Upload Documents into Assignments
1. Starting on the GradebookGradebook spreadsheet screen, or the GradebookAssignmentsList Assignments
screen, find an existing Assignment you wish to upload Documents into. 2. Open the Assignment. This brings up the Modify Assignment screen.
3. Locate the Documents control at upper right and click the icon. This brings up the “Upload Documents” view of the Modify Assignmentscreen.
4. In Step 1, enter a name for your Document. This is the name that will be displayed in Parent Access and Student Access. (This need not be the real name of the file on your computer). There can be no spaces in the Document name. Replaces spaces with underlines (‘_’):
5. In Step 2, click the button to bring up a normal File Dialog. Choose a file.
6. In Step 3, optionally check the “Save to linked assignments” checkbox and then click the button:
7. Clicking uploads the file and attaches it to the Assignment. It appears on the Modify Assignment
screen:
Removing Documents from an Assignment
1. To remove a Document from an Assignment, open the Assignment to bring up the Modify Assignmentscreen.
2. Locate the Document you want to remove and click the checkbox directly to the left of the Document’s icon. 3. Repeat Step 2 for any additional
4. Click the Trash Can icon to remove all checked Documents from the Assignment.
Linking to Standards
Standards can be linked to Assignments by the “Search Standards” control at the bottom right of the Modify Assignmentscreen:
Genesis has two standard sets in and your district can upload local standards sets if they so desire. The two built-in sets built-include:
- NJ 2009 Core Curriculum Standards, abbreviated 2009-NJCCCS
- Common Core English Language Literacy and Mathematics Standards, abbreviated CCS.
Procedure to Link Standards to an Assignment
1. Starting on the GradebookGradebookspreadsheet screen, or the GradebookAssignmentsList Assignments
screen, find an existing Assignment you wish to upload Documents into. 2. Open the Assignment. This brings up the Modify Assignmentscreen.
3. Locate the Documents control at upper right and click the icon. This brings up the “Search Standards” dialog. You need not set the drop downs before clicking the icon.
4. Select the Standard Set you wish: 5. Select the Subject:
6. Select the Standard within the Subject: 7. Select the Grade Levels:
8. Click the button. This brings up all of the Strands and all of the individual CPIs associated with those Strands:
9. Check off the CPIs you wish to link to the Assignment and then click the button. 10. This returns to the screen with the selected Standards now listed below the Search Standards control:
11. The Standards are shown in red font because they have not yet been saved to the Assignment. Click the Save button to link the selected Standards to the Assignment:
12. Repeat Steps 2 to 11 to do additional Standards Searches and attach more Standards to the Assignment. You can do as many searches as you want and attach as many Standards, from as many different Standards Sets as needed.
Procedure to Unlink a Standard from an Assignment
1. To unlink a Standard from an Assignment, open the Assignment to bring up the Modify Assignment screen. 2. Locate the list of Standards at lower right.
3. Click the button next to any Standard you wish to unlink. 4. Repeat Step 3 to remove additional Standards.
C. Grade an Assignment
Grading an Assignment: Choosing and Assignment to Grade
To open an Assignment for grading, click anywhere in the column you wish to grade. This brings up the Grade Assignment screen. The columns of the Grade Assignment screen are explained below.
The student’s ID
The Student’s Gradebook Name
The student’s grade level
The student’s current, up to the minute Marking Period Average for the selected Marking Period.
The Grade column. This column has a different shape depending on the Grading Type of the Assignment. For
numerically graded assignments, the Grade column is a text field where you can type the numbers.
Comment Fields – There are two comment fields. The one that is showing is for your private comments on the
assignment. There is a second, hidden comment field accessible by clicking the icon at the right side of the
field: . If you click that icon you will open a comment field for Parent/Student
comments:
Four Special Grades: Missing, Absent, Exempt and Incomplete.
% - The percentage of the points awarded.
Previous – If you previously gave a student a special grade, then removed it, it appears in the “Prev” column. Regular grades do not appear in the Previous column.
To grade an Assignment, click anywhere within its column –
Not in the header area.
Dual color coding indicates workgroup association.
D. Grade an Assignment: The Grade Assignment Screen
GradebookGradebookGrade AssignmentGrading Assignments: Features of the Grade Assignment Screen
The “Grade” column is specific to the “Grading Type” of the Assignment:
o Numeric Grading Type – you get a text field and you must type a number into the field
o “Checks” – You get “<<” and “>>” buttons (shown above) and you use those to select the “check mark” that you want.
o Alphabetic grades – You get a drop down field and select an alpha grade (e.g. “B+”)
o O-S-U grading – You get a drop down field and select one of the three grades: “O”, “S”, or “U” o Pass/Fail grading – Yes get a drop down field and select either “Pass” or “Fail”
o Pre-Set Points grading – You get a drop down field and select either “NHI” (Not Handed In), “HI” (Handed in), or “EC” (Extra Credit)
There is a “Comment” field where you can put short comments – These are private to you. Ciick the icon at
the right side of the field: . a comment field for Parent/Student comments:
There are four special grades of Absent, Incomplete, Exempt or Missing. If you give a student one of these grades, and later change it, the original Special grade will appear in the Previous grade column, as well as on the spreadsheet (as a small red superscript grade) and in Parent Access.
o Exempt – “Exempt” is a real grade that indicates that the student does not have to complete this Assignment and won’t be otherwise graded for it. The Assignment does not count for this student. The grade of Exempt does appear – the student is exempt; the assignment is not hidden for them. o Absent – This is treated just like an exemption – until the student returns and can do the work.
However, it is a real grade and will cause the “Previo