Release
Microsoft
1 Frameworks 3 2 Topics 5 2.1 Getting Started . . . 5 2.2 Tutorials . . . 12 2.3 Conceptual Overview . . . 55 2.4 Fundamentals. . . 74 2.5 Testing . . . 168
2.6 .NET Execution Environment (DNX) . . . 179
2.7 Frameworks . . . 206
2.8 Working with Data . . . 206
2.9 Publishing and Deployment . . . 209
2.10 Client-Side Development . . . 226 2.11 Mobile . . . 319 2.12 Security. . . 320 2.13 Performance . . . 435 2.14 Migration . . . 435 2.15 Contribute . . . 436 3 Related Resources 443 4 Contribute 445
Attention: ASP.NET 5 RC1 is now available! Please see theGetting Startedinstructions for installing the latest version.
Note: This documentation is a work in progress. Topics marked with a are placeholders that have not been written yet. You can track the status of these topics through our public documentationissue tracker. Learn how you cancontribute on GitHub. Help shape the scope and focus of the ASP.NET content by taking theASP.NET 5 Documentation Survey.
Frameworks
Topics
2.1 Getting Started
2.1.1 Installing ASP.NET 5 On Windows
ByRick Anderson,Steve Smith,Daniel RothThis page shows you how to install ASP.NET 5 on Windows. To run ASP.NET 5 apps on IIS, seePublishing to IIS.
In this article:
• Install ASP.NET 5 with Visual Studio
• Install ASP.NET 5 from the command-line
• Related Resources
Install ASP.NET 5 with Visual Studio
The easiest way to get started building applications with ASP.NET 5 is to install the latest version of Visual Studio 2015 (including the free Community edition).
1. InstallVisual Studio 2015
Be sure to specify that you want to include the Microsoft Web Developer Tools.
2. InstallASP.NET 5.
This will install the latest ASP.NET 5 runtime and tooling.
3. Enable the ASP.NET 5 command-line tools. Open a command-prompt and run: dnvm upgrade
This will make the default.NET Execution Environment (DNX)active on the path.
4. On Windows 7 and Windows Server 2008 R2 you will also need to install theVisual C++ Redistributable for Visual Studio 2012 Update 4.
Install ASP.NET 5 from the command-line
You can also install ASP.NET 5 from the command-line. There are a few steps involved, since we’ll need to install and configure the environment in which ASP.NET runs, the.NET Execution Environment (DNX). To install DNX, we need one more tool, the .NET Version Manager (DNVM).
Install the .NET Version Manager (DNVM)
Use .NET Version Manager to install different versions of the .NET Execution Environment (DNX). To install DNVM open a command prompt and run the following:
@powershell -NoProfile -ExecutionPolicy unrestricted -Command "&{$Branch='dev';iex ((new-object net.webclient).DownloadString('https://raw.githubusercontent.com/aspnet/Home/dev/dnvminstall.ps1'))}" Once this step is complete you should be able to rundnvmand see some help text.
Install the .NET Execution Environment (DNX)
The .NET Execution Environment (DNX) is used to build and run .NET projects. Use DNVM to install DNX for the full .NET Framework or for .NET Core (seeChoosing the Right .NET For You on the Server).
To install DNX for .NET Core:
1. Use DNVM to install DNX for .NET Core: dnvm upgrade -r coreclr
To install DNX for the full .NET Framework:
1. Use DNVM to install DNX for the full .NET Framework: dnvm upgrade -r clr
By default DNVM will install DNX for the full .NET Framework if no runtime is specified.
Related Resources
• Your First ASP.NET 5 Web App Using Visual Studio • Fundamentals
2.1.2 Installing ASP.NET 5 On Mac OS X
ByDaniel Roth,Steve Smith,Rick AndersonSections:
• Install ASP.NET 5 with Visual Studio Code
• Install ASP.NET 5 from the command-line
Install ASP.NET 5 with Visual Studio Code
The easiest way to get started building applications with ASP.NET 5 is to install the latest version of Visual Studio Code.
1. InstallMonofor OS X (required by Visual Studio Code). 2. InstallVisual Studio Code
3. InstallASP.NET 5 for Mac OS X
You are all set up and ready to writeyour first ASP.NET 5 application on a Mac!
Install ASP.NET 5 from the command-line
You can also install ASP.NET 5 from the command-line. There are a few steps involved, since we’ll need to install and configure the environment in which ASP.NET runs, the.NET Execution Environment (DNX). To install DNX, we need one more tool, the .NET Version Manager (DNVM).
Install the .NET Version Manager (DNVM) To install DNVM:
1. Run the followingcurlcommand:
curl -sSL https://raw.githubusercontent.com/aspnet/Home/dev/dnvminstall.sh | DNX_BRANCH=dev sh && source ~/.dnx/dnvm/dnvm.sh
2. Rundnvm listto show the DNX versions installed 3. Rundnvmto get DNVM help
The .NET Version Manager (DNVM) is used to install different versions of the .NET Execution Environment (DNX) on OS X.
Install the .NET Execution Environment (DNX)
The .NET Execution Environment (DNX) is used to build and run .NET projects. Use DNVM to install DNX for Monoor .NET Core (seeChoosing the Right .NET For You on the Server).
To install DNX for .NET Core:
1. Use DNVM to install DNX for .NET Core: dnvm upgrade -r coreclr
To install DNX for Mono:
1. InstallMonofor OS X. Alternatively you can install Mono viaHomebrew. 2. Use DNVM to install DNX for Mono:
dnvm upgrade -r mono
By default DNVM will install DNX for Mono if no runtime is specified.
Note: Restoring packages using DNX on Mono may fail with multiple canceled requests. You may be able to work around this issue by settingMONO_THREADS_PER_CPUto a larger number (2000).
Related Resources
• Your First ASP.NET 5 Application on a Mac • Fundamentals
2.1.3 Installing ASP.NET 5 On Linux
ByDaniel RothIn this article
• Install using prebuild binaries
• Installing on Debian, Ubuntu and derivatives
• Installing on CentOS, Fedora and derivatives
• Using Docker
• Related Resources
Install using prebuild binaries
Prebuild binaries for ASP.NET 5 are available (.tar.gz) and can be installed as appropriate based on your system configuration.
Alternatively you can use the .NET Version Manager (DNVM) to install ASP.NET 5 as described below.
For either method of installation you will need to install the prerequisites for your specific distribution as described in the following sections.
Installing on Debian, Ubuntu and derivatives The following instructions were tested using Ubuntu 14.04.
Install the .NET Version Manager (DNVM)
Use the .NET Version Manager (DNVM) to install different versions of the .NET Execution Environment (DNX) on Linux.
1. Installunzipandcurlif you don’t already have them: sudo apt-get install unzip curl
2. Download and install DNVM:
curl -sSL https://raw.githubusercontent.com/aspnet/Home/dev/dnvminstall.sh | DNX_BRANCH=dev sh && source ~/.dnx/dnvm/dnvm.sh
Once this step is complete you should be able to rundnvmand see some help text.
Install the .NET Execution Environment (DNX)
The .NET Execution Environment (DNX) is used to build and run .NET projects. Use DNVM to install DNX for Monoor .NET Core (seeChoosing the Right .NET For You on the Server).
1. Install the DNX prerequisites:
sudo apt-get install libunwind8 gettext libssl-dev libcurl4-openssl-dev zlib1g libicu-dev uuid-dev 2. Use DNVM to install DNX for .NET Core:
dnvm upgrade -r coreclr To install DNX for Mono:
1. InstallMonovia themono-completepackage.
2. Ensure that theca-certificates-monopackage is also installed asnotedin the Mono installation instruc-tions.
3. Use DNVM to install DNX for Mono: dnvm upgrade -r mono
By default DNVM will install DNX for Mono if no runtime is specified.
Note: Restoring packages using DNX on Mono may fail with multiple canceled requests. You may be able to work around this issue by settingMONO_THREADS_PER_CPUto a larger number (ex. 2000).
Install libuv
Libuvis a multi-platform asynchronous IO library that is used byKestrel, a cross-platform HTTP server for hosting ASP.NET 5 web applications.
To build libuv you should do the following:
sudo apt-get install make automake libtool curl
curl -sSL https://github.com/libuv/libuv/archive/v1.4.2.tar.gz | sudo tar zxfv - -C /usr/local/src cd /usr/local/src/libuv-1.4.2
sudo sh autogen.sh sudo ./configure sudo make
sudo make install
sudo rm -rf /usr/local/src/libuv-1.4.2 && cd ~/ sudo ldconfig
Note: make installputslibuv.so.1in/usr/local/lib, in the above commandsldconfigis used to updateld.so.cacheso thatdlopen(seeman dlopen) can load it. If you are getting libuv some other way or not runningmake installthen you need to ensure that dlopen is capable of loadinglibuv.so.1.
Installing on CentOS, Fedora and derivatives The following instructions were tested using CentOS 7.
Install the .NET Version Manager (DNVM)
Use the .NET Version Manager (DNVM) to install different versions of the .NET Execution Environment (DNX) on Linux.
sudo yum install unzip
2. Download and install DNVM:
curl -sSL https://raw.githubusercontent.com/aspnet/Home/dev/dnvminstall.sh | DNX_BRANCH=dev sh && source ~/.dnx/dnvm/dnvm.sh
Once this step is complete you should be able to rundnvmand see some help text.
Install the .NET Execution Environment (DNX)
The .NET Execution Environment (DNX) is used to build and run .NET projects. Use DNVM to install DNX for Mono(seeChoosing the Right .NET For You on the Server).
Note: DNX support for .NET Core is not available for CentOS, Fedora and derivative in this release, but will be enabled in a future release.
To install DNX for Mono:
1. InstallMonovia themono-completepackage.
2. Ensure that theca-certificates-monopackage is also installed asnotedin the Mono installation instruc-tions.
3. Use DNVM to install DNX for Mono: dnvm upgrade -r mono
By default DNVM will install DNX for Mono if no runtime is specified.
Note: Restoring packages using DNX on Mono may fail with multiple canceled requests. You may be able to work around this issue by settingMONO_THREADS_PER_CPUto a larger number (ex. 2000).
Install Libuv
Libuvis a multi-platform asynchronous IO library that is used byKestrel, a cross-platform HTTP server for hosting ASP.NET 5 web applications.
To build libuv you should do the following: sudo yum install automake libtool wget
wget http://dist.libuv.org/dist/v1.4.2/libuv-v1.4.2.tar.gz tar -zxf libuv-v1.4.2.tar.gz cd libuv-v1.4.2 sudo sh autogen.sh sudo ./configure sudo make
sudo make check sudo make install
ln -s /usr/lib64/libdl.so.2 /usr/lib64/libdl
ln -s /usr/local/lib/libuv.so.1.0.0 /usr/lib64/libuv.so
Using Docker
Install Docker
Instructions on how to install Docker can be found in theDocker Documentation.
Create a Container
Inside your application folder, you create aDockerfilewhich should looks something like this: # Base of your container
FROM microsoft/aspnet:latest
# Copy the project into folder and then restore packages COPY . /app
WORKDIR /app
RUN ["dnu","restore"]
# Open this port in the container EXPOSE 5000
# Start application
ENTRYPOINT ["dnx","-p","project.json", "web"]
You also have a choice to use CoreCLR or Mono. At this time themicrosoft/aspnet:latestrepository is based on Mono. You can use theMicrosoft Docker Hubto pick a different base running either an older version or CoreCLR.
Run a Container
When you have an application, you can build and run your container using the following commands: docker build -t yourapplication .
docker run -t -d -p 8080:5000 yourapplication
Related Resources
• Your First ASP.NET 5 Application on a Mac • Fundamentals
2.1.4 Choosing the Right .NET For You on the Server
ByDaniel RothASP.NET 5 is based on the.NET Execution Environment (DNX), which supports running cross-platform on Windows, Mac and Linux. When selecting a DNX to use you also have a choice of .NET flavors to pick from: .NET Framework (CLR),.NET Core(CoreCLR) orMono. Which .NET flavor should you choose? Let’s look at the pros and cons of each one.
.NET Framework
The .NET Framework is the most well known and mature of the three options. The .NET Framework is a mature and fully featured framework that ships with Windows. The .NET Framework ecosystem is well established and has
been around for well over a decade. The .NET Framework is production ready today and provides the highest level of compatibility for your existing applications and libraries.
The .NET Framework runs on Windows only. It is also a monolithic component with a large API surface area and a slower release cycle. While the code for the .NET Framework isavailable for referenceit is not an active open source project.
.NET Core
.NET Core 5 is a modular runtime and library implementation that includes a subset of the .NET Framework. .NET Core is supported on Windows, Mac and Linux. .NET Core consists of a set of libraries, called “CoreFX”, and a small, optimized runtime, called “CoreCLR”. .NET Core is open-source, so you can follow progress on the project and contribute to it onGitHub.
The CoreCLR runtime (Microsoft.CoreCLR) and CoreFX libraries are distributed viaNuGet. Because .NET Core has been built as a componentized set of libraries you can limit the API surface area your application uses to just the pieces you need. You can also run .NET Core based applications on much more constrained environments (ex. Windows Server Nano).
The API factoring in .NET Core was updated to enable better componentization. This means that existing libraries built for the .NET Framework generally need to be recompiled to run on .NET Core. The .NET Core ecosystem is relatively new, but it is rapidly growing with the support of popular .NET packages like JSON.NET, AutoFac, xUnit.net and many others.
Developing on .NET Core allows you to target a single consistent platform that can run on multiple platforms. Please seeIntroducing .NET Corefor more details on what .NET Core has to offer.
Mono
Monois a port of the .NET Framework built primarily for non-Windows platforms. Mono is open source and cross-platform. It also shares a similar API factoring to the .NET Framework, so many existing managed libraries work on Mono today. Mono is not a supported platform by Microsoft. It is however a good proving ground for cross-platform development while cross-platform support in .NET Core matures.
Summary
The .NET Execution Environment (DNX) and .NET Core make .NET development available to more scenarios than ever before. DNX also gives you the option to target your application at existing available .NET platforms. Which .NET flavor you pick will depend on your specific scenarios, timelines, feature requirements and compatibility re-quirements.
2.2 Tutorials
2.2.1 Your First ASP.NET 5 Web App Using Visual Studio
ByErik ReitanIn this tutorial, you’ll create a simple web app using ASP.NET 5. The app stores data in a SQL database using Entity Framework (EF) and uses ASP.NET MVC to support the basic CRUD operations (create, read, update, delete).
In this article:
• Prerequisites
• Create a new ASP.NET 5 project
• Entity Framework
• Create a data model and scaffolding
• Using data migrations to create the database
• Adding navigation
• Run the web app locally
• Publish the web app to Azure App Service
• Additional Resources
Prerequisites
Before you start, make sure that you have the followed the getting started steps forInstalling ASP.NET 5 On Windows. This tutorial assumes you have already installedVisual Studio 2015and the latestASP.NET 5runtime and tooling. Note: For additional information about installing ASP.NET 5 on other platforms, seeGetting Started.
Create a new ASP.NET 5 project
Start Visual Studio 2015. From theFilemenu, selectNew>Project.
Select theASP.NET Web Applicationproject template. It appears underInstalled>Templates>Visual C#>Web. Name the projectContosoBooksand clickOK.
In theNew ASP.NET Projectdialog, selectWeb ApplicationunderASP.NET 5 Preview Templates. Also, make sure theHost in the cloudcheckbox is not selected and clickOK.
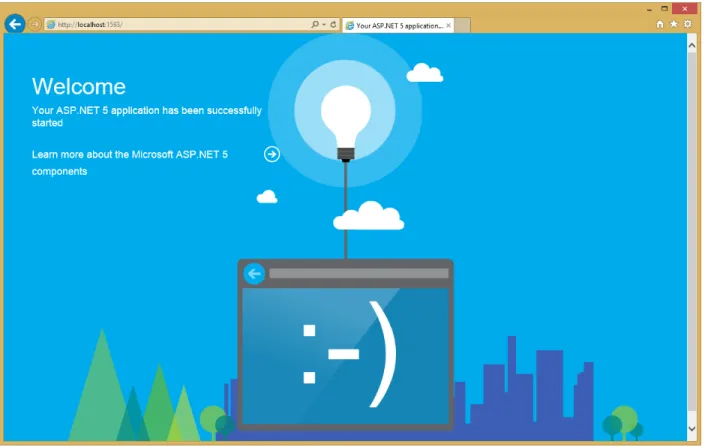
Running the default app
Once Visual Studio finishes creating the app, run the app by selectingDebug->Start Debugging. As an alternative, you can pressF5.
It may take time to initialize Visual Studio and the new app. Once it is complete, the browser will show the running app.
After reviewing the running Web app, close the browser and click the “Stop Debugging” icon in the toolbar of Visual Studio to stop the app.
Review the project
In Visual Studio, theSolution Explorerwindow lets you manage files for the project. The web application template that you used to create this web app adds the following basic folder structure:
Visual Studio creates some initial folders and files for your project. The primary files that you should be familiar with include the following:
File name Purpose
project.json The presence of aproject.jsonfile defines a .NET Execution Environment (DNX) project. It is the project.jsonfile that contains all the information that DNX needs to run and package your project. For additional details, including theproject.jsonfile schema, seeWorking with DNX Projects. global.json Visual Studio uses this file to configure the project.
config.json This file allows you to include additional project information, such as connection string values. For more information, seeConfiguration.
Statup.cs TheStartupclass provides the entry point for an application. TheStartupclass must define a Configuremethod, and may optionally also define aConfigureServicesmethod, which will be called when the application is started. For more information, see the application is started. For more information, seeApplication Startup.
In-dex.cshtml
Thisviewcontains the HTML for the default page of the view.
_Lay-out.cshtml
Thisviewcontains common HTML for multiple pages of the web app.
HomeCon-troller.cs
Thiscontrollercontains the classes that handle incoming browser requests, retrieve model data, and then specify view templates that return a response to the browser.
Understanding MVC
This project usesASP.NET MVC. MVC stands for model-view-controller. MVC is a pattern for developing applica-tions that are well architected, testable, and easy to maintain. MVC-based applicaapplica-tions contain:
• Models: Classes that represent the data of the application and that use validation logic to enforce business rules for that data.
• Views: Template files that your application uses to dynamically generate HTML responses.
• Controllers: Classes that handle incoming browser requests, retrieve model data, and then specify view tem-plates that return a response to the browser.
Understanding .NET Core
.NET Core 5 is a modular runtime and library implementation that includes a subset of the .NET Framework. .NET Core 5 has been designed for Windows, Linux and OS X. It consists of a set of libraries, called “CoreFX”, and a small, optimized runtime, called “CoreCLR”. .NET Core is open-source, so you can follow progress on the project and contribute to it on GitHub. For more information, seeChoosing the Right .NET For You on the Server.
Entity Framework
Entity Framework(EF) is an object-relational mapping (ORM) framework. It lets you work with relational data as objects, eliminating most of the data-access code that you’d usually need to write. Using EF, you can issue queries using LINQ, then retrieve and manipulate data as strongly typed objects. LINQ provides patterns for querying and updating data. Using EF allows you to focus on creating the rest of your application, rather than focusing on the data access fundamentals.
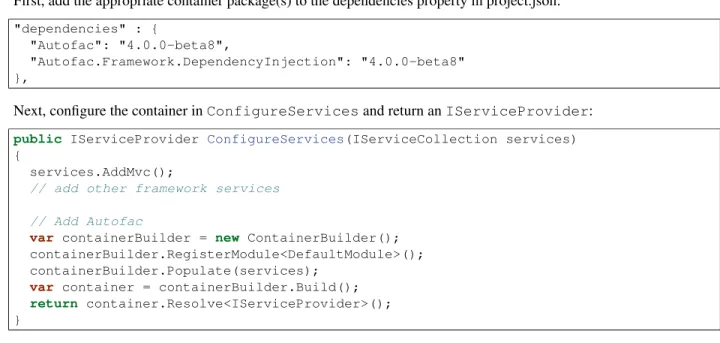
Open theproject.jsonfile. In the dependencies section, you will see the following lines related to EF: "dependencies": {
"EntityFramework.Commands": "7.0.0-rc1-final",
"EntityFramework.MicrosoftSqlServer": "7.0.0-rc1-final",
Create a data model and scaffolding
Entity Framework supports a development paradigm called Code First. Code First lets you define your data models using classes. A class is a construct that enables you to create your own custom types by grouping together variables of other types, methods and events. You can map classes to an existing database or use them to generate a database. In this tutorial, you’ll begin by creating the entity classes that define the data models for the Web application. Then you will create a context class that manages the entity classes and provides data access to the database. You will then configure EF and populate the database.
Create entity classes
The classes you create to define the schema of the data are called entity classes. If you’re new to database design, think of the entity classes as table definitions of a database. Each property in the class specifies a column in the table of the database. These classes provide a lightweight, object-relational interface between object-oriented code and the relational table structure of the database.
The Web app will have two new entities: • Book
• Author
You will define a class for each in theModelsfolder withinSolution Explorer. Each class will define the
Note: You can put model classes anywhere in your project. TheModelsfolder is just a convention.
Right-click theModelsfolder and selectAdd>New Item. In theAdd New Itemdialog, select theClasstemplate. In theNameedit box, type “Author.cs” and clickOK.
Replace the default code with the following code: using System.Collections.Generic;
namespace ContosoBooks.Models {
public class Author {
[ScaffoldColumn(false)]
public int AuthorID { get; set; }
[Required]
[Display(Name = "Last Name")]
public string LastName { get; set; }
[Display(Name = "First Name")]
public string FirstMidName { get; set; }
public virtual ICollection<Book> Books { get; set; } }
}
Repeat these steps to add another class namedBookwith the following code: using System.ComponentModel.DataAnnotations;
namespace ContosoBooks.Models {
public class Book {
[ScaffoldColumn(false)]
public int BookID { get; set; }
[Required]
public string Title { get; set; }
public int Year { get; set; }
[Range(1, 500)]
public decimal Price { get; set; }
public string Genre { get; set; }
[ScaffoldColumn(false)]
public int AuthorID { get; set; }
// Navigation property
public virtual Author Author { get; set; } }
}
To keep the app simple, each book has a single author. TheAuthorproperty provides a way to navigate the rela-tionship from a book to an author. In EF, this type of property is called anavigation property. When EF creates the database schema, EF automatically infers thatAuthorIDshould be a foreign key to the Authors table.
Add Scaffolding
Scaffolding saves you time and coding effort by automatically generating the starting point for your application’s CRUD (Create, Read, Update and Delete) operations. Starting from a simple model class, and, without writing a single line of code, you will create two controllers that will contain the CRUD operations related to books and authors, as well as the all the necessary views.
From theAdd Scaffolddialog box, selectMVC 6 Controller with views, using Entity Framework, then click the Addbutton.
Next, in theAdd Controllerdialog box, set the model class dropdown toBook (ContosoBooks.Models). Also, set the data context class toApplicationDbContext (ContosoBooks.Models). Make sure theGenerate viewscheckbox is checked. Then click theAddbutton.
As you can see in the above image, theAdd Controllerdialog box gives you the opportunity to select options for generating the controller and views.
This scaffold creates the code that provides a controller and a set of views. The views provide the UI and code to create, read, update, delete, and list data from the database.
Repeat the above scaffolding steps to create anAuthor controller and related views. Use theAuthor (Contoso-Books.Models)model class and theApplicationDbContext (ContosoBooks.Models)data context class as shown in the following image.
In theSolution Exploreryou’ll see that the new controllers were added within theControllerfolder and new views were created within theViewsfolder.
Configure the web app before including sample data
Next, you’ll add theMicrosoft.Extensions.DependencyInjectionpackage to your app. InSolution Explorerfind and openproject.json. In thedependenciessection, begin by typing the following line at the end of the section.
You will see that IntelliSense provides coding help as you type. Also, when you saveproject.json, Visual Studio will automaticaly resolve the new package reference.
After the above line has been added, thedependenciessection of yourproject.jsonfile will appear as follows: "dependencies": { "EntityFramework.Commands": "7.0.0-rc1-final", "EntityFramework.MicrosoftSqlServer": "7.0.0-rc1-final", "Microsoft.AspNet.Authentication.Cookies": "1.0.0-rc1-final", "Microsoft.AspNet.Diagnostics.Entity": "7.0.0-rc1-final", "Microsoft.AspNet.Identity.EntityFramework": "3.0.0-rc1-final", "Microsoft.AspNet.IISPlatformHandler": "1.0.0-rc1-final", "Microsoft.AspNet.Mvc": "6.0.0-rc1-final", "Microsoft.AspNet.Mvc.TagHelpers": "6.0.0-rc1-final", "Microsoft.AspNet.Server.Kestrel": "1.0.0-rc1-final", "Microsoft.AspNet.StaticFiles": "1.0.0-rc1-final", "Microsoft.AspNet.Tooling.Razor": "1.0.0-rc1-final", "Microsoft.Extensions.CodeGenerators.Mvc": "1.0.0-rc1-final", "Microsoft.Extensions.Configuration.FileProviderExtensions" : "1.0.0-rc1-final", "Microsoft.Extensions.Configuration.Json": "1.0.0-rc1-final", "Microsoft.Extensions.Configuration.UserSecrets": "1.0.0-rc1-final",
"Microsoft.Extensions.Logging.Console": "1.0.0-rc1-final", "Microsoft.Extensions.Logging.Debug": "1.0.0-rc1-final",
"Microsoft.VisualStudio.Web.BrowserLink.Loader": "14.0.0-rc1-final", "Microsoft.Extensions.DependencyInjection": "1.0.0-rc1-final"
},
Add sample data
Rather than entering several sample records by hand, you will add code that will by used to populate your database. Add a class namedSampleDatain theModelsfolder with the following code:
using Microsoft.Data.Entity; using Microsoft.Extensions.DependencyInjection; using System; using System.Linq; namespace ContosoBooks.Models {
public static class SampleData {
public static void Initialize(IServiceProvider serviceProvider) {
var context = serviceProvider.GetService<ApplicationDbContext>(); context.Database.Migrate();
if (!context.Book.Any()) {
var austen = context.Author.Add(
new Author { LastName = "Austen", FirstMidName = "Jane" }).Entity; var dickens = context.Author.Add(
new Author { LastName = "Dickens", FirstMidName = "Charles" }).Entity; var cervantes = context.Author.Add(
new Author { LastName = "Cervantes", FirstMidName = "Miguel" }).Entity;
context.Book.AddRange( new Book()
{
Title = "Pride and Prejudice", Year = 1813,
Author = austen, Price = 9.99M,
Genre = "Comedy of manners"
},
new Book() {
Title = "Northanger Abbey", Year = 1817,
Author = austen, Price = 12.95M,
Genre = "Gothic parody"
},
new Book() {
Title = "David Copperfield", Year = 1850,
Author = dickens, Price = 15,
},
new Book() {
Title = "Don Quixote", Year = 1617, Author = cervantes, Price = 8.95M, Genre = "Picaresque" } ); context.SaveChanges(); } } } }
You wouldn’t put this sample data class into production code, but it’s okay for this sample app scenario.
Next, inSolution Explorer, open the Startup.csfile. Add the following line of code at the end of the Configure method:
SampleData.Initialize(app.ApplicationServices);
After the above line has been added, the completedStartup.csfile will appear as follows: using System; using System.Collections.Generic; using System.Linq; using System.Threading.Tasks; using Microsoft.AspNet.Builder; using Microsoft.AspNet.Hosting; using Microsoft.AspNet.Identity.EntityFramework; using Microsoft.Data.Entity; using Microsoft.Extensions.Configuration; using Microsoft.Extensions.DependencyInjection; using Microsoft.Extensions.Logging; using ContosoBooks.Models; using ContosoBooks.Services; namespace ContosoBooks {
public class Startup {
public Startup(IHostingEnvironment env) {
// Set up configuration sources.
var builder = new ConfigurationBuilder() .AddJsonFile("appsettings.json")
.AddJsonFile($"appsettings.{env.EnvironmentName}.json", optional: true);
if (env.IsDevelopment()) {
// For more details on using the user secret store see http://go.microsoft.com/fwlink/?LinkID=532709 builder.AddUserSecrets();
}
builder.AddEnvironmentVariables(); Configuration = builder.Build();
public IConfigurationRoot Configuration { get; set; }
// This method gets called by the runtime. Use this method to add services to the container. public void ConfigureServices(IServiceCollection services)
{
// Add framework services. services.AddEntityFramework() .AddSqlServer() .AddDbContext<ApplicationDbContext>(options => options.UseSqlServer(Configuration["Data:DefaultConnection:ConnectionString"])); services.AddIdentity<ApplicationUser, IdentityRole>() .AddEntityFrameworkStores<ApplicationDbContext>() .AddDefaultTokenProviders(); services.AddMvc();
// Add application services.
services.AddTransient<IEmailSender, AuthMessageSender>(); services.AddTransient<ISmsSender, AuthMessageSender>(); }
// This method gets called by the runtime. Use this method to configure the HTTP request pipeline. public void Configure(IApplicationBuilder app, IHostingEnvironment env, ILoggerFactory loggerFactory) { loggerFactory.AddConsole(Configuration.GetSection("Logging")); loggerFactory.AddDebug(); if (env.IsDevelopment()) { app.UseBrowserLink(); app.UseDeveloperExceptionPage(); app.UseDatabaseErrorPage(); } else { app.UseExceptionHandler("/Home/Error");
// For more details on creating database during deployment see http://go.microsoft.com/fwlink/?LinkID=615859 try
{
using (var serviceScope = app.ApplicationServices.GetRequiredService<IServiceScopeFactory>() .CreateScope()) { serviceScope.ServiceProvider.GetService<ApplicationDbContext>() .Database.Migrate(); } } catch { } } app.UseIISPlatformHandler(options => options.AuthenticationDescriptions.Clear()); app.UseStaticFiles(); app.UseIdentity();
app.UseMvc(routes => { routes.MapRoute( name: "default", template: "{controller=Home}/{action=Index}/{id?}"); }); SampleData.Initialize(app.ApplicationServices); }
// Entry point for the application.
public static void Main(string[] args) => WebApplication.Run<Startup>(args); }
}
Notice in ConfigureServicesthe app calls Configuration.Get to get the database connection string. During development, this setting comes from the config.jsonfile. When you deploy the app to a production environment, you set the connection string in an environment variable on the host. If the Configuration API finds an environment variable with the same key, it returns the environment variable instead of the value that is inconfig.json.
Build the web application
To make sure that all the classes and changes to your Web application work, you should build the application. From theBuildmenu, selectBuild Solution.
TheOutputwindow is displayed, and if all went well, you see a succeeded message.
If you run into an error, re-check the above steps. The information in theOutputwindow will indicate which file has a problem and where in the file a change is required. This information will enable you to determine what part of the above steps need to be reviewed and fixed in your project.
Using data migrations to create the database
Data migrations in EF are used to perform model updates throughout your entire application. By initially using data migrations to create your database, you can modify your database after the model has changed with simple steps. This will allow you to build and maintain your web app more efficiently. The alternative to data migrations, where model or schema changes are required after the database has been created, involves recreating your entire database.
Open aCommand Promptin the project directory (ContosoBooks/src/ContosoBooks).
Note: To open theCommand Prompt, you can right-click the Windowsstartbutton and selectCommand Prompt from the menu.
To find the project directory, in Visual Studio you can right-click the project name (ContosoBooks) in theSolution Explorerand selectOpen Folder in File Explorer. Copy your project path fromFile Explorerso you can copy it to theCommand Prompt. For example, enter the following from theCommand Promptto change directories: cd C:\Projects\ContosoBooks\src\ContosoBooks
Note: Make sure that you have navigated to theContosoBooksfolder within thesrcfolder.
Run each of the following commands from theCommand Prompt: dnu restore
dnx ef migrations add Initial dnx ef database update
Note: If dnu restoreis not a recognized command, you may have missed a prerequisite step (or part of a prerequisites step) at the beginning of this topic. For general EF command help, enter the following in the command window: dnx ef -?. For help with theaddcommand, enter the following in the command window: dnx ef migrations add -?. And, for help with theupdatecommand, enter the following in the command window: dnx ef database update -?.
The .NET Version Manager (dnvm) is a set of command line utilities that are used to update and configure .NET Runtime.
DNX stands for the .NET Execution Environment. Theefcommand is specificed in theproject.json file of your project. For more information aboutdnvm,dnu, anddnx, seeDNX Overview.
The “add Initial” command creates a migration named “Initial” that adds code to the project, allowing EF to update the database schema. Theupdatecommand creates the actual database. After you run this command, the Migrationsfolder of your project will be updated as follows:
Adding navigation
Update the navigation for the web app. FromSolution Explorer, open theViews/Shared/_Layout.cshtmlfile. Find the following markup:
<li><a asp-controller="Home" asp-action="Index">Home</a></li> <li><a asp-controller="Home" asp-action="About">About</a></li> <li><a asp-controller="Home" asp-action="Contact">Contact</a></li>
Replace the above markup with the following markup:
<li><a asp-controller="Books" asp-action="Index">Books</a></li> <li><a asp-controller="Authors" asp-action="Index">Authors</a></li>
The above changes will add a link to view Books and a link to view Authors. You created each of these views when you added scaffolding to the project.
Build the web application
From theBuildmenu, selectBuild Solution.
Run the web app locally
Run the app now to see how you can view all of the products or just a set of products limited by category.
In theSolution Explorer, right-click the project name and selectView->View in Browser. As an alternative, you can press theF5key.
The browser will open and show the web app. Click on theBookslink at the top of the page.
Close the browser and click the “Stop Debugging” icon in the toolbar of Visual Studio to stop the app.
Publish the web app to Azure App Service
Enter a unique site name, and select an app service plan, resource group, and region. Also, choose to create a database server, along with a database username and password. If you’ve created a database server in the past, use that. When you’re ready to continue, clickCreate.
You can view the publishing progress in eith theOutputwindow or theAzure App Service Activitywindow within Visual Studio.
For additional publishing information, seePublishing and Deployment.
Additional Resources • Introduction to ASP.NET 5
• Understanding ASP.NET 5 Web Apps • ASP.NET 5 Fundamentals
2.2.2 Your First ASP.NET 5 Application on a Mac
ByDaniel Roth,Steve Smith,Rick AndersonASP.NET 5 is cross-platform; you can develop and run web apps on Mac OS X, Linux and Windows. This article will show you how to write your first ASP.NET 5 application on a Mac.
Sections:
• Setting Up Your Development Environment
• Scaffolding Applications Using Yeoman
• Developing ASP.NET Applications on a Mac With Visual Studio Code
• Running Locally Using Kestrel
• Publishing to Azure
Setting Up Your Development Environment • Install ASP.NET on your Mac with OS X
• Check which DNX version you have active by runningdnvm list
Scaffolding Applications Using Yeoman
Follow the instruction inBuilding Projects with Yeomanto create an MVC 6 project.
Developing ASP.NET Applications on a Mac With Visual Studio Code • StartVisual Studio Code
Note: IfVisual Studio Codeis not installed, seeInstall ASP.NET on your Mac with OS X.
From a Terminal / bash prompt, rundnu restoreto restore the project’s dependencies. Alternately, you can enter command shift pand then type>das shown:
This will allow you to run commands directly from within Visual Studio Code, includingdnx restoreand any commands defined in theproject.jsonfile.
At this point, you should be able to host and browse to this simple ASP.NET web application, which we’ll see in a moment.
This empty project template simply displays “Hello World!”. OpenStartup.csin Visual Studio Code to see how this is configured:
If this is your first time using Visual Studio Code (or justCodefor short), note that it provides a very streamlined, fast, clean interface for quickly working with files, while still providing tooling to make writing code extremely productive. In the left navigation bar, there are four icons, representing four viewlets:
• Explore • Search • Git • Debug
The Explore viewlet allows you to quickly navigate within the folder system, as well as easily see the files you are currently working with. It displays a badge to indicate whether any files have unsaved changes, and new folders and files can easily be created (without having to open a separate dialog window). You can easily Save All from a menu option that appears on mouse over, as well.
Codewill integrate with Git if it is installed on your system. You can easily initialize a new repository, make commits, and push changes from the Git viewlet.
The Debug viewlet supports interactive debugging of applications. Currently only node.js and mono applications are supported by the interactive debugger.
Finally, Code’s editor has a ton of great features. You should note right away that several using statements are un-derlined, because Code has determined they are not necessary. Note that classes and methods also display how many references there are in the project to them. If you’re coming from Visual Studio, Code includes many of the keyboard shortcuts you’re used to, such ascommand k cto comment a block of code, andcommand k uto uncomment.
Running Locally Using Kestrel
The sample is configured to useKestrelfor the web server. You can see it configured in theproject.jsonfile, where it is specified as a dependency and as acommand.
1 { 2 "version": "1.0.0-*", 3 "userSecretsId": "aspnet5-MyWebApp-a1b07c55-6f20-4aaf-9852-9c964160a00c", 4 "compilationOptions": { 5 "emitEntryPoint": true 6 }, 7 "tooling": { 8 "defaultNamespace": "MyWebApp" 9 }, 10
12 "EntityFramework.Commands": "7.0.0-rc1-final", 13 // Dependencies deleted for brevity.
14 "Microsoft.AspNet.Server.Kestrel": "1.0.0-rc1-final" 15 }, 16 17 "commands": { 18 "web": "Microsoft.AspNet.Server.Kestrel", 19 "ef": "EntityFramework.Commands" 20 }, 21
22 // Markup deleted for brevity. 23 24 "scripts": { 25 "prepublish": [ 26 "npm install", 27 "bower install", 28 "gulp clean", 29 "gulp min" 30 ] 31 } 32 }
• Run thednx webcommand to launch the app • Navigate tolocalhost:5000:
• To stop the web server enterCtrl+C.
Publishing to Azure
Once you’ve developed your application, you can easily use the Git integration built into Visual Studio Code to push updates to production, hosted onMicrosoft Azure.
Initialize Git
Initialize Git in the folder you’re working in. Tap on the Git viewlet and click theInitialize Git repository button.
Add a commit message and tap enter or tap the checkmark icon to commit the staged files.
Git is tracking changes, so if you make an update to a file, the Git viewlet will display the files that have changed since your last commit.
Initialize Azure Website
You can deploy to Azure Web Apps directly using Git.
• Create a new Web Appin Azure. If you don’t have an Azure account, you cancreate a free trial. • Configure the Web App in Azure to supportcontinuous deployment using Git.
Record the Git URL for the Web App from the Azure portal:
• In a Terminal window, add a remote namedazurewith the Git URL you noted previously.
– git remote add azure https://[email protected]:443/rickmac.git • Push to master.
Additional Resources • Visual Studio Code
• Building Projects with Yeoman • ASP.NET Fundamentals
2.2.3 Create a New NuGet Package with DNX
Note: We are currently working on this topic.We welcome your input to help shape the scope and approach. You can track the status and provide input on thisissue at GitHub.
If you would like to review early drafts and outlines of this topic, please leave a note with your contact information in theissue.
Learn more about how you cancontributeon GitHub.
2.2.4 Publish to an Azure Web App using Visual Studio
ByErik ReitanThis article describes how to publish an ASP.NET web app to Azure using Visual Studio.
Note:To complete this tutorial, you need a Microsoft Azure account. If you don’t have an account, you canactivate your MSDN subscriber benefitsorsign up for a free trial.
Start by either creating a new ASP.NET web app or opening an existing ASP.NET web app. 1. InSolution Explorerof Visual Studio, right-click on the project and selectPublish.
3. ClickNewin theSelect Existing Web Appdialog box to create a new Web app in Azure.
4. Enter a site name and region. You can optionally create a new database server, however if you’ve created a database server in the past, use that. When you’re ready to continue, clickCreate.
Database servers are a precious resource. For test and development it’s best to use an existing server. There isno validation on the database password, so if you enter an incorrect value, you won’t get an error until your web app attempts to access the database.
You can view the publishing progress in theWeb Publish Activitywindow within Visual Studio.
Note: We are currently working on this topic.
We welcome your input to help shape the scope and approach. You can track the status and provide input on thisissue at GitHub.
If you would like to review early drafts and outlines of this topic, please leave a note with your contact information in theissue.
Learn more about how you cancontributeon GitHub.
2.3 Conceptual Overview
2.3.1 Introduction to ASP.NET 5
ByDaniel RothASP.NET 5 is a significant redesign of ASP.NET. This topic introduces the new concepts in ASP.NET 5 and explains how they help you develop modern web apps.
What is ASP.NET 5?
ASP.NET 5 is a new open-source and cross-platform framework for building modern cloud-based Web applications using .NET. We built it from the ground up to provide an optimized development framework for apps that are either deployed to the cloud or run on-premises. It consists of modular components with minimal overhead, so you retain flexibility while constructing your solutions. You can develop and run your ASP.NET 5 applications cross-platform on Windows, Mac and Linux. ASP.NET 5 is fully open source onGitHub.
Why build ASP.NET 5?
The first preview release of ASP.NET 1.0 came out almost 15 years ago. Since then millions of developers have used it to build and run great web applications, and over the years we have added and evolved many, many capabilities to it. With ASP.NET 5 we are making a number of architectural changes that make the core web framework much leaner and more modular. ASP.NET 5 is no longer based on System.Web.dll, but is instead based on a set of granular and well factored NuGet packages allowing you to optimize your app to have just what you need. You can reduce the surface area of your application to improve security, reduce your servicing burden and also to improve performance in a true pay-for-what-you-use model.
ASP.NET 5 is built with the needs of modern Web applications in mind, including a unified story for building Web UI and Web APIs that integrate with today’s modern client-side frameworks and development workflows. ASP.NET 5 is also built to be cloud-ready by introducing environment-based configuration and by providing built-in dependency injection support.
To appeal to a broader audience of developers, ASP.NET 5 supports cross-platform development on Windows, Mac and Linux. The entire ASP.NET 5 stack is open source and encourages community contributions and engagement. ASP.NET 5 comes with a new, agile project system in Visual Studio while also providing a complete command-line interface so that you can develop using the tools of your choice.
In summary, with ASP.NET 5 you gain the following foundational improvements: • New light-weight and modular HTTP request pipeline
• Ability to host on IIS or self-host in your own process
• Ships entirely as NuGet packages
• Integrated support for creating and using NuGet packages • Single aligned web stack for Web UI and Web APIs • Cloud-ready environment-based configuration • Built-in support for dependency injection
• New tooling that simplifies modern web development
• Build and run cross-platform ASP.NET apps on Windows, Mac and Linux • Open source and community focused
Application anatomy
ASP.NET 5 applications are built and run using the new .NET Execution Environment (DNX). Every ASP.NET 5 project is aDNX project. ASP.NET 5 integrates with DNX through theASP.NET Application Hostingpackage. ASP.NET 5 applications are defined using a publicStartupclass:
1 public class Startup 2 {
3 public void ConfigureServices(IServiceCollection services)
4 {
5 }
6
7 public void Configure(IApplicationBuilder app)
8 {
9 }
10 }
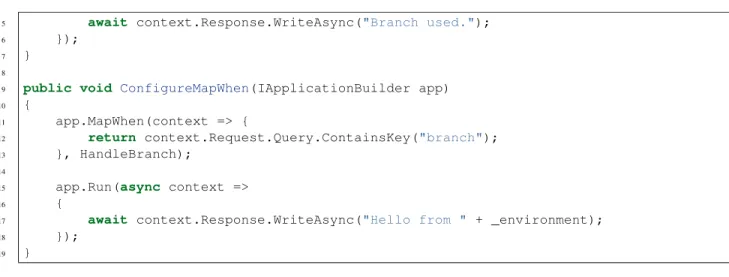
TheConfigureServicesmethod defines the services used by your application and theConfiguremethod is used to define what middleware makes up your request pipeline. SeeUnderstanding ASP.NET 5 Web Appsfor more details.
Services
A service is a component that is intended for common consumption in an application. Services are made available through dependency injection. ASP.NET 5 includes a simple built-in inversion of control (IoC) container that supports constructor injection by default, but can be easily replaced with your IoC container of choice. See Dependency Injectionfor more details.
Services in ASP.NET 5 come in three varieties: singleton, scoped and transient. Transient services are created each time they’re requested from the container. Scoped services are created only if they don’t already exist in the current scope. For Web applications, a container scope is created for each request, so you can think of scoped services as per request. Singleton services are only ever created once.
Middleware
In ASP.NET 5 you compose your request pipeline using Middleware. ASP.NET 5 middleware perform asyn-chronous logic on an HttpContext and then optionally invoke the next middleware in the sequence or termi-nate the request directly. You generally “Use” middleware by invoking a corresponding extension method on the IApplicationBuilderin yourConfiguremethod.
• Working with Static Files • Routing
• Diagnostics • Authentication
You can also author your owncustom middleware.
You can use anyOWIN-based middleware with ASP.NET 5. SeeOWINfor details.
Servers
The ASP.NET Application Hosting model does not directly listen for requests, but instead relies on an HTTP server implementation to surface the request to the application as a set of feature interfaces that can be composed into an HttpContext.
ASP.NET 5 includes server support for running on IIS or self-hosting in your own process. On Windows you can host your application outside of IIS using theWebListenerserver, which is based on HTTP.sys. You can also host your application on a non-Windows environment using the cross-platformKestrelweb server.
Web root
The Web root of your application is the root location in your project from which HTTP requests are handled (ex. handling of static file requests). The Web root of an ASP.NET 5 application is configured using the “webroot” property in your project.json file.
Configuration
ASP.NET 5 uses a new configuration model for handling of simple name-value pairs that is not based on Sys-tem.Configuration or web.config. This new configuration model pulls from an ordered set of configuration providers. The built-in configuration providers support a variety of file formats (XML, JSON, INI) and also environment vari-ables to enable environment-based configuration. You can also write your own custom configuration providers. En-vironments, like Development and Production, are a first-class notion in ASP.NET 5 and can also be set up using environment variables:
1 var builder = new ConfigurationBuilder() 2 .AddJsonFile("appsettings.json")
3 .AddJsonFile($"appsettings.{env.EnvironmentName}.json", optional: true); 4
5 if (env.IsDevelopment()) 6 {
7 // For more details on using the user secret store see http://go.microsoft.com/fwlink/?LinkID=532709 8 builder.AddUserSecrets();
9 } 10
11 builder.AddEnvironmentVariables(); 12 Configuration = builder.Build();
SeeConfigurationfor more details on the new configuration system andWorking with Multiple Environments for details on how to work with environments in ASP.NET 5.
Client-side development
ASP.NET 5 is designed to integrate seamlessly with a variety of client-side frameworks, includingAngularJS, Knock-outJSandBootstrap. SeeClient-Side Developmentfor more details.
2.3.2 Introducing .NET Core
BySteve Smith.NET Core is a small, optimized runtime that can be targeted by ASP.NET 5 applications. In fact, the new ASP.NET 5 project templates target .NET Core by default, in addition to the .NET Framework. Learn what targeting .NET Core means for your ASP.NET 5 application.
In this article:
• What is .NET Core?
• Motivation Behind .NET Core
• Building Applications with .NET Core
• .NET Core and NuGet
• Additional Reading
What is .NET Core
.NET Core 5 is a modular runtime and library implementation that includes a subset of the .NET Framework. Currently it is feature complete on Windows, and in-progress builds exist for both Linux and OS X. .NET Core consists of a set of libraries, called “CoreFX”, and a small, optimized runtime, called “CoreCLR”. .NET Core is open-source, so you can follow progress on the project and contribute to it on GitHub:
• .NET Core Libraries (CoreFX)
• .NET Core Common Language Runtime (CoreCLR)
The CoreCLR runtime (Microsoft.CoreCLR) and CoreFX libraries are distributed via NuGet. The CoreFX libraries are factored as individual NuGet packages according to functionality, named “System.[module]” onnuget.org. One of the key benefits of .NET Core is its portability. You can package and deploy the CoreCLR with your application, eliminating your application’s dependency on an installed version of .NET (e.g. .NET Framework on Windows). You can host multiple applications side-by-side using different versions of the CoreCLR, and upgrade them individually, rather than being forced to upgrade all of them simultaneously.
CoreFX has been built as a componentized set of libraries, each requiring the minimum set of library dependencies (e.g. System.Collections only depends on System.Runtime, not System.Xml). This approach enables minimal distributions of CoreFX libraries (just the ones you need) within an application, alongside CoreCLR. CoreFX includes collections, console access, diagnostics, IO, LINQ, JSON, XML, and regular expression support, just to name a few libraries. Another benefit of CoreFX is that it allows developers to target a single common set of libraries that are supported by multiple platforms.
Motivation Behind .NET Core
When .NET first shipped in 2002, it was a single framework, but it didn’t take long before the .NET Compact Frame-work shipped, providing a smaller version of .NET designed for mobile devices. Over the years, this exercise was repeated multiple times, so that today there are different flavors of .NET specific to different platforms. Add to this the further platform reach provided by Mono and Xamarin, which target Linux, Mac, and native iOS and Android devices. For each platform, a separate vertical stack consisting of runtime, framework, and app model is required to
develop .NET applications. One of the primary goals of .NET Core is to provide a single, modular, cross-platform version of .NET that works the same across all of these platforms. Since .NET Core is a fully open source project, the Mono community can benefit from CoreFX libraries. .NET Core will not replace Mono, but it will allow the Mono community to reference and share, rather than duplicate, certain common libraries, and to contribute directly to CoreFX, if desired.
In addition to being able to target a variety of different device platforms, there was also pressure from the server side to reduce the overall footprint, and more importantly, surface area, of the .NET Framework. By factoring the CoreFX libraries and allowing individual applications to pull in only those parts of CoreFX they require (a so-called “pay-for-play” model), server-based applications built with ASP.NET 5 can minimize their dependencies. This, in turn, reduces the frequency with which patches and updates to the framework will impact these applications, since only changes made to the individual pieces of CoreFX leveraged by the application will impact the application. A smaller deployment size for the application is a side benefit, and one that makes more of a difference if many applications are deployed side-by-side on a given server.
Note: The overall size of .NET Core doesn’t intend to be smaller than the .NET Framework over time, but since it is pay-for-play, most applications that utilize only parts of CoreFX will have a smaller deployment footprint.
Building Applications with .NET Core
.NET Core can be used to build a variety of applications using different application models including Web applications, console applications and native mobile applications. The .NET Execution Environment (DNX) provides a cross-platform runtime host that you can use to build .NET Core based applications that can run on Windows, Mac and Linux and is the foundation for running ASP.NET applications on .NET Core. Applications running on DNX can target the .NET Framework or .NET Core. In fact, DNX projects can be cross-compiled, targeting both of these frameworks in a single project, and this is how the project templates ship with Visual Studio 2015. For example, the frameworkssection ofproject.jsonin a new ASP.NET 5 web project will targetdnx451anddnxcore50by default:
"frameworks": {
"dnx451": { },
"dnxcore50": { } },
dnx451represents the .NET Framework, whilednxcore50represents .NET Core 5 (5.0). You can use compiler directives (#if) to check for symbols that correspond to the two frameworks: DNX451andDNXCORE50. If for instance you have code that uses resources that are not available as part of .NET Core, you can surround them in a conditional compilation directive:
#if DNX451
// utilize resource only available with .NET Framework
#endif
The recommendation from the ASP.NET team is to target both frameworks with new applications. If you want to only target .NET Core, removednx451; or to only target .NET Framework, removednxcore50from theframeworkslisted inproject.json. Note that ASP.NET 4.6 and earlier target and require the .NET Framework, as they always have.
.NET Core and NuGet
Using NuGet allows for much more agile usage of the individual libraries that comprise .NET Core. It also means that an application can list a collection of NuGet packages (and associated version information) and this will comprise both system/framework as well as third-party dependencies required. Further, third-party dependencies can now also express their specific dependencies on framework features, making it much easier to ensure the proper packages and versions are pulled together during the development and build process.
If, for example, you need to use immutable collections, you can install the System.Collections.Immutable package via NuGet. The NuGet version will also align with the assembly version, and will usesemantic versioning.
Note: Although CoreFX will be made available as a fairly large number of individual NuGet packages, it will continue to ship periodically as a full unit that Microsoft has tested as a whole. These distributions will most likely ship at a lower cadence than individual packages, allowing time to perform necessary testing, fixes, and the distribution process.
Summary
.NET Core is a modular, streamlined subset of the .NET Framework and CLR. It is fully open-source and provides a common set of libraries that can be targeted across numerous platforms. Its factored approach allows applications to take dependencies only on those portions of the CoreFX that they use, and the smaller runtime is ideal for deployment to both small devices (though it doesn’t yet support any) as well as cloud-optimized environments that need to be able to run many small applications side-by-side. Support for targeting .NET Core is built into the ASP.NET 5 project templates that ship with Visual Studio 2015.
Additional Reading
Learn more about .NET Core:
• Immo Landwerth Explains .NET Core • What is .NET Core 5 and ASP.NET 5 • .NET Core 5 on dotnetfoundation.org • .NET Core is Open Source
• .NET Core on GitHub
2.3.3 DNX Overview
ByDaniel RothWhat is the .NET Execution Environment?
The .NET Execution Environment (DNX) is a software development kit (SDK) and runtime environment that has everything you need to build and run .NET applications for Windows, Mac and Linux. It provides a host process, CLR hosting logic and managed entry point discovery. DNX was built for running cross-platform ASP.NET Web applications, but it can run other types of .NET applications, too, such as cross-platform console apps.
Why build DNX?
Cross-platform .NET developmentDNX provides a consistent development and execution environment across mul-tiple platforms (Windows, Mac and Linux) and across different .NET flavors (.NET Framework, .NET Core and Mono). With DNX you can develop your application on one platform and run it on a different platform as long as you have a compatible DNX installed on that platform. You can also contribute to DNX projects using your development platform and tools of choice.
Build for .NET CoreDNX dramatically simplifies the work needed to develop cross-platform applications using .NET Core. It takes care of hosting the CLR, handling dependencies and bootstrapping your application. You can easily define projects and solutions using a lightweight JSON format (project.json), build your projects and publish them for distribution.
Package ecosystemPackage managers have completely changed the face of modern software development and DNX makes it easy to create and consume packages. DNX provides tools for installing, creating and managing NuGet packages. DNX projects simplify building NuGet packages by cross-compiling for multiple target frameworks and can output NuGet packages directly. You can reference NuGet packages directly from your projects and transitive dependencies are handled for you. You can also build and install development tools as packages for your project and globally on a machine.
Open source friendlyDNX makes it easy to work with open source projects. With DNX projects you can easily replace an existing dependency with its source code and let DNX compile it in-memory at runtime. You can then debug the source and modify it without having to modify the rest of your application.
Projects
A DNX project is a folder with aproject.jsonfile. The name of the project is the folder name. You use DNX projects to build NuGet packages. Theproject.jsonfile defines your package metadata, your project dependencies and which frameworks you want to build for:
1 {
2 "version": "1.0.0-*",
3 "description": "ClassLibrary1 Class Library", 4 "authors": [ "daroth" ], 5 "tags": [ "" ], 6 "projectUrl": "", 7 "licenseUrl": "", 8 9 "frameworks": { 10 "net451": { }, 11 "dotnet5.4": { 12 "dependencies": { 13 "Microsoft.CSharp": "4.0.1-beta-23516", 14 "System.Collections": "4.0.11-beta-23516", 15 "System.Linq": "4.0.1-beta-23516", 16 "System.Runtime": "4.0.21-beta-23516", 17 "System.Threading": "4.0.11-beta-23516" 18 } 19 } 20 } 21 }
All the files in the folder are by default part of the project unless explicitly excluded inproject.json. You can also define commands as part of your project that can be executed (seeCommands).
You specify which frameworks you want to build for under the “frameworks” property. DNX will cross-compile for each specified framework and create the corresponding lib folder in the built NuGet package.
You can use the .NET Development Utility (DNU) to build, package and publish DNX projects. Building a project produces the binary outputs for the project. Packaging produces a NuGet package that can be uploaded to a package feed (for example,http://nuget.org) and then consumed. Publishing collects all required runtime artifacts (the required DNX and packages) into a single folder so that it can be deployed as an application.
For more details on working with DNX projects seeWorking with DNX Projects.
Dependencies
Dependencies in DNX consist of a name and a version number. Version numbers should followSemantic Versioning. Typically dependencies refer to an installed NuGet package or to another DNX project. Project references are resolved
using peer folders to the current project or project paths specified using aglobal.jsonfile at the solution level: 1 { 2 "projects": [ "src", "test" ], 3 "sdk": { 4 "version": "1.0.0-rc1-final" 5 } 6 }
Theglobal.jsonfile also defines the minimum DNX version (“sdk” version) needed to build the project.
Dependencies are transitive in that you only need to specify your top level dependencies. DNX will handle resolving the entire dependency graph for you using the installed NuGet packages. Project references are resolved at runtime by building the referenced project in memory. This means you have the full flexibility to deploy your DNX application as package binaries or as source code.
Packages and feeds
For package dependencies to resolve they must first be installed. You can use DNU to install a new package into an existing project or to restore all package dependencies for an existing project. The following command downloads and installs all packages that are listed in theproject.jsonfile:
dnu restore
Packages are restored using the configured set of package feeds. You configure the available package feeds using NuGet configuration files (NuGet.config).
Commands
A command is a named execution of a .NET entry point with specific arguments. You can define commands in your project.jsonfile:
1 "commands": {
2 "web": "Microsoft.AspNet.Server.Kestrel", 3 "ef": "EntityFramework.Commands"
4 },
You can then use DNX to execute the commands defined by your project, like this: dnx web
Commands can be built and distributed as NuGet packages. You can then use DNU to install commands globally on a machine:
dnu commands install MyCommand
For more information on using and creating commands seeUsing Commands.
Application Host
The DNX application host is typically the first managed entry point invoked by DNX and is responsible for handling dependency resolution, parsingproject.json, providing additional services and invoking the application entry point. Alternatively, you can have DNX invoke your application’s entry point directly. Doing so requires that your application be fully built and all dependencies located in a single directory. Using DNX without using the DNX Application Host is not common.
The DNX application host provides a set of services to applications through dependency injection (for example, IServiceProvider, IApplicationEnvironment andILoggerFactory). Application host services can be injected in the constructor of the class for yourMainentry point or as additional method parameters to yourMainentry point.
Compile Modules
Compile modules are an extensibility point that let you participate in the DNX compilation process. You imple-ment a compile module by impleimple-menting theICompileModuleinterface and putting your compile module in a com-piler/preprocess or compiler/postprocess in your project.
DNX Version Manager
You can install multiple DNX versions and flavors on your machine. To install and manage different DNX versions and flavors you use the .NET Version Manager (DNVM). DNVM lets you list the different DNX versions and flavors on your machine, install new ones and switch the active DNX.
SeeGetting Startedfor instructions on how to acquire and install DNVM for your platform.
2.3.4 Introduction to NuGet
Note: We are currently working on this topic.We welcome your input to help shape the scope and approach. You can track the status and provide input on thisissue at GitHub.
If you would like to review early drafts and outlines of this topic, please leave a note with your contact information in theissue.
Learn more about how you cancontributeon GitHub.
NuGetis the package management system used by the.NET Execution EnvironmentandASP.NET 5. You can learn all about NuGet and working with NuGet packages athttps://docs.nuget.org.
2.3.5 Understanding ASP.NET 5 Web Apps
BySteve SmithandErik ReitanASP.NET 5 introduces several new fundamental concepts of web programming that are important to understand in order to productively create web apps. These concepts are not necessarily new to web programming in general, but are new to ASP.NET and thus are likely new to many developers whose experience with web programming has mainly been using ASP.NET and Visual Studio.