Pharo by Example 5
Stéphane Ducasse Dimitris Chloupis Nicolai Hess Dmitri Zagidulin
Damien Pollet, Damien Cassou and Marcus Denker. The contents of this book are protected under the Creative Commons Attribution-ShareAlike 3.0 Unported license.
You arefree:
• toShare: to copy, distribute and transmit the work,
• toRemix: to adapt the work,
Under the following conditions:
Attribution. You must attribute the work in the manner specified by the author or licensor (but not in any way that suggests that they endorse you or your use of the work).
Share Alike. If you alter, transform, or build upon this work, you may distribute the resulting work only under the same, similar or a compatible license.
For any reuse or distribution, you must make clear to others the license terms of this work. The best way to do this is with a link to this web page:
http://creativecommons.org/licenses/by-sa/3.0/
Any of the above conditions can be waived if you get permission from the copyright holder. Nothing in this license impairs or restricts the author’s moral rights.
Your fair dealing and other rights are in no way affected by the above. This is a human-readable summary of the Legal Code (the full license):
http://creativecommons.org/licenses/by-sa/3.0/legalcode
[
&|]
|Published by Lulu.com & Square Bracket Associates. http://squarebracketassociates.org
ISBN 978-1-365-65459-6 First Edition, January 2017.
Contents
Contents i
1 Preface 1
1.1 What is Pharo?. . . 1
1.2 Who should read this book? . . . 2
1.3 A word of advice. . . 3
1.4 An open book . . . 3
1.5 The Pharo community. . . 3
1.6 Examples and exercises . . . 4
1.7 Acknowledgments . . . 4
1.8 Hyper special acknowledgments . . . 4
2 A quick tour of Pharo 7 2.1 Installing Pharo . . . 7
2.2 Pharo: File components . . . 8
2.3 Launching Pharo. . . 9
2.4 PharoLauncher . . . 10
2.5 The World Menu. . . 11
2.6 Sending messages. . . 13
2.7 Saving, quitting and restarting a Pharo session . . . 15
2.8 Playgrounds and Transcripts . . . 15
2.9 Keyboard shortcuts . . . 16
2.10 The System Browser. . . 19
2.11 Finding classes. . . 22
2.12 Finding methods. . . 25
2.13 Defining a new method . . . 27
2.14 Chapter summary . . . 31
3 A first application 33 3.1 The Lights Out game. . . 34
3.2 Creating a new Package . . . 34
3.3 Defining the classLOCell . . . 35
3.4 Adding methods to a class. . . 37
3.5 Inspecting an object . . . 39
3.6 Defining the classLOGame . . . 41
3.8 Finishing the game . . . 47
3.9 Let’s try our code . . . 49
3.10 Saving and sharing Pharo code . . . 51
3.11 Chapter summary . . . 56
4 Syntax in a nutshell 57 4.1 Syntactic elements. . . 57
4.2 Pseudo-variables . . . 60
4.3 Message sends . . . 61
4.4 Method syntax. . . 62
4.5 Block syntax . . . 63
4.6 Conditionals and loops in a nutshell. . . 64
4.7 Primitives and pragmas . . . 66
4.8 Chapter summary . . . 67
5 Understanding message syntax 69 5.1 Identifying messages . . . 69
5.2 Three types of messages . . . 71
5.3 Message composition . . . 74
5.4 Hints for identifying keyword messages. . . 79
5.5 Expression sequences. . . 81
5.6 Cascaded messages . . . 81
5.7 Chapter summary . . . 82
6 The Pharo object model 85 6.1 The rules of the model . . . 85
6.2 Everything is an Object . . . 85
6.3 Every object is an instance of a class . . . 86
6.4 Instance structure and behavior. . . 87
6.5 The instance side and the class side. . . 88
6.6 Every class has a superclass . . . 94
6.7 Everything happens by sending messages . . . 97
6.8 Method lookup follows the inheritance chain . . . 99
6.9 Shared variables. . . 105
6.10 Internal object implementation note . . . 109
6.11 Chapter summary . . . 110
7 Some of the key tools of the Pharo environment 113 7.1 Pharo environment overview . . . 113
7.2 The main code browser . . . 115
7.3 The inspector . . . 128
7.4 The debugger . . . 130
7.5 The process browser . . . 139
7.6 Finding methods. . . 140
Contents
8 Sharing code and source control 141
8.1 Packages: groups of classes and methods . . . 141
8.2 Source control . . . 148
8.3 The File List Browser. . . 151
8.4 In Pharo, you can’t lose code . . . 152
8.5 Chapter summary . . . 153
9 SUnit 155 9.1 Introduction . . . 155
9.2 Why testing is important . . . 156
9.3 What makes a good test? . . . 157
9.4 SUnit by example . . . 158
9.5 The SUnit cookbook . . . 162
9.6 The SUnit framework . . . 163
9.7 Advanced features of SUnit . . . 166
9.8 Continuing after a failure . . . 168
9.9 SUnit implementation . . . 168
9.10 A piece of advices on testing . . . 171
9.11 Chapter summary . . . 172
10 Basic classes 175 10.1 Object . . . 175
10.2 Numbers. . . 184
10.3 Characters . . . 188
10.4 Strings . . . 189
10.5 Booleans. . . 190
10.6 Chapter summary . . . 192
11 Collections 193 11.1 Introduction . . . 193
11.2 The varieties of collections . . . 193
11.3 Collection implementations . . . 196
11.4 Examples of key classes . . . 197
11.5 Collection iterators . . . 209
11.6 Some hints for using collections. . . 213
11.7 Chapter summary . . . 214
12 Streams 217 12.1 Two sequences of elements . . . 217
12.2 Streams vs. collections . . . 218
12.3 Streaming over collections . . . 219
12.4 Using streams for file access . . . 227
12.5 Chapter summary . . . 229
13 Morphic 231 13.1 The history of Morphic . . . 231
13.3 Composing morphs . . . 234
13.4 Creating and drawing your own morphs . . . 236
13.5 Interaction and animation. . . 239
13.6 Interactors. . . 242
13.7 Drag-and-drop. . . 243
13.8 A complete example. . . 245
13.9 More about the canvas . . . 250
13.10 Chapter summary . . . 251
14 Seaside by example 253 14.1 Why do we need Seaside? . . . 253
14.2 Getting started. . . 254
14.3 Seaside components . . . 260
14.4 Rendering HTML. . . 264
14.5 CSS: Cascading style sheets . . . 270
14.6 Managing control flow. . . 272
14.7 A complete tutorial example . . . 278
14.8 A quick look at AJAX . . . 285
14.9 Chapter summary . . . 288
15 Classes and metaclasses 291 15.1 Rules for classes and metaclasses. . . 291
15.2 Revisiting the Pharo object model . . . 292
15.3 Every class is an instance of a metaclass . . . 293
15.4 The metaclass hierarchy parallels the class hierarchy. . . 295
15.5 Every metaclass inherits fromClassandBehavior . . . 297
15.6 Every metaclass is an instance ofMetaclass . . . 300
15.7 The metaclass ofMetaclassis an instance ofMetaclass . . . 300
15.8 Chapter summary . . . 302
16 Reflection 303 16.1 Introspection . . . 304
16.2 Browsing code . . . 309
16.3 Classes, method dictionaries and methods . . . 311
16.4 Browsing environments . . . 313
16.5 Accessing the run-time context . . . 315
16.6 Intercepting messages not understood . . . 318
16.7 Objects as method wrappers . . . 322
16.8 Pragmas . . . 325
16.9 Chapter summary . . . 326
17 Regular expressions in Pharo 329 17.1 Tutorial example — generating a site map . . . 330
17.2 Regex syntax. . . 338
17.3 Regex API . . . 345
17.4 Implementation Notes by Vassili Bykov . . . 351
C H A P T E R
1
Preface
1.1
What is Pharo?
Pharo is a modern, open-source, dynamically typed language supporting live coding inspired by Smalltalk. Pharo and its ecosystems is composed of the six fundamental elements:
• A dynamically-typed language with a syntax so simple it can fit on a postcard and yet is readable even for someone not familiar with it.
• A live coding environment that allows the coder to modify its code while the code executes, without any need to slow down his or her workflow.
• A powerful IDE providing all the tools to help manage complex code and promote good code design.
• A rich library that creates an environment so powerful that it can be viewed even as a virtual OS, including a very fast JITing VM and full access to OS libraries and features via its FFI.
• A culture where changes and improvements are encouraged and highly valued.
• A community that welcomes coders from any corner of the world with any skill and any programming languages.
Pharo strives to offer a lean, open platform for professional software develop-ment, as well as a robust and stable platform for research and development into dynamic languages and environments. Pharo serves as the reference implementation for the Seaside web development framework available at
Pharo core contains only code that has been contributed under the MIT license. The Pharo project started in March 2008 as a fork of Squeak (a modern implementation of Smalltalk-80), and the first 1.0 beta version was released on July 31, 2009. The current version is Pharo 5.0, released in May 2016. Pharo 6.0 is in alpha development and planned for release in April 2017.
Pharo is highly portable. Pharo can run on OS X, Windows, Linux, Android, iOS, and Raspberry Pi. Its virtual machine is written entirely in a subset of Pharo itself, making it easy to simulate, debug, analyze, and change from within Pharo itself. Pharo is the vehicle for a wide range of innovative projects, from multimedia applications and educational platforms to commercial web development environments.
There is an important principle behind Pharo: Pharo doesn’t just copy the past, but it reinvents the essence behind Smalltalk. However we realize that Big Bang style approaches rarely succeed. Pharo instead favors evolutionary and incremental changes. Rather than leaping for the final perfect solution in one big step, a multitude of small changes keeps even the bleeding edge relatively stable while experimenting with important new features and li-braries. This facilitates rapid feedback and contributions from the community, on which Pharo depends for its success. Finally Pharo is not read-only, Pharo integrates changes made by the community, daily. Pharo got 100 contributors from all over the world. You can have an impact on Pharo, too!
1.2
Who should read this book?
The previous revision of this book was based on Pharo 1.4. This revision has been liberally updated to align with Pharo 5.0. Various aspects of Pharo are presented, starting with the basics then proceeding to intermediate topics. Advanced topics are presented inDeep into Pharo, a book on the internals of Pharo that is freely available athttp://books.pharo.org. In addition for readers interested in web development, a new bookEnterprise Pharo: a Web Perspectiveis freely available athttp://books.pharo.org.
This book will not teach you how to program. The reader should have some familiarity with programming languages. Some background with object-oriented programming would also be helpful.
This book will introduce the Pharo programming environment, the language and the associated tools. You will be exposed to common idioms and practices, but the focus is on the technology, not on object-oriented design. Wherever possible, we will show you lots of examples.
There are numerous other books on Smalltalk freely available on the web at
1.3 A word of advice
1.3
A word of advice
Do not be frustrated by parts of Pharo that you do not immediately under-stand. You do not have to know everything! Alan Knight expresses this as follows:
Try not to care. Beginning Smalltalk programmers often have trouble because they think they need to understand all the details of how a thing works before they can use it. This means it takes quite a while before they can master Transcript show: ’Hello World’. One of the great leaps in OO is to be able to answer the question “How does this work?” with ”I don’t care”.
When you don’t understand something, simple or complex, do not hesitate for a second to ask us at our mailing lists ([email protected] or [email protected]), irc and Slack. We love questions and we welcome people of any skill.
1.4
An open book
This book is an open book in the following senses:
• The content of this book is released under the Creative Commons Attribution-ShareAlike (by-sa) license. In short, you are allowed to freely share and adapt this book, as long as you respect the conditions of the license available at the following URLhttp://creativecommons.org/ licenses/by-sa/3.0/.
• This book just describes the core of Pharo. We encourage others to contribute chapters on the parts of Pharo that we have not described. If you would like to participate in this effort, please contact us. We would like to see more books around Pharo!
• It is also possible to contribute directly to this book via Github. Just fol-low the instructions there and ask any question on the mailing list. You can find the Github repo athttps://github.com/SquareBracketAssociates/ UpdatedPharoByExample
1.5
The Pharo community
The Pharo community is friendly and active. Here is a short list of resources that you may find useful:
• http://www.pharo.orgis the main web site of Pharo.
• SmalltalkHub (http://www.smalltalkhub.com/) is the equivalent of Source-Forge/Github for Pharo projects. Many extra packages and projects for Pharo live there.
• Pharo is also active on Slack - a platform for chat based on IRC (http: //pharoproject.slack.com), just ask for an invitation athttp://slackinvites. pharo.org. Everybody is welcomed.
1.6
Examples and exercises
We have tried to provide as many examples as possible. In particular, there are many examples that show a fragment of code which can be evaluated. We use a long arrow to indicate the result you obtain when you select an expression and from its context menu chooseprint it:
3 + 4
>>> 7 "if you select 3+4 and 'print it', you will see 7"
In case you want to play with these code snippets in Pharo, you can download a plain text file with all the example code from the Resources sidebar of the book’s web site:http://books.pharo.org.
1.7
Acknowledgments
We would like to thank Alan Kay, Dan Ingalls and their team for making Squeak, an amazing Smalltalk development environment, that became the open-source project from which Pharo took roots. Pharo also would not be possible without the incredible work of the Squeak developers.
We would also like to thank Hilaire Fernandes and Serge Stinckwich who allowed us to translate parts of their columns on Smalltalk, and Damien Cas-sou for contributing the chapter on Streams. We especially thank Alexandre Bergel, Orla Greevy, Fabrizio Perin, Lukas Renggli, Jorge Ressia and Erwann Wernli for their detailed reviews.
We thank the University of Bern, Switzerland, for graciously supporting this open-source project and for hosting the web site of this book.
We also thank the Pharo community for their enthusiastic support of this book project, as well as for all the translations of the first edition ofPharo by Example.
1.8
Hyper special acknowledgments
1.8 Hyper special acknowledgments
Thanks to Manfred Kröhnert, Markus Schlager, Werner Kassens, Michael OKeefe, Aryeh Hoffman, Paul MacIntosh, Gaurav Singh, Jigyasa Grover, Craig Allen, Serge Stinckwich, avh-on1, Yuriy Timchuk, zio-pietro for the typos and feedback. Special thanks to Damien Cassou and Cyril Ferlicot for their great help in the book update. Finally we want to thank Inria for its steady and important financial support, and the RMoD team members for the constant energy pushing Pharo forward.
C H A P T E R
2
A quick tour of Pharo
This chapter will take you on a high level tour of Pharo, to help you get com-fortable with the environment. There will be plenty of opportunities to try things out, so it would be a good idea if you have a computer handy when you read this chapter.
In particular, you will fire up Pharo, learn about the different ways of interact-ing with the system, and discover some of the basic tools. You will also learn how to define a new method, create an object and send it messages.
Note:Most of the introductory material in this book will work with any Pharo version, so if you already have one installed, you may as well continue to use it. However, since this book is written for Pharo 5.0, if you notice differences between the appearance or behaviour of your system and what is described here, do not be surprised.
2.1
Installing Pharo
Downloading Pharo
Pharo is available as a free download fromhttp://pharo.org/download. Click the button for your operating system to download the appropriate.zip
file. For example, the full Pharo 5.0 distribution for OS X will be available at
http://files.pharo.org/platform/Pharo5.0-mac.zip.
Once that file is unzipped, it will contain everything you need to run Pharo (this includes the VM, the image, and the sources, as explained below).
to download specific versions of Pharo. This is really handy to automate the process.
To download the latest 50 full system, use the following snippet.
wget -O- get.pharo.org/50+vm | bash
Installing Pharo
Pharo does not need to install anything in your system, as it’s perfectly ca-pable of running standalone. Depending on your platform, download the appropriate zip file, uncompress it in a directory of your choice and now you are ready to launch Pharo. In case of Ubuntu Linux, there is also the extra option of installing Pharo via the Pharo PPA. Pharo can be also installed via the command line.
2.2
Pharo: File components
Pharo consists of four main component files. Although you do not need to deal with them directly for the purposes of this book, it is useful to understand the roles they play.
1.Thevirtual machine(VM) is the only component that is different for each operating system. The VM is the execution engine (similar to a JVM). It takes Pharo bytcode that is generated each time user compiles a piece of code, converts it to machine code and executes it. Pharo comes with the Cog VM a very fast JITing VM. The VM executable is named:
• Pharo.exefor Windows;
• pharofor Linux ; and
• Pharofor OSX (inside a package also namedPharo.app).
The other components below are portable across operating systems, and can be copied and run on any appropriate virtual machine.
2.Thesourcesfile contains source code for parts of Pharo that don’t change frequently. Sources file is important because the image file format stores only objects including compiled methods and their bytecode and not their source code. Typically a newsourcesfile is generated once per major release of Pharo. For Pharo 5.0, this file is namedPharoV50.sources.
3.Thechangesfile logs of all source code modifications (especially all the changes you did while programming) since the.sourcesfile was generated. Each release provides a near empty file named for the release, for example
2.3 Launching Pharo
4.Theimagefile provides a frozen in time snapshot of a running Pharo sys-tem. This is the file where all objects are stored and as such it’s a cross plat-form plat-format. An image file contains the live state of all objects of the system (including classes and compiled methods, since they are objects too) at a given point. An image is a virtual object container. The file is named for the release (likePharo5.0.image) and it is synched with thePharo5.0.changesfile.
Image/Change pair
The.imageand.changesfiles provided by a Pharo release are the start-ing point for a live environment that you adapt to your needs. As you work in Pharo, these files are modified, so you need to make sure that they are writable. Pay attention to remove the changes and image files from the list of files to be checked by anti-viruses. The.imageand.changesfiles are in-timately linked and should always be kept together, with matching base filenames. Never edit them directly with a text editor, as.imagesholds your live object runtime memory, which indexes into the.changesfiles for the source. It is a good idea to keep a backup copy of the downloaded.imageand
.changesfiles so you can always start from a fresh image and reload your code. However, the most efficient way for backing up code is to use a version control system that will provide an easier and powerful way to back up and track your changes.
Common setup
The four main component files above can be placed in the same directory, but it’s a common practice to put the Virtual Machine and sources file in a separate directory where everyone has read-only access to them.
Do whatever works best for your style of working and your operating system.
2.3
Launching Pharo
To start Pharo, do whatever your operating system expects: drag the .image file onto the icon of the virtual machine, or double-click the .image file, or at the command line type the name of the virtual machine followed by the path to the .image file.
• OnOS X, double click thePharo5.0.appbundle in the unzipped down-load.
• OnLinux, double click (or invoke from the command line) thepharo
executable bash script from the unzipped Pharo folder.
In general, Pharo tries to ”do the right thing”. If you double click on the VM, it looks for an image file in the default location. If you double click on an.image
file, it tries to find the nearest VM to launch it with.
If you have multiple VMs installed on your machine, the operating system may no longer be able to guess the right one. In this case, it is safer to specify exactly which ones you meant to launch, either by dragging and dropping the image file onto the VM, or specifying the image on the command line (see the next section).
Launching Pharo via the command line
The general pattern for launching Pharo from a terminal is:
<Pharo executable> <path to Pharo image>
Linux command line. For Linux, assuming that you’re in the unzipped
pharo5.0folder:
./pharo shared/Pharo5.0.image
OS X command line. For OS X, assuming that you’re in the directory with the unzippedPharo5.0.appbundle:
Pharo5.0.app/Contents/MacOS/Pharo
Pharo5.0.app/Contents/Resources/Pharo5.0.image
When using a Pharo bundle, you need to right-click onPharo5.0.appand select ’Show Package Contents’ to get access to the image. If you need this often, just download a separated image/changes pair and drop that image into thePharo5.0.app.
Windows command line. For Windows, assuming that you’re in the unzipped
Pharo5.0folder:
Pharo.exe Pharo5.0.image
2.4
PharoLauncher
PharoLauncheris a tool that helps you download and manage Pharo images. It is very useful for getting new versions of Pharo (as well as updates to the existing versions that contain important bug fixes). It also gives you access to images preloaded with specific libraries that make it very easy to use those tools without having to manually install and configure them.
2.5 The World Menu
Figure 2.1:PharoLauncher - GUI
links depending on your platform.PharoLauncheris basically composed of two columns.
After installing PharoLauncher and opening it (like you would do for any Pharo image), you should get a GUI similar to Figure 2.1.
• The left column lists images that live locally on your machine (usually in a shared system folder). You can launch any local image directly (either by double-clicking, or by selecting it and pressing theLaunchbutton). A right-click context menu provides several useful functions like copying and renaming your images, as well as locating them on the file system.
• The right column lists Templates, which are remote images available for download. To download a remote image, select it and click theCreate imagebutton (located on the top right, next to theRefresh template listbutton).
You can use your own local images withPharoLauncher, in addition to work-ing with the images you donwloaded. To do so, simply ensure that your .image and its associated .changes files are placed in a folder (with the same name as your image) in your default image location. You can find the location in the
PharoLaunchersettings.
2.5
The World Menu
Figure 2.2:Clicking anywhere on the Pharo window background activates the World Menu
Clicking anywhere on the background of the Pharo window will display the
World Menu, which contains many of the Pharo tools, utilities and settings.
At the top of theWorld Menu, you will see a list of several core tools in Pharo, including the System Browser, the Playground, the Monticello package man-ager, and others. We will discuss them in more detail in the coming chapters.
Interacting with Pharo
Pharo offers three ways to interact with the system using a mouse or other pointing device.
click(or left-click): this is the most often used mouse button, and is normally equivalent to left-clicking (or clicking a single-mouse button without any modifier key). For example, click on the background of the Pharo window to bring up theWorldmenu (Figure 2.2).
action-click(or right-click): this is the next most used button. It is used to bring up a contextual menu that offers different sets of actions depending on where the mouse is pointing (see Figure 2.3). If you do not have a multi-button mouse, then normally you will configure the control modifier key to action-click with the mouse button.
2.6 Sending messages
Figure 2.3:Action Click (right click) brings the contextual menu.
Figure 2.4:Meta-Clicking on a window opens the Halos
will explain its function. In Pharo, how you meta-click depends on your oper-ating system: either you must holdShift-CtrlorShift-Alt(on Windows or Linux) orShift-Option(on OS X) while clicking.
2.6
Sending messages
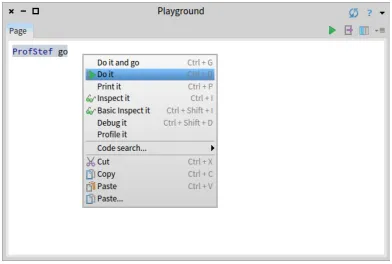
In the Pharo window, click on an open space to open theWorld Menu, and then select thePlaygroundmenu option. ThePlaygroundtool will open (you may recognize it as theWorkspacetool, from previous versions of Pharo). We can usePlaygroundto quickly execute Pharo code. Enter the following code in it, then right click and selectDo it:
ProfStef go.
This expression will trigger the Pharo tutorial (as shown in Figure 2.6). It is a simple and interactive tutorial that will teach you the basics of Pharo.
[image:19.450.127.323.233.356.2]Figure 2.5:Executing an expression is simple with theDo itmenu item.
Figure 2.6:PharoTutorial is a simple interactive tutorial to learn about Pharo
the concept of sending messages to objects. The Pharo objects are like your soldiers ready to obey once you send them a message they can understand. We will see how an object can understand a message, later on.
If you talk to Pharoers for a while, you will notice that they generally do not use expressions likecall an operationorinvoke a method, as developers do in other programming languages. Instead they will saysend a message. This reflects the idea that objects are responsible for their own actions and that the method associated with the message is looked up dynamically. When sending a message to an object, the object, and not the sender, selects the appropriate method for responding to your message. In most cases, the method with the same name as the message is executed.
[image:20.450.126.323.232.374.2]2.7 Saving, quitting and restarting a Pharo session
How to find the available messages for each object is something we will ex-plore later on.
2.7
Saving, quitting and restarting a Pharo session
You can exit Pharo at any point, by closing the Pharo window as you do any other application window. Additionally you can use theWorld Menuand select eitherSave and quitorQuit.
In any case, Pharo will display a prompt to ask you about saving your image. If you do save your image and reopen it, you will see that things areexactly
as you left them. This happens because the image file stores all the objects (edited text, window positions, added methods... of course since they are all objects) that Pharo has loaded into your memory so that nothing is lost on exit.
When you start Pharo for the first time, the Pharo virtual machine loads the image file that you specified. This file contains a snapshot of a large number of objects, including a vast amount of pre-existing code and programming tools (all of which are objects). As you work with Pharo, you will send messages to these objects, you will create new objects, and some of these objects will die and their memory will be reclaimed (garbage-collected).
When you quit Pharo, you will normally save a snapshot that contains all of your objects. If you save normally, you will overwrite your old image file with the new snapshot. Alternatively, you may save the image under a new name.
As mentioned earlier, in addition to the.imagefile, there is also a.changes
file. This file contains a log of all the changes to the source code that you have made using the standard tools. Most of the time you do not need to worry about this file at all. As we shall see, however, the.changesfile can be very useful for recovering from errors, or replaying lost changes. More about this later!
It may seem like the image is the key mechanism for storing and managing software projects, but that is not the case. As we shall see soon, there are much better tools for managing code and sharing software developed by teams. Images are very useful, but you should learn to be very cavalier about creating and throwing away images, since versioning tools likeMonticello of-fer much better ways to manage versions and share code amongst developers. In addition, if you need to persist objects, you can use several systems such asFuel(a fast object binary serializer),STON(a textual object serializer) or a database.
2.8
Playgrounds and Transcripts
1. Close all open windows within Pharo.
2. Open a Transcript and a Playground/workspace. (The Transcript can be opened from theWorld > Tools > ...submenu.)
3. Position and resize the transcript and playground windows so that the playground just overlaps the transcript (see Figure 2.7).
You can resize windows by dragging one of the corners. At any time only one window is active; it is in front and has its border highlighted.
About Transcript. TheTranscriptis an object that is often used for logging system messages. It is a kind ofsystem console.
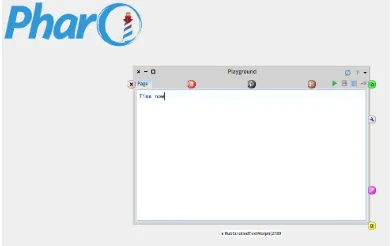
About Playground. Playgroundsare useful for typing snippets of code that you would like to experiment with. You can also use playgrounds simply for typing any text that you would like to remember, such as to-do lists or instructions for anyone who will use your image.
Type the following text into the playground:
Transcript show: 'hello world'; cr.
Try double-clicking at various points on the text you have just typed. Notice how an entire word, entire string, or all of the text is selected, depending on whether you click within a word, at the end of the string, or at the end of the entire expression. In particular, if you place the cursor before the first character or after the last character and double-click, you select the complete paragraph.
Select the text you have typed, right click and selectDo it. Notice how the text ”hello world” appears in the transcript window (See Figure 2.7). Do it again.
2.9
Keyboard shortcuts
If you want to evaluate an expression, you do not always have to right click. Instead, you can use keyboard shortcuts shown in menu items. Even though Pharo may seem like a mouse driven enviroment it contains over 200 short-cuts that allow you operate a variaty of tools, as well as the facility to assign a keyboard shortcut to any of the 80000 methods contained in the Pharo image. To have a look at the available shortcuts go to World Menu>System>Keymap Browser.
2.9 Keyboard shortcuts
Figure 2.7:Executing an expresssion: displaying a string in the Transcript.
key in Windows isCTRL, and in Linux is eitherALTorCTRL, so each time you see something likeCMD-d, just replace it with the appropriate modifier key depending on your OS.
In addition toDo it, you might have noticedDo it and go,Print it, In-spect itand several other options in the context menu. Let’s have a quick look at each of these.
Doing vs. printing
Type the expression3 + 4into the playground. NowDo itwith the keyboard shortcut.
Do not be surprised if you saw nothing happen! What you just did is send the message+with argument 4 to the number 3. Normally the resulting 7 would have been computed and returned to you, but since the playground did not know what to do with this answer, it simply did not show the answer. If you want to see the result, you shouldPrint itinstead.Print itactually compiles the expression, executes it, sends the messageprintStringto the result, and displays the resulting string.
Select3+4andPrint it(CMD-p). This time we see the result we expect.
3 + 4 >>> 7
Figure 2.8:Inspecting a simple number usingInspect
Inspect
Select or place the cursor on the line of3+4, and this timeInspect it(CMD-i).
Now you should see a new window titled ”Inspector on a SmallInteger(7)” as shown in Figure 2.8. The inspector is an extremely useful tool that allows you to browse and interact with any object in the system. The title tells us that 7 is an instance of the classSmallInteger. The top panel allows us to browse the instance variables of an object and their values. The bottom panel can be used to write expressions to send messages to the object. Typeself squaredin the bottom panel of the inspector, andPrint it.
The inspector presents specific tabs that will show different information and views on the object depending on the kind of object you are inspecting. InspectMorph new openInWorldyou should get a situation similar to the one of Figure 2.9.
Other operations
Other right-click options that may be used are the following:
• Do it and goadditionally opens anavigableinspector on the side of the playground. It allows us to navigate the object structure. Try with the previous expressionMorph new openInWorldand navigate the structure.
• Basic Inspect itopens the classic inspector that offers a more mini-mal GUI and live updates of changes to the object.
2.10 The System Browser
Figure 2.9:Inspecting a Morph usingInspect
• Profile itprofiles the code with the Pharo profile tool which shows how much time is spent for each message sent.
• Code searchoffers several options provided by System Browser, such as browsing the source code of an expression, searching for senders and implementors, and so on.
2.10
The System Browser
TheSystem Browser, also known as ”Class Browser”, is one of the key tools used for programming. As we shall see, there are several interesting browsers available for Pharo, but this is the basic one you will find in any image. The current implementation of the System Browser is called Nautilus (this is the name of the Jules Verne’s submarine).
Opening the System Browser on a given method
This is not the usual way that we open a browser on a method: we use more advanced tools! Now for the sake of this presentation, execute the following snippet:
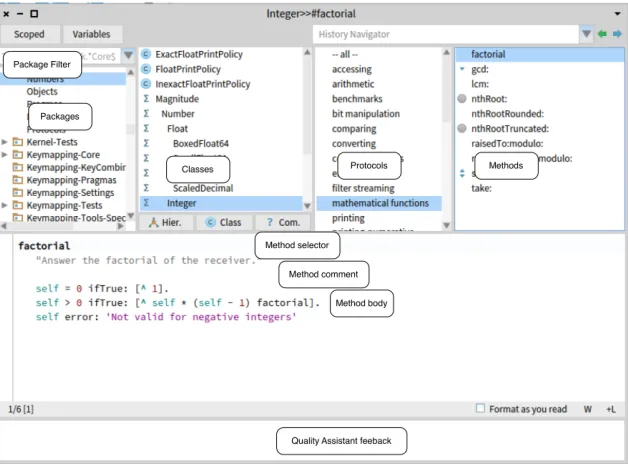
Nautilus openOnMethod: Integer>>#factorial
Figure 2.10:The System Browser showing thefactorialmethod of class
Inte-ger
In Pharo, the default System Browser is Nautilus. However, it is possible to have other System Browsers installed in the Pharo enviroment such as AltBrowser. Each System Browser may have its own GUI that may be very different from the Nautilus GUI. From now on, we will use the termsBrowser,
System Browserand (occasionally)Nautilusinterchangeably.
Navigating using the System Browser
Pharo hasSpotter(see below) to navigate the system. Now we just want to show you the working flow of the System Browser. Usually withSpotterwe go directly to the class or the method.
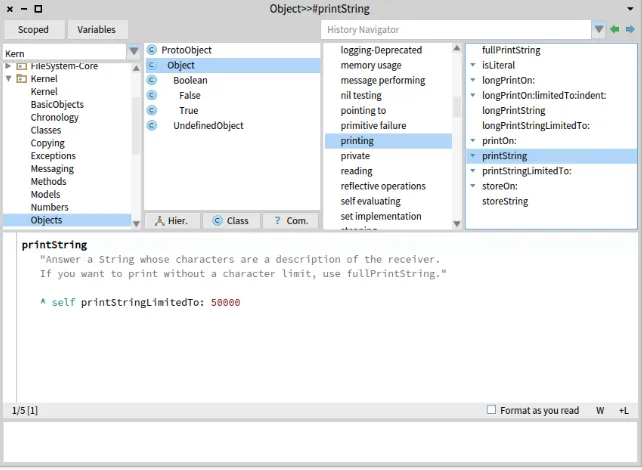
Let us look how to find theprintStringmethod defined in classObject. At the end of the navigation, we will get the situation depicted in 2.11.
Open the Browser by selectingWorld > System Browser. When a new Sys-tem Browser window first opens, all panes but the leftmost are empty. This first pane lists all known packages, which contain groups of related classes.
2.10 The System Browser
Figure 2.11:The System Browser showing theprintStringmethod of class
Object
example.
Expand theKernelpackage and select theObjectselement. When we select a package, it causes the second pane to show a list of all of the classes in the selected package. You should see the hierarchy ofProtoObject
Select theObjectclass. When a class is selected, the remaining two panes will be populated. The third pane displays the protocols of the currently selected class. These are convenient groupings of related methods. If no protocol is selected you should see all methods in the fourth pane.
Select theprintingprotocol. You may have to scroll down to find it. You can also click on the third pane and typepr, to typeahead-find theprinting
protocol. Now select it, and you will see in the fourth pane only methods related to printing.
Select theprintStringmethod. Now we see in the bottom pane the source code of theprintStringmethod, shared by all objects in the system (except those that override it).
2.11
Finding classes
There are several ways to find a class in Pharo. The first, as we have just seen above, is to know (or guess) what package it is in, and to navigate to it using the browser.
A second way is to send thebrowsemessage to the class, asking it to open a browser on itself. Suppose we want to browse the classPoint.
Using the message
browse
TypePoint browseinto a playground andDo it. A browser will open on the
Pointclass.
Using
CMD-b
to browseThere is also a keyboard shortcutCMD-b(browse) that you can use in any text pane; select the word and pressCMD-b. Use this keyboard shortcut to browse the classPoint.
Notice that when thePointclass is selected but no protocol or method is selected, instead of the source code of a method, we see a class definition. This is nothing more than an ordinary message that is sent to the parent class, asking it to create a subclass. Here we see that the classObjectis being asked to create a subclass namedPointwith two instance variables, class variables, and to put the classPointin theKernel-BasicObjectspackage. If you click on theCommentsbutton at the bottom of the class pane, you can see the class comment in a dedicated pane.
In addition the system supports the following mouse shortcuts
• CMD-Clickon a word: open the definition of a class when the word is a class name. You get also the implementors of the message when you click on a selector that is in the body of a method.
• CMD-Shift-Clickon a word: open a list browser with all the refs of the class when the word is a class name. You get also the senders of the message when you click on a selector that is in the body of a method.
Using Spotter
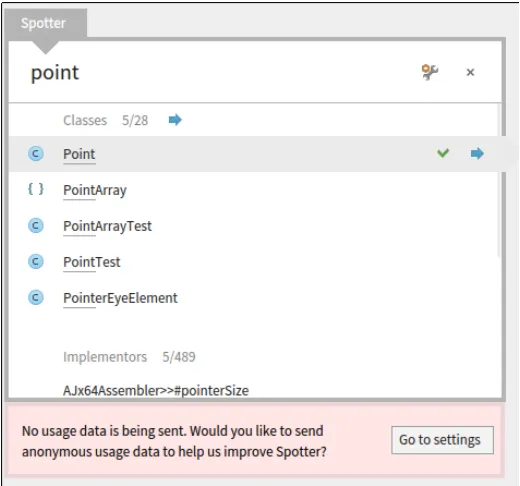
The fastest (and probably the coolest) way to find a class is to useSpotter. PressingShift+EnteropensSpotter, a very powerful tool for finding classes, methods, and many other related actions. Figure 2.12 shows that we look for
Point.
2.11 Finding classes
Figure 2.12:Opening Spotter
followed by the word you look for, indicates that you are interested in classes. This is the default so you do not need to type#class.
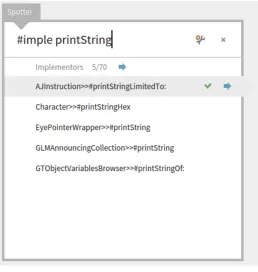
Figure 2.13 shows how we can askSpotterto show all the implementors of a given messages. We do not have to type the full category name. Other Cat-egories are menu, packages, method (#implementor), examples (#example), pragma (#pragma), senders (#sender), class references (#reference) but also playground code snippets (using#playground).You can just type the begin-ning of the category to identify it i.e.,#ref Pointwill give all the reference to the classPoint.
Spottercan be used even to browse through the OS file system, and has a history category where previous searches are stored for quickly going back to popular searches.
Navigating results
In addition we can useSpotterto navigate to our search results similarly to how we use System Browser. Spotter categorizes its search results: for example, classes are under Classes category, methods under the Implementors category, help topics under Help Topics category, etc.
Figure 2.13:Looking for implementors matchingprintString
that we can click to go back to where we were. Depending on what we click on, we step into our selection and are exposed to more categories.
For example, if our selection is thePointclass, we will dive inside a group of categories made for instance methods, class methods, super instance methods etc.
The interface is fully controllable through the keyboard. The user can move withUp/Downarrows between items orCmd-Shift-Up/Cmd-Shift-Down ar-rows (note that on Windows and LinuxCmdkey is theAltkey) through cate-gories. At the same time, the search field has the focus, so the user can switch seamlessly between selecting items and refining the search. PressingEnteron a selection opens the System Browser on that specific selected search result.
Using ’Find class’ in System Browser
In the SystemBrowser you can also search for a class via its name. For exam-ple, suppose that you are looking for some unknown class that represents dates and times.
2.12 Finding methods
and launch the Class Search window by typingCMD-f CMD-c, or selectingFind class (f,c)from the right-click context menu. Typetimein the dialog box and clickOK(or pressEnter).
A list of classes is displayed, whose names contain the substringtime. Choose one (say,Time), and the browser will show it, along with a class comment that suggests other classes that might be useful. If you want to browse one of the others, select its name (in any text pane), and typeCMD-b.
Note that if you type the complete (and correctly capitalized) name of a class in the find dialog, the browser will go directly to that class without showing you the list of options.
Using the Finder
You can also open theFinderthat is available from theWorld > Tools...
menu, and type part of the name of the class and change the Selectors to Classes in the right combo box. It is less efficient than usingSpotteror the SystemBrowser as explained above. The Finder is more useful for other types of code searches such as find methods based on examples, as we will show later.
2.12
Finding methods
Sometimes you can guess the name of a method, or at least part of the name of a method, more easily than the name of a class. For example, if you are interested in the current time, you might expect that there would be a method called ”now”, or containing ”now” as a substring. But where might it be?
SpotterandFindercan help you.
Spotter
WithSpotteryou can also find methods. Either by getting a class and navigat-ing or usnavigat-ing category such as:
• #implementor a method namewill display all the methods that are implemented and have the same name. For example you will get all the
do:methods.
• #selector a method namewill display all the selectors that matches this name
With Finder
Figure 2.14:The Finder showing all classes defining a method namednow.
The Finder will display a list of all the method names that contain the sub-string ”now”. To scroll tonowitself, move the cursor to the list and type ”n”; this type-ahead trick works in all scrolling windows. Expanding the ”now” item shows you the classes that implement a method with this name. Selecting any one of them will display the source code for the implementation in the code pane on the bottom.
Finding methods using examples
At other times, you may have a good idea that a method exists, but will have no idea what it might be called. The Finder can still help! For example, sup-pose that you would like to find a method that turns a string into upper case (for example, transforming'eureka'into'EUREKA'). We can give the inputs and expected output of a method and the Finder will try to find it for you.
TheFinderhas a really powerful functionality: you can give the receiver, arguments and expected result and the finder tries to find the corresponding message.
Trying Finder
2.13 Defining a new method
Type'eureka' . 'EUREKA'into the search box and press theEnterkey.
TheFinderwill then suggest a method that does what you were looking for, as well as display a list of classes that implement methods with the same name. In this case, it determined that theasUppercasemethod is the one that performed the operation that fit your example.
Click on the'eureka' asUppercase --> 'EUREKA'expression, to show the list of classes that implement that method.
An asterisk at the beginning of a line in the list of classes indicates that this method is the one that was actually used to obtain the requested result. So, the asterisk in front ofStringlets us know that the methodasUppercase
defined in the classStringwas executed and returned the result we wanted. The classes that do not have an asterisk are just other implementors of asUp-percase, which share the method name but werenotused to return the wanted result. So the methodCharacter>>asUppercasewas not executed in our example, because'eureka'is not aCharacterinstance (but is instead a
String).
You can also use the Finder to search for methods by arguments and results. For example, if you are looking for a method that will find the greatest com-mon factor of two integers, you might try25 . 35 . 5as an example. You can also give the method finder multiple examples to narrow the search space; the help text in the bottom pane explains how.
2.13
Defining a new method
The advent of Test Driven Development (TDD) has changed the way we write code. The idea behind TDD is that we write a test that defines the desired behaviour of our code before we write the code itself. Only then do we write the code that satisfies the test.
Suppose that our assignment is to write a method that ”says something loudly and with emphasis”. What exactly could that mean? What would be a good name for such a method? How can we make sure that programmers who may have to maintain our method in the future have an unambiguous descrip-tion of what it should do? We can answer all of these quesdescrip-tions by giving an example.
Our goal is to define a new method namedshoutin the classString. The idea is that this message should turn a string into its uppercase version as shown in the example below:
'No panic' shout >>> 'NO PANIC!'
Figure 2.15:Defining a test method in the classStringTest.
Defining a new test method
How do we create a new method in Pharo? First, we have to decide which class the method should belong to. In this case, theshoutmethod that we are testing will go in classString, so the corresponding test will, by convention, go in a class calledStringTest.
First, open a browser on the classStringTest, and select an appropriate protocol for our method, in this case'tests - converting'. The highlighted text in the bottom pane is a template that reminds you what a Pharo method looks like. Delete this template code (remember, you can either click on the beginning or the end of the text, or pressCMD-a, to ”Select All”), and start typing your method. We can turn our ”No Panic” code example into the test method itself:
testShout
self assert: ('No panic' shout = 'NO PANIC!')
Once you have typed the text into the browser, notice that the corner is or-ange. This is a reminder that the pane contains unsaved changes. So, select
Accept (s)by right clicking in the bottom pane, or just typeCMD-s, to com-pile and save your method. You should see a situation similar to the one depicted in Figure 2.15.
If this is the first time you have accepted any code in your image, you will likely be prompted to enter your name. Since many people have contributed code to the image, it is important to keep track of everyone who creates or modifies methods. Simply enter your first and last names, without any spaces.
mes-2.13 Defining a new method
Figure 2.16:Looking at the error in the debugger.
sageshoutis sent but not implemented. This can be quite useful if you have merely made a typing mistake, but in this case, we really do meanshout, since that is the method we are about to create. We confirm this by selecting the first option from the menu of choices.
Running your test method
Run your newly created test: open theTest Runnerfrom the World Menu (or press on the circle icon in front of the method name this is faster and cooler).
In theTest Runnerthe leftmost two panes are a bit like the top panes in the System Browser. The left pane contains a list of packages, but it’s restricted to those packages that contain test classes.
SelectCollectionsTests-Stringspackage, and the pane to the right will show all of the test classes in it, which includes the classStringTest. Class names are already selected, so clickRun Selectedto run all these tests.
Figure 2.17:Pressing the Create button in the debugger prompts you to select in which class to create the new method.
Figure 2.18:The automatically createdshoutmethod waiting for a real definition.
The window that opens with the error message is the Pharo debugger. We will look at the debugger and how to use it in Chapter: The Pharo Environment.
Implementing the tested method
The error is, of course, exactly what we expected: running the test generates an error because we haven’t yet written a method that tells strings how to shout. Nevertheless, it’s good practice to make sure that the test fails because this confirms that we have set up the testing machinery correctly and that the new test is actually being run. Once you have seen the error, you canAbandon
the running test, which will close the debugger window.
Coding in the debugger
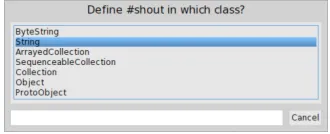
Instead of pressingAbandon, you can define the missing method using the
2.14 Chapter summary
which to define the new method (see Figure 2.17), then prompt you to select a protocol for that method, and finally take you to a code editor window in the debugger, in which you can edit the code for this new method. Note that since the system cannot implement the method for you, it creates a generic method that is tagged as to be implemented (see Figure 2.18).
Now let’s define the method that will make the test succeed! Right inside the debugger edit theshoutmethod with this definition:
shout
^ self asUppercase,'!'
The comma is the string concatenation operation, so the body of this method appends an exclamation mark to an upper-case version of whatever String object the shout message was sent to. The^tells Pharo that the expression that follows is the answer to be returned from the method, in this case the new concatenated string.
When you’ve finished implementing the method, do not forget to compile it usingCMD-sand you can pressProceedand continue with the tests. Note that
Proceedsimply continues on running the test suite, and does not re-run the failed method.
Does this method work? Let’s run the tests and see. Click onRun Selected
again in the Test Runner, and this time you should see a green bar and text indicating that all of the tests ran with no failures and no errors. When you get to a green bar, it’s a good idea to save your work by saving the image (World Menu > Save), and take a break. So, do that right now!
2.14
Chapter summary
This chapter has introduced you to the Pharo environment and shown you how to use some of the major tools, such as the System Browser, Spotter, the Finder, the Debugger, and the Test Runner. You have also seen a little of Pharo’s syntax, even though you may not understand it all yet.
• A running Pharo system consists of avirtual machine, a.sourcesfile, and.imageand.changesfiles. Only these last two change, as they record a snapshot of the running system.
• When you open a Pharo image, you will find yourself in exactly the same state (i.e., with exactly the same running objects) that you had when you last saved that image.
• You can click on the Pharo background to bring up theWorld Menuand launch various tools.
• You can use keyboard shortcuts on text in the playground, or any other tool, to evaluate code. The most important of these areDo it(CMD-d),
Print it(CMD-p),Inspect it(CMD-i), andBrowse it(CMD-b).
• TheSystem Browseris the main tool for browsing Pharo code and for developing new code.
• TheTest runneris a tool for running unit tests, and aids in Test Driven Development.
C H A P T E R
3
A first application
In this chapter, we will develop a simple game: LightsOut (http://en.wikipedia. org/wiki/Lights_Out_(game)). Along the way we will show most of the tools that Pharo programmers use to construct and debug their programs, and show how programs are shared with other developers. We will see the browser, the object inspector, the debugger and the Monticello package browser.
[image:39.450.177.274.437.536.2]In Pharo you can develop in a traditional way, by defining a class, then its in-stance variables, then its methods. However, in Pharo your development flow can be much more productive than that! You can define instance variables and methods on the fly. You can also code in the debugger using the exact context of currently executed objects. This chapter will sketch such alternate way and show you how you can be really productive.
Figure 3.2:Create a Package and class template
3.1
The Lights Out game
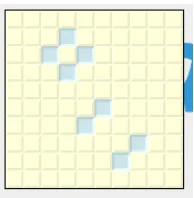
To show you how to use Pharo’s programming tools, we will build a simple game calledLights Out. The game board consists of a rectangular array of light yellow cells. When you click on one of the cells, the four surrounding cells turn blue. Click again, and they toggle back to light yellow. The object of the game is to turn blue as many cells as possible.
Lights Outis made up of two kinds of objects: the game board itself, and 100 individual cell objects. The Pharo code to implement the game will contain two classes: one for the game and one for the cells. We will now show you how to define these classes using the Pharo programming tools.
3.2
Creating a new Package
We have already seen the browser in Chapter : A Quick Tour of Pharo where we learned how to navigate to packages, classes and methods, and saw how to define new methods. Now we will see how to create packages and classes.
From theWorldmenu, open aSystem Browser. Right-click on an existing package in the Package pane and selectAdd package...from the menu. Type the name of the new package (we usePBE-LightsOut) in the dialog box and clickOK(or just press the return key). The new package is created, and positioned alphabetically in the list of packages (see Figure 3.2).
3.3 Defining the classLOCell
Figure 3.3:Filtering our package to work more efficiently
3.3
Defining the class
LOCell
At this point there are, of course, no classes in the new package. However, the main editing pane displays a template to make it easy to create a new class (see Figure 3.3).
This template shows us a Pharo expression that sends a message to a class calledObject, asking it to create a subclass calledNameOfSubClass. The new class has no variables, and should belong to the category (package) PBE-LightsOut.
Creating a new class
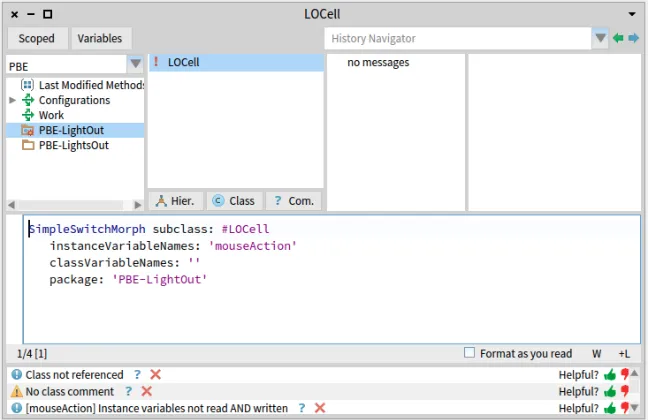
We simply edit the template to create the class that we really want. Modify the class creation template as follows:
• ReplaceObjectwithSimpleSwitchMorph.
• ReplaceNameOfSubClasswithLOCell.
• AddmouseActionto the list of instance variables.
You should get the following class definition:
SimpleSwitchMorph subclass: #LOCell instanceVariableNames: 'mouseAction' classVariableNames: ''
package: 'PBE-LightsOut'
Figure 3.4:The newly-created class LOCell
we will use to define what action the cell should take if the mouse should click on it.
At this point you still have not created anything. Note that the top right of the panel changed to orange. This means that there are unsaved changes. To actually send this subclass message, you must save (accept) the source code. Either right-click and selectAccept, or use the shortcutCMD-s(for ”Save”). The message will be sent toSimpleSwitchMorph, which will cause the new class to be compiled. You should get the situation depicted in Figure 3.4.
Once the class definition is accepted, the class is created and appears in the class pane of the browser (see Figure 3.4). The editing pane now shows the class definition. Below you get the Quality Assistant’s feedback: It runs auto-matically quality rules on your code and reports them.
About comments
Pharoers put a very high value on the readability of their code, but also good quality comments.
3.4 Adding methods to a class
context, or the rationale behind its implementation. When reading a com-ment, the reader should be comforted that his hypotheses are correct.
Class comments. For the class comment, the Pharo class comment template gives a good idea of a strong class comment. Read it! It is based on CRC for Class Responsibility Collaborators. So in a nutshell the comments state the responsibility of the class in a couple of sentences and how it collaborates with other classes to achieve this responsibilities. In addition we can state the API (main messages an object understands), give an example (usually in Pharo we define examples as class methods), and some details about internal representation or implementation rationale.
Select the comment button and define a class comment following this tem-plate
On categories vs. packages
Historically, Pharo packages were implemented as ”categories” (a group of classes). With the newer versions of Pharo, the termcategoryis being deprecated, and replaced exclusively bypackage.
If you use an older version of Pharo or an old tutorial, the class template will be as follow:
SimpleSwitchMorph subclass: #LOCell instanceVariableNames: 'mouseAction' classVariableNames: ''
category: 'PBE-LightsOut'
It is equivalent to the one we mentioned earlier. In this book we only use the termpackage. The Pharo package is also what you will be using to version your source code using the Monticello versioning tool.
3.4
Adding methods to a class
Now let’s add some methods to our class. Select the protocol'no messages'
in the protocol pane. You will see a template for method creation in the editing pane. Select the template text, and replace it by the following (Do not forget to compile it):
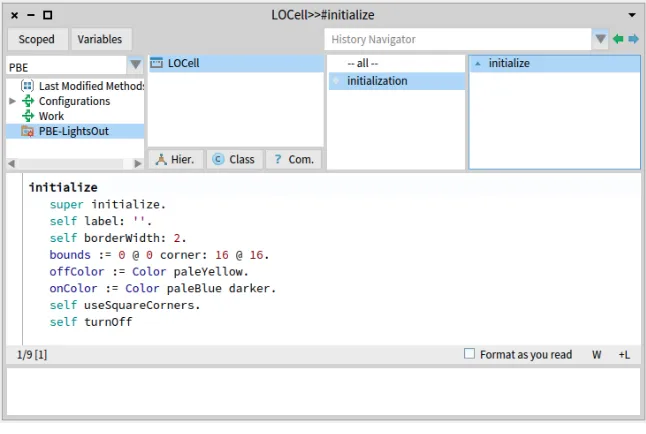
initialize
super initialize. self label: ''. self borderWidth: 2.
Figure 3.5:The newly-created methodinitialize
self turnOff
Note that the characters''on line 3 are two separate single quotes with nothing between them, not a double quote!''denotes the empty string. Another way to create an empty string isString new.Do not forget toaccept
this method definition.
Initialize methods. Notice that the method is calledinitialize. The name is very significant! By convention, if a class defines a method named initial-ize, it is called right after the object is created. So, when we executeLOCell new, the messageinitializeis sent automatically to this newly created ob-ject.initializemethods are used to set up the state of objects, typically to set their instance variables; this is exactly what we are doing here.
Invoking superclass initialization. The first thing that this method does (line 2) is to execute theinitializemethod of its superclass,SimpleSwitchMorph. The idea here is that any inherited state will be properly initialized by the
3.5 Inspecting an object
The rest of the method sets up the state of this object. Sendingself label: '', for example, sets the label of this object to the empty string.
About point and rectangle creation. The expression0@0 corner: 16@16
probably needs some explanation.0@0represents aPointobject withxand
ycoordinates both set to 0. In fact,0@0sends the message@to the number 0 with argument 0. The effect will be that the number 0 will ask thePoint
class to create a new instance with coordinates(0,0). Now we send this newly created point the messagecorner: 16@16, which causes it to create a
Rectanglewith corners0@0and16@16. This newly created rectangle will be assigned to theboundsvariable, inherited from the superclass.
Note that the origin of the Pharo screen is the top left, and theycoordinate increases downwards.
About the rest. The rest of the method should be self-explanatory. Part of the art of writing good Pharo code is to pick good method names so that the code can be read like a kind of pidgin English. You should be able to imagine the object talking to itself and saying ”Self, use square corners!”, ”Self, turn off!”.
Notice that there is a little green arrow next to your method (see Figure 3.5). This means the method exists in the superclass and is overridden in your class.
3.5
Inspecting an object
You can immediately test the effect of the code you have written by creating a newLOCellobject and inspecting it: Open aPlayground, type the expression
LOCell new, andInspectit (using the menu item with the same name).
The left-hand column of the inspector shows a list of instance variables and the value of the instance variable is shown in the right column (see Figure 3.6).
If you click on an instance variable the inspector will open a new pane with the detail of the instance variable (see Figure 3.7).
Executing expressions. The bottom pane of the inspector is a mini-playground. It’s useful because in this playground the pseudo-variableselfis bound to the object selected.
Go to that Playground at the bottom of the pane and type the textself bounds: (200@200 corner: 250@250)Do it. To refresh the values, click on theupdatebutton (the blue little circle) at the top right of the pane. The
3.6 Defining the classLOGame
Figure 3.8:An LOCell open in world
The cell should appear near the top left-hand corner of the screen (as shown in Figure 3.8) and exactly where its bounds say that it should appear. Meta-click on the cell to bring up the Morphic halo. Move the cell with the brown (next to top-right) handle and resize it with the yellow (bottom-right) handle. Notice how the bounds reported by the inspector also change. (You may have to click refresh to see the new bounds value.) Delete the cell by clicking on the
xin the pink handle.
3.6
Defining the class
LOGame
Now let’s create the other class that we need for the game, which we will name
LOGame.
Class creation
Make the class definition template visible in the browser main window. Do this by clicking on the package name (or right-clicking on the Class pane and selectingAdd Class). Edit the code so that it reads as follows, andAcceptit.
Figure 3.9:Declaringcellsas a new instance variable
Here we subclassBorderedMorph.Morphis the superclass of all of the graph-ical shapes in Pharo, and (unsurprisingly) aBorderedMorphis aMorphwith a border. We could also insert the names of the instance variables between the quotes on the second line, but for now, let’s just leave that list empty.
Initializing our game
Now let’s define aninitializemethod forLOGame. Type the following into the browser as a method forLOGameand try toAcceptit.
initialize
| sampleCell width height n | super initialize.
n := self cellsPerSide. sampleCell := LOCell new. width := sampleCell width. height := sampleCell height.
self bounds: (5 @ 5 extent: (width * n) @ (height * n) + (2 * self borderWidth)).
cells := Matrix new: n tabulate: [ :i :j | self newCellAt: i at: j ]
Pharo will complain that it doesn’t know the meaning ofcells(see Figure 3.9). It will offer you a number of ways to fix this.
ChooseDeclare new instance variable, because we wantcellsto be an in-stance variable.
Taking advantage of the debugger
At this stage if you open aPlayground, typeLOGame new, andDo it, Pharo will complain that it doesn’t know the meaning of some of the terms (see Figure 3.10). It will tell you that it doesn’t know of a messagecellsPerSide, and will open a debugger. ButcellsPerSideis not a mistake; it is just a method that we haven’t yet defined. We will do so, shortly.
3.6 Defining the classLOGame
Figure 3.10:Pharo detecting an unknown selector
a method protocol enteraccessing. The debugger will create the method
cellsPerSideon the fly and invoke it immediately. As there is no magic, the created method will simply raise an exception and the debugger will stop again (as shown in Figure 3.11) giving you the opportunity to define the behavior of the method.
Here you can write your method. This method could hardly be simpler: it answers the constant 10. One advantage of representing constants as methods is that if the program evolves so that the constant then depends on some other features, the method can be changed to calculate this value.
cellsPerSide
"The number of cells along each side of the game" ^ 10
Define the methodcellsPerSidein the debugger. Do not forget to com-pile the method definition by usingAccept. You should obtain a situation as shown by Figure 3.12. If you press the buttonProceedthe program will continue its execution - here it will stop since we did not define the method
Figure 3.11:The system created a new method with a body to be defined.
Studying the initialize method
Let us now study the methodinitialize.
1 initialize
2 | sampleCell width height n | 3 super initialize.
4 n := self cellsPerSide. 5 sampleCell := LOCell new. 6 width := sampleCell width. 7 height := sampleCell height.
8 self bounds: (5 @ 5 extent: (width * n) @ (height * n) + (2 * self borderWidth)).
9 cells := Matrix new: n tabulate: [ :i :j | self newCellAt: i at: j ]
• At line 2, the expression| sampleCell width height n |declares 4 temporary variables. They are called temporary variables because their scope and lifetime are limited to this method. Temporary variables with explanatory names are helpful in making code more readable. Lines 4-7 set the value of these variables.
3.6 Defining the classLOGame
Figure 3.12:DefiningcellsPerSidein the debugger
number of cells, and big enough to draw a border around them. How many cells is the right number? 5? 10? 100? We don’t know yet, and if we did, we would probably change our minds later. So we delegate the responsibility for knowing that number to another method, which we namecellsPerSide, and which we will write in a minute or two. Don’t be put off by this: it is actually good practice to code by referring to other methods that we haven’t yet defined. Why? Well, it wasn’t until we started writing theinitializemethod that we realized that we needed it. And at that point, we can give it a meaningful name, and move on, without interrupting our flow.
• The fourth line uses this method,n := self cellsPerSide.sends the messagecellsPerSidetoself, i.e., to this very object. The response, which will be the number of cells per side of the game board, is assigned ton.
• The next three lines create a newLOCellobject, and assign its width and height to the appropriate temporary variables.
creates a square with its origin (i.e., its top-left corner) at the point (5,5) and its bottom-right corner far enough away to allow space for the right number of cells.
• The last line sets theLOGameobject’s instance variablecellsto a newly createdMatrixwith the right number of rows and columns. We do this by sending the messagenew: tabulate:to theMatrixclass (classes are objects too, so we can send them messages). We know thatnew: tab-ulate:takes two arguments because it has two colons (:) in its name. The arguments go right after the colons. If you are used to languages that put all of the arguments together inside parentheses, this may seem weird at first. Don’t panic, it’s only syntax! It turns out to be a very good syntax because the name of the method can be used to explain the roles of the arguments. For example, it is pretty clear thatMatrix rows: 5 columns: 2has 5 rows and 2 columns, and not 2 rows and 5 columns.
• Matrix new: n tabulate: [ :i :j | self newCellAt: i at: j ]
creates a new n X n matrix and initializes its elements. The initial value of each element will depend on its coordinates. The (i,j)thelement will
be initialized to the result of evaluatingself newCellAt: i at: j.
3.7
Organizing methods into protocols
Before we define any more methods, let’s take a quick look at the third pane at the top of the browser. In the same way that the first pane of the browser lets us categorize classes into packages, the protocol pane lets us categorize methods so that we are not overwhelmed by a very long list of method names in the method pane. These groups of methods are called ”protocols”.
The browser also offers us the--all--virtual protocol, which, you will not be surprised to learn, contains all of the methods in the class.
If you have followed along with this example, the protocol pane may well contain the protocolas yet unclassified. Right-click in the protocol pane and selectcategorize all uncateg