SumoBot
®– Mini-Sumo Robotics
Assembly Documentation and Programming
WARRANTY
Parallax Inc. warrants its products against defects in materials and workmanship for a period of 90 days from receipt of product. If you discover a defect, Parallax Inc. will, at its option, repair or replace the merchandise, or refund the purchase price. Before returning the product to Parallax, call for a Return Merchandise Authorization (RMA) number. Write the RMA number on the outside of the box used to return the merchandise to Parallax. Please enclose the following along with the returned merchandise: your name, telephone number, shipping address, and a description of the problem. Parallax will return your product or its replacement using the same shipping method used to ship the product to Parallax.
14-DAY MONEY BACK GUARANTEE
If, within 14 days of having received your product, you find that it does not suit your needs, you may return it for a full refund. Parallax Inc. will refund the purchase price of the product, excluding shipping/handling costs. This guarantee is void if the product has been altered or damaged. See the Warranty section above for instructions on returning a product to Parallax.
COPYRIGHTS AND TRADEMARKS
This documentation is copyright 2002-2005 by Parallax Inc. By downloading or obtaining a printed copy of this documentation or software you agree that it is to be used exclusively with Parallax products. Any other uses are not permitted and may represent a violation of Parallax copyrights, legally punishable according to Federal copyright or intellectual property laws. Any duplication of this documentation for commercial uses is expressly prohibited by Parallax Inc.
BASIC Stamp, Stamps in Class, Boe-Bot, SumoBot, SX-Key and Toddler are registered trademarks of Parallax, Inc. If you decide to use registered trademarks of Parallax Inc. on your web page or in printed material, you must state that "(registered trademark) is a registered trademark of Parallax Inc.” upon the first appearance of the trademark name in each printed document or web page. HomeWork Board, Parallax, the Parallax logo, are trademarks of Parallax Inc. If you decide to use trademarks of Parallax Inc. on your web page or in printed material, you must state that "(trademark) is a trademark of Parallax Inc.”, “upon the first appearance of the trademark name in each printed document or web page. Other brand and product names are trademarks or registered trademarks of their respective holders.
ISBN 1-928982-26-3
DISCLAIMER OF LIABILITY
Parallax Inc. is not responsible for special, incidental, or consequential damages resulting from any breach of warranty, or under any legal theory, including lost profits, downtime, goodwill, damage to or replacement of equipment or property, or any costs of recovering, reprogramming, or reproducing any data stored in or used with Parallax products. Parallax Inc. is also not responsible for any personal damage, including that to life and health, resulting from use of any of our products. You take full responsibility for your BASIC Stamp application, no matter how life-threatening it may be.
Preface · Page iii
INTERNET DISCUSSION LISTS
We maintain active web-based discussion forums for people interested in Parallax products. These lists are accessible from www.parallax.com via the Support → Discussion Forums menu. These are the forums that we operate from our web site:
• BASIC Stamps – This list is widely utilized by engineers, hobbyists and students who share their BASIC Stamp projects and ask questions.
• Stamps in Class® – Created for educators and students, subscribers discuss the use of the Stamps in
Class educational program in their courses. The list provides an opportunity for both students and educators to ask questions and get answers.
• Parallax Educators –Exclusively for educators and those who contribute to the development of Stamps in Class. Parallax created this group to obtain feedback on our curricula and to provide a forum for educators to develop and obtain Teacher’s Guides.
• Translators – The purpose of this list is to provide a conduit between Parallax and those who translate our documentation to languages other than English. Parallax provides editable Word documents to our translating partners and attempts to time the translations to coordinate with our publications.
• Robotics – Designed exclusively for Parallax robots, this forum is intended to be an open dialogue for a robotics enthusiasts. Topics include assembly, source code, expansion, and manual updates. The Boe-Bot®, Toddler®, SumoBot®, HexCrawler and QuadCrawler robots are discussed here.
• SX Microcontrollers and SX-Key – Discussion of programming the SX microcontroller with Parallax assembly language SX-Key® tools and 3rd party BASIC and C compilers.
Javelin Stamp – Discussion of application and design using the Javelin Stamp, a Parallax module that is programmed using a subset of Sun Microsystems’ Java® programming language.
ERRATA
While great effort is made to assure the accuracy of our texts, errors may still exist. If you find an error, please let us know by sending an email to [email protected]. We continually strive to improve all of our educational materials and documentation, and frequently revise our texts. Occasionally, an errata sheet with a list of known errors and corrections for a given text will be posted to our web site, www.parallax.com. Please check the individual product page’s free downloads for an errata file.
Table of Contents · Page v
Table of Contents
Preface ...vii
Recognitions ...vii
Audience...viii
Educational Concepts from the SumoBot ...viii
Copyright and Reproduction ...ix
Chapter 1: Assemble the SumoBot ... 1
Let’s Build the SumoBot ... 2
Tools Required ... 2
About the Parts in the SumoBot Kit ... 2
Chapter 2: SumoBot Locomotion... 11
How a Servo Works ... 11
Time Measurement and Voltage Levels ... 11
SumoBot Motion Test ... 16
Challenge Yourself ... 21
Chapter 3: SumoBot Sensors and Border Detection... 23
Line Sensor Theory ... 23
Our First Operational Sumo Program ... 29
Challenge Yourself ... 34
Chapter 4: Infrared Object Detection ... 35
Infrared Headlights ... 35
The FREQOUT Trick ... 36
Installing and Testing the IR Emitters/Detectors... 37
Testing the IR Pairs ... 39
SumoBot Motion Control... 41
Chapter 5: Basic Competition Code... 45
Final Competition Notes ... 52
Page vi · SumoBot – Mini Sumo Robotics
Appendix B: Standard Mini-Sumo Competition Rules ... 55 Appendix C: Mini-Sumo Ring ... 65 Appendix D: SumoBot PCB Schematic ... 67
Preface · Page vii
PREFACE
Like its human counterpart, robot Sumo was born and thrives in Japan. It was introduced to the United States in the early 1990's by Dr. Mato Hattori. One of the early American adopters of robot Sumo was noted Seattle Robotics Society member, Bill Harrison, who organized some of the first U.S. robot Sumo tournaments.
While things started out very slowly, robot Sumo eventually caught on. Bill created a "lightweight" class that matched the Japanese physical dimensions of 20 cm by 20 cm, but reduced the mass from three kilograms (6.6 pounds) to one kilogram (2.2 pounds). The intention was to reduce the sophistication of the components required to construct a working Sumo robot. Those early contests didn't have much in the way of corporate support with prizes, so Bill resorted to offering 30 hours of his own machine-shop services to the winner.
As luck would have it, Bill's friend Robert Jorgensen won that first contest prize. Since Robert already had a winning Sumo robot, he suggested that they build a smaller version, about half the size and weight of the lightweight class to be used as a robot Sumo demonstrator. The result of their work was a very small Sumo robot that measured just 8 cm by 8 cm and mass about 240 grams. Bill took that first small Sumo to a contest in San Francisco and actually won the lightweight competition – against bigger and heavier robots. The Mini-Sumo robot class was born.
The Mini-Sumo dimensions (10 cm x 10 cm) and mass (500 grams) were formalized and Bill published adapted Japanese robot Sumo rules on his Sine Robotics web site (mirrored on many other sites, and reprinted with permission in this document). Through Bill's tireless efforts and nearly ten years of travel – often toting more than 20 robots in his bags – Mini-Sumo robotics has grown to a favorite activity among robot clubs all across the United States.
RECOGNITIONS
Many Mini-Sumo designs – especially the dual-wheel-and-scoop concept – can be traced back to Bill Harrison's early efforts to promote Mini-Sumo robotics competition. Parallax also recognizes Bill Boyer of the Dallas Personal Robotics Group for his version of the dual-wheel-and-scoop design that was refined and developed into the Parallax SumoBot robot described in this text.
Page viii · SumoBot – Mini Sumo Robotics
This text was authored by Jon Williams of Parallax, and contains additional material by several contributors, including Andy Lindsay and Ken Gracey of Parallax, as well as Bill Wong of Pennsylvania. Bill is an editor with Electronic Design magazine and a serious BASIC Stamp® robotics enthusiast. Bill enjoys creating BASIC Stamp powered robots
with his daughter, who has gone on to win several county and state awards with her maze solving robotics projects.
AUDIENCE
SumoBot was written for ages 12+ as a complimentary text to Parallax’s Robotics with the Boe-Bot and Advanced Robotics with the Toddler student guides. Like all Parallax texts, this series of experiments teaches new techniques and circuits with minimal overlap between the other publications. The general topics introduced in this series are: basic SumoBot locomotion under program control, edge avoidance, and opponent detection based on a variety of sensor inputs, as well as navigation opponent hunting using programmed artificial intelligence. Each topic is addressed in an introductory format designed to impart a conceptual understanding along with some hands-on experience. Those who intend to delve further into industrial technology, electronics or robotics are likely to benefit significantly from initial experiences with these topics.
If your experience with the SumoBot® robot differs from our expectations, please let us
know at [email protected].
EDUCATIONAL CONCEPTS FROM THE SUMOBOT
Educators frequently ask us at Parallax what can be learned from our different texts and application notes. The SumoBot is considered an intermediate robotic project and generally will instruct the following concepts:
•
Interaction between mechanical and electrical systems, and the ability to tune hardware or adjust software to obtain desired results.•
Intermediate programming skills with the BASIC Stamp 2 microcontroller. An efficient SumoBot program makes use of efficient BASIC Stamp programming techniques with BRANCH and LOOKDOWN, variable aliasing, general soundprogramming practices (constant/variable definitions that allow for program customization in just a few places rather than throughout an entire program).
•
A step-wise process which starts with the basics and builds to something morePreface · Page ix
Chapter 1: Assemble the SumoBot · Page 1
Chapter 1: Assemble the SumoBot
There's an old axiom among robot enthusiasts that states, "It's harder than it looks...." Speaking from experience, we know this to be true. That said, the purpose of this statement is not to alarm or dissuade the new robot builder, but simply to remind him or her that robotics – even on a small scale – is a serious endeavor and shouldn't be taken lightly. Patience is indeed a virtue. Follow the construction steps carefully and you'll have your SumoBot running and ready to compete in about an hour or so.
The SumoBot is capable of doing any of the things other rolling robots can do. As you learn to program the SumoBot for competition, you’ll become a more proficient – and efficient – programmer and will learn to exploit the BASIC Stamp microcontroller’s capabilities. The SumoBot demonstrates the importance of a PBASIC program that uses constants and variables, as well state-oriented design. A well-designed program means you can easily tune the software for the right mechanical control in just a few places rather than rewriting your entire program.
A surface-mounted BASIC Stamp 2 microcontroller provides the intelligence for the SumoBot. The BASIC Stamp is used throughout the Stamps in Class educational series, and provides plenty of program space, speed and memory for use with a SumoBot. The SumoBot is a purpose-built rolling robot, much like its general-purpose cousin the Parallax Boe-Bot. While they share the same differential drive mechanism and the use of sensors, the SumoBot design meets the specific criteria defined by Mini-Sumo competition rules:
•
Maximum [width and depth] dimensions of 10 cm by 10 cm•
Maximum mass of 500 gramsThe standard SumoBot comes with two sets of sensors: two QTI line sensors to keep the SumoBot on the playing surface and two sets of infrared emitters/detectors used to locate its opponent. Advanced users may expand on the standard SumoBot design by adding ultrasonic or IR distance measuring, tilt sensing and motor current sensing.
Page 2 · SumoBot – Mini Sumo Robotics
LET’S BUILD THE SUMOBOT
The SumoBot chassis design leaves little room for mechanical alteration; a requirement to stay within standard Mini-Sumo competition rules. Where the student is encouraged to explore changes is in the types of sensors used to detect the Sumo ring border and the opponent and the software algorithms used to control the SumoBot robot’s behaviors. The demonstration code provided with this text will focus on the standard sensors provided in the SumoBot kit. Future supplements may be published that deal with advanced sensors and techniques for incorporating them into the SumoBot robot’s control logic.
TOOLS REQUIRED
A Parallax screwdriver is included in your kit. You may find a pair of needle-nose pliers and a wire stripper to be useful (not included).
ABOUT PARTS IN THE SUMOBOT KIT
Appendix A includes a parts listing for the SumoBot robot kit. These instructions refer to different pieces of hardware. If your SumoBot kit is missing a piece, Parallax will replace it free of charge. Replacement Parallax Continuous Rotation servos and infrared emitters and detectors are available to purchase online from the Parallax Component Shop (www.parallax.com → Component Shop). If you need other parts replaced, please contact [email protected] or call toll free in the United States: 1-800-512-1024.
If you have trouble identifying the type of part referred to in these instructions, see the color back cover of this text that shows each part with a colored picture and Parallax stock code.
Chapter 1: Assemble the SumoBot · Page 3
Step #1
Install the Battery Box
Parts Required:
•
Battery Box•
(2) 4/40 3/8" long flat-head countersunk machine screws•
(2) 4/40 nuts•
SumoBot chassisStand the SumoBot on its PCB mounting ears. Install the plastic battery pack using two 4/40 3/8” flat-head screws and nuts. The screws will be countersunk into the battery pack when tightened and should be out of the way of the batteries.
Step #2
Install the Servo Motors
Parts Required:
•
(2) Parallax Continuous Rotation Servos•
(8) 4/40 3/8" long pan-head machine screws•
(8) 4/40 nuts•
SumoBot chassisUsing four 4/40 3/8” pan-head machine screws and 4/40 nuts, attach each servo motor to the chassis. The easiest way to do this is to hold the nut with one finger while turning the screwdriver with the other hand.
Page 4 · SumoBot – Mini Sumo Robotics
Step #3
Install the Rear SumoBot PCB Stand-offs
Parts Required:
•
(2) 5/8" roundstandoffs
•
(2) 4/40 3/8" long pan-head machine screws•
SumoBot chassisUsing a 4/40 3/8" pan-head machine screw, attach each stand-off to the rear of the SumoBot chassis.
Step #4
Install the Front SumoBot PCB Stand-offs
Parts Required:
•
(2) 5/8" roundstandoffs
•
(2) 4/40 1" long pan-head machine screws•
SumoBot PCBUsing a 4/40 1" pan-head machine screw, attach each standoff to the front mounting holes of the SumoBot PCB.
Chapter 1: Assemble the SumoBot · Page 5 Step #5 Mounting the PCB Parts Required:
•
SumoBot PCB•
(2) 4/40 3/8" long pan-head machine screws•
(2) 1-1/4" round stand-offs•
(2) Nylon washers•
SumoBot chassisFeed the ends of the 1" long pan-head machine screws through the front mounting holes on the SumoBot chassis. Secure the rear side of the SumoBot PCB to the 5/8" standoffs with two 3/8" pan-head machine screws. Holding the chassis upside-down, place a nylon washer onto the end of each 1" long pan-head machine screw, then secure by threading on the 1-1/4" round standoff.
Step #6
Prepare the Wheels
Parts Required:
•
(2) SumoBot wheels•
(2) SumoBot rubbertires
Stretch a "tire" of each wheel and adjust so that the "tire" is centered across the wheel.
Page 6 · SumoBot – Mini Sumo Robotics
Step #7
Mount the Wheels
Parts Required:
•
(2) Prepared wheels/tires•
(2) Black servo-horn screws•
SumoBot chassisCarefully press each prepared wheel onto the servo splines. Secure each wheel with the small black Phillips head screw.
Step #8
Mount the Scoop
Parts Required:
•
SumoBot scoop•
(2) 4/40 1/4" longpan-head machine screws
•
(2) 4/40 nuts•
SumoBot chassisUsing two 4/40 1/4” pan-head machine screws and 4/40 nuts, attach the scoop to the SumoBot chassis. Carefully center the scoop before tightening the screws and nuts.
Chapter 1: Assemble the SumoBot · Page 7
Step #9
Install Line Sensor Wires
Parts Required:
•
(2) 10" 3-pinextension cables
•
SumoBot chassisCarefully feed each 10" 3-pin extension cable through the center chassis slot.
Step #10
Install the QTI Line Sensors
Parts Required:
•
(2) QTI line sensors•
(2) 4/40 1/4" longpan-head machine screws
•
SumoBot chassisUsing two 4/40 1/4” pan-head machine screws, attach the QTI line sensors to the 1-1/4" round stand-offs. Connect the ends of the 10" 3-pin extension cables to the QTI line sensors, noting the polarity markings B[lack]-R[ed]-W[hite] on the QTI sensors.
Page 8 · SumoBot – Mini Sumo Robotics
Step #11
Make the Connections
Plug the servo motors and QTI sensors into the SumoBot PCB connectors as indicated below. Note that the "B" pin on each connector is for the black wire. X7 = Left Servo Motor X6 = Right Servo Motor X5 = Left QTI Line Sensor X4 = Right QTI Line Sensor Connect the battery pack wires to SumoBot PCB connector X1. The battery pack's white-striped lead connects to the
+
terminal.Note: Previous versions of the SumoBot PCB were labeled "SumoBoard" instead of "SumoBot." These boards are electrically identical to the SumoBot PCB illustrated. When using SumoBot PCBs with a revision code of C or earlier, the Vs1 and Vs2 (servo ground) connections must be jumpered to Vss for proper servo operation.
Chapter 1: Assemble the SumoBot · Page 9
Step #12
Powering the SumoBot
The SumoBot PCB has a three-position power switch. The state of each position is shown below. The three-position switch has a middle position that powers the entire circuit except the servos. A complete schematic of the SumoBot PCB is included in Appendix D.
Position 0 – No Power Position 1 – Power PCB
Chapter 2: SumoBot Locomotion · Page 11
Chapter 2: SumoBot Locomotion
The first task of any Mini-Sumo robot is to move – most competition rules do not allow the robot to stop (without competitor contact) for more than a few seconds. In this experiment you will learn how to get the SumoBot moving and learn to take control over its motion.
HOW A SERVO WORKS
Normal (un-modified) hobby servos are very popular for controlling the steering systems in radio-controlled cars, boats and planes. These servos are designed to control the position of something such as a steering flap on a radio-controlled airplane. Their range of motion is typically 90° to 270°, and they are great for applications where inexpensive, accurate high-torque positioning motion is required. The position of these servos is controlled by an electronic signal called a pulse train, which you’ll get some first hand experience with shortly. An un-modified hobby servo has built-in mechanical stoppers to prevent it from turning beyond its 90° or 270° range of motion. It also has internal mechanical linkages for position feedback so that the electronic circuit that controls the DC motor inside the servo knows where to turn to in response to a pulse train.
SumoBot motion is controlled using two pre-modified Parallax Continuous Rotation servo motors using a process called differential drive. The modification "tricks" the feedback circuitry so that the servo will stop only when it receives a centering command; it also allows the servo to continuously rotate in either direction. When both motors are turning in the same direction, the SumoBot will move in that direction. When the SumoBot servo motors turn in different directions, the chassis will rotate. The rate of movement or rotation is determined by motor speeds.
TIME MEASUREMENTS AND VOLTAGE LEVELS
Throughout this text, amounts of time will be referred to in units of seconds (s), milliseconds (ms), and microseconds (µs). Seconds are abbreviated with the lower-case letter “s”. So, one second is written as 1 s. Milliseconds are abbreviated as ms, and it means one one-thousandth of a second. One microsecond is one one-millionth of a second. Figure 2.1 shows how Milliseconds and Microseconds equate in terms of both fractions and scientific notation.
Page 12 · SumoBot – Mini Sumo Robotics
Figure 2.1: Milliseconds and Microseconds Details
s
3-10
1
s
1000
1
ms
1
=
=
×
s
6-10
1
s
1,000,000
1
s
1
µ
=
=
×
A voltage level is measured in volts, which is abbreviated with an upper case V. The SumoBot PCB has sockets labeled Vss, Vdd, and Vin. Vss is called the system ground or reference voltage. When the battery pack is plugged in, Vss is connected to its negative terminal. Vin is unregulated 6 volts (from four AA batteries) and it is connected to the positive terminal of the battery pack. Vdd is regulated to 5 volts by the SumoBot PCB’s onboard voltage regulator, and it will be used with Vss to supply power to circuits built on the SumoBot PCB’s breadboard.
Figure 2.2: SumoBot PCB Voltage Labels
Vss = 0V (ground)
Vdd = 5V (regulated)
Vin = 6V (unregulated)
Only use the Vdd sockets above the SumoBot PCB's breadboard for the activities in this workbook. Do not use the Vdd on the 20-pin App-Mod header.
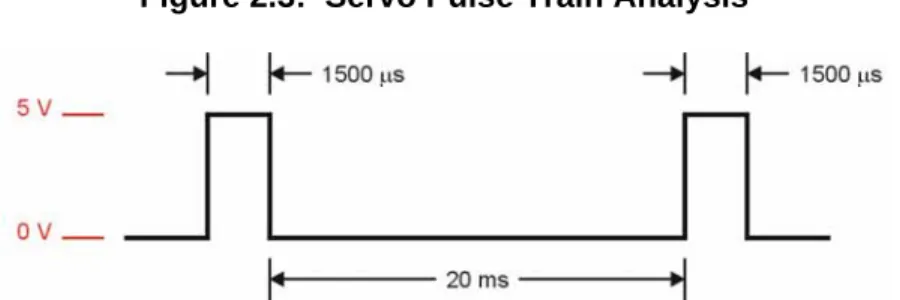
The control signal the BASIC Stamp sends to the servo’s control line is called a “pulse train,” and an example of one is shown in Figure 2.3. The BASIC Stamp can be
Chapter 2: SumoBot Locomotion · Page 13
programmed to produce this waveform using any of its I/O pins. In this example, the BASIC Stamp sends a 1500 µs pulse to P13 (left servo) and P12 (right servo). When the pulse is done being executed the signal pin is low. Then, the BASIC Stamp creates a 20 ms pause.
Figure 2.3: Servo Pulse Train Analysis
This pulse train has a 1500 µs high time and a 20 ms low time. The high time is the main ingredient for controlling a servo’s motion, and it is most commonly referred to as the pulse width. Since these pulses go from low to high (0V to 5V) for a certain amount of time, they are called positive pulses. Negative pulses would involve a resting state that’s high with pulses that drop low.
The ideal pause between servo pulses is 20 milliseconds, but can be anything between 10 and 40 milliseconds without adversely affecting the servo’s performance.
The BASIC Stamp 2’s PULSOUT instruction works in increments of 2
micro-seconds. For example, the following snippet of code creates a 1500 µs pulse: PULSOUT P13, 750 ' 1500 us pulse on pin 13
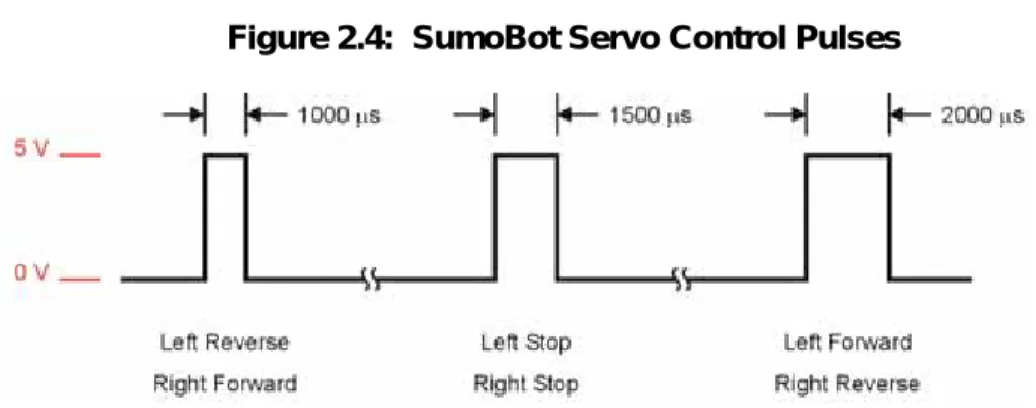
A pulse width of 1500 µs (normally, the centering command) will cause the modified servo to stop. To make the servo turn we must give change the pulse width toward either end of the standard control range of 1000 to 2000 µs. Since the right side servo motor is physically mirrored from the left, its control signals are as well. Figure 2.3 shows the control signaling for the SumoBot servos.
Page 14 · SumoBot – Mini Sumo Robotics
Figure 2.4: SumoBot Servo Control Pulses
For pulses between the 1500 µs stop point and the extremes on either end of the control range, there is a degree of speed control. This range is not linear, however, and at pulse widths just outside the stop band, servo current increases dramatically. At some points in the control range, the servo current can go high enough to cause an excessive load on the BASIC Stamp's regulator circuitry, causing it to reset or behave erratically. For Mini-Sumo competition, precise speed control is not a requirement. The goal is to find the opponent and move quickly toward him.
Open the BASIC Stamp Windows Editor.1 Load the following program that will be used
to align the SumoBot motors.2
1
The Parallax BASIC Stamp Manual 2.x includes a “Quick Start” section that details how to open and launch the BASIC Stamp Windows Editor.
2
Chapter 2: SumoBot Locomotion · Page 15
' SumoBot_2.1_Motor_Align.BS2 ' {$STAMP BS2}
' {$PBASIC 2.5}
' ---[ I/O Definitions ]---
LMotor PIN 13 ' left servo motor RMotor PIN 12 ' right servo motor
' ---[ Constants ]---
LStop CON 750 ' left motor stop RStop CON 750 ' right motor stop
' ---[ Initialization ]---
Reset:
LOW LMotor ' initialize motor outputs LOW RMotor
' ---[ Program Code ]---
Main: DO
PULSOUT LMotor, LStop ' stop left PULSOUT RMotor, RStop ' stop right PAUSE 20
LOOP
END
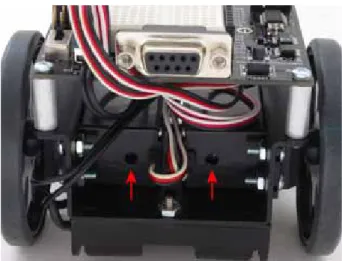
Move the SumoBot power switch to position 2, and then download the code using the Run command from the Run menu, or by pressing the ► button on the toolbar. As soon as the program is downloaded, watch for wheel movement. If either motor turns, insert a small screwdriver into the adjustment port of the servo and adjust the centering potentiometer until the motor stops. Figure 2.5 shows the location of the servo adjustment ports.
Page 16 · SumoBot – Mini Sumo Robotics
Figure 2.5: SumoBot Servo Adjustment Ports
Don't worry, for the moment, how the program works; that will become clear in the next section.
SUMOBOT MOTION TEST
With the motors aligned, it is time to test the SumoBot for essential motion control. Load the following program into the BASIC Stamp Editor, and then download it to the SumoBot:
' SumoBot_2.2_Motor_Test.BS2 ' {$STAMP BS2}
' {$PBASIC 2.5}
' ---[ I/O Definitions ]---
LMotor PIN 13 ' left servo motor RMotor PIN 12 ' right servo motor
' ---[ Constants ]---
LFwdFast CON 1000 ' left motor fwd; fast LFwdSlow CON 800 ' left motor fwd; slow LStop CON 750 ' left motor stop LRevSlow CON 700 ' left motor rev; slow
Chapter 2: SumoBot Locomotion · Page 17
LRevFast CON 500 ' left motor rev; fast
RFwdFast CON 500 ' right motor fwd; fast RFwdSlow CON 700 ' right motor fwd; slow RStop CON 750 ' right motor stop RRevSlow CON 800 ' right motor rev; slow RRevFast CON 1000 ' right motor rev; fast
' ---[ Variables ]---
pulses VAR Byte ' servo pulses counter
' ---[ Initialization ]---
Reset:
LOW LMotor ' initialize motor outputs LOW RMotor
PAUSE 2000 ' time to disconnect cable
' ---[ Program Code ]---
Main:
FOR pulses = 1 TO 65 ' fwd slow, ~12 inches PULSOUT LMotor, LFwdSlow
PULSOUT RMotor, RFwdSlow PAUSE 20
NEXT
FOR pulses = 1 TO 30 ' pivot 90 on left wheel PULSOUT LMotor, LStop
PULSOUT RMotor, RFwdSlow PAUSE 20
NEXT
FOR pulses = 1 TO 25 ' fwd fast PULSOUT LMotor, LFwdFast
PULSOUT RMotor, RFwdFast PAUSE 20
NEXT
FOR pulses = 1 TO 60 ' pivot 180 on right wheel PULSOUT LMotor, LFwdSlow
PULSOUT RMotor, RStop PAUSE 20
NEXT
FOR pulses = 1 TO 50 ' fwd fast PULSOUT LMotor, LFwdFast
PULSOUT RMotor, RFwdFast PAUSE 20
Page 18 · SumoBot – Mini Sumo Robotics
FOR pulses = 1 TO 55 ' spin turn - clockwise PULSOUT LMotor, LFwdFast
PULSOUT RMotor, RRevFast PAUSE 20
NEXT
Hold_Position: DO
PULSOUT LMotor, LStop PULSOUT RMotor, RStop PAUSE 20
LOOP
END
As soon as the program is downloaded, remove the programming cable from the SumoBot. This program runs through key motion tests, and then stops the SumoBot. When the SumoBot stops moving after its final spin, move the power switch to position 0 (off). If it doesn't move at all, you may have set the power switch to position 1. You don't have to download the program again if this happened; simply move the power switch to position 2 and then press the Reset button to restart the program.
HOW IT WORKS
This program code starts – as well-coded programs do – by defining connection and value constants used in the program. This methodology creates programs that are easier to read, maintain, and debug. In the case of the SumoBot, the motor connections are on pins 13 (left) and 12 (right). For robot Sumo, we don't need infinite speed control; simply stop, slow and fast (these are relative terms, and will vary from servo type to servo type). Speed constants for each motor are defined and can be tuned for motor variances and when changing motor types.
The initialization section (labeled Reset as this is the first code that runs after the SumoBot is reset) ensures that the motor control outputs are setup to provide the correct pulse polarity to the servos, and then introduces a two-second delay to allow the programming cable to be removed from the SumoBot. It's best to disconnect the SumoBot while doing any movement testing.
Chapter 2: SumoBot Locomotion · Page 19
The core of the program, at the label Main, is broken down into several sections:
•
Move forward slowly•
Pivot turn 90 degrees on left wheel•
Move forward quickly•
Pivot turn 180 degrees on right wheel•
Move forward quickly•
Spin turn (rotates SumoBot around its own center) 360 degrees•
Hold positionNote: If the SumoBot starts by backing up, the motor connections are reversed. Move the power switch to position 0 (off), change the connections, and then move the power switch back to position 2 to retest. You could change the firmware as well, but then you'll need to change all the SumoBot programs included in this kit.
Each movement section is constructed using a FOR-NEXT control loop to give the
motors enough time to perform the actual movements. You may notice that the SumoBot does not move precisely as the code dictates that it should. Do not be alarmed. Small variations in motors may cause the SumoBot to veer slightly to one side or the other when it should be moving straight.
This condition can be corrected (more precisely, tuned) by modifying the speed constants for the motors. If, for example, the SumoBot veers to the left when it should be moving straight, you may want to reduce the right motor speed a bit to correct the path of travel. The same holds true for the turns. In this case, the motor speed is not the culprit. To adjust turns, modify the FOR-NEXT loop end-point value and retest. If the SumoBot
turns too much, reduce the loop end-point. If it doesn't turn quite enough, increase the loop end-point value.
Page 20 · SumoBot – Mini Sumo Robotics
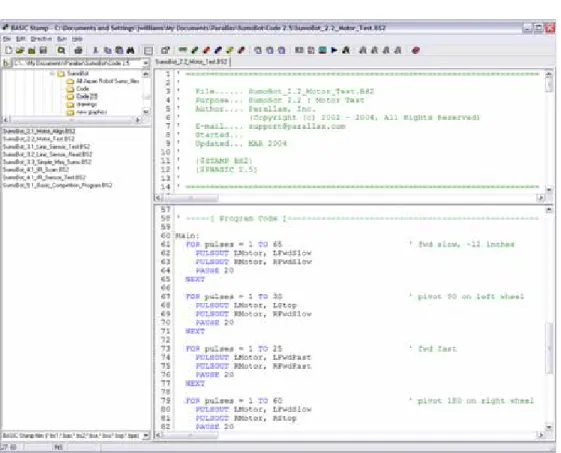
Figure 2.6: BASIC Stamp Editor with SumoBot_ 2.2_Motor_Test.BS2
Note: The figure above shows the edit window set to split-pane mode so that two sections of the program may be viewed simultaneously.
Chapter 2: SumoBot Locomotion · Page 21
CHALLENGE YOURSELF
1.
Modify the motor speed constants so that your SumoBot travels straight at low and high speeds.2.
Determine the proper loop count to cause the SumoBot to turn 30 degrees, 45 degrees and 90 degrees.3.
Using the information in # 2 above, see if you can program the SumoBot to travel in the following patterns:o Square o Triangle o Figure-8
Chapter 3: SumoBot Sensors and Border Detection · Page 23
Chapter 3: SumoBot Sensors and Border Detection
Once the SumoBot is moving, the next task is to scan the playing surface to make sure that it doesn't drive itself out of the ring. The task is accomplished by two specialized line detection sensors called QTIs. The QTI uses a reflective infrared sensor to allow the SumoBot to "look" for the ring's border.
LINE SENSOR THEORY
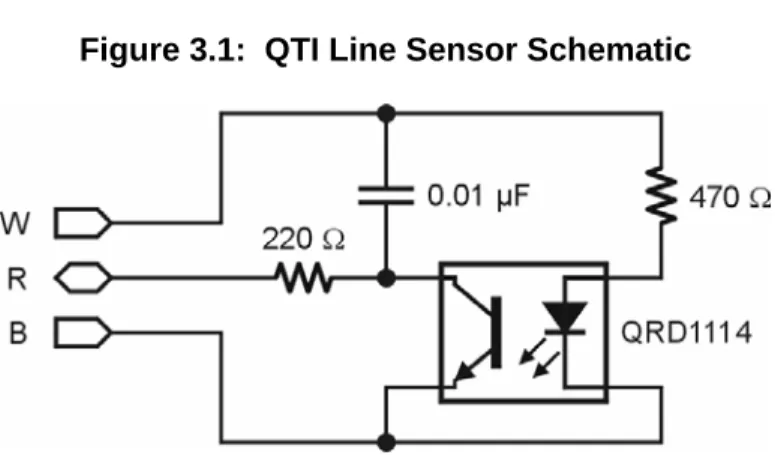
The Parallax QTI uses a QRD1114 infrared (IR) reflective sensor to determine the reflectivity of the surface below it. When the SumoBot is over the black playing field or start lines (Shikiri), the reflectivity is very low; when the QTI is over the white border (Tawara), the reflectivity is very high and will cause a different reading from the sensor. Figure 3.1 shows the schematic for the Parallax QTI line sensor.
Figure 3.1: QTI Line Sensor Schematic
The QTI sensor is activated by placing 5V (Vdd) on the W pin. This will cause current to flow through the 470 Ω resistor to the LED side of the QRD1114. IR light reflecting of the surface below will cause a change in the ability for current to flow through the phototransistor side of the QRD1114. The transistor, in effect, behaves like an IR controlled resistance.
The BASIC Stamp has a specific command designed to read a variable resistance called
RCTIME. When coupled with a capacitor, the BASIC Stamp can measure a variable
Page 24 · SumoBot – Mini Sumo Robotics
After the QTI is activated, the capacitor is discharged by bringing the R line high and holding it for about one millisecond. RCTIME is then used to measure the time required
to charge the capacitor to a specified level. This timing will be controlled by the current flow through the phototransistor side of the QRD1114. When over the black playing field, the phototransistor current flow will be very low so the capacitor will take a long time to charge, hence RCTIME will return a large value. When the QTI is positioned over
the white border line, the current flow through the phototransistor is high, so the capacitor charge time is fast and RCTIME returns a small value.
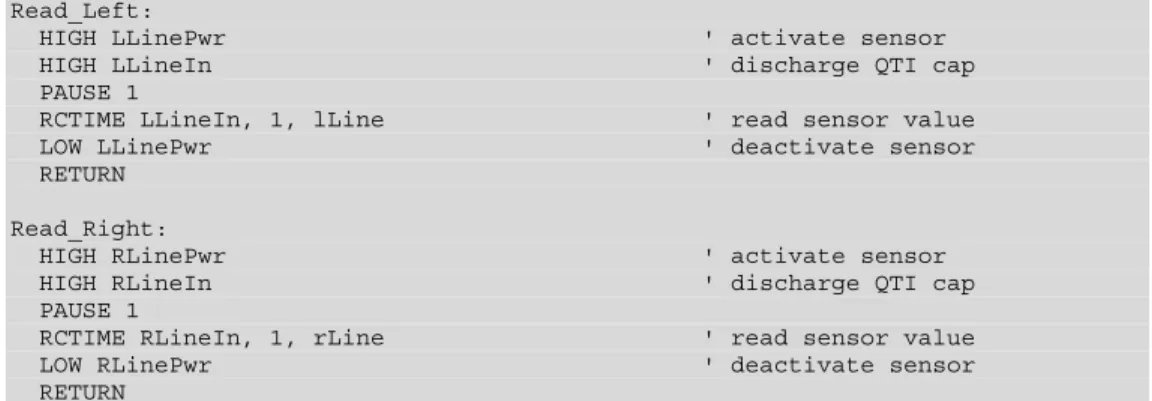
Load and run program 3.1 to test and evaluate the QTI sensors.
' SumoBot_3.1_Line_Sensor_Test.BS2 ' {$STAMP BS2}
' {$PBASIC 2.5}
' ---[ I/O Definitions ]---
LLinePwr PIN 10 ' left line sensor power LLineIn PIN 9 ' left line sensor input RLinePwr PIN 7 ' right line sensor power RLineIn PIN 8 ' right line sensor input
' ---[ Variables ]---
lLine VAR Word ' left sensor raw reading rLine VAR Word ' right sensor raw reading
' ---[ Program Code ]--- Main: DO GOSUB Read_Left GOSUB Read_Right DEBUG HOME,
"Left ", TAB, "Right", CR, "---", TAB, "---", CR,
DEC lLine, CLREOL, TAB, DEC rLine, CLREOL
PAUSE 100 LOOP
END
Chapter 3: SumoBot Sensors and Border Detection · Page 25
Read_Left:
HIGH LLinePwr ' activate sensor HIGH LLineIn ' discharge QTI cap PAUSE 1
RCTIME LLineIn, 1, lLine ' read sensor value LOW LLinePwr ' deactivate sensor RETURN
Read_Right:
HIGH RLinePwr ' activate sensor HIGH RLineIn ' discharge QTI cap PAUSE 1
RCTIME RLineIn, 1, rLine ' read sensor value LOW RLinePwr ' deactivate sensor RETURN
HOW IT WORKS
This program starts by activating the left QTI line sensor, then bringing its R line high to discharge the onboard capacitor (both sides of the capacitor will be at 5v, hence it is discharged). A one millisecond PAUSE gives the capacitor plenty of time to discharge
through the 220 Ω resistor.
After the capacitor is fully discharged, RCTIME makes the R line an input and allows the
capacitor to begin to charge (the plate connected to the R line will move toward Vss). While the capacitor is charging, the RCTIME instruction increments an internal counter.
When the BASIC Stamp sees approximately 1.4 volts on the R line, the counter value is placed in the output variable called lLine. At this point the process is complete and the QTI is deactivated.
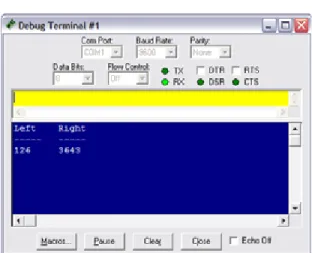
The process is repeated for the right-side QTI and DEBUG is used to display the values.
Figure 3.2 shows the output of the program with the left QTI over the Tawara (white border) line and the right QTI over the black playing field. Notice the dramatic difference between the two values.
Run the program (using Position 1 of the power switch) and record the values from your SumoBot QTI sensors in the space below:
Black White
Left QTI Right QTI
Page 26 · SumoBot – Mini Sumo Robotics
Figure 3.2: QTI Test Program Output
Don't worry about small discrepancies between the QTI values over the same color – this is due to minor variations in components and won't adversely affect the SumoBot robot’s performance.
For convenience in a competition program, the QTI code should be moved into a subroutine that can be called from any point in the program. The routine should also be developed to return either a True (1) or False (0) value if the QTI is over the Sumo ring border. To see this in action, load and run program 3.2.
' Mini_Sumo_3.2_Line_Sensor_Read.BS2 ' {$STAMP BS2}
' {$PBASIC 2.5}
' ---[ I/O Definitions ]---
LLinePwr PIN 10 ' left line sensor power LLineIn PIN 9 ' left line sensor input RLinePwr PIN 7 ' right line sensor power RLineIn PIN 8 ' right line sensor input
' ---[ Variables ]---
lLine VAR Word ' left sensor raw reading rLine VAR Word ' right sensor raw reading lineBits VAR Nib ' decoded sensors value
Chapter 3: SumoBot Sensors and Border Detection · Page 27
lbLeft VAR lineBits.BIT1 lbRight VAR lineBits.BIT0
' ---[ Program Code ]---
Main:
GOSUB Read_Line_Sensors
DEBUG HOME, "LR", CR, ' show sensor readings BIN2 lineBits, CR, CR
SELECT lineBits ' display actions CASE %00
DEBUG "Continue forward", CLREOL CASE %01
DEBUG "Spin Left", CLREOL CASE %10
DEBUG "Spin Right", CLREOL CASE %11
DEBUG "Back up and turn around", CLREOL ENDSELECT
GOTO Main END
' ---[ Subroutines ]---
Read_Line_Sensors:
HIGH LLinePwr ' activate sensors HIGH RLinePwr
HIGH LLineIn ' discharge caps HIGH RLineIn
PAUSE 1
RCTIME LLineIn, 1, lLine ' read left sensor RCTIME RLineIn, 1, rLine ' read right sensor LOW LLinePwr ' deactivate sensors LOW RLinePwr
' convert readings to bits
LOOKDOWN lLine, >=[1000, 0], lbLeft ' 0 = black, 1 = line LOOKDOWN rLine, >=[1000, 0], lbRight
RETURN
HOW IT WORKS
This program takes the working QTI code and incorporates into a unified subroutine. The end of the subroutine converts the analog values from the QTI sensors to a single nibble value that contains the status of both sensors. Incorporating both sensor readings into a single variable streamlines the SumoBot robot's border avoidance logic.
Page 28 · SumoBot – Mini Sumo Robotics
The technique for converting the raw sensor reading to a bit value takes advantage of the {optional} comparison parameter with the LOOKDOWN function. Without the comparison
parameter, LOOKDOWN uses equality to scan its table for a value match. By using the
comparison parameter, we can test a range of values with a single table entry. This line:
LOOKDOWN lLine, >=[1000, 0], lbLeft
will put 0 into lbLeft if lLine is greater or equal to 1000, otherwise it will but 1 in lbLine (lLine is between 0 and 999). This works because the comparison parameter is >= and the first table entry [index 0] is 1000. LOOKDOWN will transfer the index to the output
variable as soon as a match is found. If the sensor value is less than 1000 (as when on the border), the index value of 1 is moved into lbLeft.
We could use an IF-THEN-ELSE coding technique to accomplish the same thing:
Left_Conv: IF (lLine >= 1000) THEN lbLeft = 0 ELSE lbLeft = 1 ENDIF
As you can see, using LOOKDOWN with the comparison parameter is the more elegant
approach. You may be wondering why the value 1000 was used as the black level threshold. It was selected to allow the QTI to be affected by external light and still return an accurate reading. Extra light falling on the playing surface will reduce the QTI output values. By using a value about one-fourth the normal black reading, the program has plenty of margin for lighting variability. Now let's examine what happens with the output values.
The bit variables lbLeft and lbRight are aliased into lineBits – this means a change in either will cause a change in lineBits. We will use this variable with the SELECT-CASE
Chapter 3: SumoBot Sensors and Border Detection · Page 29
The movement logic is controlled by SELECT-CASE. The purpose of SELECT-CASE is
to replace several IF-THEN commands that would examine the same control variable.
So, the following code structure:
SELECT lineBits ' display actions CASE %00
DEBUG "Continue forward", CLREOL CASE %01
DEBUG "Spin Left", CLREOL CASE %10
DEBUG "Spin Right", CLREOL CASE %11
DEBUG "Back up and turn around", CLREOL ENDSELECT
replaces these statements, as well as the program labels and associated code for them: IF (lineBits = %00) THEN Go_Fwd
IF (lineBits = %01) THEN Spin_Left IF (lineBits = %10) THEN Spin_Right IF (lineBits = %11) THEN About_Face
and accomplishes the same objective. With simple programs like this one, using
SELECT-CASE is a clean solution. As programs grow, we'll examine other instructions
(like BRANCH) to replace multiple IF-THEN comparisons and route the program to
desired control routines. Keep in mind that program 3.2 doesn't actually move the SumoBot. It simply displays the action that should be taken given the QTI inputs.
OUR FIRST OPERATIONAL SUMO PROGRAM
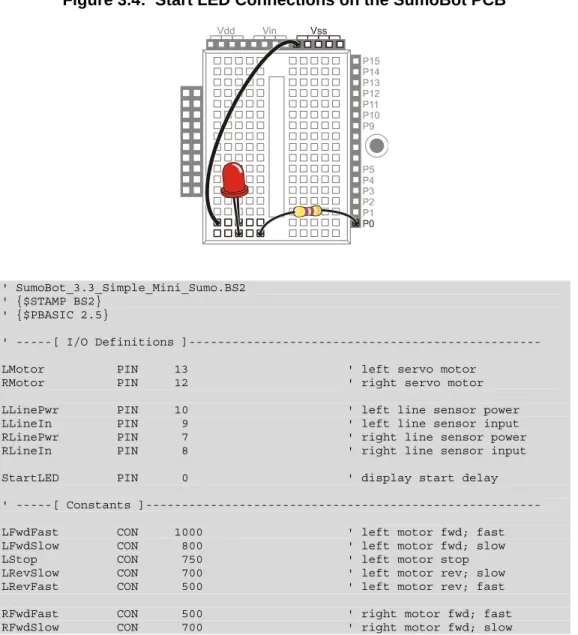
With the ability to move and to see the border on the Sumo ring, we have enough to create a working Mini-Sumo program. Add a 470 Ω resistor and LED to the breadboard as shown in Figures 3.3 and 3.4, and then load and run program 3.3.
Page 30 · SumoBot – Mini Sumo Robotics
Figure 3.4: Start LED Connections on the SumoBot PCB
' SumoBot_3.3_Simple_Mini_Sumo.BS2 ' {$STAMP BS2}
' {$PBASIC 2.5}
' ---[ I/O Definitions ]---
LMotor PIN 13 ' left servo motor RMotor PIN 12 ' right servo motor
LLinePwr PIN 10 ' left line sensor power LLineIn PIN 9 ' left line sensor input RLinePwr PIN 7 ' right line sensor power RLineIn PIN 8 ' right line sensor input
StartLED PIN 0 ' display start delay
' ---[ Constants ]---
LFwdFast CON 1000 ' left motor fwd; fast LFwdSlow CON 800 ' left motor fwd; slow LStop CON 750 ' left motor stop LRevSlow CON 700 ' left motor rev; slow LRevFast CON 500 ' left motor rev; fast
RFwdFast CON 500 ' right motor fwd; fast RFwdSlow CON 700 ' right motor fwd; slow
Chapter 3: SumoBot Sensors and Border Detection · Page 31
RStop CON 750 ' right motor stop RRevSlow CON 800 ' right motor rev; slow RRevFast CON 1000 ' right motor rev; fast
' ---[ Variables ]---
lLine VAR Word ' left sensor raw reading rLine VAR Word ' right sensor raw reading lineBits VAR Nib ' decoded sensors value lbLeft VAR lineBits.BIT1
lbRight VAR lineBits.BIT0
pulses VAR Byte ' counter for motor control temp VAR Byte
' ---[ EEPROM Data ]---
RunStatus DATA $00 ' run status
' ---[ Initialization ]---
Reset:
READ RunStatus, temp ' read current status temp = ~temp ' invert status WRITE RunStatus, temp ' save for next reset IF (temp > 0) THEN END ' run now?
Start_Delay:
HIGH StartLED ' show active PAUSE 5000 ' start delay LOW StartLED ' LED off
' ---[ Program Code ]---
Main:
GOSUB Read_Line_Sensors
' sumo movement
BRANCH lineBits, [Go_Fwd, Spin_Left, Spin_Right, About_Face]
Go_Fwd:
PULSOUT LMotor, LFwdFast PULSOUT RMotor, RFwdFast GOTO Main
Spin_Left:
FOR pulses = 1 TO 20 PULSOUT LMotor, LRevFast PULSOUT RMotor, RFwdFast PAUSE 20
Page 32 · SumoBot – Mini Sumo Robotics
GOTO Main
Spin_Right:
FOR pulses = 1 TO 20 PULSOUT LMotor, LFwdFast PULSOUT RMotor, RRevFast PAUSE 20
NEXT GOTO Main
About_Face:
FOR pulses = 1 TO 10 ' back up from edge PULSOUT LMotor, LRevFast
PULSOUT RMotor, RRevFast PAUSE 20
NEXT
FOR pulses = 1 TO 30 ' turn around PULSOUT LMotor, LFwdFast
PULSOUT RMotor, RRevFast PAUSE 20 NEXT GOTO Main END ' ---[ Subroutines ]--- Read_Line_Sensors:
HIGH LLinePwr ' activate sensors HIGH RLinePwr
HIGH LLineIn ' discharge caps HIGH RLineIn
PAUSE 1
RCTIME LLineIn, 1, lLine ' read left sensor RCTIME RLineIn, 1, rLine ' read right sensor LOW LLinePwr ' deactivate sensors LOW RLinePwr
' convert readings to bits
LOOKDOWN lLine, >=[1000, 0], lbLeft ' 0 = black, 1 = line LOOKDOWN rLine, >=[1000, 0], lbRight
RETURN
HOW IT WORKS
This program incorporates a very handy technique created by Andy Lindsay that allows the operator to use the SumoBot PCB's Reset button for Run/Don't Run control. This is
Chapter 3: SumoBot Sensors and Border Detection · Page 33
useful for controlling the SumoBot in a competition without fumbling for the actual power switch.
The code at Reset reads a byte from the BASIC Stamp's EEPROM; located at the address called RunStatus. When the program is first downloaded to the BASIC Stamp, the value stored in RunStatus will be $00 (don't run). The READ instruction is used to bring this
value into the variable temp, then temp is inverted (to $FF), and finally, WRITE is used to
put it back to the EEPROM for the next reset cycle. Next, the value of temp is tested for greater than zero. If this condition is true, the program is halted with END (which puts the
BASIC Stamp goes into low-power mode), otherwise it continues to the Start_Delay code.
The routine called Start_Delay satisfies a requirement of Mini-Sumo competition rules. The rules state that the robot must not start until five seconds after the command is given by the judge. This code is very simple: it lights the LED to show that the SumoBot is preparing to start and inserts a five second PAUSE. At the end of the delay, the LED will
be extinguished and the SumoBot will start moving.
The heart of the program begins at Main. The first step is to read the sensors with the Read_Line_ Sensors subroutine. With the QTI sensor data, the SumoBot is moved using the same logic developed earlier:
L R Action
0 0 Move forward
0 1 Spin to left
1 0 Spin to right
1 1 Back up and turn around
BRANCH takes care of routing the program to the right code section based on the QTI
inputs. As with SELECT-CASE, we're using BRANCH to replace several IF-THEN
comparisons. It should be clear that this is a cleaner approach than IF-THEN.
The only thing that might not be clear is that there is no delay (20 ms) in the Go_Fwd routine. It isn't needed when the SumoBot is in the middle of the ring (not touching the border line) because reading the QTI sensors consumes enough time that the delay is not necessary.
Page 34 · SumoBot – Mini Sumo Robotics
CHALLENGE YOURSELF
1. Experiment with the Spin_Left and Spin_Right routines so that the SumoBot generally moves toward the center after touching the border.
Chapter 4: Infrared Object Detection · Page 35
Chapter 4: Infrared Object Detection
Today's hottest products seem to have one thing in common: wireless communication. Personal organizers beam data into desktop computers, and wireless remotes let us channel surf. With a few inexpensive and widely available parts, the BASIC Stamp can also use an infrared LED and detector to detect objects to the front and side of your SumoBot.
Detecting obstacles doesn’t require anything as sophisticated as machine vision. A much simpler system will suffice. Some robots use RADAR or SONAR (sometimes called SODAR when used in air instead of water). An even simpler system is to use infrared light to illuminate the robot’s path and determine when the light reflects off an object. Thanks to the proliferation of infrared (IR) remote controls, IR illuminators and detectors are easily available and inexpensive.
INFRARED HEADLIGHTS
The infrared object detection system we’ll build on the SumoBot is like a car’s headlights in several respects. When the light from a car’s headlights reflects off obstacles, your eyes detect the obstacles and your brain processes them and makes your body guide the car accordingly. The SumoBot uses infrared LEDs for headlights. They emit infrared, and in some cases, the infrared reflects off objects, and bounces back in the direction of the SumoBot. The eyes of the SumoBot are the infrared detectors. The infrared detectors send signals to the BASIC Stamp indicating whether or not they detect infrared reflected off an object. The brain of the SumoBot, the BASIC Stamp, makes decisions and operates the servo motors based on this input.
What is Infrared?
Infra means below, so Infrared is light (or electromagnetic radiation) that has lower frequency, or longer wavelength than red light. Our IR LED and detector work at 980 nm (Nanometers) which is considered near infrared. Night-vision goggles and IR temperature sensing use far infrared wavelengths of 2000-10,000 nm, depending on the application. Approximate Color Wavelength Violet 400 nm Blue 470 Green 565 Yellow 590 Orange 630 Red 780 Near infrared 800-1000 Infrared 1000-2000 Far infrared 2000-10,000 nm
Page 36 · SumoBot – Mini Sumo Robotics
The IR detectors have built-in optical filters that allow very little light except the 980 nm infrared that we want to detect onto its internal photodiode sensor. The infrared detector also has an electronic filter that only allows signals around 38.5 kHz to pass through. In other words, the detector is only looking for infrared flashed on and off at 38,500 times per second. This prevents interference from common IR interference sources such as sunlight and indoor lighting. Sunlight is DC interference (0 Hz), and house lighting tends to flash on and off at either 100 or 120 Hz, depending on the main power source in the country where you reside. Since 120 Hz is way outside the electronic filter’s 38.5 kHz band pass frequency, it is, for all practical purposes, completely ignored by the IR detectors.
THE FREQOUT TRICK
Since the IR detectors only see IR signals in the neighborhood of 38.5 kHz, the IR LEDs have to be flashed on and off at that frequency. A common 555 timer can be used for this purpose, but the 555 timer circuit is more complex and less functional than the circuit we will use in this and the next chapter. For example, the method of IR detection introduced here can be used for distance detection; whereas, the 555 timer would need additional hardware to do distance detection.
A pair of BASIC Stamp enthusiasts found an interesting trick that made the 555 timer scheme unnecessary. This scheme uses the FREQOUT command without the RC filter
that’s normally used to smooth the signal into a sine-wave. Even though the highest frequency FREQOUTis designed to transmit is 32,768 Hz, the unfiltered FREQOUT output
contains a harmonic with useful properties for a 38.5 kHz IR detector. More useful still is the fact that you can use a command such as
FREQOUT Pin, Duration, 38500
to send a 38.5 kHz harmonic that the IR detector can detect.
Tuned electronic receivers, such as the IR detectors we’ll be using, can detect components of this signal that are called harmonics. These harmonics are actually components of the unfiltered FREQOUT pulses. The third harmonic of 38.5 kHz can be
controlled directly by entering commands such as FREQOUT Pin, Duration, or FREQOUT Pin, Duration, 40000 for 40 kHz (as might be required by different
Chapter 4: Infrared Object Detection · Page 37
INSTALLING AND TESTING THE IR EMITTERS/DETECTORS
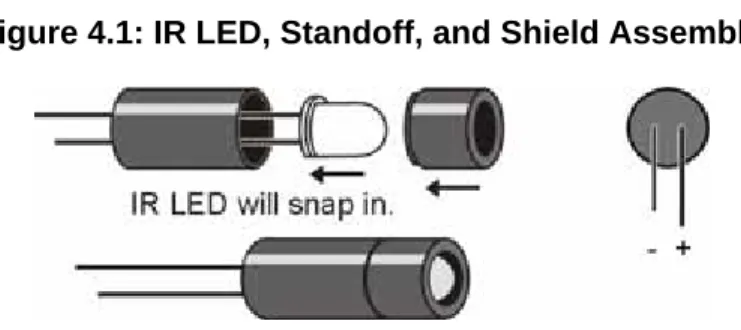
The SumoBot is specially designed to accommodate two IR emitter/detector pairs. Before we install them, we need to assemble the IR LEDs into their shells, then bend and trim the leads so that they don't become damaged or misaligned during competition. Figure 4.1 shows the assembly IR LED (clear) into the protective shell (standoff and shield). The purpose of this assembly is to prevent stray IR from falling directly onto the detector and causing a false positive reading.
Figure 4.1: IR LED, Standoff, and Shield Assembly
After assembly, bend the leads downward at a 90-degree angle so that when looking at the back side of the shield, the positive (longer) lead is on the right. Trim the leads as shown above.
Modify the detectors by trimming the leads to about 3/8" inches. This will cause the detectors to sit lower and more firmly in the sockets, reducing the chance of misalignment during competition.
Page 38 · SumoBot – Mini Sumo Robotics
Figure 4.2: IR Detector3 Trimming
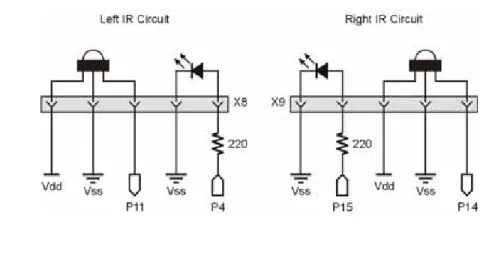
Figure 4.3 is the schematic for the SumoBot robot’s IR object sensing. Build this circuit on your SumoBot. Note that the 220 Ω resistors are already built into the SumoBot PCB; just plug in the IR emitters and your SumoBot will be ready. When aligning the IR emitter "headlights" it's a good idea to angle them slightly outward to give the SumoBot a wider field of vision.
Figure 4.3: SumoBot IR Object Detection Circuitry
3
Chapter 4: Infrared Object Detection · Page 39
Figure 4.4: SumoBot IR Object Detection Components Installed
TESTING THE IR PAIRS
The key to making each IR pair work is to send one millisecond of unfiltered 38.5 kHz
FREQOUT harmonic followed immediately by testing the signal sent by the IR detector
and saving its output value. The IR detector’s normal output state when it sees no IR signal is high (logic 1). When the IR detector sees the 38.5 kHz harmonic sent by the IR LED, its output will drop from high to low (logic 0). Of course, if the IR does not reflect off an object, the IR detector’s output simply stays high. Program 4.1 shows an example of this method of reading the detectors
' SumoBot_4.1_IR_Sensor_Test.BS2 ' {$STAMP BS2}
' {$PBASIC 2.5}
' ---[ I/O Definitions ]---
LfIrOut PIN 4 ' left IR LED output LfIrIn PIN 11 ' left IR sensor input RtIrOut PIN 15 ' right IR LED output RtIrIn PIN 14 ' right IR sensor input
Page 40 · SumoBot – Mini Sumo Robotics
' ---[ Variables ]---
irBits VAR Nib ' storage for IR target data irLeft VAR irBits.BIT1
irRight VAR irBits.BIT0
' ---[ Program Code ]---
Main: DO
FREQOUT LfIrOut, 1, 38500 ' modulate left IR LED irLeft = ~LfIrIn ' read input (1 = target)
FREQOUT RtIrOut, 1, 38500 ' modulate right IR LED irRight = ~RtIrIn ' read input (1 = target)
DEBUG HOME, "L R", CR, "----", CR,
BIN1 irLeft, " ", BIN1 irRight
PAUSE 20 LOOP
END
Two bit-sized variables are declared to store the value of each IR detector output. The command FREQOUT LfIrOut, 1, 38500 sends the [unfiltered] modulation signal
to the left IR LED, causing it to flash on and off rapidly. The harmonic contained in this signal either bounces off an object, or not. If it bounces off an object and is seen by the IR detector, the IR detector sends a low signal to I/O pin LfIrIn. Otherwise, the IR detector sends a high signal to LfIrIn. The bitwise invert operator (~) is used so that a "hit" (reflection from the opponent) is indicated by "1" and a "miss" is indicated by a "0." So long as the next command after the FREQOUT command is the one testing the state of
the IR detector’s output, it can be saved as a variable value in RAM. This is possible as the IR detector output is held active a short time after the signal goes away. The statement irLeft = ~LfIrIn checks LfIrIn, and saves the value (“1” for hit or “0”
for miss) in the irLeft bit variable. This process is repeated for the other IR pair, and the IR detector’s output is saved in the irRight variable. The DEBUG statement then displays
Chapter 4: Infrared Object Detection · Page 41
SUMOBOT MOTION CONTROL
The next task is to link the SumoBot robot’s ability to "see" with the motors so that an object – the opponent – can be tracked. Load and run program 4.2 to see a demonstration of linking IR object control to the SumoBot motors.
' SumoBot_4.2_IR_Scan.BS2 ' {$STAMP BS2}
' {$PBASIC 2.5}
' ---[ I/O Definitions ]---
LMotor PIN 13 ' left servo motor RMotor PIN 12 ' right servo motor
LfIrOut PIN 4 ' left IR LED output LfIrIn PIN 11 ' left IR sensor input RtIrOut PIN 15 ' right IR LED output RtIrIn PIN 14 ' right IR sensor input
' ---[ Constants ]---
LFwdFast CON 1000 ' left motor fwd; fast LFwdSlow CON 800 ' left motor fwd; slow LStop CON 750 ' left motor stop LRevSlow CON 700 ' left motor rev; slow LRevFast CON 500 ' left motor rev; fast
RFwdFast CON 500 ' right motor fwd; fast RFwdSlow CON 700 ' right motor fwd; slow RStop CON 750 ' right motor stop RRevSlow CON 800 ' right motor rev; slow RRevFast CON 1000 ' right motor rev; fast
' ---[ Variables ]---
irBits VAR Nib ' storage for IR target data irLeft VAR irBits.BIT1
irRight VAR irBits.BIT0
lastIr VAR Nib ' info from last reading
pulses VAR Byte ' counter for motor control
' ---[ Initialization ]---
Reset:
LOW LMotor ' initialize motor outputs LOW RMotor
Page 42 · SumoBot – Mini Sumo Robotics
Main:
GOSUB Read_IR_Sensors
BRANCH irBits, [Scan, Follow_Right, Follow_Left, Hold]
Scan:
BRANCH lastIR, [Move_Fwd, Scan_Right, Scan_Left, Move_Fwd]
Move_Fwd:
DEBUG HOME, "Forward", CLREOL GOTO Main
Scan_Right: ' spin right, slow DEBUG HOME, "Scan Right", CLREOL
PULSOUT LMotor, LFwdSlow PULSOUT RMotor, RRevSlow PAUSE 20
GOTO Main
Scan_Left: ' spin left, slow DEBUG HOME, "Scan Left", CLREOL
PULSOUT LMotor, LRevSlow PULSOUT RMotor, RFwdSlow PAUSE 20
GOTO Main
Follow_Right: ' spin right, fast DEBUG HOME, "Follow Right", CLREOL
PULSOUT LMotor, LFwdFast PULSOUT RMotor, RRevFast PAUSE 20
lastIr = irBits ' save last direction found GOTO Main
Follow_Left: ' spin left, fast DEBUG HOME, "Follow Left", CLREOL
PULSOUT LMotor, LRevFast PULSOUT RMotor, RFwdFast PAUSE 20
lastIr = irBits GOTO Main
Hold: ' on target DEBUG HOME, "On Target", CLREOL
FOR pulses = 1 TO 3 PULSOUT LMotor, LStop PULSOUT RMotor, RStop PAUSE 20
NEXT
lastIr = %00 GOTO Main
Chapter 4: Infrared Object Detection · Page 43
END
' ---[ Subroutines ]---
Read_IR_Sensors:
FREQOUT LfIrOut, 1, 38500 ' modulate left IR LED irLeft = ~LfIrIn ' read input (1 = target) FREQOUT RtIrOut, 1, 38500 ' modulate right IR LED irRight = ~RtIrIn ' read input (1 = target) RETURN
HOW IT WORKS
This program is functionally similar to the line detection program. The IR sensors are scanned and, due to variable aliasing, the state of both sensors is held in the Nibble variable irBits. If no target is detected the SumoBot will go into scanning mode. The code at Scan will look for the opponent in the last known direction (held in the variable lastIr). When a target is detected, the SumoBot will move quickly in the target direction. The direction is stored in the event the target is lost so that the SumoBot will scan in the last know target direction.
If you run the program with the power switch in position 1, the Debug Terminal will display the program's logic based on a target placed in front of the SumoBot. If you run the program with the power switch in position 2, the SumoBot will rotate in the direction of the target or scan in the suspect direction.
Chapter 5: Basic Competition Code · Page 45
Chapter 5: Basic Competition Code
Okay, it's time to get ready for competition. The program in this chapter brings all the SumoBot robot's systems together, and adds some intelligent control.
Start by adding a piezo speaker as shown in Figures 5.1 and 5.2, then load and run program 5.1.
Figure 5.1: Start LED and Piezo Speaker Schematic
Page 46 · SumoBot – Mini Sumo Robotics
' SumoBot_5.1_Basic_Competition_Program.BS2 ' {$STAMP BS2}
' {$PBASIC 2.5}
' ---[ I/O Definitions ]---
LMotor PIN 13 ' left servo motor RMotor PIN 12 ' right servo motor
LLinePwr PIN 10 ' left line sensor power LLineIn PIN 9 ' left line sensor input RLinePwr PIN 7 ' right line sensor power RLineIn PIN 8 ' right line sensor input
LfIrOut PIN 4 ' left IR LED output LfIrIn PIN 11 ' left IR sensor input RtIrOut PIN 15 ' right IR LED output RtIrIn PIN 14 ' right IR sensor input
Speaker PIN 1 ' piezo speaker StartLED PIN 0 ' display start delay
' ---[ Constants ]---
LFwdFast CON 1000 ' left motor fwd; fast LFwdSlow CON 800 ' left motor fwd; slow LStop CON 750 ' left motor stop LRevSlow CON 700 ' left motor rev; slow LRevFast CON 500 ' left motor rev; fast
RFwdFast CON 500 ' right motor fwd; fast RFwdSlow CON 700 ' right motor fwd; slow RStop CON 750 ' right motor stop RRevSlow CON 800 ' right motor rev; slow RRevFast CON 1000 ' right motor rev; fast
' ---[ Variables ]---
lLine VAR Word ' left sensor raw reading rLine VAR Word ' right sensor raw reading blackThresh VAR Word ' QTI black threshold lineBits VAR Nib ' decoded sensors value lbLeft VAR lineBits.BIT1
lbRight VAR lineBits.BIT0
irBits VAR Nib ' IR readings (l & r) irLeft VAR irBits.BIT1
irRight VAR irBits.BIT0
lastIr VAR Nib ' info from last reading
Chapter 5: Basic Competition Code · Page 47
temp VAR Byte
' ---[ EEPROM Data ]---
RunStatus DATA $00 ' run status
' ---[ Initialization ]---
Reset:
READ RunStatus, temp ' read current status temp = ~temp ' invert status WRITE RunStatus, temp ' save for next reset IF (temp > 0) THEN END ' okay to run?
' Sets black threshold to 1/4 the average of the two sensor readings. ' SumoBot must be placed over black playing surface before this code runs.
Set_Threshold: ' set QTI black threshold GOSUB Read_Line_Sensors
blackThresh = (lLine / 10) + (rLine / 10)
LOW LMotor ' make more pins outputs LOW RMotor
Start_Delay: ' five second delay FOR temp = 1 TO 5
HIGH StartLED ' show active PAUSE 900
INPUT StartLED ' blink each second FREQOUT Speaker, 100, 2500, 3000 ' beep each second NEXT
GOTO Lunge ' start aggressive!
' ---[ Program Code ]---
Main:
GOSUB Read_Line_Sensors
' If not on the Shikiri line (border), continue to look for opponent, ' otherwise, spin back toward center and resume search
BRANCH lineBits, [Search_For_Opponent, Spin_Left, Spin_Right, About_Face]
' --[ Border Avoidance ]--
Spin_Left: ' right sensor was active FOR pulses = 1 TO 20
PULSOUT LMotor, LRevFast PULSOUT RMotor, RFwdFast PAUSE 20