Courtesy NextEnergy Solar
Materials
&
Methods for
Flashing Penetrations
TILE ROOFING SYSTEMS
TILE ROOFING SYSTEMS
I
tile roofs must be penetrated and flashed according to local and international codes. The good news is that as the industry grows, new products and installation methods are becoming
available that allow installers to more quickly and easily apply appropriate, long-term solutions on the roof.
The key to being successful when working with tile roofs is to think and act like a roofer—to not only follow codes and best practices, but also know the materials. While most com-position or asphalt shingle roofs share a similar anatomy and are waterproofed at the top layer, tile roofs have significant variation in their waterproofing systems. In North America, tile roofs were generally installed using the European method of waterproofing at the top tile level without use of an under-layment. In 1986, as a result of chronic roof leaks due in part to poor flashing methods, the Uniform Building Code (UBC) began requiring an underlayment to be installed over the decking of all tile roofs (UBC Table 15-D-1 and 15-D-2). Tiles provide the first layer of weather protection, but the flashing and underlayment is the final barrier when wind-driven rain, water and moisture infiltrate the roof system.
It is important to understand how these waterproofing systems work and how to apply the appropriate mounting and flashing solutions to a specific tile roofing system. While there are many types of tile and slate roofs with different waterproofing systems, here I focus on the method of double- flashing standoffs on flat and curved tile roofs. Before install-ing solar on any roof, it is best to review the roof manufactur-er’s installation instructions and specifications to determine how to best waterproof your penetrations.
TILE ROOFING TYPES
There are many different types of tile roofs. Interlocking flat-tile and curved tile that are typically made of either clay or concrete are the most commonly found types in North America today. Concrete tiles are made from a mix-ture of Portland cement, sand, aggregate, polymers and a little water. Clay tiles are often glazed and fired ceramic. Curved tile roofs vary in style, typically made from high- and
include Eagle, Hanson, Ludowici and MonierLifetile.
In addition to standard tile roofing products, there are slate roofs and other products such as Cedarlite, a concrete
tile that looks like wood shake manufactured by Monier-Lifetile. DaVinci Roofscapes and EcoStar both manufacture synthetic slate and shake products that are made from recy-cled rubber and plastics. These materials may use underlay-ment waterproofing methods that are similar to standard tile roofing products, but they can be challenging to work with due to the manufacturer’s installation specifications.
You might encounter unusual tiles that are hard to find or are no longer being manufactured. In these cases, it is important to follow manufacturer instructions or work with an experienced roofer who is familiar with the material and associated best practices. Someone familiar with the product may know where replacement tiles can be found in local roof-ing bone yards, for example.
UNDERLAYMENT TYPES
Underlayments are important in weatherproofing tile roofs. The most common underlayments consist of asphalt felt, syn-thetic polypropylene or a modified bitumen membrane, but material and installation specifics can vary greatly due to geography and local building codes.
Most tile roofs use number 15 or number 30 felt paper as underlayment. In areas with high wind zones, the underlay-ment and tiles typically need to be adhered to the roof in order to withstand wind speeds of up to 150 mph. In hurricane-prone Florida, for instance, underlayments commonly consist of a modified bitumen product that adheres to the roof deck-ing. Tiles may also be adhered to the roof with cement mortar or polyurethane foam.
In some areas of the US, ice-dam protection membranes and other peel-and-stick adhesives were used as underlay-ments in the past. However, newer underlayment materials, such as synthetic polypropylene and single-ply modified bitu-men products, are becoming more popular. These underlay-ments vary in application, so you should thoroughly research
64 SOL ARPRO | December/January 2011 them before applying underlayment flashing for PV racking standoffs. It is critical to follow the manufacturers’ guidelines and specifications. Single- and double-layer felt underlayments can be easy to work with, but adhesive underlayments may require more sophisticated equipment and the use of torches or hot tar. For example, many peel-and-stick underlayments require an adhesive flashing to be applied with the underlayment; and other mop- or torch-down underlayments require labor-intensive roofing practices that must be performed by a professional roofer.
STANDARDS FOR BEST PRACTICES
Rack-mounting products such as tile hooks are common, but ultimately, these products rely on sealant at the underlayment level of the tile roof. The National Roofing Contractors Association (NRCA), the Tile Roofing Institute (TRI) and the Western States Roofing Contractors Association (WSRCA) provide industry best practices for tile roof installations. In the past, solar mounting systems were considered “roof attachments.” The NRCA now classifies them as “roof penetrations” and suggests that all solar-mounting penetrations be flashed appropriately.
Although some building departments may not require double flashing, the NRCA, TRI, WSRCA, as well as roofers and many PV system installers see it as the best practice for waterproofing tile-roof pen-etrations. The NRCA Roofing Manual: Steep-Slope Roof Systems–2009 includes specific directions for
flashing methods for vent pipes on tile roofs. Standoff flash-ing approaches should follow similar guidelines. One method suggests using a primary flashing underneath the tiles to be waterproofed in conjunction with the underlayment, as well as a secondary flashing at the top tile level. The Concrete and Clay Roof Tile Installation Manual for Moderate Climate Regions, written by the TRI and WSRCA, also recommends this method (see Figure 1).
DOUBLE-FLASHING APPROACHES
The basic concept of double-flashing penetrations on a tile roof is to apply a primary flashing underneath the tiles and a secondary flashing, typically aluminum or lead, at the top tile level. Here I look at two examples of the techniques.
Sungevity is a California-based integrator with a leasing program that allows homeowners to purchase the PV system output rather than the system. The system itself is owned and maintained by Sungevity. To ensure high quality and performance, and to minimize the potential liability of water damage, Sungevity has developed a list of approved flashing
products for tile-roof applications that comply with its strict installation guidelines.
Sungevity employs tile-mount double-flashing kits from Quick Mount PV that are based on one of the NRCA- and TRI-recommended methods of double flashing. These kits consist of a primary peel-and-stick butyl flashing designed to interlay into the felt underlayment, and which is followed by a secondary aluminum flashing on the top tile level (see Figures 2a and 2b, p. 66). The primary flashing is installed over a layer of felt paper and overlapped by the top layer of felt underlayment, similar to the approach shown in Figure 1. This provides a shingle-like lapping system that allows water to shed down the roof underlayment. The tile-level flashing provides a top layer of protection against direct ele-ments such as rain, hail and long-term UV exposure.
Arizona-based American Solar Electric utilizes a similar but slightly different approach. This integrator uses galva-nized flashing instead of peel-and-stick as the primary flash-ing. This primary flashing is installed underneath the tiles and over the underlayment. The primary flashing is then sealed using the three-course method listed in C O N T I N U E D O N P A G E 6 6
Tile Roofing Systems
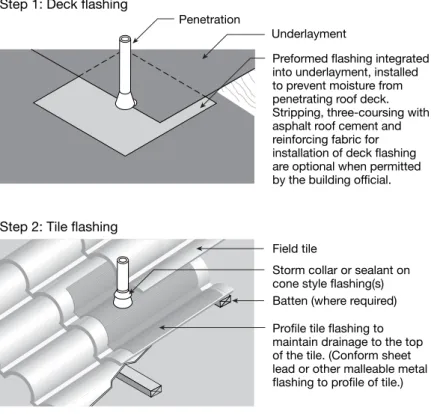
Step 1: Deck flashing
Step 2: Tile flashing
Penetration
Underlayment
Preformed flashing integrated into underlayment, installed to prevent moisture from penetrating roof deck. Stripping, three-coursing with asphalt roof cement and reinforcing fabric for installation of deck flashing are optional when permitted by the building official. Field tile
Storm collar or sealant on cone style flashing(s) Profile tile flashing to maintain drainage to the top of the tile. (Conform sheet lead or other malleable metal flashing to profile of tile.) Batten (where required)
Figure 1 The Concrete and Clay Roof Tile Installation Manual For Moderate Climate Regions includes best practices for flashing roof penetrations for tile-roof applications as shown in this two-step illustration. Note that all penetrations should be located so as not to impede flashings at roof transitions.
Courtesy
T
ile Roofing
Ins
the TRI manual (see Figure 3, p. 68). This system consists of a layer of approved mastic or roofing cement, a layer of mesh and another layer of mastic. Most building departments that require double flashing on tile roofs recognize this method.
RETROFIT APPLICATIONS
Poorly installed tile roofs can present problems for solar installers who may become vulnerable to liability issues on the roof after their job is complete. Many mistakes can be made when installing a tile roof. Proper batten and under- layment installation is key to allow complete drainage to keep the subroof clear, because concrete and clay deposits col-lect over the years underneath tiles. Many valleys and eves
have been known to leak due to improper underlayment and batten installation—and damage from water intrusion may not become noticeable until it becomes severe. It is extremely important for solar installers to partner with a reputable roofing contractor who can verify the integrity of the existing roofing system prior to the solar installation.
Although the NRCA and TRI manuals provide quality-assurance standards, they are mostly based on new roof applications. However, most solar installations are retro-fit applications. Layering flashing into the underlayment on a new roof that is being constructed can be simple, but extra steps may be needed when a flashing must be retrofitted into existing underlayment. For example, on a retrofit application your standoff and primary flashing may not fall in a position that is close to the overlap of felt paper, making it difficult to achieve shingle-like layering between the primary flashing and underlayment. The method that is used to deal with this situation is called bibbing. When the overlapping drip edge of the felt paper ends in the tile course above the penetra-tion, the installer can use a separate piece of felt paper to fit under the battens and overlapping felt, C O N T I N U E D O N P A G E 6 8
A
nyone who has been in the solar industry longer than 5 years has seen dramatic changes and improvements in technology and installation practices. Five years ago, few solar installers paid sufficient attention to roof penetrations and simply relied on the classic L-bracket fastened directly into the roof with sealant as the only weather protection. Tony Diaz, a California roofing contractor, NABCEP Certified Solar PV Installer and instructor for Solar Energy International and the Tile Roofing Institute, stated in an interview: “Every roofer has experienced the pain, misery and frustration of homeowners who have had roof damage from incorporating equipment from the solar hot water revolution in the ’70s and ’80s. That same damage is being repeated with PV installations. Fortunately, manufacturers are designing products that meet proper roofing codes and best practices so that history does not repeat itself.”Although manufacturers are designing new and improved products to meet roofing standards, many build-ing departments do not mandate proper flashbuild-ing methods to comply with roofing best practices. Unfortunately, this shifts the responsibility and liability onto the solar installer. The solar industry has always been focused on lowering cost and decreasing installation time, but it is essential that it also focus on quality. As a new and growing industry, solar cannot afford to risk painting a negative image of itself with poor workmanship or code violations. When installing a PV system, roof warranties, codes, installation specifications and best practices must always be considered. Returning to repair roof leaks after a job is complete takes more time and money than doing it right the first time. {
!"#$%&'()*+,-#$(.$/)('#)01$$
20+3"#4$5((.$/#,#*)+*6(,3
$
Courtesy Sungevity (2)
Figure 2a and 2b To meet one of the NRCA- and TRI-recommended methods of double flash-ing, the Quick Mount PV double-flashing kit consists of a primary peel-and-stick butyl flashing designed to interlay into the felt underlayment. A secondary preformed aluminum Flat Tile Mount flashing is applied at the top tile level.
68 SOL ARPRO | December/January 2011
which then extends down to bib around the penetration (see Figure 4). This technique allows water and moisture to drain down the underlayment and into the gutters.
Older traditional Spanish tiles and tiles that use mortar can pose significant challenges. Depending on the manufac-turer’s instructions, mortar and tiles may be removed and reapplied, but this approach can result in excessive tile dam-age because traditional Spanish or cap-and-barrel tile roofs tend to break easily. Most installers have found that the strip-and-go method of removing the tiles and installing asphalt shingle under the array provides the best solution for the more fragile tile roof systems (see “Living with Tile,” Aug/Sept, 2009, SolarPro magazine).
AVOIDING PAST MISTAKES
In general, most tile roofs share a similar basic anatomy consisting of decking, underlayment, battens and tiles. It is essential that installers do the research to distinguish which mounting and flashing system works best on a given proj-ect. Tile roofing is one of the more complicated pitched-roof systems to deal with, but you can accomplish a watertight rack-mounted solar installation by following roofing best practices, local code requirements and roof manufacturers’ instructions. As the solar industry continues to grow, more building departments will enforce roofing best practices such as double flashing on tile roofs. Learning from the past and preparing for the future allows the industry to design innova-tive products and improve installation methods.
Johan Alfsen / Quick Mount PV / Concord, CA / [email protected] / quickmountpv.com
Manufacturers:
DaVinci Roofscapes / 800.328.4624 / davinciroofscapes.com EcoStar / 800.211.7170 / ecostar.carlisle.com
Eagle Roofing Products / 909.822.6000 / eagleroofing.com GAF Materials / 877.423.7663 / gaf.com
Hanson Roof Tile / 800.411.8453 / hansonrooftile.com Ludowici Roof Tile / 800.945.8453 / ludowici.com MonierLifetile / 800.669.8453 / monierlifetile.com Oatey / 800.321.9532 / oatey.com
Quick Mount PV / 925.687.6686 / quickmountpv.com
Resources:
Florida Roofing, Sheet Metal and Air-Conditioning Contractors Association (FRSA) / floridaroof.com
International Code Council (ICC) site, also includes International Building Code (IBC), International Residential Code (IRC) and Uniform Building Code (UBC) / iccsafe.org
National Roofing Contractors Association (NRCA) / nrca.net Sheet Metal and Air Conditioning Contractors’ National Association (SMACNA) / smacna.org
Tile Roofing Institute (TRI) / tileroofing.org
Western States Roofing Contractors Association (WSRCA) / wsrca.com
g C O N T A C T
Tile Roofing Systems
Figure 4 In retrofit installations where the standoff and primary flashing do not fall in a position that is close to the over-lap of felt paper, an approach called
bibbing can be used. When the overlapping drip edge of the felt paper ends in the tile course above the penetration, a separate piece of felt paper is positioned under the battens
and overlapping felt, which then extends down to bib around the penetration. Figure 3 This modified double-flashing detail uses a galvanized flashing installed underneath the tiles and over the underlay-ment instead of a peel-and-stick membrane. The flashing is sealed using the three-course method listed in the TRI manual, which consists of a layer of approved mastic or roofing cement, a layer of
mesh and another layer of mastic.
Courtesy
A
me
rican Solar Electric
Courtesy Quick Mount
P