California State University, San Bernardino California State University, San Bernardino
CSUSB ScholarWorks
CSUSB ScholarWorks
Theses Digitization Project John M. Pfau Library
2008
Itimecard timesheet management system
Itimecard timesheet management system
Arpita Prashant Parikh
Follow this and additional works at: https://scholarworks.lib.csusb.edu/etd-project Part of the Databases and Information Systems Commons
Recommended Citation Recommended Citation
Parikh, Arpita Prashant, "Itimecard timesheet management system" (2008). Theses Digitization Project. 3421.
ITIMECARD TIMESHEET MANAGEMENT SYSTEM
A Project Presented to the
Faculty of
California State University, San Bernardino
In Partial Fulfillment
of the Requirements for the Degree Master of Science
in
Computer Science
by
Arpita Prashant Parikh March 2008
ITIMECARD TIMESHEET MANAGEMENT SYSTEM
A Project Presented to the
Faculty of
California State University, San Bernardino
by
Arpita Prashant Parikh March 2008
Approved by:
Dr.
ABSTRACT
In the era of opportunistic expansion, small companies are heading towards expansion and development. In such a period, efficient data processing and management have
always aided the companies to progress towards their goal. This project is one of the very few efficient ways of
processing time sheets.
Computerized .submissions of time sheets make it easy for the company to generate a paycheck without having to fill out numerous forms. It also enables the company to know right away if there are any missing time sheets or errors in the time sheets and therefore an employee could
be notified immediately. The employer or administrator of
the system only has to follow a few steps to set up an employee and project, with the help of the user-friendly interface of this system. Once set up is complete, the administrator can easily sign the submitted time sheet of an employee, which expedites the whole process.
This system is very user-friendly, provides high system availability, easy access to timesheet, and high level of security to the employee. An employee also follows
only a few steps to fill out the time sheet using a web
ACKNOWLEDGEMENTS
I am grateful for the assistance of the staff members of the Computer Science Department of CSUSB who provided guidance on the study, in particular Dr. David Turner, Dr. Richard Botting, Dr. Ernesto Gomez and Dr. Jospine Mendoza. I would like to specially thank my advisor, Dr. David
Turner for giving me the inspiration and direction to write this paper.
My sincere thanks to the following employees of iSPACE: Vinod Kottapalli, who helped me with Microsoft InfoPath and Microsoft SharePoint, and Rushi Patel, who taught me ASP.NET and Microsoft SQL Server. Also, I would thank iSPACE for their generosity in letting me use their computing resources for conducting my project results, and providing me with a rewarding professional experience. Finally, I would like to thank my family for supporting me and giving me courage.
TABLE OF CONTENTS
ABSTRACT... iii
ACKNOWLEDGEMENTS... v
LIST OF TABLES... viii
LIST OF FIGURES... x
CHAPTER ONE: INTRODUCTION 1.1 Rationale and Importance of Project... 1
1.2 Background... 2
1.3 Current Business Process... 3
CHAPTER TWO: TECHNICAL REQUIREMENT SPECIFICATION 2.1 Use Case Analysis... 6
2.2 Conceptual Model... 28
2.3 Error Handling ... 29
2.4 System Security... 30
CHAPTER THREE: TOOLS AND DEPENDENCIES 3.1 Microsoft InfoPath... 32
3.2 Microsoft ASP.NET... 33
3.3 Microsoft SQL Server... 34
3.4 Microsoft SharePoint... 35
CHAPTER FOUR: THE ITIMECARD SOFTWARE SYSTEM 4.1 Overview... 37
CHAPTER FIVE: TESTING
5.1 Unit/System Testing... 44
5.2 Problems... 71
CHAPTER SIX: SYSTEM ADMINISTRATION MANUAL 6.1 Server Setup... 74
6.2 Client Setup... 8 0 CHAPTER SEVEN: END USER MANUAL 7.1 Accessing the iTimeCard System... 81
7.2 Submitting Timesheet... 84
CHAPTER EIGHT: ADMIN USER MANUAL 8.1 Managing Submitted Timesheet... 87
8.2 Managing Employee Data... 90
8.3 Managing Project Data... 98
CHAPTER NINE: CONCLUSION 9.1 Summary... 104
9.2 Future Directions... 105
APPENDIX: APPLICATION CODE... 106
LIST OF TABLES
Table 1. Steps to Add a New. Employee... 8
Table 2. Steps to Add a New Project... 11
Table 3. Steps to View Employee... 13
Table 4. Steps to View Project... 14
Table 5. Steps to Delete a Project... 16
Table 6. Steps to Delete an Employee... 17
Table 7. Steps to Edit Employee Data... 18
Table 8. Steps to Edit Project Data... 20
Table 9. Steps to Manage Submitted Timesheet... 22
Table 10. Steps to Create a Timecard... 23
Table 11. Steps to Submit a Timesheet... 26
Table 12. Employee Table Description... 41
Table 13. Project Table Description... 42
Table 14. ProjectEmployee Table Description... 43
Table 15. Test Case of Add Employee... 45
Table 16. Test Case of Add Project... 49
Table 17. Test Case of View Employee... 52
Table 18. Test Case of View Project... 54
Table 19. Test Case of Delete Employee... 56
Table 20. Test Case of Delete Project... 57
Table 23. Test Case of Manage Submitted Timesheet... 65
Table 24. Test Case of Create Timecard... 66
LIST OF FIGURES
Figure 1. Current Timesheet... 3
Figure 2. Timesheet Submission Process... 5
Figure 3. Use Case Diagram... 7
Figure 4. Entity-Relationship Diagram... 28
Figure 5. Try Catch Block... 29
Figure 6. System Flow Diagram... 38
Figure 7. Database Diagram... 40
Figure 8. Microsoft SharePoint Setup Error Step 1.... 71
Figure 9. Microsoft SharePoint Setup Error Step 2.... 72
Figure 10. Microsoft SharePoint Setup Step 1... 75
Figure 11. Microsoft SharePoint Setup Step 2... 76
Figure 12. Microsoft SharePoint Setup Step 3... 77
Figure 13. Microsoft SharePoint Setup Step 4... 78
Figure 14. Microsoft SharePoint Setup Step 5... 79
Figure 15. Accessing the iTimeCard Home Page... 81
Figure 16. Select a Project to Access the iTimeCard... 83
Figure 17. Submitting the iTimeCard Screen Step 1.... 85
Figure 18. Submitting the iTimeCard Screen Step 2.... 8 6 Figure 19. Managing Submitted iTimeCard Screen... 88
Figure 20. Submitted iTimeCard List... 89
Figure 23. Add Employee Screen....'... 94
Figure 24. Record Save Message... 95
Figure 25. Edit Employee Screen... 97
Figure 26. Managing Project Detail Home Page... 98
Figure 27. View Project Screen... 99
Figure 28. Add a New Project Screen... 101
CHAPTER ONE INTRODUCTION
1.1 Rationale and Importance of Project
The project was proposed by iSpace, an IT and Business Process Outsourcing (BPO) solutions company. There are four major purposes in why I accepted the project. The first purpose was to gain experience with Microsoft SharePoint. Using SharePoint, I performed research on how to develop a website and how to store documents on the website. The
second purpose was to gain experience with Microsoft Visual Studio to develop websites in .NET using C# language. The third purpose was to gain experience with Microsoft SQL Server. The fourth purpose was to gain experience with Microsoft InfoPath. By working on this project I not only got a chance to learn new and demanding technologies but also gained experience in various facets of the software life cycle such as requirement gathering, designing, development and testing.
This project will help iSpace automate their timesheet submission process by storing timesheets electronically rather than storing them in the paper form. This project
also allows employees to resubmit or modify their timesheets in case of any change in their respective timesheets.
1.2 Background
Headquartered at Los Angeles, iSpace is an IT and Business Process Outsourcing (BPO) solutions company serving fortune 1000 companies in healthcare, technology, government, retail, entertainment, automotive and
transportation industries. iSpace has more than 400 employees working for clients worldwide.
iSpace employees need to submit their timesheets every week to the accounting department. The timesheets need to pass through an approval process as well.
Currently, paper timesheets are manually approved and submitted to the accounting department either via fax or email. The accounting department needs to manually collect and organize all the timesheets from all the employees. This is a time consuming task that needs lots of follow up
emails, reminders and filing paper timesheets.'
In order to eliminate drawbacks associated with paper based transactions and to gain benefits of electronic
transactions, iSpace has decided to develop the iTimeCard System.
1.3 Current Business Process
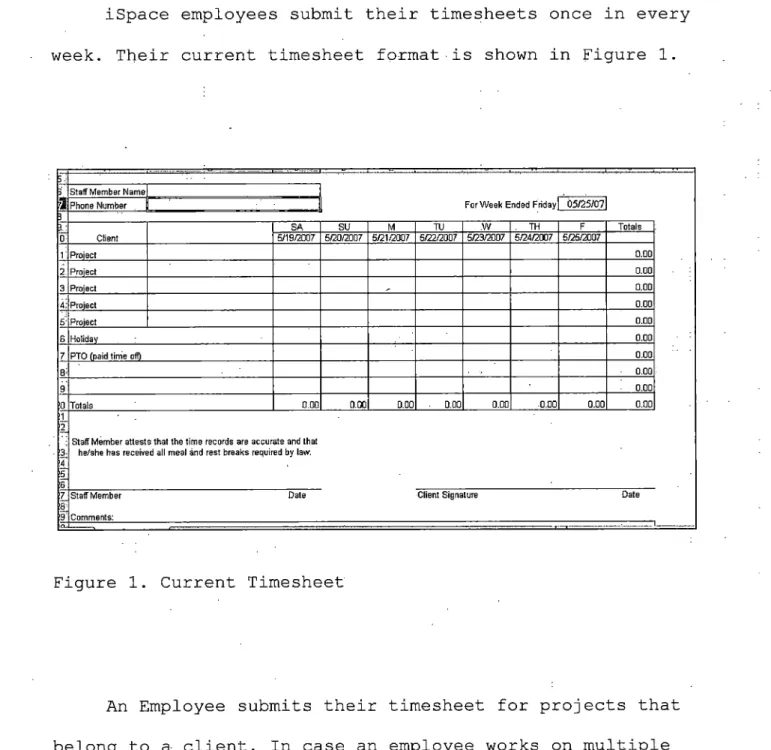
iSpace employees submit their timesheets once in every week. Their current timesheet format is shown in Figure 1.
5 -•
) Staff Member Name)
For Week Ended Friday
a
Phone Number i 05/25/07 3 I: 0 Client SA SU M TU .W . TH F Totals 5/19/2007 5/20/2007 5/21/2007 5/22/2007 5/23/2007 5/24/2007 5/25/2007 1'Project 0.00 2 Project 0.00 3 Project 0.00 4:Project 0.00 5: Project 0.00 6 Holiday 0.007 PTO (paid time off) 0.00
0.00 9 • 0.00 0 Totals 0.00 0.00 0.00 0.00 0.00 •0.00 0.00 0.00 :1 2. 3-4 £ 6
Staff Member attests that the time records are accurate and that he/she has received all meal and rest breaks required by law.
7 '8' 9’
Staff Member Date
Comments:
Client Signature Date
Figure 1. Current Timesheet
projects for the same client, only one timesheet needs to be submitted. In case an employee works on multiple
projects for different clients, different timesheets per client need to be submitted.
On the timesheet an employee identifies the project name they are working on and the number of hours they have worked for each project.
Once the timesheet is filled out, an employee has to get a signature from his/her supervisor. An employee who works at a client site has to get a signature from their respective client manager.
Finally, an employee has to fax or email (the scanned copy) of the filled timesheet to the account department. Once the account department receives the timesheet,
timesheet information is reviewed and recorded in the database. The account department also files an employee's timesheet for future references. The paycheck is then issued to the employee biweekly.
Figure 2 describes current timesheet submission
CHAPTER TWO
TECHNICAL REQUIREMENT SPECIFICATION
2.1 Use Case Analysis
The user community will consist of many people working on various locations and will be divided into two types of roles:
• Administrator (admin)
• Users
Admin user is responsible for managing Employees, Projects and submitted timesheets.
Users are employees of iSpace who will create, fill out and submit timesheets for payroll and billing purposes.
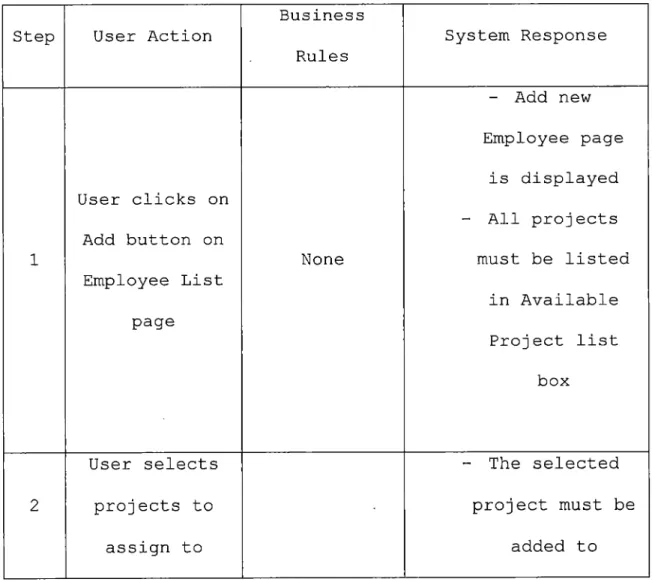
Add a New Employee:
This use case deals with adding a new employee to the system who needs to submit a timesheet for payroll and billing purpose.
Table 1. Steps to Add a New Employee
Step User Action
Business Rules System Response 1 User clicks on Add button on Employee List page None - Add new Employee page is displayed - All projects must be listed in Available Project list box 2 User selects projects to assign to - The selected project must be added to
employee (> button)
Assigned Project list box and removed
from Available Project list
box - The selected
project must be
User selects added to
projects to Available
3 unassigned to Project list
employee (< box and removed
button) from Assigned
Project list box
- Employee - Message must be
Name displayed in
User clicks on must not case business
4 save & go back be blank rules are
button - Email validated
must not - In case all the
and should be incorrec t format - Login ID must not be blank
are met, data must be saved in database - Message must be displayed to the user, stating that data is saved - View Employee list screen must be displayed 5 User click on Go Back button None - View Employee page is displayed - Will not save
any changes made in any
Add a New Project:
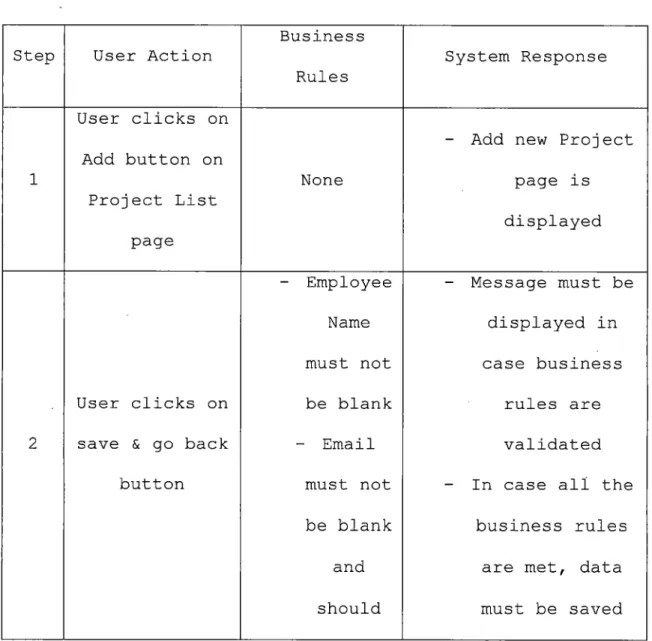
This use case deals with adding a new project that an employee needs to work on.
Table 2. Steps to Add a New Project
Step User Action
Business Rules System Response 1 User clicks on Add button on Project List page None
- Add new Project page is displayed
- Employee - Message must be
Name displayed in
must not case business
User clicks on be blank rules are
2 save & go back - Email validated
button must not - In case all the
be blank business rules
and are met, data
be incorrec t format - Login ID must not be blank in database - Message must be displayed to the user, stating that data is saved - View Project list screen must be displayed 3 User click on Clear button None - Project Name, Client Name, Client Manager, Is Active and Is billable field should be empty 4 User click on Go Back None - View Project page is displayed - Will not save
made in any field
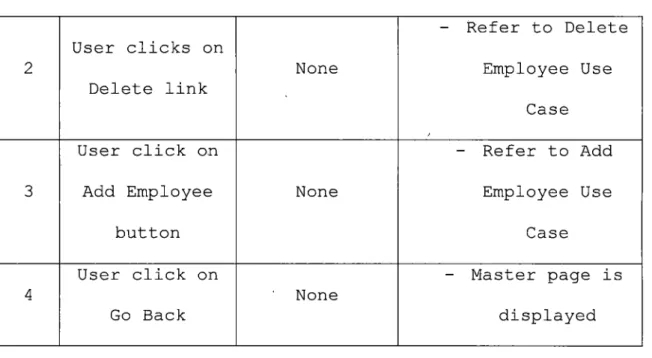
View employee:
This use case deals with viewing a list of employees using iTimeCard system.
Table 3. Steps to View Employee
Step User Action
Business Rules System Response 1 User clicks on Employee link None - View Employee page is displayed - Employee name,
Login ID, Email and IsRSM should be display in data
2 User clicks on Delete link None - Refer to Delete Employee Use Case
User click on - Refer to Add
3 Add Employee None Employee Use
button Case 4 User click on Go Back None - Master page is displayed View project:
This use case deals with viewing a list of projects available for Employees to be assigned for iTimeCard system.
Table 4. Steps to View Project
Step User Action
Business Rules System Response 1 User clicks on Project link None - View Project page is
i i l i 1 1 1 i
■
1 i i i displayed - Project Name, Client Name, Client Manager, Is Active and Is Billable should be display in data grid 2 1 User clicks on 1 Delete link i None - Refer to Delete Project Use Case 3 User click on AddiProj ect I b'utton None - Refer to Add Project Use Case 4 ' User 1 click on 1 Go Back None - Master page is displayedDelete a project: I
This gse case deals with deleting a project in case i
project is 'wrongly entered in the system.
Table 5. St'eps to Delete a Project
Business
Step User Action1
Rules System Response - Should delete 1 the selected 1 1 proj ect User , click on information Delete Link on I - If project is
1 the data grid None
assigned to of the Project
employee then list
user should not I
able to delete I
I
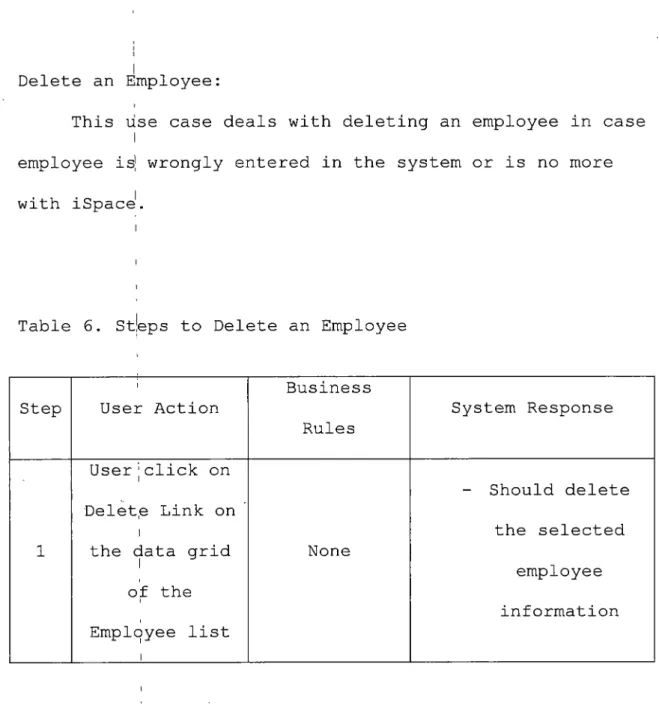
Delete an Employee:
This use case deals with deleting an employee in case I
employee is’ wrongly entered in the system or is no more with iSpace1.
i
Table 6. St’eps to Delete an Employee
Step User Action
Business Rules System Response 1 User j click on Delet,e Link on i
the data grid I of the Employee list i None - Should delete the selected employee information
Edit Employee information:
This use case deals with editing employee related information such as name, email or login id.
Table 7. Steps to Edit Employee Data
Step User Action
Business Rules System-Response 1 User click on Employee name link None
- Will open the Update Employee
page
- All the current employee information should be fill up in the update employee page. 2 User clicks on save & go back
button - Employee Name must not be blank - Message must be displayed in case business rules are
- Email validated
must not - In case all the
be blank business rules
and are met, data
should must be saved
be in database
incorrec - Message must be
t format displayed to
- Login ID the user,
must not stating that
be blank data is saved
- View Employee list screen
must be displayed
Edit Project information:
This project use cases deals with editing project information such as project name, client name etc.
Table 8. Steps to Edit Project Data
Step User Action
Business Rules
System Response
User click on
- Will open the Update Project
page
- All the current proj ect 1 Project name link None information should be fill up in the update employee page.
User clicks on - Project - Message must be
2 save & go back Name displayed in
-be blank - Client Name must not be blank rules are validated - In case all the
business rules are met, data must be saved in database - Message must be displayed to the user, stating that data is saved ' - View Project list screen must be displayed
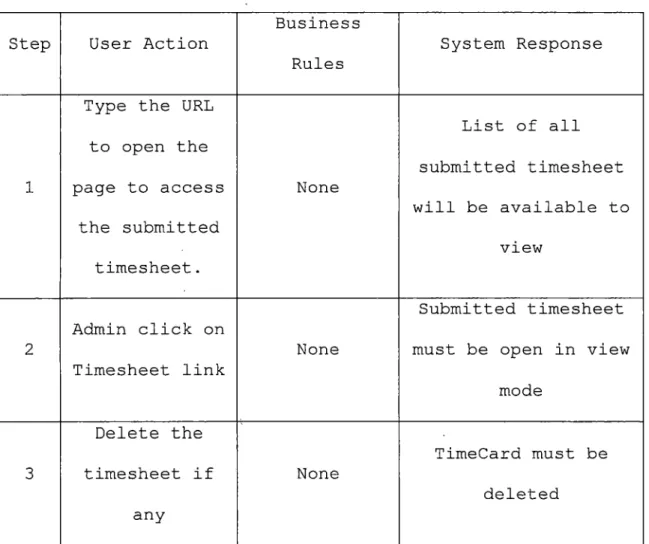
Administration manages submitted timesheet:
This use case deals with managing submitted
timesheets. The Admin can view timesheets submitted by employee, review them or delete them and ask for
resubmission if required.
Table 9. Steps to Manage Submitted Timesheet
Step User Action
Business Rules
System Response
1
Type the URL to open the page to access the submitted timesheet. None List of all submitted timesheet will be available to view 2 Admin click on Timesheet link None Submitted timesheet must be open in view
mode 3 Delete the timesheet if any None TimeCard must be deleted
information is incorrect
Create a Timecard:
Each employee is required to create a timecard using an InfoPath form by selecting a project and date.
Table 10. Steps to Create a Timecard
Step User Action
Business Rules
System Response
1
Type the URL to open the page to submit the Timesheet. None - Should open up the page 2 User click on the Timesheet link to open the Timesheet None - A timesheet should open using Window Authentication. - Project should
be populated into dropdown
list box for each user. 3 Select the Project from drop down list. None None 4 Select the ending day for
that week Ending day cannot be greater than today's date -5 Click on "Create the Timecard" None - Should open up timesheet page - In case all the
business rules are met. - The employee name, Client Name and Project Name should be
carried forward to next page - Initially all hours should be zero. - Date should be filled out according to previous screen information - Submit button should be inactive
Submitting the timesheet:
This use case deals with an employee submitting the timesheet once it is filled and complete. The submitted timesheet is emailed to accounts department and published on the SharePoint server.
Table 11. Steps to Submit a Timesheet
Step User Action Business Rules System Response
1
Users fills out hours they
for selected proj ect - Total= hour work + Holiday + Paid Time Out - Hours cannot be great than 24 hrs - Should show total according to business rule
Check the - acknowledge - Submit button
2 checkbox that filled will be
acknowledgement is correct 3 Click on submit button - Send email to account department - Save the timesheet into SharePoint - Meet the business rule mention.
2.2 Conceptual Model
For the conceptual model I have used an ER (Entity -Relationship) diagram.1
Figure 4. Entity-Relationship Diagram
Employee is an entity type that contains attributes such as EmpID, FullName, LoginlD, IsRSM and EmaillD.
Project is an entity type that contains attributes such as ProjID, ProjectName, ClientName, ClientManager, IsActive and IsBillable.
TimeSheet is an entity type that contains attributes such as TimeSheetID, EndDate, RegHrs, PaidTimeOff and HolidayHrs.
An employee can work on more than one project. And a project can be assigned to more than one employee. This illustrates that an employee and a project has a many-to- many relationship.
2.3 Error Handling
The InfoPath iTimeCard form uses Visual Studio Tool Application (C#) to handle custom code. Exception handling is done using a try catch block.
try {
loginlD = e.Inputparameters["login"] ; }
catch (Exception ex)
{
loginlD = "ruship"; }
All code is written in a try block and if exception is raised the same code is handled in catch block.
The Administrator Module written in C# handles exception in the same way. It uses .Net Validation Controls to handle various types of validations.
- The Regular Expression Validation is used for checking
the email field which it accepted in that format.
- The Required Field Validation is used to not accept
blank fields. It is applied on null field in the tables.
Validation summary is used to display error messages on the screen.
2.4 System Security
The iTimeCard form is published on the SharePoint
server system that uses Windows authentication. An employee needs to be on a network and should be a domain user in order to access the iTimeCard System.
Once an Employee accesses iTimeCard using a web
browser, internally an employee's Windows credentials are sent to SharePoint server for authentication. An Employee profile is stored in a database in the Employee table that
iTimeCard, the login id is retrieved by code written in VSTA.
Using the login id and by calling the SQL stored
procedure, employee details are retrieved for that employee from the database and displayed on the form wherever
CHAPTER THREE TOOLS AND DEPENDENCIES
3.1 Microsoft InfoPath
Microsoft InfoPath 2007 is part of the Microsoft Office System that is used to design and fill out
electronic forms. InfoPath is based on XML (Extensible Markup Language).
Organizations use various forms such as expense reports, insurance forms, time cards etc. These form
templates, can be designed using InfoPath with no or little knowledge about programming. InfoPath forms can be
published easily on shared folders on a network, SharePoint services or a web server that allows users to easily access and fill out these forms when needed.
InfoPath forms have document like features that allow them to check spelling, format text, insert graphics etc. Some forms that are browser enabled can be accessed and filled out easily using the web browser directly without installing InfoPath on the local system.
InfoPath forms can get data from many data sources and can call web services as well. It can be integrated with
Visual Studio IDE in order to write custom code in .Net languages.
In the iTimeCard system, the timecard is designed using InfoPath 2007 form templates. Some data required to populate the form is fetched by calling the web services. Custom code is written using integrated Visual Studio Tools Application (VSTA).
3.2 Microsoft ASP.NET
Microsoft .Net Framework is an environment that is used to develop and deploy web based windows applications and web services as well. There are various technologies that are part of the .Net Framework - ASP.NET, Windows Forms, Web Services, Remoting etc.
ASP.NET is a server side scripting technology that enables scripts to be executed by an Internet server. ASP.Net applications can be developed in one of the .Net languages (usually C# or VB.NET).
Unlike traditional ASP pages, ASP.NET pages are pre compiled and have less response time. It has world class tool support, is simple to use, is highly scalable and comes with a good security framework. CLR (Common Language
Runtime) is the core part of the Microsoft Framework and also of ASP.NET.
ASP.NET applications are easy to manage since
applications or changes to them can be easily be deployed by copying files to the server. Moreover, no server restart is required.
The Admin Tool to manage employees and projects used in iTimecard System is developed in ASP.NET 2.0. The
application is developed using Visual Studio 2005 IDE. The application/web site is deployed in ISS 6.0 as a virtual directory to default web sites.
3.3 Microsoft SQL Server
Microsoft SQL Server 2005 is a data management and analysis software. Databases are created using SQL Server tools. The SQL server is highly scalable and ensures
businesses with the highest level of system availability. It provides better security features and it is user
friendly.
SQL Server is a Relational Database Management System (RDBMS) that uses T-SQL as a programming language.
stored procedures, views, triggers and user defined functions.
Enterprise Manager is the SQL Server design time tool that helps to create database and database objects. SQL Query Analyzer is used for developing database objects using T-SQL scripts.
SQL Server database can be integrated with any application developed in any platform using SQL Data Provider or OLEDB Data Provider.
iTimeCard System uses Microsoft SQL Server 2005 as its database server. Database objects such as tables and stored procedures are developed to support the application. The tables are normalized and procedures are optimized.
ASP.NET pages access SQL Server database using ADO.NET technology.
3.4 Microsoft
SharePoint-Office SharePoint Server 2007 is a server program that is part of the 2007 Microsoft Office system. SharePoint is used to facilitate collaboration and implement business processes. It also contains content management features
that help to store and supply information essential to an organization.
SharePoint sites can be created easily and quickly. The sites can support content (including forms) publishing, content management, records management, or business
intelligence needs. It has a powerful search engine that helps to search for people, documents, and data.
iTimeCard InfoPath Form is published on SharePoint Server 2007 and can be accessed by end users (Employees) using the web browser. The end users need not have InfoPath installed on their local machines to access and fill the report. Also, the powerful search engine enables the admin to search any data (time records) in an organized manner. The submitted time sheet is recorded in an ordered way which is easy for an admin to access.
The Time Card, once filled, will be submitted by the Employee. The submitted iTimeCard will be stored on
CHAPTER FOUR
THE ITIMECARD SOFTWARE SYSTEM
4.1 Overview
The iTimeCard Software System is an Employee Time Card processing system in which an employee submits his/her time card for payroll and billing purposes. The system is
developed using the latest technologies such as InfoPath 2007, SharePoint 2007, ASP.Net 2.0 and SQL Server 2005.
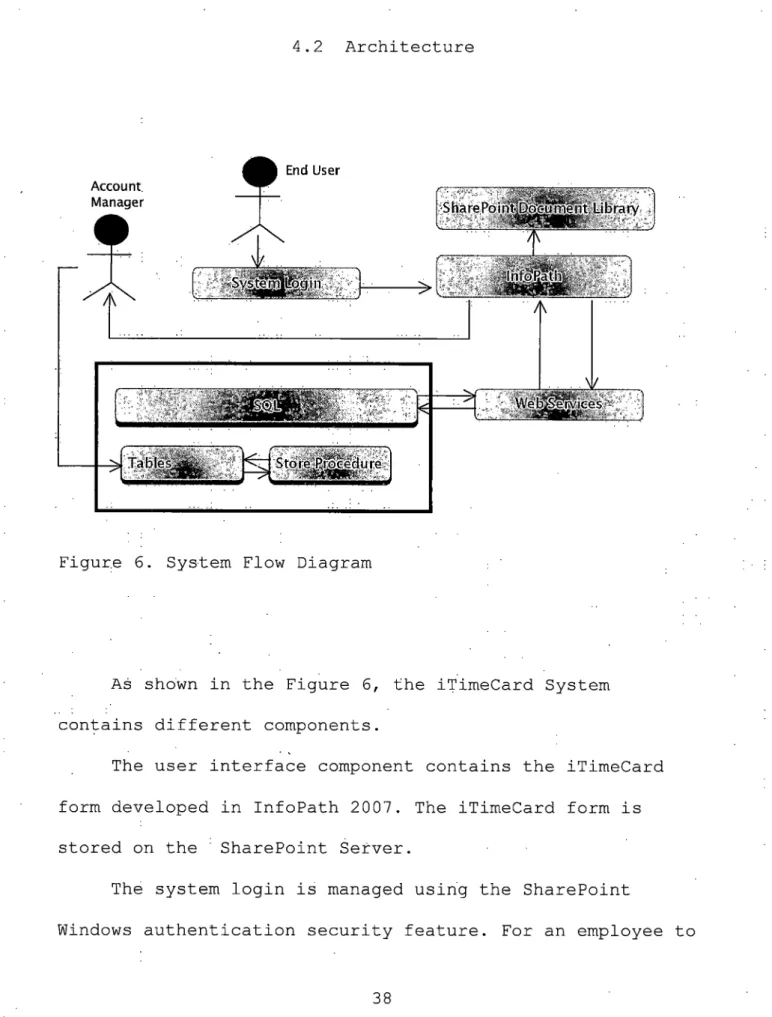
4.2 Architecture
Figure 6. System Flow Diagram
As shown in the Figure 6, the iTimeCard System contains different components.
The user interface component contains the iTimeCard form developed in InfoPath 2007. The iTimeCard form is stored on the ' SharePoint Server.
The system login is managed using the SharePoint
fill out and submit this form, he/she needs to login to the iSpace network using a domain user name since SharePoint uses Windows authentication for security purposes.
InfoPath will call a web service to get project
information for that employee. The Web services will call the database stored procedures, which will get project information from tables. InfoPath displays project information on its Create TimeCard form to allow an
employee to select a project for which he/she is filling out a timesheet.
Once the timesheet is filled out in InfoPath, it is submitted to the SharePoint Document Library and an email is also sent to the Administrator.
The Administrator is also responsible for updating the employee and the project details. For these, there is a separate Administrator module developed in ASP.NET that manages an employee and project details that are used by the iTimeCard System.
4.3 Database Design
In database, there are three tables. The Employee table contains employee information. The Project table
contains project information. Whereas, the ProjectEmployee table connects the Project and the Employee tables.
Employee: *
a
EmployeelD i. F LogonlD FullName Email. r~ IsRSM Project * ' ProjeccID u ProjectName ClientName ! ClientManager IsActive F IsBillable ProjectEmployee |i~T| ProjectlD^ P?| EmployeelDTable 12. Employee Table Description
Column Name
Data type Allow
Null
Constraints/Description
EmployeelD I nt No - Unique key into
the table
- Auto Generate by the system.
LogonlD Varchar(50) No - Will store
Domain\Username
FullName Varchar(50). Yes - Use to-Store
Employee Name into the table
IsRSM Bit Yes - If employee i
regular or not
Email varchar(50) Yes - Contains email '
address of an employee
Table 13. Project Table Description
Column Name Data
type
Allow Null
Constraints/Description
Proj ectID Int No - Unique key into
the table
- Auto Generate by the system.
Proj ectName varchar(
50)
Yes - Contains name of
proj ect
ClientName varchar(
50)
Yes - Contains name of
client
ClientManager varchar(
50)
Yes - Contains name of
manager
IsActive Bit Yes - Is project active
project or not
IsBillable Bit Yes - Is project
Table 14. ProjectEmployee' Table Description Column
Name
Data type Allow
Null
Constraints/Description
Proj ectID Int No - Foreign key of
the Project table
EmployeelD Int No - Foreign key of the
CHAPTER FIVE TESTING
5.1 Unit/System Testing
Testing was performed for each unit individually and the system in general in the iTimeCard System and the
Administrator Module. Although separate test cases were not created for unit and system testing, we have to ensure that the individual units work fine with the testing system in general via thorough code review.
Exhaustive test cases are written to test units and the system with expected results. Use case analysis is the source for generating these test cases.
Add Employee screen:
This test case deals with adding a new employee to the system who needs to submit a timesheet for payroll and
Table 15. Test Case of Add Employee Test ID User Action Expected Output Resu It (P/F ) Actual Output in case of Failure User clicks on
-Add Add new Employee
1 P
button on page is displayed
Employee List page
User
clicks on All projects must
Add be listed in
2 P
-button on Available Project
• Employee list box
List page
User The selected
selects project must be
3
-proj ects added to Assigned r
to employee
(> button)
and removed from Available Project
list box
User
selects The selected
proj ects project must be
to added to Available
4 unassigne Project list box
P
-d to and removed from
employee Assigned Project
(< list box button) User clicks on 5 save & go back button Message must be displayed for the
p and same Employee Name is blank
User clicks on save & go
back Message must be
button displayed for the
6
and Email same P
is blank or incorrect format User clicks on
save & go Message must be
back displayed for the
7
button same P
and LoginlD is blank
User Data must be saved
clicks on in database
8
save & go And Message must P
button and all business rules are
met
the user, stating that data is saved
-9 User clicks on save & go back button and all business rules are met and data is saved to database
View Employee list screen must be displayed with the
new records added to the list P -10 User click on Go Back button
View Employee page is displayed
without save any changes made in any field
-Add a New Project:
This test case deals with adding a new project that an employee needs to work on.
Table 16. Test Case of Add Project
Test ID User Action Expected Output Resu It (P/F ) Actual Output in case of Failure User clicks on
-Add Add a new Project
1
button on page is displayed
P Proj ect List page User Message must be clicks on
displayed for the
2 save & go
same P
back button
and Pro j ect Name is blank 3 User clicks on save & go back button and Client Name is blank Message must be displayed for the .
same P -4 User clicks on save & go back button and all business rules are met
Data must be saved in database And Message must
be displayed to the user, stating that data is saved
-5 User clicks on save & go back button and all business rules are met and data is saved to database
View Project list screen must be displayed with the
new records added to the list P -6 User click on Go Back button
View Project page is displayed
without
saving any changes made on add screen
-View employee:
This test case deals with viewing a list of employees using iTimeCard system.
Table 17. Test Case of View Employee
Test ID User Action Expected Output Resu It (P/F ) Actual Output in case of Failure User clicks on
-Employee View Employee page
1 P
link on is displayed
Master page
User All Employee data
clicks on that is stored in
2 Employee the database must P
-link on be listed in data
page
User
-click on Add New Employee
employee page is displayed.
3 name link to edit And all information must P
-employee be populated into
informati that page.
on 4 User clicks on delete link Record must be deleted from the
database P -5 User clicks on Add a new Employee
Add New Employee page must be displayed and all
field must be blank P -User 6 click on Go Back Master page is displayed P -button
View project:
This test case deals with viewing a list of projects available for Employees to be assigned for iTimeCard
system.
Table 18. Test Case of View Project
Test ID User Action Expected Output Resu It (P/F ) Actual Output in case of Failure 1 User clicks on proj ect link on Master page
View Project page is displayed
P
2
User clicks on
All Project data that is stored in
-proj ect link on
Master page
the database must -be listed in data
grid 3 User click on proj ect name link
Add New Project
page is displayed. P -4 User clicks on delete link Record must be deleted from the
database P -5 User clicks on Add a new Proj ect
Add New Project page must be displayed and all
field must be blank P -6 User click on Go Back button Master page is displayed P
-Delete an Employee:
This test case deals with deleting an employee in case the employee is wrongly entered in the system or is no more with iSpace.
Table 19. Test Case of Delete Employee
Test ID User Action Expected Output Resu It (P/F ) Actual Output in case of Failure User clicks on
delete Record must be
1 link on deleted from the
P
-the View database
Employee page
Delete a project:
This test case deals with deleting a project in case the project is wrongly entered in the system.
Table 20. Test Case of Delete Project
Test ID User Action Expected Output Resu It (P/F ) Actual Output in case of Failure 1 User clicks on delete link the View Proj ect page Record must be deleted from the
database if project is not
assigned to employee
P
-User Record must be Record
o
clicks on not deleted from is
delete the database if F deleted
assigned to employee database if proj ect is assigned to employee
Edit Employee information:
This test case deals with editing employee related information such as name, email or login id.
Table 21. Test Case of Edit Employee Data
Test ID User Action Expected Output Resu It (P/F ) Actual Output in case of Failure 1 User click on
Add New Employee
page is displayed. P
-employee name link to edit employee informati on on View Employee page And all information must be populated into that page. 2 User clicks on save & go back button and Employee Name is blank Message must be displayed for the
same P -3 User clicks on save & go back Message must be displayed for the
same P
-button and Email is blank or incorrect format 4 User clicks on save & go back button and LoginlD is blank Message must be displayed for the
same P -5 User clicks on save & go back button and all business rules are
Data must be saved in database and message must
be displayed to the user, stating that data is saved
-met 6 User clicks on save & go back button and all business rules are met and data is saved to database
View Employee List screen must be displayed with the updated records to the list P -7 User click on Go Back button
View Employee page is displayed
without save any changes made in any field
-Edit Project information:
This project test cases deals with editing project information such as project name, client name etc.
Table 22. Test Case of Edit Project Data
Test ID User Action Expected Output Resu It (P/F ) Actual Output in case of Failure 1 User click on proj ect name link to edit employee informati on on the View Proj ect page
Add New Project page is displayed. All information of
selected project must be populated
into that page.
-2 User clicks on save & go back button and Proj ect Name is blank Message must be displayed for the
same P -3 User clicks on save & go back button and Client Name is blank Message must be displayed for the
same P -4 User clicks on save & go back
Data must be saved in database And Message must
be displayed to
-button and all business rules are
met
the user, stating that data is saved
5 User clicks on save & go back button and all business rules are met and data is saved to database
View Project List screen must be displayed with the
updated record to the list P -6 User click on Go Back button
View Project page is displayed
without save any changes made in any field
-Administration manages submitted timesheet:
This test case deals with managing submitted
timesheets. The Admin can view timesheets submitted by employee, review them or delete them and ask for
resubmission if required.
Table 23. Test Case of Manage Submitted Timesheet
Test ID User Action Expected Output Resu It (P/F ) Actual Output in case of Failure 1 Admin type the URL to access the submitted timesheet View submitted timecard page is displayed. P -2 Admin click-on All submitted timesheet is P
-timesheet link listed 3 Delete the timesheet if any informati on is incorrect Timecard is deleted P -Create a Timecard:
Each employee is required to create a timecard using an InfoPath form by selecting a project arid date.
Table 24. Test Case of Create Timecard
Test ID User Action Expected Output Resu It (P/F ) Actual Output in case of
Failure 1 Employee type the URL to create a timesheet A page to create a timesheet is displayed. P
-2 User click on the Timesheet link to create the Timesheet Project assigned to that employee is populated into dropdown list boxP
-3 User click on "Create the Timecard" and Ending date is Message is Displayed for the-not greater than today's date User click on Timesheet page is "Create displayed with the employee name, 4 Timecard"
-client name and ir
and all project name business populated rules are met On load Initially all of 5 hours is zero. -timesheet Jr page
On load Date is filled out
of according to
6
timesheet previous screen p
7 On load of timesheet page Submit button is inactive P
-Submitting the timesheet:
This test case deals with an employee submitting the timesheet once it is filled and complete. The submitted timesheet is emailed to accounts department and published on the SharePoint server.
Table 25. Test Case of Add Employee
Test ID User Action Expected Output 1 Resu It (P/F ) Actual Output in case of Failure 1
Users Total is updated
-hours they have worked for selected proj ect Check the 2 checkbox regarding acknowled Submit button is activated P -gement 3 Click on submit button Email sent to account department P -Click on A timesheet is
4 submit save into
P
5.2 Problems
While installing the Microsoft SharePoint Server, I got two errors. One was that the product required .Net Framework 3.0. Another was that the ASP.Net 2.0 needs repairing.
To solve these errors, first I installed Framework 3.0 then again I got the ASP.NET error that stated ASP.NET
needs repairing.
After repairing .Net Framework 2.0, Microsoft SharePoint Server was running successfully.
CHAPTER SIX
SYSTEM ADMINISTRATION MANUAL
6.1 Server Setup
The server setup describes the steps needed to install SharePoint Server. It guides through each steps required for installing the same.
To install SharePoint Server:
Step 1: Insert the Microsoft SharePoint installation CD to install Microsoft SharePoint 2007. On connect to a server farm screen, it gives an option to connect to server farm or not. In our case we don't want to create a server farm. Click next.
SharePoint Products and Technologies Configuration Wizard
Connect to a server farm
A
A server farm is a collection of two or more computers that share configuration data, Do you’want to
connect to an existing server farm? . ‘ :
0-Yes, I want to connect to an existing server farm
5 i
1-<■
® No, I want to create a new server farm
S
4-»»
--- f' < Back |< Next >’ Cancel
. ...I " ■■■ ■■■' . :-7 < 7<< i
Step 2: In database settings screen, enter Database server name and Database name (as shown below). Fill out the Windows Authentication information as needed. Click Next.
SharePoint Products and Technologies Configuration Wizard
j
•J
Specify Configuration Database Settings
All servers in a server farm must share a configuration database. T ype the database server and database - name. If the. databasecioes not exist, .it.will.be created. To reuse an existing database,1 the database.must be empty. For’additional information regarding database server security configuration and network access
please see help, . ...- ..; ... J
Database server: Database name:
|sharepoint03 |5harePoint Config
Specify Database Access Account .
Select an existing Windows-account that this machine will always use to connect to the’configuration database. If your configuration database is hosted on another server, you must specify a domain account. Type the username in the form DOMAIN\User JJame and password for the account. . <
Username: Password:
IsHAREPOINTOS^Administrator-!••••••••
is
.-M,
•L ||/~Cancel■HB]
V • C%1 S 5, r iStep 3: On SharePoint Central Administration configuration screen, select an option to specify port number that we can use for web application hosted on web server. In our case we opted to select a random number. For security settsings select NTML or Kerberos. We
selected MTML that will work with any application pool account. Click Next.
r?n SharePoint Products and Technologies Configuration Wizard MM
fl
Configure SharePoint Central Administration Web Application 1 A SharePoint.Central Administration Web Application allows you to manage configuration settings for a serverfarm. The first server added to a serverfarm must host this web application. To specify a,port number for the web application hosted on this machine, check the box below.and type,a number between l and 65535. If you do not specify a. port number, a random one will be chosen. .
□] Specify port number: [21614
§
■
Configure Security Settings
Kerberos is the recommended security configuration to use with Integrated Windows authentication. Kerberos requires special configuration by the domain administrator. NTLM authentication will work with any
application pool account and the default domain configuration. Show me more information. Choose an authentication provider for this Web Application.
@NTLM Q Negotiate (Kerberos) '1 i J r_ ... * ... ♦ Cancel- :
Step 4: Verify the information. To make changes, Click Back. If informaton seems to be proper to insatll SharePoint.
Configuration Database Name
Host the Central Administration Web Application
Click Next to apply configuration settings. • Central Administration URL • Authentication provider
The following configuration settings'will be applied: Configuration Database Server
SharePoint Products and Technologies Configuration Wizard
-? ‘.■9
Conf igurat ion Wi zard
Figure 13. Microsoft 7 SharePoint Setup Step 4
■ill-. Completing the SharePoint Products and Technologies
5
•I
'"I
;.’l • . ..
<Back Next > i|r"~->Cancel .
Vy’.'.'A
Once installed, Sharepoint server screen as shown below will appear. The Central Administration screen is used by Administrator of SharePoint server for. various operations and application management.
Administrator Tasks
Home - Central Administration - Microsoft Internet Explorer " ‘F? * " ‘000
1 Fie Edt View Favorites Tools tJelp ••
l«
f$Bad, * n 3 j2) | /^Search Favorites j 5^ $$ - 0 ££& ,
lAjJdress J<J£] http://sharepoint03:21614/defau!t.a$px Sj'Ei® l|un£ "
Central Administration 1 ’ , ' '.* " C ' ■ , , „ < < WelcomeSystem Account -r | ®
Central Administration ' ' V.
feHOiel^r Opwabons ■j^ppkatfon Management j | ____ ______ ______ ______ '
Server Farm
. *.
i
?
Confkpratfon
NotComptete
’ ?■
’
•
'See gifriin&Bftpf fokia For.more hfofmation ,
View Al Site Content Central . ; ; Administraticn _ ■ Operations ' ■ Application Management' Shared Services Admfnlstratiah •
Order Title ■ ' G) Assigned To Status J 1 READ FIRST-pick this 6nk for deploymerit hstructions I
new
Not Started J Initial d^ymert: Add servers to farm Ihew
r
.'
''
U, Not Started’$1 Initial deployment: Assign services to servers 1
new
Not Sarted j.’ r Configure server farm’s shared servicesI
nch
Not Started"}Resources ’
There are currently no favorite links to dsplay. To add a new link, dick “Add nevi
Enk“ below. E Add new link E Add new task
C-® Recyde Bin
Farm Topology .__________________________ ____________
j Server _ ; , ' . - _ Services Running_____ . _ ;•
sharepointO3 Central Administration
Windows SharePoint Services'Database Windows:SharePoint Services Incoming E-Mail Windows SharePoint Services Web Application
i — J
i
*.
__ X rrrrt’' ~2.-“—iMicrosbft SQL Server Management
j^Start] 2- Jji^yror_sharePor>t.do..-. | ,^ Doajnentl~-hfcroso...| .^>AdnmislTatiyeTOTts- |.t^ Mcrosoft SQL-Serve.-;» ]j^Horne^C«itfal fld.?y| |cfc ^- 3:35 PM J
6.2 Client Setup
The client setup describes the steps needed to install InfoPath 2007. It guides through each steps required for installing the same.
Steps to install Microsoft Office 2007: 1) Insert the Microsoft Office 2007 CD
2) Click Accept to agree with terms and conditions of the Microsoft Office 2007.
3) After accepting the terms and condition, click Continue
4) Click Ok on the next screen.
5) Microsoft Office will start installing. 6) After installation is done, click Ok.
CHAPTER SEVEN END USER MANUAL
7.1 Accessing the iTimeCard System
This section includes steps reguired by an employee to access and create his/her timesheet.
Step 1: To access a iTimeCard, login to machine on iSpace network as a domain user. After logging in, access the system by entering following url
http://sharepoint03/iSpaceForms on a Web Browser
Welcome lo iForms
1 *
3 iSpace- Online Forms -Microsoft Internet Explorer
h ge EcR View Fawtes- Tools Help .. \ .
- .< [Qhdt ’ <$ *’Q @ $|p5earch ^Favorites 0 | @ - 0 , » [I Address]^ http://sb®epont03/iSpaceFwn8/ Go |.W»- ” liSpace^ ft IForms iTimeCard EtpenseReport F fl I
Step 2: All the forms that can be used by an employee of iSpace will be listed on the page. Click on iTimeCard to create time sheet shown in Figure 15.
Step 3: Create iTimeCard page will be displayed as shown in Figure 15. iTimeCard is created for a week ending on Friday and for each project on which employee has worked during that week period. Project dropdown will list all the projects assigned to that employee.
Select the appropriate project from the drop down
list. Also select the week ending date by clicking the calendar icon. Click on Create Time Card button to create time card in Figure 16.
iTimeCard - Microsoft Internet Explorer
j File Edit View Favorites Tools Help . ' ■ 1
IQBatfc - Qpg [g ^Search Favorites' 'I ' I -fl
[Address |^http://sharepoint03/sites/5I/Jayouts/Form5erver.aspx?xsnLocation=http://sharepoint03/sites/SI/FormServerTemplates/iTime%20Version2.0.xsn&OpenIn=
® dose | (9 Print View ... . • 1
iSpace, Inc. Ph. 310.563.3800 www.iSpace.com
ISpace^
Accelerating the pace ofym&grmvlfltr
Hours must be reported by Monday 10AM of each week
Project': | DemoProject. ' ... IF
For Week ended on Friday:
7.2 Submitting Timesheet
This section includes steps required by an employee to submit his/her timesheet by entering necessary information about the hours he/she has worked on a particular project. Step 1: Timesheet is displayed as shown in Figure 17 for a
particular project and week ending on Friday. Verify your name, client name and project name.
Hours worked is the actual hours that employee have worked on that project during that week.
Holiday hours need to be entered if there are any holidays during that week.
PTO (Paid Time-off) needs to be entered if employee has taken PTO during that week.
Total will be calculated based on the entered values in these boxes.
iTimeCard - Microsoft Internet Explorer
File .Edit View ^Favorites Tools Help
(©Back - Search ^Favorites ^]|0’ Ik ($i V ® fiif
^Address [§) http://sharepoint03/sites/SI/Jayouts/FormSeryer.aspx?xsnLocation=http%3a%2f°/o2fsharepohtd3%2fsite5%2i5l%2fFormServerTemplates%2fiTime+Versic ® Gose | (5J Print View
]
® Close IB PrinhVtew
Employee : Arpita Parikh iSpace^
Client: Demo
ft
Accelerating ute pace of vour growth r*
Project : Demo Project
Hours worked: Holiday:
PTO (Paid Time-off)
Total: Sat 9/8/07 Sun 9/9/07 Mon 9/10/07 Tue ' 9/11/07 Wed 9/12/07 Thu 9/13/07 Fri 9/14/07 Total
a
o P !jo j0 1 0 0 b 0 0 0 1jo 10 0 0 ]0 0 ! 0 I 0 jo i jo 100 ■ ■ 1
:o 0 p 0 !jo 10 0 '. I01
□C I hereby acknowledge that above information is correct
[ , Spbniit' | 1 Clear .] j New |
Step 2: Submit button will be enabled once you acknowledge that information submitted is correct by clicking the check box as shown in Figure 18. Click on submit
button to submit timesheet.
Conformation Message will be displayed upon successful submission of time sheet.
Address ht^/2^ar^P^t03/sites/^W^?Hts^FoI!!???[Y?r,asPx?xsnLocatIon=^ttP%3a%2f%2fs^areP0'nt030‘/o2f:site50''02f5I%2ff:crm5erverTemplates%2fiTirne+Versi
® Close [ Print View ’ j
Employee: Arpita Parikh
Silent: Demo Project : Demo Project
iSpace^
Accelerating the pace ofyour growiltr*Hours worked: Holiday:
PTO (Paid Time-off)
Total: Sat 9/3/07 Sun ' 9/9/07 : Mon 9/10/07 Tue 9/11/07 Wed 9/12/07 Thu 9/13/07 Fri 9/14/07 Total o o 4 6 ‘ |2
11
5 o 1 0 ’ o i 0 ■ 0 jp. J
0 ;P 1 0 | 0 J 0 , , J 0 £ . o 0 . i..
„..1
o 1 o 4 . . . I 6 ’211
■5“ , 1
r~-~j I.! *.! 1 hereby acknowledge that above information is correct
[~ *
Submit~'~~| |~~~rciear~~~T| [T New'~~~j
® Close | 3 Print View
CHAPTER EIGHT ADMIN USER MANUAL
8.1 Managing Submitted Timesheet
This section includes steps for an Admin to manage submitted timesheet. It helps Admin to view submitted timesheet, delete timesheet etc.
Step 1: Type http://sharepoint03/sites/SI on a web browser to access submitted timesheet. The following Figure 19 screen is displayed that list all the documents that is accessible on left frame of the page.
Home -iSapce If Solutions-Microsoft Internet Explorer B0B
.Ria- Edit View »Favorites locfc [jjlp • • "
©Back • $ - [email protected]|,©SMrch ^Fsmtes ©j 0-|gj-0 Jj • • - • , .. ,
Addas http.7/sharepctotO3/$tes/Sl/defauta$px i|'0Go ([Links »
Site Actions ’ WewAlSft&Cootent. Documents" ■ Shared Doaments ■ iTimeCard ust»~ ~ ‘ ■ Cckfrfsr ■ Tasks iSapce IT Solutions Announcements
There are anentiy no active announcements. To add a new amareement, dick‘Add new.amoireerrent' below. S Add new announcement
SharePolntServIces
Discussions
Calendar__________________________________________
There are curfehtiy no upcoming events. To add a new event, dck'Add new event" below. 3 Add new event
Team Dscussfcn
Links
There are onently no favorite links to cfctfay. To add a new IrJg did; ‘Add new GnfrT below.
9 Add new link _______
People and Groups . ■’ .0 Recycle Bm
TH
Step 2: Click on the iTimeCard link under Documents section in left frame of the page. The following page as shown in Figure 20 is displayed with list of timesheets
submitted by different employees.The information such as client name, period ending, employee name, project name is displayed on this page. You can order by this ..list with any of these listed columns.
[^ITimeCard-MicrosoftInternet Explorer
BEE3I
!@e- Mt View * Favorites Took jjelp • ■
0 Back” -origi a g>ig,
q
.
@ a. lAdiess |£f| http://st^epointO32ste5/SI/rrKneCaf d/Forrns/ByWeeJcfy>20CEent<7!>2panti%20PTO)ect .aspx ISapce IT SoLittom_____________$$ iSapce IT Solutions
iTmeCad - Forms Lircry Perod&Kkng BPeriodEnt&ig: 9/13/2007 (1)
Demo a PeriodEntfcrg; 9/6/2007 (2) SPeriodEnding: 8/30/2OT7 (I) Sites-Site Actions ’ Discissions- ' ■ TeamDtscufflO) Peylelfo&oups ® Recycle Bin
iSapce IT; Solutions i7imeCard:
iTimeCard
Welcan3 System Account ’ |
ye^-'iByWeek,~.CIiart~fflfdP?^?j QMcdfied6y ' .: s ■ lists
■ Calendar ■ Tasks
3 dent : Demo (I) 9/14/2007 View AS Ste Orient
Documents ■ Shared Documents • iTmeCvd
[Ths iTmeCard
Figure 20. Submitted iTimeCard List
Step 3: In order to view the latest submitted time sheet submitted by an employee, click on link under column name as indicated above in Figure 20. The timesheet as submitted by an employee will be displayed.
8.2 Managing Employee Data - ■
This section helps Admin to manage employee profiles. It describes steps the admin needs to take in order to add,: edit or delete an employee.
Step 1: Click on Employee link as shown in Figure 21 to manage Employee information.
Figure 21. Managing Employee Detail Home Page Untitled Page - Microsoft Internet Explorer
' File Edit ■ " View Favorites pools' Help ■
0-0;;
[ JP Search- ""^’■Favorites | l^r ’■ Ifel’QfT* Address http://localhost:4535/AddEmployee/HomePage.aspxEsH
’ IF|go<^
S
-J
Bookmarks ▼ ,;§Q blocked Check ▼ lBookmarks p Settings » -A Upgrade vour Tc
Employee
Step 2: List of employees will be displayed as shown in Figure 22 with information such as employee name, login id, email and whether he is RSM or not.
To add an employee, click on Add Employee Button to go to add employee page as shown in Figure 23. Go to Step 3.
To edit employee information, click on employee full name link to go to edit page as shown in Figure 25. Go to Step 4
To delete an employee, click on delete link against
Untitled Page - Microsoft Internet Explorer
Fite Edit Viow, Favorites Tools Help-,. •
[0
Back - -s [g|g
Search/j?FavoritesIB -
[g
OF-
&Address:|^http://localhost:4535/fiddEmployee/EditEmployee,aspx
Google [j ifr| Go @ ▼ .[* Bookmarks^ §bo blacked Check AutoLink -r 'Q ftlJtoJrft Send to-Bookmarks
t
Bsettings- |l A/lpgradeRour Toolbar Now' <■ f Messenger- E-Mail - jFull Name LogonlD Email IsRSM
Delete RushiPatel ' ruship' : . •: > [email protected]' ; True
Delete Arpita Parikh ISPACE\arpitap arpita.parikh@isp'ace.com True
Delete Vinod Kottapalli ■ ISPACEWinodk. ... [email protected] True ’ ■
Delete John Smith SHAREPOINT03\Administrator [email protected] True
Delete. RUSHABH USPACEVRUSH - : '< /■' [email protected] True,:
Delete ROHTIM SHRIMAL RSHRIMAL [email protected] True
| Go"Back
Adtj'Bii^oy^f | ■
Figure 22. View Employee Screen
Step 3: Fill out the employee's information as shown below. Assign projects to employee from list of available project by clicking on > button after selecting that project in available project list box. To unassign a project clcik on < button by selecting project in assinged project list box.
Click on Save & Go Back button after entering informaton to add an employee and go back to list page.
The following business rules apply to while adding an employee:
• Employee Name must not be blank
• Email must not be blank and should be incorrect
format
• Login ID must not be blank
Message will be displayed in red if these business rules are not met.
Confirmation message will be displayed as shown in Figure 24 if business rules are met.
"31 Untitled Page - Microsoft Internet Explorer
Back - .© V. ® Search -^Favorites'' . E|;lIL©!’‘M . <•/-*/ , ,
Address @ http://localhost:4535/AddEmployee/AddEmployee.aspx ....
iGj'"
. .
.
ElGol
f^l
St'-
|;©. Bookmarks.* -,@B Deblocked 1 Check • ▼* AutoLihk'V jgWB
Bookmarks »;.IS Settings - I A Upgradeyour Toolbar Now!FullName
Email Login ID
IsRSM
• Emailcannotbe blank
Go Back
Microsoft Internet Explorer [El
Record Saved!
Figure 24. Record Save Message
Step 4: The Figure 25 screen is displayed with information about an employee populate in the controls when user clicks an employee in link page.
Make necessary changes to employee information. Change Assigned projects to employee from list of available project, by clicking on > button, after
selecting that project in available project list box. To unassign a- project clcik on < button by selecting project in assinged project list box.
Click on Save & Go-Back button after changing
informaton to edit an employee and go back to list page.
The following business rules apply to while editing an employee:
• Email must not be blank and should be incorrect format
• Login ID must not be blank
Message will be displayed in red if these rules are not met.
Confirmation message will be displayed as Figure 24 if business rules are met.
business
'3 Untitled Page - Microsoft Internet Explorer
8.3 Managing Project Data
This section helps Admin to manage project details. It describes steps the admin needs to take in order to add, edit or delete a project.
Step 1: Click on the Project link as shown in Figure 26.
Figure 26. Managing Project Detail Home Page
Step 2: List of projects will be displayed as shown in Figure 27 with information such as project name, client name, Client Managerl, whether project is active or not and whether that project is billable project or fixed price.