GO Technical Library
PenPomt"
•
GO CORPORATIONGO TECHNICAL LIBRARY
PenPoint Application Writing Guide provides a tutorial on writing PenPoint
applications, including many coding samples. This is the first book you should read as a beginning PenPoint applications developer.
PenPoint Architectural Reference Volume I presents the concepts of the
fun-damental PenPoint classes. Read this book when you need to understand the fundamental PenPoint subsystems, such as the class manager, application framework, windows and graphics, and so on.
PenPoint Architectural Reference Volume II presents the concepts of the
supplemental PenPoint classes. You should read this book when you need to understand the supplemental PenPoint subsystems, such as the text sub-system, the file sub-system, connectivity, and so on.
PenPoint API Reference Volume I provides a complete reference to the
fundamental PenPoint classes, messages, and data structures.
PenPoint API Reference Volume II provides a complete reference to the
supplemental PenPoint classes, messages, and data structures.
PenPoint User Interface Design Reference describes the elements of the
PenPoint Notebook User Interface, sets standards for using those elements, and describes how PenPoint uses the elements. Read this book before designing your application's user interface.
PenPoint Development Tools describes the environment for developing,
•
PenPomt
MPenPoinl'M
Development Tools
GO CORPORATION
GO TECHNICAL LIBRARY
Addison-Wesley Publishing Company
Many of the designations used by manufacturers and sellers to distinguish their products are claimed as trademarks. Where those designations appear in this book and Addison-Wesley was aware of a trademark claim, the designations have been printed in initial capital letters.
The authors and publishers have taken care in preparation of this book, but make no expressed or implied warranty of any kind and assume no responsibility for errors or omissions. No liability is assumed for incidental or consequential damages in connection with or arising out of the use of the information or programs contained herein.
Copyright © 1991-92 GO Corporation. All rights reserved. No part of this publication may be reproduced, stored in a retrieval system, or transmitted, in any form or by any means, electronic, mechanical, photo-copying, recording, or otherwise, without prior written permission of the publisher. Printed in the United States of America. Published simultaneously in Canada.
The following are trademarks of GO Corporation: GO, PenPoint, the PenPoint logo, the GO logo, ImagePoint, GOWrite, NoteTaker, TableServer, EDA, MiniNote, and MiniText.
Words are checked against the 77,000 word Proximity/Merriam-Webster Linguibase, ©1983 Merriam Webster. © 1983. All rights reserved, Proximity Technology, Inc. The spelling portion of this product is based on spelling and thesaurus technology from Franklin Electronic publishers. All other products or services mentioned in this document are identified by the trademarks or service marks of their respective companies or organizations.
PenTOPS Copyright © 1990-1992, Sitka Corporation. All Rights Reserved.
WClrrI:lnTy Disclaimer GO CORPORATION MAKES NO WARRANTIES, EXPRESS OR IMPLIED, INCLUDING WITHOUT
o:md l..imitl:~ti'::>l1
or
LIMITATION THE IMPLIED WARRANTIES OF MERCHANTABILITY, FITNESS FOR A PARTICULAR liability PURPOSE AND NONINFRINGEMENT, REGARDING PENPOINT SOFIWARE OR ANYfHlNG ELSE.U.S. Government Restricted Rights
GO Corporation .does not warrant, guarantee, or make any representations regarding the use or the results of the use of the PenPoint software, other products, or documentation in terms of its correctness, accuracy, reliability, currentness, or otherwise. The entire risk as to the results and performance of the PenPoint software and documentation is assumed by you. The exclusion of implied warranties is not permitted by some states. The above exclusion may not apply to you.
In no event will GO Corporation, its directors, officers, employees, or agents be liable to you for any consequential, incidental, or indirect damages (including damages for loss of business profits, business interruption, loss of business information, cost of procurement of substitute goods or technology, and the like) arising out of the use or inability to use the documentation or defects therein even if GO Corporation has been advised of the possibility of such damages, whether under theory of contract, tort (including negligence), products liability, or otherwise. Because some states do not allow the exclusion or limitation of liability for consequential or incidental damages, the above limitations may not apply to you. GO Corporation's total liability to you from any cause whatsoever, and regardless of the form of the action (whether in contract, tort [including negligence], product liability or otherwise), will be limited to $50.
The PenPoint documentation is provided with RESTRICTED RIGHTS. Use, duplication, or disclosure by the U.S. Government is subject to restrictions as set forth in FAR 52.227-19 (Commercial Computer Software-Restricted Rights) and DFAR 252.227-7013 (c) (1) (ii) (Rights in Technical Data and Computer Software), as applicable. Manufacturer is GO Corporation, 919 East Hillsdale Boulevard, Suite 400, Foster City, CA 94404.
ISBN 0-201-60861-8
123456789-AL-9695949392
Preface
PenPoint Development Tools provides detailed information on the tools and facilities available to developers who are writing programs for the PenPoint™ operating system. This volume includes descriptions of the other volumes in the PenPoint SDK (software development kit), how to run the PenPoint operating system on a desktop PC, how to use the PenPoint source code debugger, and how to use other miscellaneous tools.
This volume also contains a Master Index to the entire SDK documentation set.
Intended Audience
PenPoint Development Tools is written for people who are designing and developing applications and other programs for the PenPoint operating system. This book addresses both those who are using high-level development tools (application generators and the like) and those who are writing programs that directly access the PenPoint APIs (application programmatic interfaces). However, parts 2 and 3 of this book will be more useful to those writing programs that access the
PenPoint APIs.
What's Here
PenPoint Development Tools is divided into several parts:
• Part 1: Getting Started, describes what is involved in developing PenPoint programs. It the describes the PenPoint documentation and how to run the PenPoint operating system on a desktop Pc.
• Part 2: Debugging PenPoint Programs, describes the PenPoint source-level debugger, the PenPoint mini-debugger, and other debugging tools and techniques available to developers.
• Part 3: Tools, describes other tools that can assist you in developing or embellishing your application. These tools include DOS tools, a bit-map icon editor, a screen shot utility, and a font editor.
Other Sources of Information
The PenPoint Application Writing Guide provides a tutorial on writing PenPoint applications. The tutorial is illustrated with several sample applications.
The PenPoint Architectural Reference groups the PenPoint classes into several functional areas and describes how to use these classes. The PenPoint Architectural Reference is divided into two volumes. The first volume describes the fundamental classes that all application developers will use; the second volume describes
vi PENPOINT DEVELOPMENT TOOLS
The PenPoint API Reference is a set of "datasheets" that were generated from the PenPoint SDK header files. These datasheets contain information about all the messages defined by the public PenPoint classes. If you own the PenPoint SDK, you can also find the header files in the directory \PENPOINT\SDK\INC.
To learn how to use PenPoint, you should refer to the PenPoint user documentation. The user documentation is included with the PenPoint SDK, and is usually packaged with a PenPoint computer. The user documentation consists of these books:
• Getting Started, a primer on how to use PenPoint.
• Using PenPoint, a detailed book on how to use PenPoint to perform tasks and procedures.
• Using GO Write, which helps users to develop more effective handwriting when using the GOWrite handwriting translation engine.
Type Styles in This Book
To emphasize or distinguish particular words or text, we use different fonts.
Computerese
We use fonts to distinguish two different forms of "computerese":
• C Language keywords and preprocessor directives, such as switch, case, #define, #ifdef, and so on.
• Functions, macros, class names, message names, constants, variables, and structures defined by PenPoint, such as DPrintfO, msgListAddltem, elsList, stsBadParam, P _LIST_NEW, and so on.
Although all these PenPoint terms use the same font, you should note that PenPoint has some fixed rules on the capitalization and spelling of messages, functions, constants, and types. By the spelling and capitalization, you can quickly identify the use of a PenPoint term.
• Classes begin with the letters "els," for example clsList. • Messages begin with the letters "msg," for example msgNew. • Status values begin with the letters "sts," for example stsOK.
• Functions are mixed case with an initial upper case letter and are terminated with open and close parenthesis, for example OSMemAvailableO.
• Constants are mixed case with an initial lower case letter, for example wsClipChildren.
• Structures and types are all upper case (with underscores, when needed, to
increase comprehension), for example, U32 or LIST_NEW_ONLY.
Code Listings
Code listings and user-PC dialogs appear in a fixed-width font.
i,4
i,4,1
PREFACE Type Styles in This Book
II Allocate, initialize, and record instance data.
II
StsJmp(OSHeapBlockAlloc(osProcessHeapld, SizeOf(*plnst), &plnst), \ s, Error);
plnst-»placeHolder = -1L; ObjectWrite(self, ctx, &plnst);
Less significant parts of code listings are grayed out to de-emphasize them. You needn't pay so much attention to these lines, although they are part of the listing .
new.object.uid nevI .
. cIs. pfilsg new.cls.ancestor nevi. cIs. size nevi. cIs.
• 'new, s, Error); clsTttApp;
0;
clsApp;
SizeOf (P APP INS'!'); SizeOf (APP _ NEI'lj ;
true; faIse; nelV.appMgT,
strcpy (nev;.
.appMgr. AlI Reserved,";
ObjCaIIJmp(msgNew, clsAppMgr, &new, s, Error);
~
Placeholders
Anything you do not have to type in exactly as printed is generally formatted in italics. This includes C variables, suggested filenames in dialogs, and pseudocode in file listings.
¥
Other Text
The documentation uses italics for emphasis. When a part uses a significant term, it is usually emphasized the first time. If you aren't familiar with the term, you can look it up in the Glossary in the PenPoint Application Writing Guide or the index of the book.
DOS filenames such as \\BOOT\PENPOINT\APP are in small capitals. PenPoint file names, which can be upper and lower case, are shown in smaller type, such as \\My Disk\ \Package Design Letter.
Book names such as PenPoint Application Writing Guide are in italics.
1.4.3
,.. Part 1 / GeHing Started 1
1 I Welcome 5
2 I The PenPoint Documentation 9 3 I Running PenPoint on a PC 25
Part 2 / Debugging PenPoint
Applications 63
4 I Introduction 67
5 I Preparing to Run the Debugger 69
61 Using DB 71
7 I DB Command Reference 85
8 I Profiling with DB 113
91 Advanced DB Techniques 123
10 I General PenPoint DebuggingTechniques 133 11 I The System Log Application 141
12 I PenPoint Mini-Debugger 145
Part 3 / Tools 155
13 I Introduction 159
141 DOS File System Utilities 161
151 Other DOS Utilities 165
161 PenPoint Bitmap Editor 167
17 I S-Shot Screen Capture Utility 175
18 I Font Editor 179
Index 211
Part1/
,.. Chapter 1 / Weicollle 5 DebugSet 3.5.7 38
Development Options 1.1 5 PenPointPath 3.5.8 38
Using High-Level Development Tools 1.1.1 5 PenProx Timeout 3.5.9 38
Using the PenPoint APIs 1.1.2 6 ScreenHeight 3.5.10 39
Additional Reading 1.2 7 Screen Width StartApp 3.5.11 3.5.12 39
39
Chapter 2 / The PenPoint StealMem 3.5.13 39
Doculllentation 9 SwapBoot 3.5.14 39
A Suggested Approach to Documentation
SwapFileSize 3.5.15 39
2.1 9 TZ 3.5.16 39
Feedback on Documentation 2.1.1 10 Version 3.5.17 39
Application Writing Guide 2.2 11 VolSel 3.5.18 40
PenPoint Development Tools 2.3 13 WinMode 3.5.19 40
PenPoint UI Design Reference 2.4 13 ZoomMargin 3.5.20 40
PenPoint Architectural Reference 2.5 13 ZoomResize 3.5.21 40
Class Manager 2.5.1 13 Running in Tablet-Like Mode 3.6 40
Application Framework 2.5.2 15 BOOT.DLC 3.7 42
Windows and Graphics 2.5.3 15 CONSOLE.DLC 3.8 43
UI Toolkit 2.5.4 16 SYSCOPY.INI 3.9 43
Input and Handwriting 2.5.5 17
SYSAW.INI
Text Component 2.5.6 17 3.10 44
File System 2.5.7 18 APP.INI 3.11 44
System Services 2.5.8 18 Setting Up Specific Configurations 3.12 44
Utility Classes 2.5.9 19 One or Two Monitors 3.12.1 44
Connectivity 2.5.10 20 Configuring a Mouse 3.12.2 45
Resources 2.5.11 20 Configuring a Digitizing Tablet 3.12.3 45
Installation API 2.5.12 20 Booting PenPoint on a PC 3.13 45
Writing PenPoint Services 2.5.13 21 Loading Debug PENPOINT.OS 3.13.1 46
API Reference 2.6 21 What Happens During Booting 3.13.2 46
Contents of the SDK 2.7 22 Boot Error Messages 3.13.3 47
Broken Pen During Booting 3.13.4 47
,.. Chapter 3 / Running PenPoint Using PenPoint on a PC 3.14 50
on a PC 25 Using a Mouse 3.14.1 50
Hardware 3.1 25 Parallel Port Interrupts 3.14.2 50
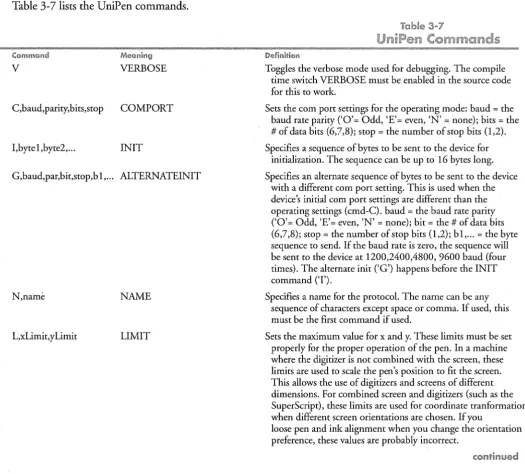
Mouse 3.1.1 26 Installing an Application 3.15 50
Memory, Caches, and RAM Disks 3.1.2 27 Installing an Application While PenPoint is
Networks 3.1.3 27 Running 3.15.1 51
Labeling Volumes 3.1.4 27 Boot-Time Install 3.15.2 52
Setting Up Initialization Files 3.2 28 Application .DLL and .DLC Files 3.15.3 53
PenPoint Boot Sequence 3.3 29 Executing the Application 3.16 54
Volume Selection 3.16.1 54
MIL.INI 3.4 29 Interrupting PenPoint 3.16.2 54
ENVIRON.INI File 3.5 34 Exiting PenPoint 3.16.3 55
AutoZoom 3.5.1 36 More on the Bookshelf 3.17 55
BkShelfPath 3.5.2 37 Using the Notebook
BootProgressMax 3.5.3
3.17.1 55 37
The Universal Serial Pen Driver
Config 3.5.4 37 3.18 56
DebugLog 3.5.5 37 UniPen Command Syntax 3.18.1 57
,... List of Figures
2-1 Documents in the Software
Development Kit 10
3-1 Installing an Application 52
,... List of lables
2-1 Sample Code in \PENPOINT\
SDK\SAMPLE 12
2-2 SDK Contents 22
3-1 Tested Machine Configurations 26
3-2 Machine Configurations with
No Committed Support 26
3-3 PenPoint Initialization Files in
\PENPOINT\BOOT 28
3-4 MIL.INI Keywords 33
3-5 ENVIRON.INI Keywords 36
3-6 SYSCOPY.INI Files 43
Chapter 1 / Welcome
Welcome to developing applications for the PenPoint™ operating system. This manual has several aims:
• It tells you what you need to know before starting to develop applications for PenPoint.
• It tells you how the PenPoint SDK documentation is organized. • It tells you the PC equipment you need to compile and run PenPoint
programs.
• It tells you how to run PenPoint on a Pc.
Development Options
There are two ways to develop applications on PenPoint:
• Using high-level development tools, such as form builders, 4GL languages, and scripting languages. These tools allow you to write applications without having to access the PenPoint APIs. Using high-level development tools, you can develop applications quickly without needing to learn many of the details of PenPoint. This is at the cost of some speed and flexibility.
• Using a compiled language (such as C) and the PenPoint APIs. This method allows you to write applications that access the PenPoint APIs directly. While the development time is longer, the resulting applications can be faster and more flexible.
Both options have their advantages and disadvantages; your choice of one over the other depends on several factors, including the type of problem you are solving, the existence of a development tool that can provide a solution to this problem, the time available to develop a solution, and your performance requirements.
".. Using High-Level Development Tools
Almost all high-level development tools run on PenPoint running on either tablet hardware or desktop PCs. If you use a desktop PC, you need:
• A desktop PC that runs PenPoint (see list of supported machines in Chapter 3).
• A digitizer tablet.
• A PenPoint SDK.
• The development tool you will be using to develop your applications.
1.1
6 PENPOINT DEVELOPMENT TOOLS Part 1 I Getting Started
If you use high-level development tools, you do not need all the extended SDK documentation. Most of the documentation is aimed at developers who are writing PenPoint applications using the PenPoint API.
".. Using
the
Pen Point
APls
So that you can start to get an idea of how you develop applications for PenPoint, here is what you do to create a PenPoint application:
1 Design Your Application. Consider the user interface that you need, how you intend to interact with other PenPoint applications, what devices you need to access, and how you intend to store your data.
2 Decide what existing classes you can use. PenPoint provides a rich set of classes that can do much of the work for your application. Your task is to decide which of these classes will serve you best. The task of the
PenPoint
Architectural Reference
is to help you find the classes you need.3 Decide what new classes you need to create (and their messages). Perhaps the PenPoint classes don't do exactly what you need. Look for the class that comes closest to your needs, then create your own class that inherits behavior from that class.
4 Write the application. PenPoint applications are written in the C language; the object oriented extensions are provided through function calls. Your application uses the PenPoint Application Framework, which performs much of the standard application tasks for you.
5 Compile, install, test, and debug. This is the classical cycle. A good strategy is to create an empty application that does no work, but still will appear as an empty page in the Notebook. Then you add the code that creates a new object or defines a new class, compile, install, test, and so on until you have a completed application.
6 Pretty up the application. When your application is nearly done, you should create icons, help notebook pages, quick help, stationery, and many other things that mak~ your application "real."
7 Contact GO Developer Technical Support. Before you can release a PenPoint application, you need to register your classes with GO. This ensures that no other PenPoint developer will use your class's unique identifiers (UIDs). 8 Ship product, schedule celebration. Of course, don't forget the
documentation.
This information is extracted from the
PenPoint Application Writing Guide,
which describes in detail how to create an application. However, before you get there, there are a number of concepts that we need to cover.Clearly you need to have some familiarity with programming in the C language to
write PenPoint applications. In addition to the C language proper, you should also be familiar with DOS C development environments and tools, such as MAKE.
CHAPTER 1 I WELCOME
Additional Reading
Writing PenPoint application also requires some familiarity with object-oriented programming and techniques, although the PenPointApplication Writing Guide
spends some time explaining concepts such as classes, objects, messages, inheritance, ancestors and so on.
On occasion, debugging PenPoint programs may require some familiarity with Intel assembly language.
Additional Reading
To develop applications that access the PenPoint APls, you need to know how to program in the C language and you should be familiar with DOS C development environments. If you need further help, there are many good books available on these subjects.
For a description of the 80386 architecture and instruction set (which you need for debugging), see:
• Intel 386DX Programmer's Reference Manua4 Intel.
Writing PenPoint applications definitely requires familiarity with object-oriented programming. Although the SDK documentation covers this topic to some extent, these books provide much more information on object-oriented programmmg:
• Principles of Object Oriented Design, Grady Booch, Redwood City, CA, The Benjamin/Cummins Publishing Co., 1991.
• Object-Oriented Programming: An Evolutionary Approach, 2nd edition, Brad J. Cox, Reading, MA, Addison-Wesley Publishing Company, 1991.
• Object-Oriented Modeling and Design, Rumbaugh, James, Michael Blaha, William Premerlani, Fredrick Eddy, and William Lorensen, Englewood Cliffs, NJ , Prentice-Hall, 1991.
• Designing Object-Oriented Software, Wirfs-Brock, Rebecca, Brian Wilkerson, and Lauren Wiener, Englewood Cliffs, NJ, Prentice-Hall, 1990.
1.2
Chapter 2 / The PenPoint
Documentation
The PenPoint™ operating system is a rich operating system that makes most of its system-defined classes available to application developers. In fact, you must use some of the classes to create a PenPoint application.
However, with this embarassment of riches comes some difficulty in knowing exactly what you want or need from the operating system.
This chapter has two purposes. The first is to give you a guide to the PenPoint SDK documentation, its organization, and how we intend you to read it. In describing the documentation, we accomplish the second purpose, which is to give you an overview of the components and features of PenPoint.
If you plan to develop PenPoint applications using a high-level development tool, you may find this tour of the documentation useful. It can help you to decide whether you want to develop using a high-level development tool or the PenPoint APIs.
A Suggested Approach to Documentation
2,1The point of the PenPoint developer documentation is to teach you:
• How to write applications.
• How to find your way around these many classes.
The manuals that make up the SDK documentation library are:
• PenPoint Development Tools (this manual)
• PenPoint Application Writing Guide
• PenPoint UI Design Reference
• PenPointArchitectural Reference (two volumes)
• PenPoint API Reference (two volumes)
10 PENPOINT DEVELOPMENT TOOLS Pa rt 1 / Getti ng Sta rted
This figure shows the PenPoint SDK documentation library and how we suggest you should use it.
Feedback on Documentation
The technical documentation team is eager to get your comments and feedback on the documentation. There is a Reader's Comments Form in the back of each volume of the PenPoint SDK documentation. If you have suggestions, criticisms, or even compliments on the documentation, please let us know. It certainly helps us to know what we're doing right, in addition to what we're doing wrong. You can fax us your Reader's Comment Form, and any marked-up pages, at
CHAPTER 2 I THE PENPOINT DOCUMENTATION
Application Writing Guide
£pp;ieaiion
W~iiing
Gui';e
The
Application Writing Guide
provides a tutorial on how to write PenPoint applications.System Overview
provides an architectural view of the PenPoint operating system. The part describes the kernel, system, component, and application layers of Pen Point, and also touches on the Application Framework and the development environment.Application Concepts
presents applications from a conceptual point of view. This chapter describes most of the parts of an application that you must write, and also describes parts of applications that are provided for you by the PenPoint Application Framework.A Developer's Checklist
presents a checklist that you can use to ensure that your application is complete. The subsequent sections of the PenPoint Application Writing Guide describe in detail how to implement the parts of the checklist.Designing Your Application
discusses the points that you must consider when creating an application.Compiling PenPoint Programs
describes how to compile and link a PenPoint application.Running PenPoint
describes how to run PenPoint on a PC, and how to install programs in PenPoint.A Simple Application
introduces a minimal application. Through this application, you can see just how much the PenPoint Application Framework does for you.Debugging
describes the tools available to you to test and debug PenPoint Programs.Creating Objects
describes how you create instances of predefined PenPoint classes and use these objects in your application.Using Windows
describes how to use some of the most useful classes in PenPoint, the windows classes. The chapter describes how to create custom windows and presents additional information about using instance data.Saving and Restoring Data
describes how to save and restore data from your application.Adding Classes
describes how you create new classes and add them to PenPoint.Refining the Application
describes how to add polish to your application.Releasing the Application
describes the steps necessary to make your application available to other PenPoint users.2.2
12 PENPOINT DEVELOPMENT TOOLS Part 1 / Getting Started
The
Appendix
describes the programs referred to in the previous chapters and other sample applications in \PENPOINT\SDK\SAMPLE and provides source code listings for some of these applications.Glossary
provides a list of terms used in the PenPoint SDK documentation. There are more sample applications in the SDK than are described inApplication
Writing Guide: Sample Code.
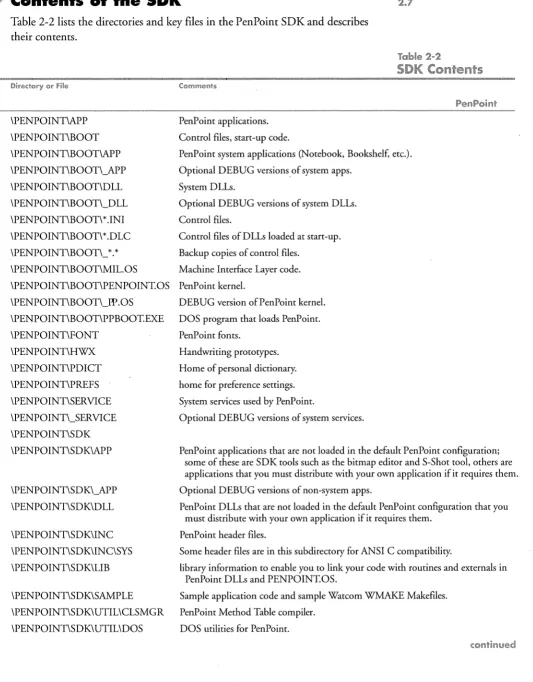
These sample applications are listed in Table 2-1.Sam
Oiredc.ry Whc.t it [s
ADDER handwriting calculator
BASICSVC Basic service
CALC Calculator accessory
CLOCK Clock accessory
CNTRAPP App developed in ADC labs
EMPTYAPP Minimal application
HELLO Graphical "Hello World"
HELLOTK UI Toolkit "Hello World"
INPUTAPP Pen input demo
MILSVC Pen Point device driver
NPAPP Note paper application
PAINT Painting application
TEMPLTAP Template application
TESTSVC A test service
TKDEMO UI Toolkit demo
TTT Tic-tac-toe application
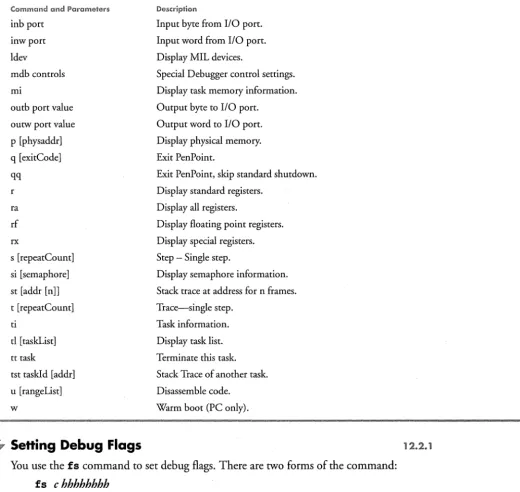
[image:21.615.27.553.184.749.2]WRITERAP Handwriting recognizer
Table 2·1
\PENPOINT\SDK\SAMPLE
Wnl:!f it Oemc.lutrl:!tes
How to write insertion pads and translators for handwritten input.
The fundamental parts to a PenPoint service.
Separate "engine" and application objects, table layout, custom layout, labels, filing.
Embedding, option sheets, modified application defaults, system timers.
Saving and restoring application state, memory-mapping state data.
How the PenPoint application framework performs application boilerplate work.
Graphics, text, font scaling, sub classing clsWin.
Custom layout, labels.
Pen input, responding to input events.
How to write a PenPoint MIL service (or device driver).
Using the NotePaper class that supports ink as a data type.
Using pixel maps, drawing contexts, pen input, and non-standard menu bars.
A template for starting new applications.
Compiling, installing, and running services.
Using most of the classes in the UI toolkit (borders, labels buttons, fields, menus, custom layouts, table layouts, toolkit tables, notes, option sheets, etc.).
Gestures, keyboard input, simple graphics, import/export, move/copy, undo, application menus, view-data model.
CHAPTER 2 / THE PENPOINT DOCUMENTATION
Pen Point Architectural Reference
".
~eii~@;iil' ~e'1r'e;@iimeiil'
V@@;SThis volume,
PenPoint Development Tools,
provides a description of the PenPoint development environment and documents the tools you use when developing applications.Getting Started
describes the overall organization of the SDK documentation and how to run PenPoint on a Pc. If you are developing an application using high-level development tools, this is probably all that you need to read.Debugging PenPoint Programs
describes the PenPoint debugging tools, including the source-level debugger (DB), the mini-debugger, and the System Log application.Development Tools,
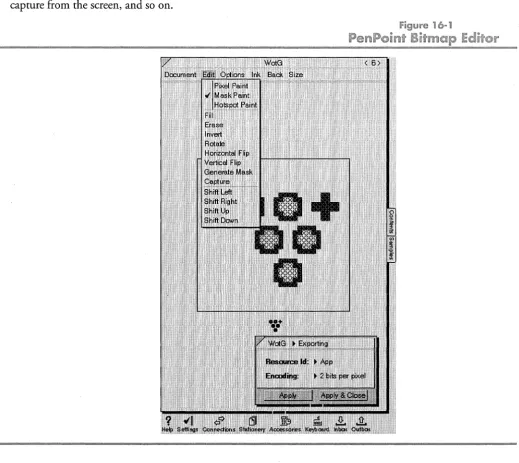
describes DOS and PenPoint utilities that can aid you in program development and refinement. Included in this part are DOS tools (such as STAMP, MAKLABEL, and GDIR), the font editor, the on-line tags facility, the PenPoint Bitmap editor (which you use to create icons), and the PenPoint screen shot utility.Master Index
contains all the index listings forPenPoint Application Writing
Guide, PenPoint Development Tools, UI Design Reference,
and thePenPoint
Architectural Reference
volumes. It does not include index entries for thePenPoint API Reference.
PenPoint UI Design Reference
ThePenPoint UI Design Reference
has two parts:PenPoint UI Specification
describes the PenPoint Notebook User Interface (NUl) as it is implemented in PenPoint.PenPoint UI Design Guidelines
suggests how you should use the PenPoint NUl when designing your applications.". PenPoint Architectural Reference
This is the bible of all the published software interfaces to PenPoint. It is divided into several parts. Each Part talks about some subsystem in PenPoint, listing its features, explaining its concepts, describing its class hierarchy, and discussing how to use it.
The following sections describe the parts in the PenPoint Architectural Reference and attempts to summarize the features of the classes that each part documents.
"., Class Manager
Part
1:Class Manager
describes the PenPoint class manager.The Class Manager is a subsystem that supports object-oriented programming in PenPoint. The Class Manager provides the message-passing capability in PenPoint, and it provides the mechanisms for object creation and class inheritance. The PenPoint Class Manager and the built-in classes, together with the SDK
2.3
2.4
2.5
2.5.1
14 PENPOINT DEVELOPMENT TOOLS Part 1 I Getting Started
Development Tools, comprise a complete object-oriented software development environment for the rapid prototyping and delivery of finished applications in PenPoint.
The PenPoint Class Manager supports these features:
Message handling. The Class Manager provides a set of C functions and macros for message handling. These are standard C constructs; there is no special language support for message passing as in C++ or Smalltalk. Object Creation.
1.'0
create an object, you send the message msgNew to aclass. The Class Manager does the rest. To create a new class you send the message msgNew to a special class, clsClass. To copy an object, you send the message msgCopy to the object to copy.
Class Inheritance. New classes can inherit functionality from ancestor classes. Root Classes. The Class Manager defines two root classes, clsObject and
clsClass, from which all other classes are derived.
Message types. Macros are provided for building message tokens. Tokens are differentiated according to the classes that defined them to provide a separate name space for each class.
Synchronous and asynchronous message passing. Because PenPoint is a multi-tasking operating system, you send messages to other tasks. If you want to wait for a response from a message that you send to another task, you can use synchronous message passing. If you don't want to wait for a response, you can use asynchronous message passing.
Single occurrence of executable code. Executable code that supplies an object's behavior is not duplicated in the class hierarchy. If the behavior is inherited from an ancestor class, the code for that behavior remains in the ancestor class.
Observing objects. You can set up an object so that it has observers. Observers are other objects that are interested in being notified of particular state changes in the observed object. Objects that want to become observers of a target object need only send the target a message requesting observer status.
CHAPTER 2 I THE PEN POINT DOCUMENTATION
Pen Point Architectural Reference
Appiication framework
Part
2:Application Framework
describes the PenPoint Application Framework, which provides you the tools you use to allow your application to run under the notebook metaphor. It provides mechanisms for:• Installing applications on PenPoint (used by the Installer).
• Creating documents.
• Activating documents (turning to a page in the notebook). • Saving and restoring document data.
• Deactivating and deleting documents (turning away from the page). • De-installing applications.
• Embedding documents in other documents, which is the foundation for the PenPoint Embedded Document Architecture (EDA).
Windows and Graphics
Part
3:Windows and Graphics
describes ImagePoint, the imaging system for the PenPoint operating system, and how applications can control the screen (or other output devices).The window system supports:
• Multiple overlapping windows in a window tree.
• Windows on any windowing device; windowing devices include the screen, printers, and memory.
• Many windows. Hundreds can be on-screen at once. • Control over window clipping, visibility, and transparency. • Notification when windows are dirty and need to repaint.
• A window layout protocol which lets windows dynamically size themselves and their children.
The ImagePoint imaging model supports:
• Device-independence.
• Arbitrary coordinate system with client-specified: • units
• scaling • rotation • translation
• RGB color specifications. • Fill and stroke painting model.
• Polylines, rectangles, ellipses, Bezier curves, arcs, chords. • Control over line thickness, ends, and corners.
2.5.2
2.5.3
16 PENPOINT DEVELOPMENT TOOLS
Part 1 / Getting Started
• Gray-scale sampled images ("bitmaps"), including dithering and scaling.
• Outline fonts with these additional features: • Hints for rendering fonts in small sizes.
• Missing fonts are synthesized from closest matching font. • Multiple font encodings supported.
• Substitution for missing characters in the current font. • Font editor (supplied as part of the SDK).
UI Toolkit
Part
4:
UI Toolkit describes the PenPoint classes that implement many of the common features required by the PenPoint user interface. These features include:• Borders, which support some common features of toolkit window repainting, such as margins, and background and foreground colors.
• General layout classes, which implement approaches for positioning and sizing child windows.
• Controls, which implement the translation of window input messages into messages sent to self and other objects.
• Labels, which are a simple way of displaying small amounts of text. • Buttons, which are labels that the user activates.
• Tookit tables, which support the initialization, layout and notification management for groups of toolkit components (such as buttons). The capability to organize components in a group is used by several subclasses. • Menus and menu buttons. Menus are special toolkit tables that often group
several buttons and menu buttons; menu buttons are special buttons that display a menu.
• Scroll bars, a special descendant of borders that handles a lot of the work of scrolling for you.
• List boxes, which are scrolling windows that support very large numbers of entries. Unlike a table, only those entries currently visible in the list box need have a window. Descendants of list boxes provide scrolling lists specifically for strings and for font names.
• Text fields, which are labels that the user can write upon. Subclasses of text fields have additional semantics to support integer fields, date fields, fixed-point fields, and so on.
• Notes, which present transient information to the user. PenPoint also provides standard message functions that display information using notes.
• Frames, which manage a collection of other
ur
components and a client window. Most applications use frames for their main windows, dialog boxes, and pop-up windows. Frames can have decorations, such as close boxes, title bars, tab bars, and command bars.CHAPTER 2 I THE PENPOINT DOCUMENTATION
PenPoint Architectural Reference
• Option sheets, which present the user with choices for attributes or settings. Because the user can leave an option sheet on-screen, the interaction between option sheets, option cards, and the selection is necessarily quite complex. • Icons, which show an iconic menu button made up of a bitmap image and
a string.
• Trackers, which grab input and draw transient "rubber-banding" figures in response to pen movements. The toolkit.uses this to provide feedback when the user drags or resizes items.
• Progress bars, which graphically display the relationship between. two values (usually one value represents a total while the second value represents percentage of the total).
". Input and Handwriting
Part
5:Input and Handwriting
describes the PenPoint input system andprogrammatic access to the handwriting translation subsystems. The input system provides:
• Programmatic control of input filtering, including priority of filters.
• Capability to receive all input events not intercepted by the filters (grabbing).
• Routing of input events to the appropriate object (listeners). The handwriting translation subsystem provides:
• Handling of accumulated pen input (strokes).
• Shape recognition. • Gesture interpretation. • Handwriting translation.
". Text Component
Part
6:Te:>ft Component
describes the PenPoint facilities that allow any application to provide text editing and formatting capabilities to its users. The text component allows:• Your code to display both plain and fancy text to the user in one or more text data objects.
• The user to interact with the text to modify both the characters and their appearance.
• The user to transfer all or part of the text from one text data object to another (possibly non-text) object, and vice versa.
• Your code tofile text data objects.
• Your code to observe and direct the user's interactions with the text.
2.5.5
2.5.6
18 PEN POINT DEVELOPMENT TOOLS Part 1 I Getting Started
• Embedded objects, which are used to implement insertion pads and signature pads, and can include graphics, spread sheets and other appli-cations in documents.
There is a difference between displaying text through the graphics subsystem and using the Text component. You can use the graphics subsystem to display
characters on the screen, but users can't dynamically manipulate the text. Furthermore, the text component includes paragraph and document attributes that define things such as margins and tabs.
File System
Part
7:
File System describes the PenPoint File System. The File System allows you to:• Create, open, close, and delete files. • Read and write file data.
• Copy, rename, and move files and directories.
• Seek to a new position within a file or find out the current byte position within a file.
• Modify file and directory attributes.
• Create user-defined attributes for files and directories.
System Services
Part 8: System Services describes the function calls that applications can use to access kernel functions, such as memory allocation, timer services, process control, and so on.
PenPoint provides basic OS-level services in areas such as task and memory management, as well as run-time language extensions. This part of the PenPoint Architectural Reference explains the use of these services. The PenPoint kernel and run-time libraries provide a level of functionality to the applications programmer collectively called System Services.
The kernel interface includes task management functions, memory management functions, and inter-task communication functions; these are the low-level PenPoint controls for the Intel multi-tasking environment.
The run-time libraries include functions for string manipulation, character handling, port I/O, buffer manipulation, memory allocation, and time stamp operations. There is a separate library for fixed-point arithmetic functions, which includes both error-checking and fast non-error-checking routines.
Note that there are no file-handling functions in System Seryices. The PenPoint File System has its own object-oriented API, described in Part
7:
File System of the PenPoint Architectural Reference. The C run-time library implements most of the C standard I/O functions such as fopen and fread on top of this object-. oriented APIobject-.2.5.1
CHAPTER 2 / THE PENPOINT DOCUMENTATION
Pen Point Architectural Reference
". Utiiity Classes
Part
9:Utility Classes
describes a wide variety of classes that save application writers from implementing fundamental things such as list manipulation, busy clock handling, and so on.• clsList provides a fundamental set of tools for creating and managing a list of 32-bit values. It is no coincidence that UIDs and pointers are also 32-bits long. You can use these objects to store lists ofUIDs or pointe~s to larger structures and you can pass these list objects to other objects.
• clsStream provides the basic messages used to communicate with a stream device. Many other classes descend from clsStream, such as clsFileSystem (the File System) and clsSio (the Serial Port class).
• The browser allows you to create a browser window or a table of contents on screen so that the user can manipulate the files and directories or documents and sections.
• File import and export uses messages from the browser to import files as PenPoint documents and to export PenPoint documents as files.
• The Selection Manager provides an central manager that keeps track of the selection owner. The selection manager notifies observers when the selection changes.
• The Transfer Class provides the messages and functions that implement the PenPoint operating system transfer protocol, which objects can use to exchange data.
• The Quick Help API provides a simple way to provide help to users. When the user "makes a question mark gesture on a window, the quick help manager locates the quick help resources associated with that window and displays the resources on screen.
• The Busy Manager allows applications to inform the user when a
time-consuming operation is taking place, thereby reassuring the user that the machine is still running.
• The search and replace API provides the protocol and traversal driver to search and replace text strings in embedded objects.
• The Undo Manager enables applications to respond to the Undo command to undo user interface actions.
• clsByteBuf and clsString implement simple data objects which file byte arrays and null-terminated strings.
• clsTable provides a general-purpose table component using a row and column metaphor to implement random and sequential access to data in a file.
• clsNotePaper provides a user interface to the PenPoint operating system's note-taking building block. Using this building block, your application can provide users with a way of managing ink on screen.
2.5.9
20 PENPOINT DEVELOPMENT TOOLS Part 1 I Getting Started
".. Connectivity
Part 1 0: Connectivity describes the classes that applications can use to access remote devices. The PenPoint remote interface includes:
• A consistent, object-based interface to ports and devices.
• A service architecture that enables users to install drivers and other
non-application programs without rebooting or otherwise interrupting work.
• Support for serial and parallel ports. • Support for fax and data modems .
•. Deferred data transfer through an In box and an Out box.
• Access to networks.
• An address book protocol.
Resources
Part 11: Resources describes how to read, write, and create PenPoint resource files. Resources include the following features:
• Ability to store data and object resources in files which can be replaced by the user.
• Agents that can read and write resources that use unique data formats. • GO provides agents to handle standard data formats.
• Applications can access a set of resources through predefined resource file lists.
• You can define data resources in a C file and compile the file to a resource file.
Installation API
Part 12: Installation API describes PenPoint support for installing applications, services, fonts, dictionaries, handwriting prototypes and so on.
PenPoint provides an installer through which users install and configure applications, fonts, services, dictionaries, and so on. This frees developers from having to write their own installer. The system-provided installer also frees users from having to learn a different installer for each product that they purchase; they just use the PenPoint installer.
The PenPoint Installer uses several system concepts and components: • All distribution volumes for PenPoint software have the same file
organization.
• Dynamic Link Libraries and control files allow products to specifY the components that they require. The PenPoint Installer can then load the components only if they are not present in the system already. The Installer can also unload components when they are no longer needed.
2.5.10
2.5.11
CHAPTER 2 / THE PENPOINT DOCUMENTATION API Reference
• The installation manager class handles installation. If a product requires special treatment not provided by existing installation managers, you can subclass the installation manager class.
• Application monitors exist for each installed application. The application monitors assist in application installation and deinstallation.
Writing PenPoint Services
Part 13: Writing PenPoint Services describes how to write a PenPoint service.
The PenPoint Services Architecture provides a framework for separately installable, non-application DLLs that provide non-application system extensions to
applications, components, and other services. The most common use for services is as MIL services (device drivers), but services can also be used for database engines, E-mail backends, and so on.
Services provide these features:
• Targeting other services to form chains of services.
• Delayed binding to targets (the target doesn't have to exist when the service is created.
• Ownership of services and restricted access to services, based on ownership. • Notification of connection and disconnection of devices and services.
• A service manager that manages installed services and controls client access to servICes.
API Reference
The API Reference provides datasheets for each function and message in each subsystem described in the Architectural Reference. These are generated from the header files in \PENPOINT\SDK\INC.
The parts in the PenPoint API Reference are organized identically to the parts in the PenPoint Architectural Reference. However, within each part, the classes are described in no particular order, other than the relative importance to the central topic of the part. If you are looking for a particular class or message, it is a good idea to use the index.
This volume (PenPoint Development Tools) contains a Master Index to all manuals in the PenPoint SDK documentation set.
2.5.13
2.6
22 PENPOINT DEVELOPMENT TOOLS Part 1 I Getting Started
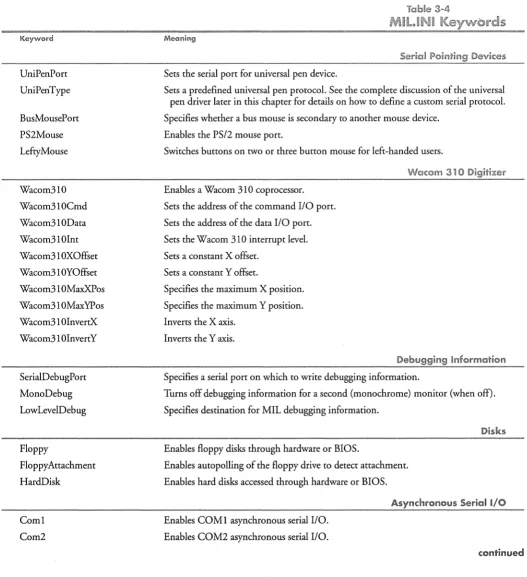
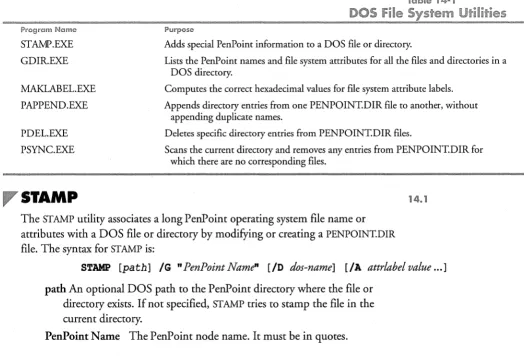
[image:31.613.31.564.76.758.2]Contents of the SDK
2.7Table 2-2 lists the directories and key files in the PenPoint SDK and describes their contents.
Directory or File
\PENPOINT\APP \PENPOINT\BOOT \PENPOINT\BOOT\APP \PENPOINT\BOOT\_APP \PENPOINT\BOOT\DLL \PENPOINT\BOOT\_DLL
\PENPOINT\BOOT\ * .INI
\PENPOINT\BOOT\*.DLC
\PENPOINT\BOOT\_ *. *
\PENPOINT\BOOT\MIL.OS
Table 2-2
SDK Contents
CommentsPenPoint applications.
Control files, start-up code.
PenPoint system applications (Notebook, Bookshelf, etc.).
Optional DEBUG versions,of system apps.
System DLLs.
Optional DEBUG versions of system DLLs.
Control files.
Control files of DLLs loaded at start-up.
Backup copies of control files.
Machine Interface Layer code.
PenPoint
\PENPOINT\BOOT\PENPOINT.OS PenPoint kernel.
\PENPOINT\BOOT\_W.OS \PENPOINT\BOOT\PPBOOT.EXE \PENPOINT\FONT \PENPOINT\HWX \PENPOINT\PDICT \PENPOINT\PREFS \PENPOINT\SERVICE \PENPOINT\_SERVICE \PENPOINT\SDK \PENPOINT\SDK\APP \PENPOINT\SDK\_APP \PENPOINT\SDK\DLL \PENPOINT\SDK\lNC \PENPOINT\SDK\lNC\SYS \PENPOINT\SDK\UB \PENPOINT\SDK\SAMPLE \PENPOINT\SDK\UTIL\CLSMGR \PENPOINT\SDK\UTIL\DOS
DEBUG version of Pen Point kernel.
DOS program that loads PenPoint.
PenPoint fonts.
Handwriting prototypes.
Home of personal dictionary.
home for preference settings.
System services used by PenPoint.
Optional DEBUG versions of system services.
PenPoint applications that are not loaded in the default PenPoint configuration; some of these are SDK tools such as the bitmap editor and S-Shot tool, others are applications that you must distribute with your own application if it requires them.
Optional DEBUG versions of non-system apps.
PenPoint DLLs that are not loaded in the default PenPoint configuration that you must distribute with your own application if it requires them.
PenPoint header files.
Some header files are in this subdirectory for ANSI C compatibility.
library information to enable you to link your code with routines and externals in PenPoint DLLs and PENPOINT.OS.
Sample application code and sample Watcom WMAKE Makefiles.
PenPoint Method Table compiler.
DOS utilities for PenPoint.
CHAPTER 2 I THE PENPOINT DOCUMENTATION 23
Directory
\WATCOM\BIN
\WATCOM\BINB
Comments
DOS-only Watcom compiler tools.
Dual mode (DOS and OS/2) Watcom compiler tools.
\GOODIES\SDK\APP Unsupported applications.
\GOODIES\SDK\BOOT\DLL Unsupported developer DLLs.
\GOODIES\SDK\UTIL Various unsupported developer utilities.
The files on the Goodies disk are unsupported, however you might find them useful. Most software on the Goodies disk has a README. TXT file in its subdirectory that explains its use. To reiterate: software on the Goodies disk is unsupported. PenPoint Developer Support will not answer questions related to
anything on the Goodies disk.
Contents of the SDK
Tobie 2-2 lenrmm.",m
Tools
Chapter 3 / Running
Pen Point
on a PC
Although the PenPoint™ operating system is targeted for mobile pen-based computers, it is possible to run PenPoint on some PC configurations. The
simulation is imperfect (no static RAM, no pen-on-screen interaction, and so on) but it is useful for development and debugging. The mouse simulation of a pen does not have the same user interface as a PenPoint computer at all. Using a pen tablet attached to a PC lets you hand write more naturally, but you still aren't able
to directly touch objects on-screen or write on what you see.
PenPoint will not work on all PCs, even those advertised as "100% IBM PC compatible," even those claiming compatibility with the requirements below.
".. Hardware
To run PenPoint on a PC, you need a 386-class machine with a hard disk that has at least 25 Megabytes free
If you want to run PenPoint on your PC, in addition it must have the following: • 8 MB of RAM configurable as extended memory. You may be able to
develop with less memory, however the PenPoint Source-level Debugger with full symbol tables and all applications loaded takes around 6 MB.
• IBM VGA or Compaq VGA video adapter (because PenPoint has its own video drivers, adapters advertised as being 100% compatible with these under DOS may not work).
• Either a mouse or a digitizing tablet.
To repeat, your PC may meet these requirements yet not be able to run PenPoint.
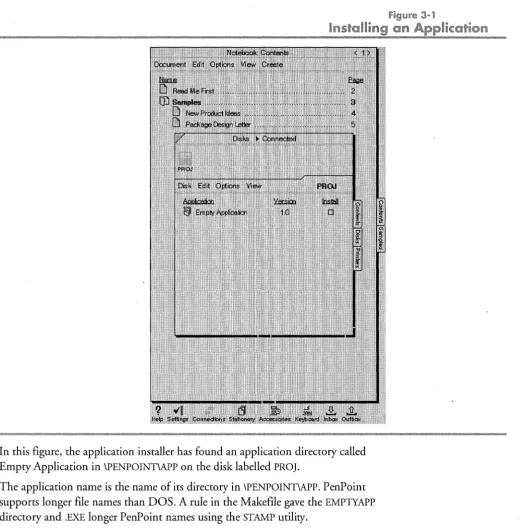
It may even be able to run one release, yet not another. Table 3-1 lists the computers that GO has tested and supports for PenPoint development.
26 PENPOINT DEVELOPMENT TOOLS Part 1 I Getting Started
Machine
Compaq 386/20E
Dell 325P
IBM PS2/70
IBM PS2/70
IBM PS2/80
IBM PS2/90
IBM PS2/95
NCR 386sx/MC20
Table 3-1
Tested Machine Configurations
Configuration
20MHz 386, no coprocessor, Compaq BIOS dated 31-May-89, DOS 5.0, 640KB
+ 8192 Extended
=
8,832KB total memory.25MHz 386, no coprocessor, Phoenix BIOS dated 27-Sep-91 version 1.10A16, DOS 5.0, 640KB + 7,160 extended = 7,800KB total memory.
25MHz 386, no coprocessor, IBM BIOS dated 2-Feb-89, DOS 5.0, 640KB + 7,424
= 8,064KB total memory.
IBM BIOS dated l1-Apr-88, 640KB + 5,376 = 5,980KB total memory.
33MHz 486, built-in coprocessor, IBM BIOS dated 30-Jan-91, DOS 5.0, 640KB
. + 11,520 extended = 12,160KB total memory.
25MHz 486, built-in coprocessor, IBM BIOS dated 8-Jan-90, DOS 5.0, 640KB
+ 7,424 extended = 8,064KB total memory.
20MHz 386, no coprocessor, NCR BIOS version 1.01.00 and Phoenix BIOS dated 15-0ct-90 version 1.02.07, DOS 3.30, 640KB + 7,424 extended = 8,064KB total memory.
GO has also tested PenPoint on the machines listed in Table 3-2, but makes no commitment for continued support.
Machine
Northgate 386 33E
Samsung S800
Toshiba 5200/100
Uniq 486133
,." Mouse
Table 3·2
Machine Configurations with No CommiHed Support
Configuration
Model FCH, 33MHz 386, no coprocessor, Northgate (AMI) BIOS dated 15-Sep-89 version 3.2B, DOS 4.01, Video 7 VGA version 1.09, 40MB type 22 drive,
640 + 7,552 extended = 8,192KB total memory.
20 MHz 386, no coprocessor, AMI BIOS version 3.04 03B dated 30-Nov-87, DOS 5.0, ATI Basic 16 VGA, type 34 Western Digital IDE controller, Conner 201 MB drive.
20 MHz 386, no coprocessor, Phoenix BIOS dated 15-Jan-88, DOS 4.01, built-in VGA, 640 + 7,168 extended = 7,808KB total memory, 102MB drive.
33 MHZ 486, built-in coprocessor, American Megatrends, Inc. (AMI) 486 BIOS for Vantage 486 version 2.0 dated 7-Jul-91, DOS 5.0, ATI VGA Wonder XL VGA wi 1MB, 640 + 7,424 extended = 8,064KB total memory, type 47 controller.
3.1.1 If you do not have a digitizing tablet, you can use a Logitech C7 or C9 serial
mouse, a Microsoft compatible mouse, a PS/2 mouse, or a bus mouse. GO does not currently support the Logitech Mouseman or newer Logitech mice.
CHAPTER 3 I RUNNING PEN POINT ON A PC Hardware
27
".. Memory, Caches, and RAM Disks
You need 8MB of RAM to run PenPoint. It must be extended memory, not expanded memory. Memory-resident software may use up much of your memory. Pen Point might run in less memory, but our QA process has only evaluated 8 MB machines.
The Watcom compiler and linker (WCC386P and WLINKP) are protected-mode programs that use extended memory. If you use large disk caches or RAM drives, they may not have enough memory to run. Also, the DOS 5 EMM386.EXE driver conflicts with their use of memory. For more information, see the section on compiling.
PenPoint will not work if you run a disk cache such as SmartDrive. It also interfers with some RAM disks. We believe that VDISK can coexist with PenPoint, but others may not.
You can check whether your RAM disk is compatible through these steps:
• Run PenPoint (PPBOOT.EXE).
• Exit back to DOS.
• If the size or contents of your RAM disk has been altered, assume that it and PenPoint conflict.
".. Networks
To stop running PenPoint on a PC, you either tap the shutdown button in the Preferences Power option sheet or press
I
PauseI
and enter q at the prompt. Usually your computer returns to DOS. However, if your computer has loaded network software, you may have to reboot your computer after running PenPoint (because the machine will hang). If you want to avoid this reboot, do not load yournetwork software before you run PenPoint or remove it from memory. In either case, GO recommends that you run CHKDSK to verify the state of the DOS file system.
Labeling Volumes
Unlike the DOS convention oflisting disks by their drive letter (C: for example), PenPoint refers to disks by their volume names (not by their devices). You can name volumes when you format them, or with the DOS LABEL command. It's a good idea to give volume names to all the floppies and hard drives you will be using with PenPoint.
PenPoint volumes are indicated by a \ \ before the volume name. Thus
\\MYDISK\DIR\FILEI is a path on a volume la~elled MYDISK.
There are a few reserved volume names in PenPoint. \\RAM is reserved for the PenPoint memory file system, which is usually in static RAM, but can be on-disk.
\ \BOOT is the volume from which PenPoint booted (programmatically known as theBootVolume). When running PenPoint on a PC, it's safe to refer to files
3.1.2
3.1.3
3.1.4
28 PENPOINT DEVELOPMENT TOOLS Part 1 I Getting Started
relative to \\BOOT; however, when booting a PenPoint computer from floppies, your configuration information must refer to the actual floppy disk volume labels. IfPenPoint encounters a volume name in a path that it does not recognize, it will prompt the user to insert the volume with that name.
". SeHing Up Initialization Files
When PenPoint starts, it reads several initialization files in \PENPOINT\BOOT.
These set certain environment variables and tell it what dynamic link libraries (DLLs) to load, and what applications to install. Before running Pen Point for the first time, you will probably need to modify at least one of these files.
All files you need to run PenPoint on a PC are in the \PENPOINT directory that you installed with your SDK. The document on installing PenPoint shipped with your software contains the latest information on installing PenPoint and machine requirements to run it.
Default versions of the initialization files necessary to run PenPoint on a PC are in
\PENPOINT\BOOT. The SDK contains two versions of each initialization file. ,One is preceded by an underscore
C),
the other isn't. You should modify the file that does not contain the underscore, and leave the one with the underscore so that you can refer to it later.If, after changing the originals, you have difficulty running PenPoint, compare the modified file with its underscored equivalent.
Two notes on initialization files:
• The last character in your initialization files must be a newline (carriage return, line feed). If the newline is not present, PenPoint will ignore the last line in your file.
• If the line is of the form tag=value and you have two lines that define the same tag, PenPoint uses the first occurence and ignores all subsequent occurrences of the tag.
3.2
Table 3-3
PenPoint Initialization Files in \PENPOINT\BOOT
Name
MIL.INI
ENVIRON.INI
BOOT.DLC
CONSOLE.DLC '
SYSCOPY.INI
SYSAIP.lNI
AIP.lNI
Description
Hardware interface settings for PC MIL.
PenPoint configuration settings.
List of system DLLs required to run PenPoint.
A subset of BOOT.DLC for single-screen debugging.
List of files and directories to copy to memory.
System applications to install.
CHAPTER 3 I RUNNING PENPOINT ON A PC MIL.INI
29
~en~oini
iiooi Sequence
When you run PPBOOT.EXE on a PC, it locates the MILINI file and uses the information in MILINI to configure the hardware, initialize the MIL (machine interface layer), and start the PenPoint operating system.
PPBOOT determines the volume from which PenPoint is being booted, and assigns the boot volume to the symbol theBootVolume. You can use theBootVolume in your code to refer to this volume.
The operating system locates the ENVIRON.INI file and uses that information to configure things such as the size of the display, the selected volume, the time zone, and the name of the first application to run. If a \PENPOINT directory does not exist on the volume, PenPoint creates one.
The PenPoint operating system then looks for \PENPOINT\BOOT\BOOT.OLC and it initializes each DLL listed. PenPoint then copies all the files and directories listed in \PENPOINT\BOOT\SYSCOPY.INI to the selected volume.
PenPoint installs the system applications listed in \PENPOINT\BOOT\SYSAPP.INI.
The last DLL in BOOT.OLC, AUXNBMGROLL, installs the applications listed in
\PENPOINT\BOOT\APP.INI.
MIL.INI
The file \PENPOINT\BOOT\MILINI describes configuration of the PC on which the PenPoint operating system will run. Although most devices are installable, there are a handful of devices that PenPoint must know about ahead of time, such as the screen type, the stylus device, and the system clock.
MIL.INI is specific to the implementation of the PenPoint MIL (machine interface layer) for a Pc. Because PC configurations can vary so much, the PC MIL imple-mentation reads the configuration information from MILINI. The MILs that run on most tablet hardware will be preconfigured for a specific machine and thus will not need to read configuration information from a file.
You must modify \PENPOINT\BOOT\MILINI before you can boot. At a minimum, you need to specify your pointing device and monitor in MILINI. Another common change is to specify the port (if any) on which debug output should appear. MILINI contains instructions forhow to modify itself together with commented-out versions of common settings.
Changing MILINI does not change an active system. Changes take effect the next time you boot PenPoint.
The format is of a setting in MILINI is:
keyword = value
Following is a list of the _MILINI file shipped with the SDK:
3.3
3.4
30 PENPOINT DEVELOPMENT TOOLS Part 1 I Getting Started
I The following applies to all serial pointing devices:
I I I I I
Use the UNIPENPORT tag to set the serial port. For example: UNIPENPORT = 1 - This will set unipen to COM1:
UNIPENPORT = 760,5 - This will set unipen to comport at 2F8 irq 5
I Use the UNIPENTYPE tag to
I UNIPENTYPE = WACOM510C
select a predefined protocol:
- This sets unipen to the Wacom 510C digitizer
*
*
MICROSOFT: Microsoft serial, two-button mouse*
I LOGITECH:
I I
f WACOM510C:
f I I I
I WACOM510:
I I I
Logitech C7 or C9 serial, three button mice. For a Logitech MouseMan use the MICROSOFT tag
The switches must be set as follows (X = ON, 0 = OFF)
-DS1 DS2 DS3
Front OXOXXOOX XXOXOXXO XXOOXXOO Back
The older Wacom units, red power LED, attached power cord. The switches must be set thusly (X = ON, 0 = OFF)
-Front OOOXOOXO XXOXOXXO XOOOXOOO 00000000 Back
I
t
I I
SuperScriptII: The SuperScript II LCD/digitizer combo. For the ink to be aligned you must specify "ScreenType=SuperScript" or "ScreenPixelsPerMeter=3690" in MIL.INI.
I
I CaICompDBII:
I I
t
I I
CalComp's DrawingBoard II, should also work with their "Wiz" product. Use the default "Hi Resolution Binary" format (123) in "run" mode, 9600 baud no parity, eight data bits, one stop bit, 1000 lpi resolution, 125 pps. Enable "Send when out of proximity", button 10=1 in bank B.
I The following are generic descriptions. You will probable have to "tune" t these by placing the parameters into MIL.INI and adjusting for
t the specific charatersitics of your digitizer.
I
I GAZELLE:
I MM: t BITPAD2:
I BITPAD2ASC:
I
For products from Gazelle System (now owned by Logitech) The common "MM" digitizer protocol.
BitPad 2 binary protocol BitPad 2 ACSII protocol
I See the universal pen driver manual for details on how to define a t custom serial protocol.
I
I Remove the "I" on the line below for the port of your pointing device: IUNIPENPORT = 1
IUNIPENPORT = 2
f
t Remove the "I" on the line below which matches your serial pointing device: