Telecom DaySave
User Guide
Table of Contents
Chapter 1: DaySave Overview ... 4
Chapter 2: Installing DaySave ... 5
Downloading the DaySave Client ... 5
Installing the DaySave Client ... 5
Using the Setup Wizard ... 6
Signing In with a Licence Key ... 6
Scanning for Files ... 7
Changing Encryption ... 8
Setup Complete ... 9
Chapter 3: Using the Settings Window ... 11
Understanding Backup Sets ... 12
Selecting Backup Sets ... 14
Creating Custom Backup Sets ... 14
Setting Up Rules ... 15
Editing Backup Sets ... 19
Using the File System Tab to Select Backup Content ... 19
Adding Files and Folders Through Windows Explorer... 20
Adding a Network Share ... 21
About Deleting, Moving, and Renaming Files ... 22
Scheduling Backups ... 23
Configuring an Automatic Backup ... 23
Configuring a Scheduled Backup ... 25
Temporarily Suspending Backups ... 26
Configuring Options... 27
Configuring General Options ... 28
Setting Bandwidth Throttling ... 29
Setting Backup Speed ... 30
Understanding Local Backup ... 30
Configuring Advanced Options ... 32
Using Proxy Servers ... 34
About the History ... 36
Viewing Backup and Restore History ... 36
About Restoring Files ... 37
Changing the Location of Temporary Files ... 37
Chapter 5: The Status Window ... 38
Using the Status Window ... 39
Chapter 6: About Restoring Files ... 41
Restoring Files Using the Restore Tab ... 42
Performing VSS Restores ... 43
Restoring Microsoft Exchange Server Data ... 43
Restoring Active Directory and SYSVOL Data ... 45
Restoring Microsoft SQL Server Data ... 46
Restoring COM+ ... 46
Restoring the Registry ... 47
Using the DaySave Virtual Drive ... 48
Right-Click Restores ... 48
Restoring from the Web ... 50
Restoring Files from the Web Using Backup Sets ... 52
Downloading Restored Files ... 53
Decrypting Restored Files Using Your Own Private Key ... 54
Chapter 7: Replacing a Computer ... 58
Chapter 8: Changing Your Password ... 60
Chapter 10: Uninstalling DaySave ... 61
Chapter 1: DaySave Overview
DaySave is a secure and reliablebackup solution for your business needs. Through the easy-to-use DaySave client interface,you can customize your fileselectionand backup scheduling.The DaySave backup servicesaves 30 days of datahistory for eachfileyou back up. In the eventthatyou need to restore files(in the caseof computerfailure, loss, etc.), DaySave makesit easy to recoverthe data via the DaySave client.
DaySave encryptsyour data locallybefore it is sent to the datacentreover an SSL connection. Your backups are then stored with either448-bit Blowfishor 256-bit AES encryptionto ensure your data is protected.
Chapter 2: Installing DaySave
Thereare multiplesteps to the installationprocess:
1. Download the DaySave client.
2. Installthe software on your computer. 3. Configurethe DaySave clientsoftware. 4. Createinitialbackup sets.
5. Advanced configuration.
This step is optional during the install. It can also be performed at any time after the install. See Using the Settings Window for more information.
The following topicsare available:
Topics:
• Downloading the DaySave Client • Installing the DaySave Client
• Using the Setup Wizard
Downloading the DaySave Client
1. To download the DaySave Client you will be sent an Activation email from the person within your company who is responsible for administering DaySave. This person will also provide you with your DaySave account password – you will need to know this password before installing the client software.
2. When you receive the email follow the link in the email to start the download process. 3. Enter your Licence Key as provided in the email.
Installing the DaySave Client
1. Browse to the location where you saved the DaySave client,then double-clickthe DaySave Client on Windows executablefile(ends in .exe).
Figure 5: Welcome screen
2. (Optional) To choosea different installation directory, select theChoosea different
install locationcheckbox.
3. Click Install to start the installationand continuewith the Setup Wizard.
Using the Setup Wizard
The Setup Wizard automaticallystartsafterthe DaySave fileshave been copied.If you do not completethe Setup Wizard,itstartswhenyoutrytoopentheDaySaveSettings.After theSetup Wizardhasbeencompleted, use the Settingswindow to makeany additional changesto your configuration.
Signing In with a Licence Key
Youwill find thelicencekey in your Activation Email atthebottomoftheemail.
1. In the LicenceKey field,type or copy the licencekey thatyou receivedin the email. 2. In the EmailAddress field,type the emailaddress thatreceivedthe email.
3. Click Next to sign in and proceedto the next step.
password – speak to your administrator).
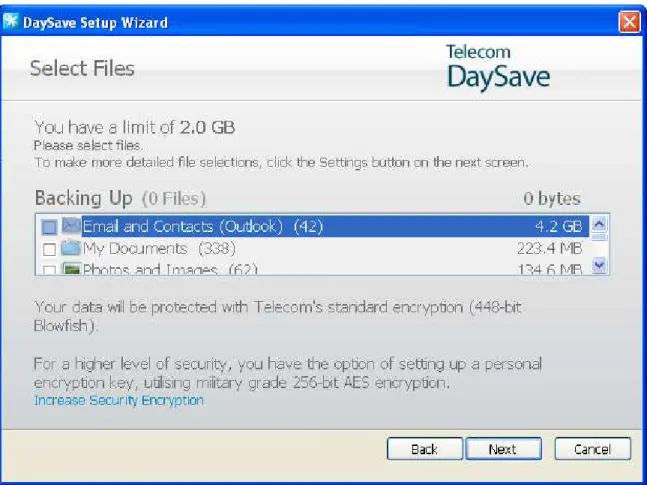
Scanning for Files
DaySave scans your hard drive for data files and groups them by common file types into backup sets. You can edit these backup sets using the Settings button at the end of the Setup Wizard. If your account has a limit and the selected files exceed your limit, you
can deselect files until you are under your limit. If you choose to continue while still over your limit,DaySave backs up your files until your limitis reached, and any filesover your limit are not backedup.
If you need more storage space, contact the person within your company responsible for administering DaySave.
Figure 6: Selecting Files Summary
1. (Conditional) If you have a spacelimitation,select the sets of filesyou want to back up until your limit is reached.
If the selectedfilesexceedyour limitand you continue, DaySave backs up your filesuntil your limitis reached. Any additionalfilesare not be backedup.
2. (Optional) To changethe encryption used to encryptyour data,click Change Encryption.
Telecom's standardencryptionuses 448-bit Blowfish,which is recommended. 3. Click Next.
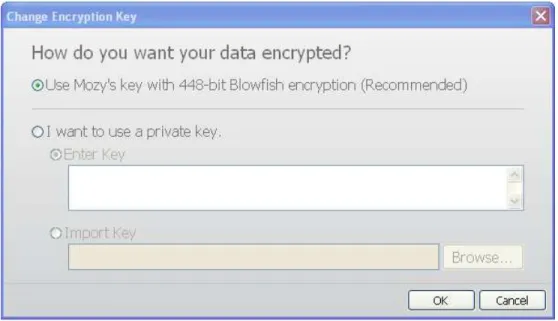
Changing Encryption
DaySave encryptsyour data before it is sent to the backup servers. Whilethe default encryptionkey is recommended,you can choose a different key to suit your needs. Dependingon your configuration,you can choose from the following:
• Use DaySave's key with 448-bit Blowfishencryption • Encryptmy datawith my own personal256-bit AES key
Caution: If you select Encrypt my data with my own personal 256-bit AES key, you are responsible for remembering that key. If you forget your personal key, you will not be able to access your backed up files when they are restored.
AfteryouhavesetupDaySave,youcannotchangetheencryptionusedwithoutreinstalling DaySaveand re-uploadingallof your data.
Figure 7: Changing Encryption
1. Selectthe encryption methodyou want.
Ifyouchoosetouseaprivatekey,enterthekeybycopyingortypingitintothe EnterKey
Caution: If you lose your key, neitheryou nor Telecom willbe ableto decrypt your data.
2. Click OK when done.
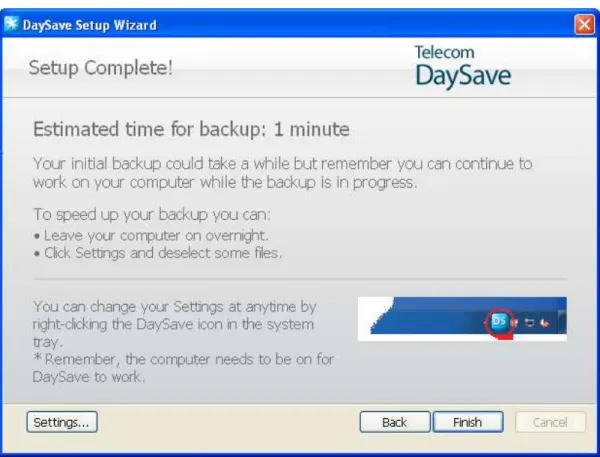
Setup Complete
Review theinformationin theSetupComplete dialogboxtounderstandhowlongyour backup mighttake.The first backuptakesawhilebecauseallofyourselected files mustbe encryptedandthensenttothebackupservers. The timeto completethe initial backup depends on the how busy your computeris and how fast your Internet connection is. This is a common issue with allonlinebackup services.
Figure 8: Setup Complete Screen
Select an option:
• Settings:ExitstheSetup Wizardandopens theSettingswindowso youcaneditbackup
setsandchange other settings.
• Back: Use this button to go back in the Setup Wizard to changethe choicesyou have made.
• Cancel: Exitsthe Setup Wizardwithoutsaving the choicesyou made. DaySave is still
installedbut not configured.When you open DaySave Settings, the Setup Wizardstarts again.
Chapter 3: Using the Settings Window
The Settings window lets you set additional configuration options such as choosing specific files to backup,whenyou want backups to take place,and what alertsyou want displayed. You can open the Settingswindow using one of the followingoptions:
• Right-click the DaySave icon in your system tray, then click Settings.
• When the backup completes, the Status window is displayed. Click Settings to open the DaySaveSettingswindow.
Clickthetabstoviewandchangeyourbackupsettings.Whenyouhavefinishedmakingallyour changes,click Save. The Settings window closes.
The following topics are available:
Topics:
• Understanding Backup Sets
• Selecting Backup Sets
• Creating Custom Backup Sets
• Editing Backup Sets
• Using the File System Tab to Select Backup Content
• About Deleting, Moving and Renaming Files
• Scheduling Backups
• Configuring Options
• About the History
• About Restoring Files
• Changing the Location of Temporary Files
Understanding Backup Sets
Backup setslet youeasilyselectfilestobackupaccordingtofiletypeinspecifieddirectories. Each timeanew fileof a type you have selectedfor backup is saved to your computer, DaySave automatically selectsthatfile for all subsequentbackups.
Bydefault,backupsetsthathavenofilesthatmeetthebackupset criteriaarenotlisted as availablebackupsets. To view allavailablebackup sets, the Show all pre-configuredbackup sets option must be selected.For informationon how to changethis option, see Configuring
Options.
For example, selectingthe checkbox for the Word Processing Documentsbackup set
automatically backs up allMicrosoft Word, OpenOffice.org, WordPerfect,Adobe Acrobat,and text fileson your computerunder the MyDocumentsandDesktopfolders.Allsubsequentfilessaved toyourcomputerinthesefolderswiththesame fileextensionsare automaticallyadded to your backups.
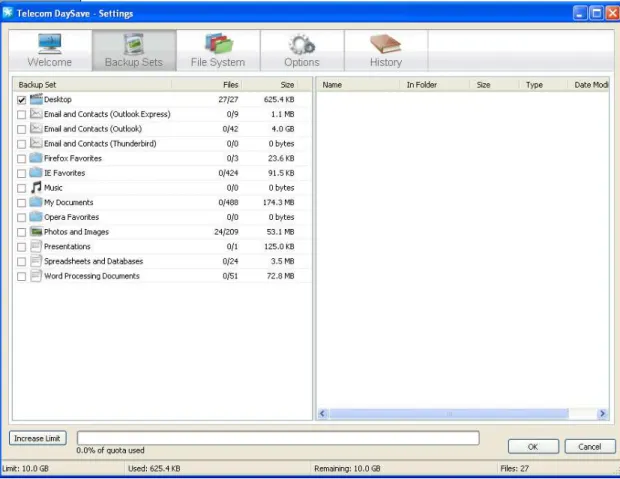
Figure 10: Backup Sets
When you click the name of a backup set, a listof the filesincluded in the backup set is displayedin the right pane. File namesfor encryptedfilesare displayedin a different color than the rest of the files.
This table describes the behavior of the backup set selector. Checkbox Description
New files matching this backup set will not be backed up. However, the backup set displays files that are being backed up because they match the rules of a different backup set or they were explicitly selected.
All of these files will be backed up, and new files in this set will not be backed up.
When you select the checkbox for a backup set, all the existing files are selected for backup. Deselecting the checkbox deselects all files in the backup set.
Selecting Backup Sets
1. Right-click the DaySave icon in your system tray, then select Settings. 2. Click the Backup Sets tab.
3. From the Backup Set list in the left pane, select the check box next to the set you want included in your back up. Select the name of the set to view its list of files in the right pane.
4. Deselect the check box next to any unwanted files in the file list.
5. If you exceed your space allotment (as shown in the quota used bar), you will need to do one of the following:
a. deselect files until you are within your quota.
b. Speak to the person within your company responsible for administering DaySave – that person will be able to allocate more storage space to you.
6. When you have finished in this tab, continue your configuration in other tabs, or click Ok. Your settings are saved and the Settings window closes.
Creating Custom Backup Sets
DaySaveletsyoucreatecustombackup setsforyourspecificneeds.When youcreateacustom backup set,you selectthe specificfilesor directoriesto include in the set or you createrules that include or excludefilesand directories.For example,if you often enhanceyour photos using Photoshop, you might not want to keep all of resultingoutput filesbecause you have the original Photoshop .psd file.Then you can selectyour working Photoshop directory, and then createa rule to exclude allthe .jpg, .gif, and other graphic filetypes. The result
is you back up just your Photoshop files.
Additionally, after creating a backup directory, you can choose to exclude the set from your backup by selecting the Files matching this set will be EXCLUDED from the final backup set
checkbox. This checkbox appears if the Show advanced backup set features is selected on the Advanced tab under Options in the Settings window.
1. Right-click the DaySave icon in your system tray, then select Settings.
2. On the Backup Sets tab, right-click in the left pane of the window, and select Add Backup Set.
3. The Backup Sets window appears.
4. In the Backup Set Name field, specify a name for your new backup set. 5. In the right pane, select the locations where your files are stored.
6. To create rules for your backup set, click Add a rule. 7. Use the drop-downs and text field to specify the rule criteria. 8. The Rules wizard appears.
Figure 11: Backup Set Editor
See Setting Up Ruleson for more information.
9. To add anotherrule, click +.
10.When youhavefinishedin thistab,continueyour configurationinothertabs,orclick Ok.
Yoursettingsare saved and the Settings window closes.
Setting Up Rules
Therearemanypossiblerulecombinations forbackup sets. Theyareallbasedoneitherincludingor excluding certainfilesaccordingto your specifications.The following sectionsexplainthe different options you can use to build a rule, moving from left to right whilebuilding your rules.
Including and Excluding Data
The firstcriterionyou selectis whetherto include or excludethe datafrom the backup set.
Click the firstdrop-down and select:
• Include to include data. • Excludeto exclude data.
Selecting File Attributes
See the second drop-down to select a file attribute for the backup set. The available options are:
Specify the fileextensionin the textbox. Examples are .exe, .doc, .txt, .pdf.
Size
Select either is less than or is greater than for your option, then specify the number of kilobytes in the text box.
Last Modified
Selecteither before, after, or betweenfrom the next drop-down list
Beforeand afterallowyoutoselectonedateforthedatefield.Ifyouselect between,twodate fieldsappearso you can set the range.
You can enterthe datemanuallyor select the datefrom a calendar thatappearswhen you clickthe datefield drop-down menu.
Created
Selecteither before, after, or between from the next drop-down list
Beforeand afterallowyoutoselect onedateforthedatefield.If youselect between,twodate fieldsappearso you can set the range.
You can enterthe datemanuallyor select the datefrom a calendar thatappearswhen you clickthe datefield drop-down menu.
File Name
Selectone of the followingfrom the next drop-down list: • is
• is not
• starts with
• doesn't start with
• ends with
• doesn't end with
Folder Name
Selectone of the followingfrom the next drop-down list. • is
• is not
• starts with
• doesn't start with
• ends with
• doesn't end with
Specifythe word or characters in the text box, and then selectthe desired if you want just Filesor
Filesand folders.
Configuring Microsoft Volume Shadow Services Backup Set Rules
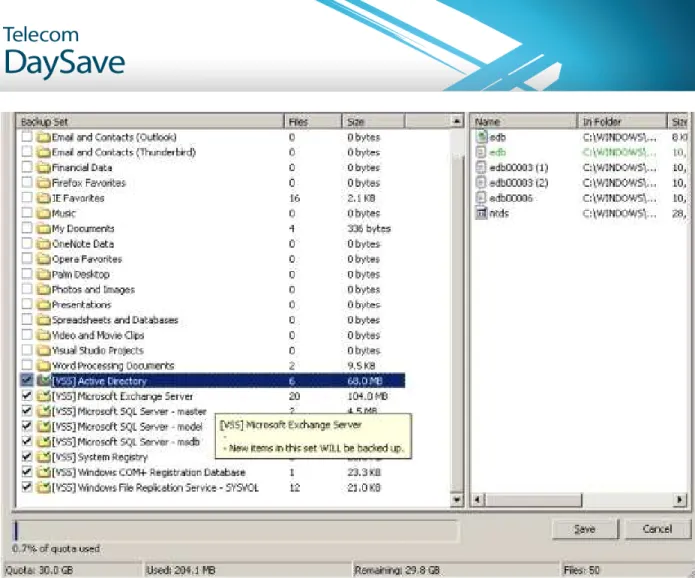
For server backups, you might want to back up MicrosoftExchange,Active Directory, MicrosoftSQL Server, SYSVOL,registry,andCOM+data.Thishelpsforquickrestorationwhenyouhavedataloss. DaySavemakesthis processeasyforyou.ForMicrosoftExchange,ActiveDirectory,MicrosoftSQL Server,SYSVOL,registry,and COM+data,DaySaveusesthenativeMicrosoftVSSwriterstobackup thedatawhiletheservicesarerunning. MicrosoftVSS support is only availableon Windows 2003 server or later.
Important: This functionality is only available with a DaySave server licence.
If these servicesare running on your machine, the DaySave clientautomaticallydetectsthe available services and displaysthemin the Backup Sets tab.
Figure 12: VSS Backup Sets
To backuptheseapplications forfilesets,select thecheckboxnexttothebackupset.TheDaySave client then automaticallyuses the Microsoft VolumeShadow-copy Service(VSS) Writerto do the backup.
At the time of backup, if the Exchangeservicesare running, a requestis made to the VSS, which notifiesthe Exchangeservicesthata backupisabouttotake place.Once thebackuphasoccured, Exchange isnotifiedthat the backup has occuredsuccssfully and Exchangedeletesthe Exchange logs.
ForMicrosoftSQL Serverto backup,theSQL ServerVSS Writerservicemustbestartedbeforethe backup set displays.It is suggestedthat you set the SQL Server VSS Writerserviceto automatically startwhen Windows starts.WhenthebackupsetsappearforMicrosoft SQLServer,eachdatabase displaysasa separatebackupset. The SQL Server servicesand SQL Server VSS Writerthen flush any transactions pending in memoryto the store fileto ensure that the backup includesthe most recentchangesavailable;after which, a snapshot of the filesare backedup.
After DaySave has backedup the file,only the changedblocks of the fileare transmitted.This happens at the block level, not the filelevel,so subsequent backups can takeminutesinstead of hours.
This style of Exchangeand SQL Server backup results in a significantlyreduced impacton the performanceof the server as well as on the SQL/Exchangeservices.BecauseDaySave avoids interfacingwith the services directly, no downtimeor slowdown of any kind is experienced.
Important: If you are configuringDaySave to back up a MicrosoftExchange Server residingon the same hardwareasthedomaincontroller,itisimportanttoselecttheVSS ActiveDirectoryandWindows File Replication Service (SYSVOL) backup sets.
Editing Backup Sets
Editingabackupset takesjust momentsandiseasytoaccomplish.Whenyoueditabackup set, youcanchange the fileattributesor the directories thatshould be used to determineif filesare included in the backup.
1. Right-click the DaySave icon in your systemtray, then select Settings. 2. On the Backup Sets tab, double-clickthe backup set you want to edit. 3. Edit the backup set.
See Creating Custom Backup Setsfor more information.
4. When youhavefinishedin thistab,continueyour configurationinothertabs,orclick Ok. Your
settingsare saved and the Settingswindow closes.
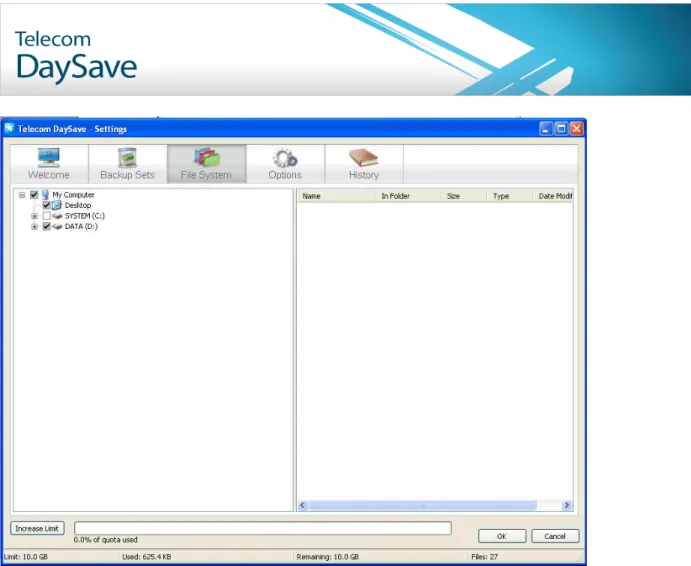
Using the File System Tab to Select Backup Content
The FileSystemtabletsyouselect ordeselectanyfilesorfoldersonyour systemtoinclude withyour backup. This methoddiffers from selectingbackup sets becauseinstead of searching for a filetype, you specifythe individualfilesor folders to includein the back up. Any files selected in eitherthe BackupSets or File System tabs are shown as selectedin both tabs. Likewise, deselectinga filein eithertab also deselectsit in the other.
1. Right-click the DaySave icon in your systemtray, then select Settings. 2. Click the FileSystem tab.
TheFileSystemisdisplayedintheleftpaneandindividual files aredisplayedintherightpane. Anencrypted filenameis displayedas a different color than the rest of your files.
Figure 13: File System Tab
1. Selectthefoldersyouwanttoincludeinthebackup.Whenyouselect afolder,allits subfoldersareselected as well.
2. Selector deselect individualfilesin the right pane that you want to includeor excludefrom the backup.
3. When youhavefinishedin thistab,continueyour configurationinothertabs,orclick Ok.
Yoursettingsare saved and the Settings window closes.
None of the steps above disengage the featurethat automaticallymarks subsequentlycreated filesin selected folders. Youcanhoveryour mousepointer overafolderto revealatooltip explaining howitistreatedduring a backup.
Adding Files and Folders through Windows Explorer
You can add filesand folders to your backup list by right-clickingon the fileor folder in Windows Explorer. If the option to "Add to the DaySave backups" isn't an option, that means the file is already selected for backup, or it is a file that Telecom cannot backup such as shortcuts. You cannotaddanetwork-mappeddriveto thebackup using this method.
Youcannotremove files andfoldersfromabackupbyrightclickingonthem;youhavetogo throughtheSettings window.
To add a fileor folder to your backup list
1. Open Windows Explorer.
2. Right-click the fileor folder you want to add, then select Add to DaySave backups.
The fileor folder is added to your backup list,and is backed up the next timea scheduledbackup occurs.
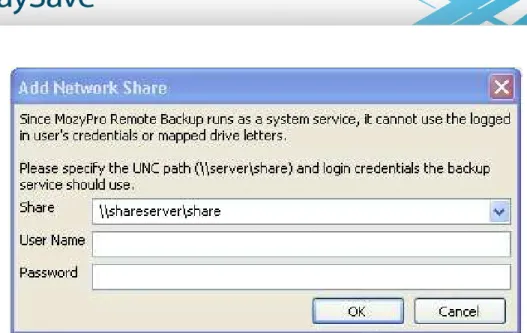
Adding a Network Share
If your computer is in a network environment, you can add network shares to your file system backups. This allows you to back up content on another computer that is shared. You can only add a network share with a server licence type.
Important: This functionality is only available with a DaySave server licence.
For information on how to share files and folders on another computer, see the computer's operating system help.
1. Right-click the DaySave icon in your system tray, then select Settings.
2. Click the File System tab.
3. Right-click the left folder list panel, then select Add network share. 4. In the Share field, enter the UNC path to the share.
Figure 14: Network Share
4. If the machine requiresyou to log in to use the share, enterthe user name in the Username
field.
5. In the Password field,enterthe password thatis required by the share. 6. Click OK.
If the share has been configuredcorrectly, the share point displaysin the list in the left pane.
About Deleting, Moving, and Renaming Files
When you delete a file from your computer, the file is marked for deletion on the backup servers. The file is permanently deleted from the servers 30 days after it was deselected. When you use the Settings window to deselect a file to exclude from future backups using either the Backup Sets or File System tab, the file is marked for deletion on the next backup on the backup servers. The file is permanently deleted from the servers 30 days after it was deselected.
When a file is marked for deletion on the backup servers, DaySave immediately releases the storage space used by that particular file. The most recent version of the file is kept for 30 days, after which the file is deleted permanently from the backup servers and is no longer retrievable. DaySave recognizes when you delete, move, or rename files on your system, and updates the backup servers. DaySave keeps an exact copy of your selections on the DaySave servers, meaning that all changes (deletions, moves, and renaming) of files on your system are mirrored.
When you rename a file on your system, DaySave treats it as a deletion of the old file and the creation of a new file with the same content. If you need to restore the file, and the restore date is prior to the renaming, the file uses the old name. After the date of renaming, the file uses the new name. All versions are kept as long as they are selectedin the filelist.
When youmove afilefromonelocationtoanotheronyour filesystem,DaySavetreatsthisin thesamemanner as a renaming.
After renaming or moving a file,the filewillnot have to be uploadedagain.
Scheduling Backups
TherearetwoschedulingmethodsyoucanusetocustomizewhenandhowoftenDaySave should backupyour computer.
• Automatic: Backups occur when your computer is not in use. You can choose the parameters that DaySave uses to determine when to start an automatic backup. See
Configuring an Automatic Backup.
• Scheduled: Backups occur at the time you select. You can choose how often and when the backup occurs. See Configuring a Scheduled Backup.
Figure 15: Scheduling
Configuring an Automatic Backup
Automaticbackups occur when your computer meetsspecificcriteriasuch as how long has it been idle.
1. Right-click the DaySave icon in the system tray , and select Settings.
2. Enter your Usernameand Password, if prompted. 3. Click Options, then click the Scheduling tab.
4. Select Automatic (PerformBack up when your computeris not in use).
5. Set the parameters by clicking the up and down arrows.
Option Description
Don't back up if the CPU is over this % busy.
Specify the highest percentage for the computer use in which a backup will run. If your computer use exceeds this percentage during an automatic backup, the backup halts until the system falls below the setting you specify. For example, if you set this to 15%, then a backup won't start unless the CPU utilization falls below 15%.
Don't back up unless the computer has been idle for at least this long (minutes).
Specify how long (in minutes) that your PC is idle before a backup is run.
If a program or system settings cause the computer to become active, the backup halts till the system is idle for the number of minutes specified. For example, if you set this to 30 minutes, then a backup won't start unless the computer has been idle for over 30 minutes. If during a backup, the computer becomes active, the backup stops and does not resume until the computer has been idle for 30 minutes again.
Don't back up more than this many times per day.
Specify the minimum number of hours DaySave waits before performing an automatic backup.
Caution: These parametersare cumlativemeaning thatallconditionsmust be met before a backup startsor resumes.
6. (Optional) Configure the following options:
Option Description
Attempt automatic backups even when the computer is running on battery power.
Backups continue to occur even when your computer is running on battery power. It is not selected by default.
Start automatic backups when a network connection is not detected.
Backups are attempted regardless if a network connection is detected. Use this if your network connection is unreliable. It is not selected by default.
7. When you have finished in this tab, continue your configuration in other tabs, or click Save . Your settings are saved and the Settings window closes.
Note: You do not need to be logged in to Windows for your backup to run.
If your operating system is Microsoft's Windows Vista, some settings might be greyed out. To resolve the problem:
1. In the upper-right part of the window, click Change settings that are currently unavailable.
2. In the Windows Access Control Window, click Trust.
The DaySave Settings window reloads displaying the settings that were previously greyed out.
Configuring a Scheduled Backup
Scheduled backups occur at the time you select.
1. Right-click the DaySave icon in your system tray, then select Settings. 2. Click Options, then click the Scheduling tab.
3. Select Scheduled.
4. From the drop-down list, select Daily or Weekly backups.
5. Select the time of the day you want to perform the backup to run.
For Weekly backups, select the day of the week you want the backup to run. 6. Select the frequency of backups. (For example, every two days.)
Option Description
Attempt automatic backups even when the computer is running on battery power.
Backups continue to occur even when your computer is running on battery power. It is not selected by default.
Start automatic backups when a network connection is not detected.
Backups are attempted regardless if a network connection is detected. Use this if your network connection is unreliable. It is not selected by default.
8. When you have finishedin this tab, continueyour configurationin other tabs, or click Save.
Your settings are saved and the Settingswindow closes.
Note: You do not need to be logged in to Windows for your backup to run.
If your operating systemis Microsoft's Windows Vista, some settingsmight be greyed out.
To resolvethe problem:
1. In the upper-rightpart of the window, click Change settings that are currently unavailable.
2. In the Windows AccessControl Window, clickTrust.
The DaySave Settingswindow reloadsdisplayingthe settings thatwere previouslygreyed out.
Temporarily Suspending Backups
You can temporarily suspend automaticand scheduledbackups from the Scheduletab in the Settings window
1. Right-click the DaySave icon in your system tray, then select Settings.
2. Click Options, then click the Scheduling tab.
3. SelectTemporarilysuspend automatic and scheduledbackups
Note: DaySave will not run backups until you deselect the suspend option.
You can also suspend backups by right-clicking theDaySave icon in your system tray.
Configuring Options
You can switchcertainfeatureson or off accordingto your preferencesand systemsetup.
1. Right-click the DaySave icon in your system tray, then select Settings.
2. Clickthe Options tab.
Figure 16: Client Options
3. Use the sub-tabs to configurethe differentoptions for DaySave.
If your operating systemis Microsoft's Windows Vista, some settingsmight be greyed out.
To resolvethe problem:
1. In the upper-right part of the window, click Change settings that are currently unavailable.
The DaySave Settingswindow reloadsdisplayingthe settings thatwere previouslygrayed out.
Configuring General Options
You can switch certain features on or off according to your preferences.
1. Right-click the DaySave icon in your system tray, then select Settings. 2. Click Options, then click the Operations tab.
3. Select the check boxes next to the options you want to activate. Deselect any undesired options.
Option Description
Show backup status icon on files and folders
Displays icon next to files and folders in Windows Explorer when a file is included in your backup list. It is selected by default.
Warn me when I go over quota Launches a small window alerting you when you have exceeded your quote. It is selected by default.
Alert me when a backup hasn’t happened in this many days.
Lets you set the number of days before an alert pops up to tell you a backup has not occurred.
4. When youhavefinishedin thistab,continueyour configurationinothertabs,orclick Ok.
Yoursettings are saved and the Settingswindow closes.
If your operating systemis Microsoft's Windows Vista, some settingsmight be greyed out.
To resolvethe problem:
a. In the upper-rightpart of the window, click Change settings that are currently unavailable.
b. In the Windows AccessControl Window, clickTrust.
Setting Bandwidth Throttling
To understand how bandwidth throttling works, imagine a set of two power lines running to and from your house, but instead of power, information such as word processing files or images is flowing through the lines. One line is only for uploading to the Internet (DaySave backups, email, etc.), while the other is only for downloading from the internet (incoming email, photos, programs, etc.). Your Internet service provider supplies your information lines and determines the size of those lines. Only so much data can flow through them at a time.
During some parts of the day (or always, depending on your service), you might need DaySave to use less of your upload bandwidth so other higher priority services such as email can use it. This is called "throttling." You can customize the backup throttle so that you don't tie up your information lines when you need them the most. While throttling determines the amount of bandwidth you want to dedicate to DaySave, Backup Speed determines how much of your computer's CPU is dedicated to the encryption and backup of your files.
1. Right-click the DaySave icon in your systemtray, then select Settings. 2. Click Options, then click the Scheduling tab.
3. Select EnableBandwidthThrottle.
Figure 17: Bandwidth Throttling
4. Click and hold the sliderto move it left or right.
Slide thecontroltothelefttolimitthebandwidthusedortotherighttoincreasethe bandwidthavailablefor backups.
5. Decide whetheryou want DaySave to alwaysthrottle or only during a specifiedperiod of the day such as during officehours.
If you select Throttle BetweenTheseHours, specifythe range.
6. When youhavefinishedin thistab,continueyour configurationinothertabs,orclick Ok.
Setting Backup Speed
BackupSpeeddetermineshowmuchofyourcomputer'sCPUisdedicatedtotheencryptionand backup ofyour files. You can choose to have fasterbackups or betterperformancefor your computer.
1. Right-click the DaySave icon in your system tray, then select Settings.
2. Click Options, then click the Performancetab. 3. Clickand hold the sliderto adjust your backup speed.
Slidethe controlto the right for quickerbackups or to the leftfor faster PC response time. 4. When youhavefinishedin thistab,continueyour configurationinothertabs,orclick Ok.
Yoursettings are saved and the Settingswindow closes.
Understanding Local Backup
In addition to backing up your files to the remote backup servers, you can back up files to a drive locally attached to your computer. This lets you keep a snapshot of your data in case you need to retrieve an older file you deleted or if you have a catastrophic hardware failure.
Local backups occur simultaneously with your online backup. If your online backup stops in the middle of a backup, your local backup continues. If the local backup drive is unavailable, your online backups continue as scheduled. The next time the local backup drive is available, your data is backed up to the local drive. If you remove a local backup drive after a backup and replace it with a new drive that does not contain any backup data, all or your backed up data will be synchronized to the new drive. If you perform a local backup without performing an online backup at the same time, the status will show either Preparing data or Communicating with server until the local backup is complete.
Unlike your online backup, the files in your local backup are not encrypted. This means your data can be readily accessed by you or someone else using the same drive. If needed, you can use programs such as Bitblocker or Truecrypt to encrypt your data on the local drive. If you do directly access your local backup files, and if you do delete any folder in that backed up set, that folder will no longer be backed up locally; however, it will still be backed up online. If a restore is ever necessary, the files will be restored from the online backup.
Just like your online backup account you can see local backup events in your history, but you will see only whether a local back up was successful; you will not see details. Only final status information is provided for local backup, though during a local backup to a removable drive, you may see indications of drive activity.
If you change your settings to exclude something, or if you delete something that had been selected for backup, those files and folders are no longer restorable from the local backup. However, because online backup stores files for 30 days, a restore can still be done from your online backup.
The maximum size of your local backup is the same as your online backup account. For example, ifyouraccount is limited to 2 GB, then your localbackup is also limited to 2 GB.
Requirements for Using Local Backup
• You can use local backup with an internaldrive, or an externally attachedUSB or Firewiredrive; however, the drive must have an assigneddrive letter. If the Statuswindow shows thatthe backup was successful,but you also see this message,An attempt n minutes ago was
incompletewith a link to LocalBackupError0,thismeansthattheonlinebackup wassuccessful, but thatthelocalbackup wasnot.This is becausethe drive you had used for localbackup is not connected.
• You cannot use localbackup with a shared or mapped network drive.
• Localbackup works with eitherthe NTFS or FAT32 filesystem;however, FAT32 does not support backing up fileslarger than 4 GB.
• You cannot use localbackup for filesthat are locallyEFS encrypted.
• Just like onlinebackup, localbackup requiresfree spaceon the localdrive equal to 130% of the largest file being backedup. Therefore,if a fileis larger than the remainingfree space,the localbackup fails and DISK FULL is enteredin the error log file.Becausethe localbackup failed,no filesare written to the drive, and thereforethe drive willnot actuallybe full as reported in the log file.
• Avoiddeepfilepaths.Local backupcannotbackupafilewithafullpathandfilenamethatis longerthan260 characters.
Configuring Local Backup
1. If the drive you intend to use for localbackup is removable, such as a USB drive or an externalhard drive, ensure it is connected.
2. Right-click the DaySave icon in your systemtray, then select Settings. 3. Click Options > Local Backup.
Figure 18: Configuring Local Backup
4. Select Enablelocal backup.
5. If you use Windows 7 or Vistaand findyou cannotselect Enablelocalbackup, look for the User Account Control icon on the Settingswindow. Clickits link to notify Windows that DaySave is permittedto access that drive.
6. In the Drivefield,select the drive where you want your backup filesstored.
Configuring Advanced Options
1. Right-clickthe DaySave icon in the systemtray , and select Settings. 2. Enteryour Usernameand Password, if prompted.
3. Click Options, then clickthe Advanced tab.
4. Select the check boxes next to the options you want to activate. Deselect any undesired options.
Option Description
Automatically update the client software without prompting me
Automatically installs any updates as soon as they are released. It is selected by default.
Automatically log me in when opening theSettings window
Saves your username and password so that you do not need to log in each time you access the Settings window. It is selected by default.
Show status when a backup successfully completes
Launches the Status window when a backup has successfully completed. It is selected by default.
Show all pre-configured backup sets Displays all the preconfigured backup sets in the Backup Sets tab. It is not selected by default.
Show advanced backup set features Lets you define a backup set that prevents files from being backed up, instead of defining a set that includes files to be backed up. It is not selected by default.
Show the virtual drive in Computer Displays the virtual drive, DaySave Home Remote Backup, when you open My Computer. It is selected by default.
Show the restore option on the right-clock menu in Windows Explorer
Displays the Restore Files in Folder entry in the right-click menu in Windows
Explorer. It is selected by default.
Enable support for backing up open files
Lets DaySave back up both open and locked files. This is not available on systems that do not have an NTFS-formatted drive, or on Windows 2000. It is selected by default.
Enable support for backing up EFS encrypted files
Lets DaySave back up files that have been EFS encrypted.
Note: You cannot use local backup for EFS encrypted files. To use local backup, you must deselect any EFS encrypted files from your backup set.
It is not selected by default.
Show all protected operation system files
Displays the C:\Program Files and C:\Windows directories. When this option is not selected, DaySave hides these directories to assist users in making wiser backup choices. It is not selected by default.
Show more details in Status window.
Displays additional information about your backup or restore in the Status window such as the number megabytes. It is not selected by default.
5. When you have finishedin this tab, continueyour configurationin other tabs, or click Save .
Your settings are saved and the Settingswindow closes.
Using Proxy Servers
If your computer uses a proxy server, you can choose if you want DaySave to use the server during backups. By default, proxy servers are not used and the Do not use a proxy to connect to servers option is selected.
1. Right-click the DaySave icon in your system tray, then select Settings.
2. Click Options > Advanced. 3. Click Setup Proxy.
Figure 19: Proxy Configuration
4. To use a proxy server, select one of the following
• Use this proxy server: Enter the proxy server you want DaySave to use.
• Use this computer's default proxy server: DaySave uses the default proxy server configured for this computer.
• Automatically detect proxy settings: DaySave configures the proxy server based on your local network proxy settings.
• Use automatic configuration script: DaySave uses the specified script to activate the proxy service.
Enter the URL where the script is located.
• Import Windows Proxy Settings: DaySave automatically copies your existing Windows proxy settings at the time you select it. It does not continually monitor your Windows proxy settings for modifications. If your proxy settings change, you need to reimport your
settings again using the Proxy Configuration window.
5. Select a Proxy authentication option:
• My proxy server does not require authentication: No authentication is used.
• My proxy server authenticates my computer via the domain: Uses your domain for authentication.
• My proxy requires a user name and password: Specify the user name, password, and domain (optional) for the proxy server.
6. Click OK to save your settings.
7. When you have finished in this tab, continue your configuration in other tabs, or click Ok. Your settings are saved and the Settings window closes.
About the History
The History tab displays all attempted DaySave backups and restores. The top pane lists all the
backups and restores, and the bottom pane displays the details for each backup and restore.
Figure 20: History
The following information is displayed in the top pane: • The start time
• Type of backup or restore • Duration
• Result
• Number of files included
• Size of the entire backup or restore • Number of files encoded and transferred • Size of backup or restore and encoded files
Viewing Backup and Restore History
1. You can open the Settings window at the History tab in one of the following ways: • Right-click the DaySave icon in your system tray, and select Settings. Click the
History tab.
• Right-click the DaySave icon in your system tray, and select Status. Click History.
2. Click a backup or restore in the top pane. The list of files for that backup or restore appears in the bottom pane.
You can sort by any of the column headings in either pane. 3. (Optional) Click Clear History to clear the history.
4. When you have finished in this tab, continue your configuration in other tabs, or click Ok. Your settings are saved and the Settings window closes.
About Restoring Files
You can use the Restore tab to restorefiles.For more information,see About Restoring Files
Changing the Location of Temporary Files
In order to encrypt your files, DaySave creates a temporary directory on the hard drive containing the files you are backing up. For the encryption process to work correctly, your hard drive must have enough free disk space to fit 130% of the largest single file you are trying to back up. For example, if the largest file is 1 GB, you'll need 1.3 GB of free space on your drive to encrypt the file. You might need more space than this, because DaySave encrypts more than one file at a time. However, if you are backing up multiple drives, DaySave spreads the encryption process across the drives, so less space is needed.
If you have another drive that has enough free space to store the temporary files, then you can change the location where temporary files are stored.
Caution: Changing the temporary folder settings changes the settings system-wide, not just for DaySave, but for all programs that use the Windows temp directories.
1. Browse to where you want the temporary files to be stored. 2. Right-click in the folder or drive, then click New > Folder. 3. Rename the folder to Temp.
4. Choose one of the following options:
• Click Start, then right-click My Computer.
• For Windows Vista, click Start, then right-click Computer.
5. Click Properties.
6. Select one of the following options:
• Click the Advanced tab, then click Environment Variables.
• For Windows Vista, click Advanced system settings, then click Environmental Variables.
7. In the User variables group box, select TEMP, then click Edit.
8. In the Variable Value field, type the path of the new temp folder you created. For example, D:\temp
9. Click OK in the Edit User Variable window.
10. In the System variables group box, select TMP, then click Edit.
11. In the Variable Value field, type the path of the new temp folder you created. For example, D:\temp
12. Click OK in the Edit System Variable window.
13. Click OK in the Environmental Variables window then click OK in the System Properties window.
14. For the changes to take effect, you must restart your computer.
Chapter 5: The Status Window
TheDaySavestatuswindowletsyouviewthestatusofthelatestbackuporrestore,startabackup manually,andlaunch the DaySave Configurationwindow.
To access the Statuswindow, right clickthe Telecom icon in your systemtray , then select Status. When a backup is in progress, its status is shown by textand green bars.
Figure 21: Client Status Window
The Total encodingprogress bar shows how much of the currentbackup set has been encrypted and encodedfor transfer.
The Total network progress bar indicatesthe percentof the current backup set thathas been successfully transferred to the backup servers.
The Total prepared progress bar shows how much of the currentbackup set has been encrypted and encodedfor transfer.
TheTotal transferredprogress bar indicates the percent of the current backup set that has
been successfully transferred to the backup servers.
When you perform a restore,the progress bar displaysthe progress made in downloadingand restoringthe files. You can adjustthe speed of the backup by moving the sliderto the left(faster computer)or right (quickerbackups); however, this impactsyour computersperformance.
Aftera backup ora restore has been attempted, the Status window displays whether the backup
or restore was successful, and when it was completed. If an error occurred during the backup or restore, the window displays an error code with a brief explanation for the error and a link for more information.
Using the Status Window
The DaySave Statuswindow lets you view the statusof a currentbackup, starta backup manually, and launch the DaySave Configurationwindow.
Figure 22: Client Status Window
1. Right-click the DaySave icon in your system tray, then select Status. 2. From the Status window, you can select any of the following options:
Option Description
Start Backup Starts a backup
Restore Files Opens your online account with DaySave to start a file restoration
Chapter 6: About Restoring Files
The following table lists the types of restores you can perform:
Option Description
The Restore tab Lets you restore files from the Settings window in the DaySave Client Virtual Drive
(DaySave Remote Backup)
Lets you restore files from a virtual drive using either file explorer window or the My Computer window.
Right – click restores Lets you restore files from the file explorer window or My Computer window by right-clicking in the window and selecting the files to restore.
Web restores Lets you download your files from the Telecom DaySave Website.
You can also restore data to a new computer from a previously backed up computer. For more information, see Replacing a Computer
The Restore tab does not appear until after the first backup has taken place.
You can also click Restore Files in the Status window or right click the Telecom icon in the system tray and select Restore Files.
DaySave in-client restores return your files to their original location on your hard drive.
Important: You cannot perform an in-client restore when the machine is in the process of a backup.
Topics:
• Restoring Files Using the Restore Tab
• Performing VSS Restores
• Using the DaySave Virtual Drive
• Right-Click Restores
Restoring Files Using the Restore Tab
You can restore filesfrom the DaySave Settingswindow.
Figure 23: Restore Tab
1. You can open the Settings window at the Restoretab in one of the followingways:
a. Right-click the DaySave icon in your systemtray, and select Settings. Clickthe
Restore tab.
b. Right-click the DaySave icon in your systemtray, and select Status. Select
Restore.
2. From the drop-down menus in the top-rightcorner of the page, select the dateand time that correspond to the backup you want to restore.
3. In the left pane, selectthe backup set from which you want to restore files. 4. In the right pane, select the fileor filesyou want to restore.
5. Click Browse to selectthe destinationfolder for your restored files.
a. Navigate to an existing folder, and click OK.
b. Alternately, create a new folder by clicking Make New Folder, then specify the name of the new folder in the appropriate field. Then Click OK.
7. Click Restore Files.
The Status window opens showing the restoration progress.
Figure 24: Status Window
Performing VSS Restores
If you have server licence, and you backed up VSS data such as Microsoft SQL Server, Microsoft Exchange Server, Active Directory, and the Windows File Replication Service (for example, SYSVOL), you can use the VSS Restore to recover this data.
Important: This functionality is only available with a DaySave Server licence.
The process for restoring VSS data is slightly different depending upon the type of data you are restoring.
Restoring Microsoft Exchange Server Data
This task is made up of these sets of steps:
• Dismount All Mailbox Stores
• Perform the Restore
Dismount All Mailbox Stores
Before you restorethe MicrosoftExchangedata,you must dismount allthe mailbox stores.
1. Open the Microsoft Exchange SystemManagerand navigate to the Servers folder. 2. Expand each storagegroup.
3. For each mailboxstore, right-clickthe mailboxstore, then click Dismount Store.
Perform the Restore
Once each mailbox store has been successfully dismounted, you can perform the restore.
1. Right-click the DaySave icon in the system tray, then click Status.
The Status window appears.
2. Click Restore Files.
The DaySave Settings window appears. 3. Click VSS Restore.
4. Select the VSS: MS Exchange Server backup set.
Caution: Selecting the Authoritative Restore forces the restored directory database to be replicated to other servers on the domain after the backups have been restored.
5. Select the method used to access the backup set:
• Download files from the DaySave Remote Backup Server. • Use previously downloaded restore.
6. If you select to use a previously downloaded restore, browse to the location where the files are stored.
7. Click Next.
The VSS downloading window appears.
Once the data has been downloaded, the VSS writer automatically copies the files to the correctlocations.
Mount All Mailbox Stores
Once the restore has been completed,all mailbox stores need to be mounted.
1. Open the Microsoft Exchange SystemManager and navigateto the Servers folder. 2. Expand each storagegroup.
3. For each mailboxstore, right-click the mailboxstore, then click Mount Store.
Restoring Active Directory and SYSVOL Data
This task is madeup of thesesets of steps:
• Restart the Server in Directory Service Restore Mode
• Restore Data to Active Directory and SYSVOL
Restart the Server in Directory Service Restore Mode
BeforerestoringdatatoActiveDirectoryandSYSVOL,youmustrestarttheserverinDirectory ServiceRestore mode.
1. Rebootthe server.
2. During the reboot process, press and hold the F8 key on the keyboard.
3. When the Windows AdvancedOptionsmenu appears,select DirectoryServicesRestore Mode,thenpress Enter.
4. When the Authentication window appears,log in as the localadministrator.
Restore Data to Active Directory and SYSVOL
Once you have restarted the server in Directory Services Repair mode, you are ready to begin the restoration process.
1. Click Start > All Programs > DaySave > DaySave Status . 2. Click Restore Files.
The DaySave Settings window appears. 3. Click VSS Restore.
4. Select VSS Active Directory and SYSVOL.
Caution: When you select the Authoritative Restore, Windows causes Active Directory to replicate and overwrites objects and object trees of objects to all domain controllers in the domain.
5. Selectthe method used to accessthe backup sets:
• Download filesfrom the DaySave RemoteBackup Server. • Use previouslydownloadedrestore.
6. If you select to use a previouslydownloadedrestore,browse to the locationwhere the files are stored.
7. Click Next.
The VSS downloadingwindow appears.
Once the datahas been downloaded,the VSS writerautomaticallycopiesthe filesto the correctlocations.
After successfully restoringActive Directoryand SYSVOL, restart Windows Server in normal mode, then log in as the domaincontroller Admin.
Restoring Microsoft SQL Server Data
1. Click Start > Run, type Service.msc, then click OK. 2. Right-click the SQL Server service, then click Stop.
Note: Do not stop the SQL Server VSS writer process.
3. Right-click the DaySave icon in the system tray, then click Status. The Status window appears.
4. Click Restore Files.
The DaySave Settings window appears. 5. Click VSS Restore.
6. Select the VSS: MS SQL Server backup sets that need to be restored. 7. Select the method used to access the backup set:
• Download files from the DaySave Remote Backup Server. • Use previously downloaded restore.
8. If you select to use a previously downloaded restore, browse to the location where the files are stored.
9. Click Next.
The VSS downloading window appears.
Once the data has been downloaded, the VSS writer automatically copies the files to the correct locations.
10.Click Start > Run, type Service.msc, then click OK.
11. Right-clickthe SQL Serverservice,then click Start.
1. Right-click the DaySave icon in the system tray, then click Status. The Status window appears.
2. Click Restore Files.
The DaySave Settings window appears. 3. Click VSS Restore.
4. Select the VSS: COM+ backup set:
• Download files from DaySave Remote Backup Server. • Use previously downloaded web restores.
5. If you select to use a previously downloaded restore, browse to the location where the are stored.
6. Click Next. The VSS downloading window appears.
7. Once the data has been downloaded, the VSS writer automatically copies the files to the correct locations. Once you have completed the restore, you must restart Windows for the restore to take effect.
Restoring the Registry
1. Right-click the DaySave icon in the systemtray, then click Status. The Statuswindow appears.
2. Click Restore Files.
The DaySave Settingswindow appears.
3. Click VSS Restore.
4. Selectthe VSS: Registrybackup set:
• Download filesfrom DaySave Remote BackupServer. • Use previouslydownloadedrestore.
5. If you select to use a previouslydownloadedrestore,browse to the locationwhere the files are stored.
6. Click Next. The VSS downloading window appears.
Once the datahas been downloaded,the VSS writerautomaticallycopiesthe filesto the correct locations. Once you have completedthe restore,you must restart Windows for the
Using the DaySave Virtual Drive
1. To accessthe My Computerwindow:
• Use eitherthe Start menu or your desktop icon to navigateto My Computer(Computerfor
Vista users)
• Right-clickon the Start button, click Explore , then click My Computer (Computer for
Vista users).
2. When the file listing appears, select Telecom DaySave .
3. Navigate to the folders and filesyou want to restore.
You might need to selectfrom a number of differentdates and timesof backedup files.
4. Selectthe most recentor the specificfilesyou require.
5. Right-click on the folder or fileand select Restore from the drop-down menu.
6. (Conditional)If,inthecaseofacorrupted file, afilebythatnameexistsonyourlocaldrive, eitheroverwrite or renamethe filewhen promptedby DaySave.
If you know the fileis corrupted and would liketo overwritethe file,click Overwrite. If you are unsure, click Rename and renamethe file.Be sure to keep trackof the new fileyou created.
The Status window opens showing the progress of your filerestore.
Right-Click Restores
The right-click restoreletsyou right-clickin a Windows Explorer window and selectthe filesto restore. The right-clickrestoreis the simplestand most efficientway for Windows users to perform a restore for a small number of filesin the eventof accidentalloss, deletion, or corruption. You can restorea single file,multiple filesin a folder, or a previous version of a file.
To restorefilesacross multipledirectories,use the Restoretab in Settings. See Restoring Files Using the Restore Tab
1. Open Windows Explorer
Option Description
Windows 2000/XP/2003 Navigate to My Computer using either the Start menu or the desktop icon. Right-click on the Start button, click Explore.
Right-click on the Start button, click Open Windows Explorer.
2. Browse to the file or folder you want to restore. 3. Select one of the following options:
Option Description
Restore Files in Folder Right-click an open space in the Windows Explorer window, then click Restore Files in
Folder.
A new window opens and displays the files available to be restored.
Restore Previous Version of a File
Right-click the file, then click Restore Previous Version.
A new window opens and displays the previous versions of the file that are available to be restored.
4. Selectthefilesorfileversions youwanttorestore fromthelist,thenright-clickthe selectedfilesorfolders.
5. Select one of the following options:
Option Description
Restore Used to restore the files or folders to the same location. If the file already exists, you must select whether you want to Overwrite, Rename, or
Cancel the restore.
Restore to Used to restore files or folders to a new location. Browse to the location where you want to save the files, then click Save.
The Status window displays the progress of your restore.
Restoring from the Web
When you request a Web restore, Telecom gathers your files and sends you an email with a link to download your files. Your restored files are only available to download for 7 days and you can only download them once. After 7 days the files are no longer available for
download. If you want to download your restored files more than once, or after 7 days, you must submit a new restore request.
1. In your browser's address bar, type https://www.daysave.co.nz, then press Enter. 2. Click the name of the computer from which you want to restore files.
3. Click Restore Files in the upper right corner.
4. From the Restore Options page, click Choose Files To Restore.
You have the option of selecting files and folders to restore in two different ways: • Restoring Files from the Web Using the File System
• Restoring Files from the Web Using Backup Sets
Restoring Files from the Web Using the File System
When you restorefilesusing the filesystemview, you have to selectfilesand folders to restore accordingto how they are arrangedon your hard drive.
2. In the drop-down menus in the top-right corner, select the date and time that correspond to the backup you want to restore.
3. Click the folder containing the files you want to restore. To view the files in the folder, click the
folder's name.
4. Select or deselect individual files, if necessary.
To select or deselect all files in the list, use the Select All checkbox.
Figure 25: Selecting Files
The number of files and size of all the files selected are displayed at the bottom of the page.
5. Click Continue to start the restore process. 6. Select the delivery method for your files:
• Web Restore: gathers your files and sends an email with a link to download your files.
Depending upon how many files you have to restore, it might take a significant amount of time for you to receive the email. If you selected Web Restore, your email includes a link to use when retrieving your restored information. Your files are available for download for 7 days.
Restoring Files from the Web Using Backup Sets
When yourestore filesusingbackup sets,youcanselectfilestorestore accordingtothe filetype.Forexample, you could restoreall word processingfilesat once.
Figure 26: Selecting Backup Sets
1. Click the Backup Sets tab.
2. From the drop-down menus in the top-right corner, select the date and time that correspond to the backup you want to restore.
3. Select the backup set you want to restore.
To view the files in the backup set, click the folder's name. 4. (Conditional) Select or deselect individual files, if necessary.
To select or deselect all files in the list, use the Select All checkbox.
The number of files and size of all the files selected are displayed at the bottom of the page.
5. Click Continue to start the restore process. 6. Select the delivery method for your files:
• Web Restore: gathers your files and sends an email with a link to download your files.
Depending upon how many files you have to restore, it may take significant amount of time for you to receive the email. If you selected Web Restore, your email includes a link to
use when retrieving your restored information. Your files are be available for download for 7 days.
For information on downloading the restored files, see Downloading Restored Files
Downloading Restored Files
You should usea download manager, such as the one included with Firefox, to
download restores. This is because restores can be large, and therefore can take some
time to completely and successfully download. If the download process has any problemsor disruptions,a download manager can restartthe process where it leftoff, rather than startingthe entire download againfrom the beginning. You can search for and obtain download managers on the Internet.
To download the restore you requested:
1. Log into your account by either going to https://www.daysave.co.nz or by clicking the link in the Web Restore notification email.
2. Under Web Restores, click Download. 3. Save the file.
This file may resemble a folder. It contains all your restored files in a compressed (or zipped) fashion, to make the file as small as possible so you can download it faster. 4. Choose your next action:
• If you chose to use your own personal key to encrypt files when you first installed the DaySave software, skip the rest of this task and go to Decrypting Restored Files Using Your Own Private Key
• Otherwise, go to the next step.
5. Extract your files.
If your Windows computer does not have the extraction program supplied by Microsoft, you can search for and obtain one on the Internet, such as 7-Zip or WinZip.
a) Right-click the folder, and then click Extract All.
b) Make a note of the folder into which the restoredfileswillbe extracted, then click
Extract.
In the extraction destination folder, a restore folder is created with the same name as the restore zip file. This restore folder contains all the folders and files you requested to be restored. Inside the folder, the complete folder structure for all the restored files is preserved, beginning with the letter identifying the drive the files were backed up from, which is typically C. This helps you know where to move your restored folders and files to, so that they will be in the same location as they were when they were backed up..
For example, if you back up folders and files in your Documents folder, the path for that folder structure might be something like: C:\Users\your user name\My Documents. If you