UNIT CODE: A.BBBB.CC.DD.E.F
A: E: External Tooth I: Internal tooth SD: Without tooth
BBBB: Outer diameter of the slewing ring
CC: Ball diameter
DD: Material
00: C45 10: C45 y 42CrMo4 15: 42CrMo4
E: Slewing ring shape
A Series with IR and OR bolts at the same bolt pattern
B Standard series
C Light series
D Heavy series
D: Holes type
Notice
• The following text includes notices and procedures which should be observed when installing the slewing rings and during the maintenance.
• Read carefully this manual before any operation is performed. The working features can only be ensured if the steps have been followed correctly.
• All steps listed below must be carried out by qualified personal.
• This manual should be kept near the structural element and has to be always accessible to the personal.
• The purchaser is responsible for protective measures and installation of all the equipment.
• Please contact our technical department for any further assistance.
INDEX
1. Transport, handling and storage provision ... 3
2. Installation ... 3
2.0 Previous checks ... 3
2.1 Clean the slewing ring and the mounting structure ... 3
-2.2 Determine permissible flatness deviation δp and perpendicular deviation δw of the supporting surfaces of the mounting structure. ... 3
2.3 Lubricate the Slewing ring or check oil level ... 4
2.4 Choice of mounting bolts ... 5
2.5 Choice of tightening torques ... 5
2.6 Install the Slewing ring ... 6
3. Operation test ... 7
4. Maintenance/safety checks and lubrication ... 7
4.1 Checking mounting bolts ... 7
4.2 Relubrication of slewing ring... 8
4.3 Relubrication intervals ... 8
-Contents
1. Transport, handling and storage provision
• Transport only in horizontal position, Impacts should be avoided.
• Wear work gloves and be careful when handling the Slewing rings. Slewing rings are generally provided with threaded holes or through holes in the inner and in the outer ring into which eyebolts can be assembled. This enables safe handling on a hoisting device. The threaded length of the bolt should be at least 1.5 times the diameter of the bolt. It should be transported without other assembled components.
• Store only in horizontal position and in closed rooms. Keep it away from the areas where it could get wet. The surface corrosion protection holds for approx. 5 months in the enclosed packaging. Longer periods of storage require special protective measures.
2. Installation
2.0 Previous checks
• Check the slewing ring for physical damage.
• Check that the slewing ring turns smoothly. In case the slewing ring does not turn, please check whether there is impediment, or check connection power (hydraulic or electric) to be sure it is properly in supply.
• If the slewing ring makes noise, please check whether lubrication is good enough or the flatness of the structure is as required.
• Check whether the dimension of the bolt is as expected.
• Check whether the type of the bolt (metric or imperial) is as expected.
2.1 Clean the slewing ring and the mounting structure
• Remove extraneous materials from supporting surfaces.
• Clean the outer mounting surfaces using a cold solvent that doesn’t damage the rubber seals.
• Cleaning the slewing ring with steam jet or high-pressure cleaner is not permissible.
2.2 Determine permissible flatness deviation δp and perpendicular deviation δw of the supporting surfaces of the mounting structure.
The surfaces that are going to be in contact with the slewing ring must satisfy some specifications of flatness and perpendicular deviation which are described below.
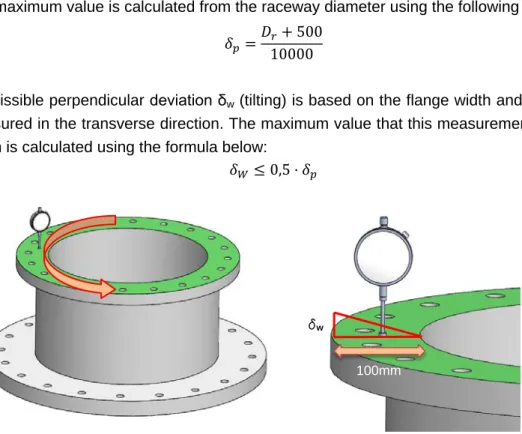
The maximum value for flatness deviation δp (waviness) along the circumference can be
reached only once each 180 deg. The form must resemble a sine curve that rises and falls. The maximum value is calculated from the raceway diameter using the following formula:
𝛿𝑝 =𝐷10000𝑟+ 500
Permissible perpendicular deviation δw (tilting) is based on the flange width and must be
measured in the transverse direction. The maximum value that this measurement should reach is calculated using the formula below:
𝛿𝑊 ≤0,5 ·𝛿𝑝
Image 1: Flatness deviation (left) and perpendicularity deviation (right) measuring procedure
2.3 Lubricate the Slewing ring or check oil level
Slewing rings are supplied with slewing ring raceway pre-lubricated. It is recommended to grease it again prior to initial operation and re-lubricated accordingly, depending on working conditions. Suitable grease types for normal cases are listed on table 3:
Recommended grease type Mineral or Synthetic grease (compatible with mineral)
EP (Extreme Pressure) YES
Consistency NLGI (ISO2137) Grade 2
Oil Separation < 3%
Corrosion and water protection YES
Acceptable Thickeners Calcium, Lithium or Aluminium sulphates
Temperature range in ºC -20ºC / +125ºC
Base oil viscosity (at 40ºC) >125mm2/s
Welding Load >200kg
Table 1: Table of standard grease properties
100mm
Parts of the slewing ring
that need lubrication Tooth Ring raceway
Quantity of grease Cover with a light layer
all the teeth
10cc each 250mm of raceway diameter
Table 2: Grease quantity for each part of the slewing ring
In case the slewing ring has to withstand extreme loads and working conditions or lower re-lubrication intervals are required, optimum grease can be used (See Annex I). The procedure to be used for re-lubrication is detailed on point 4.2.
2.4 Choice of mounting bolts
Please take great care in specifying this item which will attach our product to yours. • Prescribed sizes, number and quality grades shall be used.
• All the holes in the slewing ring must be used to fix it to the mounting structure. • Grip ratio (grip length to diameter of bolt) shall be observed, from minimum ≥ 2
to maximum ≤ 10.
• Bolts with a fully threaded shaft should not be used.
• Slewing ring function, lifespan, and durability of the bolt connection are affected in case of non-compliance.
• When the permissible interfacial pressure is exceeded, use washers of appropriate size and strength.
• Do not reuse bolts, nuts and washers. Replace after certain amount of time. • Retighten the bolts to the proper torque every 3 months.
Materials Max. surface pressure in MPa
50Mn / C45N / 46Cr2N 420
42CrMo4 700
Table 3: Table of admissible interfacial pressures
2.5 Choice of tightening torques
Mounting bolts are in normal cases adequately secured by proper preloading. Use of split rings, split washers, etc. is not permissible.
Mounting bolt Dimension Tightening torque MA in Nm Quality class 10.9 M6 15 ± 1 M8 37 ± 3 M10 72 ± 6 M12 126 ± 10 M16 312 ± 25 M20 609 ± 50
Table 4: Tightening torques for Metric mounting bolts (non-lubricated thread).
Mounting bolt Dimension
Tightening torque MA in lbs·ft
Quality SAE grade 8
1/4-20 UNC 12 ± 1 5/16-18 UNC 24 ± 2 3/8-16 UNC 45 ± 4 1/2-13 UNC 110 ± 7 5/8-11 UNC 210 ± 18 3/4-10 UNC 380 ± 36
Table 5: Tightening torques for Imperial mounting bolts (non-lubricated thread).
2.6 Install the Slewing ring
• Determine the main load-carrying zone. • The soft zone is marked with a filling plug.
• With a gauge, check whether the slewing rings supporting surfaces are fully in contact with the mounting structure.
• Fix the slewing ring to the structure with bolts. Use all the holes of the slewing ring to fix it properly.
• The slewing ring shall be mounted in an unloaded condition.
• In case the slewing ring is exposed outdoors or in applications where a corrosive atmosphere is present, it is recommended to apply a special treatment that protects it against corrosion or painting it to add an extra protection.
The following procedure shall be followed in order to avoid deviations between bolt tightening forces.
o It is recommended to apply thread locker to the bolt threads (last three to five filets) in order to ensure uniform frictional resistance.
o Preload the bolts incl. washers, if required, crosswise in 3 steps: 30%, 80% and 100% of the tightening torque. The scheme below shows the order to be followed when tightening the bolts
o Once the screw is tightened, Please make a mark in the surface of the screw and other structure surface. It is useful to inspect it to see if the bolts are loose or not.
3. Operation test
If the mounting bolts are properly tightened and the motor is correctly connected, then the slewing ring shall rotate uniformly. Deviations of the mounting structure and the effect of extraneous loads can strongly impact the friction torque.
• Rotate mounted slewing ring several times.
• Check whether slewing ring runs smoothly without ripple. • Perform further test under full load.
• After the operation test, recheck the tightening torques of mounting bolts.
4. Maintenance/safety checks and lubrication
4.1 Checking mounting bolts
To compensate the possible settling, it is necessary to retighten the bolts to the prescribed torque. This shall be done after no more than 100 hours of the first operation and without external load applied to the bolt connection. It is recommended to inspect the bolts every year (using the marks done during assembly) and retighten the bolts if necessary.
The inspection frequency can be increased if there is no special working or extreme weather conditions. In case of loose bolts, replace those bolts, nuts and washers with new ones.
4.2 Re-lubrication of slewing ring
Suitable substitute lubricants can be found in Table 1. Manufacturer provisions about handling the respective lubricants must be observed.
Follow the procedure described below:
Raceway
• Inject grease into all cleaned grease nipples one after the other while rotating the slewing ring, until a bead of fresh grease forms at least on one sealing lip or at the bearing gap.
• Ensure that old grease can flow out of the slewing ring freely.
• If possible, rotate the Slewing rings during regreasing following the accident prevention regulations while doing this.
Gear
• Apply grease to the teeth of the Slewing Ring with a clean brush. The grease can also be sprayed on instead of using a brush, or applied by means of a suitable lubricating device (e.g. a lubricating pinion).
• Remove excess and old grease. Adhesive lubricants have proved to be particularly effective in open gearing.
4.3 Re-lubrication intervals
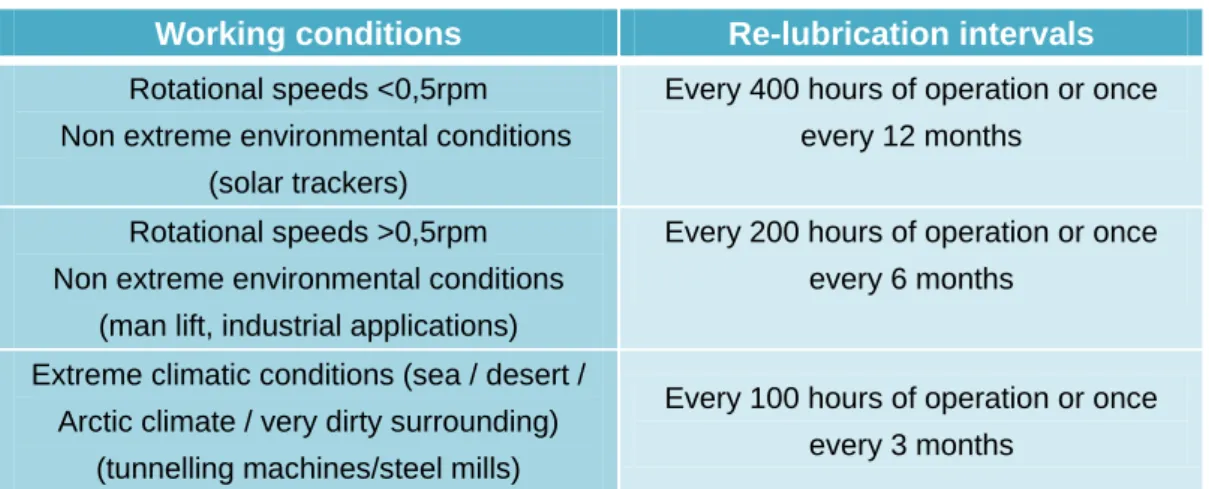
Re-lubrication is needed to assure a minimum quality on the grease inside the slewing ring. In case no comparative results are available, the following table can be used as a reference.
Table 6: Re-greasing intervals depending on working conditions
The specified values are valid for the following conditions: • Operating temperature on slewing ring -20ºC < T < 65ºC • Maximum linear speed < 4m/s
• Low to medium loads
The table can never replace values established through experience. The most frequent cause of failure of slewing rings is insufficient lubrication.
Slewing rings shall generally be re-lubricated after every cleaning and also before and after long inactive periods, e.g. for crane and construction machines during winter months. Cleaning a slewing ring with steam jet or high-pressure cleaner is not permissible.
Working conditions Re-lubrication intervals
Rotational speeds <0,5rpm Non extreme environmental conditions
(solar trackers)
Every 400 hours of operation or once every 12 months
Rotational speeds >0,5rpm Non extreme environmental conditions
(man lift, industrial applications)
Every 200 hours of operation or once every 6 months
Extreme climatic conditions (sea / desert / Arctic climate / very dirty surrounding)
(tunnelling machines/steel mills)
Every 100 hours of operation or once every 3 months
5. Last indications
The instructions give you the information you need to be able to correctly install and maintain a TGB slewing ring.
Please always check that you are working with the latest revision.
These instructions shall be sent to all new customers. All work steps listed here are to be executed by suitably qualified personnel.
Please do not hesitate to contact our Engineering Department for any further assistance. All the information in this document has been carefully evaluated and checked.
We do not, however, accept responsibility for any omissions or errors. TGB accepts no liability for:
1. Non-compliance with Installation and Maintenance Instructions 2. Failure to pass on content to third part.