Part No. 118357-A Rev. A September 1997
Marketing Release 5.1
Managing Remote
All rights reserved. Printed in the USA. September 1997.
The information in this document is subject to change without notice. The statements, configurations, technical data, and recommendations in this document are believed to be accurate and reliable, but are presented without express or implied warranty. Users must take full responsibility for their applications of any products specified in this document. The information in this document is proprietary to Bay Networks, Inc.
The software described in this document is furnished under a license agreement and may only be used in accordance with the terms of that license. A summary of the Software License is included in this document.
Trademarks
Bay Networks is a registered trademark and Quick2Config, Remote Annex, Bay Networks Press, and the Bay Networks logo are trademarks of Bay Networks, Inc. Microsoft, MS, MS-DOS, Win32, Windows, and Windows NT are registered trademarks of Microsoft Corporation.
All other trademarks and registered trademarks are the property of their respective owners.
Restricted Rights Legend
Use, duplication, or disclosure by the United States Government is subject to restrictions as set forth in subparagraph (c)(1)(ii) of the Rights in Technical Data and Computer Software clause at DFARS 252.227-7013.
Notwithstanding any other license agreement that may pertain to, or accompany the delivery of, this computer software, the rights of the United States Government regarding its use, reproduction, and disclosure are as set forth in the Commercial Computer Software-Restricted Rights clause at FAR 52.227-19.
Statement of Conditions
In the interest of improving internal design, operational function, and/or reliability, Bay Networks, Inc. reserves the right to make changes to the products described in this document without notice.
Bay Networks, Inc. does not assume any liability that may occur due to the use or application of the product(s) or circuit layout(s) described herein.
SUCH PORTIONS OF THE SOFTWARE ARE PROVIDED “AS IS” AND WITHOUT ANY EXPRESS OR IMPLIED WARRANTIES, INCLUDING, WITHOUT LIMITATION, THE IMPLIED WARRANTIES OF
CONDITIONS OF THIS LICENSE AGREEMENT. THE TERMS EXPRESSED IN THIS AGREEMENT ARE THE ONLY TERMS UNDER WHICH BAY NETWORKS WILL PERMIT YOU TO USE THE SOFTWARE. If you do not accept these terms and conditions, return the product, unused and in the original shipping container, within 30 days of purchase to obtain a credit for the full purchase price
1. License Grant. Bay Networks, Inc. (“Bay Networks”) grants the end user of the Software (“Licensee”) a personal, nonexclusive, nontransferable license: a) to use the Software either on a single computer or, if applicable, on a single authorized device identified by host ID, for which it was originally acquired; b) to copy the Software solely for backup purposes in support of authorized use of the Software; and c) to use and copy the associated user manual solely in support of authorized use of the Software by Licensee. This license applies to the Software only and does not extend to Bay Networks Agent software or other Bay Networks software products. Bay Networks Agent software or other Bay Networks software products are licensed for use under the terms of the applicable Bay Networks, Inc. Software License Agreement that accompanies such software and upon payment by the end user of the applicable license fees for such software.
2. Restrictions on use; reservation of rights. The Software and user manuals are protected under copyright laws. Bay Networks and/or its licensors retain all title and ownership in both the Software and user manuals, including any revisions made by Bay Networks or its licensors. The copyright notice must be reproduced and included with any copy of any portion of the Software or user manuals. Licensee may not modify, translate, decompile, disassemble, use for any competitive analysis, reverse engineer, distribute, or create derivative works from the Software or user manuals or any copy, in whole or in part. Except as expressly provided in this Agreement, Licensee may not copy or transfer the Software or user manuals, in whole or in part. The Software and user manuals embody Bay Networks’ and its licensors’ confidential and proprietary intellectual property. Licensee shall not sublicense, assign, or otherwise disclose to any third party the Software, or any information about the operation, design, performance, or implementation of the Software and user manuals that is confidential to Bay Networks and its licensors; however, Licensee may grant permission to its consultants, subcontractors, and agents to use the Software at Licensee’s facility, provided they have agreed to use the Software only in accordance with the terms of this license.
maintaining adequate procedures apart from the Software to reconstruct lost or altered files, data, or programs.
4. Limitation of liability. IN NO EVENT WILL BAY NETWORKS OR ITS LICENSORS BE LIABLE FOR ANY COST OF SUBSTITUTE
PROCUREMENT; SPECIAL, INDIRECT, INCIDENTAL, OR
CONSEQUENTIAL DAMAGES; OR ANY DAMAGES RESULTING FROM INACCURATE OR LOST DATA OR LOSS OF USE OR PROFITS ARISING OUT OF OR IN CONNECTION WITH THE PERFORMANCE OF THE SOFTWARE, EVEN IF BAY NETWORKS HAS BEEN ADVISED OF THE POSSIBILITY OF SUCH DAMAGES. IN NO EVENT SHALL THE LIABILITY OF BAY NETWORKS RELATING TO THE SOFTWARE OR THIS
AGREEMENT EXCEED THE PRICE PAID TO BAY NETWORKS FOR THE SOFTWARE LICENSE.
5. Government Licensees. This provision applies to all Software and
documentation acquired directly or indirectly by or on behalf of the United States Government. The Software and documentation are commercial products, licensed on the open market at market prices, and were developed entirely at private expense and without the use of any U.S. Government funds. The license to the U.S. Government is granted only with restricted rights, and use, duplication, or disclosure by the U.S. Government is subject to the restrictions set forth in subparagraph (c)(1) of the Commercial Computer Software––Restricted Rights clause of FAR 52.227-19 and the limitations set out in this license for civilian agencies, and subparagraph (c)(1)(ii) of the Rights in Technical Data and Computer Software clause of DFARS 252.227-7013, for agencies of the Department of Defense or their successors, whichever is applicable.
6. Use of Software in the European Community. This provision applies to all Software acquired for use within the European Community. If Licensee uses the Software within a country in the European Community, the Software Directive enacted by the Council of European Communities Directive dated 14 May, 1991, will apply to the examination of the Software to facilitate interoperability. Licensee agrees to notify Bay Networks of any such intended examination of the Software and may procure support and assistance from Bay Networks.
required export licenses or other governmental approvals. Without limiting the foregoing, Licensee, on behalf of itself and its subsidiaries and affiliates, agrees that it will not, without first obtaining all export licenses and approvals required by the U.S. Government: (i) export, re-export, transfer, or divert any such Software or technical data, or any direct product thereof, to any country to which such exports or re-exports are restricted or embargoed under United States export control laws and regulations, or to any national or resident of such restricted or embargoed countries; or (ii) provide the Software or related technical data or information to any military end user or for any military end use, including the design,
development, or production of any chemical, nuclear, or biological weapons. 9. General. If any provision of this Agreement is held to be invalid or
unenforceable by a court of competent jurisdiction, the remainder of the provisions of this Agreement shall remain in full force and effect. This Agreement will be governed by the laws of the state of California.
Revision Level History
Revision Description
Contents
About This Guide
Before You Begin . . . xxiii
Conventions . . . xxiii
Acronyms . . . xxiv
Ordering Bay Networks Publications . . . xxv
Bay Networks Customer Service . . . xxv
How to Get Help . . . xxvi
Chapter 1
Introduction to Remote Access Concentrators
RAC Overview . . . 1-1 Dual WAN Interfaces . . . 1-2 PRI . . . 1-2 CAS. . . 1-3 Channel Allocation . . . 1-3 Multi-Protocol Support . . . 1-4 Typical Network Configurations . . . 1-5 Typical PRI Configurations . . . 1-5 Typical CAS Configuration . . . 1-8 Mixed RAC/Remote Annex Environment . . . 1-9 Configuration Prerequisites . . . 1-10 Parameter Configuration. . . 1-10 RAC Management Tools . . . 1-11 Parameter Types. . . 1-12 Loading Configuration Files from Hosts . . . 1-12
Chapter 2 Using the CLIs
The Command Line Interface . . . 2-1 Command Syntax . . . 2-2 Squelch . . . 2-2 CLI Commands . . . 2-3 The na and admin Utilities . . . 2-11 Command Notation . . . 2-11 Command Syntax . . . 2-12
Chapter 3
Using the Configuration File
Parsing the Configuration File . . . 3-14 File Sections . . . 3-15 Include Statement . . . 3-15 Setting Up the Configuration File . . . 3-15 Creating %gateway Entries in the Configuration File . . . 3-19 Creating %macro Entries in the Configuration File . . . 3-27 Creating %service Entries in the Configuration File . . . 3-37 Creating %rotary Entries in the Configuration File . . . 3-39 Creating %digital_modem Entries in the Configuration File . . . 3-39 Creating %dialout Entries in the Configuration File . . . 3-39 Creating %wan Entries in the Configuration File . . . 3-52 Automated Firmware Download (AFD) . . . 3-52 Creating %gateway Entries for AFD . . . 3-53 Console Port Status Messages . . . 3-54 CLI stats Command . . . 3-55 LEDs . . . 3-56 Syslog Messages . . . 3-56 Error Handling. . . 3-57
Chapter 4
Configuring Hosts and Servers
Contents
Configuring Name Servers . . . 4-22 Using RAC Security . . . 4-23 Installing the ACE/Server Software . . . 4-23 Configuring LAT Services . . . 4-23 Advertised Services . . . 4-24 Learned Services . . . 4-25 Group Codes. . . 4-25 Accessing LAT Services . . . 4-25 Reverse LAT . . . 4-27 Reverse LAT vcli . . . 4-27 Telnet-to-LAT Gateway . . . 4-28 LAT-to-Telnet Gateway . . . 4-30 Data-b Slot Support for LAT . . . 4-31 Miscellaneous LAT Parameters . . . 4-32
Chapter 5
Configuring the WAN Interfaces, Global Ports, and Sessions
Chapter 6
Configuring Security
Contents
Limiting Access to Hosts via acp_restrict . . . 6-94 Using include Files in the acp_userinfo File . . . 6-99 Modifying the Supplied Security Application . . . 6-99 Disabling User Name and Password Validation . . . 6-100 Linking NIS Password File Verification to ACP . . . 6-100 Modifying Message Formats in the ACP Log File . . . 6-101 Changing the Expected File Names Used by ACP . . . 6-102 Locking the ACP Log File . . . 6-106 Masking CLI Commands . . . 6-107 Modifying the Code . . . 6-109 Re-Compiling erpcd . . . 6-110 Using the ch_passwd Utility . . . 6-111 Configuring Third-Party Security Regimes . . . 6-112 Using Kerberos Authentication . . . 6-112 Configuring the RAC for Use with SecurID . . . 6-114 Using SafeWord AS Security . . . 6-119 SafeWord Backup Security . . . 6-126 Configuring the IP Basic Security Option (IPSO) . . . 6-126 Using the ACE/Server . . . 6-127 Installation . . . 6-131 Using AppleTalk Security . . . 6-133 ARA Security . . . 6-133 Zone Security . . . 6-134 NVE Filtering . . . 6-134 Logging . . . 6-134 Using IPXCP Security . . . 6-135 Using PPP Security . . . 6-135 Password Authentication Protocol (PAP) . . . 6-135 Challenge-Handshake Protocol (CHAP) . . . 6-137 Using the PPP Security Parameters . . . 6-140 Dynamic Allocation of Network Addresses . . . 6-142 Introduction to DHCP . . . 6-142 Unsupported Features of DHCP . . . 6-143 Cautions . . . 6-143 Creating the acp_dialup File . . . 6-143 Determining Dial-up Addresses Using the acp_dialup File . . . 6-145 Using Filters for Security. . . 6-146 Include and Exclude . . . 6-147 Accessing the Filter Subcommands . . . 6-148 Filter Numbers . . . 6-150 Filter Lists . . . 6-150 Configuring Security for the RAC FTP Daemon . . . 6-152 Logging Security Events . . . 6-153
Chapter 7 Digital Modems
Customizing Modem Configuration . . . 7-6 Configuring Modem and Channel Error Detection . . . 7-7 Counting the Call Events . . . 7-8 Specifying the Consecutive Failure Threshold . . . 7-9 Displaying the Call Event Counts . . . 7-10 Resetting the Consecutive Failure Counts to Zero . . . 7-10 Displaying and Changing Modem Status . . . 7-11 Displaying Internal Modem Information . . . 7-11 Modem Statistics . . . 7-15
Chapter 8
Point-to-Point Protocol
Point-to-Point Protocol . . . 8-1 PPP Configuration Overview . . . 8-2 Step 1: Decide How to Assign IP Addressing . . . 8-2 Step 2: Edit the Configuration File . . . 8-5 Step 3: Review and Reset Global Port Parameters . . . 8-6 How to Assign IP Addresses to PRI B Channels . . . 8-9 Configuration Samples . . . 8-10 Sample Configuration for Addressing Using the acp_dialup File . . . 8-10 Sample Configuration for Addressing Using Asynchronous Port Parameters . . . 8-12 Sample Configuration for Connecting Two Subnets . . . 8-14 Routing across a PPP Link (Basic Passive RIP) . . . 8-17 Route Cache . . . 8-18 Protocol Stack . . . 8-18 Negotiating the LCP Options . . . 8-18 Negotiating the Network Control Protocol. . . 8-21 BOOTP Requests. . . 8-24 Using the CLI netstat -ip Command . . . 8-24 Displaying Data for Ports . . . 8-25 PPP Over Sync Port . . . 8-25
Chapter 9
Multilink Point-to-Point Protocol (MP)
Contents
Establishing MMP Connections . . . 9-14 Configuring MMP . . . 9-15 Resetting Ports for MP Links. . . 9-16 Administration of Multilink PPP (MP Statistics). . . 9-16
Chapter 10
Serial Line Internet Protocol
SLIP and Compressed SLIP . . . 10-1 SLIP Configuration Overview . . . 10-2 Step 1: Decide How to Handle IP Addressing. . . 10-2 Step 2: Edit the Configuration File . . . 10-4 Step 3: Review and Reset Global Port Parameters . . . 10-5 Sample Configuration for a Single Remote Node . . . 10-9 Sample Configuration for Connecting Two Subnets . . . 10-10 Routing Across a SLIP Link (Basic Passive RIP) . . . 10-12 Routing Between Two Networks . . . 10-13 Route Cache . . . 10-14 Extending a Single Host onto the Network . . . 10-14 BOOTP Requests . . . 10-15
Chapter 11
Routing Information Protocol (RIP)
Advertising the Default Route . . . 11-51 Advertising to a Subset of Routers . . . 11-52 RIP Configuration Parameters - Reference . . . 11-53 Displaying Routing Information . . . 11-60 Displaying RIP Statistics . . . 11-61 Displaying the RAC Routing Table . . . 11-62 Displaying the route cache . . . 11-66 Using the ping -t (traceroute) Option . . . 11-67 Troubleshooting . . . 11-72 CLI Commands Providing Routing Information . . . 11-72 Common Configuration Errors . . . 11-73 What To Do If the RAC Does Not Advertise Updates. . . 11-77 What to Do if the RAC Does not Receive Updates. . . 11-79 Other Documentation . . . 11-80
Chapter 12
Internetwork Packet Exchange Protocol
Novell Networks . . . 12-1 IPXCP Features . . . 12-2 Default IPX Parameter Settings . . . 12-3 IPX Configuration Overview . . . 12-3 Step 1: Decide How to Handle IPX Addressing . . . 12-4 Step 2: Edit the Configuration File . . . 12-5 Step 3: Review and Reset Global Port Parameters . . . 12-6 Default PPP-Related Global Port Parameters . . . 12-7 How to Change a Global Port Parameter Setting . . . 12-7 Assigning IPX Networks or Nodes to B Channels . . . 12-9 Configuration Samples . . . 12-10 Sample Configuration Using Dial-up Addresses. . . 12-11 Sample Configuration Using Fixed Addressing . . . 12-13 Obtaining IPX Information . . . 12-15 System Logs . . . 12-15 IPXCP Interface Statistics. . . 12-16 IPX Interfaces, Memory Buffers, Routes, and Servers . . . 12-18 IPX Frame Type and Network Number. . . 12-23 IPX State. . . 12-24 IPX Connections . . . 12-24 Statistics for All Interfaces and for 802.2 . . . 12-25
Chapter 13 AppleTalk
Contents
Command Syntax . . . 13-7 arap . . . 13-8 arp . . . 13-8 AppleTalk over ARA . . . 13-9 AppleTalk Configuration Overview . . . 13-9 Step 1: Edit the RAC Configuration File . . . 13-10 Step 3: Review and Reset Global Port Parameters . . . 13-12 Sample AppleTalk Configuration . . . 13-13 ARA Security . . . 13-15 Security Features . . . 13-16 Network-Visible Entity (NVE) Filtering . . . 13-17 AppleTalk over PPP . . . 13-17
Appendix A
Digital Modem Configuration Parameters
Custom Modem Configuration . . . A-1 Using the %digital_modem Section . . . A-1 Setting Parameter Values . . . A-2 Standard Digital Modem Configurations . . . A-3 U.S. Operation, V.42bis Primary/MNP5 Secondary . . . A-3 U.S. Operation, Disable V.42bis Compression
(V.42 only) . . . A-4 U.S. Operation, MNP5 Primary: V.42/V.42bis Disabled . . . A-4 U.S. Operation, Disable V.34 Extended Speeds
Parameter 24 . . . A-24 Parameter 25 . . . A-24 Parameter 26 . . . A-24 Parameter 27 . . . A-26 Parameter 28 . . . A-27 Parameter 29 . . . A-28 Parameter 30 . . . A-29 Parameter 31 . . . A-30 Parameter 32 . . . A-31 Parameter 33 . . . A-31 Parameter 34 . . . A-32 Parameter 35 . . . A-33 Parameter 36 . . . A-34 Parameter 37 . . . A-34 Parameter 38 . . . A-35 Parameter 39 . . . A-36 Parameter 40 . . . A-36 Parameter 41 . . . A-36 Parameter 42 . . . A-36 Parameter 43 . . . A-37 Parameter 44 . . . A-37 Parameter 45 . . . A-37 Parameter 46 . . . A-39 Parameter 47 . . . A-40 Parameter 48 . . . A-41 Parameter 49 . . . A-41 Parameter 50 . . . A-41 Parameter 51 . . . A-41 Parameter 52 . . . A-42 Parameter 53 . . . A-42 Parameter 54 . . . A-42 Parameter 55 . . . A-42 Parameter 56 . . . A-43 Parameter 57 . . . A-43 Parameter 58 . . . A-43 Parameter 59 . . . A-43 Parameter 60 . . . A-44 Parameter 61 . . . A-44 Parameter 62 . . . A-44 Parameter 63 . . . A-44
Figures
Tables
About This Guide
I
f you are responsible for configuring and administering a Bay Networks® Remote Access Concentrator (RAC), you need to read this guide.Before You Begin
Before using this guide, you must complete the following procedures. For a new RAC:
• Order your WAN (PRI or CAS) lines from your telco. Order information is provided in the Bay Networks publication Line
Provisioning for Remote Access Concentrators.
• When ordering your WAN lines, keep a record of the service options the telco provides you with, so that you can set WAN parameters on the RAC accordingly. The WAN parameters you need to set for PRI and CAS are described in the Remote Access
Concentrator Software Reference Manual.
• Install the RAC and boot it, as described in the appropriate hardware installation manual (for example, for the Model 8000 RAC, this is the Bay Networks publication Installing the Model
8000 Remote Access Concentrator).
• Do not physically connect cables to the WAN interface ports; wait until you have at least performed a minimal configuration. An alarm from an improperly configured interface could cause the telco to drop the line.
Conventions
This manual uses the following conventions:
Convention: Represents:
Acronyms
BootP Bootstrap Protocol
BRI Basic Rate Interface
CCITT International Telegraph and Telephone Consultative Committee (now ITU-T)
GUI graphical user interface
HDLC high-level data link control
IP Internet Protocol
ISDN Integrated Services Digital Network
bold Bold indicates commands, pathnames, or filenames that must be entered as displayed.
italics In the context of commands and command syntax, lowercase italics indicate variables for which the user supplies a value.
[ ] In command dialog, square brackets indicate default values. Pressing <CR> selects this value. Square brackets appearing in command syntax indicate optional
arguments.
{ } In command syntax, braces indicate that one, and only one, of the enclosed values must be entered.
| In command syntax, this character separates the different options available for a parameter.
Notes provide important information.
Warnings inform you about conditions that can have adverse effects on processing.
About This Guide
ITU-T International Telecommunications Union– Telecommunications (formerly CCITT)
LAN local area network
MAC media access control
OSI Open Systems Interconnection
PPP Point-to-Point Protocol
SNMP Simple Network Management Protocol
TCP/IP Transmission Control Protocol/Internet Protocol
Telnet Telecommunication Network
TFTP Trivial File Transfer Protocol
WAN wide area network
Ordering Bay Networks Publications
To purchase additional copies of this document or other Bay Networks publications, order by part number from Bay Networks Press™ at the following numbers:
• Phone--U.S./Canada: 888-422-9773
• Phone--International: 510-490-4752
• FAX--U.S./Canada and International: 510-498-2609
The Bay Networks Press catalog is available on the World Wide Web at support.baynetworks.com/Library/GenMisc. Bay Networks publications are available on the World Wide Web at support.baynetworks.com/Library/tpubs.
Bay Networks Customer Service
Information about customer service is also available on the World Wide Web at support.baynetworks.com.
How to Get Help
If you purchased a service contract for your Bay Networks product from a distributor or authorized reseller, contact the technical support staff for that distributor or reseller for assistance.
If you purchased a Bay Networks service program, call one of the following Bay Networks Technical Solutions Centers:
United States and Canada
800-2LANWAN; then enter Express Routing Code (ERC) 290, when prompted, to purchase or renew a service contract
508-916-8880 (direct)
508-916-3514
Europe 33-4-92-96-69-66 33-4-92-96-69-96
Asia/Pacific 61-2-9927-8888 61-2-9927-8899
Latin America 561-988-7661 561-988-7550
Technical Solutions Center Telephone number Fax number
Billerica, MA 800-2LANWAN 508-916-3514
Santa Clara, CA 800-2LANWAN 408-495-1188
Valbonne, France 33-4-92-96-69-68 33-4-92-96-69-98
Sydney, Australia 61-2-9927-8800 61-2-9927-8811
Chapter 1
Introduction to Remote Access
Concentrators
T
his chapter provides information about:• The Remote Access Concentrator (RAC)
• The dual WAN interfaces (the PRI interface and the CAS interface)
• A list of general capabilities supported by the RAC, including multiprotocol support and security systems
• Typical network configurations for the types of traffic the RAC recognizes
• Configuration prerequisites
• The different types of parameters used to configure the RAC
• Loading configuration files from hosts
RAC Overview
The RAC is a dual WAN server that supports analog calls and digital calls carried over ISDN.
The RAC handles the following types of traffic:
• Analog Pulse-Code Modulated (PCM) voice data and analog Dial Tone Multiple Frequency (DTMF) data, both originating from standard analog (for example, V.34) modems.
• Digital data conforming to the synchronous PPP specification.
Session configuration for analog, TA, and synchronous PPP dial access can be managed with a single phone number. You do this by adding a session parameter block (SPB) to the %pri section of the config.annex file. The SPB configures the RAC accordingly as the call is set up. Refer
toConfiguring Session Parameter Blocks on page 5-25 for examples.
Dual WAN Interfaces
The RAC’s dual WAN interfaces enable it to handle digital calls carried by PRI running over a T1/E1 line and analog calls carried over a channelized T1/E1 line (referred to in this book as channel associated signaling, or CAS). The RAC can configure the WAN interfaces in any combination: one of each type or two of the same type.
The RAC handles calls from both WAN interfaces using a common pool of digital modems; each incoming call is assigned to an available modem in a circular manner, regardless of which WAN interface it arrives on. For complete information, refer toDigital Modems on page 7-1.
Both WAN protocol families (ISDN PRI and CAS) are carried over the same type of framing medium, or line. In North America and Japan, this means a T1 line; in Europe, an E1 line is used.
PRI
The ISDN Primary Rate Interface (PRI) uses a number of B channels for the transmission of “payload” data, as well as a single D channel for the transmission of signaling data used for call setup, teardown, and connection management.
Chapter 1 Introduction to Remote Access Concentrators
CAS
The channel associated signaling(CAS) protocol is used to carry analog (voice) data on channelized T1 or channelized E1 lines. These lines are also referred to as DS1 channels. Each DS1 channel is divided into DS0 channels for carrying data; each DS0 channel contains a subchannel that is used for call setup/teardown and framing management, also known as signaling information.
CAS supports only analog modem data, although TA and Sync PPP data may be handled if they are carried by DOSBS (Data Over Speech Bearer Service).
CAS does not support the transmission of a busy signal for all protocols. To avoid problems that may result from this, the RAC allows network administrators to busy-out DS0 channels when no modems are available to handle the calls they are carrying. Refer toBusying-Out DS0 Channels
Automatically on page 7-4 for complete details.
Channel Allocation
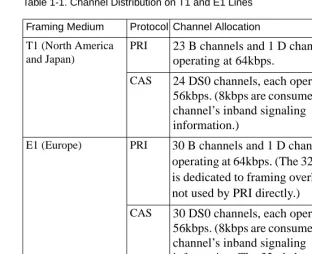
T1 lines are divided into 24 channels, E1 lines into 32 channels. These channels are allocated differently depending on which format is in use, PRI or CAS (seeTable 1-1).
In this book, discussion of CAS is limited to channelized T1 and channelized E1, although switch types for other
Table 1-1. Channel Distribution on T1 and E1 Lines
Channel distribution may be different for CAS protocols other than channelized T1/E1 (such as R1, R2, etc.).
Multi-Protocol Support
The RAC supports all of the dial-in, multiprotocol, remote access features characteristic of Bay Networks Remote Annex products. Once a call has been established, the RAC allows the use of multiple protocols, including asynchronous IP, PPP, SLIP, IPX, LAT (with limitations), and AppleTalk, as well as synchronous IP over PPP, IPX over PPP (IPXCP), and AppleTalk over PPP.
In addition, the RAC provides ISDN calls originating from a router (such as the Bay Networks Clam or Marlin) with access to standard
Framing Medium Protocol Channel Allocation
T1 (North America and Japan)
PRI 23 B channels and 1 D channel, each operating at 64kbps.
CAS 24 DS0 channels, each operating at 56kbps. (8kbps are consumed by each channel’s inband signaling
information.)
E1 (Europe) PRI 30 B channels and 1 D channel, each operating at 64kbps. (The 32nd channel is dedicated to framing overhead and is not used by PRI directly.)
CAS 30 DS0 channels, each operating at 56kbps. (8kbps are consumed by each channel’s inband signaling
Chapter 1 Introduction to Remote Access Concentrators
Typical Network Configurations
Typical PRI Configurations
Following are examples of the three PRI connection types supported by the RAC.
Voice (Analog) Calls
The example inFigure 1-1 shows a PC user with a standard modem (e.g., a V.34) dialing into the RAC over a PRI connection.
Other modem call configurations can be established instead of the one shown inFigure 1-1.
Figure 1-1. Voice Call over Analog Line
InFigure 1-1, the telco central office (CO) terminates the analog line from the modem, converts the voice call into digital data, and dynamically chooses a PRI B channel to carry the data through the telephone network to the RAC. The CO also converts the signals describing the
characteristics of the call into ISDN out-of-band signaling messages, as defined by the Q.931 and Q.932 standards. These signaling messages are carried to the RAC on the PRI D channel.
Analog Line Modem
CO
PRI Line RAC PC
Corporate LAN PRI Port
The RAC does not automatically accept the modem call. First, the CO allocates a B channel and the RAC determines whether it has the resources, such as an available modem, to handle the call. RAC negotiations are based not only on physical resources but also on parameters that you configure. If the RAC’s parameters are set properly, the call is accepted. Calls can be rejected explicitly through the use of session parameter blocks (SPBs).
Once a call is accepted (and the user is authenticated), the RAC places the user in the protocol environment you have configured. The supported protocols are asynchronous PPP, SLIP, ARAP, and CLI.
Terminal Adapter Calls
The RAC supports terminal adapter (TA) calls using the V.120, V.110, and X.75 rate adaptation protocols.
The example inFigure 1-2 shows a TA using the V.120 rate adaptation protocol to convert asynchronous data generated by a PC into V.120 frames. These frames are transmitted over a BRI line to the appropriate switch at the CO and then sent to the RAC on a negotiated PRI B channel. If the RAC’s parameters are configured correctly for this kind of call, the call is accepted. The RAC converts the V.120 frames into an asynchronous data stream, and the RAC software handles the data as if it originated at a V.120 asynchronous port.
Other V.120 call configurations can be established instead of the one shown inFigure 1-2. For example, the BRI line could be a PRI line.
Chapter 1 Introduction to Remote Access Concentrators
Figure 1-2. TA Call over a BRI Line
Synchronous PPP Calls
Figure 1-3 shows a sample synchronous PPP call from a user whose PC has an adapter card supporting synchronous PPP encapsulation over ISDN. The user connects to the CO via a BRI line and connects to the RAC over a negotiated PRI B channel. If the RAC’s parameters are configured correctly for this kind of call, the call is accepted.
Once a call is accepted (and the user is authenticated), the RAC places the user in the protocol environment you have configured. The supported protocols for synchronous calls are IPCP (IP over PPP), IPXCP (IPX over PPP), and ATCP (AppleTalk over PPP).
Figure 1-3. Synchronous PPP Connection TA
CO
BRI Line RAC
PC
Corporate LAN PRI Port
Ethernet Port
PRI Line
CO BRI Line
RAC PC with
Corporate LAN PRI Port
Ethernet Port
Synchronous PPP PRI Line
Multilink PPP
The RAC also supports synchronous Multilink PPP (MP). MP is a protocol standard that provides a means for data aggregation over multiple DS0 or B channels. This implementation of MP is based on the RFC1990 technical specification. For information on using and
configuring MP, seeMultilink Point-to-Point Protocol (MP) on page 9-1.
Typical CAS Configuration
Figure 1-4 shows a PC user with a standard modem (e.g., a V.34) dialing into the RAC over a CAS connection.
Other modem call configurations can be established instead of the one shown inFigure 1-4.
Figure 1-4. Voice Call over Analog Line
InFigure 1-4, the telco CO terminates the analog line from the modem and dynamically chooses a DS0 channel to carry the data through the telephone network to the RAC. The CO also converts the signals describing the characteristics of the call into signaling messages; these signaling messages are carried to the RAC in the signaling subchannel of the DS0.
Analog Line Modem
CO
Channelized T1/E1 Line
RAC PC
Corporate LAN CAS Port
Chapter 1 Introduction to Remote Access Concentrators
The modem call is not automatically accepted by the RAC. First, the CO allocates a B channel and the RAC determines whether it has the resources, such as an available modem, to handle the call. RAC negotiations are based not only on physical resources but also on parameters that you configure. If the RAC’s parameters are set properly, the call is accepted. (Calls can be explicitly rejected through the use of SPBs.)
Once a call is accepted and the user is authenticated, the RAC places the user in the protocol environment you have configured. The supported protocols are asynchronous PPP, SLIP, ARAP, and CLI.
Mixed RAC/Remote Annex Environment
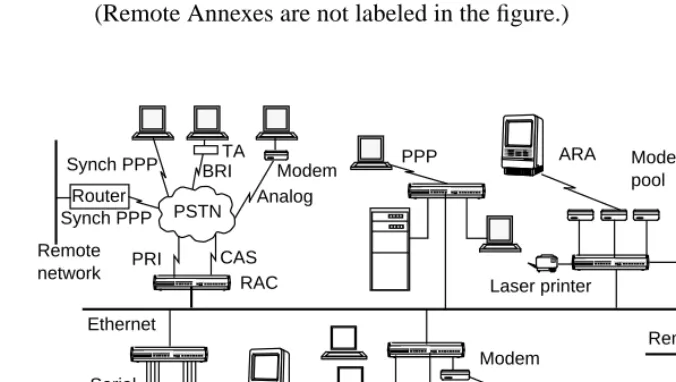
[image:37.612.155.493.368.559.2]Figure 1-5 shows how a RAC can fit into an environment with Bay Networks Remote Annexes to provide a complete enterprise solution. (Remote Annexes are not labeled in the figure.)
Figure 1-5. Network with Mixed Remote Annex Types PPP Analog ARA Modem pool UNIX host SLIP Laser printer X-window display Modem Remote Ethernet
Configuration Prerequisites
Before you configure your RAC, you must:
• Order your WAN (PRI or CAS) lines from your telco. Order information is provided in the Bay Networks publication Line
Provisioning for Remote Access Concentrators.
• When ordering your WAN lines, keep a record of the service options the telco provides you with, so that you can set WAN parameters on the RAC accordingly. The WAN parameters you need to set for PRI and CAS are described in the Remote Access
Concentrator Software Reference.
• Install the RAC and boot it, as described in the appropriate hardware installation manual (for example, for the Model 8000 RAC, this is the Bay Networks publication Installing the Model
8000 Remote Access Concentrator).
• Do not physically connect cables to the WAN interface ports; wait until you have at least performed a minimal configuration. An alarm from an improperly configured interface could cause the telco to drop the line.
Parameter Configuration
Chapter 1 Introduction to Remote Access Concentrators
RAC Management Tools
The RAC software provides network management tools and files for setting the parameters that control the RAC environment.
• The Network Administrator (na) program is a host-based UNIX utility. It provides commands for displaying and modifying operating characteristics of the RAC, its en0 or PRI port, and PRI call handling.
• The Command Line Interpreter (CLI) is the RAC’s command interface. You can use CLI commands to connect to hosts and to display and change RAC characteristics. You can display known hosts, as well as statistics for the RAC and the network. The CLI also provides superuser commands for network administration and management.
• The CLI admin command, which you access as a superuser on a CLI connection, is a local (resides in the RAC) substitute for the host-resident na command. The admin command set provides a subset of the host-resident na commands. However, all
parameters that you can set via na you can also set using admin.
• Certain host-based configuration files allow you to create entries that can control, among other things, PRI call handling and user security. The default configuration file is named config.annex and is located in the /usr/annex/ directory on the UNIX load host.
Parameter Types
You can configure the RAC by setting the following types of parameters:
• Annex-wide parameters that apply to an entire RAC or set of RACs. This parameter type is described inConfiguring RAC Parameters on page 3-2.
• Global port parameters that apply to all calls. You can also set these parameters for a subset of calls. To define port parameters globally, use na or admin. To define the same parameters for a subset of calls, enter the parameters in a Session Parameter Block (SPB) that handles the calls. SPBs are located in the RAC’s configuration file.
• WAN parameters, which define characteristics of the WAN line and establish remote IP and IPX addresses.
• Interface parameters.
• Modem parameters that apply to the internal modem set.
For detailed information, seeConfiguring the WAN Interfaces, Global
Ports, and Sessions on page 5-1.
Loading Configuration Files from Hosts
RAC files can be loaded from a host using either the Trivial File Transfer Protocol (tftp) or the expedited remote procedure call daemon (erpcd):
• The erpcd utility runs on a UNIX host; it listens for RAC file server host requests (to download the operational code and other files).
• The tftp program, supplied on most hosts, is supported as an alternative to erpcd and as a backup in case a UNIX host is not available to install erpcd.
Chapter 2
Using the CLIs
T
he RAC provides three command interfaces for performing tasks. The first is referred to simply as the command line interface (CLI), a set of general commands available to non-administrative users for controlling jobs and sessions. In addition, the RAC provides na and admin, both of which are administrative utilities for configuring and managing the RAC. The na utility resides on and is accessed from a UNIX host; it is especially useful when managing one or more RACs across a network. The admin utility is a subset of the na utility (there are seven na commands which are not included in admin) which resides on the RAC itself and is accessed via a superuser CLI session on the RAC. The difference between na andadmin is a set of seven commands which are relevant only to
administering multiple RACs, or administering a RAC across a network.
The na and admin utilities provide commands that allow you to:
• Set and display the operating characteristics of the RAC.
• Reboot or reset the RAC, reset internal ports, and reset sessions.
• Broadcast administrative messages to RAC users.
For a detailed description of each command in the CLI or na (and therefore admin), refer to the Remote Access Concentrator Software Reference.
The Command Line Interface
The CLI provides two groups of commands - user and superuser; the superuser commands are used for RAC administration.
Each CLI command can take a maximum of ten arguments.
Command Syntax
You can shorten any CLI command or host name to the minimum number of letters that make the name unique. This is called minimum uniqueness. If you do not want the RAC to interpret a host name using minimum uniqueness, enclose the name in double quotes (""). For example, entering hosts “new” prevents ambiguities between hosts newark and new. You can enter commands and host names in lowercase, uppercase, or a combination of the two. The RAC performs any necessary case conversion.
Squelch
If six consecutive CLI errors occur within 6 seconds (e.g., invalid command, noise on the line), the RAC triggers a squelch, i.e., stops all I/O for approximately 4 seconds after receiving the sixth error. Pressing <Return> after this period of time returns you to the CLI prompt.
If the errors occur over a time period greater than 6 seconds, the RAC ignores them and restarts the timer.
Chapter 2 Using the CLIs
CLI Commands
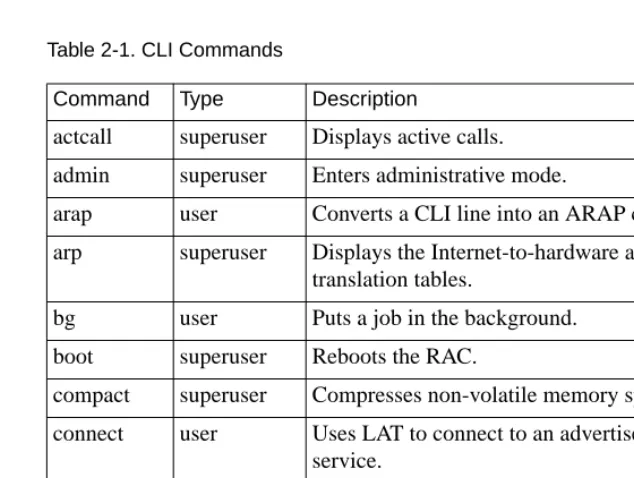
Table 2-1 throughTable 2-3 list both the user and superuser CLI commands.
To access the superuser CLI commands, issue the su command at the user CLI prompt and enter the RAC’s administrative (su) password (for more details on the superuser password, see the Remote Access Concentrator Software Reference). The default superuser prompt is a # symbol instead of a colon:
[image:43.612.179.496.316.555.2]annex: su Password: annex#
Table 2-1. CLI Commands
(continued on next page)
Command Type Description
actcall superuser Displays active calls.
admin superuser Enters administrative mode.
arap user Converts a CLI line into an ARAP connection.
arp superuser Displays the Internet-to-hardware address translation tables.
bg user Puts a job in the background.
boot superuser Reboots the RAC.
compact superuser Compresses non-volatile memory space.
connect user Uses LAT to connect to an advertised LAT service.
control superuser Changes the state of DTR and RTS or outputs a test message.
cp superuser Copies a file in the local file system.
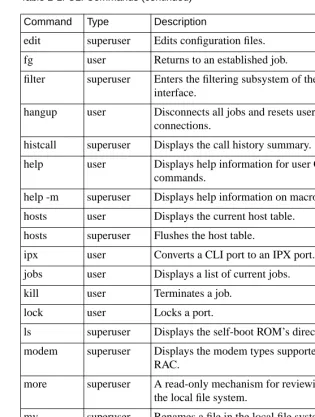
Table 2-1. CLI Commands (continued)
(continued on next page)
Command Type Description
edit superuser Edits configuration files.
fg user Returns to an established job.
filter superuser Enters the filtering subsystem of the CLI user interface.
hangup user Disconnects all jobs and resets user CLI connections.
histcall superuser Displays the call history summary.
help user Displays help information for user CLI commands.
help -m superuser Displays help information on macros.
hosts user Displays the current host table.
hosts superuser Flushes the host table.
ipx user Converts a CLI port to an IPX port.
jobs user Displays a list of current jobs.
kill user Terminates a job.
lock user Locks a port.
ls superuser Displays the self-boot ROM’s directory.
modem superuser Displays the modem types supported by the RAC.
more superuser A read-only mechanism for reviewing files on the local file system.
mv superuser Renames a file in the local file system.
netstat user Displays network statistics.
passwd superuser Changes the administrative password.
Chapter 2 Using the CLIs
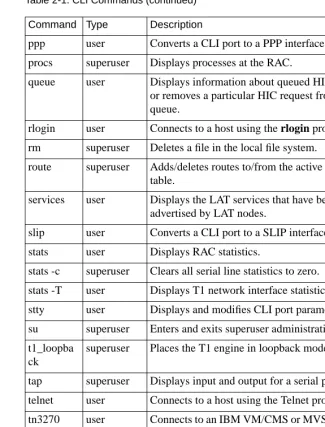
Table 2-1. CLI Commands (continued) Command Type Description
ppp user Converts a CLI port to a PPP interface port.
procs superuser Displays processes at the RAC.
queue user Displays information about queued HIC requests or removes a particular HIC request from the queue.
rlogin user Connects to a host using the rlogin protocol.
rm superuser Deletes a file in the local file system.
route superuser Adds/deletes routes to/from the active routing table.
services user Displays the LAT services that have been advertised by LAT nodes.
slip user Converts a CLI port to a SLIP interface port.
stats user Displays RAC statistics.
stats -c superuser Clears all serial line statistics to zero.
stats -T user Displays T1 network interface statistics.
stty user Displays and modifies CLI port parameters.
su superuser Enters and exits superuser administrative mode.
t1_loopba ck
superuser Places the T1 engine in loopback mode.
tap superuser Displays input and output for a serial port.
telnet user Connects to a host using the Telnet protocol.
tn3270 user Connects to an IBM VM/CMS or MVS host using the tn3270 variation of the Telnet protocol.
who user Displays RAC users.
Table 2-2. Non-Privileged RAC VMS Commands Command Description
backwards Selects next available, lower numbered session to which your port is connected.
close Closes sessions.
connect Uses LAT to connect to an advertised LAT service.
disconnect Disconnects sessions.
forwards Selects next available, higher numbered session to which your port is connected.
list port Displays information about communications server ports from the permanent database.
list server Displays information from the permanent database about the communications server.
lock Locks a port to prevent unauthorized access.
logout port Logs out of the terminal server and disconnects all sessions.
resume session
Returns to a session you have suspended.
set port Specifies or modifies port characteristics immediately.
set privileged
Enables your port to perform privileged operations.
set session Specifies characteristics for your current LAT session.
show port Displays information from the operational database about communication server ports.
show server Displays information from the operational database about the communications server.
show service Displays information about LAT services to which you can connect.
show sessions
Displays connected active sessions for your port.
Chapter 2 Using the CLIs
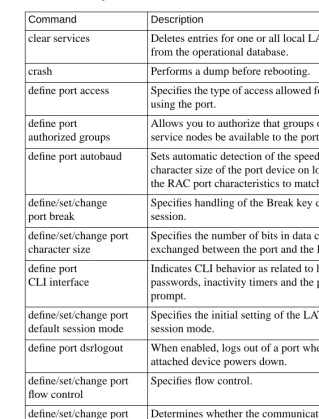
Table 2-3. Privileged RAC VMS Commands
(continued on next page)
Command Description
clear services Deletes entries for one or all local LAT services from the operational database.
crash Performs a dump before rebooting.
define port access Specifies the type of access allowed for the device using the port.
define port authorized groups
Allows you to authorize that groups of LAT service nodes be available to the port.
define port autobaud Sets automatic detection of the speed, parity, and character size of the port device on login and sets the RAC port characteristics to match.
define/set/change port break
Specifies handling of the Break key during a session.
define/set/change port character size
Specifies the number of bits in data characters exchanged between the port and the RAC.
define port CLI interface
Indicates CLI behavior as related to logging in, passwords, inactivity timers and the port default prompt.
define/set/change port default session mode
Specifies the initial setting of the LAT session mode.
define port dsrlogout When enabled, logs out of a port when the attached device powers down.
define/set/change port flow control
Specifies flow control.
define/set/change port inactivity logout
Determines whether the communications sever automatically logs out of a port after a period of inactivity.
define/set/change port input flow control
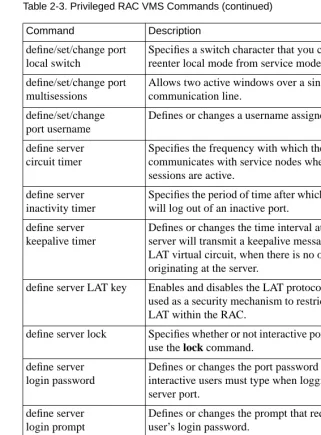
Table 2-3. Privileged RAC VMS Commands (continued)
(continued on next page)
Command Description
define/set/change port local switch
Specifies a switch character that you can use to reenter local mode from service mode.
define/set/change port multisessions
Allows two active windows over a single communication line.
define/set/change port username
Defines or changes a username assigned to a port.
define server circuit timer
Specifies the frequency with which the server communicates with service nodes when LAT sessions are active.
define server inactivity timer
Specifies the period of time after which the server will log out of an inactive port.
define server keepalive timer
Defines or changes the time interval at which the server will transmit a keepalive message over a LAT virtual circuit, when there is no other traffic originating at the server.
define server LAT key Enables and disables the LAT protocol, and is used as a security mechanism to restrict access to LAT within the RAC.
define server lock Specifies whether or not interactive port users can use the lock command.
define server login password
Defines or changes the port password that interactive users must type when logging in to a server port.
define server login prompt
Defines or changes the prompt that requests the user’s login password.
define server
maintenance password
Defines or changes the user password required for remote applications such as NCP and TSM.
define server login prompt
Chapter 2 Using the CLIs
Table 2-3. Privileged RAC VMS Commands (continued)
(continued on next page)
Command Description
define server MOP host Requires the physical Ethernet address for the preferred VMS host.
define/set/change port modem control
Specifies whether or not the RAC manipulates modem signals.
define port name Specifies the name of the port.
define/set/change port noloss
Specifies whether or not the port will store data in its type ahead buffer while waiting for a session connection to be made. If so, it will then pass the data to the connection partner.
define/set/change port output flow control
Specifies output flow control.
define/set/change port parity
Specifies whether or not the port will provide a parity bit with each character for error checking.
define/set/change port password
Specifies whether or not a user requires a password to log in to the RAC.
define port session limit
Limits the number of connected sessions on the port.
define/set/change port speed
Specifies the port speed in bits per second.
define/set/change port stop bits
Tells the RAC to use 1, 1.5, or 2 stop bits when outputting a character.
define/set/change port type
Defines or changes the type of terminal
connected to your port, the ports specified in the port-list, or all ports.
define server multicast timer
Specifies time to elapse between service announcement transmissions.
define server name Specifies a 1 to 16 character name for the RAC.
Table 2-3. Privileged RAC VMS Commands (continued)
Command Description
define server password limit
Specifies the number of times a user can try to enter the correct password for any password-protected RAC operation.
define server privileged password
Specifies the password a user must enter following a set privileged command in order to use privileged commands at the port.
define server queue limit
Specifies the maximum number of queued connection requests for remote access to RAC ports.
define server retransmit limit
Specifies the number of times a LAT message is retransmitted to a service node when the RAC receives no messages of acknowledgment.
define server security Determines whether or not the RAC performs any security checking.
define server session limit
Specifies the maximum number of active sessions that the RAC allows at one time.
define server software Specifies the file name of the RAC software image.
initialize server Reboots the RAC.
set noprivileged set privileged
Returns the port to non-privileged status to inhibit unauthorized use. Enables your port to perform privileged operations.
Chapter 2 Using the CLIs
The na and admin Utilities
The RAC stores the parameters set using na in non-volatile memory. After a reboot or a reset, the RAC updates its run-time parameters with the non-volatile parameters changed by na. The na utility can
communicate with the RAC only when the RAC is running its operational code.
All na commands are taken from the na standard input: you can run na interactively or provide it with input through a file or pipeline. You can create a script file containing na commands to configure a RAC. This script file can save the configuration information for a specific RAC and, when required, restore the configuration.
This chapter illustrates command names, parameter names, and keywords in their long forms. Examples of na commands sometimes appear without the interactive command prompt, and with embedded comments that describe the functions being performed. This format resembles the appearance of na scripts; the portion of the script entered at the terminal in response to the command prompt appears in bold type.
Command Notation
Interactive na sessions allow you to enter na commands with or without arguments or parameters. If you enter the command without arguments or parameters, na prompts for them. The conventions for an interactive session are:
• You can abbreviate commands and parameter names to the minimum number of characters that uniquely distinguish the name from any other name that may appear in the same context.
• To enter a space as an argument, enclose it in double quotes (" "). Otherwise, the space is assumed to be a delimiter.
• The UNIX interrupt character (usuallyCTRL-C) returns you to the command prompt.
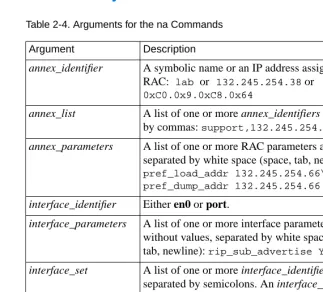
Additionally, na permits comments when the # character is present at the beginning of a comment line. All characters between the # and the next new line are ignored.Table 2-4 describes the supported arguments for na.
[image:52.612.156.479.270.561.2]Command Syntax
Table 2-4. Arguments for the na Commands
Argument Description
annex_identifier A symbolic name or an IP address assigned to a RAC: lab or 132.245.254.38 or
0xC0.0x9.0xC8.0x64
annex_list A list of one or more annex_identifiers separated by commas:support,132.245.254.42,lab annex_parameters A list of one or more RAC parameters and values
separated by white space (space, tab, new line):
pref_load_addr 132.245.254.66\ pref_dump_addr 132.245.254.66 interface_identifier Either en0 or port.
interface_parameters A list of one or more interface parameters, with or without values, separated by white space (space, tab, newline):rip_sub_advertise Y
interface_set A list of one or more interface_identifiers separated by semicolons. An interface_set can include interfaces on different RACs:
port_parameters A list of one or more global port parameters, with or without values, separated by white space:
Chapter 2 Using the CLIs
na and admin
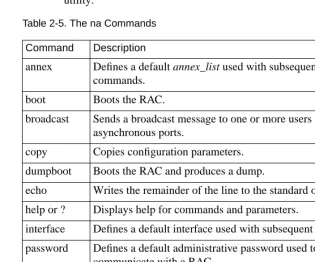
Commands [image:53.612.180.495.259.521.2]Table 2-5 lists the na commands. Refer to the Remote Access Concentrator Software Reference for a detailed description of each.
Table 2-5. The na Commands
(continued on next page)
Seven of the na commands use standard UNIX superuser protection - only a superuser at the host can execute these commands: boot, broadcast, copy, dumpboot, read, reset, and
set. These seven commands are the na commands which are not
included in the subset of na commands which make up the admin utility.
Command Description
annex Defines a default annex_list used with subsequent commands.
boot Boots the RAC.
broadcast Sends a broadcast message to one or more users on internal asynchronous ports.
copy Copies configuration parameters.
dumpboot Boots the RAC and produces a dump.
echo Writes the remainder of the line to the standard output.
help or ? Displays help for commands and parameters.
interface Defines a default interface used with subsequent commands.
password Defines a default administrative password used to communicate with a RAC.
port Specifies the global port.
quit Terminates na.
Table 2-5. The na Commands (continued)
After installing na on a UNIX host, type na at a terminal connected to this host. No arguments or command line options are available.
% na
Annex network administrator Rx.x command:
Command Description
reset Resets an internal port, interface, or subsystem.
set Defines or modifies the value of a parameter.
show Displays the current value of a parameter.
Chapter 3
Using the Configuration File
T
his chapter describes configuring annex parameters, which apply to an entire RAC or to multiple RACs (as opposed, for example, to wan parameters that apply only to the WAN interfaces). The following topics are covered:• Configuring RAC parameters with na and admin
• Customizing the RAC environment
• Parsing and setting up the configuration file, including special sections
• Using automated firmware download (AFD)
The Local File System
Configuring RAC Parameters
You can configure RAC parameters using the following:
• The host-based na utility
• The CLI superuser admin command
• Annex Manager (GUI)
• An SNMP-based manager such as Sun NetManager
To determine the current settings of RAC parameters, use the show annex
all command. The set annex command allows you to change any setting.
All parameters have default settings. Some of these parameters must be set using the ROM Monitor before booting the RAC with its operational code (see the hardware installation manual for your RAC for more details).
By default, the show annex command scrolls the selected parameters line by line in two-column format.
You can set up a pager as follows:
setenv PAGER more (BSD)
or
set PAGER=more; export pager (System V)
Chapter 3 Using the Configuration File
Using the na Utility
To use the na utility:
1. Log into a UNIX host and enter na:
% na
Annex network administrator Rx.x January 1997 command:
2. Specify one or more RACs:
command: annex 192.9.200.95
or annex 192.9.200.95,frontlobby
or annex
enter default annex list: 192.9.200.95,frontlobby
3. Execute the set annex command to change parameters. The following sample command lines:
• Enable the DNS name server.
• Define two name server hosts.
• Enable security on the RAC.
• Define a security server host.
• Enable security for virtual CLI connections.
• Define an administrative password.
• Enable event logging.
• Define a CLI prompt.
command: set annex name_server_1 dns
command: set annex pref_name1_addr 192.9.200.95 command: set annex name_server_2 dns
command: set annex pref_name2_addr 192.9.200.85 command: set annex enable_security Y
command: set annex vcli_security Y
command: set annex pref_secure1_host 192.9.200.95 command: set annex password piano
command: set annex syslog_mask all
4. Execute the show annex all command to review your changes. Using the example in step 3, the terminal displays:
command: show annex all
Annex Generic Parameters
inet_addr: 132.245.44.187 subnet_mask:255.255.255.0 pref_load_addr: 132.245.44.80 pref_dump_addr:132.245.33.8 load_broadcast: Y broadcast_addr:132.245.44.255 load_dump_gateway:132.245.44.22 load_dump_sequence: net image_name: "" motd_file: "motd" config_file: "config.annex" authoritative_agent: Y
routed: Y server_capability: none
disabled_modules: vci tftp_load_dir: "" tftp_dump_name: "" ipencap_type: ethernet ip_forward_broadcast: N tcp_keepalive: 120 option_key: "" session_limit: 1152 output_ttl: 64
VCLI Parameters
max_vcli: unlimited cli_prompt: "%a%c" vcli_security: Y vcli_password: "<unset>" vcli_inactivity off
Nameserver Parameters
nameserver_broadcast: N rwhod: Y
pref_name1_addr: 192.9.200.95 name_server_1: dns pref_name2_addr: 192.9.200.85 name_server_2: dns host_table_size: 64 min_unique_hostnames: Y
Security Parameters
enable_security: Y security_broadcast: Y pref_secure1_host:192.9.200.95 pref_secure2_host: 0.0.0.0 network_turnaround: 2 loose_source_route: Y acp_key: "<unset>" password: "<set>" allow_snmp_sets: N lock_enable: Y
passwd_limit: 3 chap_auth_name: "chap" max_chap_chall_int: 0
Chapter 3 Using the Configuration File
Time Parameters
time_broadcast: N daylight_savings: us timezone_minuteswest: 300 time_server: 0.0.0.0
SysLog Parameters
syslog_mask: all syslog_facility: log_local7 syslog_host: 192.9.200.95 syslog_port: 0
MOP and "Login" User Parameters
pref_mop_host: 00-00-00-00-00-00
mop_password: “<unset>” login_password: “<set>” login_prompt: “#” login_timer: 30
LAT Parameters
lat_key: "" facility_num: 0 server_name: "" sys_location: "" lat_queue_max: 4 service_limit: 256 keep_alive_timer: 20 circuit_timer: 8 retrans_limit: 8 group_value: none vcli_groups: none multicast_timer: 30 multisessions_enable: N
AppleTalk Parameters
a_router: 00-00-00-00-00-00
default_zone_list: "" node_id: 0.0 zone: ""
Router Parameters
rip_auth: "<unset>" rip_routers: all
IPX Parameters
ipx_file_server: "" ipx_frame_type: raw802_3 ipx_dump_username: "" ipx_dump_password: "<unset>" ipx_dump_path: "" ipx_do_checksum: N
TMux Parameters
tmux_enable: N tmux_max_host: 64
tmux_delay: 20 tmux_max_mpx: 700
DHCP Parameters
pref_dhcp1_host: 0.0.0.0 pref_dhcp2_host: 0.0.0.0 dhcp_bcast: N
5. Execute either boot or reset annex all to effect these changes on the RAC.
You can configure more than one RAC simultaneously using this sequence:
• Define the RAC using the annex command. Next, use the set
annex command to change the parameters.
• Define the parameters for one RAC and use the write command to copy the parameters to a script file. The script file will contain all copied parameter settings with a comment character (#) at the beginning of lines defining the settings for the IP address, administrative password, virtual CLI password, LAT key, option key, and ACP key. Remove the comment character for any of the settings you want to use.
Chapter 3 Using the Configuration File
Using the CLI admin Command
Entering the RAC superuser CLI admin command puts you in administrative mode. The admin prompt replaces the CLI prompt. Pressing the attention key or typing quit at the admin prompt terminates the admin session and returns you to the superuser CLI prompt.
To modify RAC parameters using the admin command:
1. At the CLI prompt, execute the su command and enter the superuser password:
annex: su password:
2. At the superuser CLI prompt, execute the admin command:
annex# admin
ANNEX-PRI Rx.x, 32 async, 32 sync, 32 ta, 32 modem ports
admin:
3. Execute the set annex command to change parameters. The following sample command lines:
• Enable the DNS name server
• Define two name server hosts
• Enable security on the RAC
admin: set annex name_server_1 dns
admin: set annex pref_name1_addr 192.9.200.95 admin: set annex name_server_2 dns
admin: set annex pref_name2_addr 192.9.200.85 admin: set annex enable_security Y
4. Execute the show annex all command to review your changes. Using the example in step 3, the terminal displays:
admin: show annex all
Annex Generic Parameters
inet_addr:132.245.44.187 subnet_mask:255.255.255.0 pref_load_addr:132.245.44.80 pref_dump_addr:132.245.33.8 load_broadcast:Y broadcast_addr:132.245.44.255 load_dump_gateway:132.245.44.22 load_dump_sequence: net image_name: "" motd_file: "motd" config_file: "config.annex" authoritative_agent: Y
routed: Y server_capability: none
disabled_modules: vci tftp_load_dir: "" tftp_dump_name: "" ipencap_type: ethernet ip_forward_broadcast: N tcp_keepalive: 120 option_key: "" session_limit: 1152 output_ttl: 64
VCLI Parameters
max_vcli: unlimited cli_prompt: "%a%c" vcli_security: Y vcli_password: "<unset>" vcli_inactivity off
Nameserver Parameters
nameserver_broadcast: N rwhod: Y
pref_name1_addr: 192.9.200.95 name_server_1: dns pref_name2_addr: 192.9.200.85 name_server_2: dns host_table_size: 64 min_unique_hostnames: Y
Security Parameters
enable_security: Y security_broadcast: Y pref_secure1_host:192.9.200.95 pref_secure2_host: 0.0.0.0 network_turnaround: 2 loose_source_route: Y acp_key: "<unset>" password: "<set>" allow_snmp_sets: N lock_enable: Y
passwd_limit: 3 chap_auth_name: "chap" max_chap_chall_int: 0
Chapter 3 Using the Configuration File
Time Parameters
time_broadcast: N daylight_savings: us timezone_minuteswest: 300 time_server: 0.0.0.0
SysLog Parameters
syslog_mask: all syslog_facility: log_local7 syslog_host: 192.9.200.95 syslog_port: 0
MOP and "Login" User Parameters
pref_mop_host: 00-00-00-00-00-00
mop_password: “<unset>” login_password: “<set>” login_prompt: “#” login_timer: 30
LAT Parameters
lat_key: "" facility_num: 0 server_name: "" sys_location: "" lat_queue_max: 4 service_limit: 256 keep_alive_timer: 20 circuit_timer: 8 retrans_limit: 8 group_value: none vcli_groups: none multicast_timer: 30 multisessions_enable: N
AppleTalk Parameters
a_router: 00-00-00-00-00-00
default_zone_list: "" node_id: 0.0 zone: ""
Router Parameters
rip_auth: "<unset>" rip_routers: all
IPX Parameters
ipx_file_server: "" ipx_frame_type: raw802_3 ipx_dump_username: "" ipx_dump_password: "<unset>" ipx_dump_path: "" ipx_do_checksum: N
TMux Parameters
tmux_enable: N tmux_max_host: 64
tmux_delay: 20 tmux_max_mpx: 700
DHCP Parameters
pref_dhcp1_host: 0.0.0.0 pref_dhcp2_host: 0.0.0.0 dhcp_bcast: N
5. Execute either boot or reset annex all to effect these changes on the RAC.
Customizing the RAC Environment
You can customize the following RAC attributes:
• The prompt that displays when a user accesses the CLI
• The number of simultaneous virtual CLI connections
• The name of the configuration file
• The name of the message-of-the-day file
• RIP
• The IP encapsulation type used by the LAN
• TMux
• LAT
• AppleTalk
• IPX
Setting the CLI Prompt
The RAC displays a prompt when a user accesses the CLI. The
cli_prompt parameter allows you to customize the RAC prompt. You
Chapter 3 Using the Configuration File
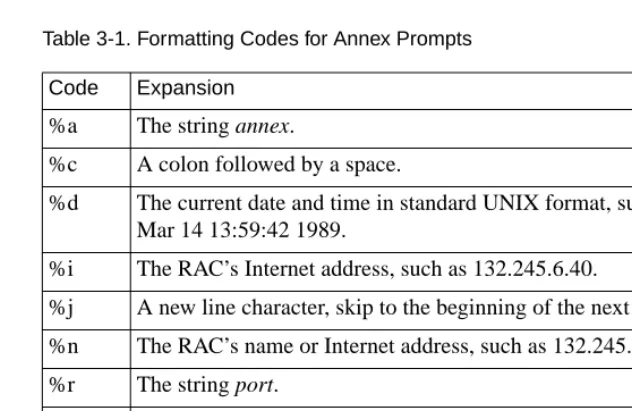
[image:65.612.181.497.220.425.2]The values for this parameter are called prompt strings. A prompt string consists of characters and embedded formatting codes that are expanded when the prompt is displayed. The formatting codes consist of a percent character (%) followed by a single lowercase character. Each formatting code occupies one character in storage. You can also specify a string for the prompt using these codes. The default is %a%c (annex:).Table 3-1 describes the codes for the prompt string.
Table 3-1. Formatting Codes for Annex Prompts
If you want a prompt to appear as date and time (new line) annex-name, use the following code:
%d%j%n%s%c
For the port on the RAC named thirdfloor, the prompt is:
Mon Jan 6 11:10:25 1997 thirdfloor
For the superuser CLI prompt, a pound sign (#) and a space replace the code %c; otherwise a # is appended at the end.
Code Expansion
%a The string annex.
%c A colon followed by a space.
%d The current date and time in standard UNIX format, such as Mon Mar 14 13:59:42 1989.
%i The RAC’s Internet address, such as 132.245.6.40.
%j A new line character, skip to the beginning of the next line.
%n The RAC’s name or Internet address, such as 132.245.6.40.
%r The string port.
%s A space.
%t The current time in 24-hour format, such as 13:59:42.
Setting a Limit on Virtual CLI Connections
The number of virtual CLI connections on a RAC can affect the use of memory, because each virtual CLI connection uses memory. The
max_vcli parameter determines the maximum number of virtual CLI
connections the RAC can create at any one time. You can set the number of virtual CLI connections from an unlimited number to none. The range of values that you can enter are from 0 to 254 or unlimited. The default is “unlimited”. If you define this parameter as zero, users cannot create a virtual CLI connection on the RAC.
Setting Up the Configuration File
The configuration file contains all RAC configuration information. It resides on the preferred boot host or the local media and is loaded during the RAC booting process (seeConfiguring Hosts and Servers on page 4-1 for more details on creating and using the configuration file).
You can define a name for the configuration file using the configuration parameter config_file. The default file name is
config.annex.
You can create these files on the local media using the superuser CLI
edit command.
Setting Up the motd File
Chapter 3 Using the Configuration File
To use this option, create an ASCII file on a file server host with the desired message. This file must be located in the same directory that holds the operational images (usually /usr/spool/erpcd/bfs). The default file name is motd. If you use another name for this file, you must specify this name using the RAC parameter motd_file.
Remote Access Concentrator Service Tools forWindows NT stores the motd file in: <product-installation-root-drive>\bfs sub-directory.
Using RIP
The RAC uses a routing daemon (routed) for its routing services. This daemon implements Versions 1 and 2 of the Routing Information Protocol (RIP).
The routed parameter enables or disables RIP; the default is enabled. If RIP is disabled, the RAC does not listen for or transmit RIP routing updates. Instead, it depends on the routing information in the gateway section of the configuration file. If you disable RIP, define a default route in the configuration file.