Construction Junction
Inventory Management
Software Requirements Specification
Version 2.0
Summa Technologies
October 1st, 2009
Summa Technologies, Inc.
925 Liberty Avenue 6
thFloor
Pittsburgh, PA 15222
(412) 258-3300
Table of Contents
REVISION HISTORY ... 3
APPROVALS ... 3
REQUIREMENTS ANALYSIS TEAM ... 3
1. INTRODUCTION ... 4
1.1. PURPOSE ... 4
1.2. SCOPE ... 4
1.3. AUDIENCE ... 4
1.4. DEFINITIONS AND ACRONYMS ... 4
2. OVERVIEW ... 5
2.1. ACTORS ... 5
3. DETAILED FUNCTIONAL REQUIREMENTS ... 6
3.1. VIEW INVENTORY ... 6
3.2. MANAGE DEPARTMENTS ... 8
3.3. MANAGE CATEGORIES ... 10
3.4. MANAGE ATTRIBUTES AND DETAILS ... 14
3.5. ADD ITEM TO INVENTORY ... 17
3.6. MANAGE INVENTORY ITEMS ... 19
3.7. SUGGEST ITEM PRICE... 22
3.8. VIEW ACQUISITIONS ... 24
3.9. RECEIVE ACQUISITION... 26
3.10.SELL ITEM ... 28
3.11.REPORTS ... 29
4. HIGH-LEVEL FUNCTIONAL REQUIREMENTS ... 31
4.1. MEDIUM PRIORITY ... 31
4.2. LOW PRIORITY ... 35
5. SUPPLEMENTARY REQUIREMENTS ... 37
5.1. USABILITY ... 37
5.2. AVAILABILITY ... 37
5.3. RELIABILITY ... 37
5.4. SECURITY ... 37
5.5. PERFORMANCE ... 37
5.6. INTERFACES ... 37
5.7. CLIENT PLATFORM ... 59
5.8. DATA MIGRATION ... 59
5.9. DISASTER RECOVERY,BACKUPS, AND BUSINESS CONTINUITY PLAN ... 59
5.10.MAINTAINABILITY ... 60
5.11.PORTABILITY ... 60
5.12.LEGAL,COPYRIGHT AND OTHER NOTICES... 60
5.13.LICENSING ... 60
5.14.APPLICABLE STANDARDS ... 60
APPENDIX A: REFERENCES ... 61
Revision History
Date
Version Description
Author
October 1
st, 2009
1.0
Initial draft
Adriano Wisnik
November 9th, 2009
1.1
Changes from review by Mindy
Adriano Wisnik
March 7, 2011
2.0
Final draft completed by Mindy
Mindy Schwartz
Approvals
Name
Department
Version
Date
Approval Method
Requirements Analysis Team
Role
Name
Department
Business Unit Representative Mindy Schwartz Operations
1. Introduction
1.1. Purpose
The purpose of this document is to define the requirements of the Inventory Management System as proposed by the Construction Junction (CJ) staff.
1.2. Scope
The scope of the Inventory Management project and subsequently the requirements defined by this document is the creation of a categorized Inventory Management System that provides the functionality identified by the Construction Junction team. Requirements defined in this document are prioritized by business and technical sponsors (Please refer to Appendix A). All implementation will be based on project planning estimates and revisions to these requirements.
1.3. Audience
This document is intended for the Construction Junction team, individual developers, and the system architect.
1.4. Definitions and Acronyms
2. Overview
The Inventory Management System is an application designed to allow the Construction Junction staff to create, maintain and view the contents and value of its inventory of items in a categorized way. It also facilitates the process of receiving items into the Construction Junction inventory via the drop-off, pick-up and deconstruction donation processes so that items can be traced from donation through sale. It also integrates with the QuickBooks Point of Sale retail management software currently in use by Construction Junction as well as the organization‟s website.
2.1. Actors
Actors are people, hardware, systems, or other entities external to the system that interact with the system. This section contains a description of each actor that interfaces with the system:
Administrator: A member of the Construction Junction staff who can perform any of the Inventory
Management functions.
Director: A member of the Construction Junction staff who can perform the same Inventory
Management functions as a Manager, plus view, create, modify and delete Inventory Management users.
Manager: A member of the Construction Junction staff who can perform the same Inventory
Management functions as a Receiving Associate, plus change item properties.
Receiving Associate: A member of the Construction Junction staff who receives donated items at
the receiving docks and performs their initial entry into the Inventory Management System and provides donors with their donation receipts.
Customer Service Representative: A member of the Construction Junction staff who works in the
customer service desk and performs specific tasks such as constituent and member database management, item returns processing, creating drop-off acquisitions, and others.
Pickup Associate: A member of the Construction Junction staff who picks up donated items and
brings them for processing at the receiving dock.
Decon Associate: A member of the Construction Junction staff who executes a deconstruction
and/or strip out job and brings the items for processing at the receiving dock.
Sales Associate: A member of the Construction Junction staff who processes purchases by
Construction Junction customers.
Construction Junction Staff Member: Any of the Construction Junction user types: Administrator,
Director, Manager, Receiving Associate, Pickup Associate, Decon Associate, Customer Service Representative or Sales Associate.
Donor: An individual or organization who donates items to the Construction Junction inventory and
receives a tax deduction for doing so.
Buyer: A customer who purchases items from the Construction Junction inventory.
Primary Contact: An individual who is the primary contact for a donation. The individual may be the
actual donor or be acting on behalf of one.
Vendor: An individual or organization who sells items to be added to Construction Junction‟s
inventory
3. Detailed Functional Requirements
This section contains detailed reports for each product-functional use cases. Each report contains the following data or sections (if a section has no content for a use case, it has been removed):
Name of the use case High-level description
Actor(s): All actors who interact with the system during the course of the use case.
Pre-conditions: Pre-conditions are conditions that must be true prior to beginning the use case and
are assumed to be true throughout the use case.
Triggers: Events and precursors that cause this use case to initiate.
Use Case Dependencies: Other use cases which this use case depends on.
Basic Flows: The flows for the standard, expected execution of the use case. This section provides
few details, but should be sufficient for a project manager or business representative to understand the use case.
Alternative Flows: Exceptional flows and how the system handles them.
Business Rules: All of the detailed validation, logic, and other rules that govern the use case.
Post-conditions: Any states the system could possibly be in when the use case terminates.
Special Requirements: Any security, auditing, interface or other special requirements.
Open Issues: Any issues that have yet to be resolved relating to the use case.
Extension Points: Requirements or features that are beyond the scope of this release, but may be
included in later releases and subsequently should be kept in mind during design and implementation.
Activity Diagram: Visual representation of a complicated flow.
Notes: Any ancillary details of importance that do not otherwise fit one of the above sections.
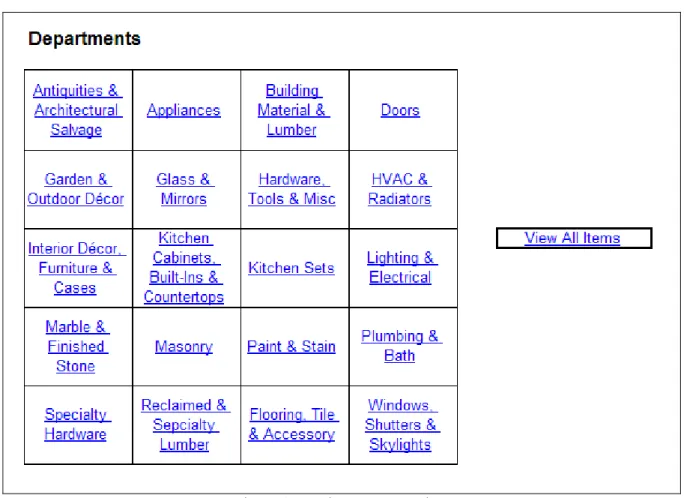
3.1. View Inventory
The system should provide a categorized view of the entire inventory to the Construction Junction staff. Starting at the department level, users can navigate into the inventory item categories and
sub-categories, all the way down to an individual inventory item.
3.1.1. Actor(s):
Administrator Director Manager
Customer Service Representative Receiving Associate
Pick Up Associate Decon Associate
3.1.2. Assumptions, Pre-Conditions & Triggers:
1. User is logged into the system
3.1.3. Use Case Dependencies
3.1.4. Basic Flows:
1. User accesses the main inventory screen 2. The screen displays all inventory departments 3. User clicks a department cell
4. The screen displays all inventory categories for the selected department 5. User clicks a category cell that contains sub-categories
6. The screen displays all inventory sub-categories for the selected category 7. User clicks a sub-category cell (leaf category)
7.1. For a Unique Item category:
7.1.1. The screen displays a list of all inventory items for that selected category 7.1.2. User clicks an item in the items list
7.1.3. The screen displays the details for the item 7.2. For a Stock Item category:
7.2.1. The screen displays the details for that Stock Item category 7.3. For a Under $5 category:
7.3.1. Nothing happens – The category cell is not clickable
3.1.5. Alternative Flows:
1. At any point, the user may click on a department on the inventory department shortcuts list, which takes the user to the inventory view for that particular department.
2. The user may click the View All Items button at any level in the inventory to view a list of all items in that department or category
3. The user may click the View All Items button on the main inventory screen to view the complete list of all items in the inventory
4. Once in the view items list screen, the user may filter the results by searching for: 4.1. A particular item by item number
4.2. All items with Donor, Department, Category or Description matching the provided keyword 4.3. All items with certain attributes, features and/or details
3.1.6. Business Rules:
1. Inventory departments and categories are displayed in matrix format
2. The matrix dimensions are fixed, and are the same when displaying departments or categories. 3. Unused matrix cells are displayed empty.
4. The actual matrix dimensions are to be determined during system implementation. 4.1. The matrix should be able to hold at least 30 tiles at each level
5. Each matrix cell displays a department or category name.
5.1. For departments with subcategories, the department name is a hyperlink to the view of the department subcategories
5.2. For a department with no subcategories, the department name is a hyperlink to the view of the items in that department
5.3. For categories with subcategories, the category name is a hyperlink to the view of the subcategories
5.4. For a category with no subcategories
5.4.1. For a Unique Item category, the category name is a hyperlink to a view of the items under that category
5.4.2. For a Stock Item category, the category name is a hyperlink to a view of the details for that Stock Item, including the current quantity on hand
5.4.3. For a Under $5 category:
5.4.3.1. The category name is not a hyperlink
6. By default, the items list contains the list of all Unique and Stock items in the selected department or category, or across all departments and categories when viewing the all inventory items screen 7. When a search keyword is specified, the system filters the default items list for that screen and
returns only the items for which the keyword matches one or more of the following columns: 7.1. Donor
7.2. Department 7.3. Category 7.4. Description
8. When user clicks on an item in the items list for a category or department, the system displays the item details screen
9. Departments and categories are listed in alphabetical order in each row, from left to right and top to bottom
10. The cell in the top left corner of the matrix always represents a generic item in the selected
department (e.g. a generic appliance when viewing the categories in the appliance department) and is automatically generated by the system
11. The cell to the right of the top left corner of the matrix always represents under $5 items in the selected department and is automatically generated by the system
3.1.7. Post-Condition(s):
None
3.1.8. Open Issues:
None
3.1.9. Extension Points:
None
3.1.10. Activity Diagram(s):
None
3.1.11. Notes:
See the View Inventory user interface requirements.
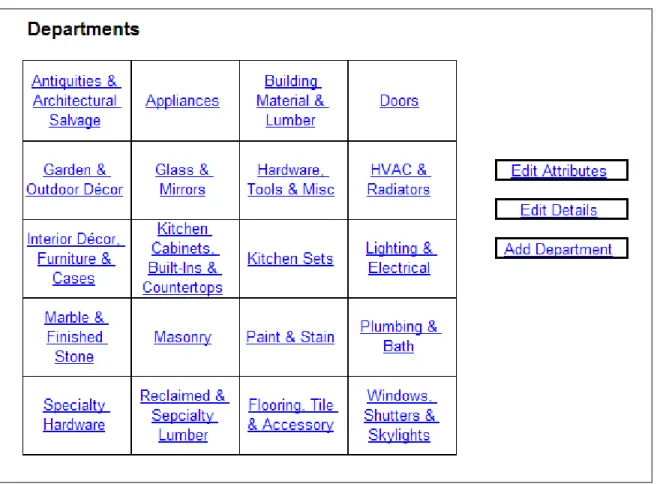
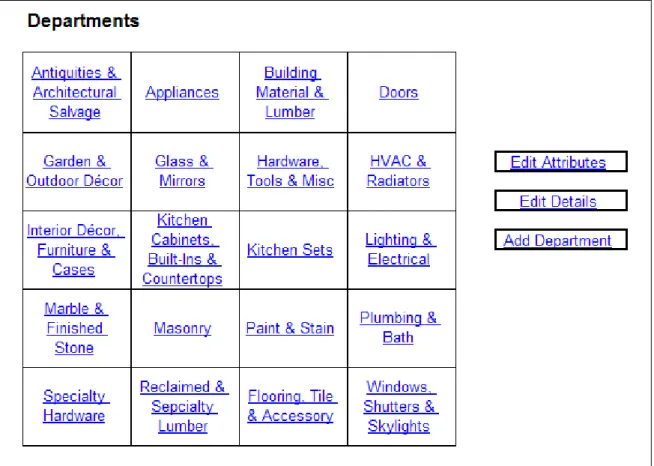
3.2. Manage Departments
The system should allow inventory administrators to customize the inventory structure by defining the inventory departments (not to be confused actual retail floor departments known later in this document as stocking locations).
3.2.1. Actor(s):
Administrator
3.2.2. Assumptions, Pre-Conditions & Triggers:
1. User is logged into the system
3.2.3. Use Case Dependencies
1. View Inventory
3.2.4. Basic Flows:
1. Add Department
1.1. User accesses the main inventory screen 1.2. System displays the Add Department button
1.3. User clicks the Add Department button 1.4. User enters the Department data 1.5. System validates the Department data
1.6. System adds the new Department to the inventory 1.7. User is taken back to the main inventory screen
2. Edit Department
2.1. User navigates to a Department (see View Inventory) 2.2. System displays the Edit Department button
2.3. User clicks the Edit Department button 2.4. System displays the Department data 2.5. User edits Department data
2.6. System validates the Department data 2.7. System updates the Department information 2.8. User is taken back to the Department screen
3. Delete Department
3.1. User navigates to a Department (see View Inventory) 3.2. System displays the Edit Department button
3.3. User clicks the Edit Department button 3.4. System displays the Department data 3.5. User clicks the Delete Department button 3.6. System validates the Department deletion
3.7. System removes the Department from the inventory 3.8. User is taken back to the main inventory screen
3.2.5. Alternative Flows:
1. Add Department
1.1. User cancels the Department add and is taken back to the main inventory screen
1.2. During data validation, data is deemed invalid and an error message is presented to the user
2. Edit Department
2.1. User cancels the Department edit and is taken back to the main inventory screen
2.2. During data validation, data is deemed invalid and an error message is presented to the user
3. Delete Department
3.1. User cancels the Department deletion and is taken back to the Department screen
3.2. During deletion validation, deletion is deemed invalid and an error message is presented to the user
3.2.6. Business Rules:
1. Add Department
1.1. The following fields are mandatory: 1.1.1. Name
1.1.2. POS Department Code 1.1.3. Unique Tag
1.2. The Department Name must be unique across the inventory 1.3. The Department‟s Unique Tag must be unique across the inventory 1.4. The POS Department Code must be at most 3 characters long 1.5. The Unique Tag must be at most 18 characters long
1.6. There must be at least one slot available in the Department matrix to hold the new Department
2. Edit Department
2.1. The following fields are mandatory: 2.1.1. Name
2.1.2. Unique Tag
2.2. The Department Name must be unique across the inventory 2.3. The Department‟s Unique Tag must be unique across the inventory 2.4. The Unique Tag must be at most 18 characters long
3. Delete Department
3.1. A Department cannot be deleted if it contains categories and/or items 3.2. The system must ask for confirmation before deleting a Department
3.2.7. Post-Condition(s):
1. Add Department
1.1. The new Department is added
2. Edit Department
2.1. The Department is updated
3. Delete Department
3.1. The Department is deleted
3.2.8. Open Issues:
None
3.2.9. Extension Points:
None
3.2.10. Activity Diagram(s):
None
3.2.11. Notes:
See the Manage Departments user interface requirements.
3.3. Manage Categories
The system should allow inventory administrators to customize the inventory structure by defining the inventory departments and categories.
3.3.1. Actor(s):
Administrator
3.3.2. Assumptions, Pre-Conditions & Triggers:
1. User is logged into the system
3.3.3. Use Case Dependencies
1. View Inventory
3.3.4. Basic Flows:
1. Add Category
1.1. User navigates to a Department or Category (see View Inventory) 1.2. System displays the Add Category buttons
1.2.1. Unique Item 1.2.2. Stock Item
1.3. User clicks the desired Add Category button
1.4. System displays the appropriate screen for the Category type 1.4.1. Unique Item
1.4.2. Stock Item
1.5. User enters Category data
1.6. System validates the Category data
1.7. System adds the new Category to the inventory
1.8. User is taken back to the parent Department or Category of the added Category
2. Edit Category
2.1. User navigates to a Category (see View Inventory) 2.2. System displays the Edit Category button
2.3. User clicks the Edit Category button
2.4. System displays the appropriate screen for the Category type 2.4.1. Unique Item
2.4.2. Stock Item
2.5. User edits Category data
2.6. System validates the Category data 2.7. System updates the Category information 2.8. User is taken back to the Category screen
3. Delete Category
3.1. User navigates to a Category (see View Inventory) 3.2. System displays the Edit Category button
3.3. User clicks the Edit Category button
3.4. System displays the appropriate screen for the Category type 3.4.1. Unique Item
3.4.2. Stock Item
3.5. User clicks the Delete Category button 3.6. System validates the Category deletion
3.7. System removes the Category from the inventory
3.8. User is taken back to the parent Department or Category of the deleted Category
4. Move Categories
4.1. User navigates to a Department or Category (see View Inventory) 4.2. System displays the Move Categories button
4.3. User clicks the Move Categories button 4.4. System displays the Move Categories screen 4.5. User selects Categories to move
4.6. User selects target location on categorized inventory for the moved Categories 4.6.1. User may select an existing Department or Category
4.6.2. User may choose to create a new Category to hold the moved Categories
4.6.2.1. In this case, user selects the parent Department or Category of the new Category to be created
4.6.2.2. User enters the new Category data 4.7. User selects the type of move to be performed
4.7.1. Move selected categories as-is and make them children of the target Department or Category
4.7.2. Merge the contents (items) of the selected categories and add them to the target Department or Category
4.8. System validates the entered data 4.9. System moves the selected Categories
4.10. User is taken back to the parent Department or Category of the moved Categories
3.3.5. Alternative Flows:
1. Add Category
1.1. User cancels the Category add and is taken back to parent Department or Category
1.2. During data validation, data is deemed invalid and an error message is presented to the user
2. Edit Category
2.1. User cancels the Category edit and is taken back to Category screen
2.2. During data validation, data is deemed invalid and an error message is presented to the user
3. Delete Category
3.1. User cancels the Category deletion and is taken back to the Category screen
3.2. During deletion validation, deletion is deemed invalid and an error message is presented to the user
4. Move Categories
4.1. User cancels the Category move and is taken back to the parent Department or Category screen 4.2. During move validation, move is deemed invalid and an error message is presented to the user
3.3.6. Business Rules:
1. Add Category
1.1. The following fields are mandatory: 1.1.1. Unique Item Category
1.1.1.1. Name 1.1.1.2. Unique Tag 1.1.2. Stock Item Category
1.1.2.1. Name 1.1.2.2. Unique Tag 1.1.2.3. Price
1.2. The Category Name must be unique across the inventory 1.3. The Category‟s Unique Tag must be unique across the inventory 1.4. The Unique Tag must be at most 18 characters long
1.5. There must be at least one slot available in the Category matrix at the level the new Category will be created to hold the new Category
1.6. The available options in the Material, Finish, Color and Features selectors should be the ones defined for the selected department (see Manage Attributes and Details)
1.7. The fields and available options under the Details section should be the ones defined for the selected category (see Manage Attributes and Details)
1.8. When a Stock Item Category is created, a corresponding item is added to QuickBooks POS 1.8.1. The ID of the item in POS is set to the Category‟s Unique Tag
1.8.2. The initial item quantity in POS is set to zero
2. Edit Category
2.1. The following fields are mandatory: 2.1.1. Unique Item Category
2.1.1.1. Name 2.1.1.2. Unique Tag 2.1.2. Stock Item Category
2.1.2.1. Name 2.1.2.2. Unique Tag
2.1.2.3. Price
2.2. The Category Name must be unique across the inventory 2.3. The Category‟s Unique Tag must be unique across the inventory 2.4. The Unique Tag must be at most 18 characters long
2.5. The available options in the Material, Finish, Color and Features selectors should be the ones defined for the selected department (see Manage Attributes and Details)
2.6. The fields and available options under the Details section should be the ones defined for the selected category (see Manage Attributes and Details)
2.7. When a Stock Item Category is updated, the corresponding item is updated in QuickBooks POS 2.7.1. The ID of the item in POS is set to the Category‟s Unique Tag
2.7.2. The initial item quantity in POS is set to zero
2.8. Generic categories and Under $5 item categories are generated automatically by the system and cannot be modified
3. Delete Category
3.1. When a Category is deleted, all of its items should be moved to the parent category 3.2. The system must ask for confirmation before deleting a Category
3.3. Generic item categories and Under $5 item categories are generated automatically by the system and cannot be deleted
4. Move Categories
4.1. The Categories to Move selector is populated with the categories seen on the matrix at the level where the Move Categories button was pressed.
4.2. User must select at least one Category to move
4.3. User must select either an existing or new target Department or Category
4.4. User cannot move categories to any Departments or Categories that don‟t have enough slots available in the matrix to hold the moved categories
4.5. User cannot move categories to any of their subcategories (cannot create loops in the inventory hierarchy)
4.6. If a new target Category is selected 4.6.1. User must enter
4.6.1.1. Name 4.6.1.2. Unique Tag
4.6.1.3. Parent Department or Category of the new Category 4.6.2. The Category is created as a Unique Item Category
4.7. User cannot select a Stock Item, Under $5 Category or Generic Category as the target Category 4.8. When a Category is moved it keeps its assigned Item Details
4.9. When the option to merge the contents of the selected Categories is selected, the Item Details assigned to the selected Categories are combined and assigned to the target Department or Category
4.10. When the option to merge the contents of the selected Categories is selected, the moved items must be updated in QuickBooks POS
3.3.7. Post-Condition(s):
1. Add Category
1.1. The new Category is added
2. Edit Category
2.1. The Category is updated
3. Delete Category
3.1. The Category is deleted
4. Move Categories
4.2. If the „move categories and make them children‟ option is selected, the selected Categories are moved to the selected target location
4.3. If the „merge contents of selected categories‟ option is selected, the contents of the selected Categories are moved to the selected target location
3.3.8. Open Issues:
None
3.3.9. Extension Points:
None
3.3.10. Activity Diagram(s):
None
3.3.11. Notes:
See the Manage Categories user interface requirements.
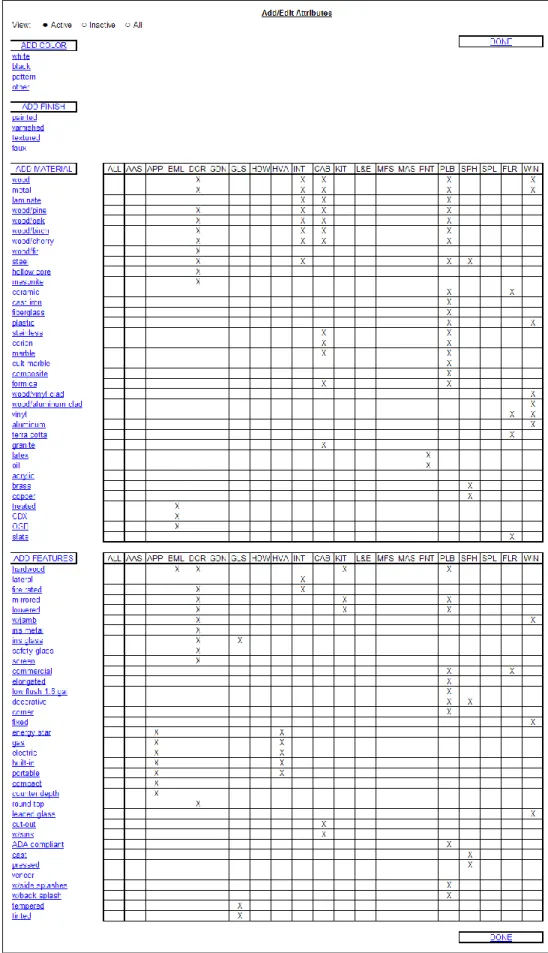
3.4. Manage Attributes and Details
The system should allow inventory administrators to customize the attributes and details available for each inventory item. Attributes can be defined for each department, and details can be defined for each department and/or category
3.4.1. Actor(s):
Administrator
3.4.2. Assumptions, Pre-Conditions & Triggers:
1. User is logged into the system
3.4.3. Use Case Dependencies
1. View Inventory
3.4.4. Basic Flows:
1. View Item Attributes
1.1. User accesses the main inventory screen 1.2. System displays the Edit Attributes button 1.3. User clicks the Edit Attributes button
1.4. System displays the Edit Attributes screen which displays all existing item attributes and their attribute x department assignments
1.5. Optionally, user filters view by attribute status (active, inactive, all) 1.6. User clicks the Done button
1.7. User is taken back to the main inventory screen
2. View Item Details
2.1. User accesses the main inventory screen 2.2. System displays the Edit Details button 2.3. User clicks the Edit Details button
2.4. System displays the Edit Details screen which displays all existing item details and their detail x department and category assignments
2.5. Optionally, user filters view by detail status (active, inactive, all) 2.6. User clicks the Done button
2.7. User is taken back to the main inventory screen
3. Edit Item Attributes
3.1. User accesses the main inventory screen 3.2. System displays the Edit Attributes button 3.3. User clicks the Edit Attributes button
3.4. System displays the Edit Attributes screen which displays all existing item attributes and their attribute x department assignments
3.5. Optionally, user filters view by attribute status (active, inactive, all) 3.6. User edits attributes
3.6.1. User changes attribute x department assignments 3.6.2. User changes attribute data
3.6.3. User changes attribute active x inactive status 3.6.4. User creates new attribute
3.6.5. System validates the attribute data
3.6.6. System updates the Item Attribute information 3.7. User clicks the Done button
3.8. User is taken back to the main inventory screen
4. Edit Item Details
4.1. User accesses the main inventory screen 4.2. System displays the Edit Details button 4.3. User clicks the Edit Details button
4.4. System displays the Edit Details screen which displays all existing item details and their detail x department and category assignments
4.5. Optionally, user filters view by detail status (active, inactive, all) 4.6. User edits details
4.6.1. User changes detail x department or category assignments 4.6.2. User changes detail data
4.6.3. User changes detail active x inactive status 4.6.4. User creates new detail
4.6.5. System validates the detail data
4.6.6. System updates the Item detail information 4.7. User clicks the Done button
4.8. User is taken back to the main inventory screen
3.4.5. Alternative Flows:
1. View Item Attributes None
2. View Item Details None
3. Edit Item Attributes
3.1. User cancels the Item Attribute edit and is taken back to the main inventory screen
3.2. During data validation, data is deemed invalid and an error message is presented to the user
4. Edit Item Details
4.1. User cancels the Item Detail edit and is taken back to the main inventory screen
3.4.6. Business Rules:
1. View Item Attributes None
2. View Item Details None
3. Edit Item Attributes
3.1. The following fields are mandatory: 3.1.1. Name
3.2. The Item Attribute Name must be unique across the inventory
3.3. The De-Activate Attribute button is replaced with an Activate Attribute button when the attribute is inactive
3.4. Material and Features attributes can be assigned to any combination of departments 3.5. Material and Features attributes can be assigned to „All‟ departments
3.6. Color and Finish attributes can only be set to „All‟ departments
3.7. An Attribute cannot be set simultaneously to „All‟ departments and to specific department(s) 3.7.1. Assigning an attribute to „All‟ departments disables the individual department selectors, but
preserves the current department selections
3.7.2. Un-assigning an attribute from the „All‟ departments enables the individual department selectors, restoring the previous department selections
4. Edit Item Details
4.1. The available detail types are: 4.1.1. Number
4.1.2. Text 4.1.3. Selection
4.2. The following fields are mandatory: 4.2.1. Name
4.2.2. Type
4.3. If the Type is set to „Selection‟, then the selection list must contain at least one item 4.4. The Item Detail Name must be unique across the inventory
4.5. The De-Activate Detail button is replaced with an Activate Detail button when the detail is inactive 4.6. Details can be assigned to any combination of departments and categories
4.7. Details can be assigned to „All‟ departments and/or categories
4.8. Assigning a detail to a department or category automatically assigns it to its subcategories 4.8.1. Assignments automatically made by the system can be changed by the user
3.4.7. Post-Condition(s):
1. View Item Attributes None
2. View Item Details None
3. Edit Item Attributes
3.1. The Item Attributes are updated
4. Edit Item Details
4.1. The Item Details are updated
3.4.8. Open Issues:
3.4.9. Extension Points:
None
3.4.10. Activity Diagram(s):
None
3.4.11. Notes:
See the Manage Attributes and Details user interface requirements.
3.5. Add Item to Inventory
Items are typically added to the inventory as part of the donation processes. This is called adding an item in donation processing. Alternatively, items can be added during routine inventory maintenance. This is called adding an item in inventory management mode.
3.5.1. Actor(s):
Administrator Director Manager
Receiving Associate Pickup Associate Decon Associate
Customer Service Representative
3.5.2. Assumptions, Pre-Conditions & Triggers:
1. User is logged into the system
3.5.3. Use Case Dependencies
1. View Inventory
2. Suggest Item Price
3. Manage Attributes and Details
4. Receive Acquisition
3.5.4. Basic Flows:
1. User accesses the main inventory screen
5. The screen displays all inventory departments in matrix format (see View Inventory) 2. User drills down to the appropriate category for the item
2.1. If in donation processing mode, the item entry screen is presented automatically
2.2. If in inventory management mode, the list of existing inventory items in that category is displayed 2.2.1. User clicks the Add Item button
3. The appropriate item entry screen is presented 4. User fills in item information
5. User confirms the addition of the new item 6. Inventory is updated
7. System gives the option of printing an item tag 8. User prints item tag(s)s for unique or stock item(s) 9. User attaches tag(s) to the item(s)
3.5.5. Alternative Flows:
1. At any point, the user may click on a department on the inventory department shortcuts list, which takes the user to the inventory view for that particular department.
2. At any point while in the item add screen, the user may cancel the operation.
3.5.6. Business Rules:
1. When navigating to the desired item category, departments and categories are displayed according to the rules defined in View Inventory
2. Items can be added at any level in the categorized inventory 3. Only unique and stock items are tracked by the inventory system
3.1. Only unique and stock items are available to be added in inventory management mode 3.2. Under $5 items can only be added in donation processing mode
3.2.1. Information about Under $5 items is only added for the purpose of generating the donation receipt
4. When an item is added to the inventory, the system updates QuickBooks POS accordingly and promptly
4.1. A new item entry is created in POS for a unique item
4.2. The item category name in POS is set to XXXXXXXXXXXXXXXXXX-NNNNNNNNNNN, where XXXXXXXXXXXXXXXXXX is the category‟s Unique Tag and NNNNNNNNNNN is a sequential, system–generated number
4.3. The item quantity is updated for a stock item 5. Mandatory fields:
5.1. Unique items 5.1.1. Quantity 5.1.2. Condition 5.1.3. Price
5.1.4. Description, if the selected category is a generic category 5.2. Stock items
5.2.1. None – all fields are pre-set and cannot be modified 5.3. Under $5 items
5.3.1. Description
6. The Category field is a link to the inventory matrix view, which allows you to select a new category by drilling down to any existing category
7. The available options in the Material, Finish, Color and Features selectors should be the ones defined for the selected department (see Manage Attributes and Details)
8. The fields and available options under the Details section should be the ones defined for the selected category (see Manage Attributes and Details)
9. For Stock Items, all fields are pre-set and disabled, and cannot be changed
10. For Unique Items, all fields with values defined when the Unique Item category was created are pre-set and cannot be changed
11. For unique and stock items, the system makes pricing recommendations to the user on the item entry screen (see Suggest Item Price)
11.1. For unique items, user can accept the suggested price, enter a different one, or leave it blank
11.1.1. The item price can only be left blank during the processing of an acquisition. The price has to be set before the item can be added to the inventory
11.2. For stock items, the price is pre-set and the user cannot change it
12. Receiving Associates and Pickup and Decon Associates can only add items to the inventory as part of processing a donation (see Receive Acquisition)
13. Pickup and Decon Associates can access the screen and enter all item information, but they cannot complete the add operation and add the item into the inventory.
14. The item tag, which could be an RFID tag, should contain the following information: 14.1. CJ logo
14.2. Department name 14.3. Category name
14.4. Item description 14.5. Condition 14.6. Size (with units)
14.7. Price (with indication if item is being sold on consignment) 14.8. Item number and bar code
14.9. Acquisition number 14.10. Date received
3.5.7. Post-Condition(s):
1. Item is present in the Inventory Management System 2. Unique and stock items have item tags
3. In the case of a unique item, item is added to QuickBooks POS
4. In the case of a stock item, item quantity is updated in QuickBooks POS
3.5.8. Open Issues:
None
3.5.9. Extension Points:
None
3.5.10. Activity Diagram(s):
None
3.5.11. Notes:
See the Add Item to Inventory user interface requirements.
3.6. Manage Inventory Items
The system should allow various management actions to be performed on items existing in the inventory. These include modifying, deleting and splitting an item, and viewing the item‟s details and item history. These actions are only available for Unique and Stock items.
3.6.1. Actor(s):
Administrator Director Manager
3.6.2. Assumptions, Pre-Conditions & Triggers:
1. User is logged into the system
3.6.3. Use Case Dependencies
1. View Inventory
2. Add Item to Inventory
3. Suggest Item Price
3.6.4. Basic Flows:
1.1. User accesses the main inventory screen
1.2. The screen displays all inventory departments in matrix format with option to select and/or edit items to move them to a new department/category
1.3. User drills down to the desired existing inventory item (see View Inventory) 1.4. The item detail screen is presented
1.5. User modifies item information 1.6. The system validates item information 1.7. Item information is updated in the inventory
1.8. System gives the option of re-printing then item tag
1.9. User optionally re-prints the item tag and attaches it to the item
2. Adjust Item Quantity
2.1. User accesses the main inventory screen
2.2. The screen displays all inventory departments in matrix format
2.3. User drills down to the desired existing inventory item (see View Inventory) 2.4. The item detail screen is presented
2.5. User changes the item quantity
2.6. The system displays a confirmation screen where a reason for the adjustment must be specified by the user
2.7. The system validates the item change 2.8. Item information is updated in the inventory
3. Split Inventory Item
3.1. User accesses the main inventory screen
3.2. The screen displays all inventory departments in matrix format
3.3. User drills down to the desired existing inventory item (see View Inventory) 3.4. The item detail screen is presented
3.5. User clicks the Split Item button
3.6. The system displays the Item Split screen
3.7. User builds the list of items that the original item will be split into
3.7.1. User can clone the original item to add new item(s) to the list that have similar attributes as the original item
3.7.2. User can add new items to the list by selecting Unique and Stock categories in the same way as adding a new item to the inventory (see Add Item to Inventory)
3.8. Once the list is complete, user confirms the split 3.9. The system validates the split
3.10. Item information is updated in the inventory 3.10.1. The original (split) item is updated in the inventory
3.10.2. Any new items that were added to the split list are added to the inventory maintaining parental history
4. View Inventory Item History
4.1. User accesses the main inventory screen
4.2. The screen displays all inventory departments in matrix format
4.3. User drills down to the desired existing inventory item (see View Inventory) 4.4. The item detail screen is presented
4.5. User clicks the Item History button
4.6. The system displays the Item History screen containing current and historical information about the inventory item
3.6.5. Alternative Flows:
1. Modify Inventory Item
1.1. User cancels the operation and is taken back to the item selection screen
2. Adjust Item Quantity
2.1. User cancels the operation and is taken back to the item selection screen
2.2. During data validation, data is deemed invalid and an error message is presented to the user
3. Split Inventory Item
3.1. User cancels the operation and is taken back to the item selection screen
3.2. During data validation, data is deemed invalid and an error message is presented to the user
4. View Inventory Item History None
3.6.6. Business Rules:
1. Modify Inventory Item
1.1. All item properties available when the item was originally added to the inventory can be modified, except for the system-generated item number (see Add Item to Inventory).
1.2. The business rules defined for adding a new item into the inventory are also applicable to modifying an existing inventory item (see Add Item to Inventory).
1.3. Once set for the first time in the inventory, the item price can only be modified by a Manager, Director or Administrator, must maintain a history and include an explanation for the price change
1.4. Changes to the item in the inventory should be reflected in the corresponding item in QuickBooks POS
2. Adjust Item Quantity
2.1. When an item is updated, the system must automatically detect that the item quantity has been modified and present the adjustment confirmation screen
2.2. If the quantity is decreased, a reason for the change is required 2.2.1. Valid reasons for are:
2.2.1.1. Scraped
2.2.1.2. Given Away (free bin) 2.2.1.3. Discarded
2.2.1.4. Broken
2.2.1.5. Shrinkage (stolen or lost) 2.2.1.6. Correction (data entry mistake) 2.2.1.7. Other (please explain)
2.2.2. If the „Other‟ reason is selected, the user must enter an additional comment
2.3. If the quantity is increased, the user must enter a comment describing the reason for the change 2.4. Changes to an item‟s quantity in the inventory should be reflected in the corresponding item in
QuickBooks POS
3. Split Inventory Item
3.1. When building the split item list, at least two items must exist in the list, including the original item 3.2. When building the split item list, the business rules defined for adding a new item into the
inventory are also applicable (see Add Item to Inventory).
3.3. Clicking the Clone button on a row adds a new item row with the same item values as the original, except for the item number, which is left blank
3.4. Clicking the Add Item button takes the user through the inventory matrix so that a category can be selected for the new item. The user is then taken to the View/Update Item screen
3.5. Clicking the category name for an item takes the user to the View/Update Item screen for that item
3.6. All items in the split item list are saved in the inventory when the user confirms the split 3.6.1. The original item is updated
3.6.2. The new items are added to the inventory
3.6.3. New items added to the inventory as part of a split item operation contain a reference to the original item they were split from
4. View Inventory Item History
4.1. The system should record the following actions and associated parameters for every item in the inventory and display them on the item history screen, along with action date/time:
4.1.1. Item added to inventory: Initial quantity, user and original (parent) item number if this item was created as part of a split
4.1.2. Item price set: Initial price and user 4.1.3. Item price changed: New price and user 4.1.4. Item sold: Sale price and quantity
4.1.5. Quantity adjusted: Adjusted quantity, user and reason if quantity decreased 4.1.6. Item split: Item numbers of the new items added as part of the split and user
3.6.7. Post-Condition(s):
1. Modify Inventory Item
1.1. Item is updated in the inventory 1.2. Item is updated in QuickBooks POS
2. Adjust Item Quantity
2.1. Item is updated in the inventory 2.2. Item is updated in QuickBooks POS
3. Split Inventory Item
3.1. Original item is updated in the inventory 3.2. Original item is updated in QuickBooks POS 3.3. New items are updated in the inventory 3.4. New items are updated in QuickBooks POS
4. View Inventory Item History None
3.6.8. Open Issues:
None
3.6.9. Extension Points:
None
3.6.10. Activity Diagram(s):
None
3.6.11. Notes:
See the Manage Inventory Items user interface requirements.
3.7. Suggest Item Price
The system should assist in the task of pricing a new inventory item by making pricing suggestions to the user when adding to or modifying an item in the inventory. The suggested prices should be calculated based on the original and sale prices of similar items that currently exist or existed in the inventory in the past.
3.7.1. Actor(s):
Administrator Director Manager
Customer Service Representative Receiving Associate
Pickup Associate Decon Associate
3.7.2. Assumptions, Pre-Conditions & Triggers:
1. User is logged into the system
3.7.3. Use Case Dependencies
1. Add Item to Inventory
2. Manage Inventory Items
3.7.4. Basic Flows:
1. User accesses the inventory entry screen (see Add Item to Inventory, Manage Inventory Items) 2. System shows price recommendations based on current item data and default price suggestion
configuration options 3. User modifies item data
4. System makes new price suggestions based on new item data
3.7.5. Alternative Flows:
1. User changes price suggestion configuration options
2. System shows new price recommendations based on current item data and new configuration options
3.7.6. Business Rules:
1. Price suggestion is only applicable to Unique items
2. By default, price suggestion considers historical data for items of the same: 2.1. Department
2.2. Category 2.3. Condition
3. The following price suggestion configuration parameters are available:
3.1. Number of months of historical price information to include when calculating price recommendations. Available options:
3.1.1. Six Months 3.1.2. Twelve Months
3.1.3. All (include all historical pricing data with no time restriction)
3.2. Whether or not to include item attributes when finding items of similar characteristics
3.2.1. When user chooses to include item attributes for item matching, user can specify which attributes to consider
4. System displays the following price recommendation information: 4.1. For unique items:
4.1.1. Historical original item price information: 4.1.1.1. Lowest price
4.1.1.2. Mean price 4.1.1.3. Highest price 4.1.2. Historical sale price information
4.1.2.1. Lowest price 4.1.2.2. Mean price 4.1.2.3. Highest price
4.1.3. Number of items evaluated when calculating the amounts above 5. For stock items
5.1.1. System shows the pre-determined price for this stock item, set when the stock item category was created
3.7.7. Post-Condition(s):
1. Price suggestion information is displayed on the screen
3.7.8. Open Issues:
None
3.7.9. Extension Points:
None
3.7.10. Activity Diagram(s):
None
3.7.11. Notes:
None
3.8. View Acquisitions
Acquisition records for Drop-Off, Pickup and Decon donations are created in the CRM system. Inventory Management users should be able to view all past and current acquisitions. Receiving Associates use this function to locate an expected acquisition when receiving a donation at the loading dock. Pickup and Decon crews may also use this function to initiate the process of receiving items while in the truck, on their way to the receiving dock.
Drop Off acquisitions are not typically pre-scheduled as Pick Up and Decon acquisitions except for those submitted through the organizational website. As such, when a donor arrives with an unexpected drop off donation, a new acquisition needs to be able to be created in the CRM system first, at either the customer service desk or at the dock, before it can be viewed in the acquisitions screen.
3.8.1. Actor(s):
Administrator Director Manager
Customer Service Representative Receiving Associate
Pick Up Associate Decon Associate
3.8.2. Assumptions, Pre-Conditions & Triggers:
1. User is logged into the system
3.8.3. Use Case Dependencies
3.8.4. Basic Flows:
1. User accesses the acquisitions screen
2. The screen displays a list of all acquisitions, latest ones at the top of the list
3. User may optionally filter the acquisitions displayed on the screen by changing filtering options 4. User clicks on an acquisition record
5. System display the details for that acquisition, including expected items
3.8.5. Alternative Flows:
1. Drop Off acquisitions
1.1. User may alternatively click the New Drop Off button on the acquisition list screen which redirects the user to the CRM acquisition creation screen
1.2. User creates new Drop Off acquisition in the CRM system
1.3. User returns to the acquisitions screen and sees the newly created Drop Off acquisition 2. User can use a bar code scanner to scan the acquisition ticket generated at customer service
3.8.6. Business Rules:
1. The acquisitions screen should display: 1.1. Acquisition Number
1.2. Type
1.2.1. Drop Off 1.2.2. Pick Up 1.2.3. Decon
1.2.4. Donor Name with Zip Code 1.2.5. Primary Contact Name
1.2.6. Primary Contact Phone Number 1.2.7. Start Date
1.2.8. End Date 1.2.9. Status
1.2.9.1. Expected
1.2.9.2. Partially Received 1.2.9.3. Completed
2. Users should be able to filter (on multiple fields simultaneously ) acquisitions by: 2.1. Type
2.2. Donor and Primary Contact Name 2.3. Acquisition Number
2.4. Primary Contact Phone Number 2.5. Status
3. User should be able to sort the acquisition list by any of its columns 4. The default sorting is by descending order of acquisition End Date
5. Changes to acquisition information in CRM should be immediately visible in the Inventory Management System.
6. Changes to acquisition information in the Inventory Management System should be immediately visible in CRM.
7. CRM should allow the creation of a Drop Off acquisition where only a Zip Code and Donation Location Type or Donor Type are provided.
8. All acquisitions are created in CRM.
9. The system should provide a link from the acquisitions view in the Inventory Management System to the acquisition creation screen in CRM for easy access.
10. Inventory Management users should be granted permission to create new Drop Off acquisitions in CRM in order to access that functionality.
3.8.7. Post-Condition(s):
3.8.8. Open Issues:
None
3.8.9. Extension Points:
None
3.8.10. Activity Diagram(s):
None
3.8.11. Notes:
See the View Acquisitions user interface requirements.
3.9. Receive Acquisition
A donor in possession of a valid acquisition number can proceed to the receiving dock where the items to be donated will be received and processed, and a donation receipt will be generated. Alternatively, a donor may go directly to the receiving dock, in which case a new acquisition is created by the Receiving Associate before items can be received and processed.
The screens used for the acquisition process should simplify and expedite the data entry process, allowing the Receiving Associate to enter only the information needed to generate the donation receipt. Additional attributes needed to complete the item information and effectively add the item to the inventory can be added at a second step, after the receipt has been printed and the donor has been served. The Receiving Associate can print temporary acquisition labels for items that require further processing.
Pick Up and Decon crews may also initiate the receiving process, entering as much detailed information about the donated items as desired, and generating a donation receipt. They cannot, however, add items to the inventory or complete the acquisition process. A Receiving Associate is required to review all the acquisition information before those actions can take place.
3.9.1. Actor(s):
Donor / Primary Contact Administrator
Director Manager
Customer Service Representative Receiving Associate
Pick Up Associate Decon Associate
3.9.2. Assumptions, Pre-Conditions & Triggers:
1. An acquisition has been created for this donation in CRM and exists in the system in the Expected state.
3.9.3. Use Case Dependencies
1. View Acquisitions
3.9.4. Basic Flows:
1. Donor or Primary Contact arrives at receiving dock with a valid donation number 2. Receiving Associate locates donation request in the system (see View Acquisitions) 3. System displays donation request information
4. Receiving Associate enters information about each donated item into the donation request (see Add Item to Inventory)
4.1. A new item can be added to the list by cloning an existing item 4.2. A new item can be added by clicking the Add Item button 4.3. An item can be removed by setting the received quantity to zero 5. Receiving Associate prints a donation receipt
6. Receiving Associate optionally writes information to the receipt by hand such as condition 7. Donation receipt is given to the Donor or Primary Contact
8. Receiving Associate prints item tags for unique and stock items (see Add Item to Inventory) 9. Receiving Associate attaches printed tags to corresponding items
10. Receiving Associate closes donation request
3.9.5. Alternative Flows:
1. Items can be set aside for further processing
1.1. In this case, the Receiving Associate can alternatively tags displaying the donation number and donor information.
1.2. The acquisition is left in the Partially Received state until processing is completed at a later time
3.9.6. Business Rules:
1. Donation receipt information: 1.1. Donation date
1.2. List of donated items 1.2.1. Description 1.2.2. Quantity Received 1.2.3. Condition
1.3. Name of Construction Junction representative 1.4. Signature of Construction Junction representative 1.5. Construction Junction contact information
1.6. Tax deduction information text
2. Buttons and shortcuts should be easy to click on a touch screen workstation. Extra spacing between rows should be added if necessary.
3. The donation item name initially displayed on each item row is the donation item name in the CRM acquisition record.
4. The Pickup and Decon crews can change anything on this screen and also in the item detail screen, but can't complete the acquisition or add items to the inventory (buttons are disabled)
5. The Email Receipt button takes you to the Email Receipt screen
6. The email receipt screen shows all email addresses associated with the Acquisition in CRM 6.1. One or more can be selected to receive the email receipt
6.2. If no emails are available, they need to be added in CRM 7. The system must record every time a receipt is printed or emailed
8. Selecting a stock category takes you back to the acquisition screen , not to the items details page 9. Selecting an under $5 category prompts for a description and also takes you back to the acquisition
screen
10. Condition is optional. If left blank, the donor may write it manually on the receipt
11. Clicking add item takes you directly to the inventory matrix so that the item category can be selected, then to the item details screen
12. Adding an item here also adds a record to the Acquisition in CRM (shared entities)
13. Updating an item here updates the inventory fields on the Acquisition record in CRM (shared entities) 14. Completing the acquisition freezes the record in both CRM and the Inventory Management System 15. The system should record the total amount of time taken to process each acquisition
16. The original CRM acquisition data must be kept, not overridden by the values entered here
3.9.7. Post-Condition(s):
1. Donated items are present in the Inventory Management System 2. Unique and stock items have item tags
3. Unique items are added to POS
4. Quantities for stock items are updated in POS 5. Donor has donation receipt
6. Donation request in the system has a status of Processed
3.9.8. Open Issues:
None
3.9.9. Extension Points:
None
3.9.10. Activity Diagram(s):
None
3.9.11. Notes:
See the Receive Acquisition user interface requirements.
3.10. Sell Item
Any item in the inventory may be purchased by a Construction Junction customer. The sale of the item is processed by QuickBooks POS and the inventory must be updated accordingly.
3.10.1. Actor(s):
Buyer
Sales Associate
Customer Service Representative
3.10.2. Assumptions, Pre-Conditions & Triggers:
1. The item being purchased has been previously added to the inventory.
3.10.3. Use Case Dependencies
1. Add Item to Inventory
3.10.4. Basic Flows:
1. Buyer arrives at the cashier or checkout desk with the items to be purchased 2. Sales associate scans the item tags
3. Sales associate processes the sale of the items in QuickBooks POS 4. The system updates the inventory to reflect the sale
3.10.5. Alternative Flows:
1. Certain items sold in QuickBooks POS may not exist in the inventory (under $5 items, for instance). The system must be able to recognize that situation and bypass the inventory update.
3.10.6. Business Rules:
1. After a sale in QuickBooks POS, the following item attributes must be updated in the inventory: 1.1. Sale price
1.2. Quantity on hand
2. The sale price must not override the original item price in the inventory
3. The item quantity on hand in the inventory must be decremented by the quantity sold
3.10.7. Post-Condition(s):
1. Inventory is updated to reflect the sale
3.10.8. Open Issues:
None
3.10.9. Extension Points:
None
3.10.10.
Activity Diagram(s):
None
3.10.11.
Notes:
None
3.11. Reports
The application will provide a reporting mechanism that, at a minimum, allows Construction Junction to review and report by inventory, inventory type, donor contact information, and the ability to link inventory to individual that donated it.
The system should be able to generate reports based on the following entities, including reports that correlate them:
Inventory items Inventory departments Inventory categories Acquisitions
Donors
The following are examples of reports that the system is expected to be able to generate:
Current status of inventory
o Item counts, value and volume by department, category, acquisition type, donor, donor location, donor type on hand, by date range and date range comparison
Inventory changes
o New item counts, value and volume by date range/comparison and by department, category, acquisition type, donor, donor location, donor type
o Item sale counts, value and volume by date range/comparison and by department, category, acquisition type, donor, donor location, donor type
o Deleted inventory items by date period, user
o Item price adjustments by date period, user
Acquisitions
o Current partially received acquisitions
o Number, value and volume of acquisitions processed by date range/comparison and by donation type, donor, donor location, donor type, receiving associate
o Processing time by date range and by donation type, donor, donor location, donor type, receiving associate
o Acquisition items entered as generic items by donation type, donor, donor location, donor type, receiving associate
The system should allow the Construction Junction Staff to create new reports whenever required to satisfy their changing operational and business needs.
4. High-Level Functional Requirements
This section contains high-level requirements for systems functions identified during the inception phase as being medium and low priority items.
4.1. Medium Priority
4.1.1.
Website Integration
– The system should integrate with Construction Junction‟s website and allow, in addition to capacity outlined in later sections, the ability for customers to view and search CJ‟s inventory online. The item search can be done in two ways:The user may „drill down‟ to a particular category using the hierarchical inventory view displayed on the website.
The user may perform a search for items by keyword (basic search) and other parameters such as price, date received and/or discount (advanced search).
The „Shop‟ page on CJ‟s website provides a starting concept of what the categorized inventory search might look like as does the website at www.seconduse.com.
„Contact Us‟ and „Online Donation Form‟ website pages should integrate with Salesforce and allow donors to upload images.
The system should also include the implementation of Salesforce.com Ideas on CJ‟s „Recycling & Resources‟ webpage to allow for crowd sourcing the best recycling options for various materials in the Pittsburgh metropolitan area.
4.1.2.
E-Blast Flagging
– The ability to easily flag items for inclusion in e-Blast, both while adding the item to the inventory and after it has been added to inventory (such as by scanning the bar code). This also includes adding one or more photographs of the item to the inventory which can be included in the e-Blast or other marketing material.A „blastworthy‟ flag already exists on the item entry and update screens. That field can be used to flag an item for inclusion on the next e-Blast.
When an item is flagged for e-Blast, the system should verify that a stocking location has been set for the item.
The system should allow Construction Junction staff to view a list of all items that are currently flagged as blastworthy that haven‟t yet been included in an e-Blast. The user can then select which flagged items should be included on the next e-Blast.
The system should also provide an e-Blast preview screen that displays all items selected for that week‟s e-Blast, and also all items that have been flagged but not selected.
A cart with a laptop, camera and bar code reader will be used by the Construction Junction staff when looking for items in the sales floor that should be e-Blasted. That allows the user to quickly locate an item in the inventory by scanning its tag, flag items that aren‟t yet flagged and enter additional item information prior to the e-Blast.
The system should integrate with Vertical Response (or its future possible replacement, Exact Target) for the e-Blast email notifications.
The system should also allow Construction Junction staff to view a list of all items that were included in previous week‟s e-Blast and that have been sold. The user can then select the items that should be included in the „Great and Gone‟ section of the website. The system should also allow the user to select any sold items, adding pictures as needed, to be included in the „Great and Gone‟ section, even if they were not part of previous week‟s e-Blast. „Great and Gone‟ items should have a “Sold” overlay over their associated images.
Items should be able to be re-Blasted without affecting previous e-Blast versions.
4.1.3.
e-Commerce Integration
– Integration with the Construction Junction website to allow for online purchases and auctions, automatically adding new items to the e-Commerce site and updating the site when items are sold, either through the e-Commerce site or in the store. Additionally, support inventory that is available only through the e-Commerce site and cannot be purchased in the store.The website should present an „Add to Cart‟ button on search results and item detail screens and standard „View Shopping Cart‟ and checkout functionality as well as the option to „forward item to a friend‟.
The system does not need to support shipping options. All items purchased have to be picked up at the Construction Junction site.
Only items flagged as available for online purchase on the inventory system can be purchased online. Those items are held in a separate area in the warehouse designated for online items and can only be purchased online.
For items that are not available for online purchase the website should display a comment that reads 'You can purchase this item over the phone or at Construction Junction'. When an item is purchased over the phone it is physically moved to the SOLD items area in the warehouse, but should remain on the website for an additional 15 days with “Sold” appearing across the item name and image.
4.1.4.
Membership Program
– Implement a membership program that would make it easier to track customer/donor activity. Based on a membership card, linked to thedonor/customer contact in CRM and QuickBooks POS, where swiping or scanning the card would quickly bring up the customers information, making the donation or purchasing process faster (eliminating the need for Construction Junction staff to enter the name and demographic information for repeat donors/customers). Once established, a membership card program could be used for any number of uses, such as:
A membership rewards or frequent donor rewards program Special “members only” promotions, coupons or discounts Targeting marketing for program members
Once registered online, the system should allow Construction Junction staff to print out a member card (possibly via QuickBooks POS) containing the member‟s name and unique member ID, in both numeric and bar code format. The member card can be scanned by Construction Junction staff to quickly identify the member when donating or purchasing items. The member‟s email address and associated customer ID/barcode should uniquely identity the member in both QuickBooks POS and in the CRM system.
The system should allow Construction Junction to reward customers for frequent donating by giving them in-store credit that can be used when purchasing items.
The „Reuse Reward‟ amount credited for each donated item should be kept separate from store credit for returned merchandise and be calculated as follows:
For stock items, credited when the item is received, and calculated as 0.5% of the stock item‟s pre-defined price.
For unique items, credited only the item is sold, and calculated as 1% of the price the item was actually sold for.
The system should also provide reports that show all items a particular donor brought in and how much those items were sold for.
QuickBooks POS should be aware of the current amount of credit accrued by a member so that it can be used whenever the member wants to purchase an item. Users should be able to use their accrued balance to buy gift certificates and give them to someone else.
The system should be able to print the donor‟s current credit amount on the donation receipt. QuickBooks POS should also print a message on the sales and donation receipt informing customers that they can earn rewards by donating to Construction Junction.
Additional membership benefits should include:
Signing up for CJ‟s weekly e-Blast (all users who sign up for the e-Blast are automatically members and all users who sign up to be members automatically receive the weekly e-Blast (unless they manually uncheck that option)).
Ability to manage online profile including status of e-Blast subscription, donation addresses, view sales history, donation history and re-reprint donation receipts online. Ability to have insight into the type of items scheduled for pickup by CJ
Automatic notification when accumulated credits reach a certain self-defined threshold. Ability to create a public green business or service listing.
Ability to upload images and video of their reuse project(s) Advance notification of new class offerings and upcoming events.
Easier purchasing of items offered online and automatic pre-registration for online auctions.
Option to purchase CJ gift cards at a slightly discounted rate. Bonus in store discounts on member‟s birthday.
Allows faster completion of online donation form and allows user to view and request available slots in CJ‟s pickup schedule.
4.1.5.
Customer Wish List
– Provide users with the ability to notify Construction Junction of items that they would like to purchase and be notified when/if those items become available. Customer wish lists would only be viewable by Construction Junction staff and will not be publicly available.Construction Junction website users should be able to select a particular item category in the inventory (via an inventory or e-Blast view) and add it to their wish list. Users should also be able to add to the wish list any of the categories for items returned as search results. Anytime a new item is received into the inventory in that category, an automated notification is then sent to the user.
The notification can be in multiple forms such as an email message, text message, voice blast, Twitter or Facebook. That option is set by the user in his/her website account settings. That means that in order to take advantage of the wish list functionality, the user must be registered as a Construction Junction website member.