Web : http://support.vestek.com.tr Mail : [email protected] Tel : +90 212 286 01 06
Vestek Elektronik Ar-Ge A.Ş. İTÜ Ayazağa Kampüsü Koru Yolu Arı 2-B Blok Maslak/İstanbul
HotelTV2
Control Server Setup Guide
REV A0.11
Web : http://support.vestek.com.tr Mail : [email protected] Tel : +90 212 286 01 06
Vestek Elektronik Ar-Ge A.Ş. İTÜ Ayazağa Kampüsü Koru Yolu Arı 2-B Blok Maslak/İstanbul
2 / 17
Date
Owner
Version
Reason & Change
16 Dec 2011
İbrahim Özbey
A0.1
Initial Creation
18 Apr 2012
Ferhan Badur
A0.2
Structure Changed
18 Apr 2012
Görkem Giray
A0.3
Structure Changed
03 May 2012
Görkem Giray
A0.4
Added Avedeo installation routines
04 May 2012
Görkem Giray
A0.5
Added missing pictures and corrected
wrong links
09 May 2012 Görkem Giray A0.6 Client config file control phrase added
25 Sep 2012 Umut Türe A0.7 Added license pages
03 Jan 2013 Umut Türe A0.8 Modified according the new UI
18 Jan 2013 Bora Tunçer A0.9 Minor structure change
31 Oct 2013 Bora Tunçer A0.10 Naming change
Web : http://support.vestek.com.tr Mail : [email protected] Tel : +90 212 286 01 06
Vestek Elektronik Ar-Ge A.Ş. İTÜ Ayazağa Kampüsü Koru Yolu Arı 2-B Blok Maslak/İstanbul
3 / 17
2.
Table of Contents
1. Revision History ... 2
2. Table of Contents ... 3
3. Table of Figures ... 4
4. Introduction ... 5
4.1. Purpose ... 5
4.2. Scope ... 5
4.3. Abbreviations ... 5
5. Requirements ... 6
6. Installation of HotelTV2 ... 6
7. Configuration of HotelTV2 ... 10
8. Uninstalling HotelTV2 ... 12
9. Installing Avadeo ... 13
10. Installing New Interface ... 15
Web : http://support.vestek.com.tr Mail : [email protected] Tel : +90 212 286 01 06
Vestek Elektronik Ar-Ge A.Ş. İTÜ Ayazağa Kampüsü Koru Yolu Arı 2-B Blok Maslak/İstanbul
4 / 17
3.
Table of Figures
Figure 6-1-: Select Installation Address ... 6
Figure 6-2: Connect to Server ... 7
Figure 6-3: HotelTV2 Setup ... 7
Figure 6-4: Register Now ... 8
Figure 6-5: Setup Key ... 8
Figure 6-6: Registry Key ... 9
Figure 6-7: Confirm Installation ... 9
Figure 7-1: Configuration Parameters ... 10
Figure 7-2: ServicesRootPath ... 10
Figure 7-3: Permissions for HotelTV2 Setup ... 11
Figure 7-4: Windows Features ... 11
Figure 8-1: Programs and Features... 12
Figure 9-1: Application Install ... 13
Figure 9-2: Integration Tool ... 13
Figure 9-3: Notification Area ... 14
Figure 9-4: Integration Tool ... 14
Figure 10-1: Settings Form ... 15
Figure 10-2: XML file ... 15
Figure 10-3: Source Folder ... 16
Figure 10-4: Destination Path ... 16
Figure A-0-1: Convert to Application ... 17
Figure A-0-2: Manage Applications ... 17
Web : http://support.vestek.com.tr Mail : [email protected] Tel : +90 212 286 01 06
Vestek Elektronik Ar-Ge A.Ş. İTÜ Ayazağa Kampüsü Koru Yolu Arı 2-B Blok Maslak/İstanbul
5 / 17
4.
Introduction
4.1.
Purpose
This document describes the HotelTV2 client software installation process of MB70 model
TVs. The following sections describe the environment usage model:
•
“5 – Server Requirements” describes the preliminaries of the server machine before
installing HotelTV2 product
•
“6 – Installing HotelTV2” section describes the installation steps of HotelTV2 product
•
“7 – Uninstalling HotelTV2” section describes removing steps of HotelTV2 product
from your system
4.2.
Scope
This document intends to be a reference manual for installation of HotelTV2 client releases
and explains each step of HotelTV2 client release setup process with examples. This
document is shared and applicable for the development all VESTEL sites.
4.3.
Abbreviations
•
IIS
Internet Information Services
•
SQL
Structured Query Language
•
RAM
Random Access Memory
•
GB
Giga Byte
•
ASP
Active Server Pages
•
HDD
Hard Disk Drive
Web : http://support.vestek.com.tr Mail : [email protected] Tel : +90 212 286 01 06
Vestek Elektronik Ar-Ge A.Ş. İTÜ Ayazağa Kampüsü Koru Yolu Arı 2-B Blok Maslak/İstanbul
6 / 17
5.
Requirements
The following list indicates the preliminaries and system requirements for installation of
HotelTV2.
System Requirements:
•
Minimum 8 GB RAM, “Quad Core” processor, 1 GB free HDD space
•
Microsoft IIS 7
•
SQL Server 2008
•
Windows Installer 4.1 and Microsoft .NET
6.
Installation of HotelTV2
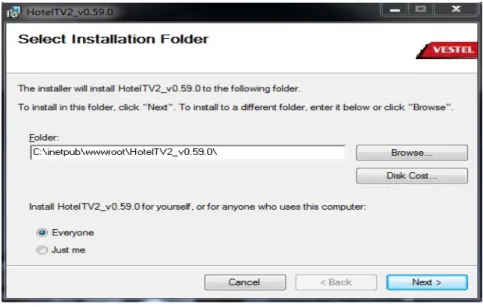
We will start installation process by executing “
HotelTV2_vX.XX.X.msi” file then chose
installation properties for HotelTV2 then click next button (Figure 6-1).
Folder section on Figure 6-1 must be a unique folder name under
“wwwroot”otherwise
installer can delete the previous folder and be the cause of irreversible condition. Default
directory name will be as
‘HotelTV2_vX.XX.X’to avoid such a situation.
Figure 6-1-: Select Installation Address
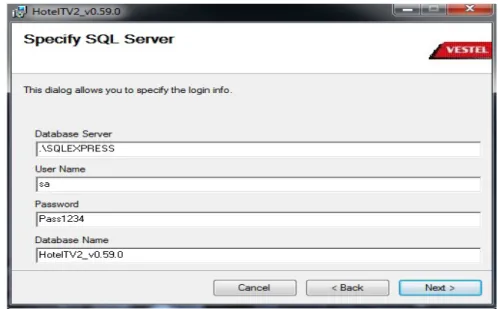
You should fill the areas in the Figure 6-3 according to information situated in your SQL Server 2008 login window (Figure 6-2).
Web : http://support.vestek.com.tr Mail : [email protected] Tel : +90 212 286 01 06
Vestek Elektronik Ar-Ge A.Ş. İTÜ Ayazağa Kampüsü Koru Yolu Arı 2-B Blok Maslak/İstanbul
7 / 17
Figure 6-2: Connect to Server
You should fill “User Name” box with your SQL Server login name and “Password” with your SQL Server password. It is recommended to enter a unique database name which has not existed on server yet.
Figure 6-3: HotelTV2 Setup
Web : http://support.vestek.com.tr Mail : [email protected] Tel : +90 212 286 01 06
Vestek Elektronik Ar-Ge A.Ş. İTÜ Ayazağa Kampüsü Koru Yolu Arı 2-B Blok Maslak/İstanbul
8 / 17
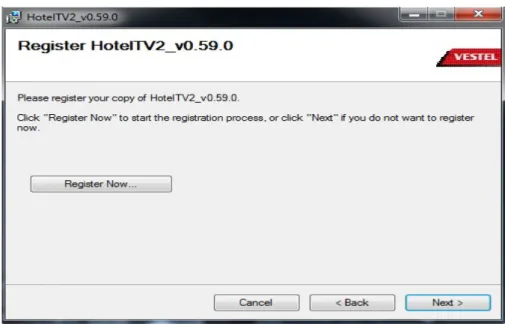
Figure 6-4: Register Now
You should generate a setup key by clicking ‘Register Now’.
Figure 6-5: Setup Key
This setup key is generated in order to licence HotelTV2. You should contact to Vestek and get a Registry Key for next step.
Web : http://support.vestek.com.tr Mail : [email protected] Tel : +90 212 286 01 06
Vestek Elektronik Ar-Ge A.Ş. İTÜ Ayazağa Kampüsü Koru Yolu Arı 2-B Blok Maslak/İstanbul
9 / 17
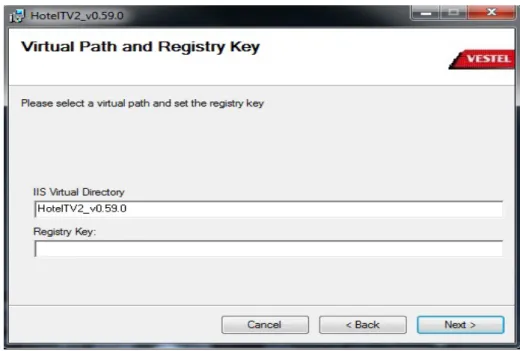
Figure 6-6: Registry Key
Please put the Registry Key which is taken from Vestek in order to license HotelTV2.IIS Virtual Directory section on Figure 6-6 must be an unique alias name.
WARNING: If you want to cancel installation progress or change some settings, cancel or change it before this section) (Figure 6-7)
Web : http://support.vestek.com.tr Mail : [email protected] Tel : +90 212 286 01 06
Vestek Elektronik Ar-Ge A.Ş. İTÜ Ayazağa Kampüsü Koru Yolu Arı 2-B Blok Maslak/İstanbul
10 / 17
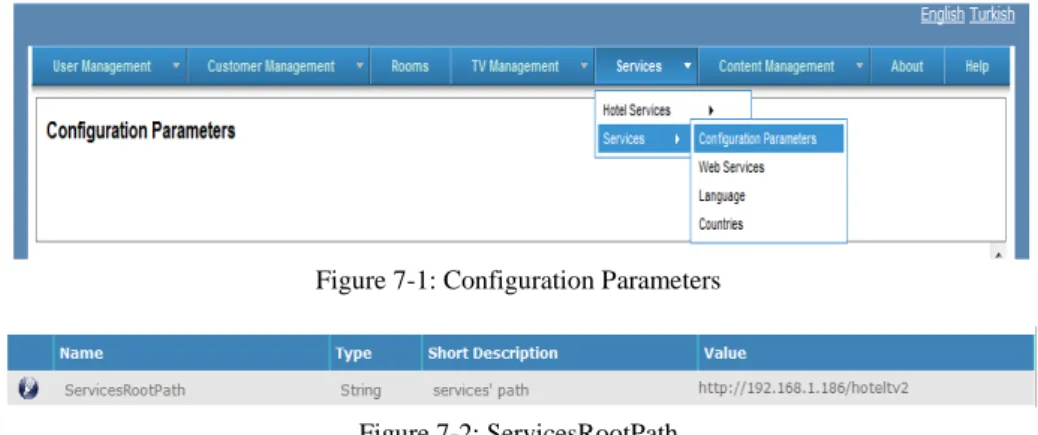
(xxx is the last section of your IP address) and log on by using the link situated at the right-top corner of the page. You should use “admin” as username and “vestek” as password, then change “ServicesRootPath” field in configuration parameters screen by following the way of “Services
Services Configuration Parameters” (Figure 7-1). You should enter your IP address and publish name (which has already set on setup) (Figure 7-2)
For Example: http://192.168.1.xxx/HotelTV2
Figure 7-1: Configuration Parameters
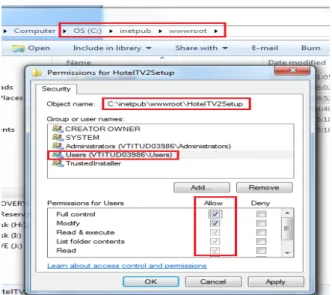
Figure 7-2: ServicesRootPath
Open server Administrative Tools by following “Control Panel Administrative Tools Services”) and restart “HTVServiceChecker”.
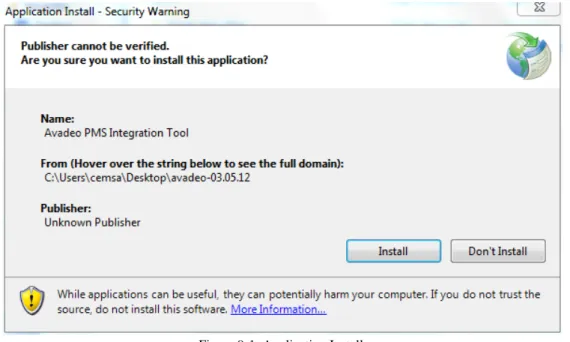
You should give administrative privileges to the installation folder under “C:\inetpub\wwwroot” directory. So it is mandatory to give administrative permission to the folder where you install HotelTV2 project. In this example we right click “HotelTV2Setup” folder, choose properties and click “Security” tab. Then we will click “Edit” button, choose indicated user and apply given permissions below. (Figure 7-3)
Web : http://support.vestek.com.tr Mail : [email protected] Tel : +90 212 286 01 06
Vestek Elektronik Ar-Ge A.Ş. İTÜ Ayazağa Kampüsü Koru Yolu Arı 2-B Blok Maslak/İstanbul
11 / 17
Figure 7-3: Permissions for HotelTV2 Setup
If you install IIS then we need to ensure that, “IIS Metabase and IIS 6 configuration compatibility” section is loaded. (Figure 7-4)
Figure 7-4: Windows Features
It is required that you should check the “web.config” file under the folder of
“C:\inetpub\wwwroot\HotelTV2\Client\” and make sure the section “<client>” must me as
indicated below:
<client>
<endpoint address="http://localhost:8080/avadeoservice" binding="basicHttpBinding"
bindingConfiguration="BasicHttpBinding_IAvadeoService" contract="PMSService.IAvadeoService"
name="BasicHttpBinding_IAvadeoService" /> </client>
Web : http://support.vestek.com.tr Mail : [email protected] Tel : +90 212 286 01 06
Vestek Elektronik Ar-Ge A.Ş. İTÜ Ayazağa Kampüsü Koru Yolu Arı 2-B Blok Maslak/İstanbul
12 / 17
HotelTV2Setup at that program list. Then click uninstall button and please wait until installer is finished uninstalling. (Figure 7-1)
Web : http://support.vestek.com.tr Mail : [email protected] Tel : +90 212 286 01 06
Vestek Elektronik Ar-Ge A.Ş. İTÜ Ayazağa Kampüsü Koru Yolu Arı 2-B Blok Maslak/İstanbul
13 / 17
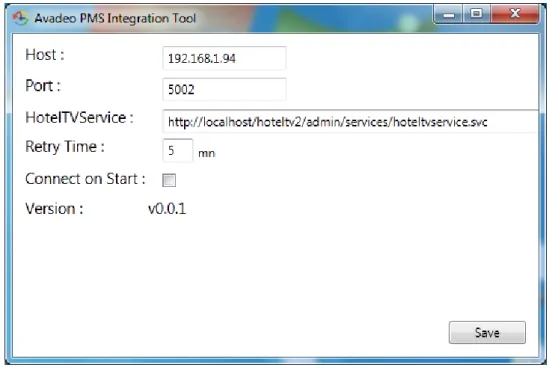
Figure 9-1: Application Install
You should ignore the new opened blank window (Figure 9-2).
Figure 9-2: Integration Tool
Then, you will click the notification area arrow to extend applications list. You should right-click on Avadeo icon and choose “Settings” to do configuration process (Figure 9-3).
Web : http://support.vestek.com.tr Mail : [email protected] Tel : +90 212 286 01 06
Vestek Elektronik Ar-Ge A.Ş. İTÜ Ayazağa Kampüsü Koru Yolu Arı 2-B Blok Maslak/İstanbul
14 / 17
Figure 9-3: Notification Area
In the opened window shown in figure (Figure 9-4), you should enter the IP of Fidelio installed machine to “Host” box. Port number of the same machine should be entered to the “Port” box.
“HotelTVService” box should be filled with this address as indicated in the figure below: “http :/ /l oca lh os t/h o tel tv 2/a dm in /se rv ic e s/h ot elt vs er vic e. sv c”. When Fidelio is
disconnected, Avadeo tool retries to connect Fidelio. “Retry Time” value indicates the limit of
retrying time to re-connect. After making changes, click “Save” button to save configuration settings.
Web : http://support.vestek.com.tr Mail : [email protected] Tel : +90 212 286 01 06
Vestek Elektronik Ar-Ge A.Ş. İTÜ Ayazağa Kampüsü Koru Yolu Arı 2-B Blok Maslak/İstanbul
15 / 17
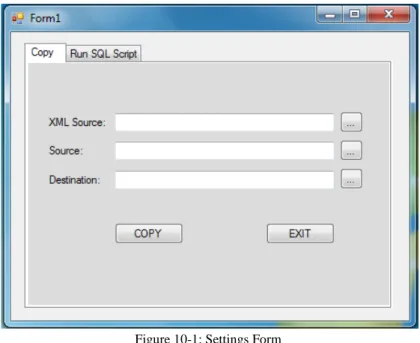
Windows Application and fill the required areas to change the interface. In the application window, to include XML source, click browse button next to XML source box (Figure 10-1).
Figure 10-1: Settings Form
You have to choose “copy.xml” file under the release folder (Figure 10-2).
Web : http://support.vestek.com.tr Mail : [email protected] Tel : +90 212 286 01 06
Vestek Elektronik Ar-Ge A.Ş. İTÜ Ayazağa Kampüsü Koru Yolu Arı 2-B Blok Maslak/İstanbul
16 / 17
Figure 10-3: Source Folder
Finally, for the “Destination” box, you should enter “C:/inetpub/wwwroot/hoteltv2/client” path
(Figure 10-4). After these processes, click “COPY” button to submit the changes.
Web : http://support.vestek.com.tr Mail : [email protected] Tel : +90 212 286 01 06
Vestek Elektronik Ar-Ge A.Ş. İTÜ Ayazağa Kampüsü Koru Yolu Arı 2-B Blok Maslak/İstanbul
17 / 17
Occasionally, some problems are occurring during installation progress and so you must intervention some settings. SQL Server connection falling timeout, IIS connection, inadequacy of hardware requirements may cause some problems. To fix the problem apply the options indicated below.
• Open your IIS and find your project application than open it. There is an Admin and Services folder. Right click that folder and choose “Convert to application” section (Figure 8-1). (Be sure that Physical Path and Application Pool is set right)
Physical Path for Admin : “C:\inetpub\wwwroot\HotelTV2Setup\Admin\WEBUI” Physical Path for Services : “C:\inetpub\wwwroot\HotelTV2Setup\Services” • Application Pool settings are the same Admin and Services : ASP.NET v4.0
• Right click root application and choose “Manage Folder Advanced Settings” and set physical path “C:\inetpub\wwwroot\HotelTV2Setup\Client” (Figure 8-2) (Figure 8-3)
Figure A-0-1: Convert to Application Figure A-0-2: Manage Applications