Copyright©1995-2013 SolarWinds, Inc., all rights reserved worldwide. No part of this document may be reproduced by any means nor modified, decompiled, disassembled, published or distributed, in whole or in part, or translated to any electronic medium or other means without the written consent of SolarWinds. All right, title and interest in and to the software and documentation are and shall remain the exclusive property of SolarWinds and its licensors. SolarWinds®, the SolarWinds logo, ipMonitor®, LANsurveyor®, and Orion®are among the trademarks or registered trademarks of the company in the United States and/or other countries. All other trademarks contained in this document and in the Software are the property of their respective owners.
SOLARWINDS DISCLAIMS ALL WARRANTIES, CONDITIONS OR OTHER TERMS, EXPRESS OR IMPLIED, STATUTORY OR OTHERWISE, ON SOFTWARE AND
DOCUMENTATION FURNISHED HEREUNDER INCLUDING WITHOUT LIMITATION THE WARRANTIES OF DESIGN, MERCHANTABILITY OR FITNESS FOR A PARTICULAR PURPOSE AND NONINFRINGEMENT. IN NO EVENT SHALL SOLARWINDS, ITS SUPPLIERS OR ITS LICENSORS BE LIABLE FOR ANY DAMAGES, WHETHER ARISING IN TORT, CONTRACT OR ANY OTHER LEGAL THEORY EVEN IF SOLARWINDS HAS BEEN ADVISED OF THE POSSIBILITY OF SUCH DAMAGES.
Microsoft®, Windows 2000 Server®, Windows 2003 Server®, and Windows 2008 Server®are either registered trademarks or trademarks of Microsoft Corporation in the United States and/or other countries.
Graph Layout Toolkit and Graph Editor Toolkit©1992 - 2001 Tom Sawyer Software, Oakland, California. All Rights Reserved.
Portions Copyright©ComponentOne, LLC 1991-2002. All Rights Reserved.
Fluent is a trademark of Microsoft Corporation and the Fluent user interface is licensed from Microsoft Corporation.
Contacting SolarWinds
You can contact SolarWinds in a number of ways, including the following:
Contact Information Team 1.866.530.8100 Sales www.solarwinds.com TEST www.solarwinds.com/support Technical Support http://support.solarwinds.net/support User Forums
Note:You need a customer account to access the Customer Support area of the website.
SolarWinds Failover Engine Documentation Library
The following documents are included in the SolarWinds Failover Engine documentation library:Purpose Document
Provides detailed configuration and conceptual information. Administrator Guide
Provides detailed setup information. Installation Guides
Provides help for every window in the SolarWinds Failover Engine user interface.
Page Help
Provides late breaking information, known issues, and updates. The latest Release Notes can be found atwww.solarwinds.com/ Release Notes
Conventions
The documentation uses consistent conventions to help you identify items throughout the printed and online library.
Specifying Convention
Window items including buttons and fields.
Bold
Book and CD titles, variable names, new terms. Italics
File and directory names, commands and code examples, text typed by you.
Fixed font
Optional command parameters Straight brackets, as in
[value]
Required command parameters Curly braces, as in {value}
Exclusive command parameters where only one of the options can be specified.
Logical OR, as in value1|value2
Architecture...11
Protection...12
SolarWinds Failover Engine Networking Configuration...14
SolarWinds Failover Engine Communications...15
SolarWinds Failover Engine Switchover and Failover Processes...16
Recovery from a Failover...19
Chapter 2: Configuring SolarWinds Failover Engine...21
Configure Server Wizard...21
Configure Machine Identity...22
Configure Server Role...22
Change the Client Connection Port...23
Configure Channel IP Routing...23
Configure the Default Channel Port...24
Configure Low Bandwidth Optimization...24
Configure Public IP Addressing...25
Configure the Message Queue Logs...26
Configure Maximum Disk Usage...27
Chapter 3: Status and Control...29
Managing SolarWinds Failover Engine Clusters...29
Install Client Tools...29
Starting the SolarWinds Failover Manager ...30
Navigating the SolarWinds Failover Manager ...31
Changing the SolarWinds Failover Manager Font...34
Add a SolarWinds Failover Engine Group...35
Add a New Connection...37
Edit a Connection...39
Move a Connection...40
Remove a Connection...41
Edit User Name and Passwords...42
Review the Status of SolarWinds Failover Engine Clusters and Groups...43
Exit SolarWinds Failover Manager ...44
Shutdown Windows with SolarWinds Failover Engine Installed...44
Controlled Shutdown...44
Chapter 4: Server Protection...47
Overview...47
Monitoring the Status of Servers...47
Configure SolarWinds Failover Engine Settings...48
Configure Pings...48
Configure Failover...50
Common Administrative Tasks in SolarWinds Failover Engine ...51
Forcing a Switchover...54
Failover versus Switchover...54
Configuring Failover and Active Server Isolation...55
Recover From a Failover...58
Split-brain Avoidance...60
Configuring Management IP Addressing...61
Chapter 5: Network Protection...63
Overview...63
Configure Public Network Monitoring...63
Enabling Automatic Switchover in a WAN...65
Setting Max Server Time Difference...66
Chapter 6: Application Protection...67
Applications Environment...67
Applications: Summary...67
View Application Status...68
View the Status of Services...73
Add a Service...74
Edit a Service...76
Remove a Service...77
Change the Order of Services...77
Applications: Tasks...78
Add a Task...79
Edit a Task...80
Remove a Task...81
Change the Order of Tasks...81
Manually Start a Task...81
View, Add, and Remove User Accounts...81
Application: Rules...83 Applications: Plug-ins...83 Install a Plug-in...84 Edit a Plug-in...84 Uninstall a Plug-in...85 Chapter 7: Performance Protection...87 Rules Overview...87
Check a Rule Condition...87
Edit a Rule...88
Chapter 8: Data Protection...89
Data: Replication...89
File System and Registry Synchronization Status...89
Initiate a Full Registry Check...90
Initiate a Full System Check...90
Fast Check...92
Manually Initiate File Synchronization...93
Manually Initiate Verify and Synchronize...94
Data: File Filters...98
Determine Effective Filters...98
Add a User Defined Inclusion Filter...99
Add a User Defined Exclusion Filter...99
Edit User Defined Inclusion/Exclusion Filters...100
Remove User Defined Filters...101
Data: Rollback...101
Data: Traffic/Queues...101
Configure Send and Receive Queue Size...101
Review the SolarWinds Channel Status...102
Data: WAN Compression...103
Configure WAN Compression...104
Appendix A: Other Administrative Tasks...107
Configure Alerts...107
Configure Alert Reporting...108
Add and Remove Email Alert Recipients...109
Using WScript to Issue Alert Notifications...111
Test Alert Reporting...112
Configure Event Log Files...112
Review Event Logs...113
Appendix B: Troubleshooting...117
Two Active Servers...117
Two Passive Servers (In a Pair)...119
Synchronization Failures...120
Services Running on the Passive Server...121
SolarWinds Channel Incorrectly Configured...122
Incorrect or Mismatched Disk Configuration...122
The Passive Server has Less Available Space than the Active Server...123
Unprotected File System Features...124
Registry Status is Out-of-Sync...124
Channel Drops...125
Performance Issues...125
Passive Server Does Not Meet Minimum Hardware Requirements...126
Hardware or Driver Issues on Channel NICs...126
[L20]Out of disk space (NFChannelOutOfDiskSpaceException)...134 Application Slowdown...134 Poor Application Performance...135 Servers Could Accommodate the Initial Load but the Load has Increased.136 One Server is Able to Cope, but the Other Cannot...136 Scheduled Resource Intensive Tasks...137
SolarWinds Failover Engine is a Windows based system specifically designed to provideHigh Availability (HA) andDisaster Recovery (DR) to server configurations in one solution that does not require any specialized hardware. To appreciate the full capabilities of SolarWinds Failover Engine you must understand the basic concepts under which SolarWinds Failover Engine operates and the terminology used.
Note: In this document, the term “Cluster” refers to a SolarWinds Failover Engine Cluster. Refer to the Glossary for more information about SolarWinds Failover Engine Clusters.
Architecture
SolarWinds Failover Engine provides a flexible solution that can be adapted to meet most business requirements for deployment. When discussing SolarWinds Failover Engine, it is beneficial to use common terminology to describe its configuration and what is occurring.
SolarWinds describes the organization of servers based upon Clusters, Cluster status, and relationships between Clusters. SolarWinds refers to a Cluster of two servers as a SolarWinds Failover Engine Pair. Installing SolarWinds Failover Engine on the servers and assigning an Identity (primary or secondary) to the servers results in a SolarWinds Failover Engine Pair.
Each server is assigned both anIdentity (Primary or Secondary) and aRole
(Active orPassive). Identity is used to describe the physical instance of the server while the Role is used to describe what the server is doing. When the Identity is assigned to a server it normally will not change over the life of the server whereas the Role of the server is subject to change as a result of the operations the server is performing. When SolarWinds Failover Engine is deployed on a Pair of servers, SolarWinds Failover Engine can provide all five levels of protection (Server, Network, Application, Performance, and Data) and can be deployed for High Availability in a Local Area Network (LAN) or Disaster Recovery over a Wide Area Network (WAN).
In its simplest form, SolarWinds Failover Engine operates as a SolarWinds Failover Engine Pair with one server performing an active role (normally the primary server) while the other server performs a passive role (normally the secondary server). The server in the active role provides application services
to users and serves as the source for replication while the server in the passive role serves as the standby server and target for replicated data. This
configuration supports replication of data between the active and passive server over the SolarWinds Channel.
When deployed for High Availability, a LAN connection is used. Due to the speed of a LAN connection (normally 100 Mb or more) bandwidth optimization is not necessary.
When deployed in a WAN for Disaster Recovery, SolarWinds Failover Engine can assist replication by utilizing WAN Compression with the built-in WAN Acceleration feature.
Protection
SolarWinds Failover Engine provides five levels of protection to ensure that end-user clients remain connected in the event of a failure.
• Server Protection— SolarWinds Failover Engine continues to provide availability to end-user clients in the event of a hardware failure or operating system crash. When deployed, SolarWinds Failover Engine provides the ability to monitor the active server by sending “I‘m alive” messages from the passive server to the active server which reciprocates with an
acknowledgment over a network connection referred to as the SolarWinds Channel. Should thepassive server detect that the process or heartbeat has failed, it can then initiate a failover.
A failover occurs when the first passive server detects that the active server is no longer responding. This can be because the active server’s hardware has crashed or because its network connections are lost. Rather than the active server being gracefully closed, it has been deemed to have failed and requires no further operations. In a failover, the first passive server is brought up immediately to take on the role of the active server. The mechanics of failover are discussed later in this guide.
• Network Protection— SolarWinds Failover Engine proactively monitors the ability of the active server to communicate with the rest of the network by polling up to three defined nodes around the network, including by default, the default gateway, primary DNS server, and the Global Catalog server at regular intervals. If all three nodes fail to respond, for example, if a network card or local switch fails, SolarWinds Failover Engine can gracefully switch the roles of the active and passive servers (referred to as a switchover) allowing the previously passive server to assume an identical network identity to that of the previously active server. After the switchover, the newly active server then continues to service the clients.
running on the active server and restarts them on the passive server along with the application or service that caused the failure. The mechanics of switchover are discussed in more detail later in this guide.
• Performance Protection— SolarWinds Failover Engine proactively monitors system performance attributes to ensure that your protected applications are actually operational and providing service to your end users, and that the performance of those applications is adequate for the needs of those users.
SolarWinds Failover Engine Plug-ins provide these monitoring and preemptive repair capabilities. SolarWinds Failover Engine Plug-ins monitor application services to ensure that protected applications are operational, and not in a ‘hung’ or ‘stopped’ state. In addition to monitoring application services, SolarWinds Failover Engine can also monitor specific application attributes to ensure that they remain within normal operating ranges. Similar to application monitoring, various rules can be set to trigger specific corrective actions whenever these attributes fall outside of their respective ranges.
• Data Protection— SolarWinds Failover Engine ensures the data files that applications or users require in the application environment are made available should a failure occur. Once installed, SolarWinds Failover Engine can be configured to protect files, folders, and even the registry settings of the active server by mirroring these protected items, in real-time, to the passive server. This means that if a failover occurs, all files that were protected on the failed server will be available to users on the server that assumes the active role after the failover.
Updates to protected files are placed in a queue on the active server (the send queue), ready to be sent to the passive server with each request numbered to maintain its order in the queue. Once the send queue reaches a specific configured size, or the configured time duration has expired, the update is sent to the passive server, which places all the requests in an array of log files termed the receive queue. The passive server then confirms the changes have been logged by sending the active server an
acknowledgment.
Thepassive server’s receive queue is then read in numerical order and a duplicate set of file operations are applied to the disk of the passive server.
SolarWinds Failover Engine provides all five protection levels simultaneously ensuring that all facets of the user environment are maintained at all times and that the network (thePrincipal (Public) Network) continues to operate through as many failure scenarios as possible.
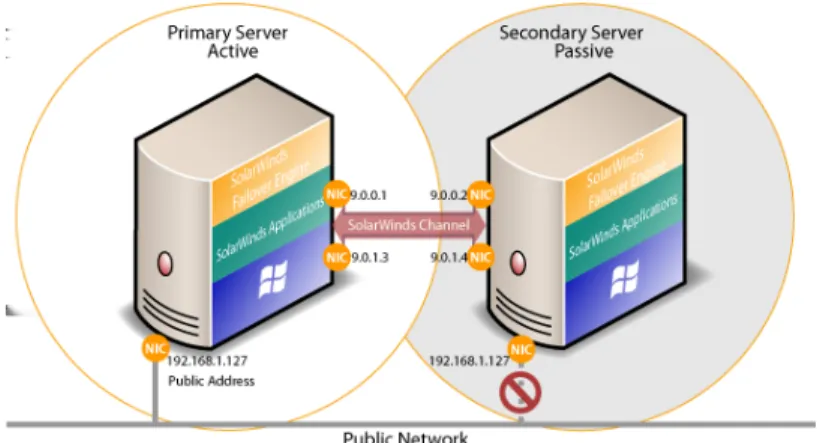
SolarWinds Failover Engine Networking
Configuration
The server IP address used by a client to connect to the active server, the Principal (Public) IP address, must be a static IP address (not DHCP-enabled). In the example below, the Principal (Public) IP address is configured as
192.168.1.5.
Figure 1: SolarWinds Failover Engine Network Configuration
Note: The IP addresses of all NICs on the server can be obtained using a Windows command prompt and typing ipconfig /all.
In a High Availability configuration, the Principal (Public) NIC on the passive server uses the same IP address as the active server but is prevented from communicating with the live network through an IP packet filtering system installed with SolarWinds Failover Engine. This packet filter prevents traffic using the Principal (Public) IP address from being committed to the wire. It also prevents NetBIOS traffic utilizing other IP addresses on the NIC from being sent to prevent NetBIOS name resolution conflicts.
When configured for Disaster Recovery (DR) to a remote site with a different subnet, SolarWinds Failover Engine must be configured to use a different Principal (Public) IP address for the primary and secondary servers. When a switchover is performed, the DNS server will be updated to redirect users to the new active server at the DR site. These updates are not required when the
record' from the Forward lookup zone and removing the 'PTR record' from any relevant reverse lookup zones.
• Next,NFDNSUpdatemust register the new address with all DNS servers that need an entry (again this may not be all DNS servers in the enterprise). Registering the address involves adding the 'A host record' to the Forward lookup zone and adding the 'PTR record' to the pertinent reverse lookup zone.
• Finally, where secondary DNS servers are present,NFDNSUpdatemust instruct them to force a replication with the already updated primary servers. The NICs on the primary and secondary servers intended for use by the SolarWinds Channel must be configured so that they use IP addresses outside of the Principal (Public) Network subnet range. These addresses are termed the SolarWinds Channel addresses.
Important: NetBIOS must be disabled for the SolarWinds Channel(s) on the active and passive servers because the primary and secondary servers use the same NetBIOS name. When SolarWinds Failover Engine installation is complete (runtime), NetBIOS will automatically be disabled across the channel(s) preventing NetBIOS name conflicts.
The NICs that allow the connectivity across the SolarWinds Channel can be standard 100BaseT or Gigabit Ethernet cards providing a throughput of 100Mbits per second or more across standard Cat-5 cabling.
Note: A dedicated channel requires no hubs or routers, but any direct connection requires crossover cabling.
When configured for a WAN deployment, the SolarWinds Channel is configured using static routes over switches and routers to maintain continuous
communications independent from traffic on the Principal (Public) Network.
SolarWinds Failover Engine Communications
The SolarWinds Channel is a crucial component of the setup and is configured to provide dedicated communications between the servers. When deploying in a pair configuration, each server in the pair requires at least one network card (see Single NIC configuration in the Installation Guide) although two network
cards are recommended (one NIC for the Principal (Public) Network connection and at least one NIC for the SolarWinds Channel connection). An additional pair of NICs may be used for the SolarWinds Channel to provide a degree of redundancy. In this case, the SolarWinds Channel is said to beDualed if more than one dedicated NIC is provided for the SolarWinds Channel on each server.
Figure 2: SolarWinds Failover Engine Pair Communications
Note: To provide added resilience, the communications for the second channel must be completely independent from the first channel, for example, they must not share any switches, routers, or WAN connection.
SolarWinds Failover Engine Switchover and Failover
Processes
SolarWinds Failover Engine uses four different procedures to change the role of active and passive servers depending on the status of the active server.
Note: This section illustrates the simpler cases of switchover and failover in SolarWinds Failover Engine Pair.
The Managed Switchover Process
A managed switchover can be initiated manually from the SolarWinds Failover ManagerServer Summarypage by selecting the server to make active and clicking theMake Activebutton. When a managed switchover is initiated, the running of protected applications is transferred from the active machine to the passive machine in the Cluster - the server roles are reversed.
Figure 3: SolarWinds Failover Engine Switchover Process
The automatic procedure executed during a managed switchover operation includes the following steps:
1. Stop the protected applications on the active server. Once the protected applications are stopped, no more disk updates are generated.
2. Send all updates that remain queued on the active server to the passive server. After this step, all updates are available on the passive server. 3. Change the status of the active server to ‘switching to passive’. The server
is no longer visible from the network.
4. Apply all queued updates on the passive server.
5. Change the status of the passive server to 'active'. After this step, the new active server starts intercepting disk I/Os and queues them for the new passive server. The new active server becomes visible on the network with the same identity as the old active server.
6. Change the status of the old active server from ‘switching to passive’ to 'passive'. The new passive server begins accepting updates from the active server.
7. Start the same protected applications on the new active server. The protected applications become accessible to users.
The managed switchover is complete.
The Automatic Switchover Process
An automatic-switchover (auto-switchover) is triggered automatically if a protected application, which the system is monitoring, fails.
An auto-switchover is different from a managed switchover in that although the server roles are changed, SolarWinds Failover Engine is stopped on the previously active server to allow the administrator to verify the integrity of the
data on the newly passive server and to investigate the cause of the auto-switchover.
Auto-switchovers are similar to failover (discussed next) but initiated upon the failure of a monitored application. Once the cause for the auto-switchover is determined and corrected, the administrator can use theConfigure Server Wizardto change the server roles to their original state.
The Automatic Failover Process
When a passive server detects that the active server is no longer running properly, it assumes the role of the active server.
Figure 4: SolarWinds Failover Engine Failover Process
During automatic failover, the passive server performs the following steps: 1. It applies any intercepted updates that are currently saved in the passive
server receive queue as defined by the log of update records that are saved on the passive but not yet applied to the replicated files.
The length of the passive server receive queue affects the time the failover process takes to complete. If the passive server receive queue is long, the system must wait for all updates to the passive server to complete before the rest of the process can take place. When there are no more update records that can be applied, it discards any update records that it is unable to apply (an update record can only be applied if all earlier update records are applied, and the completion status for the update is in the passive server receive queue).
2. It switches its mode of operation from passive to active.
It enables the public identity of the server. The active and passive servers both use the same system name and same Principal (Public) IP address. This Principal (Public) IP address can only be enabled on one of the systems
and logged.
At this stage, the originally active server is “off the air,” and the originally passive server assumes the role of the active server and runs the protected applications. Because the originally active server stopped abruptly, the protected applications may lose some data, but the updates that completed before the failover are retained. The application clients can reconnect to the application and continue running as before.
The Managed Failover Process
A managed failover is similar to an automatic-failover in that the passive server automatically determines that the active server has failed, and can warn the system administrator about the failure; but no failover occurs until the system administrator chooses to trigger this operation manually.
Recovery from a Failover
Assuming the primary server was active and the secondary server was passive before the failover, the secondary server becomes active and the primary server becomes passive after the failover.
Once the problem that initiated the failover is rectified it is a simple process to reinstate the primary server as the active server and the secondary server as the passive server.
When SolarWinds Failover Engine starts on the failed primary server, it detects that it did not stop cleanly the previous time. It disables the public identity by deploying the IP packet filter at boot time, and halts SolarWinds Failover Engine so that the issues that caused the failure can be resolved.
The following steps are used to restore the previously failed server to the active role.
1. Correct incident that caused the failover.
2. Verify the integrity of the disk data on the failed server. 3. Restart the failed server.
4. Once all such issues are resolved, run theConfigure Server Wizardon the failed server to set the correct server role.
5. Start SolarWinds Failover Engine on failed server.
At this stage, the instances of SolarWinds Failover Engine running on the servers connect and start to resynchronize the data on the primary server. 6. Allow SolarWinds Failover Engine to fully synchronize.
When synchronization is complete, you can continue running with this configuration (for example, the secondary is the active server and the primary is the passive server), or initiate a managed switchover to reverse the server roles in the SolarWinds Failover Engine Pair (for example, giving the primary and secondary the same roles that they had before the failover.
Server Wizard) helps you set up and maintain communications between SolarWinds Failover Engine servers. Configuration information includes the IP address for the SolarWinds Channel(s) and Principal (Public) addresses on all servers in the Pair. The Identity of a server (primary and secondary) describes the physical hardware of the machine and should not be confused with what the server is doing (the Role).
Prerequisites
Prior to making changes using the SolarWinds Failover EngineConfigure Server Wizard, you must stop SolarWinds Failover Engine.
Procedure
• Once SolarWinds Failover Engine is stopped, navigate toStart>All Programs> SolarWinds Failover Engine >Configure Server Wizard
to launch theConfigure Server Wizard.
Configure Machine Identity
The Identity of a server (primary and secondary) describes the physical hardware of the machine and should not be confused with what the server is doing (the Role).
Prerequisites
Prior to making changes using theConfigure Server Wizard, you must stop SolarWinds Failover Engine.
Procedure
• To change the machineIdentity, select theMachinetab of theConfigure Server Wizardand select thePhysical Hardware Identityof the local machine and clickNextorFinish.
Figure 6: Configure Server Wizard - Machine Tab
Configure Server Role
The server's role describes what the server is currently doing.
Prerequisites
Before changing theRoleof the local server to active, verify that no other server (including remote servers) in the Cluster is active.
Change the Client Connection Port
TheClient Connection Portspecifies the port through which clients (such as the SolarWinds Failover Manager) connect to SolarWinds Failover Engine.
Procedure
• To change theClient Connection Port, select theMachinetab of the
Configure Server Wizardand type a new value in the text box. ClickNext
orFinishto accept changes.
Note: Do not change this port unless the default port (52267) is required by another application.
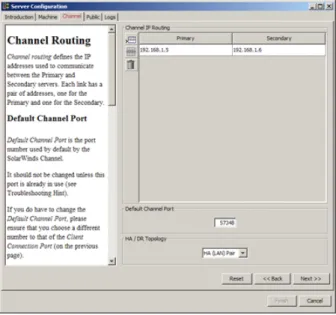
Configure Channel IP Routing
Channel IP routing defines the IP addresses used to communicate between the local server (such as the primary) and the adjacent server (the secondary). Each link uses two addresses, one for the local server and one for the remote server.
Procedure
• To add a channel after installing and configuring the NICs, select the
Channeltab of theConfigure Server Wizard. Add the new IP addresses for the local server and the remote server to the SolarWinds Channel IP Routingtable by clicking theAdd Rowicon. The drop-down list shows the IP addresses available on the local server. Manual entry of the IP addresses for remote servers is required
Figure 7: Configure Server Wizard - Channel IP Routing
• To change the channel IP addresses, select and edit the entry in the table. ClickNextorFinishto accept changes.
Configure the Default Channel Port
The SolarWinds Channel uses theDefault Channel Portto communicate between the primary and secondary servers. Do not change this port unless required by another application.
Procedure
• To change theDefault Channel Port, select theChanneltab of the
Configure Server Wizardand edit the default entry (57348). ClickNextor
Finishto accept changes.
Configure Low Bandwidth Optimization
Low Bandwidth Optimizationis configured automatically during installation based upon the configuration options selected during Setup. Low Bandwidth Optimization can be configured for: High Availability (HA) when deployed as a pair in a LAN or DR when deployed in a WAN.
In a High Availability (HA) server pair, the queues and buffers are optimized for a high-speed local area network (LAN) connection, compression is disabled, and automatic failover between servers is enabled. In a Disaster Recovery(DR)
Note: The same HA/DR configuration must be set on all servers in the pair.
• To change Low Bandwidth Optimization after installation, select theChannel
tab of theConfigure Server Wizardand use theHA/DR Topology
drop-down to select the appropriate topology. ClickNextorFinishto accept changes.
Figure 8: Configure Server Wizard - Channel tab
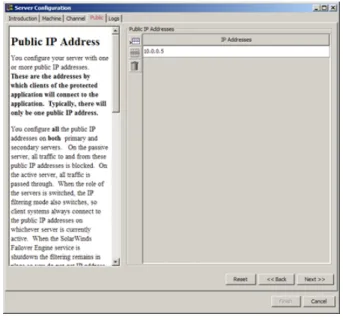
Configure Public IP Addressing
A typically configured SolarWinds Failover Engine Cluster uses only one Principal (Public) IP address when deployed as a pair or on a LAN, but can be configured with more than one Principal (Public) IP address. These are the addresses by which clients of the protected application connect to the
application. Typical installations configure the same Principal (Public) IP address on the primary and secondary servers. All traffic to and from these Principal (Public) IP addresses is passed through to the active server but blocked on the passive server(s). When the server roles are switched, the IP filtering mode
also switches, so client systems always connect to the Principal (Public) IP addresses on whichever server is currently active. When the SolarWinds Failover Engine service is shut down, the filtering remains in place to prevent IP address conflicts between servers.
Procedure
1. To configure Principal (Public) IP addressing, select thePublictab of the
Configure Server Wizardand list all of the addresses intended for use as Principal (Public) IP addresses.
Note: An address must not appear more than once, and no Principal (Public) IP address may appear in the list of IP addresses on the Channel tab.
Figure 9: Configure Server Wizard - Public Tab
2. To add an address, double-click a row and manually type in the address or select one from a list of currently defined addresses. ClickNextorFinish
to accept changes.
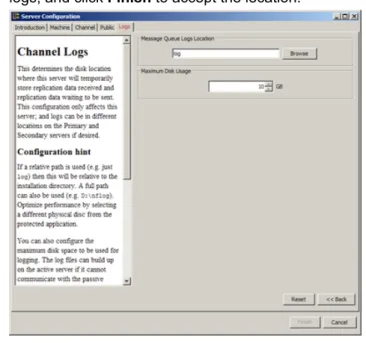
Configure the Message Queue Logs
The configured message queue logs location determines where the local server temporarily stores replication data received (the receive queue) and the replication data waiting to send (the send queue). This configuration affects only the local server; logs can be in different locations on the primary and secondary servers.
Figure 10: Configure Server Wizard - Logs Tab
Configure Maximum Disk Usage
You can configure the maximum disk space allocated for logging. Log files accumulate when the active server cannot communicate with the passive server, when a passive server is performing certain operations, or when a server is under heavy load. Configuring this value is important because when the value set for maximum disk usage is reached, replication stops, and your system is no longer protected. If your system uses a dedicated disk for log files, consider disabling the maximum disk usage setting.
Procedure
• If your system uses a dedicated disk for log files, consider disabling the maximum disk usage setting. To do this, setMaximum Disk Usageto zero (0).
Note: When Maximum Disk Usage is disabled, there is a risk that
this happens, a shutdown and restart may be required before replication can resume.
• SolarWinds recommends aMaximum Disk Usagesetting that leaves a little overflow space to enable SolarWinds Failover Engine to stop replicating gracefully. To configureMaximum Disk Usage, select theLogstab of the
Configure Server Wizardand enter the maximum dedicated disk space allocated for message queue log files and clickFinishto accept the changes.
Cluster administered as a single entity using the SolarWinds Failover Manager. The SolarWinds Failover Manager, which can be run from any server in the Cluster or remotely from another machine in the same subnet, simplifies routine administration tasks for one or more Clusters.
Note: The controlling workstation must have SolarWinds Failover Engine or SolarWinds Failover Engine Client Tools installed.
Install Client Tools
SolarWinds Failover Engine allows installation of SolarWinds Failover Engine Client Tools for remote management of SolarWinds Failover Engine clusters.
Prerequisites
When installing SolarWinds Failover Engine Client Tools on Windows XP, the following Service Pack levels are required.
• Windows XP 32 bit SP3
• Windows XP 64 bit SP2
Note: SolarWinds Failover Engine Client Tools requires that Microsoft™.Net
Framework 4 be installed prior to runningSetup.exe. If .Net Framework 4 is not installed when you attempt to initiate Setup, SolarWinds Failover Engine Client Tools will prevent installation until .Net Framework 4 is installed.
Procedure
1. To install SolarWinds Failover Engine Client Tools, download, extract the contents, and initiate SolarWinds Failover Enginesetup.exe.
a) Download SolarWinds Failover Engine to a suitable location..zip
b) Extract the contents of the SolarWinds Failover Engine.zipfile. c) Double-click thesetup.exefile to initiate the installation process. 2. On theSetup Typepage, selectInstall Client Tools Onlyand clickNext.
3. Read the license agreement carefully and selectI accept terms of the License Agreement. ClickNext.
4. Configure the installation paths. The default installation location is
C:\Program Files\SolarWinds\FoE\ but can be changed by manually typing a path to another install location. Alternatively, clickBrowseto select one of these locations. SelectCreate icons on Desktopand clickNext.
Note: The path of the SolarWinds Failover Engine Client Tools installation folder cannot contain Unicode characters. The path of the SolarWinds Failover Engine Client Tools installation folder can only contain lower and upper case letters A to Z, digits from 0 to 9, and the following special characters: space \ _ - ( ) . :
Additionally, SolarWinds Failover Engine Client Tools does not support file or folder names ending with a period “.” or space “ “.
5. Review the summary of options and configuration information for the installation. ClickNext.
Pre-install checks run to ensure that the installation can continue. TheReport
pane displays the results of the pre-install checks. If some pre-install checks are unsuccessful, go back through the wizard, make the necessary changes, and run the pre-install checks again.
6. If the pre-install checks are successful, clickNext.
The next page displays the progress of the installation. During this process, SolarWinds Failover Engine Setup installs the necessary files and folders onto your system and applies the configuration you specified.
7. ClickNextafter SolarWinds Failover Engine Client Tools components are complete.
TheClient Tools Installation Completepage is displayed. 8. ClickFinish.
Starting the SolarWinds Failover Manager
You can start the SolarWinds Failover Manager from any server in the SolarWinds Failover Engine Cluster.
Procedure
1. Right-click the SolarWinds Failover Engine interactive status icon in the Windows tool tray (located on the right side of the Windows tool bar). The SolarWinds Failover Engine quick access menu opens.
Figure 11: SolarWinds Failover Engine Quick Access Menu
2. SelectManage Server. The SolarWinds Failover Manager opens in a new window and shows the SolarWinds Failover Manager Servers (overview) page.
Alternatively you can start the SolarWinds Failover Manager from the SolarWinds Failover Engine program group on the Windows Start menu. This is the only method supported if the SolarWinds Failover Manager has been installed on a workstation that is not part of the Cluster.
Figure 12: SolarWinds Failover Engine Servers (Overview) page
Navigating the SolarWinds Failover Manager
After the SolarWinds Failover Manager is running, use the navigation panel on the left of the SolarWinds Failover Manager page to view and select the Groups, and Cluster Connections to manage with the SolarWinds Failover Manager.
Note: A Group is an arbitrary collection of SolarWinds Failover Engine Clusters used for organization.
A Connection, or Cluster Connection, allows SolarWinds Failover Manager to communicate with a SolarWinds Failover Engine Cluster, either on the same machine or remotely.
The Group or Cluster you select make in the navigation panel “point” the SolarWinds Failover Manager to that Group or Cluster, and the SolarWinds Failover Manager provides information related to only the selected Group or Cluster. To avoid confusion, pay particular attention to the selection in the navigation panel when you are managing more than one Group or Cluster.
Note: Groups and Clusters are not automatically detected by the SolarWinds Failover Manager. Each Group and Cluster you want to manage must be added to the SolarWinds Failover Manager before you can use it to view status or change settings for that Group or Cluster Connection.
Select a Cluster in the navigation panel of the SolarWinds Failover Manager to show a set of tabs and sub-tabs that offer detailed status and control of the associated SolarWinds Failover Engine servers in the Cluster. The table below provides an outline of these pages.
Figure 13:
Table 1: SolarWinds Failover Manager Interface Features
Interactive Features Sub-tab
Tab
Main frame features selectable servers (click on a server to select) and graphical status
Summary Server
Graphical display of connectivity status between servers in the Cluster.
Monitoring
Buttons includeConfigure Pings,Configure Failover, and
Configure Response Times
Graphical display of network connectivity status
----Network
Summary pane identifying the Active server and status of network connectivity
Ping Targets from Currently Active Server pane listing targets and associated IP addresses
Buttons includeConfigure PingsandConfigure Auto-switchover
Detail of application health and Log Summary
Applications
Application Health pane -Clearbutton
Applications pane -Edit,Remove,Start Applications,
Stop Applications, andConfigurebuttons Applications Log pane -Filters,Propertiesbuttons List of services and current status
Services
Add,Edit,Remove,Move UpandMove Downbuttons List of tasks
Tasks Add,Edit,Remove,Move Up,Move Down,Run Now, andUser Accountsbuttons
List of rules Rules
Edit,Check Nowbuttons List of Plug-ins
Plug-ins
Install,Uninstall,Editbuttons
Configurationbutton - Displays theOrphaned Files,Fast Check, andControlled Shutdowntabs
Replication Data
Interactive Features Sub-tab
Tab
Registry Synchronization Status pane -Full Registry Check
button
File Hierarchy pane -Full System Checkbutton,
Synchronizebutton +Including Subdirectoriescheck box,
Verify and Synchronizebutton +Including Subdirectories check box.
List of file filters and state (EffectiveorNot Effective) File Filters Buttons -Add Inclusion Filter,Add Exclusion Filter,Edit,
Remove
Not available in this release Rollback
Graphical status of traffic -Configurebutton
Traffic Queues Tabs in bottom frame provide detailed information about PrimaryServer andSecondaryServer send and receive queues status (P>S Connection)
Status of WAN and WAN Compression/Acceleration,
Configurebutton WAN
Compression
Detailed Event Log
----Logs Buttons:event log to recipients immediatelyExport event log as comma-separated text,Remove all entries,Mail
from the event log,Filters,Configure,Properties,Mail Settings,Configure Alerts,Test Alert Reporting
Changing the SolarWinds Failover Manager Font
The font face and font size can be changed using the SolarWinds Failover Manager interface.
Procedure
1. SelectFont Selectionfrom thePreferencesmenu. TheFont Selection dialogopens.
.
Figure 14: Font Selection Dialog
2. In theStylepane, scroll to and click to select a font.
3. In theSize:text box, type a new numeric (point) size or use the arrow buttons to change the font size.
4. ClickOKto accept the changes and close the dialog. A confirmation message appears.
5. ClickYesto confirm the changes and restart the SolarWinds Failover Manager to apply the new font settings. ClickNoto restart later; the changes will be applied the next time the SolarWinds Failover Manager is started. ClickCancelto exit without making any changes
Add a SolarWinds Failover Engine Group
The Add Group feature in the SolarWinds Failover Manager allows you to add new SolarWinds Failover Engine Groups to manage.
Procedure
1. Open the SolarWinds Failover Manager and clickAdd Groupin the tool bar, selectAdd Groupfrom theFilemenu, or right-click an existing group in the navigation panel and selectAdd Groupfrom the menu.
Figure 15: Add Group - Tool Bar Button
2. Type a name for the new group into the text box and clickOKto create the group. The newly created group appears in the navigation panel on the left of the SolarWinds Failover Manager window.
Figure 16: Add Group Dialog
Figure 17: Group Added to Navigation
Remove an SolarWinds Failover Engine Group
The Remove Group feature in the SolarWinds Failover Manager allows you to remove existing SolarWinds Failover Engine Groups from management.
Procedure
1. Select the Group to be removed in the navigation panel of the SolarWinds Failover Manager. ClickRemove Groupin the tool bar, or selectRemove Groupfrom theFilemenu.
Figure 18: Remove Group - Tool bar Button
A Confirmation message appears.
2. ClickYesto remove the selected Group orNoto cancel removal and close the message window.
The selected Group is removed.
Add a New Connection
When you created a SolarWinds Failover Engine Group using the instructions inAdd a SolarWinds Failover Engine Group, you created an empty container. Next you must add the connections to the Cluster or Clusters that comprise your new SolarWinds Failover Engine Group. TheAdd Connectionfeature in the SolarWinds Failover Manager allows you to add a new Cluster Connection to an existing SolarWinds Failover Engine Group.
Procedure
1. In the navigation panel, select the SolarWinds Failover Engine Group to receive the new connection. ClickAdd Connectionin the tool bar, Select
Add Connectionfrom theFilemenu, or right-click an existing group in the navigation panel and selectAdd Connectionfrom the menu.
Figure 19: Add Connection - Tool bar Button
TheAdd Connectiondialog appears.
2. Type theHost Nameor IP address for the new connection into the text box, select thePort Number(if different from the default value of52267), and
select a group from theAdd to Groupdrop-down list (to add the connection to a Group other than the one currently selected).
Figure 20: Add Connection Dialog
Note: You may be prompted to login. If so, login using a valid
administrator-level User Name and Password for the server for which you are adding a connection, and clickOK.
Figure 21: Add Connection Login
3. Click theAlternate IPsbutton to add additional IPs for the server.
Note: The Add Connection dialog allows you to add additional Management IP addresses to the connection for the server. In the event that the main IP address becomes unavailable, the SolarWinds Failover Manager will attempt to use the alternate IP addresses to connect to SolarWinds Failover Engine.
Important: To use alternate IP addresses, you must configure Management IP addresses for the server.
Figure 22: Add Alternate IPs Dialog
Figure 23: Add Alternate IP Dialog
4. ClickOKon each dialog to create the connection.
The newly created connection appears in the navigation panel on the left of the SolarWinds Failover Manager window, and theServer Summary
page updates to represent any existing network relationships of the added server.
5. Enter the remaining connections necessary to define the new SolarWinds Failover Engine Group.
Edit a Connection
The Edit Connection feature in the SolarWinds Failover Manager allows you to change thePort Numberfor existing connections.
Procedure
1. In the navigation panel, select the connection you want to change and select
Edit Connectionfrom theFilemenu, or right-click an existing connection in the navigation panel and selectEdit Connectionfrom the menu.
Note: When a configured connection is not found, an error message similar to the one shown in below may be displayed. ClickEdit Connectionto reconfigure the connection.
Figure 24: Edit Connection - File Menu
Figure 25: Edit Connection - Error Message
Figure 26: Edit Connection Dialog
2. Type the new value for thePort Numberinto the text box, or use the up and down arrow controls to the right of the text box to select a new value. Click
OK.
Move a Connection
The Move Connection feature in the SolarWinds Failover Manager allows you to reassign an existing Cluster to a different Group.
Procedure
1. Select the Cluster in the navigation panel and clickMove Connectionin the tool bar, selectMove Connectionfrom the File menu, or right-click on the Connection in the navigation panel and selectMove Connectionfrom the menu.
Figure 27: Move Connection - Tool bar Button
The Move Connection dialog appears.
Figure 28: Move Connection Dialog
2. Select the destination Group to receive the Connection from the drop-down list and clickOKto move the Connection, or clickCancelto dismiss the dialog without making any changes.
Remove a Connection
The Remove Connection feature in the SolarWinds Failover Manager allows you to remove an existing Connection.
Procedure
1. Select the Connection in the navigation panel and clickRemove Connection
in the tool bar, selectRemove Connectionfrom theFilemenu, or right-click on the Connection in the navigation panel and selectRemove Connection
Figure 29: Remove Connection - Tool bar Button
A confirmation message appears.
2. ClickYesto remove the selected Connection orNoto cancel removal and close the message window.
Edit User Name and Passwords
The Edit User Name and Password feature in the SolarWinds Failover Manager allows you to change theUser NameandPasswordsettings used to connect to a given Cluster.
Procedure
1. Select a connection in the navigation panel and selectEdit User Name and Passwordfrom theFilemenu, or right-click on the Connection in the navigation panel and selectEdit User Name and Passwordfrom the menu.
Figure 30: Edit User Name and Password - Navigation panel
2. Type new values forUser NameandPasswordinto the corresponding text boxes and clickOKto accept the changes orCancelto close the dialog without making any changes.
Review the Status of SolarWinds Failover Engine
Clusters and Groups
Procedure
• Click on the top level of the SolarWinds Failover Manager,Groups, to view a list of all managed Clusters and a quick status of the protected applications, network, file system, and registry settings for each Cluster. In the example below, two Clusters are identified and both are operating as expected.
Figure 32: SolarWinds Failover Engine Servers Overview page
The status hyperlinks in the overview page link to pages that provide more specific, related information and management controls.
• Click:
Description Option
To view theServer: Summarypage Server
To view the applications status on theApplications: Summarypage Applications
To view the network status on theNetwork Monitoringpage Network
To view the File System status on theData: Replicationpage File System
To view the Registry status on theData: Replicationpage Registry
Exit SolarWinds Failover Manager
Procedure
1. ClickExiton theFilemenu.
TheConfirm Exitmessage appears.
2. ClickYesto close the SolarWinds Failover Manager window orNoto dismiss the message without exiting the SolarWinds Failover Manager.
Shutdown Windows with SolarWinds Failover Engine
Installed
Procedure
• Always stop SolarWinds Failover Engine before attempting to shut down Microsoft Windows. If an attempt is made to shut down Windows without stopping SolarWinds Failover Engine, SolarWinds Failover Engine will not stop in a graceful manner.
Controlled Shutdown
A Controlled Shutdown is a process where the SolarWinds Failover Engine service is able to delay a system shutdown for a sufficient period to perform all of the necessary steps required to stop the applications and replication in a synchronized state. The Controlled Shutdown is intended for situations where an unattended planned shutdown of the server is necessary. When configured in the SolarWinds Failover ManagerData: Replicationpage, this feature allows SolarWinds Failover Engine to gracefully shutdown in the absence of the administrator.
Procedure
1. Navigate to theData: Replicationpage of the SolarWinds Failover Manager. 2. Click theConfigurebutton.
3. Select theControlled Shutdowntab of theReplication Configurationdialog. 4. Select the servers on which to enable Controlled Shutdown.
5. Select the days and hours parameters under which the server(s) will perform Controlled Shutdown.
6. Configure the length of time for the server(s) to wait for the Controlled Shutdown.
Figure 33: Controlled Shutdown
7. clickOK.
Note: When the Fast Check process is enabled in addition to the Controlled Shutdown process, SolarWinds Failover Engine can be scheduled to perform unattended restarts of the system while maintaining synchronization of data. For more information about Fast Check, seeConfigure Fast Check.
Protection against operating system or hardware failure affecting the active server is facilitated by multiple instances of SolarWinds Failover Engine that monitor one another by sending “I am alive” messages and reciprocating with acknowledgments over the SolarWinds Channel. If a passive server detects that this process (heartbeat) has failed, an automatic-failover is initiated.
Monitoring the Status of Servers
TheServer Monitoringpage provides information about the status of communications between the servers within the Cluster. The graphical representation provides an overview of the status of communications between the servers. A green channel icon indicates that the channel is connected and healthy, a red-dashed channel icon indicates that communications are not operational between the indicated servers, and an orange icon with an exclamation mark on it indicates that the channel has just disconnected and SolarWinds Failover Engine will wait for the configured amount of time before determining that the channel is disconnected. In addition to the heartbeat sent between the servers, SolarWinds Failover Engine also sends a ping to ensure that the servers remain visible to one another.
Figure 34: Server Monitoring page
Configure SolarWinds Failover Engine Settings
TheServer Monitoringpage provides three configuration features:Configure Pings,Configure Failover, andConfigure Response Times.
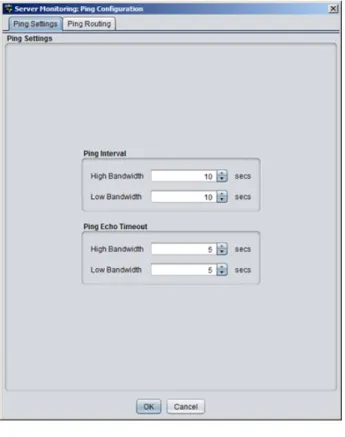
Configure Pings
TheServer Monitoring Ping Configurationdialog allows you to configure the
Ping Intervaland thePing Echo Timeoutused to conduct ping operations between servers. Additionally, ping routing can be configured to add additional ping targets by selecting thePing Routingtab of the dialog. The IP addresses of all NICs used for the SolarWinds Channel were identified during installation and do not need to be added. You can add additional targets to the list for each server’s channel connection in the event of redundant NICs. The settings in theServer Monitoring Ping Configurationdialog allow SolarWinds Failover Engine to send pings across the SolarWinds Channel and the Principal (Public) Network in addition to the heartbeat (“I am alive” messages) to confirm that the server is still operational and providing service.
Procedure
• ClickConfigure Pingsto open theServer Monitoring Ping Configuration
.
Figure 35: Server Monitoring: Ping Configuration: Ping Settings Tab
• Select thePing Routingtab and enter the auxiliary IP addresses of the appropriate servers.
Configure Failover
The Failover timeout dictates how long SolarWinds Failover Engine waits for a missed heartbeat before it takes a pre-configured action. This value is set to 60 seconds by default.
Procedure
1. To configure theFailover timeout, clickConfigure Failoverto open the
Server Monitoring: Failover Configurationdialog.
Figure 37: Server Monitoring: Failover Configuration
2. Type a new numeric value (seconds) in theFailover timeouttext box or use the arrow buttons to set a new value.
3. Select or clear the check boxes to select the actions to take if the specified
Failover timeoutis exceeded.
Note: For more information about configuring options for failover, see
Split-brain Avoidance.
4. ClickOKto accept the changes orCancelto dismiss the dialog without making any changes.
Note: The default configuration for a WAN installation is with the automatic switchover (spontaneous failover) DISABLED. To enable Auto-switchover in a WAN pair, selectNetwork>Configure Auto-Switchover, select the check box and set the missed ping failover count.
The following options are available:
• Time to wait following channel connection before starting replication
• Time to wait following channel disconnection before stopping replication
Figure 38: Server Monitoring: Response Times
2. Type new numeric values (second) into the text boxes or use the arrow buttons to select new values.
3. ClickOKto accept the changes orCancelto dismiss the dialog without making any changes.
Common Administrative Tasks in SolarWinds
Failover Engine
TheServer Summarypage provides the following buttons that allow you to quickly perform common administrative tasks:
• Make Active— Opens theMake Active Optionsdialog.
Figure 39: Make Active Options
Select a server and clickOKto make the selected server active, or click
Cancelto close the dialog without making any changes.
Figure 40: Shutdown Options
Select the server(s) to shut down. If you select theActiveserver (primary or secondary), additional options to stop or not stop protected applications appear in the dialog. ClickOKto perform the selected shutdown options, or clickCancelto close the dialog without shutting down.
• Start Replication— Opens theStart Replication Optionsdialog.
Figure 41: Start Replications Options
Select to start or not start the protected applications and clickOKto start replication from theActiveserver. By default, all protection modes start when SolarWinds Failover Engine starts and a manual start is not required unless the system stopped in response to an automated stop.
Figure 42: Stop Replication Options
Use this method to stop replication, such as to contain a virus infection or to upgrade a protected application.
Select whether to stop or not stop protected applications and clickOK. Replication of data files stops and, if selected, protected applications also stop.
Note: The SolarWinds Failover Engine service continues to run on the servers, providing heartbeats and protecting the system and network facets of the active server.
• Start Applications— Click to start the protected applications on the active server.
• Stop Applications— Click to stop the protected applications on the active server.
• Configure— Click to open theConfiguredialog.
Figure 43: Configure (Shutdown)
Select the radio button corresponding to whether you want to stop or leave running the protected applications when SolarWinds Failover Engine is shut down. You can select whether to leave protected applications running upon shutdown when a net stop command is issued, and to start protected applications upon startup when a net start command is issued. Type a number (seconds) or use the arrow buttons to select an alert threshold value for time difference between servers, which is checked at handshake following
startup. ClickOKto accept the changes orCancelto dismiss the dialog without making any changes.
Forcing a Switchover
After SolarWinds Failover Engine is configured to protect all required applications and data, it allows the secondary to take over from the primary server in a managed and seamless way called a managed switchover.
This is particularly useful when maintenance work performed on the primary server requires rebooting the server.
Prior to performing work on the primary server, a managed switchover can be triggered by selecting the server to make active and then clickingMake Active
in theServer: Summarypage. This changes the server roles such that the active server becomes passive and the selected server becomes active. This means users are able to work continuously while the primary server is off line. When the primary server is back up and running, the managed switchover can be triggered again so that the primary server becomes active and the previously active server becomes passive.
Important: The managed switchover process may be performed at any time as long as the systems are fully synchronized with respect to data files and registry replication. Switchovers cannot be performed if either server is in an unsynchronized or unknown state.
Since a managed switchover cannot be performed during synchronization, it is important to review the queue information prior to attempting a managed switchover. If the queues are large, file operations on the active server are high and for this reason it may be prudent to delay a managed switchover due to the length of time required to completely clear the queue. Queue lengths can be viewed in theData: Traffic/Queuespage of the SolarWinds Failover Manager.
Failover versus Switchover
Do not confuse a failover with a switchover.
A switchover is a controlled switch (initiated from the SolarWinds Failover Manager or automatically by SolarWinds Failover Engine when pre-configured) between the active and passive servers. A failover may happen when any of the following fail on the active server: power, hardware, or Channel
communications. The passive server waits a pre-configured period of time after the first missed heartbeat before initiating a failover. When this period expires,
server is warranted should the servers experience missed heartbeats.
Procedure
To configure failover:
Note: For information on configuring ping routing, seeConfigure Pingsand
Configure Public Network Monitoring.
1. Navigate toServer: Monitoring>Configure Failoverto open theServer Monitoring: Failover Configurationdialog.
2. TheFailover timeoutcan be customized by changing the default value (60 seconds) to a custom value. Type a new numeric value (seconds) in the
Failover timeouttext box or use the arrow buttons to configure how long SolarWinds Failover Engine waits for a missed heartbeat before it takes a pre-configured action to failover or isolate the active server from the network. 3. Select or clear check boxes for the items listed below to select the actions
to take if the specifiedFailover timeoutis exceeded.
When the configuredFailover timeoutvalue has elapsed, SolarWinds Failover Engine will evaluate, in order, the following pre-configured rules before taking action:
Note: If a rule is not selected, SolarWinds Failover Engine will skip the rule and move to the next rule in the list. After all selected rules have been evaluated SolarWinds Failover Engine will take action.
• Failover from Primary server to Secondary server if channel heartbeat is lost for failover timeout
• Failover from Secondary server to Primary server if channel heartbeat is lost for failover timeout
• Prevent failover or auto switchover while not synchronized
• Prevent Failover if channel heartbeat is lost but Active server is still visible to other servers
• Make the server passive if the Channel and Public networks are lost for the configured failover timeout
Note: You must configure Management IP addresses on the Principal (Public) network cards of each server to allow the passive server to send a ping via the Principal (Public) network. Management IP addresses are
additional IP addresses assigned to the network card connected to the Principal (Public) network. They are used to allow the passive server to communicate, because unlike the Principal (Public) IP address, they are not filtered. For information about how to configure Management IP addresses, seeConfiguring Management IP Addressing.
4. ClickOK.
Important: If eitherServer: Monitoring Ping RoutingorNetwork Monitoring Ping Routingis misconfigured, unpredictable behavior can occur.
Typical Failover and Active Server Isolation Scenarios
The following scenarios assume that SolarWinds Failover Engine is deployed in a LAN with all rules selected in theServer: Monitoring>Configure Failover
>Failover Configuration dialog.
Failover
The following scenario assumes the active server has failed and is no longer available.
Upon detection of missed heartbeats, SolarWinds Failover Engine on the passive server performs the following steps:
1. As soon as the passive server detects that the SolarWinds Channel is experiencing missed heartbeats, it will determine it itself is a valid failover target to the currently active server.
2. As soon as the passive server detects that the SolarWinds Channel is experiencing missed heartbeats. It will attempt to ping the active server's Management IP address via the Public network using the passive server's NIC configured with the Management IP address. If the ping is successful, the passive server will veto the failover. If the ping is unsuccessful, it will continue to the next step.
Note: Since the passive server assumes that active server has failed, the passive server will not attempt to verify synchronization with the active server.
3. At this point, the passive server checks the configured value of theFailover timeoutand starts a "Heartbeat lost" countdown The passive server continues with the next step.
4. At this point, failover to the passive server is postponed until the value of theFailover timeouthas elapsed.
5. The passive server changes its role to active, removes the packet filter, and starts all services.
Figure 44: Network Isolation Workflow Diagram
Upon detection of missed heartbeats SolarWinds Failover Engine performs the following steps:
1. As soon as the active server detects that the SolarWinds Channel is experiencing missed heartbeats, it will determineif a valid failover target (the passive server) is present.