Volume 58, 2019, Pages 8–16
Proceedings of 34th International Confer-ence on Computers and Their Applications
RealPi - A Real Time Operating System on the Raspberry
Pi
Samuel Delaney, Dwight Egbert, and Frederick C. Harris, Jr.
Department of Computer Science and Engineering, University of Nevada Reno, NV 89557, USA
[email protected] [email protected] [email protected]
Abstract
Academia has always sought to ride the line between established thought and new developments. No much more so than in the terms of technology. Universities seek to teach using known and proven methods and resources but also stay relevant with new technologies to provide students the knowledge they will need to be competitive in the work place or graduate field. In this work we will present how the University of Nevada approaches this problem with its Real Time Operating system course. Namely on how using the established Micro C/OS II Real time Operating System with the new builder phenomena the Raspberry Pi we can overcome the challenge of updating a tried and true lesson plan in order to use technology relevant and interesting to the students of today.
1
Introduction
All Computer Science and Computer Engineering disciples have encountered the “real time” catchphrase at least once in their career. Whether that experience equates to a simple buzz word or a fundamental understanding is beyond the scope of this article but none the less the concept has a claim to key concepts in the computing world.
As technology has advanced and computers become faster and more efficient they allow us more room to error in our programming and still produce acceptable response times. Even the most observant user will be unable to distinguish the difference of execution time measured in a few clock cycles. However, as students continue to develop their programming expertise they will encounter problems were devices are stripped to bare essentials to keep costs down but still expect timely program execution. This is the realm of the traditional Real Time Operating System course.
But as time heals all wounds it also destroys all circuitry. For many years students in Real Time would use the 8051 micro-controller as the development platform for their course work. Students today need a processor more in line with the products that today’s software development companies are utilizing and the Raspberry Pi is such a platform. Utilizing the Pi hardware but still maintaining the ease of use offered by the 8051 lead to the main focus of this work and will enable students to run the same simple real time operating examples provided by Jean Jacques but on a board that will stay pace with them their academic careers.
To best convey this process from idea to working project, this work will be broken out as follows: Section 2 will introduce background concepts and other related work. Section 3 will cover the hardware utilized and provide a high level view of specific critical components. Section 4 will shift focus from hardware to software and the actually porting of the Micro cOS II Operating system utilizing a starting code base provided from GitHub [4], and Section 5 will provide a summary of lead into future work.
2
Background and Related Work
Whole courses are spent covering the basic topics in Operating Systems. In this paper we must assume that the reader has basic knowledge of Operating Systems including kernel’s schedulers, context switching and multitasking.
For a system to be classified as real-time it must follow a simple rule: Any task must be completed and correct before it’s deadline is hit. It seems that if this is all that is required that almost every computer is running in real-time. Everyday users open their email, play video games, and run other applications without issue or users walking away in frustration as they never complete the task but the fact is that there is no guarantee that any of these tasks will complete in a set time constraint. Browsers may take time to load waiting for resources to become available, a system with many other applications may not prioritize the latest task resulting in longer compute times. This lack of a guaranteed result in a set time prevents system from being considered real-time.
Perhaps the best example of a real-time system is the pacemaker. One of the methods a pacemaker may use to regulate heart rate is that of Bi-ventricular Pacing to treat Congestive Heart Failure. In a healthy heart the left ventricle will receive an electrical pulse to compress the chamber, and the right ventricle will receive a pulse as well in order to contract in unison. In a patient suffering from Congestive Heart Failure however the right ventricle either receives a delayed or absent pulse preventing the heart from pumping in unison. When the ventricles fail to pump in unison the rate of blood flow becomes compromised leaving the patient at risk of death or disability. With the use of a pacemaker configured to use Bi-ventricular pacing an embedded device will detect the pulse in the left ventricle and then within milliseconds send a pulse to the right ventricle to cause it to contract. In this system there is essentially one task: When a pulse is detected send a pulse. The deadline for this task is configured by the doctors assessing the patient but it will be under second in time. It’s readily apparent that this is a real time system as the pacemaker will always send a pulse, completing the task, before the deadline is approached. If it does not the consequences are catastrophic.
A real-time operating system servers as a facilitator for real-time applications by using an advanced scheduler that ensures the most important task is giving priority in execution time. There are different methods in how this scheduler approaches executions of tasks.
become starved for jobs or resource hogging. As a result most scheduling algorithms in real time systems are highly advanced and are key components of the system.
The main real time operating system that this paper will focus on is the MicroC/OS-II ”The Real Time Kernel”. While it has been replaced commercially by a new version MicroC/OS-III version II still remains a main stay choice. Part of this viability is no doubt due to it’s free licensing for personal or educational use, but MicroC/OS-II has other key features that appeal to hobbyists and large developers alike. First of these features is the scalability of the OS, by scalability it means that the developer can choose what features to build into the kernel and leave out unused modules keeping the kernel size as small as possible. This is also known as avoiding ”bloat” or space dedicated to programs that are never used. For scheduling MicroC/OS-II uses a preemptive scheduler so all context switching is performed by the OS itself. In addition to being preemptive it is also deterministic ensuring that all tasks will be completed on time and correctly [6].
The concept of running a Real Time Operating System on the Raspberry Pi has been milling around on many INTERNET forums since the Raspberry Pi was released. The project of porting an RTOS to the Raspberry Pi had been discussed though most users found that through virtualization of the RTOS that the performance was within the threshold needed for the hobbyist. Most predominate of these virtualizations was FreeRTOS. FreeRTOS is a real time operating system offered as an open source and free RTOS solution for a multitude of processors. Built as a collaboration effort from leading chip companies and possessing a small foot print, the OS has found wide spread use through out the industry, with a significant presence in the micro-controller market. For this reason alone it makes sense that this would be an entry point for having a RTOS running on the Raspberry Pi and to date is the most complete ported RTOS available for the Raspberry Pi [3].
3
Hardware
While Real Time Operating systems differ greatly from their bigger more well known counter parts the hardware used is essentially the same. Porting software is simply the task of writing the interface code that will allow the software to use the hardware. In cases of embedded systems this file is sometimes referred to as the board support package file or BSP file.
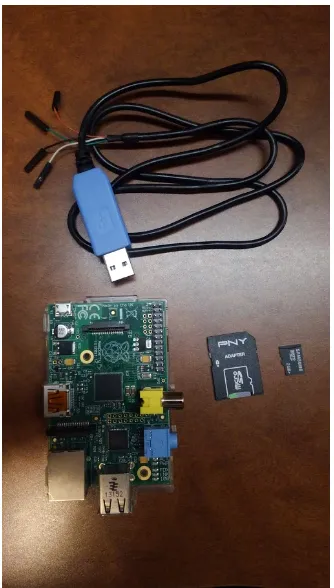
While computer enthusiasts have been readily abundant since the first do it yourself com-puters were released in the early 70s, the initial cost was ever on the rise. In response to this absence of a low cost all in one computer the Raspberry Pi was developed. Developed in the United Kingdom by the Raspberry Pi foundation, the main goal of the Pi was to create a cost effective platform to teach children Computer Science. By providing an all in one board which only requires a SD card, monitor, input device to run it was a practical and affordable device.
Figure 1: Pi 1 Hardware
4
Implementation
4.1
Tool chain
Before we can delve into the workings of the Raspberry Pi and Micro C/OS-II we need to be able to convert our source files into a language that the Raspberry Pi can use. This is accomplished through the use of a tool chain. A tool chain, like it’s namesake, is a group of tools, in our case programs, that when linked or grouped together create a software program. One of the most prevalent examples tool chain use is the Integrated Development Environment or IDE. Most IDEs like Microsoft’s Visual Studio provide the ability to edit code, compile and link objects. The more advanced of these tool-chains build “hooks” into the developers programs that allow on the fly debugging. It is worth to note however that not all IDEs provide all these features and may only provide subsets of the previous mentioned capabilities.
As the Raspberry Pi is a minimalist computer which is marketed as a cost effective tinker/de-velopment platform, it makes sense to use a minimalist approach to develop our software. As such for the toolkit used in this project we will be using readily available freeware. The free tool-chain that does all the steps and works on the processor we need is called Yagarto.
Yagarto was created and considered feature compete five years later. Since it’s development new tool-chains and IDE’s have been developed to deploy ARM programs however the simplicity of use and proven track record keep Yagarto a stable of ARM hobbyists [9].
4.2
Making the Kernel
The Yagarto tool-chain uses the GCC compiler, basically allowing us to use C++, to build and link objects which are then packaged into a Kernel image based on the ARM architecture specified in our make file. While Yagarto will provide us that ARM kernel shell, without the specific operating system code it is not enough to run the processor much less a full board. To actually allow the target board, in our case the Pi, to run we need to provide the operating system itself.
Micro c/OS-II, while aged, was still written with the concept that operating systems should not have specific hardware dependencies. As such we are able to use the source code as is from the developer Micurium. This is a huge boon as any changes made to the Micro c/OS-II code would prompt significant testing changes to ensure we didn’t accidentally alter functionality. However, we are not able to simply drop in the code and hit run. There are two other key components that we need to address to bridge the gap from our high level source code to the low level assembly that drives the hardware. Specifically the board support package or bsp and the port of the OS CPU file. It is these two parts that will allow our software the knowledge it needs about the hardware to fully utilize the device. However, we need to eat this elephant one bite at a time and the board support package and cpu port will be discussed once we are further along in the process.
Early Goals Before bumping into the unknown blindly we set out to see if any Pi Enthusiasts or those in Academia had dabbled with the MicroC/OS-II system and could provide any ground work to build off of. During this research we found two projects that would benefit us greatly. The first was a bare metal programming of the Raspberry Pi to run simple tasks written by a developer named Dave Welch [8]. The term bare metal has many meanings to many people so we should clarify that in this context it is the most simple programming of a device we can do; very reminiscent of the old paper programs where we need to tell the device how to everything from storing data to turning LEDs on and off. Mr Welch’s simple programs however were critical in development as it provided the memory map that would allow me to access the hardware components on the Pi. Remember the Board Support Package we mentioned earlier? The memory addresses provided by Mr Welch were essential in building the BSP as they provided all the memory address and simple calls that could be used to access the hardware on the Raspberry Pi. The second project was found on GitHub developed by Weng Kai which allowed a basic port of the Micro C/OS-II operating system to the original Raspberry Pi [4]. With his port we were able to see how he structured the build in order to utilize the Yagarto tool-chain in a user friendly manner and also create a build directory that wouldn’t confuse entry level programmers. It also provided us with a safe starting point for our build.
but upon the first attempt to build the amount of declaration errors was significant. This of course required the tedious task of ensuring all C++ and header files were linking appropriately and also modernizing some of the data types used throughout the program. All understandable as this original code was written in 2005. With this complete we can move to the next step: addressing the issue of creating a CPU port.
CPU Port The CPU port itself is relatively simple in relation to our goals as we are mainly concerned with two things, the Stack and the Registers. These two components are essentially the life blood of the project and are needed to perform any form of context switching. While a true port of a CPU would be a massive en-devour encompassing all aspects of the CPU our port only requires from us the where and how to do the context switching. This all takes place over two files. One file is a C++ file that is simply providing the memory location for the Stack. The memory locations used are the same ones provided by all ARM ports used by Micerium. The other file is an assembler source file and requires us to actually think as it is a bit more difficult. We now must tell the CPU how to to perform the context switching tasks using the stack we specified in our C file. We will take solace in the fact that we really only need to handle five aspects: 1) Storing the current working registers 2) Save our state 3) Handle an interrupt 4) Load a new state 5) Load new working registers
Utilizing other ports provided by Micerium we can see that each port essentially performs the same functions in context switching, it’s just a matter of syntax. It’s essentially just a matter of ensuring your compiler understands the assembly language you are using. For example, if a function’s intent it to put this value in register 2, we simply need to write the corresponding assembly for our compiler to take a value and place it in register 2.
With what essentially amounted to code house keeping complete we were able to build a kernel that would boot from the microSD card and start Micro C/OS II with two tasks. These tasks would simply write “Task 1” and “Task 2” back and forth as each interrupt was triggered but again the goal here was to have something that worked and we could go back to when it stopped working. Now our goal was to move from two simple tasks interrupting one another to examples provided to the students.
4.3
Micro C/OS-II examples
The textbook Micro C/OS II, the Real Time Kernel by Jean Lebrasse [5] has five examples that display the more predominant features of the Micro C/OS II operating system. Students compile and run these samples with minor modifications to understand the basics of the OS. However, the programs were meant to be compiled with a Borland 4.5 compiler and run on a system executing the DOS operating system, not a Raspberry Pi
To port these examples the following objectives were identified: Remove DOS entry and return protocols, remove and replace Borland specific functionality with gcc functionality and remove screen video display with serial port communications.
With the examples modified to remove all DOS references, Borland dependencies and in-formation being passed through the serial port we are now able to move the software into our kernel image. The easiest way to create our bootable SD card with our kernel is to inject our kernel into a prebuilt bootable SD card. To do this we need to download the Raspbian OS from the Raspberry Pi Organization website [2]. With OS in hand we can utilize a SD writing tool to burn the Raspbian OS to the SD card.
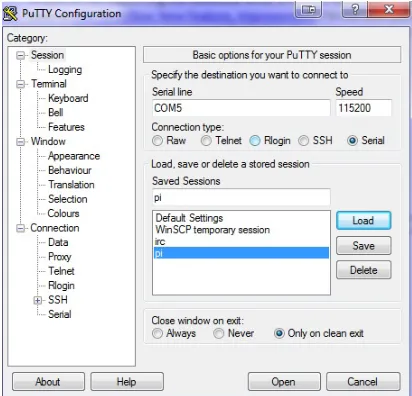
Figure 2: Sample Putty Configuration
Figure 3: A successful build output
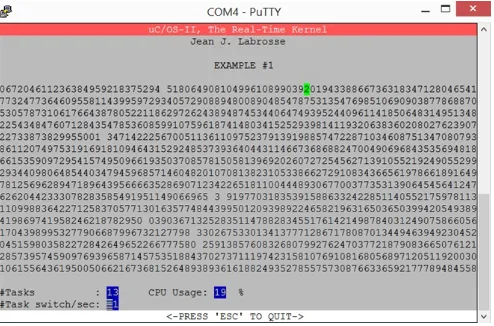
on a host PC to run the Putty [7] Serial application so we can see our tasks executing. Putty Configuration can be seen in Figure2. Using a serial to GPIO cable attached to both the Pi and our host PC we need only to apply power to the Pi and let the program run. By observing the Putty terminal we will shortly see the application begin to populate the terminal window with a graphical output and run the loaded project. The build of the kernel can be seen in Figure3, and the output of a running example can be seen in Figure 4.
4.4
Running Micro C/OS-II on the Pi
Figure 4: Running Example
5
Conclusions and Future Work
5.1
Conclusions
This work provided a look into how exposing students to new hardware but teaching thoroughly tested and reviewed software methodology we can both educate and motivate hand in hand.
We started by assembling all the components necessary to build our program. Preliminary research assisted us with the establishment of a simple working prototype. From there we assembled the tools needed to build a bootable kernel that could be used in the Raspberry Pi. Key to all of this was keeping students and their needs in mind. Aside from the board itself nothing in this project had to be purchased. Starting with simple freeware programs we were able to construct a tool-chain that would build a working kernel. Under the education license we could access all the components of the uCOS-II software for use. Finally with a few modifications this build could be converted to work in the Linux operating environment.
With the tools assembled we then focused on modifying our code to work with the Raspberry Pi hardware and CPU. Utilizing other ports as a guide, the build of the stack was complete and our program had access to the hardware components needed to run a simple program. From a working simple program we then added the working examples provided from Micrium.
Finally, with ported software we were able to assemble a bootable SD card that would run a Raspberry Pi that would provide a host PC running a Putty terminal our graphical interface that mirrored the DOS version identically. With the port complete the hope is to allow University students to build their knowledge and understanding of Real Time Operating systems on a system that will grow with them as they progress through their undergraduate careers.
5.2
Future Work
of the Micro cOS II RTOS. For cost purposes and sheer novelty of the power to size ratio, the Pi Zero will most likely be the candidate for students to utilize during a Real Time Operating Systems Course.
While the new Raspberry Pi Zero provides a cost efficient board with full capabilities to meet the requirements for the Real Time Operating Course, there is still work that could be accomplished. The Pi 3 provides a 64 bit processor and even more ram than the Pi or Pi 2. However, of interesting note is that the Pi 3 does not natively run in a 64 bit environment even though it utilizes a 64 bit processor. Work has already begun amongst tinkerers in the community to fix this issue and we do believe that it would prove a challenge for another graduate student to see what performance enhancements could be gained by running uCOS-II natively in a 64 bit environment.
Another limitation found during the development of this project was the direct writing to the frame buffer pixels. With the development of “hats” - small boards that attach directly to the pi, usually with LCD displays - it would be a great enhancement to develop a graphics library and BSP to replace the serial communications and allow the Pi to operate completely independently. In addition to the video port, many of the other internal hardware components were not added to the bsp as they were not needed. Future work could implement these devices and allow the uCOS-II tasks to operate them and build real applications for academia or industry. The functionality of the Raspberry Pi was barely tapped in this project, and as a working base the sky is truly the limit for future projects to build upon.
Acknowledgments
This material is based in part upon work supported by the National Science Foundation under grant number IIA- 1301726. Any opinions, findings, and conclusions or recommendations ex-pressed in this material are those of the authors and do not necessarily reflect the views of the National Science Foundation.
References
[1] Samuel Francis Delaney. RealPi - A Real Time Operating System on the Raspberry Pi. Master’s thesis, University of Nevada, Reno, Reno, NV, 89557, USA, December 2018. https://www.cse. unr.edu/~fredh/papers/thesis/075-delaney/thesis.pdf.
[2] Raspberry Pi Foundation. Raspberry Pi, Last accessed Mar 2017.https://www.raspberrypi.org/. [3] FreeRTOS. FreeRTOS, Last accessed Mar 2017. https://www.freertos.org/.
[4] Weng Kai. Github, 2013.https://github.com/fmlab/ucos_RaspberryPi.
[5] Jean Labrosse.MicroC OS II: The Real Time Kernel. Focal Press, Burlington, MA, second edition, 2015.
[6] Micrium. Micrium embedded software, Last accessed Mar 2017.https://www.micrium.com/rtos/ kernels/.
[7] Simon Tatham. Download PuTTY, Last accessed Nov 2018. https://www.putty.org/. [8] David Welch. Github, 2016. https://github.com/dwelch67/raspberrypi.