Version 2.4.0
Keith Donald , Erwin Vervaet , Jeremy Grelle , Scott Andrews , Rossen Stoyanchev , Phillip Webb
Copyright ©
Copies of this document may be made for your own use and for distribution to others, provided that you do not charge any fee for such copies and further provided that each copy contains this Copyright Notice, whether distributed in print or electronically.
Table of Contents
Preface ... ix
1. Introduction ... 1
1.1. What this guide covers ... 1
1.2. What Web Flow requires to run ... 1
1.3. Where to get support ... 1
1.4. Where to follow development ... 1
1.5. How to access Web Flow artifacts from Maven Central ... 1
1.6. How to access Web Flow artifacts with Ivy ... 2
1.7. How to access nightly builds and milestone releases ... 3
Accessing snapshots and milestones with Maven ... 3
2. What's New ... 4
2.1. Spring Web Flow 2.4 ... 4
Java-based Configuration ... 4
Spring MVC Flash Scope Integration ... 4
Partial JSR-303 Bean Validation ... 4
Hibernate 4 Support ... 4
Tiles 3 Support ... 4
Minimum JSF 2.0 Requirement ... 4
Portlet API 2.0 and JSF 2.0 support ... 4
Deprecations ... 5
2.2. Spring Web Flow 2.3 ... 5
Embedding A Flow On A Page ... 5
Support For JSR-303 Bean Validation ... 5
Flow-Managed Persistence Context Propagation ... 5
Portlet 2.0 Resource Requests ... 5
Custom ConversationManager ... 5
Redirect In Same State ... 5
Samples ... 6
2.3. Spring Web Flow 2.2 ... 6
JSF 2 Support ... 6
Comprehensive JSF 2 Support ... 6
Travel Sample With the PrimeFaces Components ... 6
Spring Security Facelets Tag Library ... 7
Spring JavaScript Updates ... 7
Deprecated ResourcesServlet ... 7
Dojo 1.5 and dojox ... 7
Two Spring JS artifacts ... 7
Client resources moved into META-INF/web-resources ... 7
JSF Portlet Support ... 7
Portlet API 2.0 and JSF 1.2 support ... 7
3. Defining Flows ... 8
3.1. Introduction ... 8
3.2. What is a flow? ... 8
3.3. What is the makeup of a typical flow? ... 8
3.4. How are flows authored? ... 9
3.5. Essential language elements ... 9
view-state ... 10
transition ... 10
end-state ... 10
Checkpoint: Essential language elements ... 10
3.6. Actions ... 11
evaluate ... 11
Assigning an evaluate result ... 11
Converting an evaluate result ... 12
Checkpoint: flow actions ... 12
3.7. Input/Output Mapping ... 12
input ... 13
Declaring an input type ... 13
Assigning an input value ... 13
Marking an input as required ... 13
output ... 13
Specifying the source of an output value ... 14
Checkpoint: input/output mapping ... 14
3.8. Variables ... 15
var ... 15
3.9. Calling subflows ... 15
subflow-state ... 15
Passing a subflow input ... 15
Mapping subflow output ... 15
Checkpoint: calling subflows ... 16
4. Expression Language (EL) ... 17
4.1. Introduction ... 17 Expression types ... 17 Standard Expressions ... 17 Template expressions ... 17 4.2. EL Implementations ... 18 Spring EL ... 18 Unified EL ... 18 OGNL ... 19 4.3. EL portability ... 19 4.4. Special EL variables ... 20 flowScope ... 20 viewScope ... 21 requestScope ... 21 flashScope ... 21 conversationScope ... 21 requestParameters ... 21 currentEvent ... 22 currentUser ... 22 messageContext ... 22 resourceBundle ... 22 flowRequestContext ... 22 flowExecutionContext ... 22 flowExecutionUrl ... 22 externalContext ... 22
5. Rendering views ... 24
5.1. Introduction ... 24
5.2. Defining view states ... 24
5.3. Specifying view identifiers ... 24
Flow relative view ids ... 24
Absolute view ids ... 25
Logical view ids ... 25
5.4. View scope ... 25
Allocating view variables ... 25
Assigning a viewScope variable ... 25
Manipulating objects in view scope ... 25
5.5. Executing render actions ... 26
5.6. Binding to a model ... 26
5.7. Performing type conversion ... 27
Type Conversion Options ... 27
Upgrading to Spring 3 Type Conversion And Formatting ... 27
Configuring Type Conversion and Formatting ... 28
Working With Spring 3 Type Conversion And Formatting ... 30
Formatting Annotations ... 30
Working With Dates ... 30
5.8. Suppressing binding ... 30
5.9. Specifying bindings explicitly ... 31
5.10. Validating a model ... 32
JSR-303 Bean Validation ... 32
Partial Validation ... 32
Programmatic validation ... 33
Implementing a model validate method ... 33
Implementing a Validator ... 34
Default validate method ... 34
ValidationContext ... 35
5.11. Suppressing validation ... 35
5.12. Executing view transitions ... 35
Transition actions ... 36
Global transitions ... 36
Event handlers ... 36
Rendering fragments ... 37
5.13. Working with messages ... 37
Adding plain text messages ... 37
Adding internationalized messages ... 38
Using message bundles ... 38
Understanding system generated messages ... 38
5.14. Displaying popups ... 39 5.15. View backtracking ... 39 Discarding history ... 39 Invalidating history ... 39 6. Executing actions ... 40 6.1. Introduction ... 40
6.2. Defining action states ... 40
6.3. Defining decision states ... 41
6.5. Action implementations ... 41
Invoking a POJO action ... 42
Invoking a custom Action implementation ... 42
Invoking a MultiAction implementation ... 42
6.6. Action exceptions ... 42
Handling a business exception with a POJO action ... 43
Handling a business exception with a MultiAction ... 43
6.7. Other Action execution examples ... 44
on-start ... 44 on-entry ... 44 on-exit ... 44 on-end ... 44 on-render ... 45 on-transition ... 45 Named actions ... 45 Streaming actions ... 46
Handling File Uploads ... 46
7. Flow Managed Persistence ... 48
7.1. Introduction ... 48
7.2. FlowScoped PersistenceContext ... 48
7.3. Flow Managed Persistence And Sub-Flows ... 49
8. Securing Flows ... 50
8.1. Introduction ... 50
8.2. How do I secure a flow? ... 50
8.3. The secured element ... 50
Security attributes ... 50
Matching type ... 51
8.4. The SecurityFlowExecutionListener ... 51
Custom Access Decision Managers ... 51
8.5. Configuring Spring Security ... 51
Spring configuration ... 52
web.xml Configuration ... 52
9. Flow Inheritance ... 53
9.1. Introduction ... 53
9.2. Is flow inheritance like Java inheritance? ... 53
9.3. Types of Flow Inheritance ... 53
Flow level inheritance ... 53
State level inheritance ... 53
9.4. Abstract flows ... 54 9.5. Inheritance Algorithm ... 54 Mergeable Elements ... 54 Non-mergeable Elements ... 55 10. System Setup ... 56 10.1. Introduction ... 56
10.2. Java Config and XML Namespace ... 56
10.3. Basic system configuration ... 56
FlowRegistry ... 56
FlowExecutor ... 57
10.4. flow-registry options ... 57
Assigning custom flow identifiers ... 58
Assigning flow meta-attributes ... 58
Registering flows using a location pattern ... 58
Flow location base path ... 59
Configuring FlowRegistry hierarchies ... 60
Configuring custom FlowBuilder services ... 61
conversion-service ... 62
expression-parser ... 62
view-factory-creator ... 62
development ... 62
10.5. flow-executor options ... 62
Attaching flow execution listeners ... 63
Tuning FlowExecution persistence ... 63
max-executions ... 64 max-execution-snapshots ... 64 11. Spring MVC Integration ... 65 11.1. Introduction ... 65 11.2. Configuring web.xml ... 65 11.3. Dispatching to flows ... 65
Registering the FlowHandlerAdapter ... 65
Defining flow mappings ... 65
Flow handling workflow ... 66
11.4. Implementing custom FlowHandlers ... 66
Example FlowHandler ... 67
Deploying a custom FlowHandler ... 68
FlowHandler Redirects ... 68
11.5. View Resolution ... 68
11.6. Signaling an event from a View ... 69
Using a named HTML button to signal an event ... 69
Using a hidden HTML form parameter to signal an event ... 69
Using a HTML link to signal an event ... 70
11.7. Embedding A Flow On A Page ... 70
Embedded Mode Vs Default Redirect Behavior ... 70
Embedded Flow Examples ... 71
11.8. Saving Flow Output to MVC Flash Scope ... 71
12. Spring JavaScript Quick Reference ... 72
12.1. Introduction ... 72
12.2. Serving Javascript Resources ... 72
12.3. Including Spring Javascript in a Page ... 74
12.4. Spring Javascript Decorations ... 74
12.5. Handling Ajax Requests ... 76
Providing a Library-Specific AjaxHandler ... 76
Handling Ajax Requests with Spring MVC Controllers ... 77
Handling Ajax Requests with Spring MVC + Spring Web Flow ... 77
13. JSF Integration ... 78
13.1. Introduction ... 78
13.2. JSF Integration For Spring Developers ... 78
13.3. Upgrading from Spring Web Flow 2.3 ... 78
Spring Faces Components ... 78
Third-party Libraries ... 79
Spring Security Facelets Tag Library ... 79
13.4. Configuring web.xml ... 79
13.5. Configuring Web Flow for use with JSF ... 80
13.6. Replacing the JSF Managed Bean Facility ... 83
Using Flow Variables ... 83
Using Scoped Spring Beans ... 83
Manipulating The Model ... 84
Data Model Implementations ... 84
13.7. Handling JSF Events With Spring Web Flow ... 85
Handling JSF In-page Action Events ... 85
Handling JSF Action Events ... 86
Performing Model Validation ... 87
Handling Ajax Events In JSF ... 87
13.8. Embedding a Flow On a Page ... 87
13.9. Redirect In Same State ... 88
13.10. Handling File Uploads with JSF ... 89
File Uploads with PrimeFaces ... 89
File Uploads with RichFaces ... 89
13.11. Using the Spring Security Facelets Tag Library ... 90
13.12. Third-Party Component Library Integration ... 92
14. Portlet Integration ... 94
14.1. Introduction ... 94
14.2. Configuring web.xml and portlet.xml ... 94
14.3. Configuring Spring ... 95
Flow Handlers ... 95
Handler Mappings ... 95
Flow Handler Adapter ... 95
14.4. Portlet Views ... 96
14.5. Portlet Modes and Window States ... 96
Window State ... 96
Portlet Mode ... 96
14.6. Using Portlets with JSF ... 97
... 97
14.7. Issues in a Portlet Environment ... 98
Redirects ... 98
Switching Portlet Modes ... 98
15. Testing flows ... 99
15.1. Introduction ... 99
15.2. Extending AbstractXmlFlowExecutionTests ... 99
15.3. Specifying the path to the flow to test ... 99
15.4. Registering flow dependencies ... 99
15.5. Testing flow startup ... 100
15.6. Testing flow event handling ... 100
15.7. Mocking a subflow ... 100
16. Upgrading from 1.0 ... 102
16.1. Introduction ... 102
16.2. Flow Definition Language ... 102
Flow Definition Updater Tool ... 102
EL Expressions ... 103
16.3. Web Flow Configuration ... 103
Web Flow Bean Configuration ... 103
Web Flow Schema Configuration ... 103
flow-executor ... 103
flow-execution-listeners ... 103
flow-registry ... 104
Flow Controller ... 104
Flow URL Handler ... 104
View Resolution ... 104
16.4. New Web Flow Concepts ... 105
Automatic Model Binding ... 105
OGNL vs Spring EL ... 105
Flash Scope ... 105
JSF ... 105
External Redirects ... 106
Preface
Many web applications require the same sequence of steps to execute in different contexts. Often these sequences are merely components of a larger task the user is trying to accomplish. Such a reusable sequence is called a flow.
Consider a typical shopping cart application. User registration, login, and cart checkout are all examples of flows that can be invoked from several places in this type of application.
Spring Web Flow is the module of Spring for implementing flows. The Web Flow engine plugs into the Spring Web MVC platform and provides declarative flow definition language. This reference guide shows you how to use and extend Spring Web Flow.
1. Introduction
1.1. What this guide covers
This guide covers all aspects of Spring Web Flow. It covers implementing flows in end-user applications and working with the feature set. It also covers extending the framework and the overall architectural model.
1.2. What Web Flow requires to run
Java 1.5 or higher Spring 3.1 or higher
1.3. Where to get support
Professional from-the-source support on Spring Web Flow is available from SpringSource, the company behind Spring, and Ervacon, operated by Web Flow project co-founder Erwin Vervaet
1.4. Where to follow development
You can help make Web Flow best serve the needs of the Spring community by interacting with developers at the Spring Community Forums.
Report bugs and influence the Web Flow project roadmap using the Spring Issue Tracker. Subscribe to the Spring Community Portal for the latest Spring news and announcements. Visit the Web Flow Project Home for more resources on the project.
1.5. How to access Web Flow artifacts from Maven Central
Each jar in the Web Flow distribution is available in the Maven Central Repository. This allows you to easily integrate Web Flow into your application if you are already using Maven as the build system for your web development project.
To access Web Flow jars from Maven Central, declare the following dependency in your pom (includes transitive dependencies "spring-binding" and "spring-js"):
<dependency> <groupId>org.springframework.webflow</groupId> <artifactId>spring-webflow</artifactId> <version>x.y.z.RELEASE</version> </dependency>
If using JavaServer Faces, declare the following dependency in your pom (includes transitive dependencies "spring-binding", "spring-webflow" and "spring-js"):
<dependency> <groupId>org.springframework.webflow</groupId> <artifactId>spring-faces</artifactId> <version>x.y.z.RELEASE</version> </dependency>
1.6. How to access Web Flow artifacts with Ivy
To access Spring Web Flow jars with Ivy, add the following repositories to your Ivy config:
<url name="com.springsource.repository.bundles.release">
<ivy pattern="http://repository.springsource.com/ivy/bundles/release/
[organisation]/[module]/[revision]/[artifact]-[revision].[ext]" /> <artifact pattern="http://repository.springsource.com/ivy/bundles/release/ [organisation]/[module]/[revision]/[artifact]-[revision].[ext]" /> </url>
<url name="com.springsource.repository.bundles.external">
<ivy pattern="http://repository.springsource.com/ivy/bundles/external/
[organisation]/[module]/[revision]/[artifact]-[revision].[ext]" /> <artifact pattern="http://repository.springsource.com/ivy/bundles/external/ [organisation]/[module]/[revision]/[artifact]-[revision].[ext]" /> </url>
To access Spring Web Flow jars as well as 3rd party dependencies with Ivy, add the following repository to your Ivy config:
<url name="springsource-repository">
<ivy pattern="http://repo.spring.io/libs-release/[organization]/[module]/[revision]/ [type]s/ivy-[revision].xml" />
<artifact pattern="http://repo.spring.io/libs-release/[organization]/[module]/ [revision]/[type]s/[module](-[classifier])-[revision].[ext]" />
</url>
Then declare the following dependencies in your ivy.xml:
<dependency org="org.springframework.webflow" name="org.springframework.binding"
rev="x.y.z.RELEASE" conf="compile->runtime" />
<dependency org="org.springframework.webflow" name="org.springframework.js"
rev="x.y.z.RELEASE" conf="compile->runtime" />
<dependency org="org.springframework.webflow" name="org.springframework.webflow"
rev="x.y.z.RELEASE" conf="compile->runtime" />
If using JavaServer Faces, declare the following dependency in your pom (also adds the above dependencies):
<dependency org="org.springframework.webflow" name="org.springframework.faces"
rev="x.y.z.RELEASE" conf="compile->runtime" />
1.7. How to access nightly builds and milestone releases
Nightly snapshots of Web Flow development branches are available using Maven. These snapshot builds are useful for testing out fixes you depend on in advance of the next release, and provide a convenient way for you to provide feedback about whether a fix meets your needs.
Accessing snapshots and milestones with Maven
For milestones and snapshots you'll need to use the SpringSource repository. Add the following repository to your Maven pom.xml:
<repository>
<id>springsource-repository</id>
<name>Spring project snapshots, milestones, and releases</name> <url>http://repo.spring.io/snapshot</url>
</repository>
Then declare the following dependencies:
<dependency> <groupId>org.springframework.webflow</groupId> <artifactId>spring-binding</artifactId> <version>x.y.z.BUILD-SNAPSHOT</version> </dependency> <dependency> <groupId>org.springframework.webflow</groupId> <artifactId>spring-js</artifactId> <version>x.y.z.BUILD-SNAPSHOT</version> </dependency> <dependency> <groupId>org.springframework.webflow</groupId> <artifactId>spring-webflow</artifactId> <version>x.y.z.BUILD-SNAPSHOT</version> </dependency>
And if using JavaServerFaces:
<dependency> <groupId>org.springframework.webflow</groupId> <artifactId>spring-faces</artifactId> <version>x.y.z.BUILD-SNAPSHOT</version> </dependency>
2. What's New
2.1. Spring Web Flow 2.4
This release requires JDK 1.6.
Java-based Configuration
Web Flow now supports a Java-based alternative for its system configuration. See the updated Chapter 10, System Setup.
Also see the booking-mvc and booking-faces samples that have been updated to use all Java config.
Spring MVC Flash Scope Integration
When a flow ends it can now redirect to a Spring MVC controller after saving attributes in Spring MVC's flash scope for the controller to access.
See Section 11.8, “Saving Flow Output to MVC Flash Scope”.
Partial JSR-303 Bean Validation
A flow definition can apply partial validation on the model through the validation-hints attribute supported on view state and transition elements.
See the section called “Partial Validation”.
Hibernate 4 Support
The HibernateFlowExecutionListener now supports Hibernate 4 in addition to Hibernate 3.
Tiles 3 Support
The AjaxTilesView now supports Tiles 3 in addition to Tiles 2.2.
Minimum JSF 2.0 Requirement
Java ServerFaces version 1.2 and earlier are no longer supported by Spring Web Flow, if you have not done so already you will need to upgrade to JSF 2.0 or above. In addition the Spring Faces components that were previously provided with JSF 1.2 for progressive AJAX enhancements have been removed in this release.
See Section 13.3, “Upgrading from Spring Web Flow 2.3”.
Portlet API 2.0 and JSF 2.0 support
The internal Portlet integration introduced in Spring Web Flow 2.2 has been upgraded for JSF 2.0 compatibility. Some of the more advanced JSF 2.0 features, such as partial state saving, are not supported in a Portlet environment, however, existing application can now upgrade to the minimum required JSF version. Upgraded projects will need to ensure that the <faces:resources> elements is included as part of their Spring configuration.
See Section 14.6, “Using Portlets with JSF”.
Deprecations
This release deprecates Spring.js. The deprecation includes the entire spring-js-resources module including Spring.js and Spring-Dojo.js and the bundled Dojo and CSS Framework. Also deprecated is the SpringJavascriptAjaxHandler from the spring-js module. The rest of spring-js, e.g.
AjaxHandler, AjaxTilesView, will be folded into spring-webflow in a future release. OGNL support is now deprecated.
2.2. Spring Web Flow 2.3
Embedding A Flow On A Page
By default Web Flow does a client-side redirect upon entering every view state. That makes it impossible to embed a flow on a page or within a modal dialog and execute more than one view state without causing a full-page refresh. Web Flow now supports launching a flow in "embedded" mode. In this mode a flow can transition to other view states without a client-side redirect during Ajax requests. See Section 11.7, “Embedding A Flow On A Page” and Section 13.8, “Embedding a Flow On a Page”.
Support For JSR-303 Bean Validation
Support for the JSR-303 Bean Validation API is now available building on equivalent support available in Spring MVC. See Section 5.10, “Validating a model” for more details.
Flow-Managed Persistence Context Propagation
Starting with Web Flow 2.3 a flow managed PersistenceContext is automatically extended (propagated) to sub-flows assuming the subflow also has the feature enabled as well. See Section 7.3, “Flow Managed Persistence And Sub-Flows”.
Portlet 2.0 Resource Requests
Support for Portlet 2.0 resource requests has now been added enabling Ajax requests with partial rendering. URLs for such requests can be prepared with the <portlet:resourceURL> tag in JSP pages. Server-side processing is similar to a combined an action and a render requests but combined in a single request. Unlike a render request, the response from a resource request includes content from the target portlet only.
Custom ConversationManager
The <flow-execution-repository> element now provides a conversation-manager attribute accepting a reference to a ConversationManager instance.
Redirect In Same State
By default Web Flow does a client-side redirect when remaining in the same view state as long as the current request is not an Ajax request. This is useful after form validation failure. Hitting Refresh or Back won't result in browser warnings. Hence this behavior is usually desirable. However a new flow execution attribute makes it possible to disable it and that may also be necessary in some cases specific to JSF applications. See Section 13.9, “Redirect In Same State”.
Samples
The process for building the samples included with the distribution has been simplified. Maven can be used to build all samples in one step. Eclipse settings include source code references to simplify debugging.
Additional samples can be accessed as follows: mkdir spring-samples
cd spring-samples
svn co https://src.springframework.org/svn/spring-samples/webflow-primefaces-showcase cd webflow-primefaces-showcase
mvn package
# import into Eclipse
mkdir spring-samples cd spring-samples
svn co https://src.springframework.org/svn/spring-samples/webflow-showcase cd webflow-showcase
mvn package
# import into Eclipse
2.3. Spring Web Flow 2.2
JSF 2 Support
Comprehensive JSF 2 Support
Building on 2.1, Spring Web Flow version 2.2 adds support for core JSF 2 features The following features that were not supported in 2.1 are now available: partial state saving, JSF 2 resource request, handling, and JSF 2 Ajax requests. At this point support for JSF 2 is considered comprehensive although not covering every JSF 2 feature -- excluded are mostly features that overlap with the core value Web Flow provides such as those relating to navigation and state management.
See Section 13.5, “Configuring Web Flow for use with JSF” for important configuration changes. Note that partial state saving is only supported with Sun Mojarra 2.0.3 or later. It is not yet supported with Apache MyFaces. This is due to the fact MyFaces was not as easy to customize with regards to how component state is stored. We will work with Apache MyFaces to provide this support. In the mean time you will need to use the javax.faces.PARTIAL_STATE_SAVING context parameter in web.xml to disable partial state saving with Apache MyFaces.
Travel Sample With the PrimeFaces Components
The main Spring Travel sample demonstrating Spring Web Flow and JSF support is now built on JSF 2 and components from the PrimeFaces component library. Please check out the booking-faces sample in the distribution.
Additional samples can be found at the Spring Web Flow - Prime Faces Showcase, an SVN repository within the spring-samples repository. Use these commands to check out and build:
svn co https://src.springframework.org/svn/spring-samples/webflow-primefaces-showcase cd webflow-primefaces-showcase
Spring Security Facelets Tag Library
A new Spring Security tag library is available for use with with JSF 2.0 or with JSF 1.2 Facelets views. It provides an <authorize> tag as well as several EL functions. See Section 13.11, “Using the Spring Security Facelets Tag Library” for more details.
Spring JavaScript Updates
Deprecated ResourcesServlet
Starting with Spring 3.0.4, the Spring Framework includes a replacement for the ResourcesServlet. Please see the Spring Framework documentation for details on the custom mvc namespace, specifically the new "resources" element.
Dojo 1.5 and dojox
The bundled custom Dojo build is upgraded to version 1.5. It now includes dojox.
Note that applications are generally encouraged to prepare their own custom Dojo build for optimized performance depending on what parts of Dojo are commonly used together. For examples see the scripts used by Spring Web Flow to prepare its own custom Dojo build.
Two Spring JS artifacts
The spring-js artifact has been split in two -- the new artifact (spring-js-resources) contains client side resource (.js, .css, etc.) while the existing artifact (spring-js) contains server-side Java code only.
Applications preparing their own custom Dojo build have an option now to avoid including spring-js-resources and put Spring.js and Spring-Dojo.js directly under the root of their web application. Client resources moved into META-INF/web-resources
Bundled client resources (.js, .css, etc.) have been moved to META-INF/web-resources from their previous location under META-INF. This change is transparent for applications but will result in simpler and safer configuration when using the new resource handling mechanism available in Spring 3.0.4.
JSF Portlet Support
Portlet API 2.0 and JSF 1.2 support
In previous versions of Spring Web Flow support for JSF Portlets relied on a Portlet Bridge for JSF implementation and was considered experimental. Spring Web Flow 2.2 adds support for JSF Portlets based on its own internal Portlet integration targeting Portlet API 2.0 and JSF 1.2 environments. See Section 14.6, “Using Portlets with JSF” for more details. The Spring Web Flow Travel JSF Portlets sample has been successfully tested on the Apache Pluto portal container.
3. Defining Flows
3.1. Introduction
This chapter begins the Users Section. It shows how to implement flows using the flow definition language. By the end of this chapter you should have a good understanding of language constructs, and be capable of authoring a flow definition.
3.2. What is a flow?
A flow encapsulates a reusable sequence of steps that can execute in different contexts. Below is a Garrett Information Architecture diagram illustrating a reference to a flow that encapsulates the steps of a hotel booking process:
Site Map illustrating a reference to a flow
3.3. What is the makeup of a typical flow?
In Spring Web Flow, a flow consists of a series of steps called "states". Entering a state typically results in a view being displayed to the user. On that view, user events occur that are handled by the state. These events can trigger transitions to other states which result in view navigations.
The example below shows the structure of the book hotel flow referenced in the previous diagram:
Flow diagram
3.4. How are flows authored?
Flows are authored by web application developers using a simple XML-based flow definition language. The next steps of this guide will walk you through the elements of this language.
3.5. Essential language elements
flow
Every flow begins with the following root element:
<?xml version="1.0" encoding="UTF-8"?> <flow xmlns="http://www.springframework.org/schema/webflow" xmlns:xsi="http://www.w3.org/2001/XMLSchema-instance" xsi:schemaLocation="http://www.springframework.org/schema/webflow http://www.springframework.org/schema/webflow/spring-webflow-2.0.xsd"> </flow>
All states of the flow are defined within this element. The first state defined becomes the flow's starting point.
view-state
Use the view-state element to define a step of the flow that renders a view:
<view-state id="enterBookingDetails" />
By convention, a view-state maps its id to a view template in the directory where the flow is located. For example, the state above might render /WEB-INF/hotels/booking/ enterBookingDetails.xhtml if the flow itself was located in the /WEB-INF/hotels/booking
directory.
transition
Use the transition element to handle events that occur within a state:
<view-state id="enterBookingDetails">
<transition on="submit" to="reviewBooking" /> </view-state>
These transitions drive view navigations.
end-state
Use the end-state element to define a flow outcome:
<end-state id="bookingCancelled" />
When a flow transitions to a end-state it terminates and the outcome is returned.
Checkpoint: Essential language elements
With the three elements view-state, transition, and end-state, you can quickly express your view navigation logic. Teams often do this before adding flow behaviors so they can focus on developing the user interface of the application with end users first. Below is a sample flow that implements its view navigation logic using these elements:
<flow xmlns="http://www.springframework.org/schema/webflow" xmlns:xsi="http://www.w3.org/2001/XMLSchema-instance" xsi:schemaLocation="http://www.springframework.org/schema/webflow http://www.springframework.org/schema/webflow/spring-webflow-2.0.xsd"> <view-state id="enterBookingDetails">
<transition on="submit" to="reviewBooking" /> </view-state>
<view-state id="reviewBooking">
<transition on="confirm" to="bookingConfirmed" /> <transition on="revise" to="enterBookingDetails" /> <transition on="cancel" to="bookingCancelled" /> </view-state> <end-state id="bookingConfirmed" /> <end-state id="bookingCancelled" /> </flow>
3.6. Actions
Most flows need to express more than just view navigation logic. Typically they also need to invoke business services of the application or other actions.
Within a flow, there are several points where you can execute actions. These points are: • On flow start • On state entry • On view render • On transition execution • On state exit • On flow end
Actions are defined using a concise expression language. Spring Web Flow uses the Unified EL by default. The next few sections will cover the essential language elements for defining actions.
evaluate
The action element you will use most often is the evaluate element. Use the evaluate element to evaluate an expression at a point within your flow. With this single tag you can invoke methods on Spring beans or any other flow variable. For example:
<evaluate expression="entityManager.persist(booking)" />
Assigning an evaluate result
<evaluate expression="bookingService.findHotels(searchCriteria)" result="flowScope.hotels"
/>
Converting an evaluate result
If the expression returns a value that may need to be converted, specify the desired type using the
result-type attribute:
<evaluate expression="bookingService.findHotels(searchCriteria)" result="flowScope.hotels"
result-type="dataModel"/>
Checkpoint: flow actions
Now review the sample booking flow with actions added:
<flow xmlns="http://www.springframework.org/schema/webflow"
xmlns:xsi="http://www.w3.org/2001/XMLSchema-instance"
xsi:schemaLocation="http://www.springframework.org/schema/webflow
http://www.springframework.org/schema/webflow/spring-webflow-2.0.xsd">
<input name="hotelId" /> <on-start>
<evaluate expression="bookingService.createBooking(hotelId, currentUser.name)"
result="flowScope.booking" /> </on-start>
<view-state id="enterBookingDetails">
<transition on="submit" to="reviewBooking" /> </view-state>
<view-state id="reviewBooking">
<transition on="confirm" to="bookingConfirmed" /> <transition on="revise" to="enterBookingDetails" /> <transition on="cancel" to="bookingCancelled" /> </view-state>
<end-state id="bookingConfirmed" /> <end-state id="bookingCancelled" /> </flow>
This flow now creates a Booking object in flow scope when it starts. The id of the hotel to book is obtained from a flow input attribute.
3.7. Input/Output Mapping
Each flow has a well-defined input/output contract. Flows can be passed input attributes when they start, and can return output attributes when they end. In this respect, calling a flow is conceptually similar to calling a method with the following signature:
FlowOutcome flowId(Map<String, Object> inputAttributes);
... where a FlowOutcome has the following signature:
public interface FlowOutcome { public String getName();
public Map<String, Object> getOutputAttributes(); }
input
Use the input element to declare a flow input attribute:
<input name="hotelId" />
Input values are saved in flow scope under the name of the attribute. For example, the input above would be saved under the name hotelId.
Declaring an input type
Use the type attribute to declare the input attribute's type:
<input name="hotelId" type="long" />
If an input value does not match the declared type, a type conversion will be attempted. Assigning an input value
Use the value attribute to specify an expression to assign the input value to:
<input name="hotelId" value="flowScope.myParameterObject.hotelId" />
If the expression's value type can be determined, that metadata will be used for type coersion if no
type attribute is specified. Marking an input as required
Use the required attribute to enforce the input is not null or empty:
<input name="hotelId" type="long" value="flowScope.hotelId" required="true" />
output
Use the output element to declare a flow output attribute. Output attributes are declared within end-states that represent specific flow outcomes.
<end-state id="bookingConfirmed"> <output name="bookingId" /> </end-state>
Output values are obtained from flow scope under the name of the attribute. For example, the output above would be assigned the value of the bookingId variable.
Specifying the source of an output value
Use the value attribute to denote a specific output value expression:
<output name="confirmationNumber" value="booking.confirmationNumber" />
Checkpoint: input/output mapping
Now review the sample booking flow with input/output mapping:
<flow xmlns="http://www.springframework.org/schema/webflow"
xmlns:xsi="http://www.w3.org/2001/XMLSchema-instance"
xsi:schemaLocation="http://www.springframework.org/schema/webflow
http://www.springframework.org/schema/webflow/spring-webflow-2.0.xsd">
<input name="hotelId" /> <on-start>
<evaluate expression="bookingService.createBooking(hotelId, currentUser.name)"
result="flowScope.booking" /> </on-start>
<view-state id="enterBookingDetails">
<transition on="submit" to="reviewBooking" /> </view-state>
<view-state id="reviewBooking">
<transition on="confirm" to="bookingConfirmed" /> <transition on="revise" to="enterBookingDetails" /> <transition on="cancel" to="bookingCancelled" /> </view-state>
<end-state id="bookingConfirmed" >
<output name="bookingId" value="booking.id"/> </end-state>
<end-state id="bookingCancelled" /> </flow>
The flow now accepts a hotelId input attribute and returns a bookingId output attribute when a new booking is confirmed.
3.8. Variables
A flow may declare one or more instance variables. These variables are allocated when the flow starts. Any @Autowired transient references the variable holds are also rewired when the flow resumes.
var
Use the var element to declare a flow variable:
<var name="searchCriteria" class="com.mycompany.myapp.hotels.search.SearchCriteria"/>
Make sure your variable's class implements java.io.Serializable, as the instance state is saved between flow requests.
3.9. Calling subflows
A flow may call another flow as a subflow. The flow will wait until the subflow returns, then respond to the subflow outcome.
subflow-state
Use the subflow-state element to call another flow as a subflow:
<subflow-state id="addGuest" subflow="createGuest"> <transition on="guestCreated" to="reviewBooking">
<evaluate expression="booking.guests.add(currentEvent.attributes.guest)" /> </transition>
<transition on="creationCancelled" to="reviewBooking" /> </subflow-state>
The above example calls the createGuest flow, then waits for it to return. When the flow returns with a guestCreated outcome, the new guest is added to the booking's guest list.
Passing a subflow input
Use the input element to pass input to the subflow:
<subflow-state id="addGuest" subflow="createGuest"> <input name="booking" />
<transition to="reviewBooking" /> </subflow-state>
Mapping subflow output
Simply refer to a subflow output attribute by its name within a outcome transition:
<transition on="guestCreated" to="reviewBooking">
<evaluate expression="booking.guests.add(currentEvent.attributes.guest)" /> </transition>
In the above example, guest is the name of an output attribute returned by the guestCreated
outcome.
Checkpoint: calling subflows
Now review the sample booking flow calling a subflow:
<flow xmlns="http://www.springframework.org/schema/webflow"
xmlns:xsi="http://www.w3.org/2001/XMLSchema-instance"
xsi:schemaLocation="http://www.springframework.org/schema/webflow
http://www.springframework.org/schema/webflow/spring-webflow-2.0.xsd">
<input name="hotelId" /> <on-start>
<evaluate expression="bookingService.createBooking(hotelId, currentUser.name)"
result="flowScope.booking" /> </on-start>
<view-state id="enterBookingDetails">
<transition on="submit" to="reviewBooking" /> </view-state>
<view-state id="reviewBooking">
<transition on="addGuest" to="addGuest" /> <transition on="confirm" to="bookingConfirmed" /> <transition on="revise" to="enterBookingDetails" /> <transition on="cancel" to="bookingCancelled" /> </view-state>
<subflow-state id="addGuest" subflow="createGuest"> <transition on="guestCreated" to="reviewBooking">
<evaluate expression="booking.guests.add(currentEvent.attributes.guest)" /> </transition>
<transition on="creationCancelled" to="reviewBooking" /> </subflow-state>
<end-state id="bookingConfirmed" >
<output name="bookingId" value="booking.id" /> </end-state>
<end-state id="bookingCancelled" /> </flow>
4. Expression Language (EL)
4.1. Introduction
Web Flow uses EL to access its data model and to invoke actions. This chapter will familiarize you with EL syntax, configuration, and special EL variables you can reference from your flow definition.
EL is used for many things within a flow including:
1. Access client data such as declaring flow inputs or referencing request parameters. 2. Access data in Web Flow's RequestContext such as flowScope or currentEvent. 3. Invoke methods on Spring-managed objects through actions.
4. Resolve expressions such as state transition criteria, subflow ids, and view names.
EL is also used to bind form parameters to model objects and reversely to render formatted form fields from the properties of a model object. That however does not apply when using Web Flow with JSF in which case the standard JSF component lifecyle applies.
Expression types
An important concept to understand is there are two types of expressions in Web Flow: standard expressions and template expressions.
Standard Expressions
The first and most common type of expression is the standard expression. Such expressions are evaluated directly by the EL and need not be enclosed in delimiters like #{}. For example:
<evaluate expression="searchCriteria.nextPage()" />
The expression above is a standard expression that invokes the nextPage method on the
searchCriteria variable when evaluated. If you attempt to enclose this expression in a special delimiter like #{} you will get an IllegalArgumentException. In this context the delimiter is seen as redundant. The only acceptable value for the expression attribute is an single expression string. Template expressions
The second type of expression is a template expression. A template expression allows mixing of literal text with one or more standard expressions. Each standard expression block is explicitly surrounded with the #{} delimiters. For example:
<view-state id="error" view="error-#{externalContext.locale}.xhtml" />
The expression above is a template expression. The result of evaluation will be a string that concatenates literal text such as error- and .xhtml with the result of evaluating
externalContext.locale. As you can see, explicit delimiters are necessary here to demarcate standard expression blocks within the template.
Note
See the Web Flow XML schema for a complete listing of those XML attributes that accept standard expressions and those that accept template expressions. You can also use F2 in Eclipse (or equivalent shortcut in other IDEs) to access available documentation when typing out specific flow definition attributes.
4.2. EL Implementations
Spring EL
Starting with version 2.1 Web Flow uses the Spring Expression Language (Spring EL). Spring EL was created to provide is a single, well-supported expression language for use across all the products in the Spring portfolio. It is distributed as a separate jar org.springframework.expression in the Spring Framework. Existing applications will need to remove dependencies on org.jboss.el or org.ognl
and use org.springframework.expression instead. See the section below on EL Portability for other notes on upgrading.
Unified EL
In Web Flow 2.0 Unified EL was the default expression language with jboss-el as the implementation. Use of Unified EL also implies a dependency on el-api although that is typically provided by your web container. Tomcat 6 includes it, for example. Spring EL is the default and recommended expression language to use. However it is possible to replace it with Unified EL if you wish to do so. You need the following Spring configuration to plug in the WebFlowELExpressionParser to the flow-builder-services:
<webflow:flow-builder-services expression-parser="expressionParser"/>
<bean id="expressionParser" class="org.springframework.webflow.expression.el.WebFlowELExpressionParser"> <constructor-arg>
<bean class="org.jboss.el.ExpressionFactoryImpl" /> </constructor-arg>
</bean>
Note that if your application is registering custom converters it's important to ensure the WebFlowELExpressionParser is configured with the conversion service that has those custom converters.
<webflow:flow-builder-services expression-parser="expressionParser" conversion-service="conversionService"/>
<bean id="expressionParser" class="org.springframework.webflow.expression.el.WebFlowELExpressionParser"> <constructor-arg>
<bean class="org.jboss.el.ExpressionFactoryImpl" /> </constructor-arg>
<property name="conversionService" ref="conversionService"/> </bean>
<bean id="conversionService" class="somepackage.ApplicationConversionService"/>
OGNL
Note
OGNL support is deprecated as of Web Flow version 2.4.
OGNL is the third supported expression language. OGNL is the EL most familiar to Web Flow version 1.0 users. Please refer to the OGNL language guide for specifics on its EL syntax. If you wish to use OGNL this is the Spring configuration necessary to plug it in:
<webflow:flow-builder-services expression-parser="expressionParser"/>
<bean id="expressionParser" class="org.springframework.webflow.expression.WebFlowOgnlExpressionParser"/ >
Note that if your application is registering custom converters it's important to ensure the WebFlowOgnlExpressionParser is configured with the conversion service that has those custom converters.
<webflow:flow-builder-services expression-parser="expressionParser" conversion-service="conversionService"/>
<bean id="expressionParser" class="org.springframework.webflow.expression.WebFlowOgnlExpressionParser"> <property name="conversionService" ref="conversionService"/>
</bean>
<bean id="conversionService" class="somepackage.ApplicationConversionService"/>
4.3. EL portability
In general, you will find Spring EL, Unified EL and OGNL to have a very similar syntax.
Note however there are some advantages to Spring EL. For example Spring EL is closely integrated with the type conversion of Spring 3 and that allows you to take full advantage of its features. Specifically the automatic detection of generic types as well as the use of formatting annotations is currently supported with Spring EL only.
There are some minor changes to keep in mind when upgrading to Spring EL from Unified EL or OGNL as follows:
1. Expressions deliniated with ${} in flow definitions must be changed to #{}.
2. Expressions testing the current event #{currentEvent == 'submit'} must be changed to
#{currentEvent.id == 'submit'}.
3. Resolving properties such as #{currentUser.name} may cause NullPointerException without any checks such as #{currentUser != null ? currentUser.name : null}. A much better alternative though is the safe navigation operator #{currentUser?.name}.
For more information on Spring EL syntax please refer to the Language Reference section in the Spring Documentation.
4.4. Special EL variables
There are several implicit variables you may reference from within a flow. These variables are discussed in this section.
Keep in mind this general rule. Variables referring to data scopes (flowScope, viewScope, requestScope, etc.) should only be used when assigning a new variable to one of the scopes.
For example when assigning the result of the call to
bookingService.findHotels(searchCriteria) to a new variable called "hotels" you must prefix it with a scope variable in order to let Web Flow know where you want it stored:
<?xml version="1.0" encoding="UTF-8"?>
<flow xmlns="http://www.springframework.org/schema/webflow" ... >
<var name="searchCriteria" class="org.springframework.webflow.samples.booking.SearchCriteria"
/>
<view-state id="reviewHotels"> <on-render>
<evaluate expression="bookingService.findHotels(searchCriteria)" result="viewScope.hotels"
/>
</on-render> </view-state>
</flow>
However when setting an existing variable such as "searchCriteria" in the example below, you reference the variable directly without prefixing it with any scope variables:
<?xml version="1.0" encoding="UTF-8"?>
<flow xmlns="http://www.springframework.org/schema/webflow" ... >
<var name="searchCriteria" class="org.springframework.webflow.samples.booking.SearchCriteria"
/>
<view-state id="reviewHotels"> <transition on="sort">
<set name="searchCriteria.sortBy" value="requestParameters.sortBy" /> </transition>
</view-state>
</flow>
The following is the list of implicit variables you can reference within a flow definition:
flowScope
Use flowScope to assign a flow variable. Flow scope gets allocated when a flow starts and destroyed when the flow ends. With the default implementation, any objects stored in flow scope need to be Serializable.
<evaluate expression="searchService.findHotel(hotelId)" result="flowScope.hotel" />
viewScope
Use viewScope to assign a view variable. View scope gets allocated when a view-state enters and destroyed when the state exits. View scope is only referenceable from within a view-state. With the default implementation, any objects stored in view scope need to be Serializable.
<on-render>
<evaluate expression="searchService.findHotels(searchCriteria)" result="viewScope.hotels"
result-type="dataModel" /> </on-render>
requestScope
Use requestScope to assign a request variable. Request scope gets allocated when a flow is called and destroyed when the flow returns.
<set name="requestScope.hotelId" value="requestParameters.id" type="long" />
flashScope
Use flashScope to assign a flash variable. Flash scope gets allocated when a flow starts, cleared after every view render, and destroyed when the flow ends. With the default implementation, any objects stored in flash scope need to be Serializable.
<set name="flashScope.statusMessage" value="'Booking confirmed'" />
conversationScope
Use conversationScope to assign a conversation variable. Conversation scope gets allocated when a top-level flow starts and destroyed when the top-level flow ends. Conversation scope is shared by a top-level flow and all of its subflows. With the default implementation, conversation scoped objects are stored in the HTTP session and should generally be Serializable to account for typical session replication.
<evaluate expression="searchService.findHotel(hotelId)" result="conversationScope.hotel" / >
requestParameters
<set name="requestScope.hotelId" value="requestParameters.id" type="long" />
currentEvent
Use currentEvent to access attributes of the current Event:
<evaluate expression="booking.guests.add(currentEvent.attributes.guest)" />
currentUser
Use currentUser to access the authenticated Principal:
<evaluate expression="bookingService.createBooking(hotelId, currentUser.name)"
result="flowScope.booking" />
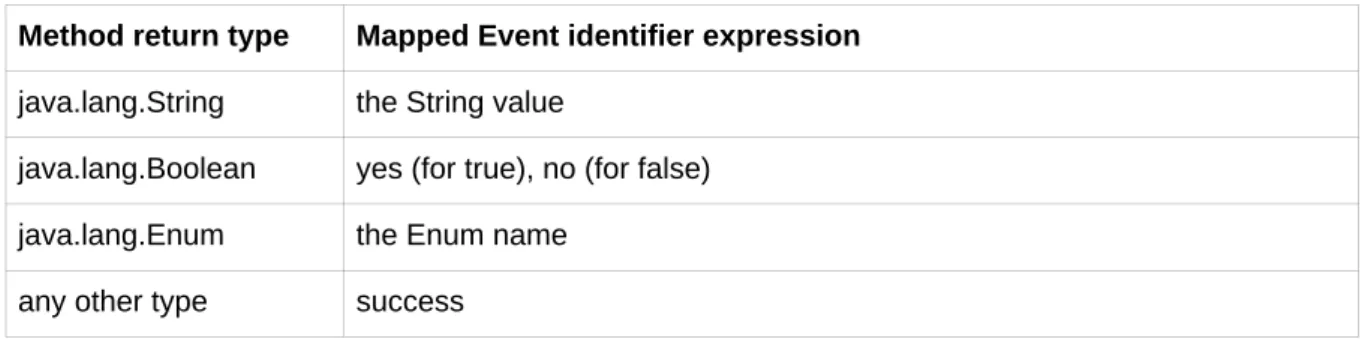
messageContext
Use messageContext to access a context for retrieving and creating flow execution messages, including error and success messages. See the MessageContext Javadocs for more information.
<evaluate expression="bookingValidator.validate(booking, messageContext)" />
resourceBundle
Use resourceBundle to access a message resource.
<set name="flashScope.successMessage" value="resourceBundle.successMessage" />
flowRequestContext
Use flowRequestContext to access the RequestContext API, which is a representation of the current flow request. See the API Javadocs for more information.
flowExecutionContext
Use flowExecutionContext to access the FlowExecutionContext API, which is a representation of the current flow state. See the API Javadocs for more information.
flowExecutionUrl
Use flowExecutionUrl to access the context-relative URI for the current flow execution view-state.
externalContext
Use externalContext to access the client environment, including user session attributes. See the
<evaluate expression="searchService.suggestHotels(externalContext.sessionMap.userProfile)"
result="viewScope.hotels" />
4.5. Scope searching algorithm
As mentioned earlier in this section when assigning a variable in one of the flow scopes, referencing that scope is required. For example:
<set name="requestScope.hotelId" value="requestParameters.id" type="long" />
When simply accessing a variable in one of the scopes, referencing the scope is optional. For example:
<evaluate expression="entityManager.persist(booking)" />
When no scope is specified, like in the use of booking above, a scope searching algorithm is used. The algorithm will look in request, flash, view, flow, and conversation scope for the variable. If no such variable is found, an EvaluationException will be thrown.
5. Rendering views
5.1. Introduction
This chapter shows you how to use the view-state element to render views within a flow.
5.2. Defining view states
Use the view-state element to define a step of the flow that renders a view and waits for a user event to resume:
<view-state id="enterBookingDetails">
<transition on="submit" to="reviewBooking" /> </view-state>
By convention, a view-state maps its id to a view template in the directory where the flow is located. For example, the state above might render /WEB-INF/hotels/booking/ enterBookingDetails.xhtml if the flow itself was located in the /WEB-INF/hotels/booking
directory.
Below is a sample directory structure showing views and other resources like message bundles co-located with their flow definition:
Flow Packaging
5.3. Specifying view identifiers
Use the view attribute to specify the id of the view to render explicitly.
Flow relative view ids
<view-state id="enterBookingDetails" view="bookingDetails.xhtml">
Absolute view ids
The view id may be a absolute path to a view resource in the webapp root directory:
<view-state id="enterBookingDetails" view="/WEB-INF/hotels/booking/bookingDetails.xhtml">
Logical view ids
With some view frameworks, such as Spring MVC's view framework, the view id may also be a logical identifier resolved by the framework:
<view-state id="enterBookingDetails" view="bookingDetails">
See the Spring MVC integration section for more information on how to integrate with the MVC
ViewResolver infrastructure.
5.4. View scope
A view-state allocates a new viewScope when it enters. This scope may be referenced within the view-state to assign variables that should live for the duration of the view-state. This scope is useful for manipulating objects over a series of requests from the same view, often Ajax requests. A view-state destroys its viewScope when it exits.
Allocating view variables
Use the var tag to declare a view variable. Like a flow variable, any @Autowired references are automatically restored when the view state resumes.
<var name="searchCriteria" class="com.mycompany.myapp.hotels.SearchCriteria" />
Assigning a viewScope variable
Use the on-render tag to assign a variable from an action result before the view renders:
<on-render>
<evaluate expression="bookingService.findHotels(searchCriteria)" result="viewScope.hotels"
/>
</on-render>
Manipulating objects in view scope
Objects in view scope are often manipulated over a series of requests from the same view. The following example pages through a search results list. The list is updated in view scope before each render.
Asynchronous event handlers modify the current data page, then request re-rendering of the search results fragment.
<view-state id="searchResults"> <on-render>
<evaluate expression="bookingService.findHotels(searchCriteria)"
result="viewScope.hotels" /> </on-render>
<transition on="next">
<evaluate expression="searchCriteria.nextPage()" /> <render fragments="searchResultsFragment" /> </transition>
<transition on="previous">
<evaluate expression="searchCriteria.previousPage()" /> <render fragments="searchResultsFragment" />
</transition> </view-state>
5.5. Executing render actions
Use the on-render element to execute one or more actions before view rendering. Render actions are executed on the initial render as well as any subsequent refreshes, including any partial re-renderings of the view.
<on-render>
<evaluate expression="bookingService.findHotels(searchCriteria)" result="viewScope.hotels"
/>
</on-render>
5.6. Binding to a model
Use the model attribute to declare a model object the view binds to. This attribute is typically used in conjunction with views that render data controls, such as forms. It enables form data binding and validation behaviors to be driven from metadata on your model object.
The following example declares an enterBookingDetails state manipulates the booking model:
<view-state id="enterBookingDetails" model="booking">
The model may be an object in any accessible scope, such as flowScope or viewScope. Specifying a model triggers the following behavior when a view event occurs:
1. View-to-model binding. On view postback, user input values are bound to model object properties for you.
2. Model validation. After binding, if the model object requires validation that validation logic will be invoked.
For a flow event to be generated that can drive a view state transition, model binding must complete successfully. If model binding fails, the view is re-rendered to allow the user to revise their edits.
5.7. Performing type conversion
When request parameters are used to populate the model (commonly referred to as data binding), type conversion is required to parse String-based request parameter values before setting target model properties. Default type conversion is available for many common Java types such as numbers, primitives, enums, and Dates. Users also have the ability to register their own type conversion logic for user-defined types, and to override the default Converters.
Type Conversion Options
Starting with version 2.1 Spring Web Flow uses the type conversion and formatting system introduced in Spring 3 for nearly all type conversion needs. Previously Web Flow applications used a type conversion mechanism that was different from the one in Spring MVC, which relied on the
java.beans.PropertyEditor abstraction. Spring 3 offers a modern type conversion alternative to PropertyEditors that was actually influenced by Web Flow's own type conversion system. Hence Web Flow users should find it natural to work with the new Spring 3 type conversion. Another obvious and very important benefit of this change is that a single type conversion mechanism can now be used across Spring MVC And Spring Web Flow.
Upgrading to Spring 3 Type Conversion And Formatting
What does this practically mean for existing applications? Existing applications are likely registering their own converters of type org.springframework.binding.convert.converters.Converter
through a sub-class of DefaultConversionService available in Spring Binding. Those converters can continue to be registered as before. They will be adapted as Spring 3 GenericConverter types and registered with a Spring 3 org.springframework.core.convert.ConversionService
instance. In other words existing converters will be invoked through Spring's type conversion service. The only exception to this rule are named converters, which can be referenced from a binding element in a view-state:
public class ApplicationConversionService extends DefaultConversionService { public ApplicationConversionService() {
addDefaultConverters(); addDefaultAliases();
addConverter("customConverter", new CustomConverter()); }
}
<view-state id="enterBookingDetails" model="booking"> <binder>
<binding property="checkinDate" required="true" converter="customConverter" /> </binder>
</view-state>
Named converters are not supported and cannot be used with the type conversion service available in Spring 3. Therefore such converters will not be adapted and will continue to work as before, i.e. will not involve the Spring 3 type conversion. However, this mechanism is deprecated and applications are encouraged to favor Spring 3 type conversion and formatting features.