© SEMO 2012. Commercial in Confidence Page | 1
SEMO Online Helpdesk
© SEMO 2012. Commercial in Confidence Page | 2
2.
I
NTRODUCTION... 3
3.
A
CCESSING THEO
NLINEH
ELPDESK... 3
4.
L
OGIN TO THEO
NLINEH
ELPDESK... 3
5.
O
NLINEH
ELPDESKH
OMEP
AGE... 4
6.
L
OG AL
IMITEDC
OMMUNICATIONSF
AILURE... 4
6.1 Log an LCF by providing an xml File ... 4
6.1.1 Enter the query details ... 5
6.1.2 Request has been Logged Confirmation ... 5
6.1.3 Submit the xml file ... 6
6.1.4 Submit screen shots of error experienced ... 6
6.1.5 Complete & Fax Transaction Notification Form ... 6
6.2 Log an LCF by Completing an Online LCF Form ... 7
6.2.1 Log an LCF for a Demand Unit ... 7
6.2.2 Log an LCF for a Generator Unit ... 8
6.2.3 Log an LCF for an Interconnector Unit ... 9
6.2.4 Request has been logged Confirmation ... 10
6.2.5 Submit screen shots of error experienced ... 11
6.2.6 Complete & Fax Transaction Notification Form ... 11
© SEMO 2012. Commercial in Confidence Page | 3
1.
Revision History
Rev Number
Date Notes Author
0.1 24/09/2012 First Draft Created SEMO CS
0.2 08/10/2012 Second Draft Published SEMO CS
2.
Introduction
A SEMO Online Helpdesk is planned to be available from October 9th 2012.
The SEMO Online Helpdesk will provide Participants with the ability to log General and Formal Queries online, as well as Limited Communications Failures (LCF). This document outlines how a Participant can log an LCF (only) via the SEMO Online Helpdesk.
3.
Accessing the Online Helpdesk
The SEMO Online Helpdesk can be found at the following link
https://www.markethelpdesk.sem-o.com
In order use the SEMO Online Helpdesk, Participants must email the Market Helpdesk and request a password.
4.
Login to the Online Helpdesk
To login to the SEMO Online Helpdesk, enter your email address in the ‘Customer ID’ box, enter your password and click Sign In (see figure 1 below).
© SEMO 2012. Commercial in Confidence Page | 4
5.
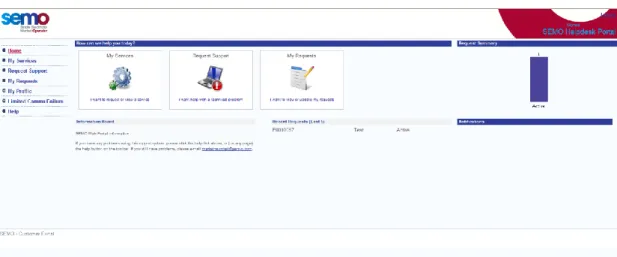
Online Helpdesk Home Page
Figure 2 below shows the SEMO Online Helpdesk Home Page.
Figure 2: SEMO Online Helpdesk Home Page
6.
Log a Limited Communications Failure
There are two ways that a Limited Communications Failure can be logged in the SEMO Online Helpdesk:
1) Log an LCF by providing an xml file
2) Log an LCF by completing an online LCF form
6.1 Log an LCF by providing an xml File
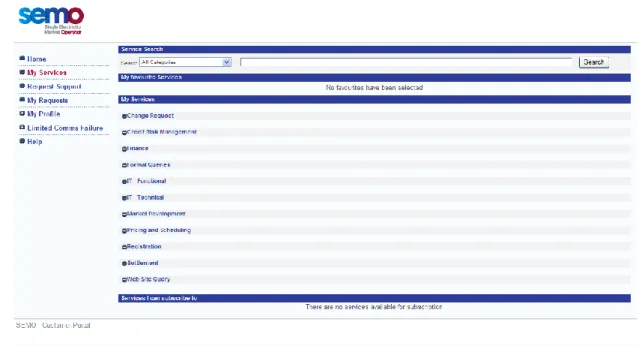
To log an LCF by providing an xml file, go to the Online Helpdesk Home Page, and select ‘My Services’ from the left hand navigation bar.
© SEMO 2012. Commercial in Confidence Page | 5
Figure 3: My Services Page
6.1.1 Enter the query details
On the ‘My Services’ page
1) Click the plus sign beside ‘Pricing & Scheduling’
2) Click on the button ‘Raise Request’ beside ‘Pricing & Scheduling – LCF Submission with Attachment’
3) In the ‘Please provide details of your query’ enter a summary of the problem you are experiencing when trying to submit bids
4) In the ‘What is the participant number in question if applicable’ enter your account ID e.g. PT_xxxxxx
5) Click ‘Next’
6) In the resulting screen ‘General Query – Urgent’ should be selected 7) Click ‘Submit’
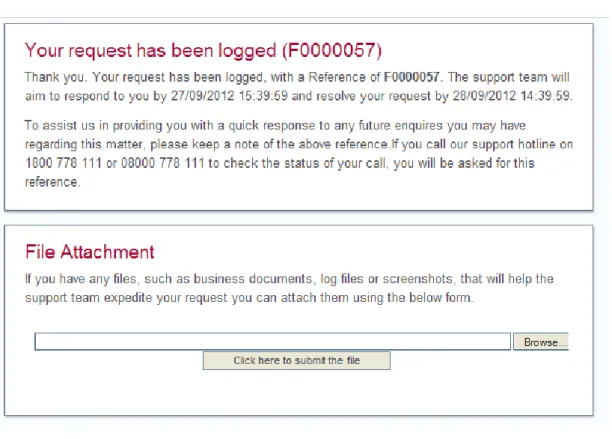
6.1.2 Request has been Logged Confirmation
Once you click ‘Submit’ after entering the query details, you will receive a message to say that ‘Your request has been logged (Fxxxxxx)’ (see Figure 4). This reference number should be detailed on the completed Transaction
Notification form that must be faxed to us once an LCF form has been submitted online.
© SEMO 2012. Commercial in Confidence Page | 6
Figure 4: Request has been logged screen
6.1.3 Submit the xml file
The xml file is submitted in the ‘Your request has been logged’ screen, in the ‘File Attachment’ section.
a) Click ‘Browse’
b) Select the xml file you want to upload and click ‘Ok’ c) Click ‘Click here to submit the file’
6.1.4 Submit screen shots of error experienced
Screenshots of the error messages you experienced when trying to submit bids can be submitted in the ‘Your request has been logged’ screen as well, in the ‘File Attachment’ section.
a) Click ‘Browse’
b) Select the screenshots you want to upload and click ok c) Click ‘Click here to submit the file’
Note, more then one file can be uploaded if necessary. Simply click browse a second time and attach another file.
6.1.5 Complete & Fax Transaction Notification Form
When an LCF has been submitted by providing an xml file, a completed Transaction Notification form should be faxed to SEMO. The Transaction Notification form should included the following details:
a) Reference number from the ‘Your request has been logged’ screen b) Authorised Person’s name, password and signature
© SEMO 2012. Commercial in Confidence Page | 7
The completed Transaction Notification Form should be faxed to the following numbers:
ROI: +353 1 2370035 NI: +44 2890 707555
Once an LCF has been submitted by completing an online LCF form please follow up with a phone call to the operations hotline:
ROI: +353 1 2370573
6.2 Log an LCF by Completing an Online LCF Form
**Please note the LCF forms shown in this section are still beingdeveloped and sections/details may change for the Online Helpdesk go live date.**
To log an LCF by completing an Online LCF Form, click ‘Limited Comms Failure’ on the left hand navigation bar, and from the drop down list select the relevant unit type (see Figure 5 below).
Figure 5: LCF drop down list
6.2.1 Log an LCF for a Demand Unit
From the drop down list select ‘Demand Units’ and enter the details in the resulting form:
a) Enter the relevant details for your unit
b) To add another row in the ‘Forecast Details’ section, click the grey arrow. c) To remove a line, click the x beside the row.
d) When completed click ‘Submit Request’.
© SEMO 2012. Commercial in Confidence Page | 8
Figure 6: Dummy completed Demand Unit LCF form
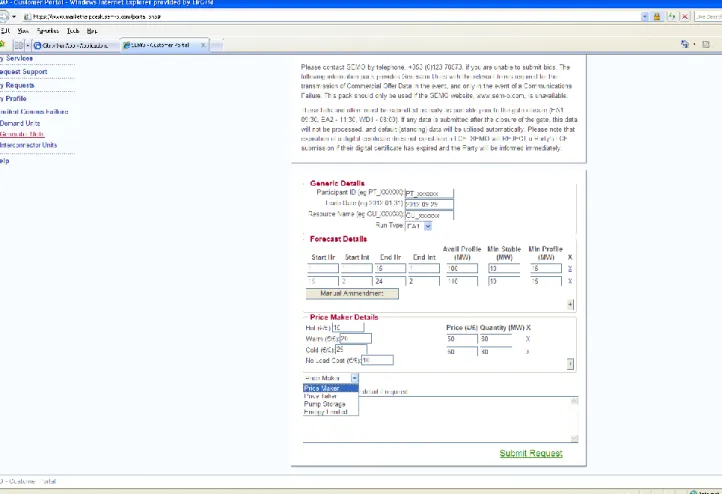
6.2.2 Log an LCF for a Generator Unit
From the drop down list select ‘Generator Units’ and enter the details in the resulting form:
a) Enter the relevant details for your unit.
b) To add another row in the ‘Forecast Details’ section, click the grey arrow. c) To remove a line, click the x beside the row.
d) When completed click ‘Submit Request’.
See figure 7 below for a dummy completed generator unit LCF form.
Please note the drop down list at the bottom left of the figure where you can select your unit type.
© SEMO 2012. Commercial in Confidence Page | 9
Figure 7: Dummy Generator LCF Form
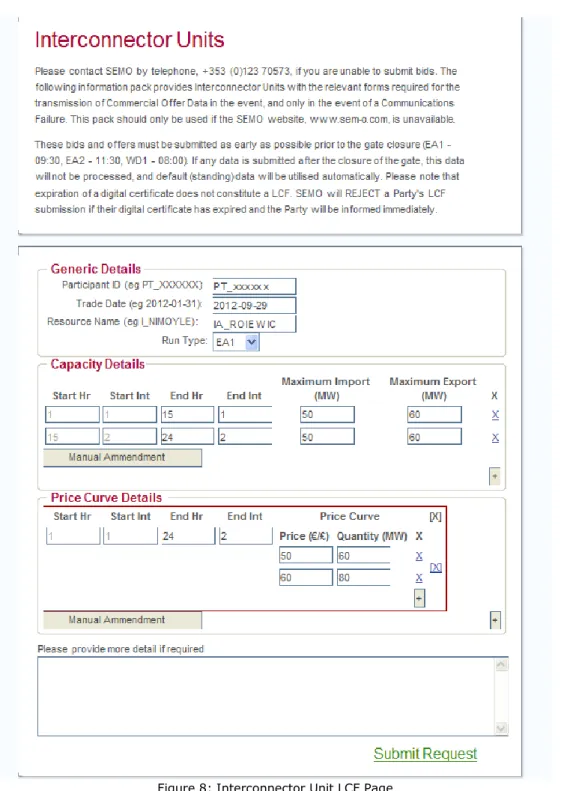
6.2.3 Log an LCF for an Interconnector Unit
From the drop down list select ‘Interconnector Units’ and enter the details in the resulting form:
e) Enter the relevant details for your unit.
f) To add another row in the ‘Capacity Details’ section click the grey arrow. g) To add another PQ Pair in the ‘Price Curve Details’ section, click the grey
arrow.
h) To remove a line, click the x beside the row. i) When completed click ‘Submit Request’.
© SEMO 2012. Commercial in Confidence Page | 10
Figure 8: Interconnector Unit LCF Page
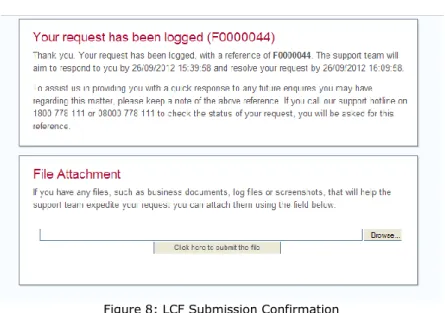
6.2.4 Request has been logged Confirmation
Once you have clicked ‘Submit Request’, you will receive confirmation that your request has been logged including the call reference number Fxxxxxxx (as per figure 9 below). This is the reference number that should be detailed on the completed Transaction Notification form that should be faxed to SEMO once an LCF form has been completed online.
© SEMO 2012. Commercial in Confidence Page | 11
Figure 8: LCF Submission Confirmation
6.2.5
Submit screen shots of error experienced
The screenshots of the error messages you experienced when trying to submit bids can be submitted in the ‘Your request has been logged’ screen, in the ‘File Attachment’ section.
a) Click ‘Browse’
b) Select the screenshots you want to upload and click ok c) Click ‘Click here to submit the file’
Note, more then one file can be uploaded if necessary. Simply click browse a second time and attach another file.
6.2.6
Complete & Fax Transaction Notification Form
When an LCF has been submitted by completing an online LCF form, a completed Transaction Notification form should be faxed to SEMO. The Transaction
Notification form should include the following details:
c) Reference number from the ‘Your request has been logged’ screen d) Authorised Person’s name, password and signature
The Transaction Notification Form is included in the appendix.
The completed Transaction Notification Form should be faxed to the following numbers:
ROI: +353 1 2370035 NI: +44 2890 707555
Once an LCF has been submitted by completing an online LCF form please follow up with a phone call to the operations hotline:
© SEMO 2012. Commercial in Confidence Page | 12
Section 1
From Party (Name): ______________________________
From Party Id: _______________________ Participant ID:
________________________
(eg PT_XXXXXX) (eg PY_XXXXXXX)
Resource Name: ______________________ Resource Type:
___________________
Section 2
Contact Name: _______________________ Contact Number:
__________________
Time of submitting call to Emergency Communications Phone: ___________________
Section 3
Trade Date: _________________ Run Type:
___________________
Transaction Number: ______________________
Date/time LCF effective from: _________________ Date/time LCF effective to: ________________
Section 4
The transactions, methods used and revised timeline for each communication are detailed below:
Data Transaction Alternative Communication Method
Authorised Person (if being sent by a Party):