Sage Abra SQL HRMS
Setup
User Guide
© 2010 Sage Software, Inc. All rights reserved. Sage, the Sage logos, and the Sage product and service
names mentioned herein are registered trademarks or trademarks of Sage Software, Inc., or its
affiliated entities. Business Objects, the Business Objects logo, and Crystal Reports are registered
trademarks of SAP France in the United States and in other countries. NetLib is a registered
trademark of Communication Horizons. OrgPlus is a trademark of HumanConcepts, LLC. TextBridge
is a registered trademark of ScanSoft, Inc. Microsoft, Outlook, Windows, Windows NT, Windows
Server, the .NET logo, Windows Vista and the Windows logo are trademarks or registered
trademarks of Microsoft Corporation in the United States and /or other countries. The names of all
other products and services are the property of their respective holders.
Sage has made every effort to ensure this documentation is correct and accurate but reserves the right
to make changes without notice at its sole discretion. Use, duplication, modification, or transfer of the
product described in this publication, except as expressly permitted by the Sage License Agreement is
strictly prohibited. Individuals who make any unauthorized use of this product may be subject to civil
and criminal penalties.
For additional assistance on this and other Sage products and services, visit our Web site at:
Table of Contents
Set Up Code Tables ... 5
Set Up Code Tables... 6
Employee Codes... 8
Set Up Employers for Abra HR... 8
Setting up EEO Information ... 11
Set Up Benefits... 13
Set Up Benefit Rate Tables ... 16
Set Up Benefit Insurance Plans ... 19
Set Up Benefit Savings Plans ... 23
Set Up Open Enrollment Insurance Plans ... 27
Abra HR Code Table Descriptions... 33
Attachment Codes ... 33
Benefits‐Related Code Tables... 33
Criteria Codes... 33
Dependent Relationship Codes ... 34
Disability Codes ... 34
EEO Classification Codes... 34
EEO‐1 Classification Codes ... 35
EEO‐4 Classification Codes ... 35
EEO Job Group Codes... 36
EEO‐4 Job Function Codes... 36
Employee Note Author Codes ... 36
Employee Note Type Codes... 36
Employee Type Codes... 36
Ethnic ID Codes ... 37
Event Codes... 37
FMLA Event Reason Codes... 37
Job Codes ... 37
Job Family Codes ... 38
Organization Codes... 38
OSHA Body Part Codes ... 38
OSHA Injury Codes... 39
OSHA Injury Location Codes ... 39
Pay Equity Job Group Codes... 39
Reason Codes ... 39
Salary Grades ... 39
Step Rates... 40
Shift Differential Codes... 40
Skill Codes ... 40
State / Province Codes... 41
Union Codes ... 41
User‐Defined Codes ... 41
Time Off Codes... 43
Set Up Employers for Time Off... 43
Set Up Attendance Plans... 44
Add Attendance Plans ... 45
Modify Attendance Plans ... 49
Delete Attendance Plans ... 50
Time Off Code Table Descriptions ... 52
Absence Reason Codes... 52
FMLA Event Reason Codes... 52
Understanding Plan Years... 52
Understanding Calculation Methods... 53
Training Codes ... 57
Set Up Training ... 57
Set User‐Defined Field Titles... 59
Training Code Table Descriptions ... 60
Attachment Codes ... 61
Certification Codes ... 61
Class Ratings Codes ... 62
Courses Codes... 63
Course Type Codes... 64
Enrollment Status... 65
Instructor Ratings Codes ... 65
Job Codes ... 67
Job Requirements... 68
Organization Codes... 68
Priority Codes... 68
Programs Codes ... 68
State / Province Codes... 70
Training Locations Codes ... 70
User‐Defined Codes ... 71
System Codes ... 73
Set Ad Hoc Reporting Security ... 73
Change a Password... 75
Set Up the Enterprise... 76
Define Enterprise Options ... 76
Define Organization Titles... 78
Select the Enterprise Logo ... 78
Set Up the Audit Trail ... 79
Define User‐Defined Code Table Titles ... 81
Set Group Security ... 82
Modify an Employer... 85
Rebuild System Files ... 85
Set User Security ... 85
Index ... 87
Set Up Code Tables
Sage Abra SQL HRMS uses codes to manage and store information in files. These codes provide
abbreviated, standard references to specific information. Sage Abra SQL HRMS stores these codes and
their associated descriptions in code tables.
A list of state and province abbreviations is an example of a code table. Instead of typing or re‐entering a
state name (such as Mississippi) in a field, you can select the appropriate code (MS) from a list of
predefined codes contained in a code table. Instead of typing British Columbia, you can select the code
BC. Code tables contain one column for the code and a second column for the code description.
A drop‐down list provides information for a field related to a code table. For instance, if a page contains a
field for the state, a drop‐down list provides a list of state codes, such as MO, IA, and FL, from which you
can choose.
Benefits of Using and Defining Code Tables
Code tables provide several advantages. Using code tables allows you to:
Customize information to meet your employerʹs needs. For example, you can define unique
divisions, departments, and locations specific to your employer.
Save time. When you enter information for hundreds of employees, it is much easier and more
efficient to type or select RFT for each employee rather than type Regular Full Time
Ensure accuracy and consistency. Without a uniform coding scheme, a data entry clerk might
enter a department code in several different ways (ENGDEPT, ENGRDEPT, ENG, or ENGR) for
several different employees. Even though the clerk describes the same department, Sage Abra SQL
HRMS interprets the entries as four different pieces of information for four different departments.
If the entries are inconsistent, Sage Abra SQL HRMS will not be able to calculate department totals
accurately.
Build Code Tables
Most code tables in Sage Abra SQL HRMS are two‐column tables containing codes in the left column and
brief descriptions in the right column. However, some tables are more complex (benefit plans, for
instance) and contain more information than can fit in two columns. The instructions for copying, adding,
editing, and deleting codes are identical, whether you work with two‐column or multi‐column tables.
Most code tables have recommended default values. You can add, edit, or delete values to suit your
employer’s needs.
All of the predefined code tables in Sage Abra SQL HRMS are enterprise code tables. You can adjust these
Set Up Code Tables
When you initially set up a code table, the codes are blank. As long as the Codes area is blank, an
individual employer uses the codes from the enterprise code table. As soon as you add a new code, the
system recognizes you are creating a code table that no longer references the enterprise code table. To add
a code for a specific employer from the list of enterprise codes, copy the enterprise code table to the
employer code table and then add the unique code to the employer’s code table.
For example, if two of three employers in your system use the same codes, edit the enterprise code tables
to accommodate the two employers. When you then set up codes for the two employers who share
common codes, they automatically use the enterprise codes unless you create new codes in their code
tables.
For the third employer who uses a slightly different set of codes, you can copy the enterprise code table
and then make whatever minor changes are necessary to meet the third employer’s coding requirements.
Therefore, you save time by not having to create a whole new set of codes from scratch, yet you are still
able to customize the code table to the third employer’s specifications.
Set Up Code Tables
Sage Abra SQL HRMS allows you to quickly and easily add, edit, copy, and delete codes so you can meet
each employerʹs specific coding requirements. For instance, you might want to change a previously
defined code to reflect a change in your organization.
Notes: After you save a code, the following fields are disabled. Benefit Rate Tables
Benefit Savings Plans Attendance Plans Absence Reason Codes FMLA Event Reason Codes
Working with Sage Abra SQL HRMS Code Tables
Sage Abra SQL HRMS allows you to quickly and easily add, edit, copy, and delete codes so you can meet
each employerʹs specific coding requirements. For instance, you might want to change a previously
defined code to reflect a change in your organization. The following sections describe how to work with
Sage Abra SQL HRMS code tables.
To Copy Code Tables
1. From the Navigation Pane, select Setup > Employees, Time Off, Payroll, or Training > Click the link
for the type of codes you want to work with. The code table you selected opens.
2. Select the employer with whom you want to work.
3. Click Copy. Only those employers with codes defined in the current table appear in the selection
list. The employer with whom you are working does not appear in the list because you cannot copy
Set Up Code Tables
4. Highlight the enterprise or employer whose codes you want to copy and click OK. For most code
tables, the Select Codes to Copy page opens. The Available list shows all the defined codes for that
code table. The Selected list shows those codes you select.
Note: When copying some codes you are first shown a dialog box informing you of the related
codes which will be updated to correspond with those you are copying (see Job Codes below).
Click Yes to continue or click No to return to the code table page.
5. From the Available list box, double‐click the codes you want to copy. The selected codes appear in
the right list box. If you want to remove a code from the Selected list, highlight it and click Remove.
6. Click OK. The system checks to see if the codes to be copied are the same as any which already exist
for the employer receiving them. If there are any duplicates, Sage Abra SQL HRMS asks whether
you want the old code to be overwritten with the new. Select Yes or No.
7. The new codes are copied to the employer with which you are working. To adapt the code table to
this employer’s needs, you can add additional codes to the list.
8. Click the Close button after you finish making your changes.
To Add Codes
1. From the Navigation Pane, select Setup > Employees, Time Off, Payroll, or Training > Click the link
for the type of codes you want to work with. The code table you selected opens.
2. Select the employer with whom you want to work.
3. Click Add. The codes detail page opens.
4. Enter at least a code and description. Some code tables ask for additional information to be supplied
for the added code. Other code tables contain a blank code described as None Specified. This allows
you to leave a field blank when you are entering information. To provide this option for your own
code tables, include a blank code along with the description None Specified.
5. Click OK. Sage Abra SQL HRMS checks for duplicate codes and saves the changes if no duplicate
exists. If a duplicate is found, the system prompts you to enter a different code.
To Edit Codes
1. From the Navigation Pane, select Setup > Employees, Time Off, Payroll, or Training > Click the link
for the type of codes you want to work with. The code table you selected opens.
2. Select the employer with whom you want to work.
3. Highlight the code you want to edit and click More…. The detail page for the code you selected
opens. Codes that have been set up in the following code tables cannot be changed. If you need to
change a code name, create a new code and delete the old one. • Benefit Rate Tables
• Benefit Savings Plans • Attendance Plans
Employee Codes
4. FMLA Event Reason Codes
5. Edit the information and click OK.
To Delete Codes
1. From the Navigation Pane, select Setup > Employees, Time Off, Payroll, or Training > Click the link
for the type of codes you want to work with. The code table you selected opens.
2. Select the employer with whom you want to work.
3. Highlight the code you want to delete and click Delete. Sage Abra SQL HRMS prompts you to
confirm the deletion. Also, deleting a code could affect history files and reports that contain the
code.
4. Click Yes to delete the record, or click No to cancel the deletion.
5. Click the Close button when you finish.
Add Codes From Details
You can also directly add codes to a code table when you are working with details pages. For every field
that references a code table, Sage Abra SQL HRMS provides a drop‐down list of codes. For example, on
the Current Job page, the Job Code field accesses the Job Codes table.
Sage Abra SQL HRMS provides an option that enables you to add a new code while you are entering
information on the page. When working with Abra HR, you can add codes from pages for all Abra HR
code tables except for the Benefit Insurance Plans, Benefit Savings Plans, and Benefit Rate Tables. You
must access these code tables in Rules to work with them. To Add a Code From a Detail
For more information about using drop‐down lists, see Using pages.
1. Open the drop‐down list for the field that references the code table you want to update.
2. Scroll to the bottom of the list and select Add New Code. A page opens so you can add a new code.
3. Enter the information for the new code and click OK. Sage Abra SQL HRMS adds the code to the
list and selects the new code for the field.
Employee Codes
Set Up Employers for Abra HR
Abra HR allows you to manage information for multiple employers. However, because the system stores
the data for each employer in separate databases, you must set up information for each employer
separately.
Abra HR identifies each employer with a unique employer code you assign when you add a new
employer to the system. Abra HR uses this code to store and access information. For example, the system
stores sample employer data for Z‐Systems, Inc., whose company code is ZSI.
You should have already set up your enterprise and added your employers to the enterprise. After you
Employee Codes
defining the options for your employers and determining the user‐defined fields on employee pages your
employers might want to use to hold specific information not stored elsewhere in Abra HR. For detailed
information about how to set up your enterprise and how to add employers to your enterprise, refer to
Getting Started.
For each employer you added, you must complete the HR Setup information.
Note: Each Abra software program creates and maintains its own databases. Therefore, if you use other
Abra programs with Abra HR, you must set up each employer for each applicable product.
To Set Up an Employer for Abra HR
1. Log in to Sage Abra SQL HRMS.
2. Select the company you want to work with.
3. From the Navigation Pane, select Setup > Employees > HR Setup.
4. The list includes all the employers you added to your system. Scroll through the list, select the
employer set up, and click OK.
5. The HR Setup page opens for the employer you selected. Fill in the appropriate information using
the tabs on this page: HR Options, EEO‐1, and EEO‐4.
Completing the HR Options Tab
Fields Descriptions
Allow EEO‐4 Reporting
Enable this option if your employer must submit EEO‐4 reports to the Equal Employment Opportunity Commission (EEOC). Do not enable this option if your employer must submit EEO‐1 reports.
Select Yes to enable the EEO‐4 tab on this page. Select No to enable the EEO‐1 tab on this page.
Note: It is your responsibility to understand EEOC guidelines governing the
submission of EEO‐4 and EEO‐1 reports.
Job Code Validation
When you enter a job code or job title for an employee, you have the choice of either selecting from a list of job codes or job titles (you establish the list when you set up your job codes and titles) or manually entering a job code or a job title.
Select Yes to select from a list of job codes. Select No to manually enter a job code or job title.
Note: If you enable job code validation (select Yes), when you create a custom detail and select job code as a field to add to the page, the job code will be used. If you disable job code validation (select No), when you create a custom detail and select job code as a field to add to the page, the job title will be used.
Employee Codes
Fields Descriptions
you set up for the selected job code.
Select Yes to direct Abra HR to validate that the employee’s salary is within the salary grade for the job.
Select No to disable the validation. Numeric
Employee ID
If you are using Abra Workforce Connections, you should never change the Numeric Employee ID setting when an open enrollment or life event is in process, or if the open enrollment or life event has not yet been transferred to Abra HR.
You can set up Abra HR to automatically assign the next available (and sequential) ID number when you add new employees.
Select Yes to enable automatic numbering of employee IDs.
Select No to disable automatic numbering. This means that when you add a new employee, you must manually assign an ID number to the employee. Abra HR reminds you if you accidentally assign a number that already exists.
If you change your selection for this option after you first set up your employer, Abra HR asks you if you want to convert existing IDs into either character format (if you disable the option) or numeric format (if you enable the option). Select Yes to have Abra HR automatically convert all the IDs for you.
Warning Age You can enter the minimum legal employment age for your state or employer. Abra HR then warns you if you hire a person younger than the legal age. Leave the field blank if you do not want a warning.
Description of Establishment
If your employer submits EEO reports, enter a brief description of the major business activity of the establishment. The information you enter here appears on the EEO‐1 Headcount Summary report.
User‐Defined Employment Fields
You can define four fields that appear as Miscellaneous fields on the HR Status page. The text you enter is used for the miscellaneous field labels.
If your employer has special needs not covered in Abra HR, you can define your own field labels and fields to meet these needs. For example, medical groups can define fields to track details about degrees, specialties, and certification dates. You might also want to use these fields to record information about drivers’ licenses, security clearances, uniform sizes, or the results of pre‐ employment screenings.
You can also track information unique to your employer by designing and creating custom pages. User‐Defined Pay
Fields
You can define four field labels that appear as Miscellaneous fields on the Current Pay page. The text you enter is used for the miscellaneous field labels.
Employee Codes
Setting up EEO Information
When you set up your employer, you need to determine whether to set up information for EEO‐1
reporting or for EEO‐4 reporting. It is your responsibility to comply with federal regulations and
procedures governing the filing of EEO‐1 and EEO‐4 reports. To Set Up EEO-1 Information
1. On the HR Options tab, select No in the Allow EEO‐4 Reporting field. The EEO‐1 tab becomes
enabled. Click the EEO‐1 tab to display the EEO‐1 setup options.
2. Enter the required EEO‐1 setup information, as described in the following table. The information
you enter appears on the EEO‐1 Headcount Summary report.
Field Label Field Description
Establishment Enter the name and address of the establishment. Parent Co Enter the name and address of the Parent Company. CO Number Enter the Company Number.
Unit Number Enter the Unit Number.
SIC Code Enter the Standard Industrial Classification code. EI Number Enter the Employer Identification Number.
Duns No Dun and Bradstreet identification number, if applicable. NAICS Code Enter the North American Industry Classification System code. Filing
Requirements
Select the check boxes to indicate Yes or clear the check boxes to indicate No for filing requirement tests 1 through 3.
Type of Report Indicate Headquarters (Type 3) or Establishment (Type 4) Report. Filed Last Year Indicate Yes or No.
Employ Apprentices
Indicate Yes or No.
To Set Up EEO-4 Information
1. On the HR Options tab, select Yes in the Allow EEO‐4 Reporting field. The EEO‐4 tab becomes
Employee Codes
Next Step
After you set up your enterprise and add and set up all of your employers, you are now ready to set up
Set Up Benefits
Before you can enroll employees and their dependents in your employer’s benefit plans, you must first set
up your benefit rate tables and benefit plans.
Sage Abra SQL HRMS calculates your benefits quickly and easily. After you define your plans, you can
direct Abra HR to determine which employees are eligible for which plans and to calculate coverage,
premium, and employee contribution information.
To work with your employer’s various benefit plans, you must first understand the following terms and
their definitions:
Coverage ‐ Coverage is the amount of benefits an insurance plan provides to eligible employees. In
some insurance plans, coverage is the same for all participants. For other participants, coverage
varies according to the participantʹs job group, salary, seniority, or benefit choices.
Premiums ‐ Premiums are the monthly amounts paid for coverage. In Abra HR, employee
premiums are the amounts paid to the insurance company for the individual employee’s coverage,
no matter how those amounts are distributed between employee and employer. Dependent
premiums are the amounts paid to the insurance company for dependent coverage. Premiums are
always monthly amounts.
Contribution ‐ A contribution is the amount paid by the employee for the benefits received.
Abra HR calculates the appropriate employee contribution based on the information you enter.
Follow these steps when you set up benefit plans:
Step 1 Set Up Benefit Type Code Tables
Step 2 Set Up Benefit Rate Tables
Step 3 Set Up Insurance Plans (referencing rate tables, if appropriate)
Step 4 Set Up Savings Plans (referencing rate tables, if appropriate)
If you are using Abra Workforce Connections for benefits enrollment, follow these additional steps:
Step 5 ‐ Set Up Open Enrollment Insurance Plans
Step 6 ‐ Set Up Open Enrollment Savings Plans
Step 7 ‐ Set Up Open Enrollment Rate Tables
Employee Codes
Complete the Benefit Enrollment step in the Record New Hire or Rehire Employee action. Open the Insurance Benefits and Savings Benefits pages and enter enrollment information. If you are using Abra Workforce Connections for benefits enrollment, complete the open
enrollment setup steps in Abra Workforce Connections and notify your employees that they can
start the open enrollment process.
Abra HR provides a sample employer, Z‐Systems, Inc., so you can experiment with the many features of
Abra HR. We recommend you experiment with benefit setup using Z‐Systems, Inc. to gain an even better
understanding of benefit plans and rate tables and how to design each plan to best serve your employerʹs
needs.
Rules for Benefit Plan Data and Calculations
Benefit plans often require complex calculations depending upon a number of different factors. Coverage,
premiums, and contribution calculations can vary according to an employee’s age, income, years of
service or other variables.
For example, employees life insurance coverage might vary based upon the employees salary. In another
case, an employee’s monthly dependents premium amount can depend on the number of enrolled
dependents.
You can determine data and calculations for coverage, employee and dependent premiums and
contributions using fixed amounts, or you can calculate them using formulas. You can also refer to a rate
table if you created one for the particular field with which you are working.
When you set up your benefit plans, Sage Abra SQL HRMS provides the following options you can use to
define insurance coverage and premium information:
Leave the field blank. If you leave the field blank, Abra HR does not use automatic benefit
calculation for this field and you can manually enter an amount for each employee on the
employees Insurance Benefits page. Or, leave the field blank if the field does not apply to this type
of insurance (such as coverage for a dental plan or a dependent premium for employee life
insurance).
Enter zero ‐ If you enter a zero, the fixed amount is zero (0). For example, the dependent premium
for employee life insurance is always zero.
Note: A zero (0) does not disable automatic benefit calculation. If you enter a zero, automatic
benefit calculation replaces any number you previously entered on the employees benefit pages
with a zero.
Enter a fixed dollar amount ‐ Each affected employee benefit record automatically receives this
amount. If the amount changes (as it would, for example, whenever your insurance company raises
rates), you can correct the amount on the page for the insurance plan; then all employees who have
Employee Codes
To enter a fixed dollar amount, such as $10,000 of coverage, enter the amount without a dollar sign
or comma: 10000.
Enter a mathematical formula using the data in your systems databases.
For example, you can specify two times the employees annual pay with the formula2*ANNUAL(). To insert expressions using items from the Personnel or Benefits database, click the Expression
Builder button. The Expression Builder opens so you can build an expression for the insurance
plan calculations. For more information, see Expressions and Functions.
Set up rate tables to help you test for specific conditions and to perform complex calculations. Rate
tables allow you to define calculations once and then reference the information instead of
repeatedly typing the calculations. Use rate tables to define coverage, premium, and contribution
amounts.
For example, you might want to set up a rate table that charges different monthly premiums for
employees based on age, gender and whether or not they smoke.
To use a rate table you previously set up, select it from the list of Available Rate Tables. Enter a conditional formula using the IIF function.
If you are familiar with expressions, you can type them directly or use the Expression Builder to help you
when you set up your insurance plans. For example, you can use an expression to calculate 20% of an
employee’s salary for the coverage amount of a disability insurance policy. For more information
regarding expressions, see Expressions and Functions.
Note: You must precede any referenced data from the employee Benefit database with ʺBE.ʺ to signify it
originates from the Benefits database rather than the Employee Personnel database. Set Up Benefit Type Code Tables
Benefit type codes define the type of benefit. For example, you could use M to define a medical‐type plan
or D to define a dental‐type plan. The Benefit Type code table should contain codes and descriptions for
each type of benefit plan your employer offers.
For more information about maintaining code tables, see Set Up Code Tables. Set Up Benefit Rate Tables
Rate tables allow you to test for specific conditions and to perform complex calculations. You define the
calculations once and then reference this information for other plans that you define. For example, you
can set up a rate table that calculates different premiums based on whether the employee coverage
includes a spouse or dependent children. Rate Tables Must be Unique
Each benefit plan must reference a unique rate table. That is, you cannot have more than one benefit plan
Set Up Benefit Rate Tables
five benefit plans to reference it, set up five separate rate tables with the same values, naming them HMO,
1HMO, 2HMO, 3HMO, and 4HMO.
Use the Copy Table button on the Benefit Rate Table Setup Detail page to copy a rate table with the same
values and then enter a different code and description for the rate table. Abra Workforce Connections
If you are using Abra Workforce Connections, you should never change or remove a rate table that is
currently in use in a life event or attached to a life event that has not yet been transferred to Abra HR.
Set Up Benefit Rate Tables
1. From the Navigation Pane, select Setup > Employees > Benefits > Rate Table Setup.
2. From the Employer drop‐down list, select the employer with whom you want to work.
3. Click Add (or select an existing table, click More and then click Copy Table to copy the original rate
table to a new rate table). The Benefit Rate Table Setup Detail page opens.
4. Enter the Code and Description for the rate table. When you set up a benefit plan, you reference the
rate table by this code.
5. Enter a column heading for the first condition you want to check. Abra HR can check for a
condition by the following methods. These methods are called Column Match Types. Select one of
the following:
• Exact Match ‐ Abra HR looks at the condition it is checking for and if it exactly matches a
condition in the rate table, Abra HR will use the associated rate.
• Up To and Including ‐ Abra HR looks at the condition it is checking for and if it falls within a
range defined in the rate table, Abra HR will use the associated rate. Use Up To and Including for
a coverage, premium, or contribution amount since they usually fall within a range.
• Cumulative ‐ Cumulative is normally used for savings plans. You can define an employer match
for different percentages the employee contributes to the plan. For example, an employer matches
dollar for dollar employee contributions up to the first 4% of their salary. If an employee
contributes 6%, then the employer still matches dollar for dollar up to 4% but only matches $.50
on the dollar on the remaining 2%. Going one step further, if an employee contributes 8% of their
salary, the employer matches dollar for dollar on the first 4%, $.50 on the dollar for the next 2%,
then $.25 on the dollar for the remaining 2%.
6. In the Column Expression field, enter a function. The Column Expression field enables you to enter
a function or expression. To define the expression as an amount, enter the amount in the field. To
define the expression as a function or formula, select Expression Builder. The Expression Builder
opens so you can define the expression for the rate table.
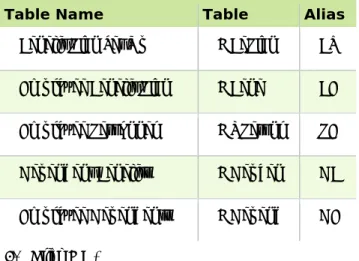
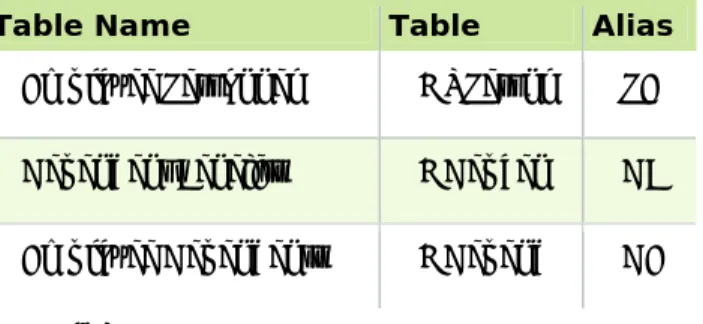
If you are using Abra Workforce Connections and are defining a rate table expression to be used in
a benefit plan for life events or open enrollment, please note that Abra Workforce Connections can
only support benefit calculation expressions that reference records from the following tables:
Set Up Benefit Rate Tables
Table Name Table Alias
Benefit Plan Set Up HBePlan BT Employee Benefit Plan HBene BE Employee Personnel HRPersnl PE Dependent Benefits HDepben DB Employee Dependents HDepend DE
7. Repeat steps 5‐6 for each condition you want to check.
8. Click the Rate Table tab to enter the rates.
Enter Rate Table Data
When you set rates for the conditions you are checking for, you specify the order in which Abra HR
checks the conditions and the rates it should use for those conditions.
For example, a rate table for a medical plan defines the following rates for enrolled dependents: • $0 for no spouse and no children
• $100 for a spouse and no children • $75 for no spouse and one child • $150 for a spouse and one child
• $250 for a spouse and two or more children
The order and conditions for this rate table are illustrated by the following table. Order Insured
Spouse Insured Child Rate
1 0 0 0
2 1 0 100
3 0 1 75
4 1 1 150
5 1 99 250
9. On the Rate Table tab, click Add. Abra HR automatically inserts the number 1 in the Order column
of the first row.
10. Click Tab to move to the first column.
Set Up Benefit Rate Tables
12. Click Tab to move to the Rate column and enter a value.
13. Click Enter to save your rate and move back to the Order column.
14. Click Add to set the next rate. Abra HR inserts the number 2 in the Order column.
15. Repeat the process, clicking Add for each new rate, until you have completed the rates for the
benefit plan.
Note: Do not exceed 251 characters in the Rate column.
16. Click OK to save your rate table. Abra HR returns you to the Benefit Rate Table Setup page.
Set Up Benefit Insurance Plans
Set Up Benefit Insurance Plans
After you set up your benefit types and the optional benefit rate tables, you are ready to set up your
insurance plans. The Insurance Plans page contains codes, descriptions, and data for every insurance plan
your employer provides. Examples might include AD+D for Accidental Death and Dismemberment,
HMO for HMO Health Care Insurance and PPO for PPO Health Care Insurance.
Before you set up an insurance plan, we recommend you review Rules for Benefit Plan Data and
Calculations.
Abra Workforce Connections
If you are using Abra Workforce Connections, you should never change or delete an insurance plan that is
currently in use in a life event or attached to a life event that has not yet been transferred to Abra HR.
To Set Up a Benefit Insurance Plan
1. From the Navigation Pane, select Setup > Employees > Benefits > Insurance Plans.
2. Select the level at which you want to set up the plan. Select Enterprise or a specific employer from
the Employer list. Use the following information to help you decide:
• If you want the plan to only be available to a specific employer, select the Employer. • If you want the plan to be available to all employers, select Enterprise.
• If you are using Abra Workforce Connections for benefits enrollment and you want the same
plan to be available to multiple employers, but you want different open enrollment periods
for each employer, you must set up a separate employer‐level plan for each employer.
3. If you are using Abra Workforce Connections for benefits enrollment, we recommend you set all
insurance and savings plans at the employer level (not the Enterprise level).
4. Click Add (if the setup interview dialog box displays, click No). The Benefits Insurance Plans Detail
page opens. If you want to create a new insurance plan from an existing plan, click Copy.
5. In the Code field, enter a code to represent the plan. This code uniquely identifies the group benefit
plan.
Note: Do not use special characters to define the code, specifically single quote ( ʹ ),
percentage sign ( % ), and underscore ( _ ).
6. In the Description field, enter a longer description of the plan you are setting up. This description
will appear as a selection on the employeesʹ Insurance Benefits page. It will also print on benefit
Set Up Benefit Insurance Plans
From the Benefits Insurance Plans Detail page you will:
Define General Information
This will include general information about the plan, including the code and description, employee
contribution frequency, plan type, and COBRA continuation.
Field Label Field Description
Benefit Type Select a benefit type. These types originate from the Benefit Type code table. Employee
Contribution Frequency
Indicate the frequency at which employee deductions are made. Select a default value from the drop‐down list: weekly, biweekly, semimonthly, or monthly.
Note: The frequency at which the employee pays the contribution might differ from the frequency at which premium charges are paid. Premium charges always appear as monthly figures in reports and on other pages.
Benefit Continuable Under COBRA
Indicate whether or not your employer offers this benefit to employees according to COBRA guidelines. When you terminate an employee, Abra HR gives you the opportunity of entering a date on which COBRA and non‐COBRA benefits will expire for the employee.
Plan Is In Effect Indicate when this plan is being offered. Employee coverage in the plan cannot start before the beginning of the planʹs Effective Period, and employee coverage will automatically expire at the end of the planʹs Effective Period.
If you do not want any restrictions as to when employees can be covered by this plan, leave the dates blank.
Note: If you are using Abra Workforce Connections for benefits enrollment, you must provide a From and To date, regardless of whether the plan will be used for open enrollment or life events.
Current Amounts Went Into Effect On
Enter the date the new amounts should go into effect. On this date, all employees enrolled in
the benefit plans will be updated with the current amounts.
If you are using Abra Workforce Connections for benefits enrollment, this date will automatically be updated when the new plan year takes effect.
Define the Coverage Per Employee and Dependents
Coverage is the amount of benefits an insurance plan provides to eligible employees. In some insurance
plans, coverage is the same for all participants. For other participants, coverage varies according to the
participants’ job group, salary, and seniority or benefit choices.
Dependent coverage is the amount of benefits an insurance plan provides to the dependents of eligible
employees.
Note: If coverage is applicable to this plan and you are using Abra Workforce Connections for
benefits enrollment, you must define the coverage in order to make this plan available for open
Set Up Benefit Insurance Plans
Define the Employee Premium
The monthly employee premium is the amount of the monthly bill from the insurance company for the
employeeʹs benefit. It includes both the employees and the employers’ contribution. For self‐insured
plans, this amount is the premium‐equivalent and is always paid monthly, which is not necessarily the
same period as the employee contribution.
Note: If you are using Abra Workforce Connections for benefits enrollment, you must define the
employee premium in order to make this plan available for open enrollment or life events.
Define the Dependent Premium
The monthly dependent premium is the amount of the monthly bill from the insurance company for the
employeeʹs dependents. It includes both the employees and the employers’ contribution toward the
dependent premium. For self‐insured plans, this amount is the premium‐equivalent, paid monthly, which
is not necessarily the same period as the employee contribution.
Note: If a dependent premium is applicable to this plan and you are using Abra Workforce Connections
for benefits enrollment, you must define the dependent premium in order to make this plan available
for open enrollment or life events.
Define the Employee Contribution
This is the amount the employee contributes toward the total premium charges.
The Employee Contribution Frequency determines how often the employee pays their contribution for the
plan. The selection in this field defaults to the selection you made on the General tab.
Note: If an employee contribution is applicable to this plan and you are using Abra Workforce
Connections for benefits enrollment, you must define the employee contribution in order to make this
plan available for open enrollment or life events
Define Eligibility Requirements
Not every employee is eligible to participate in every plan. The eligibility requirements you set up for an
insurance plan define which employees are eligible and which are not. After you define eligibility, you
can direct Abra HR to automatically add the benefit to all eligible employees.
If all employees are eligible for the plan, leave the fields blank. Refer to your employerʹs policies and the
particular insurance policy for eligibility requirements.
Note: If you are using Abra Workforce Connections for open enrollment, you do not need to define
eligibility requirements here. Rather, you will define them in the Abra Workforce Connections module
Set Up Benefit Insurance Plans
The Standard Eligibility tab contains the following fields.
Field Label Field Description
Salaried/Hourly Indicate which employees are eligible for this plan. Select a default value from the drop‐down list: Salary, Hourly, or Salary and Hourly.
Employee Type Use this field to limit eligibility to Regular Full Time, Regular Part Time or any other employee type you defined in the Employee Type code table. If you select None Specified, the benefit plan applies to employees of all status codes.
Minimum Age The start date for the benefit becomes the date on which the employee reaches the minimum age.
Minimum Hours This field can limit a benefit plan to employees who work at least a specified number of hours or units per pay frequency. Abra HR compares this field to the Hours/Units field on the Current Pay page.
Minimum Days Employed
The effective start date for the benefit is the date the employee reaches the minimum number of days employed. Entering zero means the benefit requires no minimum days employed and employees are eligible on the first day of the following month.
Automatically Add To Eligible
Employees
Indicate whether to have Abra HR add the benefit to all active employees who meet all the eligibility requirements (both Standard and Custom). When you have finished setting up the plan and click OK to save all your data, Abra HR proceeds to add the benefit to eligible employees.
Some points to consider:
An active employee has an employee status of Active (defined on the Current Job page). Abra HR does not automatically add benefits to employees who are terminated, on leave of absence or classified as COBRA dependents.
When you add new active employees to the system, Abra HR assigns the benefit if they meet the eligibility requirements.
If you define eligibility criteria incorrectly and direct Abra HR to automatically add the benefit to the wrong group of employees, delete the benefit code from all employees. You can then re‐enter the benefit code and specify a different group of employees.
Use <Date> to Start Benefit
Use these fields to define a waiting period for eligibility after the employee meets all other requirements. You can use the Original Hire Date, Last Hire Date, or the Adjusted Seniority Date to determine when to start the benefit. Choose to start the benefit on the first day (click the Day radio button) following a specific number of months or on the first day of the month (click the Month radio button) following a specific number of months.
If you need to enter additional eligibility criteria, click the Custom Eligibility tab. You can enter an
expression or use the Expression Builder to specify even more precisely those employees eligible for the
benefit plan. For instance, Abra HR will exclude Regular Part Time employees if you enter the
Set Up Benefit Savings Plans
Defining custom criteria does not affect the start date of the benefit. For more information, see
Expressions and Functions. Complete the Process
After you have entered all your insurance benefit plan information, click OK. Abra HR asks if you want to
update the employee benefit file with the new calculations.
Click Yes to update the employee benefit file and then click OK when Abra HR completes the update. To
enroll an employee in an insurance benefit plan, open the employeeʹs Insurance Benefits page, click Add,
then enter the appropriate information for the employee. Set Up the Plan as an Open Enrollment Plan
If you also use Abra Workforce Connections for benefits enrollment and you want this plan to be
available to your employees for open enrollment or life events, go to Set Up Open Enrollment Insurance
Plans for instructions.
Set Up Benefit Savings Plans
After you set up your benefit types and the optional benefit rate tables, you are ready to set up your
savings plans. The Benefit Savings Plans page contains codes, descriptions, and data for every savings
plan your employer provides. An example is a 401(k). After you set up the plan, Abra HR will
automatically calculate both the employee contributions and the employer matches.
When the employee’s contribution falls between the ranges, Abra HR will use the next rate in the table for
the employer match. For example, an employer matches 100% of the first 4%, 50% of the next 2%, and 25%
of the remaining 2%. If an employee contributes 7%, Abra HR uses 100% for the match on the first 4%,
50% on the next 2% and 25% on the remaining 1%.
Before you set up a savings plan, we recommend you review Rules for Benefit Plan Data and
Calculations.
Abra Workforce Connections
If you are using Abra Workforce Connections, you should never change or delete a savings plan that is
currently in use in a life event or attached to a life event that has not yet been transferred to Abra HR. To Set Up a Benefit Savings Plan
1. From the Navigation Pane, select Setup > Employees > Benefits > Savings Plans.
2. Select the level at which you want to set up the plan. Select Enterprise or a specific employer from
the Employer list. Use the following information to help you decide:
• If you want the plan to only be available to a specific employer, select the Employer. • If you want the plan to be available to all employers, select Enterprise.
Set Up Benefit Savings Plans
• If you are using Abra Workforce Connections for benefits enrollment and you want the same
plan to be available to multiple employers, but you want different open enrollment periods
for each employer, you must set up a separate employer‐level plan for each employer. • If you are using Abra Workforce Connections for benefits enrollment, you must set up all
insurance and savings plans at the same level, either Enterprise or Employer.
3. Click Add (if the setup interview dialog box displays, click No). The Benefits Savings Plans Detail
page opens. To create a new savings plan from an existing plan, click Copy.
4. In the Code field, enter a code to represent the plan. This code uniquely identifies the group benefit
plan.
Note: Do not use special characters to define the code, specifically single quote ( ʹ ), percentage
sign ( % ), and underscore ( _ ).
5. In the Description field, enter a longer description of the plan you are setting up. This description
will appear as a selection on the employees Savings Benefits page. It will also print on benefit
statement reports, such as the Benefit Enrollment by Plan and Benefit Premium Totals by Plan.
6. Set up the following on the Detail page:
Define general information about the plan; including the type of employer contribution and the
amount of the employer contribution (see the table below)
Define the Coverage Per Employee and Dependents. Coverage is the amount of benefits an
insurance plan provides to eligible employees. In some insurance plans, coverage is the same for
all participants. For other participants, coverage varies according to the participants’ job group,
salary, and seniority or benefit choices. Dependent coverage is the amount of benefits an
insurance plan provides to the dependents of eligible employees.
Note: If coverage is applicable to this plan and you are using Abra Workforce Connections
for benefits enrollment, you must define the coverage in order to make this plan available for
open enrollment or life events.
Define eligibility requirements (see the table below)
Define the Employee Premium. The monthly employee premium is the amount of the monthly
bill from the insurance company for the employeeʹs benefit. It includes both the employeeʹs and
the employerʹs contribution. For self‐insured plans, this amount is the premium‐equivalent and is
always paid monthly, which is not necessarily the same period as the employee contribution.
Note: If you are using Abra Workforce Connections for benefits enrollment, you must
define the employee premium in order to make this plan available for open enrollment or life
events.
Define the Dependent Premium. The monthly dependent premium is the amount of the monthly
Set Up Benefit Savings Plans
and the employerʹs contribution toward the dependent premium. For self‐insured plans, this
amount is the premium‐equivalent, paid monthly, which is not necessarily the same period as the
employee contribution.
Note: If a dependent premium is applicable to this plan and you are using Abra Workforce
Connections for benefits enrollment, you must define the dependent premium in order to
make this plan available for open enrollment or life events.
Define the Employee Contribution. This is the amount the employee contributes toward the total
premium charges. The Employee Contribution Frequency determines how often the employee
pays their contribution for the plan. The selection in this field defaults to the selection you made
on the General tab.
Note: If an employee contribution is applicable to this plan and you are using Abra
Workforce Connections for benefits enrollment, you must define the employee contribution in
order to make this plan available for open enrollment or life events
Define General Information
Field Label Field Description
Employer Contribution Type
Indicate whether your employer expresses its contribution to the savings plan as a percentage or a dollar amount.
Some points to consider:
If your employer contributes a dollar amount, select Amount. If the employee contribution is a fixed amount, enter the amount in the field. If the employer contribution varies with the percentage the employee contributes, select Expression Builder and build an expression for the savings plan, or you can select Rate Table and choose which rate table defines the benefit plan. If your employer contributes a percentage, regardless of the employee contribution, select Percent. Then if the employee contribution is a fixed amount, enter the value in the field. If the employer contribution varies with the percentage the employee contributes, select Expression Builder and create an expression for the savings plan, or select Rate Table and choose which rate table defines the benefit plan.
Employer Contribution Per Pay Period
From the list of Available Rate Tables, double‐click the appropriate rate table. Abra HR displays it in the Employer Contribution Per Pay Period field.
Plan Is In Effect Indicate when this plan is being offered. Employer contributions to the plan cannot start before the beginning of the planʹs Effective Period, and will automatically expire at the end of the plans Effective Period.
If you do not want any restrictions as to when employees can be covered by this plan, leave the dates blank.
Set Up Benefit Savings Plans
Field Label Field Description
From and To date regardless of whether the plan will be used for open enrollment or life events. Employer Match
Went Into Effect On
Enter the date the employer match goes into effect.
Define Eligibility Requirements
Perhaps not every employee is eligible to participate in every plan. The eligibility requirements you set
up for a savings plan define which employees are eligible and which are not. After you define
eligibility, you can tell Abra HR to automatically add the benefit to all eligible employees. If all
employees are eligible for the plan, leave the fields blank. Refer to your employer’s policies for
eligibility requirements.
The Standard Eligibility tab contains the following fields.
Field Label Field Description
Salaried/Hourly Indicate which employees are eligible for this plan. Select a default value from the drop down list: Salary, Hourly, or Salary and Hourly.
Employee Type Use this field to limit eligibility to Regular Full Time, Regular Part Time, or any other employee type you defined in the Employee Type code table. If you select None Specified, the benefit plan applies to employees of all status codes.
Minimum Age The start date for the benefit becomes the date on which the employee reaches minimum age.
Minimum Hours This field can limit a benefit plan to employees who work at least a specified number of hours, or units per pay frequency. Abra HR compares this field to the Hours/Units field on the Current Pay page.
Minimum Days Employed
The effective start date for the benefit is the date the employee reaches the minimum number of days employed. Entering zero means the benefit requires no minimum days employed, and employees are eligible on the first day of the following month.
Automatically Add to Eligible Employees
Indicate whether to have Abra HR add the benefit to all who meet all the eligibility requirements (both Standard and Custom). When you have finished setting up the plan, click OK to save the data. Abra HR then proceeds to add the benefit to eligible employees. Here are some points to consider when you check this box:
• An active employee has an employee status of Active (defined on the Current Job page). Abra HR does not automatically add benefits to employees who are terminated, on leave of absence, or classified as COBRA dependents.
• When you add new active employees to the system, Abra HR assigns the benefit if they meet the eligibility requirements.
Set Up Open Enrollment Insurance Plans
Field Label Field Description
• If you define eligibility criteria incorrectly and direct Abra HR to automatically add the benefit to the wrong group of employees, delete the benefit code from all employees. You can then re‐enter the benefit code and specify a different group of employees.
If you need to enter additional eligibility criteria, click the Custom Eligibility tab. You can enter an
expression or use the Expression Builder to specify even more precisely those employees eligible for the
benefit plan. For instance, Abra HR will exclude Regular Part Time employees if you enter the
expression, PE.P_EMPLOY<>"RPT". For more information, see Expressions and Functions. Complete the Process
After you have entered all your savings benefit plan information, click OK. Abra HR asks if you want to
update the employee benefit file with the new calculations.
Click Yes to update the employee benefit file and then click OK when Abra HR completes the update. To
enroll an employee in a savings benefit plan, open the employee’s Savings Benefits page, click Add, then
enter the appropriate information for the employee. Set Up the Plan as an Open Enrollment Plan
If you also use Abra Workforce Connections for benefits enrollment and you want this plan to be
available to your employees for open enrollment or life events, go to Set Up Open Enrollment Savings
Plans for instructions.
Set Up Open Enrollment Insurance Plans
This information applies only if you are using Abra Workforce Connections
This step enables you to select the insurance plans you want to be available for open enrollment in Abra
Workforce Connections. Before you can select the plans, make sure you have entered all the necessary
information for the plan. Refer to Setting Up Insurance Plans for detailed instructions.
From the Navigation Pane, select Setup > Employees > Open Enrollment > Insurance Plans. The Open
Enrollment Insurance Plans page opens for the enterprise and lists all benefit insurance plans you have
already added for open enrollment. The effective from and to dates are also displayed to show each planʹs
open enrollment period.
To add a plan
The steps below enable you to add a plan for open enrollment.
1. Click Add to open the Select Current Benefit Plans two‐list chooser. The Available column lists
Set Up Open Enrollment Insurance Plans
2. Double‐click the plans you want for open enrollment.
3. Click OK when you are finished selecting. Sage Abra SQL HRMS saves the selected benefit plans
and their associated rate tables so they will now be available for open enrollment in Abra Workforce
Connections.
• If a benefit plan set up at an employer level, it will be saved as an open enrollment benefit plan at
the same employer level. Similarly, if it was set up at the enterprise level, it will be saved at the
enterprise level.
• If you are adding a benefit plan that uses the same rate table that a current open enrollment plan
uses, the system will not save the plan and a message will display. In this case, you must assign a
unique rate table to the plan before you can add it.
4. Review the plans and verify that their Effective From and Effective To dates are correct. If you need
to change a planʹs code, description, benefit type, employee contribution frequency, COBRA
continuation or plan effective dates, go to the Benefit Insurance Plans Detail page and make the
necessary changes. After making changes, return to this Enrollment Insurance Plans page and start
at step 1 to add the plan.
To delete a plan
The steps below enable you to delete a plan that is not available for open enrollment.
Important! You should never delete an insurance plan if it is currently being used in an open
enrollment that has not yet been transferred to Abra HR.
1. Select the plan and click Delete. A message displays reminding you that the plan and associated
rate tables will be deleted. It is important to note that if the open enrollment period for the plan is
currently in progress and employees have already made selections, the system will delete all
employee selections.
2. Click OK to delete the plan and associated rate tables. Otherwise, click Cancel.
To edit plan rates
Important! You should never edit an insurance plan if it is currently being used in an open
enrollment that has not yet been transferred to Abra HR.
The steps below enable you to edit plan amounts only if the amounts do not use a rate table. If a plan
uses a rate table and you need to change the rates for the new plan year, use the Open Enrollment Rate
Table Setup page to adjust rate table values.
1. Select the plan and click More... to open the plan amounts page.
2. Change the following plan amounts as necessary. • Coverage Amount
• Dependent Coverage Amount • Employee Contribution • Employee Premium