Revised: 7.22.2015
AMS360 and WorkSmart Capabilities
Versions AMS360 7.5 and later and WorkSmart 6.0
Contents
Introduction ... 1
Commercial Lines Renewal Workflow ... 2
Creating and Saving the Expiration/Renewal Report in AMS360 ... 3
Preparing the Expiration/Renewal Report for Import ... 4
Importing the Expiration/Renewal Report into WorkSmart... 5
Checking for Errors ... 7
System-Generated Tasks ... 8
Using Your Strategy Decisions to Process the Tasks ... 8
Ren – Int Strategy Meeting ... 9
Ren – Gather Renewal Information ... 14
Creating and Sending the Renewal Letter in AMS360 ... 14
Adding Renewal Information ... 19
Setting the Attributes and Releasing the Task ... 22
Ren – Pending Renewal Information ... 27
Ren – Auto Renew... 32
Ren – Non Renewal ... 37
Ren – Support ... 42
Commercial Lines Submission Workflow ... 47
Sub – Marketing ... 48
Creating a Submission in AMS360 and sending it to WorkSmart... 55
Creating a Submission for an Expiring Policy in AMS360... 55
WorkSmart Task Creation and Processing... 97
Endt – Request Processing ... 97
Endt – From Carrier ... 102
Endt – Follow Up ... 111
Endt – Correction Requested ... 115
Changing the Task Target ... 118
Adding Folder Notes ... 122
Adding Email Messages ... 124
Customer Level Capabilities ... 126
WorkSmart Open ... 126
Policy-Level Capabilities ... 127
Using Policy Level Capabilities ... 127
Activity/Document-Level Capabilities ... 128
Creating an Activity ... 129
Viewing an Activity in AMS360 ... 130
Sending Policy Applications, Forms, Overflow pages, and Attachments to WorkSmart ... 130
Working with Customers and Policies in WorkSmart and AMS360 ... 132
Scenario One ... 132
Scenario Two ... 133
Creating an AMS360 Activity while in WorkSmart ... 133
Viewing WorkSmart documents in AMS360 ... 134
Vendor Level Capabilities ... 135
WorkSmart Best Practice File Structure ... 136
Commercial Lines File Structure ... 137
Personal Lines File Structure ... 139
Introduction
WorkSmart, powered by ImageRight, is the premier provider of insurance-focused content
management, enterprise workflow, and business intelligence solutions. WorkSmart helps you improve operations, increase productivity, and reduce expenses.
AMS360, a market-leading Agency Management system, joins with WorkSmart to provide a powerful tool for process workflow and content management.
This guide explains how to use AMS360 together with WorkSmart to process three common workflows for commercial lines:
● Renewals ● Submissions ● Endorsements
In addition, this guide describes how you can use WorkSmart with AMS360 as a content management tool.
Commercial Lines Renewal Workflow
The Commercial Lines workflow process includes three main phases: 1. Creating an Expiration/Renewal Report in AMS360.2. Importing the Expiration/Renewal Report into WorkSmart.
3. Setting up, and then processing commercial lines renewals in WorkSmart.
Figure 1: Commercial Lines Renewal workflow
To initiate the Renewal workflow shown in Figure 1, you need to create and save an Expiration/Renewal Report in AMS360.
Creating and Saving the Expiration/Renewal Report in AMS360
The first step the Commercial Lines Renewal workflow is the creation and processing of a renewal report. The information in this section related to the report is for the WorkSmart administrator responsible for preparing and processing the report. If you are not responsible for the report, you can skip this section and continue with the sections related to processing tasks in the workflow.
1. Log in to AMS360.
2. Open the Reports-All form by clicking 360 Toolbox > Classic Reports.
3. Locate the Expiration/Renewal Report, and then click the report name link (Figure 2).
Figure 2: Expiration/Renewal Report
4. Select the criteria for the report list based on the date range and other criteria for the list you want to import into WorkSmart (Figure 3).
6. When the .csv file opens in Excel, choose File > Save As using the following directory path: C:\Renewal\RawReport\[ReportName].csv. The report name should be unique for each Expiration/Renewal Report you run.
7. When saving the csv you may receive a message that the file contains features that are not compatible with CSV and asks in you want to keep the format. Click Yes.
8. On the Report-Expiration/Renewal dialog box you can save the report selections you’ve chosen or close without saving. If your selections will be used for future reports you can save the criteria over the existing report or save it with a new name.
For our scenario, we created an Expiration/Renewal List that includes four customers, each with one expiring policy (Figure 4).
Figure 4: Expiration/Renewal List
You’ll notice that some column widths are not set to adjust for the text in the cells. You won’t need to change the column widths as WorkSmart will see the content behind the number symbols.
Preparing the Expiration/Renewal Report for Import
Before the report can be imported into WorkSmart the data on the report must be modified so WorkSmart can use the information. An administration or designated person will run the preparation tasks on the report. It is done once for all items on the report.
The following steps prepare the report file for import. Begin by identifying the location of the following items:
● The Make_FlatFile_wLOB.vbs (Visual Basic script file), typically in C:\Renewal. The script file is used to format the report for the import process.
● The .csv file for the line of business that you want to run, typically in:
C:\Renewal\[ReportName].csv (where [ReportName] equals the name of the .csv file, for example, RenewalReport.csv)
● The destination folder for the text (.txt) file that is created for the import process when you use the script file. The .txt file is placed in the same folder as the .csv file. The .txt file (referred to as the NUP file) name is the report name with a number and the .txt extension added, for example, RenewalReport_1.txt.
● The folder defined in ImageRight Enterprise Management Console where files to be imported are placed, often referred to as the import directory.
○ The path for a WorkSmart Online environment may be similar to:
https://wsol-*******utl.worksmartonline.vertafore.com/imports/NUP/CL (where ****** is your organization’s unique customer number)
The long path noted above may be mapped to a network drive; therefore, you may have a path similar to DriveLetter\NUP\CL.
○ The path for an in-house WorkSmart environment may be similar to: \\ServerName\NUP\CL
Importing the Expiration/Renewal Report into WorkSmart
With the file locations identified, you are ready to import the .csv file into WorkSmart. During the import process, tasks are created on the folder notes of the expiring policy folders.
1. Click Start, type Run in the Search box, and then press Enter. Alternatively, you can press +R. 2. Open Windows Explorer, find the file named Make_FlatFile_wLOB.vbs
3. Drag the file to the Open field in the Run dialog box (Figure 5) to add the path of the file to the Run command, creating the command line.
4. Before running the .vbs script, add the location (file path) of the .csv file to the Run dialog box. ● Open Windows Explorer and find the .csv file (RenwalReport.csv).
● Drag the file to the Open field (not shown). 5. The command line will look similar to the following:
C:\Renewal\Make_FlatFile_wLOB.vbs C:\Renewal\RenewalReport.csv 6. In Run, click OK to create the Note Update Import (NUP) file with the .txt extension
(RenewalReport.txt).
7. A series of messages (Figure 6) will be presented. Click OK for each one.
Figure 6: Click OK as the messages are presented.
8. Move the newly created NUP file (RenewalReport_1.txt) to the WorkSmart import directory that you identified as explained earlier.
9. The NUP file is processed automatically by the import process. If the import is successful, a backup folder is created in the import folder. An error folder, which can be helpful for troubleshooting, is created when records in the file cannot be processed.
Figure 7: Verify the backup folder Checking for Errors
When specific records do not import correctly, a folder with the process date is created in the Errors folder. A folder for each job processed on the same date is created.
1. In the Errors folder, open the two text files. One file is an error log to aid you in determining what caused the import error. The second file contains only the records that could not be processed because of an error.
2. Review the error log and correct the errors related to the records that were not imported. 3. Move the text file containing the corrected records to the import directory where it will be
System-Generated Tasks
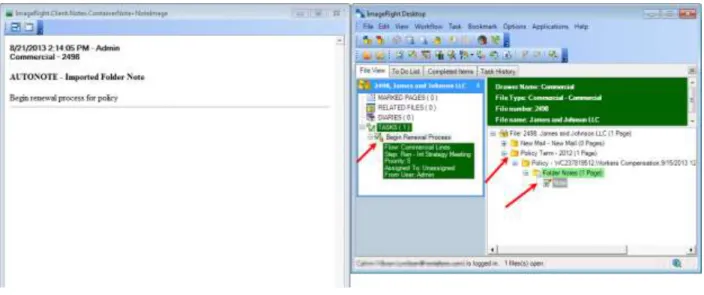
After you process the Expiration/Renewal Report as explained in Importing the Expiration/Renewal Report into WorkSmart on page 5, you will find system-generated tasks in the Ren – Int Strategy Meeting step (the step in which all renewal tasks are created) of the Renewal workflow (Figure 1 on page 2). The tasks are created on the folder notes of the expiring policy folders. The appearance of a locked task is shown in Figure 9.
Figure 9: Locked task in a Policy folder
Based on the discussion in the strategy meeting, you can route the tasks to different steps in the workflow. When tasks are routed in a workflow, they move from one step to the next. Typically, tasks in the Renewal workflow are routed automatically based on task attributes that you set before you release the task. The attributes function as a “send to” mechanism to direct the task to the next step. For example, if you select Auto Renew from the Send To attribute list on a task in the Ren – Int Strategy Meeting step, and then release the task, the task will be moved to the Ren – Auto Renew step in the workflow.
Using Your Strategy Decisions to Process the Tasks
In the separate sections listed below, we explain the steps you can follow to process tasks based on your strategy decisions. As a reminder, the workflow steps we discuss are shown in Figure 1 on page 2.
● Ren – Int Strategy Meeting on page 9
● Ren – Gather Renewal Information on page 14 ● Ren – Pending Renewal Information on page 27 ● Ren – Auto Renew on page 32
● Ren – Non Renewal on page 37 ● Ren – Support on page 42
Typically, tasks related to expiring policies are processed in the workflow steps in the following order: 1. Ren – Int Strategy Meeting
2. Ren – Gather Renewal Information 3. Ren – Pending Renewal Information
4. Sub – Marketing step in the Submission workflow.
Along the way, keep in mind, you can route tasks to other steps in the workflow as needed. For example, if a policy is ready for automatic renewal, you can route the task directly to the Ren – Auto Renew step.
There are two recommendations to consider when processing the tasks.
● Task movement – A task target needs to be moved from the current policy term to the next term Submission folder for easy navigation going forward. If multiple policies will be
renewed in one cycle, only one task will need to carry forward through the renewal process. All other tasks can be parked in the Bind – Pending Policy step until policy order and arrival. To park tasks, set the Bind – Pending Policy attribute as explained later. For information about changing the task target, see Changing the Task Target on page 118.
● Renewal notes – Notes should be entered on the Policy folder. Notes include lists of outstanding items requested to process the renewal. For more information, see Adding Folder Notes on page 122.
Ren – Int Strategy Meeting
All tasks in the Renewal workflow start in the Ren – Int Strategy Meeting step. The tasks represent an electronic version of your Expiration/Renewal Report. The tasks are created on the folder notes of the expiring Policy folder under the Policy Term [Year] folder, as shown in Figure 9 on page 8.
After the strategy decision regarding how to handle the selected renewal, set the task attributes to define the path the task follows in the workflow.
Typically, tasks in Ren – Int Strategy Meeting are sent to Ren – Gather Renewal Information using the next steps.
4. Double-click the task in the list (Figure 10) that you want to process to lock the task and open the file. In our simple system used for documentation, the number of tasks found is limited. The appearance of your to-do list will differ.
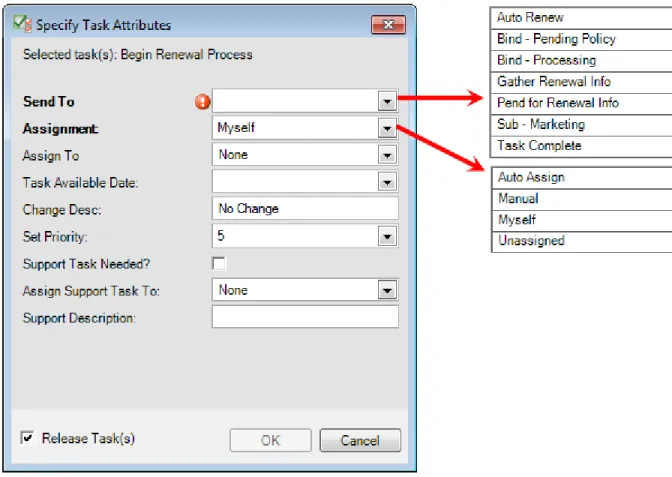
6. In Specify Task Attributes:
● Send To, select Gather Renewal Information.
● Change Desc, enter a description for the task to identify the purpose of the task. Leave No
Change to retain the current description, or remove No Change to replace the current description with a system-generated description.
If you do not need to send the renewal to the Ren – Gather Renewal Information step, you can manage other processing options in the Specify Task Attributes dialog box (Figure 12) by defining attributes based on your requirements. For example, you might want to send the task to the Ren – Auto Renew step.
Figure 12: Specify attributes for processing alternatives ● Select the Send To attribute:
○ Unassigned to leave the task unassigned to anyone.
● Enter a Task Available Date to define the future date the task will be available for processing. Leave the date blank to have the task appear in the to do list on the current date.
● Enter a meaningful task description in Change Desc to identify the task or the needed processing. Leave No Change to retain the current description, or remove No Change to replace the current description with a system-generated description.
● Select the new priority in Set Priority.
● Select Support Task Needed to create a new task requesting support in the Ren – Support step, for example, to request a loss run.
● Select a name in Assign Support Task To if you want to assign the support task to a specific person.
● Enter a description in Support Description to provide information about the reason for the support request, for example, “Pull Loss Run.”
Ren – Gather Renewal Information
The tasks in the Ren – Gather Renewal Information require additional information before they can be completed. For example, you may need information about changes to the insured’s property or vehicle. Also, a renewal letter is issued from AMS360 while the task is in the step.
Creating and Sending the Renewal Letter in AMS360
1. Select the renewal policy from the customer file in WorkSmart, and then click Open in AMS360 from the toolbar.
2. From the AMS360 Dec Page toolbar, click Form Letters.
3. In the Form Letter dialog box select the Renewal category and the document name of the letter you want to merge and send to the customer.
4. In our scenario we are choosing the Request for information on loc(ation), bldg (building), veh(icles). We have chosen the Customer as the recipient (Figure 13).
5. Click the View link to merge data from AMS360 into the Form Letter and open the document in Word (Figure 14).
Figure 14: Form letter with data inserted
7. Switch to your email Sent Items folder. Click the message you sent to the insured with the letter attached. Hold down the left mouse button and drag the message to WorkSmart. Next, click the
ImageRight tab (installation of an add-in is required for this tab) above the ribbon, and then click
Import on the ribbon (Figure 15).
Figure 15: Import the letter
8. Click Import and choose the settings below when the dialog box appears. Leave the color as black and white (Figure 16).
9. The Merged (document name) dialog box shows a preview of the document being imported. Click the Import Into tab (Figure 17).
10. On the Import Into tab you can choose the folder where the document is to be placed (Figure 18). If you have a file open in WorkSmart you can click the folders in WorkSmart and automatically update the folder location of the merged document.
Figure 18: Define the file location
11. After selecting the folder where you want the letter filed, click Import. Adding Renewal Information
As you gather renewal information (letters, loss run, vehicle lists, etc.) in the Ren – Gather Renewal Information step, the information must be added to the customer’s file in WorkSmart, making it available for submission to the market as needed and preventing future E&O exposure.
4. In the Import Images dialog box (Figure 20), click the Import Into tab. 5. Under Policy Term – YYYY, Submission/Quote, select Loss Run. 6. Click Import.
7. Verify that the document is added to the Policy Term – YYYY, Submission/Quote folder, and the Loss Run document type (Figure 21).
Figure 21: Verify the addition of the document Setting the Attributes and Releasing the Task
In the typical workflow introduced earlier, tasks are released from the Ren – Gather Renewal Information step to the Ren – Pending Renewal Information step after the needed information is available using the next steps.
To make it easier to find tasks in the to do list, you may want to create and use favorites. For more information about favorites, click ImageRight Help on the Help menu and search for Favorites.
1. In WorkSmart, click the To Do List tab. 2. Select the following search criteria:
● Workflow containing the tasks you want to locate and process, Commercial Lines in our example.
● Step containing the tasks you want to locate, Ren – Gather Renewal Information in our example. ● User – name of the person to the tasks are assigned, typically your name or unassigned.
3. Click Fetch.
4. Double-click the task in the list (Figure 22) that you want to process to lock the task and open the file. In our simple system used for documentation, the number of tasks found is limited. The appearance of your to-do list will differ.
5. Right-click the locked task, indicated by , and then click Set Task Attributes (Figure 23).
6. In Specify Task Attributes (Figure 24):
● Send To, select Pend for Renewal Info.
● Change Desc, enter a description for the task to identify the purpose of the task. Leave No
Change to retain the current description, or remove No Change to replace the current description with a system-generated description.
If you do not need to send the task to the Ren – Pending Renewal Information step, you can manage other processing options in the Specify Task Attributes dialog box (Figure 25) by defining attributes based on your requirements. For example, you might want to send the task to the Bind – Processing step in the Binding workflow.
Figure 25: Specify attributes for processing alternatives ● Select the Send To attribute:
○ Bind – Pending Policy to send the task to the Bind – Pending Policy step in the Binding workflow if you have authority to bind the policy and have already bound the policy. ○ Bind – Processing to send the task to the Bind – Processing step in the Binding workflow
if you do not have authority to bind the policy so the policy can be bound later.
○ Pend for Renewal Info to send the task to the Ren – Pending Renewal Information step. ○ Reschedule/Reassign to define a future date the task should be available and/or assign
it to another person. The task remains in the current step.
○ Sub-Marketing to send the task to the Sub – Marketing step in the Submission workflow. ○ Task Complete to send the task to the End step, no further processing necessary.
● Select the Assignment attribute:
○ Auto Assign to assign the task automatically to another person. ○ Manual to assign the task to person you select in the Assign To list.
○ Myself to assign the task to yourself.
○ Unassigned to leave the task unassigned to anyone.
● Enter a Task Available Date to define the future date the task will be available for processing. Leave the date blank to have the task appear in the to do list on the current date.
● Enter a meaningful task description to identify the task or the needed processing in Change Desc.Leave No Change to retain the current description, or remove No Change to replace the current description with a system-generated description.
● Select the new priority in Set Priority.
● Select Support Task Needed to create a new task requesting support in the Ren – Support step, for example, to request a loss run.
● Select a name in Assign Support Task To if you want to assign the support task to a specific person.
● Enter a description in Support Description to provide information about the reason for the support request, for example, “Pull Loss Run.”
Ren – Pending Renewal Information
Typically, you route tasks to the Ren – Pending Renewal Information step after you have requested additional information in Ren – Gather Renewal Information. For example, you might request updated property information from the insured as you did in Creating and Sending the Renewal Letter in AMS360 on page 14. After you have received the requested information, you are ready to complete the work in the step.
In the typical workflow introduced earlier, tasks are moved from the Ren – Pending Renewal
Information step to the Sub – Marketing step in the Commercial Lines Submission workflow using the next steps.
1. In WorkSmart, click the To Do List tab. 2. Select the following search criteria:
● Workflow containing the tasks you want to locate and process, Commercial Lines in our example.
4. Double-click the task in the list (Figure 22) that you want to process to lock the task and open the file. In our simple system used for documentation, the number of tasks found is limited. The appearance of your to-do list will differ.
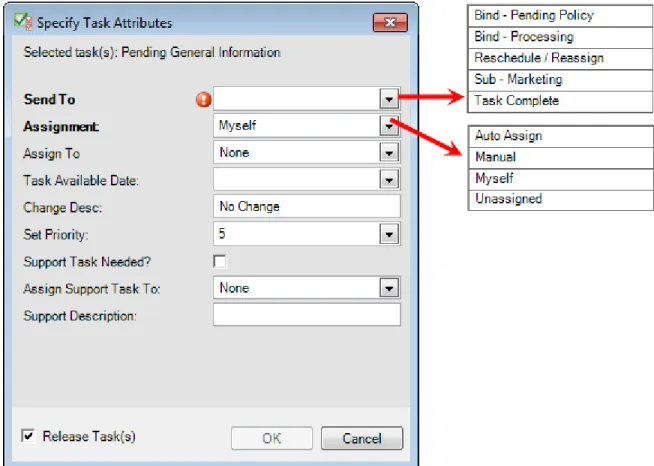
6. In Specify Task Attributes:
● Send To select Sub – Marketing.
● Change Desc, enter a description to identify the purpose of the task. Leave No Change to retain
the current description, or remove No Change to replace the current description with a system-generated description.
7. Click OK to release the task and send it to the Sub – Marketing step (Figure 28).
If you do not need to send the task to the Sub – Marketing step, you can manage other processing options in the Specify Task Attributes dialog box (Figure 29) by defining attributes based on your requirements. For example you might want to send the task to the Bind – Processing step in the Binding workflow.
Figure 29: Specify attributes for processing alternatives ● Select the Send To attribute:
○ Unassigned to leave the task unassigned to anyone.
● Enter a Task Available Date to define the future date the task will be available for processing. Leave the date blank to have the task appear in the to do list on the current date.
● Enter a meaningful task description to identify the task or the needed processing in Change Desc. Leave No Change to retain the current description, or remove No Change to replace the current description with a system-generated description.
● Select the new priority in Set Priority.
● Select Support Task Needed to create a new task requesting support in the Ren – Support step, for example, to request a loss run.
● Select a name in Assign Support Task To if you want to assign the support task to a specific person.
● Enter a description in Support Description to provide information about the reason for the support request, for example, “Pull Loss Run.”
Ren – Auto Renew
The tasks in the Ren – Auto Renew step are related to policies that require no additional information or work. Typically, the tasks are sent from the Ren – Int Strategy Meeting step to the Ren – Auto Renew step. Tasks remain in the step until the policies are ready to be bound or the renewals are received. In our example, the policy is ready for binding, and we are going to prepare and release the task to the Bind – Pending Policy step in the Commercial Lines Binding workflow.
1. In WorkSmart, click the To Do List tab. 2. Select the following search criteria:
● Workflow containing the tasks you want to locate and process, Commercial Lines in our example.
● Step containing the tasks you want to locate and process, Ren – Auto Renew in our example. ● User – name of the person to whom the tasks are assigned, typically your name or unassigned. 3. Click Fetch.
4. Double-click the task in the list (Figure 30) that you want to process to lock the task and open the file. In our simple system used for documentation, the number of tasks found is limited. The appearance of your to-do list will differ.
5. Right-click the locked task, indicated by , and then click Set Task Attributes (Figure 31).
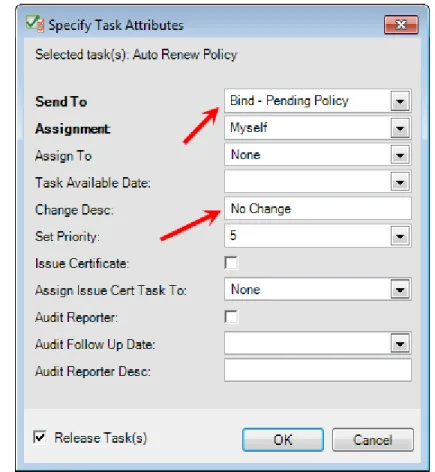
Figure 31: Click Set Task Attributes 6. In Specify Task Attributes:
● Send To select Bind – Pending Policy.
● Change Desc, enter a description to identify the purpose of the task. Leave No Change to retain
the current description, or remove No Change to replace the current description with a system-generated description.
7. Click OK to release the task and send it to the Bind – Pending Policy step (Figure 32).
If you do not want to send the task to the Bind – Pending Policy step, you can manage other processing options in the Specify Task Attributes dialog box (Figure 33) by defining attributes based on your requirements. For example, you might want to send the task to the end of the workflow when there’s no further processing necessary.
Figure 33: Specify attributes for processing alternatives ● Select the Send To attribute:
○ Bind – Pending Policy to send the task to the Bind – Pending Policy step in the Binding workflow if you have authority to bind the policy and have already bound the policy. ○ Bind – Processing to send the task to the Bind – Processing step in the Binding workflow
if you do not have authority to bind the policy so the policy can be bound later.
○ Reschedule/Reassign to define a future date the task should be available and/or assign it to another person. The task remains in the current step.
○ Task Complete to send the task to the End step, no further processing necessary. ● Select the Assignment attribute:
○ Auto Assign to assign the task automatically to another person. ○ Manual to assign the task to person you select in the Assign To list. ○ Myself to assign the task to yourself.
● Enter a Task Available Date to define the future date the task will be available for processing. Leave the date blank to have the task appear in the to do list on the current date.
● Enter a meaningful task description to identify the task or the needed processing in Change
Desc. Leave No Change to retain the current description, or remove No Change to replace
the current description with a system-generated description. ● Select the new priority in Set Priority.
● Select Issue Certificate to create a new task in the Proof of Insurance workflow ● Select a name in Assign Issue Cert Task To to specify the person to whom the issue
certificate task should be assigned.
● Select Audit Reporter to create a new task in the Audit – Reporter step of the Audit workflow.
● Enter a date in Audit Follow Up Date to specify the date for following up on the Audit task. ● Enter a description in Audit Reporter Desc to provide identifying information regarding the
audit related task. Ren – Non Renewal
The Ren – Non Renewal step is used when a policy will not be renewed.
In our example, a non-renewal letter is received from the carrier. As a result, there is a need to find a new market. The letter is scanned, typically in the mailroom. The letter is indexed by the person who processes incoming mail. A task is created in the Ren – Non Renewal step and assigned to an account manager or an account service manager. The task is then sent to the Sub – Marketing step in the Submission workflow.
For purposes of our discussion, the scanning and indexing of the letter is outside our scope. For more information about the processes, consult your organization’s procedures related to processing new mail, indexing, etc.
1. In WorkSmart, click the To Do List tab. 2. Select the following search criteria:
4. Double-click the task in the list (Figure 34) that you want to process to lock the task and open the file. In our simple system used for documentation, the number of tasks found is limited. The appearance of your to-do list will differ.
6. In Specify Task Attributes:
● Send To, select Sub – Marketing.
● Change Desc, enter a description for the task to identify the purpose of the task Leave No
Change to retain the current description, or remove No Change to replace the current description with a system-generated description.
7. Click OK to release the task and send it to the Sub – Marketing step in the Submission workflow (Figure 36).
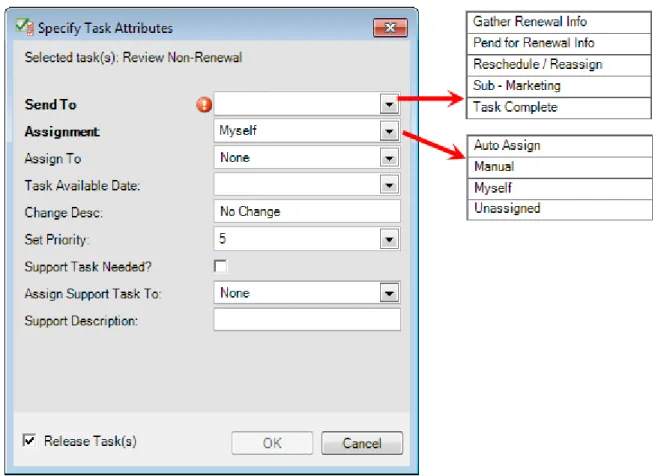
If you do not want to send the task to the Sub – Marketing step, you can manage other processing options in the Specify Task Attributes dialog box (Figure 37) by defining attributes based on your requirements. For example, you might want to send the task to the Ren – Gather Renewal Information step.
Figure 37: Specify attributes for processing alternatives ● Select the Send To attribute:
● Enter a Task Available Date to define the future date the task will be available for processing. Leave the date blank to have the task appear in the to do list on the current date.
● Enter a meaningful task description to identify the task or the needed processing in Change
Desc. Leave No Change to retain the current description, or remove No Change to replace
the current description with a system-generated description. ● Select the new priority in Set Priority.
● Select Support Task Needed to create a new task requesting support in the Ren – Support step, for example, to request a loss run.
● Select a name in Assign Support Task To if you want to assign the support task to a specific person.
● Enter a description in Support Description to provide information about the reason for the support request, for example, “Pull Loss Run.”
Ren – Support
Tasks are created in the Ren – Support step when additional information or assistance is needed to support the renewal process, such as a loss run, and the task will be processed by another person. In our example, a request for a loss run was sent to the Ren – Support step from the Ren – Gather Renewal Information step, creating a new task. The original task in the Ren – Gather Renewal
Information step was sent to the Ren – Pending Renewal Information step, pending receipt of the loss run. When the loss run is obtained, it is added to the customer file, and the task is completed using the next steps.
The loss run should be added to the customer file in WorkSmart. In our example, we are going to add the loss run to the Submission/Quote folder in the Policy Term YYYY folder for the renewal.
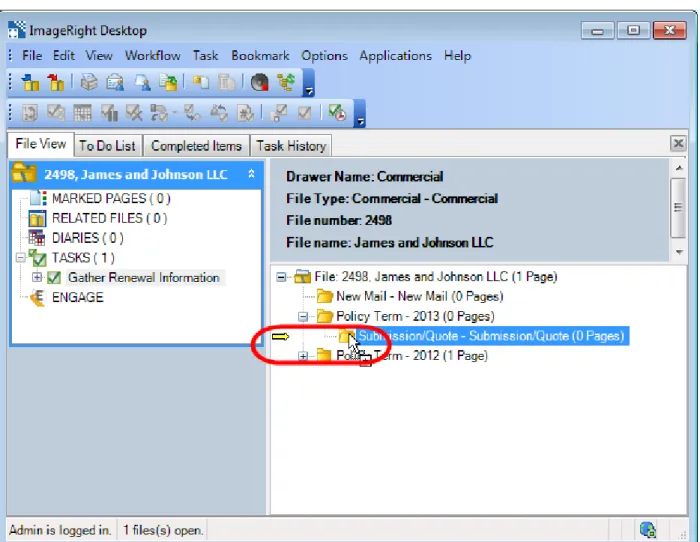
1. Add the loss run to Policy Term YYYY, Submission/Quote using a drag-and-drop operation (Figure 38). Notice the appearance of the yellow arrow to help you identify the destination.
2. In the Import dialog box (Figure 39), click the Import Into tab. 3. Under File info, Import into, select Current File.
4. In the file tree:
● Expand the Submission/Quote folder. ● Select the document type, Loss Run. 5. Click Import to add the loss run to the folder.
After adding the loss run to the file, you are ready to complete the task using the next steps while the file is open.
1. In navigation pane, double-click the task related to the request for support to lock it. 2. Right-click the locked task, indicated by , and then click Set Task Attributes (Figure 40).
3. In Specify Task Attributes, select Task Complete.
4. Click OK to save your changes and release the task to the End step (Figure 41).
Commercial Lines Submission Workflow
The Commercial Lines Submission Workflow process is used to process tasks when a policy requires marketing.
● Sub – Marketing below
● Sub – Track Carrier Response on page 56 ● Sub – Prepare Proposal on page 70
● Sub – Pend for Instructions/Response on page 82 ● Sub – Support on page 87
Typically, submission tasks are processed in the workflow steps in the following order: 1. Sub – Marketing
2. Sub – Track Carrier Response 3. Sub – Prepare Proposal
4. Sub – Pend for Instructions/Response
Along the way, keep in mind, you can route tasks to other steps in the workflow as needed. For example, you can send a task to the Sub – Support step by selecting the appropriate task attribute. Our discussion is based on a simple system used for documentation. The makeup of the files, workflows, tasks, etc., we use is limited. The appearance of your system will differ.
Sub – Marketing
Tasks are typically sent from the Ren – Int Strategy Meeting (explained on page 9) to the Sub – Marketing step when a policy should be sent to market.
Specific carrier folders and tasks related to each carrier to which the submission will be sent must be created. The creation of the folders and tasks is initiated by defining the appropriate task attribute as explained next.
The additional tasks are created in the Sub – Track Carrier Response step. The original or main task, remains in the Sub – Marketing step. The additional tasks in Sub – Track Carrier Response are used to track correspondence, etc., with the carriers that you select as explained in Sub – Track Carrier Response on page 56.
After the additional tasks are completed in the Sub – Track Carrier Response step, you return to the Sub – Marketing step and continue processing the main task.
1. In WorkSmart, click the To Do List tab. 2. Select the following search criteria:
● Workflow – Commercial
● Step – Sub – Marketing
● User – name of the person to whom the tasks are assigned 3. Click Fetch.
4. Double-click the task in the list (Figure 43) that you want to process to lock the task and open the file.
5. Right-click the locked task, indicated by , and then click Set Task Attributes (Figure 44).
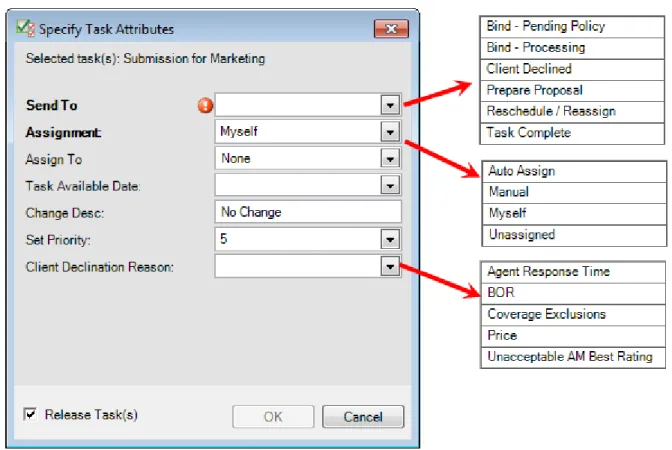
6. In Specify Task Attributes (Figure 45), Send To, select Create Carrier Tasks/Folders. 7. Enter the information for the following:
● Market Year – a Policy Term – YYYY folder will be created, if it does not exist
● Market To – select carriers to which the submission will be sent. A folder will be created for each carrier.
● Market LOB – line of business being submitted (GL in our example). The line of business is shown next to the carrier name in the folder and in the task description. If you are submitting multiple lines of business and you want to keep them all under the same carrier folders, leave this field blank.
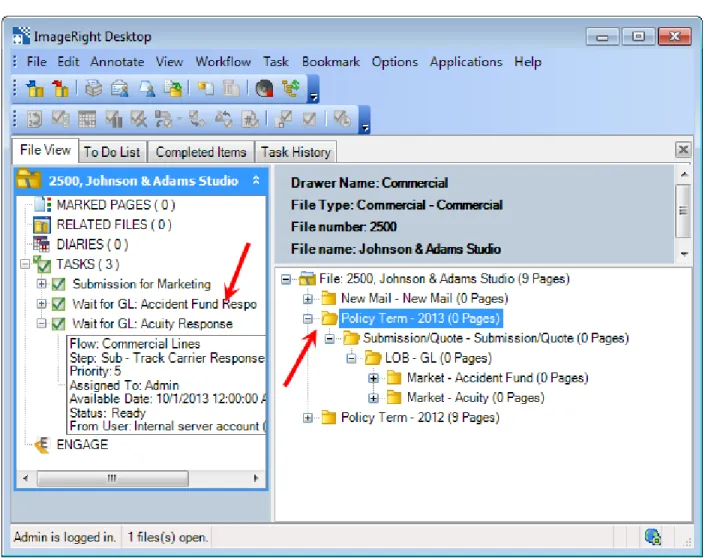
Figure 46: File structure changes
After you define the task attributes as explained earlier, the following changes are made in the file (see highlights in Figure 46):
● Policy Term – YYYY folder created
● Submission/Quote – Submission/Quote folder created ● LOB folder created
● Market – [carrier name] created (one for each carrier selected)
● Tasks added in Sub – Track Carrier Response step (one for each carrier selected)
You are now ready to track the carrier responses as explained in Sub – Track Carrier Response on page 56.
After you receive and complete tracking of the carrier responses, return to the original task in this step and send it to the Sub – Prepare Proposal step.
1. Find and lock the task in the Sub – Marketing step that you want to process by doing one of the following:
● Locate the task in the to do list and double-click it to lock it and open the file.
● Open the file and locate the task in the navigation pane as shown. Double-click the task to lock it.
If you do not need to send the task to the Sub – Prepare Proposal step, you can manage other
processing options in the Specify Task Attributes dialog box (Figure 48) by defining attributes based on your requirements.
Figure 48: Specify attributes for processing alternatives ● Select the Send To attribute:
○ Bind – Pending Policy to send the task to the Bind – Pending Policy step in the Binding workflow if you have authority to bind the policy and have already bound the policy. ○ Bind – Processing to send the task to the Bind – Processing step in the Binding workflow
if you do not have authority to bind the policy so the policy can be bound later. ○ Client Declined to send the task to the End step, no further processing necessary. ○ Prepare Proposal to send the task to the Sub – Prepare Proposal step.
○ Reschedule/Reassign to define a future date the task should be available and/or assign it to another person. The task remains in the current step.
○ Task Complete to send the task to the End step, no further processing necessary. ● Select the Assignment attribute:
○ Auto Assign to assign the task automatically to another person. ○ Manual to assign the task to person you select in the Assign To list. ○ Myself to assign the task to yourself.
● Enter a Task Available Date to define the future date the task will be available for processing. Leave the date blank to have the task appear in the to do list on the current date.
● Enter a meaningful task description to identify the task or the needed processing in Change Desc. Leave No Change to retain the current description, or remove No Change to replace the current description with a system-generated description.
● Select the new priority in Set Priority.
● Select the Client Declination Reason if the Send To attribute is Client Declined.
Creating a Submission in AMS360 and sending it to WorkSmart
The following scenario is for an existing client that you are creating a submission at renewal to remarket the policy.
Creating a Submission for an Expiring Policy in AMS360 1. Open WorkSmart and AMS360.
2. In AMS360, click the Customer tab and search for and open the customer with the expiring policy you want to remarket.
3. Under the sidebar menu Actions: New section, click Submission.
4. In the Submission Group, click Copy Submission. Rename the Group Submission number to include the marketing year and type of coverage being submitted (e.g., 2013-14 Pkg).
5. In the Copy Policy/Submission window, select the current term policy number from the list and enter the following:
● Submission # (Can be the same as the Submission Group Name.) ● Effective Date
● Other options that you want to change when remarketing the policy.
6. On the Submission form, enter/change submission information for the remarket. Click Save & Close. 7. If the Activity dialog box appears, enter information for the activity, and then click Save & Close. 8. Click eForms Manager > Applications > New from the toolbar In the Submission Group dialog box.
6. Enter any additional information to the activity, and then click Save & Close. 7. In WorkSmart, verify you see the forms you have just sent.
Sub – Track Carrier Response
Tasks are created in the Sub – Track Carrier Response step when you send a task from the Sub – Marketing step as explained on page 48. Sending tasks from Sub – Marketing triggers the creation of folders and tasks in Sub – Track Carrier Response. A folder in the file structure and a task are created for each carrier you select (Figure 49).
Figure 49: New carrier folders
The tasks and folders are used to track any correspondence with the carriers and the carrier responses to the submission. Any correspondence, information, the quote, etc. received from the carriers should be filed in the appropriate carrier folder.
Notes regarding phone calls, etc., should be added as folder notes to the Submission/Quote folder. By adding all notes to the named folder, it will be easier to review all notes related to the submission in one
place as opposed to the individual market folders. For information about adding folder notes, see Adding Folder Notes on page 122.
In our limited example, we are going to send an application in the file to one carrier, and explain how to track the responses from the carrier. You can easily adapt our steps to send documents to multiple carriers and track their responses.
The application is created in AMS360 and sent to WorkSmart as an eForm. In our environment, the application appears in the Policy Information folder. The location of the application may differ in your environment because the location is predefined to meet each organization’s needs. For information about creating the application in AMS360 and sending it to WorkSmart, see Creating a Submission in AMS360 and sending it to WorkSmart on page 55.
1. Select the application to be moved and drag it to the Submission/Quote folder (Figure 50). Notice the appearance of the yellow arrow to help you identify the destination.
2. In Change Type, Submission/Quote – Submission/Quote, select the Application document type (Figure 51).
3. To send the application to the carrier via email, right-click the application in the file tree, point to
Send To, and then click Mail Recipient (Figure 52).
Figure 52: Send the document
4. In Send To Mail Recipient, select Attach Selected Pages to ensure the attachments are added to the
message.
5. Right-click the generic name Attachment, and then click Rename.
7. Click Send (Figure 53).
8. Prepare the email address and message for the carrier in your email editor (Microsoft Outlook in our example), and then send the message (Figure 54).
Figure 54: Prepare the address and message
After sending the application and message to the carrier, the message and attachments should be filed in WorkSmart using a drag-and-drop operation as explained in Adding Email Messages on page 124.
Tracking Carrier Response with a Quote
Using the next steps, you can process a carrier response that includes a quote.
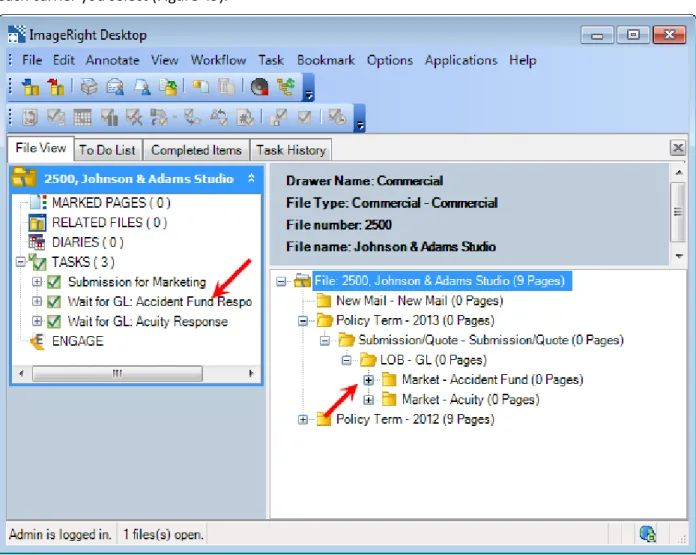
1. Find and lock the task related to the carrier, Wait for GL: Accident Fund Response, in our example, by doing one of the following:
● Locate the task in the to do list and double-click it to lock it and open the file.
● Open the file and locate the task in the navigation pane as shown in Figure 55. Double-click the task to lock it.
Figure 55: Locate and lock the task
2. Add the correspondence, email message, etc., from the carrier to the carrier folder. In our example, a drag-and-drop operation is used to add an email message to the folder (Figure 56). Notice the yellow arrow that indicates the destination of the message.
3. In the Import dialog box (Figure 57), click the Import Into tab. 4. Under File info, Import into, select Current File.
5. In the file tree, select:
● The Market – [carrier name] folder of the carrier to which the message was sent, Market –
Accident Fund in our example.
● The document type, Correspondence in our example. 6. Click Import to add the message and attachments to the folder.
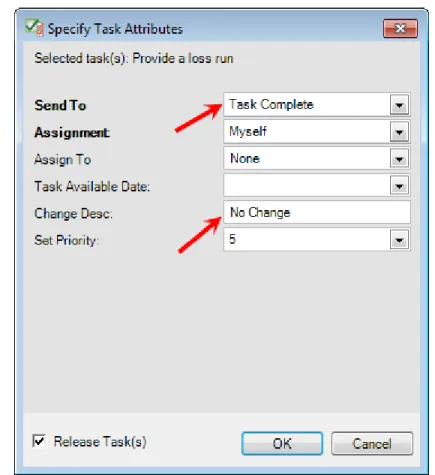
8. In Specify Task Attributes, Send To, select Task Complete (Figure 59). The task will be sent to the End step in the workflow.
9. In CarrierResponse, select Quoted. 10. Enter the Carrier Quote Amount.
11. Click OK to release the task. The task is sent to the End step and removed from the navigation pane.
Tracking Carrier Declinations and Non-Responses
If a carrier declines to quote the business or does not respond, you can use the next steps to complete the processing of the task related to the specific carrier.
1. Find and lock the task related to the carrier, Wait for GL: Acuity Response, in our example, by doing one of the following:
● Locate the task in the to do list and double-click it to lock it and open the file.
● Open the file and locate the task in the navigation pane as shown. Double-click the task to lock it (Figure 60).
2. Right-click the task, and then click Set Task Attributes (Figure 61).
Figure 61: Click Set Task Attributes
Remember, after all tasks related to the individual carriers are completed, you must return to and complete the processing of the original task.
3. In Specify Task Attributes, Send To, select Task Complete (Figure 62). The task will be send to the End step in the workflow.
4. Select the appropriate Carrier Response in the list, Declined or No Response.
Figure 62: Define the task attributes
5. If the Carrier Response is Declined, select the appropriate Carrier Declination Reason (Figure 63). 6. Click OK to release the task. The task is removed from the navigation pane.
Figure 63: Click OK to release the task
After completing all tasks related to each carrier to which the submission was sent, you are ready for the next step in the typical submission workflow, preparing the proposal as explained in Sub – Prepare Proposal below.
Sub – Prepare Proposal
Tasks are typically sent to Sub – Prepare Proposal from the Sub – Marketing step. After the necessary quotes have been received from the carriers, the next step, in the typical submission workflow, is to prepare the proposal and send it to the producer or client.
1. In WorkSmart, click the To Do List tab. 2. Select the following search criteria:
● Workflow – Commercial Lines ● Step – Sub – Marketing
● User – name of the person to whom the task is assigned 3. Click Fetch.
4. Double-click the task in the list (Figure 64) that you want to process to lock the task and open the file.
5. Right-click the locked task, indicated by , and then click Set Task Attributes (Figure 65).
6. In Specify Task Attributes (Figure 66), Send To, select Prepare Proposal. 7. Enter the Market Year.
10. Add the proposal to the Policy Term – YYYY, Submission/Quote folder as a Proposal document (Figure 67). In our example, we use a drag-and-drop operation to move a proposal (an eForm) created in AMS360 to the folder.
11. In ChangeType, open the SubmissionQuote folder, and then select the Proposal document type (Figure 68).
12. Right-click the Proposal document, point to Send To, and then click Mail Recipient (Figure 69).
Figure 69: Send the document
You are now ready to create the email message and attachments to send the proposal to the producer or client and file the sent items in the Submission/Quote folder. After the proposal is sent, the task in the Sub – Prepare Proposal step is released to the Sub – Pend for Instructions/Response step by defining task attributes.
1. In Send To Mail Recipient (Figure 70), select Attach Selected Pages to ensure the attachments are
added to the message.
2. Right-click the generic name Attachment, and then click Rename.
3. Enter an easily identifiable name for the attachment, Proposal for example. 4. Click Send.
5. Prepare the email address and message in your email editor (Microsoft Outlook in our example), and then send the message (Figure 71).
After sending the application and message to the carrier, the message and attachments should be filed in the Market – [carrier name] folder using a drag-and-drop operation as explained in Adding Email Messages on page 124.
You are now ready to define the task attributes and send the task to the next step. 1. Right-click the locked task, and then click Set Task Attributes (Figure 72).
4. Click OK to release the task to the Sub – Pend for Instructions/Response step (Figure 73).
If you do not need to wait for a response or instructions, you can manage other processing options in the Specify Task Attributes dialog box (Figure 74) by defining attributes based on your requirements.
Figure 74: Specify alternative task attributes ● Select the Send To attribute:
○ Bind – Pending Policy to send the task to the Bind – Pending Policy step in the Binding workflow if you have authority to bind the policy and have already bound the policy. ○ Bind – Processing to send the task to the Bind – Processing step in the Binding workflow
○ Myself to assign the task to yourself.
○ Unassigned to leave the task unassigned to anyone.
● Enter a Task Available Date to define the future date the task will be available for processing. Leave the date blank to have the task appear in the to do list on the current date.
● Enter a meaningful task description to identify the task or the needed correction in Change Desc. Leave No Change to retain the current description, or remove No Change to replace the current description with a system-generated description.
● Select the new priority in Set Priority.
● Select the Client Declination Reason if the Send To attribute is Client Declined.
Sub – Pend for Instructions/Response
When you are waiting for responses and binding instructions from the producer or client, the related submission task should be in the Sub – Pend for Instructions/Response step, having been sent from the Sub – Prepare Proposal step when the proposal was delivered. Once you have received the information you need, you are ready to process the tasks in the step.
Typically, tasks are sent from the Sub – Pend for Instructions/Response step to the Binding workflow as explained next.
1. Find and lock the task in the Sub – Pend for Instructions/Response step related to the submission by doing one of the following:
● Locate the task in the to do list and double-click it to lock it and open the file.
● Open the file and locate the task in the navigation pane as shown. Double-click the task to lock it.
2. Right-click the task, and then click Set Task Attributes (Figure 75).
3. In Specify Task Attributes (Figure 76), select the appropriate Send To attribute based on your needs and the following descriptions:
● If you have authority to bind the policy, select Bind – Pending Policy to send the task to the Bind – Pending Policy step in the Binding workflow and have already bound the policy.
● If you do not have authority to bind the policy, select Bind – Processing to send the task to the Bind – Processing step in the Binding workflow so the policy can be bound later.
4. Click OK to release the task and send it to the Binding workflow where processing will be completed.
If the policy will not be bound as explained earlier, you can manage other processing options in the Specify Task Attributes dialog box (Figure 77) by defining attributes in the dialog box based on your requirements.
Figure 77: Specify attributes for processing alternatives ● Select the Send To attribute:
○ Bind – Pending Policy to send the task to the Bind – Pending Policy step in the Binding workflow if you have authority to bind the policy and have already bound the policy.
○ Myself to assign the task to yourself.
○ Unassigned to leave the task unassigned to anyone.
● Enter a Task Available Date to define the future date the task will be available for processing. Leave the date blank to have the task appear in the to do list on the current date.
● Enter a meaningful task description to identify the task or the needed correction in Change Desc. Leave No Change to retain the current description, or remove No Change to replace the current description with a system-generated description.
● Select the new priority in Set Priority.
Sub – Support
Tasks are created in the Sub – Support step when additional information or assistance is needed to support the submission process, such as a loss run, and the task will be processed by another person. We explain how to create a task to request a loss run. In our example, we create the task at the folder level. Keep in mind that you can create the task at other levels, the document level for example, as needed. We wrap up by explaining how to add the loss run to the file and complete the task. 1. Select the folder, Submission/Quote in our example, for which you want to create the task. 2. On the Task menu, click Create Task on Selected (Figure 78).
3. In Create Task (Figure 79), enter or select a Description to identify the purpose of the task. 4. Select the Commercial Lines workflow and the Sub: Support step.
5. In Assign to, select the name of the person to whom the task should be assigned.
6. Click Create to save your changes and create the task.
After the loss run is received, it should be added to the file, and the task should be completed using the following steps.
1. Find and lock the task related to the request for the loss run by doing one of the following: ● Locate the task in the to do list and double-click it to lock it and open the file.
● Open the file and locate the task in the navigation pane as shown. Double-click the task to lock it.
3. In the Import dialog box (Figure 81), click the Import Into tab. 4. Under File info, Import into, select Current File.
5. In the file tree:
● Expand the Submission/Quote folder. ● Select the document type, Loss Run. 6. Click Import to add the loss run to the folder.
8. In Specify Task Attributes (Figure 83), Send To, select Task Complete. 9. Click OK to complete the task and send it to the End step.
Create Tasks and Folders
In Sub – Marketing on page 48, we explain how to create tasks and folders in the Sub – Track Carrier Response step (explained on page 56) when you have an existing task in the Sub – Marketing step. At some point, you may need to create additional carrier folders in order to send a submission to specific carriers but have no task in the Sub – Marketing step. In our example, we are going to create one carrier folder that can be used to store carrier-related correspondence and track responses. You can easily adapt our steps to create multiple folders as needed.
1. In the Policy Term – YYYY folder, select the Submission/Quote folder. 2. On the Task menu, click Create Task on Selected (Figure 84).
● Assign to – name of the person to whom the tasks should be assigned ● Priority
6. Click Create to create the task and carrier folder.
7. Click the Refresh File Tree button repeatedly as needed until you see the new folder and task added to the file (Figure 86).
Commercial Lines Endorsement Workflow
In this section, we provide information you can use to process commercial lines endorsement requests. An endorsement request may be initiated by the insured, producer, carrier, etc. The request may be in the form of a phone call, an email message, mail, etc.
Figure 87: Endorsement workflow
Endorsing a commercial lines policy begins by creating an endorsement for the policy in AMS360 and sending it to WorkSmart. The processing of tasks related to the endorsement is completed in
WorkSmart in the Commercial Lines Endorsement workflow shown in Figure 87.
Endorsement requests received are typically processed in the workflow steps in the following order: 1. Endt – Request Processing (request not received from carrier) or
2. Endt – From Carrier (request received from the carrier) 3. Endt – Follow Up
In Entering an Endorsement in AMS360 and Sending it to WorkSmart below, we explain how to create an endorsement transaction in AMS360 and send it to WorkSmart.
In the separate sections listed below, we explain the steps you can follow to process tasks in the Endorsement workflow. As a reminder, the workflow steps we discuss are shown in Figure 87 on page 96.
● Endt – Request Processing below ● Endt – From Carrier on page 102 ● Endt – Follow Up on page 111
● Endt – Correction Requested on page 115
Entering an Endorsement in AMS360 and Sending it to WorkSmart
1. The customer requests a change to a policy.
2. Create an endorsement for the policy and enter the information being changed. 3. Open eForms Manager and create the policy change request.
4. On the toolbar, click WorkSmart.
5. Choose the Change Request you've just entered, and then click Send to WorkSmart.
6. In the eForm Manager WorkSmart Options, select the options to use for the forms you are sending to WorkSmart.
7. In the right panel, select the forms, overflow pages, and attachments you want to send to WorkSmart for remarketing.
8. Click Send to WorkSmart.
9. When the forms have been sent to WorkSmart you may see and Activity dialog box with the forms being sent to WorkSmart listed as attachments to the activity.
10. Enter any additional information to the activity, and then click Save & Close.
11. Switch to the WorkSmart Desktop and you’ll see the policy change request displayed in the customer’s file.
In the steps that follow, we explain how to add an email message requesting a change in coverage received from the insured to WorkSmart, create a task, and assign the task to another person for processing.
Using the following steps, add the email message to WorkSmart.
1. In WorkSmart, open the file to which the email message should be added.
2. Drag the message to WorkSmart and add it to the Policy Term – YYYY folder (Figure 88).
3. In the Import dialog box (Figure 89), click the Import Into tab. 4. Under File info, Import into, select Current File.
5. In the file tree:
● Expand the Policy Term – YYYY, Policy [number], and Policy Information folder. ● Select the Endorsement document type.
7. Select the document just added, and then on the Task menu, click Create Task on Selected (Figure 90).
8. In Create Task (Figure 91), enter the following information: ● Description – Endorsement Request Processing
● Workflow – Commercial Lines ● Step – Endt: Request Processing
● Assign to – name of the person to whom the task should be assigned 9. Click Create to save your changes and create the task.
Endt – From Carrier
When you receive an endorsement (policy change) directly from the carrier, a task is created in the Endt – From Carrier step. You might receive an unsolicited endorsement or an endorsement as a paper document returned due to a request.
The following steps can be used when an email message along with an endorsement is received from the carrier. The message and endorsement are added to WorkSmart. In our example, the endorsement is correct and no follow up is required; therefore, a task will be created and sent to the End step in the workflow for tracking purposes.
Using the following steps, add the email message to WorkSmart.
1. Drag the email message to WorkSmart and add it to the Policy Term – YYYY folder (Figure 92).
2. In the Import dialog box (Figure 93), click the Import Into tab. 3. Under File info, Import into, select Current File.
4. In the file tree:
● Expand the Policy Term – YYYY, Policy [number], and Policy Information folder. ● Select the Endorsement document type.
6. Select the document just added, and then on the Task menu, click Create Task on Selected (Figure 94).
7. In Create Task (Figure 95), enter the following information: ● Description – Endorsement From Carrier
● Workflow – Commercial Lines ● Step – Endt: From Carrier
● Assign to – name of the person to whom the task should be assigned 8. Click Create to save your changes and create the task.
9. Double-click the task to lock it, indicated by , right-click the task, and then click Set Task Attributes (Figure 96).
Figure 96: Click Set Task Attributes 10. In Specify Task Attributes:
● Send To, select Task Complete.
● Change Desc, enter a description for the task in Change Desc to identify the purpose of the task.
Leave No Change to retain the current description, or remove No Change to replace the current description with a system-generated description.
● Select the Carrier that sent the endorsement.
● Select Premium Endorsement if the endorsement is premium bearing. ● Select Agency Bill if an AMS360 invoice transaction is required.
11. Click OK to release the task to the End step (Figure 97).
If you do not want to send the task to the End step, you can manage other processing options in the Specify Task Attributes dialog box (Figure 98) by defining attributes based on you requirements.
Figure 98: Specify alternative task attributes ● Select the Send To attribute:
○ Endorsement Request to send the task to the Endt – Request Processing step.
○ Reschedule/Reassign to define a future date the task should be available and/or assign it to another person. The task remains in the current step.
○ Task Complete to send the task to the End step, no further processing necessary. ● Select the Assignment attribute:
○ Auto Assign to assign the task automatically to another person. ○ Manual to assign the task to person you select in the Assign To list. ○ Myself to assign the task to yourself.
○ Unassigned to leave the task unassigned to anyone.
● Enter a Task Available Date to define the future date the task will be available for processing. Leave the date blank to have the task appear in the to do list on the current date.
● Enter a meaningful task description to identify the task or the needed correction in Change Desc. Leave No Change to retain the current description, or remove No Change to replace the current description with a system-generated description.
● Select the new priority in Set Priority.
● Select Premium Endorsement if the endorsement is premium bearing. ● Select Agency Bill if an AMS360 invoice transaction is required.
The Premium Endorsement and Agency Bill options are used for reporting purposes only and do not result in any additional processing.
The endorsement can be sent to the insured using your preferred method, email in our example, and the message filed in WorkSmart.
5. Click Send.