Digital
System
Table of Contents
About the Program Record Form
General Programming Tips
Entering the Program Mode
Entering a Program
Entering Data, Erasing Mistakes, and Moving Through Options
Saving and Exiting
Programs
Program 1 - Class of Service
Program 2 - Intercom Signaling
Program 3 - Miscellaneous System Features
Program 4 - System Timers
Program 5 - PBX Trunk Access Codes
Program 6 - Toll Restriction
Program 7 - Music, External Paging, Relays
Program 8 - System Messages
Program 10 - Line Port Characteristics
Program 11 - Line Groups
Program 12 - Line Features
Program 14 - Extension Port Characteristics
Program 15 - Programming Access Level
Program 16 - Line and Line Group Access
Program 17 - Key Assignments
Program 18 - Extension Features (Part I)
Program 19 - Extension Hunt Groups
●
In Edit
➮
Preferences
➮
General, set the following:
– Default Magnification = Fit Width
– Display Splash Screen at Startup = Disabled (box not checked)
– Display Open Dialog Box at Startup = Disabled (box not checked)
●
For easiest reading on-screen, select View
➮
Fit Width (or Ctrl K). This option
is automatically enabled if you set the
Default Magnification in General
Preferences as described above.
●
To return to the opening screen at any time, press Home.
To scroll up or down on a page, press PageDown or PageUp.
To navigate between pages, press –> or <–.
●
To increase the speed with which your Acrobat files load, try one of the following:
– In Windows 3.1, add
ACROREAD.EXE to your Startup Group (with the Run
Minimized box checked).
– In Windows 95, add
ACROREAD.EXE to the Windows\Start
●
Provides on-line viewing and printing.
●
Extensive search and navigation capabilities.
●
Ensures more timely turnaround of documents.
●
When we provide an Acrobat manual with a product (e.g., Nitsuko TAPI Driver),
you are assured of having the most up-to-date manual available.
●
With the installation of a PC fax/modem, it makes faxing of any brochure, user
guide, proposal or manual quick and easy.
●
Acrobat Reader programs for Macintosh, DOS and UNIX platforms also can be
provided, if required.
●
For Technical Support for the Acrobat Reader, contact:
Adobe Systems, Inc.
1585 Charleston Road
P.O. Box 7900
Mountain View, CA 94039-7900
Telephone Number: 415-961-4400
Adobe FaxY1 (technical/product information by fax): 206-628-5737
Adobe Electronic Bulletin Board (on-line information): 206-623-6984
URL: http://www.adobe.com
●
To return to the opening screen, press the HOME key.
About the Program Record Form
The Program Record Form lets you record the way you configure a customer's DIGITAL SYSTEM and shows you how to enter the configuration data into system memory. For each program in the system, there is a form (grid) for recording the program's configuration data codes. Next to each grid are instructions for entering the data codes into system memory from a system programming extension (e.g., a display phone connected to port 00, initially extension 300).
You'll find the configuration data codes in the DIGITAL SYSTEM Administrator's Programming Guide
(P/N N1872ADG**). Simply turn to a program and look for the heading, Filling Out the Program Record Form. The data codes for each feature option are underneath.
See also How to Use Part II (Customizing the System) in the DIGITAL SYSTEM Administrator's Programming Guide
General Programming Tips
There are four basic steps to entering data codes into system memory. Once you become familiar with them, you will not need to continually refer to the specific entry instructions with each program.
To enter data codes into memory:
1. Enter the program mode from the port 00 phone (initially extension 300) or from another system programming extension (see Program 15).
2. Enter a program.
3. Enter data using the dialpad, erase mistakes, and move through the program's feature options. 4. Save and Exit.
Note: When you program the system for the first time, run Program 20 before any
others to ensure that the factory set values are in place.
Entering the Program Mode
To enter the program mode from the port 00 phone or another system programming extension (see Program 15): 1. Do not lift the handset.
2. Press # key. 3. Dial SP.
The code SP stands for "System Program" and is 77 on the dialpad. 4. Dial 5312.
The code 5312 is the DIGITAL SYSTEM password. 5. Press #.
If you leave the system in the program mode too long without pressing a key or dialing a code, you'll hear reorder (fast busy) tone, and the system automatically exits the program mode.
Entering a Program
To enter a program after you enter the program mode: 1. Press the program's key.
--Keys 1-20 give you access to programs 1-20. Keys 1-5 are on the left, keys 6-10 are on the right, keys 11-16 are directly below the dial pad. The HOLD
(Program 17), CONF (Program 18), MIC/DND (Program 19), and ICM (Program 20) keys are in the last row of keys. Note: Program numbers 9 and 13 are not used.
Entering Data, Erasing Mistakes and Moving Through Options
To enter data after you enter a program: 1. Dial the data.
2. Press the # key.
This step stores the data and moves you to the next feature option.
For example, to enter the data code Y: 1. Dial Y, which is 9 on the dialpad. 2. Press #.
When you dial data for the last feature option in a program and press #, you exit the level you are working in and return to the previous level. In some cases, "returning to the previous level" means you exit the program and do not have to press SAVE to exit the program (see below).
To erase a mistake (in most cases):
1. Dial * after you dial the mistake but before you press # to store it.
If you make an invalid entry and press #, you will hear reorder (fast busy) tone. You can dial * (in most cases) during the reorder tone and re-enter the data.
To accept the data on the display and move to the next feature option: 1. Press the # key.
Saving and Exiting
To save and exit after entering data: 1. Press the SAVE key.
Pressing SAVE moves you out of a program, one level at a time. You may have to press SAVE several times to exit all the way out.
Note: Some instructions in the Program Record Form are abbreviated.
When You See: It Means This:
Dial data + # . . . .Enter the system program information, then press # SAVE . . . .Press SAVE
DIAL . . . .Press DIAL
-Program 1 - Class of Service
COS
Only Intercom Calls at Night
Off-Premise Call Forward
Break-In (Intrusion)
Camp-On (Busy Extension)
Internal Call Forward
System Speed Dial
Toll Restriction Level
Only Local Calls (Day/Night)
Only Local Calls at Night
Extended Ring
Privacy
Callback Priority
Direct Trunk Access/Camp-On
All Call Page
Page Zone 1 Access
Page Zone 2 Access
Page Zone 3 Access
Silent Monitor
No Single Line Flash/ACD Supervisor
Single Ring for ASI/OPX
Only CO Call FWD to VX
00 01 02 03 04 05 06 07 08 09 10 11 12 13 14 15 16 17 18
Cont'd next page
Program 1 - Class of Service (cont'd)
COS Only Intercom Calls at Night Off-Premise Call Forward Break-In (Intrusion) Camp-On (Busy Extension) Internal Call Forward System Speed Dial Toll Restriction Level Only Local Calls (Day/Night) Only Local Calls at Night Extended Ring Privacy Callback Priority Direct Trunk Access/Camp-On All Call Page Page Zone 1 Access Page Zone 2 Access Page Zone 3 Access Silent Monitor No Single Line Flash/ACD Supervisor Single Ring for ASI/OPX Only CO Call FWD to VX
19
20
21
22
23
24
25
26
27
To enter Program 1 data:
1. Enter program mode.
# + dial 775312 + #. 2. Press key 1.
3. Dial COS number + #.
4. To accept the displayed data: #.
OR
To change the displayed data: Dial data + #.
To erase data before pressing #: Press *. 5. Repeat step 4 until done.
If you finish and do not see, "COS. NO.": SAVE. 6. Select an option:
- To program another COS: Go to step 3. - To exit Program 1: SAVE.
- To enter another program after exiting: Press its key. - To exit program mode: SAVE twice.
Program 2 - Intercom Signaling
Feature Name Feature Data
Call Wait Tones
Handsfree Reply
Voice-Announced
Calls
Auto Handsfree
To enter Program 2 data:
1. Enter program mode.
# + dial 775312 + #. 2. Press key 2.
3. To accept the displayed data: #.
OR
To change the displayed data: Dial data + #.
- To erase data before pressing #: Press *. 4. Repeat step 3 for all data.
If you finish and do not see, "SAVE TO EXIT": SAVE. 5. Select an option:
- To enter another program: Press its key. - To exit program mode: SAVE.
Program 3 - Miscellaneous System Features
Feature Name Feature Data Feature Name Feature Data
# Operators Voice Mail
Oper. 01 Ext. Voice Mail
Master Ext.
Oper. 02 Ext. Dial-Out # in
Speed Dial
Oper. 03 Ext. Dial 1 Before
Area Code
Oper. 04 Ext. Walking COS
Security Code
# System Speed Dial Digits
Play MOH on Transfer
Side Tone Test Digit
AUX Port's Baud Rate
To enter Program 3 data:
1. Enter program mode.
# + dial 775312 + #. 2. Press key 3.
3. To accept the displayed data: #.
OR
To change the displayed data: Dial data + #.
- To erase data before pressing #: Press *. 4. Repeat step 3 for all data.
If you finish and do not see, "SAVE TO EXIT": SAVE. 5. Select an option:
- To enter another program: Press its key. - To exit program mode: SAVE.
Note: Before a number can be entered as the Voice Mail Master Extension, the VX (Voice Mail) prompt in Program 18 must be set to Y(es) and UCD group programming must be completed.
Program 4 - System Timers
Timer Number Timer Name Duration
01 Park Orbit
02 Hold Recall
03 Camp-On
04 Line Response
05 Modem Reserve
06 # Ring Before Recall
07 # Delayed Rings
08 Flash Response
09 Dial Tone Detect
10 Make
11 Break
12 Interdigit
To enter Program 4 data:
1. Enter program mode.
# + dial 775312 + #. 2. Press key 4.
3. Dial Timer number + #. 4. To accept the displayed data: #.
OR
To change the displayed data: Dial data + #.
To erase data before pressing #: Press *. 5. Repeat steps 3-4 for remaining timers.
6. Select an option:
- To exit Program 4: SAVE.
- To enter another program after exiting: Press its key. - To exit program mode: SAVE twice.
Program 5 - PBX Trunk Access Codes
ID Number
PBX Access
Code
01
02
03
04
05
06
07
08
09
10
11
To enter Program 5 data:
1. Enter program mode.
# + dial 775312 + #. 2. Press key 5.
3. To accept the displayed data: #.
OR
To change the displayed data: Dial data + #.
- To enter a wild card: DIAL + dial X (9) + #. - To erase data: Press * + #.
4. Repeat step 3 for all data.
If you finish and do not see, "SAVE TO EXIT": SAVE. 5. Select an option:
- To enter another program: Press its key. - To exit program mode: SAVE.
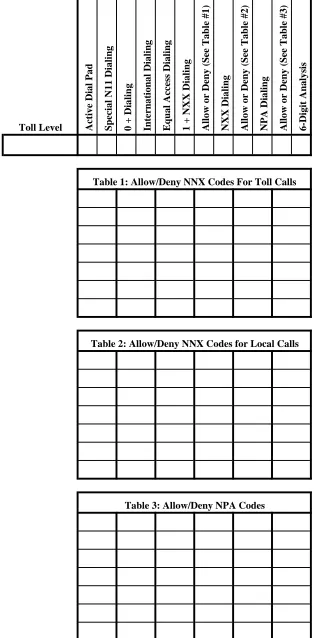
Program 6 - Toll Restriction
Before you fill in data, either use the Copy and Paste commands to make additional copies of the Toll Restriction forms for each Toll Restriction level you wish to customize or print copies of the blank forms. You may not need to use all three forms for each level.
Toll Level Active Dial Pad Special N11 Dialing 0 + Dialing International Dialing Equal Access Dialing 1 + NXX Dialing Allow or Deny (See Table #1) NXX Dialing Allow or Deny (See Table #2) NPA Dialing Allow or Deny (See Table #3) 6-Digit Analysis
Table 1: Allow/Deny NNX Codes For Toll Calls
Table 2: Allow/Deny NNX Codes for Local Calls
Table 3: Allow/Deny NPA Codes
Program 6 - Toll Restriction (cont'd)
Toll Level: Table 4: Allow/Deny Codes For Area Code:
Table 5: Allow/Deny Codes For Area Code:
Table 6: Allow/Deny Codes For Area Code:
Table 7: Allow/Deny Codes For Area Code:
Cont'd next page
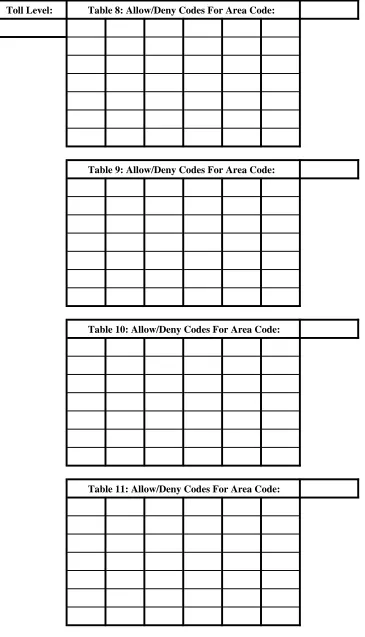
Program 6 - Toll Restriction (cont'd)
Toll Level: Table 8: Allow/Deny Codes For Area Code:
Table 9: Allow/Deny Codes For Area Code:
Table 10: Allow/Deny Codes For Area Code:
Table 11: Allow/Deny Codes For Area Code:
Cont'd next page
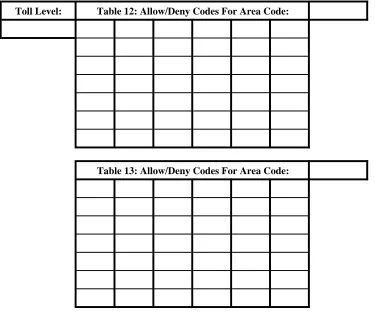
Program 6 - Toll Restriction (cont'd)
Toll Level: Table 12: Allow/Deny Codes For Area Code:
Table 13: Allow/Deny Codes For Area Code:
To enter Program 6 data:
1. Enter program mode.
# + dial 775312 + #. 2. Press key 6.
3. For first-time programming or to initialize (reset) toll levels: Dial I + Y. Otherwise, go to step 5. To stop initialization after dialing I: Dial N + go to step 5.
4. To allow the system to accept the new NPA codes, at the prompt "NEW DIAL PLAN-N", dial Y. 5. Dial P to program toll levels.
Re-order tone means: Go to step 1 and initialize in step 3. 6. Dial toll level + #.
7. To accept the displayed data: #.
OR
To change the displayed data: Dial data + #.
- To erase data before pressing #: Press *.
- ADD-DELETE-LIST means you can enter Table data. Use a-c for Tables 1 through 3. Use the steps on the following page for Tables 4 through 13.
a. Dial A, D, or L. Or, to exit the table at this point: # and go to beginning of step 7. b. To add/delete: Dial codes.
OR
To list more or exit list: # + go to step 7a.
c. To save and exit table: # + go to beginning of step 7.
OR
To save and go to "ADD-DELETE-LIST:" SAVE + go to step 7a. 8. Repeat step 7 for all data.
If you finish and do not see, "TOLL LEVEL": Press # until you see it.
Program 6 - Toll Restriction (cont'd)
9. Select an option:
- To program another level: Go to step 6. - To exit Program 6: SAVE.
- To enter another program after exiting: Press its key. - To exit mode: SAVE twice.
To use the 6-Digit Analysis Tables (4 - 13) when you see ADD-DELETE- LIST on the display:
1. Dial A, D, or L.
OR
Press # to exit the table (and Program 6). 2. Dial the area code intended for 6-digit analysis.
If you selected "Listing" in step 1, the system lists the codes now, four at a time. To see more codes or exit at the end of the list, press # and return to step 1. Steps 3-6 do not apply to listing.
3. Dial A for an Allow Table of NXX codes.
OR
Dial D for a Deny Table of NXX codes. 4. Dial codes to be added or deleted. 5. Select an option:
- To save and go to "ADD-DELETE-LIST" for another area code: SAVE + Go to step 1. - To save and exit toll level: # + Go to step 6 on the previous page.
- To save and exit Program 6: SAVE three times.
- To enter another program after exiting: Press its key. - To SAVE and exit program mode: SAVE four times.
Program 7 - Music, External Paging, Relays
Feature Name Feature Data Background
Music (BGM)
Music on Hold
External Page Zone 1 Ring Over All
Call External Page
Zone 2 BGM to Ext.
Zones Interrupted Ring Relays Page/Music
Volume
Relay 01 Owner
Relay 02 Owner
To enter Program 7 data:
1. Enter program mode.
# + dial 775312 + #. 2. Press key 7.
3. To accept the displayed data: #.
OR
To change the displayed data: Dial data + #.
To erase data before pressing #: Press *. 4. Repeat step 3 for all data.
If you finish and do not see, "SAVE TO EXIT": SAVE. 5. Select an option:
- To enter another program: Press its key. - To exit program mode: SAVE.
Program 8 - System Messages
Message No. Messages
600 601 602 603 604 605 606 607 608 609 610 611 612 613 614 615
To enter Program 8 data:
1. Enter program mode.
# + dial 775312 + #. 2. Press key 8.
3. Dial Message number + #. 4. To accept the displayed data: #.
OR
To erase displayed data: Press * + Enter new message (see below) or press # and go to step 3.
OR
To changed the displayed data: Enter entire message + #.
To enter message:
a. Press dialpad button for desired letter or number. To enter a blank space, Q, or Z: Press 0.
b. To make a letter appear: Dial the number (1, 2, or 3) that corresponds to the letter's position on the button (e.g. dial 1 if you want the first letter).
OR
To make a number appear: Dial 4.
Note: To make a blank space, Q, or Z appear: Dial 1, 2, or 3, respectively. c. Repeat a-b for all characters (to erase previous character: LAST).
5. Repeat steps 3-4 for all messages. 6. Select an option:
- To exit Program 8: SAVE.
- To enter another program after exiting: Press its key. - To exit program mode: SAVE twice.
Program 10 - Line Port Characteristics
Line Number Circuit Type Line Gain PBX Line Side Tone Test Name
01
02
03
04
05
06
07
08
09
10
11
12
13
14
15
16
17
18
19
20
21
22
23
24
Cont'd next page
Program 10 - Line Port Characteristics (cont'd)
To enter Program 10 data:
1. Enter program mode.
# + dial 775312 + #. 2. Press key 10.
3. Dial Line number + #.
4. To accept the displayed data: #.
OR
To change the displayed data: Dial data + #.
- To erase data before pressing #: Press *. - To enter circuit type X: DIAL + dial X.
- To enter a name:
a. Press dialpad button for desired character. To enter a blank space, Q, or Z: Press 0.
b. To make a letter appear: Dial the number (1, 2, or 3) that corresponds to the letter's position on the button (e.g. dial 1 if you want the first letter).
OR
To make a number appear: Dial 4.
Note: To make a blank space, Q, or Z appear: Dial 1, 2, or 3, respectively. c. Repeat a-b for all characters (to erase previous character: LAST).
5. Repeat step 4 for all data.
If you finish and do not see, "LINE NO.": SAVE. 6. Select an option:
- To program another line: Go to step 3. - To exit Program 10: SAVE.
- To enter another program after exiting: Press its key. - To exit program mode: SAVE twice.
Program 11 - Line Groups
Group Number Line Members
90
91
92
93
94
95
96
97
98
To enter Program 11 data:
1. Enter program mode.
# + dial 775312 + #. 2. Press key 11.
3. Dial Group number + #. 4. To accept the displayed data: #.
OR
To enter or change the displayed data: Dial data + #. - To erase data before pressing #: Press *.
- To erase a line from the group, dial *. Dialing * for the first member of the group erases the entire group.
5. Repeat step 4 for all data in group. 6. Press SAVE.
7. Select an option:
- To program another line group: Go to step 3. - To exit Program 11: SAVE.
- To enter another program after exiting: Press its key. - To exit program mode: SAVE twice.
Program 12 - Line Features
Line Number
CPG
(Call Pickup Group)
TR (Toll Restriction)
DTD
(Direct Termination
Day)
DTN
(Direct Termination
Night)
COS
(Class Of Service)
01
02
03
04
05
06
07
08
09
10
11
12
13
14
15
16
17
18
19
20
21
22
23
24
Cont'd next page
Program 12 - Line Features (cont'd)
To enter Program 12 data:
1. Enter program mode.
# + 775312 + #. 2. Press key 12.
3. Dial Line number + #.
4. Dial feature's abbreviation + #. 5. To accept the displayed data: #.
OR
To change the displayed data: Dial data + #.
- To accept DTD or DTN data, you may have to press SAVE instead. - To erase data before pressing #: Press *.
6. Repeat steps 4-5 for all features. 7. Press SAVE.
8. Select an option:
- To enter data for another line: Dial Y + go to step 3. - To exit Program 12: SAVE.
- To enter another program after exiting: Press its key. - To exit program mode: SAVE twice.
Page 18
Program 14 - Extension Port Characteristics
Port Number Extension Number
Circuit
Type DSS Owner
DSS
Block Name (16 characters, maximum)
00 01 02 03 04 05 06 07 08 09 10 11 12 13 14 15 16 17 18 19 20 21 22 23 24 25 26 27 28 29 30 31 32 33 34 35
* Note: A DSS console cannot be installed in an Expansion Cabinet. Cont'd next page
Program 14 - Extension Port Characteristics (cont'd)
Port Number Extension Number
Circuit
Type DSS Owner
DSS
Block Name (16 characters, maximum)
36 37 38 39 40 41 42 43 44 45 46 47 48 49 50 51 52 53 54 55 56 57 58 59 60 61 62 63 64 65 66 67 68 69 70 71
* Note: A DSS console cannot be installed in an Expansion Cabinet.
Program 14 - Extension Port Characteristics (cont'd)
To enter Program 14 data:
1. Enter program mode.
# + dial 775312 + #. 2. Press key 14.
3. Dial Port number + #.
4. To accept the displayed data: #.
OR
To change the displayed data: Dial data + #.
- To erase data before pressing #: Press *.
- To enter circuit X: DIAL + dial X.
- To enter circuit Z: DIAL + dial 0.
- To enter a letter, number, blank:
- Press dial pad button that has desired character. Zero button=blank, Q, Z (in that order). - Dial digit (1, 2, 3)=letter's position on button (e.g., dial 1 for 1st letter).
OR
Dial 4 for the button's number. - To erase last character, press LAST. - Repeat above steps for entire message. 5. Repeat step 4 for all data.
If you finish and do not see, "STN PORT NO.": SAVE. 6. Select an option:
- To program a port: Go to step 3. - To exit Program 14: SAVE.
- To enter another program after exiting: Press its key. - To exit program mode: SAVE twice.
Note: You cannot change the circuit type of the extension from which you are programming; you must use another extension that has program access level 04 or 05.
Program 15 - Programming Access Level
Extension
Program Access Level
Extension
Program Access Level
Extension
Program Access Level
300 324 348
301 325 349
302 326 350
303 327 351
304 328 352
305 329 353
306 330 354
307 331 355
308 332 356
309 333 357
310 334 358
311 335 359
312 336 360
313 337 361
314 338 362
315 339 363
316 340 364
317 341 365
318 342 366
319 343 367
320 344 368
321 345 369
322 346 370
323 347 371
Cont'd next page
Program 15 - Programming Access Level (cont'd)
To enter Program 15 data:
1. Enter program mode.
# + dial 775312 + #. 2. Press key 15.
3. Dial extension + #.
4. To accept the displayed data: #.
OR
To change the displayed data: Dial data + #.
- To erase data before pressing #: Press *. 5. Repeat steps 3-4 for all extensions.
6. Select an option:
- To exit Program 15: SAVE.
- To enter another program after exiting: Press its key. - To exit program mode: SAVE twice.
Program 16 - Line and Line Group Access
Extension
Line ____ Access
Line ____ Access
Line ____ Access
Line ____ Access
Line ____ Access
Line ____ Access
Line ____ Access
Line ____ Access
Line ____ Access
Line ____ Access
Line ____ Access
Line ____ Access
Line ____ Access
Line ____ Access
Line ____ Access
Line ____ Access
Group 90 Access
Group 91 Access
Group 92 Access
Group 93 Access
Group 94 Access
Group 95 Access
300 301 302 303 304 305 306 307 308 309 310 311 312 313 314 315 316 317 318 319 320 321 322 323 324 325 326 327 328 329 330
Cont'd next page
Program 16 - Line and Line Group Access (cont'd)
Extension
Line ____ Access
Line ____ Access
Line ____ Access
Line ____ Access
Line ____ Access
Line ____ Access
Line ____ Access
Line ____ Access
Line ____ Access
Line ____ Access
Line ____ Access
Line ____ Access
Line ____ Access
Line ____ Access
Line ____ Access
Line ____ Access
Group 90 Access
Group 91 Access
Group 92 Access
Group 93 Access
Group 94 Access
Group 95 Access
331 332 333 334 335 336 337 338 339 340 341 342 343 344 345 346 347 348 349 350 351 352 353 354 355 356 357 358 359 360 361
Cont'd next page
Program 16 - Line and Line Group Access (cont'd)
Extension Line ____ Access Line ____ Access Line ____ Access Line ____ Access Line ____ Access Line ____ Access Line ____ Access Line ____ Access Line ____ Access Line ____ Access Line ____ Access Line ____ Access Line ____ Access Line ____ Access Line ____ Access Line ____ Access Group 90 Access Group 91 Access Group 92 Access Group 93 Access Group 94 Access Group 95 Access
362
363
364
365
366
367
368
369
370
371
To enter Program 16 data:
1. Enter program mode.
# + dial 775312 + #. 2. Press key 16.
3. Dial extension + #.
- To erase data before pressing #: Press *. 4. Dial L for line or G for group data.
5. Dial Line or Group number + #. 6. To accept the displayed data: #,
OR
To change the displayed data: Dial data + #. 7. Repeat steps 5-6 for all lines/groups. 8. Press SAVE.
9. Select an option:
- To enter line or group data for same extension: Go to step 4. - To enter data for another extension: SAVE + dial Y + go to step 3. - To exit Program 16: SAVE twice.
- To enter another program after exiting: Press its key. - To exit program mode: SAVE three times.
Program 17 - Key Assignments
Before you fill in data, either use the Copy and Paste commands to make additional copies of the blank Key Assignment forms for each installed Multibutton phone and DSS Console or print copies of the forms required. There is a form for the phone and the console. Make sure you copy the correct one.
Extension Number
Keyset Phone
(Dial pad located here)
HOLD CONF MIC/DND ICM MSG HF
Cont'd next page
Program 17 - Key Assignments (cont'd)
Extension Number
DSS Console
Cont'd next page
Program 17 - Key Assignments (cont'd)
To enter Program 17 data:
1. Enter program mode.
- # + dial 775312 + #.
- If you are programming assignments for a DSS Console, you must program from the phone assigned to the console.
2. Press key 17 (HOLD).
You see "DEST ICM NO:" (i.e., destination extension). 3. Dial extension (XXX) to be programmed + #.
You see "SOURCE:" (i.e., source extension). If you are programming assignments for your DSS Console, enter your entension number.
4. To program the keys at extension XXX: Dial extension (XXX) again + #.
OR
To copy keys from extension YYY to XXX: Dial YYY + # + go to step 8 if you do not need to change individual keys after you copy; otherwise, go to step 5.
- This procedure does not copy Speed Dial (stored) numbers, Ring Assign. (Program 18 [II]), or Line Access (Program 16).
- If you are programming assignments for your DSS Console, enter your entension number. 5. Press key you wish to program.
- For DSS Consoles, press DSS Console key. 6. To accept the displayed data: #.
OR
To change the displayed data: Dial key data + #. Remember: To dial "Z", dial 0 (zero). 7. Repeat steps 5-6 for other keys.
8. Press SAVE and select an option:
- To program another extension: Dial Y + go to step 3. - To exit Program 17: SAVE.
- To enter another program after exiting: Press its key. - To exit program mode: SAVE twice.
Program 18 - Extension Features (Part I)
Extension
DND (Do Not Disturb)
COS (Class of Service)
RG
(Ring Group)
CPG
(Call Pickup Group)
PRG
(Privacy Release Group)
OHR (Off-Hook Ring)
BLF (DSS/BLF Lamps)
LDU (Line Dial-Up)
PZ
(Page Zone Member)
SO
(Station Operator)
SDB
(Speed Dial Block)
VX (Voice Mail)
DS (Data set)
DB (Door Box) - Alert 1
DB (Door Box) - Alert 2
DB (Door Box) - Alert 3
DB (Door Box) - Alert 4
300 301 302 303 304 305 306 307 308 309 310 311 312 313 314 315 316 317 318 319 320 321 322 323 324 325 326 327 328 329 330
Cont'd next page
Program 18 - Extension Features (Part I) (cont'd)
Extension
DND (Do Not Disturb)
COS (Class of Service)
RG
(Ring Group)
CPG
(Call Pickup Group)
PRG
(Privacy Release Group)
OHR (Off-Hook Ring)
BLF (DSS/BLF Lamps)
LDU (Line Dial-Up)
PZ
(Page Zone Member)
SO
(Station Operator)
SDB
(Speed Dial Block)
VX (Voice Mail)
DS (Data set)
DB (Door Box) - Alert 1
DB (Door Box) - Alert 2
DB (Door Box) - Alert 3
DB (Door Box) - Alert 4
331 332 333 334 335 336 337 338 339 340 341 342 343 344 345 346 347 348 349 350 351 352 353 354 355 356 357 358 359 360 361
Cont'd next page
Program 18 - Extension Features (Part I) (cont'd)
Extension DND (Do Not Disturb) COS (Class of Service) RG (Ring Group) CPG (Call Pickup Group) PRG (Privacy Release Group) OHR (Off-Hook Ring) BLF (DSS/BLF Lamps) LDU (Line Dial-Up) PZ (Page Zone Member) SO (Station Operator) SDB (Speed Dial Block) VX (Voice Mail) DS (Data set) DB (Door Box) - Alert 1 DB (Door Box) - Alert 2 DB (Door Box) - Alert 3 DB (Door Box) - Alert 4
362
363
364
365
366
367
368
369
370
371
To enter Program 18 (Part I) data:
1. Enter program mode.
# + dial 775312 + #. 2. Press key 18 (CONF).
3. Dial extension + #.
4. Dial feature abbreviation + #. To dial PZ: Dial P0. 5. To accept the displayed data: #.
OR
To change data: Dial data + #.
- To erase a data entry before you press #: Press *.
- To accept the SO (station operator) data, you may have to press SAVE instead. 6. Repeat steps 4-5 for all features.
7. Press SAVE or Go to step 4 in a Program 18 (Part II) procedure. 8. Select an option:
- To enter Part I data for another extension: Dial Y + go to step 3. - To exit Program 18: SAVE.
- To enter another program after exiting: Press its key. - To exit program mode: SAVE twice.
Program 18 - Extension Features (Part II)
Before you fill in data, either use the Copy and Paste commands to make additional copies of the blank Extension Feature forms for each installed extension or print copies of the blank forms as needed.
Extension: Feature Y/N
HS (Headset)
VA (Voice-Announce Calls) VP (Voice Page Thru Spkr) VO (Whisper Page)
RLP (Ringing Line Pref.)
Feature Line # ________ Line # ________ Line # ________ Line # ________ Line # ________ Line # ________ Line # ________ Line # ________ Line # ________ Line # ________ Line # ________ Line # ________ Line # ________ Line # ________ Line # ________ Line # ________ Line # ________ Line # ________
RA (Ringing Assignment)
NR (Night Ringing)
DRA (Direct Ringing Assign.)
PLA (Prime Line Assign.)
Personal Speed Dial Numbers
Bin 50: Bin 20:
Bin 51: Bin 21:
Bin 52: Bin 22:
Bin 53: Bin 23:
Bin 54: Bin 24:
Bin 55: Bin 25:
Bin 56: Bin 26:
Bin 57: Bin 27:
Bin 58: Bin 28:
Bin 59: Bin 29:
Key 1: Key 13:
Key 2: Key 14:
Key 3: Key 15:
Key 4: Key 16:
Key 5: Key 17:
Key 6: Key 18:
Key 7: Key 19:
Key 8: Key 20:
Key 9: Key 21:
Key 10: Key 22:
Key 11: Key 23:
Key 12: Key 24:
Program 18, Part II (cont'd)
Direct Station Selection (and Call Coverage) and Hotline Layout
Keys 1-15 are Direct Station Selection keys. The Call Coverage and Hotline keys can be anywhere, depending on how they are assigned in Program 17. You can use the DSS procedure below to change the extension associated with a DSS or Call Coverage key.
Keyset Phone
(Dial pad located here)
HOLD CONF MIC/DND ICM MSG HF
To enter Program 18 data for HS, VA, VP, VO, RLP:
1. Enter the program mode.
# + dial 775312 + #. 2. Press key 18 (CONF).
3. Dial extension + #.
4. Dial feature abbreviation + #. 5. To accept the displayed data: #.
OR
To change the displayed data: Dial data + #. 6. Select an option:
- To program another feature: Go to step 4 (in any Program 18 procedure). - To program another extension: SAVE + dial Y + go to step 3 (in
any Program 18 procedure). - To exit Program 18: SAVE twice.
- To enter another program after exiting: Press its key. - To exit program mode: SAVE three times.
Program 18, Part II (cont'd)
To enter Program 18 data for RA, NR, DRA, PLA:
1. Enter program mode.
# + dial 775312 + #. 2. Press key 18 (CONF).
3. Dial extension + #.
4. Dial feature abbreviation + #.
The Line keys you can program light steadily or flash. Steady means the feature is disabled, flashing means it is enabled.
5. Dial a line number.
OR
Press a Line key.
6. To change or enter data: Dial data (Y)es or (N)o, press #. 7. Repeat steps 5-6 for all lines.
8. Select an option:
- To program another feature for same extension: SAVE + go to step 4 (in any Program 18 procedure).
- To program another extension: SAVE twice + dial Y + go to step 3 (in any Program 18 procedure).
- To exit Program 18: SAVE three times.
- To enter another program after exiting: Press its key. - To exit program mode: SAVE four times.
To enter Program 18 data for Personal Speed Dial (SD):
1. Enter the program mode.
# + dial 775312 + #. 2. Press key 18 (CONF).
3. Dial extension + #. 4. Dial SD + #.
5. Dial bin number + #.
OR
Press lit bin key (to make a SD bin keys, see Program 17). 6. If you can store a name: Enter name + #. Or, skip to step 7.
To enter a letter, number, blank:
- Press dial pad button that has desired character. Zero button=blank, Q, Z (in that order). - Dial digit (1, 2, 3)=letter's position on button (e.g., dial 1 for 1st letter).
OR
Dial 4 for the button's number. - To erase last character, press LAST. - Repeat above steps for entire message.
7. Store a line as follows: Press a Line key or (Dial line number + #).
- Reorder tone means you cannot store that line. Go to step 4.
- To store Intercom feature codes: Press ICM in step 7, dial codes in step 8. 8. To accept the displayed data: # + go to step 5.
OR
To change the displayed data: Dial telephone number + #.
- You can store any number allowed by the toll level of the extension you program from. Numbers longer than 16 digits flow to the next bin.
- To enter a pause: HOLD.
Program 18, Part II (cont'd)
- To enter a Flash, press MSG, or to enter a Delay, press DIAL. These options are only available with software versions AUX Module 02.10/Base 02.00 and higher.
- To enter *: DIAL + press *. - To enter #: DIAL + press #. 9. Select an option:
- To program more bins: Go to step 5.
- To program another feature: SAVE + go to step 4 in any Program 18. - To program another extension: SAVE twice + dial Y + go to step 3. - To exit Program 18: SAVE three times.
- To enter another program after exiting: Press its key. - To exit program mode: SAVE four times.
To enter Program 18 data for DSS:
1. Enter the program mode.
# + dial 775312 + #. 2. Press key 18 (CONF).
3. Dial extension + #. 4. Dial DSS or HL + #.
DSS keys (1-15) flash, any Call Coverage and Hotline keys flash. 5. Press a flashing key.
6. To accept the displayed data: #.
OR
To change the displayed data: Dial data + #.
7. Repeat steps 5-6 for all DSS keys you wish to program. 8. Select an option:
- To program another extension for DSS: SAVE twice + dial Y + go to step 3 (in any Program 18 procedure).
- To program another feature for same extension: SAVE + go to step 4 (in any Program 18 procedure).
- To exit Program 18: SAVE three times.
- To enter another program after exiting: Press its key. - To exit program mode: SAVE four times.
Cont'd next page
Program 18, Part II (cont'd)
Form for System Speed Dial
Bin Number System Speed Dial Numbers and Names
Program 18, Part II (cont'd)
To enter Program 18 data for System Speed Dial (SD):
1. Enter the program mode.
# + dial 775312 + #. 2. Press key 18 (CONF).
3. Dial the number of the extension you are programming from + #. 4. Dial SD + #.
5. Dial bin number + #.
6. If you can store a name: Enter name + #. Or skip to step 7.
To enter a letter, number, blank:
- Press dial pad button that has desired character. Zero button=blank, Q, Z (in that order). - Dial digit (1, 2, 3)=letter's position on button (e.g., dial 1 for 1st letter).
OR
Dial 4 for the button's number. - To erase last character, press LAST. - Repeat above steps for entire message. 7. Store a line: Press a Line key or (Dial line number + #).
- Reorder tone means you cannot store that line. Go to step 4.
- To store Intercom feature codes: Press ICM in step 7, dial codes in step 8. 8. To accept the displayed data: # + go to step 5.
OR
To change the displayed data: Dial telephone number + #.
- You can store any outside number allowed by the toll restriction level of the extension you program from. Numbers longer than 16 digits automatically flow to the next bin.
- To enter a pause: HOLD.
- To enter a Flash, press MSG, or to enter a Delay, press DIAL. These options are only available available with software versions AUX Module 02.10/Base 02.00 and higher.
- To enter *: DIAL + dial *. - To enter #: DIAL + dial #. 9. Select an option:
- To program more bins: Go to step 5.
- To program another feature: SAVE + go to step 4 (in any Program 18 procedure). - To program another extension: SAVE twice + dial Y + go to step 3
(in any Program 18 procedure). - To exit Program 18: SAVE three times.
- To enter another program after exiting: Press its key. - To exit program mode: SAVE four times.
Program 19 - Extension Hunt Groups
Before you fill in data, either use the Copy and Paste commands to make additional copies of the blank Circular/Terminal or UCD/ACD Hunt Group form for each such group you wish to program or print and copy the forms as needed.
Form for Circular/Terminal Hunt Group
Group Name:
Member Extension
Hunt Type
Member Extension
Hunt Type
Member Extension
Hunt Type
To enter Program 19 data for Circular or Terminal Hunt (types 01, 02, 03):
1. Enter program mode.
# + dial 775312 + #. 2. Press key 19 (MIC/DND).
3. Dial 01, 02, or 03 (it doesn't matter). 4. Dial Member Extension + #. 5. Dial Hunt Type + #.
6. Repeat steps 4-5 for all Member Extension 7. Select an option:
- To program another group: # until you see "HUNT TYPE -" + Go to step 3 in any Program 19 procedure.
- To exit Program 19: SAVE.
- To enter another program after exiting: Press its key. - To exit program mode: SAVE twice.
Note: To accept the displayed data in any step: #.
To delete a member of a Circular or Terminal group:
1. Enter program mode.
# + dial 775312 + #. 2. Press key 19 (MIC/DND).
3. Dial 01, 02, or 03 (it doesn't matter). 4. Dial first Member Extension in group + #.
5. Press # until you see the extension you want to delete.
6. If the extension is the last extension in a Terminal hunt group: Dial 300 + #.
OR
If the extension is in the middle of a group, dial the extension that comes after it + #. For example, if the group is 304, 305, 306 and you want to delete 305:
- Press # until you see 305 (as explained in step 5). - Dial 306 + #.
7. Continue as follows:
- Press # until you see "HUNT TYPE - ". - Dial 01, 02, or 03 + #.
- Dial the extension you just deleted + #. - Dial 00 for Hunt Type + #.
8. Press SAVE until you exit program mode.
Note: To accept the displayed data in any step: #.
To add a member to a Circular or Terminal Group:
1. Enter program mode.
# + dial 775312 + #. 2. Press key 19 (MIC/DND).
3. Dial 01, 02, or 03 (it doesn't matter). 4. Dial first Member Extension + #.
5. Press # until you see the extension before which you want to add an extension.
For example, if the group is 304, 305, 306 and you want to add 307 before 306: Press # until you see 306.
6. Dial the extension you want to add + #. Dial its Hunt Type + #. Repeat for the extension after it. To continue with the example set up in step 5: Do step 6 for extension 307, then 306. 7. Press # until you see "HUNT TYPE-".
8. Press SAVE until you exit program mode.
Note: To accept the displayed data in any step: #.
Cont'd next page
Program 19 - Extension Hunt Groups (cont'd)
Form for a UCD/ACD Hunt Group
Before you fill in the data, either use the Cut and Paste commands to make additional copies of the blank forms for each UCD/ACD group you wish to program or print and copy the forms as needed.
Hunt Type Master Extension Overflow Extension Supervisor Extension Group Name:
Member Extension
Hunt Type
Member Extension
Hunt Type
Member Extension
Hunt Type
To enter Program 19 data for UCD/ACD Hunt (type 04, 05):
1. Enter program mode.
# + dial 775312 + #. 2. Press key 19 (MIC/DND).
3. Dial Hunt Type + #. 4. Dial Master Extension + #. 5. For type 04: Go to step 6. For type 05: Dial Overflow + #.
6. Press # to move past "MASTER EXT." prompt.
OR
To delete a group: Dial * + SAVE + Go to step 10.
7. Dial a Member Extension when you see UCD MEMBER + #. - To move past a member: #.
- To delete a member: Dial *.
Program 19 - Extension Hunt Groups (cont'd)
8. Repeat step 7 for all members. 9. Press SAVE.
10. Select an option:
- To program another group: Go to step 3 in any Program 19 procedure. - To exit Program 19: SAVE.
- To enter another program after exiting: Press its key. - To exit program mode: SAVE twice.
Note: To accept the displayed data in any step: #.
To enter Program 19 data for ACD Supervisor:
1. Enter program mode.
# + dial 775312 + #. 2. Press key 19 (MIC/DND).
3. Dial 00 for Hunt Type + #.
4. Dial Master Extension for Supervisor's group + #. You see "UCD MEMBER." 5. Dial Supervisor Extension + #.
This step automatically places the Supervisor Extension in the associated UCD group. 6. Select an option:
- To program another Supervisor, go to step 3. - To exit Program 19: SAVE.
- To enter another program after exiting: Press its key. - To exit program mode: SAVE twice.
To delete an ACD Supervisor
1. Enter program mode.
# + dial 775312 + #. 2. Press key 19 (MIC/DND).
3. Dial Hunt Type for Supervisor's group + #. 4. Dial Master Extension for Supervisor's group + #. 5. Press # until you see Supervisor's Extension. 6. Press *.
7. Press SAVE. 8. Select an option:
- To delete more Supervisor Extensions: Go to step 3. - To exit Program 19: SAVE.
- To enter another program after exiting: Press its key. - To exit program mode: SAVE twice.
Note: To accept the displayed data in any step: #.
Program 20 - System Initialization
To use Program 20:
1. Enter program mode.
# + dial 775312 + #. 2. Press key 20 (ICM).
3. Dial Y to initialize and wait for the date and time to display. When you see the date and time, this means initialization is complete.
OR
Dial N to exit Program 20 without initialization.
- To enter another program: Press its key. - To exit program mode: Press SAVE.
Page 43
Nitsuko America, Telecom Division
4 Forest Parkway
Shelton, CT 06484
TEL: 203-926-5400
FAX: 203-929-0535
Other Important Telephone Numbers
Sales: ...
Customer Service:...
Customer Service FAX:...
Technical Service: ...
Discontinued Product Service: ...
Technical Training:...
Emergency Technical Service (After Hours): ...
(Excludes discontinued products)
Digital System
Program Record Form
Part No. N1872PRF04 Issue 1-0, June 1996 Printed in U.S.A.