TEK
USERS MANUALFirst Printing APR 1986
Part No. 061-3216-00 Product Group 07
4405
ARTIFICIAL
INTELLIGENCE
SYSTEM
Please Check at the
Rear of this Manual
for
NOTES
and
CHANGE INFORMATION
Copyright 1986 by Tektronix, Inc., Beaverton, Oregon. Printed in the United States of America. All rights reserved. Contents of this publication may not be reproduced in any form without permission of Tektronix, Inc. This instrument, in whole or in part, may be protected by one or more U.S. or foreign patents or patent applications. Information provided upon request by Tektronix, Inc., P.O. Box 500, Beaverton, Oregon 97007.
TEKTRONIX is a registered trademark of Tektronix, Inc .. UNIX is a trademark of Bell Laboratories.
TOPS-10, TOPS-20, VMS, and RSTS are trademarks of Digital Equipment Corp.
Portions of this manual are reprinted with permission of the copyright holder. Technical Systems Consultants, Inc., of Chapel Hill, North Carolina. The operating system software copyright information is embedded in the code. It can be read via the "info" utility.
Smalltalk-80 is a trademark of Xerox Corp.
UniFLEX is a registered trademark of Technical Systems Consultants, Inc.
WARRANTY FOR SOFTWARE PRODUCTS
Tektronix warrants that this software product will conform to the specifications set forth herein, when used properly in the specified operating environment, for a period of three (3) months from the date of shipment, or if the program is installed by Tektronix, for a period of three (3) months from the date of installation. If this software product does not conform as warranted, Tektronix will provide the remedial services specified below. Tektronix does not warrant that the functions contained in this software product will meet Customer's requirements or that operation of this software product will be uninterrupted or error-free or that all errors will be corrected.
In order to obtain service under this warranty, Customer must notify Tektronix of the defect before the expiration of the warranty period and make suitable arrangements for such service in accordance with the instructions received from Tektronix. If Tektronix is unable, within a reasonable time after receipt of such notice, to provide the remedial services specified below, Customer may terminate the license for the software product and return this software product and any associated materials to Tektronix for credit or refund.
This warranty shall not apply to any software product that has been modified or altered by Customer. Tektronix shall not be obligated to furnish service under this warranty with respect to any software product a) that is used in an operating environment other than that specified or in a manner inconsistent with the Users Manual and documentation or b) when the software product has been integrated with other software if the result of such integration increases the time or difficulty of analyzing or servicing the software product or the problems ascribed to the software product. TEKTRONIX DISCLAIMS ANY IMPLIED WARRANTIES OF MERCHANTABILITY OR FITNESS FOR A PARTICULAR PURPOSE. TEKTRONIX' RESPONSIBILITY TO PROVIDE REMEDIAL SERVICE WHEN SPECIFIED, REPLACE DEFECTIVE MEDIA OR REFUND CUSTOMER'S PAYMENT IS THE SOLE AND EXCLUSIVE REMEDY PROVIDED TO CUSTOMER FOR BREACH OF THIS WARRANTY. TEKTRONIX WILL NOT BE LIABLE FOR ANY INDIRECT, SPECIAL, INCIDENTAL OR CONSEQUENTIAL DAMAGES IRRESPECTIVE OF WHETHER TEKTRONIX HAS ADVANCE NOTICE OF THE POSSIBILITY OF SUCH DAMAGES.
PLEASE FORWARD ALL MAIL TO:
Artificial Intelligence Machine
Tektronix, Inc.
MANUAL REVISION STATUS
PRODUCT: 4405 ARTIFICIAL INTELLIGENCE SYSTEM
This manual supports the following versions of this product: Serial Numbers 8010100 and up.
REV DATE DESCRIPTION
Table of Contents
SECTION 1 INTRODUCTION
ABOUTPRELIMINARYMANUALS ... 1-1 ABOUT THIS MANUAL ... ... ... ... ... ... ... ... .... .... ... ... ... ... ... 1-1 YOUR QUALIFICATIONS ... 1-1 UNPACKINGTHE4405 ... 1-2 OVERVIEWOFTHE4405 ... 1-2 GENERALINFORMATION ... 1-2 4405HARDWAREOVERVIEW ... 1-3 The 4405 Display/CPU ... 1-3 The 4405 Keyboard ... 1-7 The 4405 Mouse .. .... ... .... ... ... ... ... ... ... ... .... ... .... ... .... .... ... 1-7 THE 4405 STANDARD MASS STORAGE UNIT .. ... ... ... ... ... ... .... ... ... 1-8 4405 STANDARD AND OPTIONAL SOFTWARE ... 1-11 STANDARDSOFTWARE ... 1-11 Smalltalk-80 ... 1-11 The 4405 Operating System ... ... ... ... ... ... 1-11 4405 OPI'IONS ... 1-12 Additional 2 MB Physical Memory . ... ... ... .... ... ... ... ... ... ... ... 1-12 Additional 4 MB Pllysical Memory ... ... ... ... 1-12 ETHERNET® Interface ... : ... 1-12 Franz LISP ... 1-12 Common LISP .. ... ... ... ... ... ... ... ... ... ... ... ... ... ... ... ... ... 1-12 PROLOG ... 1-12 EMACS ... 1-13 Other Options .... ... ... ... ... ... ... ... ... 1-13 Mass Storage Expansion ... ... ... ... ... ... ... 1-13 4405 DOCUMENTATION ... 1-13 STANDARD DOCUMENTATION ... 1-13 The 4405 User's Manual (This Book) ... 1-13
An Introduction to the Smalltalk-80 System ... 1-13 The 4400 Series Operating System Reference Manual.. ... ... .... ... .... .... ... .... ... 1-14 4400 Series Assembly Language Reference ... ... ... ... ... ... ... 1-14 4400 Series
'c'
Language Reference ... ... ... ... 1-14 OOCUMENTATIONOFOPI'IONS ... 1-14 OPTIONAL DOCUMENTATION ... 1-14 Smalltalk-80 Documentation ... 1-14 Service Documentation ... ... 1-15 The 4405 Field Service Manual ... ... ... 1-15 The 4405 Component-Level Service Manual ... 1-15SECTION 2 THE FIRST TIME
INTRODUCTION ... 2-1 COMMENTED TRANSCRIPT OF SESSION .. ... ... ... ... ... ... ... ... 2-1 TURN ON THE 4405 .. ... ... ... .... ... ... ... ... ... .... ... ... ... ... 2-1 FII...ES AND DIRECTORIES ... 2-2 MOVING AROUND IN THE DIRECTORY ... 2-4 SOME sheU FEATURES ... 2-5 history ... 2-5 Command Line Editing ... 2-7
The shell Environment ... .... ... 2-9 Environment Variables ... 2-9 Aliases ... ... ... ... ... 2-10 Saving Definitions ... ... ... ... ... 2-11 CONTROLLING THE TERMINAL EMULATOR ... 2-12
ANSI Commands ... ... 2-12 Other Terminal Attributes ... ... ... 2-12 RS-232 Terminal Emulation ... ... ... ... ... ... ... 2-12 ENDING THE SESSION . ... ... ... ... ... ... ... 2-13
SECTION 3 USING THE 4405
INTRODUcrION ... 3-1 POWER ON AND SYSTEM BOOT ... ... 3-1 POWER-UP SELF-TEST AND BOOT ... 3-1 BOOTING THE SYSTEM ... ... .... ... ... ... ... ... ... ... 3-1 THE LOGIN PROCESS ... 3-2
CHECKING THE PASSWORD FILE ... 3-2 USER INITIALIZATION ... 3-2 SETTING PASSWORDS ... 3-2 STOPPING THE SYSTEM ... 3-2 STOP ... 3-3 POWER OFF ... ... ... ... ... 3-3 THE OPERATING SYSTEM AND UTILITIES ... 3-3 OVERVIEW ... 3-3 COMMANDS AND COMMAND SYNTAX ... 3-4
Options ... ... 3-4
Arguments and Parameters ... ... ... ... ... ... ... 3-4
Options That Take Arguments ... 3-5 MANUAL SYNTAX CONVENTIONS ... ... ... ... ... 3-5 FILE STRUCfURE ... 3-5 Directory Contents ;-; dir ... ... ... ... ... ... ... ... 3-6 Moving Around The Directory Tree ... 3-6 Adding and Removing Files ... ... ... ... ... ... ... 3-7 \VII...D CARD EXPANSION ... 3-7 MULTI-TASKING ... ... ... ... ... ... 3-7 USER COMMANDS BY FUNCfION ... 3-7 FILE MANIPULATION ... 3-7 copy ... 3-7 create ... 3-8
edit ... 3-8
link ... 3-8
list ... 3-8
move ... 3-8
remove ... 3-8
rename ... 3-8
FILE PROCESSING ... ... ... ... ... ... 3-8
compare ... ... ... 3-8
dump ... 3-8
filetype ... ... 3-8
info ... 3-9 touch ... 3-9 tail ... 3-9 DIRECTORY MANIPULATION . ... ... ... ... ... ... 3-9 chd ... 3-9 crdir ... 3-9 dir ... 3-9 path ... 3-9 SYSTEM ACCESS AND STATUS .. ... ... ... ... 3-9 date ... 3-9 dperm ... 3-9 exit ... 3-9 help ... 3-10 login ... 3-10 owner ... 3-10 password ... 3-10 perms ... 3-10 status ... ... ... ... ... ... 3-10 stop ... 3-10 DISK MANAGEMENT ... 3-10 backup ... 3-10 diskrepair ... ... ... ... 3-10 format ... ... ... ... ... ... ... ... 3-10 free ... 3-11 restore ... ... ... ... ... ... ... ... 3-11 COMMAND EXECUTION ... 3-11 echo ... 3-11 int ... 3-11 jobs ... 3-11 script ... ... ... ... .... ... ... 3-11 shell ... 3-11 wait ... 3-11 COMMUNICATIONS ... ... ... ... ... ... ... 3-11 commset ... ... 3-11 conset ... ... ... ... ... ... ... ... ... 3-11 remote ... .... ... ... ... ... ... ... ... 3-12 PROORAM DEVELOPMENT ... ... ... ... ... ... 3-12 asm ... 3-12 cc ... 3-12 debug ... 3-12 headset ... 3-12 libgen ... ... 3-12 libinfo ... ... ... ... ... ... ... ... 3-12 load ... 3-12 sma11talk ... ... ... ... ... ... 3-12 strip ... 3-12 relinfo ... ... ... ... 3-12 update ... ... ... ... 3-13
SECTION 4 SOFTWARE MAINTENANCE
INTRODUCTION ... 4-1 THEFACTORYCONFIGURATION ... 4-1 USER public ... ... ... ... ... ... ... ... ... ... ... 4-2 File Protection and Ownership ... 4-2 Passwords ... ... ... ... .... ... ... ... .... ... ... ... 4-2 Backing up User Files ... ... ... 4-2 A Suggestion . ... ... ... ... ... ... ... 4-3 RESPONSIBILITIES OF USER system ... 4-4 BACKING UP THE SYSTEM ... 4-5 Performing a system Backup ... 4-5 ADDING AND DELETING USERS ... 4-5 INSTALLING SOFTWARE ON THE 4405 ... 4-6 ERROR RECOVERY AND SYSTEM REBUILDING ... 4-7
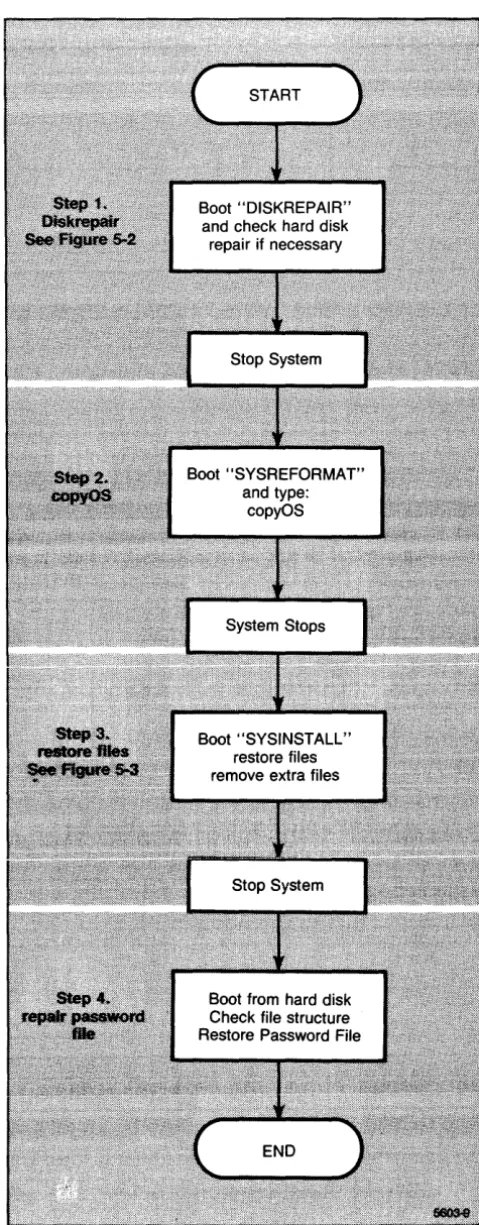
SECTION 5 RECOVERY AND REBllLD
B - Fonnat th.e Hard Disk ... 5-21 Logical Fonnat ... 5-21 Physical Fonnat ... 5-21 STEP 2 - RESTORE THE SYSTEM WITH THE SYSINSTALL DISK ... 5-22 A - Boot th.e SYSINSTALL Disk ... 5-22 B - Restore Files from Your System Backups ... 5-22 C - Stop me System and Reboot ... 5-22 STEP 3 - RESTORE USER'S FII.,ES ... ... 5-23 4405 SELFI'EST ... ... 5-23 OVERVIEW ... 5-23 RUNNING SELF TEST ... 5-23 Key f1 ... 5-24 Key f2 ... 5-24 Key f3 ... 5-24 Key f9 ... 5-24 Key flO ... 5-24 Key f11 ... 5-24 Key f12 ... 5-25 FINDING INTERMITTENT ERRORS ... 5-25 Invoking Continuous selftest ... 5-25
Appendix A UNPACKING AND INSTALLATION
INSTALLATION ... A-I SELECTING A SITE ... ... A-I UNPACKING ... A-2 UNPACK THE MSU ... A-2 UNPACK THE DISPLAY/CPU ... A-2 CHECK THE ACCESSORIES ... A-2 ASSEMBLE THE MOUSE ... A-3 CONNECT THE CABLES ... A-3 READ SECI'ION 1 ... A-4
Appendix B CLEANING AND MAINTENANCE
GENERAL CLEANING ... ... ... ... ... ... ... B-1 CLEANING THE MOUSE ... B-1 CLEANING SPILLS ON THE KEYBOARD ... ... ... ... .... ... B-1
Appendix C Options
Appendix D CONNECTING PERIPHERALS
INTRODUCI'ION ... D-1 THE SCSI BUS ... D-l LOCATION ... ... ... ... ... ... ... ... D-l SOFTWARE ACCESS ... ... ... ... ... ... D-l THE RS-232 COMMUNICATIONS PORT ... D-2 LOCATION ... D-2 SOFTWARE CONTROL ... D-2 THE PARALLEL PRINTER PORT ... D-2 LOCATION ... D-2 SOFTWARE ACCESS ... D-2
THE Ex:rERNAL SPEAKER JACK ... D-2 LOCATION ... D-2 SPECIFICATIONS ... D-3 SOFfW ARE ACCESS ... D-3 THE ETHERNET INTERFACE ... D-3
Appendix E SPECIFICATIONS
Figures
1-1. 640 X 480 Window Into 1376 X 1024 Bit-Map. . ... 1-3 1-2. Display/CPU Front Panel Controls.. . ... 1-5 1-3. Display/CPU Rear Panel. ... 1-5 1-4. The 4405 Keyboard.. . ... .... ... ... ... ... ... ... ... ... ... ... 1-7 1-5. The 4405 Mouse.. . ... 1-8 1-6. Front of MSU.. . ... 1-9 1-8. SCSI Terminator. . ... ... ... ... .... ... .... .... ... ... ... 1-11 5-1. Non-Destructive System Rebuild Procedure.. . ... 5-9 5-2. Step 1. Using (BIDISKREPAIRP. . ... 5-11 5-3. Step 3. Restore Files. . ... 5-15
Examples
5-1. Minimum Bootable System. . ... 5-14
Tables
Section
1
INTRODUCTION
ABOUT PRELIMINARY MANUALS
Some of the 4400 Series manuals are preliminary. They are as complete and accurate as they can be, given the lead time required for writing and printing. Some of the information given in preliminary manuals may be inaccurate or missing.
We of AIM Documentation want each customer to receive complete, final manuals as soon as possible. In order that you not be missed (sometimes addresses get lost or are unavailable) please fill out and return the enclosed, postage-free, card. Of course, we would appreciate any comments you can make to help us make the documentation for this system better. (We also like praise, too, if we've done something right.) If the card is missing, or if you have more comments to send at a later time, send them to:
Tektronix, Inc. P.O. Box 1000
Wilsonville, OR 97070 D.S.60-405
Attention: AIM Documentation
ABOUT THIS MANUAL
This is the introductory manual to the 4405 Artificial Intelligence System. (We call it the 4405 from here on.) You should read this manual before attempting to use your new 4405 - it contains useful information that can help you get the most out of the 4405. You'll find instructions on how to unpack and connect the system, a guided tour of the first time you tum it
on, a discussion on how to work with the system on a day-by-day basis, suggestions for working with more than one user on the system, and some ways to recover from the inevitable errors to which humans are prone.
YOUR QUALIFICATIONS
This manual is not a tutorial document. Although we've tried to keep this manual clear and simple, it assumes that you're an experienced computer user. You need not have systems programming experience, or be a "Wizard," but you should be past the neophyte stage on a large computer operating system. You should be comfortable with a hierarchical or tree-structured filing system, know how to issue commands and run applications, and, in general, be a "knowledgeable user."
If you're comfortable with an operating system such as Unix®, TOPS-IO/20®, VMS®, RSTS®, or any of the other multi-user operating systems that abound, you should have little trouble adapting to the 4405 operating system. If you are not, you should take a course, read through one of the many tutorials, or find a knowledgeable person to help you adjust to the 4405. If you must search out tutorial information on your own, look for tutorials on the Unix operating system. The 4405 operating system is not Unix, but the structure and philosophy behind it is not too dissimilar, and tutorial information explaining the Unix operating system is readily available.
INTRODUCTION
UNPACKING THE 4405
If you've just purchased your 4405 - congratulations! You'l1 want to get it put together and running as soon as possible. First, don't discard your shipping cartons. If you ever want to move your 4405 any distance, you should use these containers. Exercise patience, follow instructions, and you should have no trouble bringing the system up for the first time.
To save time and trouble, follow this sequence:
1. Skim over this procedure to get a feel for the sequence.
2. Tum to Appendix A and follow those instructions. This appendix shows you, in detail, how to unpack and connect the pieces that form the 4405.
3. Come back to this point and read the rest of Section 1, the introduction. You need to get an overview of the 4405 before trying to use it.
4. Read Section 2, The First Time User next. Follow the examples on your 4405. This section takes you through an initial introduction to the 4405 operating system and shows you a few of its many features.
5. Next read through Section 3, Using the 4405. This section talks about normal, day-to-day use of the 4405. You'll want to experiment with the system - you shouldn't have any trouble at this point.
6. Read Section 4, Software Maintenance, to get an idea of the maintenance tasks you'll have to deal with. If more than one user will be using the 4405, one person should be responsible for these tasks.
7. Section 5, Recovery and Rebuild, is the section we all hope to avoid. If you must, you can find system rebuilding procedures here.
OVERVIEW OF THE 4405
GENERAL INFORMATION
The 4405 is a single-user computer system that has been designed for the efficient development and use of artificial intelligence (AI) applications. (Single-user means that, although the 4405 can have many separate user accounts, it is not a time-sharing system; only one user may be logged in at a time.) The 4405 can be used both as a stand-alone applications development system and as a terminal connected to a host computer.
As an applications development system, the 4405 provides a programming environment for the Smalltalk-80 system, LISP, and PROLOG. These languages run under the 4405's multi-tasking operating system. The 4405 also has a hierarchical file system, complete with various graphics and mathematics libraries to assist with program development. In addition, the 4405 contains a
'c'
programming environment that allows porting of many applications programs to it.INTRODUCTION
4405 HARDWARE OVERVIEW
The 4405 consists of two major components, the Display/CPU module and mass storage unit (MSU). These, in addition to a keyboard and mouse, make up the basic 4405. The following discussion examines each component in detail.
The 4405 Display/CPU
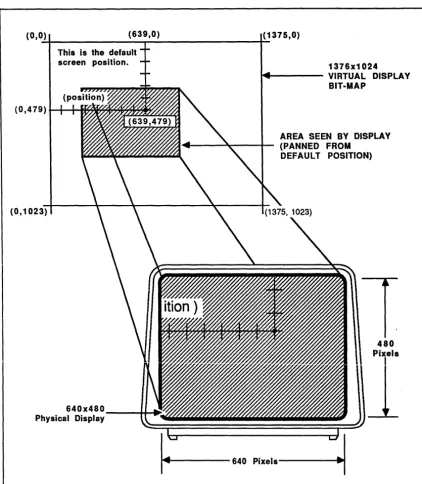
The Display/CPU is the heart of the 4405 system. Although it is no larger than the display cabinet of a conventional terminal, it contains a monochrome 640 X 480 pixel bit-map display, the central processing unit, one megabyte (standard, two or four additional megabytes available as options) of fast semiconductor memory, and the interface electronics that allow the 4405 to communicate with the outside world.
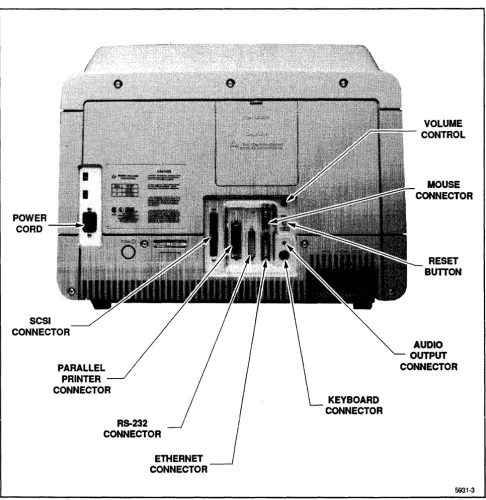
Connected to the rear of the Display/CPU unit are the power cord, mass storage unit, keyboard, and mouse. There, we also find a volume control for the internal speaker, an audio connector for an external speaker, a parallel printer port, the RS-232 port, the ethernet connector, and a reset button.
The 4405 uses a monochrome 640 X 480 pixel display as a window into a 1376 X 1024 bit-map. The 4405' s electronics allow smooth panning of the 640 X 480 window over the virtual display under control of the operating system.
Figure 1-1 shows how the 640 X 480 pixel display relates to the 1376 X 1024 bit-map.
INTRODUCTION
(0,0) (639,0) (1375,0)
~---~---+~
This is the default screen position.
(0,479) t-+-+l~~~~~~
1376x1024 ... - - - VIRTUAL DISPLAY
BIT-MAP
AREA SEEN BY DISPLAY (PANNED FROM
DEFAULT POSITION)
(0,1023)
640x480 Physical Display
j : = = 6 4 0
Pixel.~
Figure 1-1.640 X 480 Window Into 1376 X 1024 Bit-Map.
480 Pixels
iNTRODUCTION
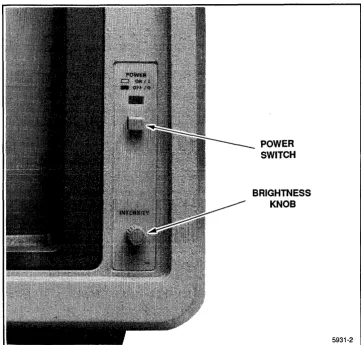
Figure 1-2 shows the front of the Display/CPU unit. Two controls are located at the front of the unit: the brightness control and the power switch. Figure 1-3 shows the rear panel controls and connectors on the Display/CPU.
4405 USERS
POWER SWITCH
BRIGHTNESS KNOB
Figure 1-2. Display/CPU Front Panel Controls.
5931-2
INTRODUCTION
CORD
SCSI CONNECTOR
PARALLEL PRINTER CONNECTOR
RS-232 CONNECTOR
ETHERNET CONNECTOR
Figure 1-3. Display/CPU Rear Panel.
KEYBOARD CONNECTOR
VOLUME CONTROL
MOUSE CONNECTOR
RESET BUTTON
AUDIO OUTPUT CONNECTOR
INTRODUCTION
The 4405 Keyboard
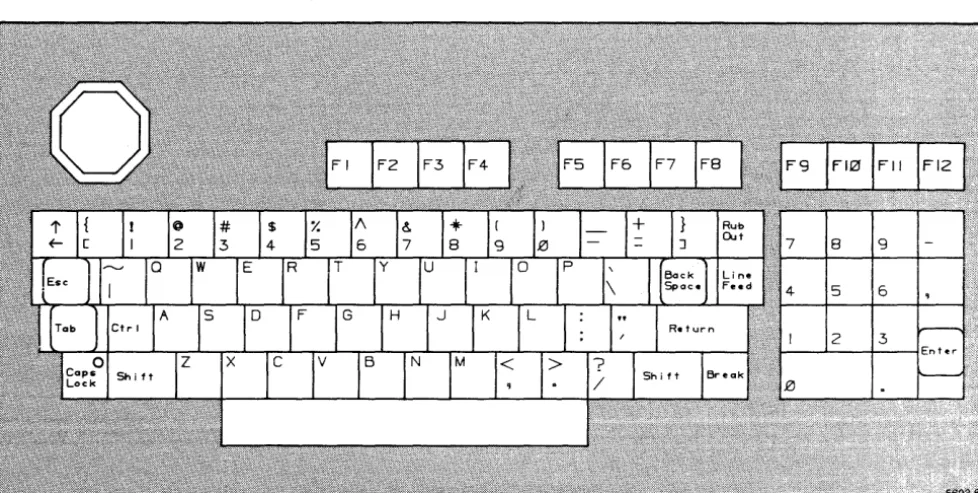
Figure 1-4 shows the 4405 keyboard. This keyboard is similar to that used by the Tektronix 4100 Series tenninals. The joydisk, function keys, numeric pad, and keyboard keys are all accessible to the 4405 software. The only unfamiliar key is the up-arrowlleft-arrow key used in Smalltalk programming.
Figure 1-4. The 4405 Keyboard.
The 4405 Mouse
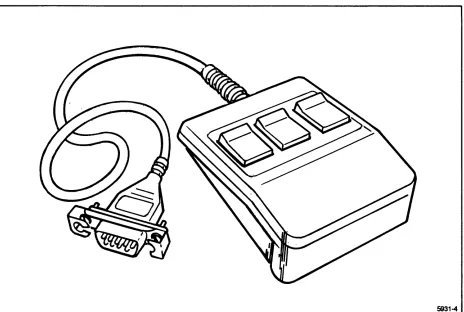
The 4405 mouse, shown in Figure 1-5 is the primary pointing device used with Smalltalk-80. The mouse consists of a rubber coated steel ball (to detect mouse movement over a surface) and three buttons. To use the mouse, place it on a clean surface and guide it with one hand. Use your fingers to press the mouse buttons. The mouse connector plugs into the back of the 4405 Display/CPU unit near the keyboard connector.
INTRODUCTION
5931-4
Figure 1-5. The 4405 Mouse.
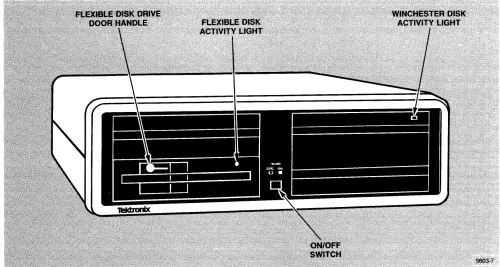
THE 4405 STANDARD MASS STORAGE UNIT
REMOTE POWER CONTROL
CONNECTOR (NOT USED)
POWER CORD CONNECTOR
Figure 1-6. Front of MSU.
FUSE
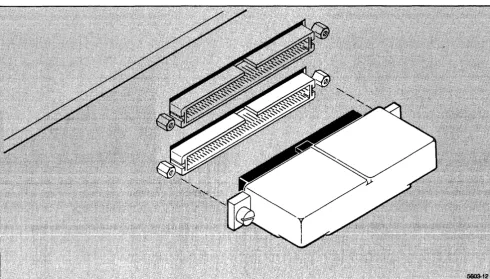
SCSI CONNECTORS
Figure 1-7. Rear of MSU.
INTRODUCTION
LINE VOLTAGE INDICATOR
4405 USERS 1-9
INTRODUCTION
INTRODUCTION
4405 STANDARD AND OPTIONAL SOFTWARE
STANDARD SOFTWARE
Smalltal k-80
The standard programming language for the 4405 is Smalltalk-80, version 2, developed by Xerox corporation. Smalltalk-80 is a object-oriented, general-purpose programming language that makes extensive use of the 4405 bit-mapped screen and mouse. A full description of the Tektronix implementation of Smalltalk-80 is given in the companion manual An Introduction to the Smalltalk-80 System.
The 4405 Operating System
The 4405 contains a small, robust operating system, based on UniFLEX@, by Technical Systems Consultants, Inc. The operating system gives one user at a time access to the 4405's resources. The operating system gives you these features:
• Single-user operation
• Multiple user accounts (with password protection) • A hierarchical, tree-structured file system
• Multi-tasking
• An interactive shell featuring command aliasing, history, shell variables, definable search path, and command line editing
• Command file (script) execution • User (public) and system utilities
• A relocating assembler and linking loader
• A
'c'
compiler and libraries that include standard'c'
functions and a graphics library that gives access to the 4405's hardware resources• A symbolic debugging tool for
'c'
and assembly language programs• An ANSI X3.64 terminal emulator, available both to the 4405 operating system and to an external host via a RS-232-C connection
• A line and content oriented text editor • Printer support
• Remote file transfer and host communications
INTRODUCTION
4405 OPTIONS
In addition to the standard 4405 hardware and software, many additional options are available. Some of these are:
Additional 2 MB Physical Memory
This option, an additional two Megabytes of semiconductor memory gives you a total of three Megabytes of physical memory for your 4405.
Additional
4
MB Physical Memory
This option, an additional two Megabytes of semiconductor memory gives you a total of five Megabytes of physical memory for your 4405.
ETHERNET® Interface
This option adds the hardware and software necessary for the 4405 to function in an ETHERNET network.
Franz LISP
An implementation of the LISP programming language that is widely available on UNIX systems.
Common LiSP
This implementation of Common LISP includes some extensions, such as a "Foreign Function Interface," as well as the full language as documented in the book by Guy Steele, Common llSP, the Language.
PROLOG
INTRODUCTION
EMACS
A widely used, extensible, screen-oriented editor with mouse extensions.
Other Options
Additional 4405 options may be available in the future. Please contact your local Tektronix Sales Representative for currently available 4405 options.
Mass Storage Expansion
If you need more mass storage than is available on the standard internal 45 Mb Hard disk, use the applicable configuration of the 4944 Mass Storage Device to extend your storage. The 4944 is available in a number of configurations that add various sizes of hard disk storage and streaming tape support. The 4400 Series operating system automatically senses the presence of supported expansion units and mounts them when the system boots up.
4405 DOCUMENTATION
STANDARD DOCUMENTATION
With your 4405, you received five principal manuals. This standard set of documentation includes:
The 4405 User's Manual (This Book)
This manual should be the first manual you read. It contains the introductory material to the 4405: unpacking and connection procedures, a first-time user's session, hints on daily use of the system, discussions of software configuration, maintenance and data security. This manual contains the general "how-to-do-it" information that you'll need while getting acquainted with your new 4405. You'll probably need to use this manual extensively for the first week or so, then will probably need to refer to it only in emergencies.
An Introduction to the Smalltalk-80 System
This manual is the introduction to Smalltalk-80 as implemented on the 4405. This manual is not a "stand-alone" manual, it is meant to be used in conjunction with two other texts, Smalltalk-80:
the Programming Environment and Smalltalk-80: The Language and Its Implementation
published by Addison-Wesley. You will need both these books in order to use Smalltalk-80. The manual An Introduction to Smalltalk-80 makes extensive references to the Addison-Wesley
INTRODUCTION
books and details the differences between the image in those books and the image on the 4405. The Introduction does contain some tutorial information, and an excellent overview of the language, as well as providing the intimate details that affect the language user.
The 4400 Series Operating System Reference Manual
The 4400 Series Operating System Reference Manual contains the detailed description of the
4400 Series hardware and software from the programmer's point of view. This book is the basic 4400 Series reference, and contains information on the details of commands, syntax, extensions, and the other operating system level concerns. Look in this manual for detailed information not covered elsewhere.
4400 Series Assembly Language Reference
The 4400 Series Assembly Language Programmer's Reference Manual contains details of the
supplied MC68000 (including MC68010 and MC68020) assembler. This manual is a reference manual to the syntax and details of the 4400 Series assembler and system calls and libraries. This manual also contains information on the operation of the linking loader.
4400 Series
'e'
Language Reference
The 4400 Series 'C'Language Reference Manual contains details of the implementation of the
'c'
language and libraries. This manual also contains some tutorial information on using the "BitBlt" graphics facilities of the 4400 series machines.DOCUMENTATION OF OPTIONS
Each software option has its own reference manual(s) that details its operation. Refer to these manuals for details of how to use these software packages.
Hardware options come with installation instructions (if the option is customer-installed) and the necessary manuals for operation of that option.
Some manuals for options are small and come without binders. Place these manuals in this binder under Appendix C, Options.
OPTIONAL DOCUMENTATION
Smalltalk-80 Documentation
INTRODUCTION
• Smalltalk-80 The Interactive Programming Environment by Adele Goldberg. Tektronix part number 062-8859-00
• Smalltalk-80 The Language and Its Implementation by Adele Goldberg and David Robson. Tektronix part number 062-8860-00
Service Documentation
Two service manuals are available for the 4405. These are:
The 4405 Field Service Manual
The 4405 Field Service Manual contains information useful for a technician troubleshooting a 4405 in the field. It contains commonly used adjustments, checks, and information that enables a technician to repair a 4405 to the module level. {Modules are subassemblies that should be repaired at the factory or other service location that has specialized diagnostic instrumentation.}
The 4405 Component-Level Service Manual
This manual is designed for the experienced electronic technician and gives the information necessary to repair the 4405 subassemblies. It is not intended for use in the field; it requires test fixtures and specialized knowledge to use it.
Section 2
THE FIRST TIME
INTRODUCTION
You should now have your 4405 unpacked, connected, and ready for its first use. This section is a commented transcript of a new user trying the 4405 for the first time.
Think of this section a guided tour of the 4405 operating system. Follow along on your own machine - feel free to experiment as you go along. This section won't cover all of the features and capabilities of the operating system, but it will show you enough to get you started.
In this transcript, the actual dialog between the user and the 4405 is indented and in a different type style than the comments and explanations. The actual commands that you type are shown as they appear on the screen; enter them exactly as shown (omit the system prompt, but be sure to include the spaces). Remember, for commands to be executed, you must terminate the command line by pressing the Return key - this manual doesn't show that as an explicit part of this dialog. Your session should look very similar when you issue the same commands in the same order.
COMMENTED TRANSCRIPT OF SESSION
CAUTION
If you must leave the session early, type "stop" and wait
for the message
" . .. System shutdown complete ... "
before turning off the power. Any other method of
shutting down the 4405 can seriously damage the
operating system disk software structure.
TURN ON THE 4405
First, you 11 want to see what happens to each unit of the 4405 when you tum on one unit at a time. (Later on, you 11 just want to tum on the power to both units and start working.) Press the power switch on the MSU (mass storage unit). Notice that the winchester disk activity light on upper right hand of the MSU front panel comes on until the disk gets up to speed, then shuts off.
Now, press the power switch on the Display/CPU unit. The LED in the key marked Caps Lock comes on, flashes for a time, then goes out. When the display screen lights up, you see in the upper left comer the display:
Tektronix 4405
If this message does not appear, try adjusting the brightness control.
THE FIRST TIME
Tektronix 4405 Operating System Version X.X Includes licensed material
For copyright and other proprietary information, use "info" command.
Total user memory = xxxxK
++
It usually takes a few minutes for the prompt - the + + (double plus signs) - to appear. During this time, the 4405 has gone through a power-up self-test, loaded the operating system, automatically logged you in as a user with the user-name public, invoked the interactive shell (the program that talks to you), and is now waiting for you to give it a command.
The Version X.X message tells you what version of the operating system you have, and the Total user memory message tells you how much physical memory is actually available for your use. The + + is the default system prompt, and the flashing "_" (underscore) is the cursor.
FILES AND DIRECTORIES
You have been automatically logged into the system as user public. The command dir shows you the visible files in your directory. Type dir:
++ dir
++
As you can see, there are no visible files in your directory (unless someone else has left them there). If someone else has used the system and created files, you 11 see the file names they left. There are a number of files in your directory that are invisible. The operating system normally doesn't show files that begin with a period. To see these files, type dir with the +a option:
+ dir +a
.login .shellbegin .shellhistory ++
Each of these invisible files has a use. We'll talk about them later. To find out more about the command dir, you can use help, the on-line help utility. In fact, you can use help to find out about itself. (We won't show the full system response here, as it is so long. Try it for yourself on your 4405.)
++ help help
(Here the system gives a list of commands for which help is available. If you want no help, just press Return to exit.)
Help with what command? dir
(The system prints the help file for dir.)
++
We see that the command dir also can take an argument - the name of the directory we want to list. The fundamental directory of the system, the root, is named "!". To see what it contains, type (be sure to leave a space between dir and I):
++ dir /
(Here the system lists the files in "/".) ++
THE FIRST TIME
You need not be in a particular directory to give commands concerning files. You simply give the file's path name (the sequence of directories from" j") in front of the file name. For example, the file system. boot in the directory "/" contains the operating system kernel in addition to other components. The info utility shows you the version number and copyright information about this fundamental file. Type:
++ info /system.boot
Tektronix 4405 Operating System Version X.x Released MMM DD, YYYY
as
Kernel:Copyright (C), YYYY, by
Technical Systems Consultants, Inc. All rights reserved.
++
Other components: Copyright (C), YYYY, by
Tektronix, Inc. All rights reserved.
When you don't specify a path name, you implicitly give the files the path of your current working directory, in this case, the directory Ipublic. For example, create the following files:
++ create aFile
++
++ crdir aDirectory
++
++ dir aDirectory
++
aFile
you've created two files, both empty in the directory Ipublic. One, aFile, is just that - a file. The other, aDirectory, is a directory, a special file that contains other files. Let's use the + I
(lower case L) option to dir to find out more about them. Type:
++ dir +1 aDirectory aFile
++
1 d rwxrwx 2
o
rw-rw- 1The fields in the directory listing (from left to right) are: 1. The name of the file.
public 12:00 Nov 29,1985 public 12:01 Nov 29,1985
2. The size of the file in 512 byte blocks (1 for aDirectory 0 for aFile).
3. The file type (d for directories, b for block devices, c for character devices, and blank for files). The special file, aDirectory, has a d for directory; aFile is a normal file (blank). 4. The pennissions for the file (rwxrwx for aDirectory, rw-rw- for aFile). The first three
THE FIRST TIME
the pennissions for all others. See perms in the 4400 Series Operating System Reference Manual for a complete explanation of pennissions.
5. A count of how many other files are linked to that file (2 for aDirectory and 1 for aFile). 6. The file's owner (user public).
7. The time and date the file was created (or last modified).
MOVING AROUND IN THE DIRECTORY
Use the command chd to change your location in the directory structure (your current working directory). chd with no argument returns you to your home directory. The command path tells you the name of your current working directory:
++ path /public ++
++ chd aDirectory ++
++ path
/public/aDirectory ++
If you now create a file, newFiIe, it will have a path name IpubliclaDirectorylnewFile. To access this file from outside the directory IpubliclaDirectory, you must give the path name of the directory IpubliclaDirectory, then a I, and as the last element, the name of the file, newFile. Let's try it and see.
++ create newFile ++
++ dir newFile
newFile 0 rw-rw- 1 public 12:05 Nov 29,1985 ++
Notice that when you give a file as an argument to dir, it returns the same information the +1
option does. Now, to change directories try chd without an argument. It will get you back to your home directory from wherever you might be. You can also combine more than one command on a single command line by separating them with a semicolon. Try that also:
++ chdipath /public ++
Where's the file newFile we created a moment ago? Let's see:
THE FIRST TIME
++ dir newFile
***
Error: File doesn't exist. While Getting file status on file "newFile"++
It's obviously not in the directory Ipublic. Let's try the file's path name: ++ dir /public/aDirectory/newFile
/public/aDirectory/newFile 0 rw-rw- 1 public 12:05 Nov 29,1985
++
The shell also contains a directory stack, a list of directories that you can move among. To move
to the directory Ibin and save your present directory, use the pushd command:
++ pushd /bin;path /bin /public /bin
You are now in the directory Ibin with the directory Ipublic stored on the directory stack. To get
back to the last stored; directory, use the command popd:
++ popd /public ++ path /public
SOME
shell
FEATURES
The interactive shell contains many capabilities to help you in your work. Let's look at a few of them.
history
The shell keeps an ongoing record of the last commands you've given it. This command file (. she llh is to ry ) gets updated when you log out of the system. You can recall and edit these commands to save yourself typing.
To recall your previous commands, Type history and, if you typed exactly the commands that
THE FIRST TIME
++ history 1: dir 2: dir +a 3: help help 4: dir /
5: info /system.boot 6: create aFile 7: crdir aDirectory 8: dir
9: dir +1 10: path
11: chd aDirectory 12: path
13: create newFile 14: dir newFile 15: chd;path 16: dir newFile
17: dir /public/aDirectory/newFile 18: pushd /bin;path
19: popd 20: path ++
Obviously, if you typed something else, your history will differ. To recall the last command you entered, press <Ctrl-P> (hold down the key marked Ctri and press the key marked P) or press the top of the joydisk. The last command reappears with the cursor under the first character of the command. Each time you press <Ctrl-P> (or the top of the joydisk), the command line becomes the previous history entry. To move the command line forward in your history, press <Ctrl-N> (or the bottom of the joydisk). Move up and down in your history until the command line reads
path. Press Return, and the 4405 executes this command again:
++ path /public ++
Try history again. You'll see an additional line:
++ history 1: dir
18: pushd /bin;path 19: popd
20: path 21: path
Notice that history doesn't get stored.
THE FIRST TIME
Command Line Editing
You can edit commands, whether you are in the process of entering new ones or have retrieved old ones. Let's edit an old command.
1. Press the top of the joydisk (we11 call that actionjoyup - it has the same effect as <Ctrl-P» several times. Notice how you step back through the commands.
2. Hold the top of the joydisk down (it automatically repeats) until you get to the earliest command stored. (The beeping of the bell tells you that you've exhausted your stored history,)
3. Step down through the commands with either <Ctrl-N> or the bottom of the joydisk (joydown).
4. Move down until the command line is blank (at the bottom of your history). Let's take a slight detour and look at some interesting features about recalling history:
a. Type the letters cr on the command line, then stop. Do not press Return.
b. Move up and down through your recalled history with joyup and joydown. Notice that you can only recall three commands: create newFile, crdir aDirectory, and create aFile in addition to the cr you entered.
You can recall only those commands that match the characters to the left of the cursor on your present line - those that begin with cr.
c. Move the cur&or one character to the left on the command line (press <Ctrl-B>) so it is just under the r in cr.
d. Try moving through your history again. Now you can retrieve any command that begins with c.
5. Use joyup and joydown until the command line becomes:
++ crdir aDirectory
6. Move the cursor around on the command line by using using <Ctrl-F> or Joyright and Joyleft or <Ctrl-B>.
7. Put the cursor on the character Din aDirectory and press <Ctrl-D> to delete the D.
8. Press the Back Space key to delete the a and replace it with a lower case d by pressing the d key. At this point, you've nearly finished editing the command line. Notice that we have two types of single character deletion: Back Space and <Ctrl-D>. In addition, you have several more ways to move the cursor on the command line. Press and release the Esc key then press F to move the cursor right one word. <Esc-B> (the same sequence with the B key) moves the cursor left a word. <Ctrl-E> moves the cursor to the end and <Ctrl-A> moves the cursor to the beginning of the command line.
9. Press <Ctrl-E>. The cursor moves to the end of the word directory in the command line.
10. Type in B and press Return. It looks like this: ++ crdir directoryB
THE FIRST TIME
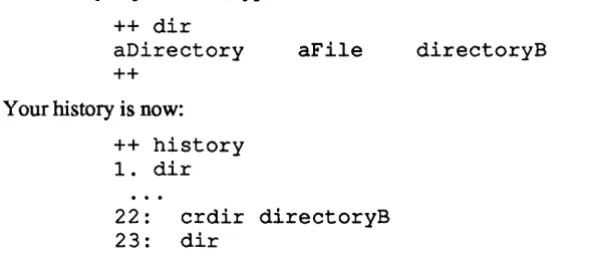
You've successfully retrieved a command, edited it to make a new command, and then executed the new command. You 11 find that, in many cases, it's much faster to retrieve an old command and edit it than to type in a new command. To see the results of the command you just issued, type:
++ dir aDirectory
++
Your history is now:
++ history 1. dir
aFile
22: crdir directoryB 23: dir
directoryB
When you are editing a command line, should you want to enter a control character such as <Ctrl-P> rather than executing it, enter the quote character, <Ctrl-Q>, followed by the control character you want to insert. (We11 use this later with environment variables and alias.) Table 2-1 shows the moving commands you can use on the command line.
Function
Move up one line Move down one line Move right one character Move left one character Move to end of line Move to beginning of line Move right one word Move left one word
Table 2-1 Moving Commands
Control and Escape Keys
<Ctrl-P> <Ctrl-N> <Ctrl-F> <Ctrl-B> <Ctrl-E> <Ctrl-A> <Esc-F> <Esc-B> Joydlsk Equivalent! joyup joydown joyright joyleft
Table 2-2 shows the commands for deleting characters, words, and the entire command line.
Table 2-2
Deleting Commands
Function Control and Escape Keys
Delete character left BackSpace <Ctrl-H> Delete character right <Ctrl-D> Delete word left <Esc-H> Delete word right <Esc-D> Delete line to right of cursor <Ctrl-K> Delete entire line <Ctrl-U> (Restore it if deleted)
THE FIRST TIME
This discussion has covered a lot of territory so far. You should probably clean up your directory and remove the files and directories we've left there. To test your own understanding, remove the files and directories you created in /public. At this point, you should test your understanding (and get some command line editing practice) by observing the following restrictions:
• Remove all files and directories in /public one by one.
• Type the word remove on the command line, then press Return. Yow will see a prompt for the syntax of the remove command.
• Form the other commands by recalling remove from your history and edit the command line. Don't just type in your commands.
Hint: Don't forget help and the options to remove.
The
shell
Environment
Your shell environment is the way in which the shell responds to your commands. You can change the environment in two ways: by setting environment variables and by aliasing commands.
Environment Variables
The shell maintains a list of environment variables, (these are not the same as Unix environment variables) some of which are bound to special keys or functions and others that simply store values. To see what these bindings are, type set or env.
In response to set or env with no arguments, the 4405 displays a list of environment variables that are already set. You've met some of these earlier.
THE FIRST TIME
you while you are executing the shell.
PATH is the set of directories that the shell searches before deciding that it cannot recognize a command, and PROMPT is the string that it displays for the system prompt. (To put spaces in a string, you have to enclose the string in single or double quotes - otherwise the shell just takes the first word of the string.) Let's change a few variables and see what happens.
++ PROMPT="public++ " public++
public++ f5=dir public++
public++ F5='dir +al' pubIic++
Notice that we didn't have to put quotes around dir, the defining string for f5, but did around the
string for F5 (shifted f5) as it contained a space. Now press function key f5. (Follow with Return
if you want to do the function, <Ctrl-C> or <Ctrl-U> if you don't.) Now try pressing function key F5 (hold the shift key down and press f5).
Notice that pressing the keys f5 and F5 have the same effect as typing in the commands you bound to them, and that you have to press Return to execute the commands.
It is also possible to put a Return in the definition of key F5. Since we want the Return in the string, we can't just press Return (that executes the command line). We use a pair of characters, the quote character «Ctrl-Q» followed by a lower-case n, to embed the character Return in the defining string. It looks like this:
public++ F5='dir +al<Ctrl-Q>n'<Return> pub Ii c++
Type set to see the definition, then press F5 to try the programmed function.
To change or remove a shell environment variable definition, you can define it to something else (it will overwrite the old definition) or you can use unset:
public++ unset f5 public++
Alternately, you can define the environment vairable to be null (F 5=) to remove an environment variable.
Aliases
In addition to environment variables, the shell maintains a list of aliases. When you enter a command line, the shell checks the first command against its alias list, and if the command is aliased, executes the underlying command. To see your list of aliases, type alias followed by
Return.
Let's alias a command, then remove the alias.
THE FIRST TIME
public++ alias showMe 'dir +as' public++
public++ showMe
.home? .login .shellbegin .shellhistory public++
public++ unalias showMe public++
public++ showMe
showMe: command not found public++
Like unset, you can use unalias with the +a option to remove all aliases from your shell.
You can use argument designators to extract arguments from commands. With environment commands, the designators apply to the last command executed, while with aliases, they apply to the current command line. To pass all the arguments to the basic command, let's alias II and accept all arguments to it.
public++ alias 11 'dir +a $*'
public++
Now, to see the contents of three directories in long form, type:
public++ 11 jete /bin .
Watch carefully as the system displays the directories of fetc, fbin, and ., your current directory.
Saving Definitions
You can define environment variables and aliases in a text file, then use the set command to pass them to the shell. To set your environment back to what you started with, type:
public++ set .shellbegin ++
If you look at your environment with set, you 11 find that PROMPT has been reset. If you haven't used unalias +a, any aliases you made still exist since they aren't mentioned in .shellbegin. The shell sets the environment automatically from .shellbegin when the shell starts up at login time or when it is subsequently invoked. You can edit .shellbegin to define any environment variables and aliases you want to have whenever you work on the 4405.
The file .shellhistory also saves your history, aliases and variables from one login to the next.
THE FIRST TIME
CONTROLLING THE TERMINAL EMULATOR
The 4405 communicates with you via a terminal emulator. This emulator is ANSI X3.61 compatible with some extensions. You can change some of the operating attributes via either ANSI command sequences or by ussing the conset command.
ANSI Commands
You can issue ANSI commands to the terminal emulator via the echo command. For example, you can change the cursor from the default underline to a block by issuing the command:
++ echo '<Ctrl-Q><Esc> [>31h' ++
Where the <Ctrl-Q> tells the shell to accept the next character literally.
See the 4400 Series Operating System Reference Manual under "Terminal Emulation" for details of the supported ANSI commands.
Other Terminal Attributes
In addition to the ANSI attributes, the 4405 terminal emulator has a number of options that are non-ANSI. These include options that allow you to enable or disable raw mode, character echoing, expansion of tabs, action of the <Back Space> key, positive or negative video, fonts, and other attributes. To invoke these attributes, use the conset command. (Conset without any options displays the current state of the terminal emulator.)
To see the full range of options, type: ++ help con set
(the help message for conset appears) ++
To change from positive video (black letters on white background) to negative video (white letters on black background), type:
++ conset -video ++
To change back to positive video, type: ++ conset +video
RS-232 Terminal Emulation
The 4405 supports an RS-232 port. To make the 4405 emulate an RS-232 terminal, connect the RS-232 cable from the 4405 to a modem or computer port and give the command remote. The
remote command contains provisions for capturing text in a buffer, and a file transfer protocol that can be invoked from a host computer. The source code for an example of the host computer software is given in the file Isampleslxfer.c. This code is suitable for use on a computer using the
THE FIRST TIME
Unix operating system and is unsupported code.
The RS-232 port options, such as baud rates, flagging, stop bits, parity, and
crs
flagging, are set by using the commset command. Commset without any options shows the current state of the RS-232 port.ENDING THE SESSION
Experiment with the operating system commands. Read the O/S reference manual to get an idea of the commands that are available and how they work, then try them. When you are finished, type stop.
++ stop
Section 3
USING THE 4405
INTRODUCTION
At this point, you should have gone through the first-time user's exercise in Section 2. If you have not done so yet, you should do so before proceeding.
This section covers normal day-to-day use of the 4405 from a user's standpoint. This discussion takes a broader look at the operating system and how it operates than was covered in Section 2. This discussion assumes that you have not logged in as user system, are logged in under public,
and are performing routine tasks.
POWER ON AND SYSTEM BOOT
To start using your 4405, turn on the power switches on both the Display/CPU unit and the Mass Storage Unit. The system then goes through a power-up self-test and initialization procedure, then logs in user public if its password has not been set.
Although this procedure is fully automated, quite a lot happens during this short time. If you want to reconfigure the system, or customize your environment, you can do so by altering files used in this procedure. Let's follow the boot process and see what happens.
POWER-UP SELF-TEST AND BOOT
When you first turn the power on to the Display/CPU unit, control goes to a program located in ROM (read-only memory) located on the processor board. This program executes the power-up self test. It checks and initializes the main memory (RAM), the various interfaces, and then attempts to boot the system.
The boot ROM code looks for a file named system _4405 .boot on the winchester disk. If the file
system _4405 .boot is present on the winchester, the boot ROM attempts to load and execute it. (The system also checks in various other places for boot files, as explained in Section 5's discussion of self-test.) If system _ 4405 .boot is not present, the 4405 asks you to enter the name of the boot file.
You can also put the 4405 into an interactive boot from self-test. This option is also explained in Section 5 in the discussion of self-test.
BOOTING THE SYSTEM
When system _4405 .boot executes, it loads the operating system kernel and performs some diagnostics on the file structure. It looks for telltale signs that the system had not been shut down cleanly, and if it finds them, it executes a system utility called diskrepair. Diskrepair makes a thorough analysis of the disk file structure and repairs any defects it finds. It also (since it executes in the verbose mode) prints messages on the screen to let you know what it is doing.
Diskrepair may shut down the system and ask you to reboot (press the Reset button) if it makes substantial repairs.
If the system had been shut down cleanly (or if diskrepair was able to repair the disk without needing to shut the system down) the 4405 then begins the login process for user public.
USING THE 4405
THE LOGIN PROCESS
CHECKING THE PASSWORD FILE
The 4405 begins the login process by first checking in the file /etC/log/password to see if the user-name (public on power-up/reset or the user-name from a login prompt) is valid. If the user name is valid and the name has no password associated with it, the system logs the user in. If the user-name is not valid, or if the user has set a password, the 4405 then prompts the user for a password. (No password will be acceptable for an invalid user-name.) If the user-name and password are valid, the 4405 then logs in the user.
To login from another user name, issue the command login
followed by the user name to login under:
login <user name>
USER INITIALIZATION
On bootup, or if you login with the user-name public, the 4405 runs the shell script
/public/.login. The default version of this script is empty - you can enter whatever commands you want script to execute every time you login.
Next, the interactive shell reads its own initialization files, .shellbegin and .shellhistory, to define your shell environment This file sets up environment variables, aliases, and restores your history. Finally, the shell issues you a prompt and you are ready to begin.
If you login under another user-name, the 4405 looks for the file .login, and the shell looks for the file .shellbegin in your home directory.
SETTING PASSWORDS
You can set the password of your home directory with the password command. Simply type the command followed by a <Return>, and the system will prompt you for a password. After you type it, the system prompts you to type it again, then sets the password for your user-name. Only the user logged in as system can set passwords for others. If you forget your password as a user, a person logged in as system can change your password. If you forget the password for system, the forgotten password can be removed with a utility on the DISKREPAIR diskette (see Section 5,
Recovery and Rebuild for information on this utility.)
USING THE 4405
STOP
Whenever possible, you should back up your files before stopping the system. For a discussion of backup strategy, see Section 3, Software Maintenance.
The command to issue when you want to shut down the 4405 is stop. This command terminates the system gracefully; it flushes the contents of buffers to disks, closes open files, terminates background processes, and completes other housekeeping that is necessary to gracefully shut the system down.
The syntax of this command is simply:
stop
The 4405 maintains several files and buffers while it is running. If the system is not shut down gracefully, some of these files may exist after shut-down, and some of the files it maintains may not contain correct information.
WARNING
In extreme cases, simply turning off the power or
pressing the reset button
maydamage the file
structure to the point that the system is no longer
usable. To l!revent this, it is essential to stop the
system gracefully before turning off the power.
IPOWER OFF
After you issue the command stop, the system begins the shutdown process. This procedure may take a few moments.
Wait. After a few more moments (the time depends on the number of background processes to shut down, and other housekeeping jobs) the system gives you the message:
... System shutdown complete ...
At this point, it is safe to tum off the power to both the MSU and the Display/CPU.
THE OPERATING SYSTEM AND UTILITIES
OVERVIEW
The 4400 Series Operating system consists of a small kernel that can execute a number of operations. Most commands and utilities are stored in the file system. As a point of fact, the kernel does not deal directly with the user - the user interface is via a utility called shell. If the user input matches a file found in the search path (the sequence of directories the shell searches for commands), the kernel loads and executes that file if it is an executable file, or executes it via
USING THE 4405
another utility called script if it is a text file with the proper permissions. The search path for
shell is stored in the environment variable PATH. You can view the shell's search path by issuing the command:
++ env $PATH
The two utilities, shell and script, do not follow the same search path. The path in shell is set by the string argument to the environment variable PATH, and that in script is set via a built-in command. See the discussion in the 4400 Series Operating System Reference Manual on script to learn more about its search path.
COMMANDS AND COMMAND SYNTAX
The general form of a 4400 Series Operating system command or utility is just the name of the file containing the command followed by a carriage return. In addition, most commands take
options or switches (sequences of characters, usually preceded by a ' +' character) that modify the action of the command, and some may require arguments or parameters to the command. The
4400 Series Operating System Reference Manual gives a full listing of the options, parameters, and arguments to each of the operating system commands and utilities.
Options
Most options are introduced by the plus (+) character immediately before the option character. When a command has more than one single-character option, you can put multiple option characters together on one line following the "+".
For example (ignoring arguments for now), the command dir takes several extensions - a, b, d, f, 1, r, s, t, and S. These commands alter the format in which dir displays the directory. If you want to see a directory of normally invisible files (those that begin with"."), you add the extension +a. If you want the directory to print the files one per line, add the extension +s.
If you want to do both (show all the files, including the invisible files, one per line), the command is:
dir +as (or alternatively)
dir +a +s
Arguments and Parameters
Although there is a subtle difference between the terms "arguments" and "parameters," they are often used interchangeably to refer to the additional information needed by a command. Arguments usually take on a default value if you omit them, but the system will require you to supply parameters.
For example, the command chd (the command to change directories) takes a directory name as its argument, and defaults to your home directory if you do not supply the argument. The command
USING THE 4405
Options That Take Arguments
Some options take arguments, such as the w option (wait) for the status command. When an option takes argument (other than its default), the option that takes the argument must be the last option in the option string (the sequence of characters following the "+"). The option taking an argument must have a "=" immediately behind it, followed by the argument value. Some commands can contain only one option string, while others may have multiple strings.
For example, to display the system status you can use the status command. To display the system status every 30 seconds, you can use the command:
status +w=30
To display more information, you could use: status +alsxw=30
(or one of the equivalents)
... etc.
status +w=30 +alsx status +al +sx +w=30 status +a +1 +sxw=30
MANUAL SYNTAX CONVENTIONS
Throughout this manual and the other manuals for the 4400 Series products, the following syntax conventions apply:
• Words standing alone on the command line are keywords. They are the words recognized by the system and should be typed exactly as shown.
• Words enclosed by angle brackets ("<" and ">") enclose descriptions that you must replace with a specific argument. If an expression is enclosed only in angle brackets, it is an essential part of the command line. For example, in the line:
adduser <user name>
you must specify the name of the user in place of the expression <user_name>.
In addition, specific keyboard keys for you to press are shown in angle brackets. For example, <Return> means "press the key on the keyboard marked 'Return,' while <Ctrl-C> means "hold down the key on the keyboard marked 'Ctrl', press
'c'
and release them both."• If the word "list" appears as part of a term, that term consists of one or more elements of the type described in the term, separated by spaces. For example:
<file name list>
consists of a series (one or more) of file names separated by spaces.
• Words or expressions surrounded by square brackets ("[" and "]") are optional. You may omit these words or expressions if you wish.
FILE STRUCTURE
The 4400 Series file system is a tree-structured hierarchy. Entries are files, some of which are directories. File identifiers consist of a path name, the sequence of files beginning at the root, or fundamental directory of the hierarchy, continuing through each subdirectory to the actual file name.
USING THE 4405
The file name is the identifier for a file in a particular directory. The path name is the chain of directories that enables you to find a particular file in the entire directory structure. The full name of a file is the path name of its directory with the file name after a separating "!" character.
Directory Contents -
dir
The dir command lists the contents of a directory. Without an argument, it lists the contents of directory it takes as a default, or your current working directory; with one or more arguments, it lists the contents of the directories you give as the arguments. To identify directory entries within a directory, use the dir command with the option +1.
For example, let's look at the directory of "/", the root directory. Give the command:
dir f +1
The system shows the directory entries, one per line. Following the name field is a number (the file size in 512 byte blocks), then in some files a single character (when this character is a d, the file is a subdirectory), the link count, permissions associated with the file, the file's owner, and the date associated with the file.
Each directory contains two "relative" subdirectories. The first (.) refers to the directory itself. The second (..) refers to the parent of that direct~ry. (Files beginning with a period are normally invisible; to see these files, use the +a option.)
You can use the "." and " .. " designations from any working directory. For example, if you were down a directory tree, you could see the contents of the grandparent of your directory with the command:
dir .. f ..
Moving Around The Directory Tree
When you login to the system, the 4405 makes your home directory (this directory is defined in your entry in the password file / etc! log/password) your current working directory . You can think of your current working directory as your location in the directory tree and changing the default directory as moving to different locations in that tree.
Your current location is always available with the command path. For example if you are in the directory /neat/stuff, and type path, the system responds with /neat/stuff.
To change your position, type the command chd, with or without an argument. Without an argument, chd returns you to your home directory; with an argument, it moves you to the specified directory.
In addition, shell maintains a directory stack. You can move about the directory stack by pushing the current directory onto the stack and moving to a new directory with the command pushd.
USING THE 4405
Adding and Removing Files
You can create empty files with the utility create, and directory files with the utility crdir. In addition, many applications programs (such as the text editor) will automatically create files for you. To remove files or directories, you should use the utility remove. To remove an empty directory you can use the +d option; to remove a directory and all the files in it, you can use the
+koption.
WILD CARD EXPANSION
Both shell and script perform wild card expansion - they will match a series of characters against wild cards on the command line. The most commonly used wild card is n*n, which stands for any sequence of any characters. For example, the pattern a*x matches ax, a Jox,
amazing_clox, or any other letter combination that begins with a and ends with x. You can match
single characters with n?n as a wild card. (The