585-313-501 108647298 January 2000 Issue 3
Intuity™ CONVERSANT® System
Version 7.0
Copyright and Legal Notices
Copyright Copyright © 2000 by Lucent Technologies. All rights reserved.
Printed in the USA.
This material is protected by the copyright laws of the United States and other countries. It may not be reproduced, distributed, or altered in any fashion by any entity (either internal or external to Lucent Technologies), except in accordance with applicable agreements, contracts or licensing, without the express written consent of the Business Communications Systems (BCS) Global Learning Solutions (GLS) organization and the business management owner of the material.
Acknowledgment This document was prepared by the GLS organization of the BCS division of Lucent Technologies. Offices are located in Denver CO, Columbus OH, Middletown NJ, and Basking Ridge NJ, USA.
Trademarks Lucent Technologies has made every effort to supply the following trademark information about company names, products, and services mentioned in the Intuity CONVERSANT documentation library:
Copyright and Legal Notices
• CLEO Communications — Trademarks: LINKix.
• Hayes Microcomputer Products, Inc. — Trademarks: Hayes, Smartmodem.
• Intel Corporation — Registered trademarks: Pentium.
• Interface Systems, Inc. — Trademarks: CLEO.
• International Business Machines Corporation — Registered trademarks: IBM, VTAM.
• Lucent Technologies — Registered trademarks: 5ESS, AUDIX,
CONVERSANT, DEFINITY, Voice Power. Trademarks: FlexWord, Intuity, Lucent.
• Microsoft Corporation — Registered trademarks: Excel, Internet Explorer, Microsoft, MS, MS-DOS, Windows, Windows NT.
• Minnesota Mining and Manufacturing — Trademarks: 3M.
• Netscape Communications — Trademarks: Netscape Navigator.
• Novell, Inc. — Registered trademarks: Novell.
• Oracle Corporation — Trademarks: OBJECT*SQL, ORACLE, ORACLE*Terminal, PRO*C, SQL*FORMS, SQL*Menu, SQL*Net, SQL*Plus, SQL*ReportWriter.
Copyright and Legal Notices
• Santa Cruz Operation, Inc. — Registered trademarks: UnixWare.
• UNIX System Laboratories, Inc. — Registered trademarks: UNIX.
• Veritas Software Corporation — Trademarks: VERITAS.
• Xerox Corporation — Trademarks: Ethernet.
Limited Warranty Lucent Technologies provides a limited warranty on this product. Refer to the “Limited Use Software License Agreement” card provided with your package. Lucent Technologies has determined that use of this electronic data delivery system cannot cause harm to an end user's computing system and will not assume any responsibility for problems that may arise with a user's computer system while accessing the data in these document.
Every effort has been made to make sure that this document is complete and accurate at the time of release, but information is subject to change.
United States FCC Compliance Information
Part 15: Class A statement. This equipment has been tested and found to comply with the limits for a Class A digital device, pursuant to Part 15 of the FCC Rules. These limits are designed to provide reasonable protection against harmful interference when the equipment is operated in a commercial environment. This equipment generates, uses, and can radiate
Copyright and Legal Notices
Operation of this equipment in a residential area is likely to cause harmful interference, in which case the user will be required to correct the
interference at his own expense.
Canadian Department of Communications (DOC) Interference Information
This digital apparatus does not exceed the Class A limits for radio noise emissions set out in the radio interference regulations of the Canadian Department of Communications.
Le Présent Appareil Nomérique n’émet pas de bruits radioélectriques dépassant les limites applicables aux appareils numériques de la class A préscrites dans le reglement sur le brouillage radioélectrique édicté par le ministére des Communications du Canada.
European Union Declaration of Conformity
Lucent Technologies Business Communications Systems declares that the Lucent Intuity CONVERSANT system equipment specified in this document conforms to the referenced European Union (EU) Directives and Harmonized Standards listed below: EMC Directive 89/336/EEC Low-Voltage Directive 73/23/EEC. The “CE” mark affixed to the equipment means that it conforms to the above directives.
Telecom New Zealand Ltd Warning Notices
Copyright and Legal Notices
in all respects with other items of Telepermitted equipment of a different make or model, nor does it imply that any product is compatible with all of Telecom’s network services.
IMPORTANT NOTICE: Under power failure conditions, this device may not operate. Please ensure that a separate telephone, not dependent on local power, is available for emergency use.
AUTOMATIC RE-ATTEMPTS TO THE SAME NUMBER: Some parameters required for compliance with Telecom’s Telepermit requirements are dependent on the equipment (PC) associated with this device. The associated equipment shall be set to operate within the following limits for compliance with Telecom specifications:
• There shall be no more than 10 call attempts to the same number within any 30 minute period for any single manual call initiation, and,
Copyright and Legal Notices
USER INSTRUCTIONS (AUTOMATIC CALL SETUP): This equipment shall not be set up to make automatic calls to the Telecom "111" emergency service.
CALL ANSWERING (AUTOMATIC ANSWERING EQUIPMENT): Some parameters required for compliance with Telecom’s Telepermit requirements are dependent on the equipment (PC) associated with this device. In order to operate within the limits for compliance with Telecom specifications, the associated equipment shall be set to ensure that calls are answered between 3 and 30 seconds of receipt of ringing.
Toll Fraud Toll fraud is the unauthorized use of your telecommunications system by an unauthorized party, for example, persons other than your company’s employees, agents, subcontractors, or persons working on your company’s behalf. Note that there may be a risk of toll fraud associated with your telecommunications system and, if toll fraud occurs, it can result in substantial additional charges for your telecommunications services.
Your Responsibility for Your System’s Security
You and your system manager are responsible for the security of your system and for preventing unauthorized use. You are also responsible for reading all installation, instruction, and system administration documents provided with this product in order to fully understand the features that can introduce risk of toll fraud and the steps that can be taken to reduce that risk. Lucent
Copyright and Legal Notices
prevent unauthorized use of common-carrier telecommunication services or facilities accessed through or connected to it. Lucent Technologies will not be responsible for any charges that result from such unauthorized use.
Lucent Technologies Fraud Intervention and Corporate Security
If you suspect that you are being victimized by toll fraud and you need technical support or assistance, call the Lucent Technologies National Customer Care Center Toll Fraud Intervention Hotline at 1 800 643-2353. Aside from whether immediate support is required, all toll fraud incidents involving Lucent products or services should be reported to Lucent Corporate Security at 1 800 821-8235. In addition to recording the incident, Lucent Corporate Security is available for consultation on security issues,
investigation support, referral to law enforcement agencies, and educational programs.
Documentation Ordering Information
Copyright and Legal Notices
Write, Call, or Fax
Lucent Technologies Publications Center 2855 N. Franklin Road
Indianapolis, IN 46219
Voice 1 800 457-1235 International Voice 317 322-6791 FAX 1 800 457-1764 International FAX 317 322-6699
World Wide Web
Use a web browser to reach one of the following sites. Click Documents and follow the instructions at the site.
• Organizations within Lucent Technologies
http://www.cic.lucent.com
• Lucent Technologies customers and others
http://www.lucentdocs.com
Standing Orders
Contents
Copyright and Legal Notices
ii
Copyright. . . .ii
Acknowledgment. . . .ii
Trademarks . . . .ii
Limited Warranty . . . iv
United States FCC Compliance Information . . . iv
Canadian Department of Communications (DOC) Interference Information. . . v
European Union Declaration of Conformity. . . v
Telecom New Zealand Ltd Warning Notices . . . v
Toll Fraud . . . .vii
Documentation Ordering Information . . . viii
About This Book
xxxv
Overview . . . . xxxvIntended Audience . . . xxxvi
How to Use This Book . . . xxxvi
Administration Procedures and Information . . . xxxvi
Reference Material . . . .xxxviii
Terminology. . . xxxix Keyboard and Telephone Keypad Representations . . . xlii Cross References and Hypertext . . . xliii Screen Displays . . . xliii Other Typography . . . xliv
Safety and Security Alert Labels . . . .xlv Getting Help . . . xlvi Technical Assistance. . . xlvii
Web Site . . . xlvii Contact Numbers . . . xlvii
Related Resources. . . . xlviii
Training . . . xlviii Documentation . . . xlix
Using the CD-ROM Documentation . . . . l
Setting the Default Magnification . . . l Adjusting the Window Size . . . .li Hiding and Displaying Bookmarks . . . .li Using the Button Bar . . . .li Using Hypertext Links . . . .li Navigating with Double Arrow Keys . . . .li Searching for Topics . . . .li Displaying Figures. . . lii Printing the Documentation. . . lii
Comment Form . . . liii Contact Us Directly . . . .liv
1 Administration Overview
1
Overview . . . 1
User Interface Overview . . . 2
Intuity CONVERSANT User Interface . . . 2
Cursor Movement Keys . . . 3
Menus and Windows . . . 5
Menus . . . 5
Windows . . . 7
Message Line . . . 10
Function Keys . . . 11
Standard Function Key Labels . . . 12
Optional Function Key Labels . . . 14
Online Help . . . . 17
Access the Intuity CONVERSANT Administration Menus . . . . 18
Intuity CONVERSANT Main Administration Menu Options . . . 20
UNIX System Administration. . . 20
Voice System Administration. . . 20
2 UNIX
Administration 22
Overview . . . . 22
UnixWare Documentation . . . . 23
UNIX System Administration Access . . . . 23
Application Administration . . . . 25
Backup Scheduling, Setup, and Control . . . . 26
Basic Backup . . . 28
Backup History . . . 29
Backup of All Personal Files . . . 30
Backup of Selected Personal Files . . . 31
Schedule a Backup to Tape . . . 33
Performing Extended Backup Services . . . 42
File System Creation, Checking, and Mounting . . . . 43
Machine Configuration, Display, and Shutdown . . . . 44
Memory Size Disparity. . . 45
Network Services Administration . . . . 46
Port Access Services and Monitors . . . . 47
Printer Configuration and Services . . . . 47
Restore From Backup Data . . . . 48
Performing Basic Restore Services . . . 48
Performing Extended Restore Services. . . 49
Security Management . . . . 51
Software Installation and Removal. . . . 52
Storage Device Operations and Definition . . . . 53
System Name, Date/Time, and Initial Password Setup . . . . 54
User Login and Group Administration . . . . 56
Exit UNIX System Administration Menu . . . . 57
3 Voice System Administration
58
Overview . . . . 58Accessing the Voice System Administration Menu . . . . 58
Voice System Administration Menu Options . . . 59
Application Package Administration . . . 60
Backup/Restore. . . 60
Configuration Management. . . 60
Feature Packages . . . 61
Reports . . . 61
Script Builder Applications . . . 62
Switch Interfaces. . . 62
System Monitor . . . 62
Unix Management . . . 62
Configuration Management . . . . 63
Host Configuration . . . . 67
Access Host Sessions . . . 68
Show Host Session Screens Window . . . 69
Specify Terminal Emulator Sessions. . . 70
Configure Host Sessions . . . 71
Assign Host Sessions . . . 72
Free a Host Sessions . . . 74
Login Host Sessions . . . 75
Logout Host Sessions . . . 76
Renumber Host Sessions . . . 78
Unassign Host Sessions . . . 78
Display Host Sessions . . . 80
Host Sessions: Actions Menu . . . 84
Access the SDLC Protocol Menu . . . 88
Add an SDLC Protocol . . . 89
Change an SDLC Protocol . . . 92
Deleting an SDLC Protocol . . . 94
Diagnose the SDLC Connection . . . 95
Display an SDLC Protocol. . . 96
View SDLC Connection Information . . . 97
Rename an SDLC Protocol. . . 98
Access the Token Ring Protocol Menu . . . 99
Add Token Ring Protocol. . . 100
Change a Token Ring Protocol . . . 102
Display a Token Ring Protocol . . . 105
Rename a Token Ring Protocol . . . 106
Message Administration . . . 107
Access Message Administration . . . 108
Add Message Destinations . . . .111
Remove Message Destinations . . . 113
Add Thresholds . . . 115
Remove Thresholds. . . 117
Modify Message Priorities . . . 118
Modify Threshold Periods . . . 119
Save Changes and Exit Message Administration . . . 122
Remote Alarming Administration. . . 123
Access Remote Alarming Administration. . . 123
System Control . . . 126
Diagnose . . . 127
Diagnose Equipment. . . 127
Voice Port Loop Around Test. . . 130
Renumber Voice Channels . . . 133
Report Voice System Status . . . 135
Stop the Voice System. . . 136
Shut Down the System . . . 138
Start the Voice System . . . 139
Modify the Display Voice Equipment Window Parameters . . . 144
Equipment Options . . . 147
Equipment State . . . 150
Suggestions for Changing the Maintenance State of Channels . . . 154
Groups to Channels. . . 157
Assign Groups to Channels . . . 157
Unassign Groups to Channels . . . 159
PBX Extension. . . 160
Assign PBX Extension . . . 161
Unassigning PBX Extensions from Channels . . . 162
SSP Functions . . . 163
Assign SSP Functions. . . 163
Display SP/SSP Functions . . . 166
PBX Extension. . . 168
Assign PBX Extension . . . 168
Unassigning PBX Extensions from Channels . . . 169
Voice Services . . . 170
Channel Services . . . 171
Number Services. . . 178
Print a Voice Equipment Report. . . 184
4 Feature Package Administration
185
Overview . . . 185FAX Transmission Control . . . 187
Update the FAX Transmission Control Window . . . 191
Remove a Fax From the FAX Transmission Control Window . . . 192
Load and Print Faxes. . . 192
ASAI Administration . . . 195
Channel Administration . . . 198
Add a Channel Entry . . . 202
Change a Channel Entry. . . 203
Remove a Channel Entry . . . 205
Log In a Channel. . . 205
Log Out a Channel . . . 206
Domain Administration. . . 207
Add a Domain . . . 213
Change a Domain . . . 214
Remove a Domain . . . 216
Enable a Domain. . . 216
Disable a Domain . . . 217
Parameter Administration . . . 217
Show the ASAI Software Version . . . 220
Show the Status of the ASAI Link . . . 222
UCID Administration . . . 223
Switch Interfaces Hardware . . . 227
Analog Interfaces. . . 227
Digital Interfaces . . . 228
Access the Switch Interfaces Menu . . . 230
Analog Interfaces . . . 231
Access the Analog Interfaces Window . . . 232
Set Default Analog Interfaces Parameters . . . 233
Set Analog Interfaces Parameters. . . 238
Standard Analog Interface Parameters. . . 239
Blind Transfer Actions . . . 242
Intelligent Transfer Actions . . . 243
Print Analog Interface Information . . . 245
Non-US Analog Switch Integration . . . 245
Country-Specific Switch Packages . . . 246
Digital Interfaces . . . 247
Access the Digital Interfaces Menu . . . 247
Display Digital Interface Assignments . . . 248
Supported Digital Protocol Parameters . . . 250
Line Side Protocols . . . 255
Line Side DEFINITY Protocol . . . 255
Line Side Galaxy Protocol. . . 270
E1 CAS P2 - Australian DEFINITY Protocol . . . 283
E1 CAS P2 - Australian Network Protocol . . . 293
Access T1 A/B Robbed-bit E&M Menu . . . 303
Assign T1 A/B Robbed-bit E&M to Digital Circuit Cards . . . 304
Change T1 A/B Robbed-bit E&M Parameters. . . 310
Display T1 A/B Robbed-bit E&M Parameters . . . 312
Unassign T1 A/B Robbed-bit E&M to Digital Circuit Cards . . . 314
ISDN-PRI Layer 1 Protocol . . . 316
Access the ISDN-PRI Layer 1 Menu. . . 316
Assign an ISDN-PRI Layer 1 to Digital Circuit Cards . . . 317
PRI Layer 2 and Layer 3 Parameters . . . 323
Change ISDN-PRI Layer 1 Card Parameters . . . 325
Display ISDN-PRI Layer 1 Parameters . . . 327
Unassign ISDN-PRI Layer 1 Card. . . 330
E1 PRI Using the ACULAB Protocol Converter. . . 332
T1 Configuration for the Intuity CONVERSANT System for 4ESS Applications . . . 334
Change Switch System Parameters . . . 337
Display Switch System Parameters . . . 341
6 Database Administration
342
Overview . . . 342Databases and the Voice System . . . 342
Call Data Tables . . . 343
CALL Table . . . 346
SERVICE Table . . . 347
CDHSUM Table . . . 348
EVENTS Table. . . 349
EVSUM Table . . . 350
TRASUM Table . . . 351
OLDCDH View . . . 351
Relationship Between the CALL, SERVICE, and EVENT Tables . . . 351
Resize Call Data Tables. . . 353
Verify Call Data Tables. . . 356
Table Searches . . . 357
Indexes and Key Fields. . . 357
Database Interface Process . . . 360
Database DIP Timeout. . . 361
Database Cursors . . . 362
Database Cursor Calculations . . . 363
Increase Database Storage Size . . . 365
Decrease Database Storage Size . . . 367
Reduce the Amount of Call Data Stored . . . 368
Reduce the Number of Days Data Is Stored . . . 368
Change the Data Storage Number of Days . . . 369
Increase Shared Pool Size. . . 371
Rollback Segment . . . 372
Voice System Database Administration . . . 376
Database Access ID Table Window. . . 377 Database Access IDs . . . 378 Add a Local Database Access ID . . . 379 Add a Remote Database Access ID Using SQL*NET V2 . . . 381 Completing ORACLE Environment Setup if Server is Not an Intuity CONVERSANT Server . . . 386 Accessing a Remote Database Using PRO*C or SQL*PLUS . . . 387 Setting the Connect Descriptor . . . 387 Setting Environment Variables . . . 388 Remove a Database Access ID. . . 393
SQL*PLUS Database Administration . . . 395
Administration for Applications and Databases . . . 395 Application Conventions . . . 396
Monitor the Database . . . 396
Database Commands . . . 396 The dbcheck Command . . . 397 The dbfree Command . . . 398 The dbfrag Command . . . 399 The dbused Command . . . 400 Database Trace Files. . . 401
Access the Unix Management Menu . . . 403 Modem Administration . . . 405
Install the Modem . . . 405 Configure the Modem . . . 406 Configure the Modem Via the Modem Control Panel . . . 406 Configure the Modem Via a Terminal . . . 413 Administer the Modem. . . 415 Administering the Voice System to Recognize the Modem. . . 415 Setting Up UnixWare to Use a Modem for Outgoing Calls . . . 418 Setting Up UnixWare to Use a Modem for Incoming Calls . . . 421
Printer Administration . . . 427
Install the Printer . . . 428 Configure the Printer on the Voice System . . . 428 Administer the Printer on the Voice System . . . 438 Set Up Printer . . . 440
Remote Terminal Administration . . . 441
Configure the Remote Terminal . . . 442 Administer the Remote Terminal . . . 444
TCP/IP Administration . . . 446
Administer TCP/IP . . . 446
8 Common Administration
449
Command Menu . . . 449
Access the Command Menu . . . 450 System Monitor . . . 450 Access System Monitor. . . 451 Service Status Column . . . 453 Change the System Monitor Refresh Rate . . . 456 Print System Monitor-Voice Channel Report. . . 457 Trace Service. . . 457 Perform a Trace . . . 458
Reports Administration. . . 460
Update the Administrative Commands Log Report. . . 517 Traffic Report . . . 518 Display the Traffic Report . . . 519 Modify the Traffic Report . . . 520 Print the Traffic Report . . . 523 Update the Traffic Report . . . 524 Signal Processing Activity Report . . . 524 Data Collection for Signal Processing Activity Report. . . 525 Custom Database Reports . . . 526
Common Administrative Procedures. . . 527
Appendix A: Summary of Commands
528
erase . . . 654 explain . . . 656 faxit. . . 660
Conversion Tools. . . 663
trace . . . 874 trarpt . . . 882 unassign_permissions . . . 884 vfyLogMsg . . . 885 vsdisable . . . 888 vsenable . . . 889 vusage . . . 890 wl_copy . . . 891 wl_edit . . . 892 wl_gen . . . 894 wl_init . . . 897 wl_install . . . 898 xferdip_off . . . 898 xferdip_on . . . 899
Appendix B: Country Switch Packages
900
Appendix C: Format Conversion Tools for Fax Files
1037
Overview . . . 1037
File Inputs . . . 1038
tif2itf.exe as a Post-Processor for the TiffWorks Driver . . . 1039 Task Overview . . . 1040 Requirements . . . 1042 Installing the tif2itf.exe Tool for Windows Systems . . . 1042
Creating an Installation Diskette . . . 1043 Installing the Software. . . 1045 Uninstalling the Software . . . 1046
Installing the TiffWorks Driver for the tif2itf.exe Post-Processor . . . 1047 Converting Documents With the TiffWorks Driver and tif2itf.exe Tool . . . 1049 Converting a Hijaak Pro 4.01 Image File . . . 1050 Converting an HP Deskscan II Image File . . . 1052 Converting TIFF and FTF Files to Intuity CONVERSANT Fax Files . . . 1053
Optional Parameters . . . 1055
Cautions . . . 1056
Glossary
1057
About This Book
Overview
This book describe the procedures needed to perform full system
administration for the Intuity CONVERSANT system in the following areas:
• The UNIX operating system
• The voice system
• Specialized feature packages
• Databases
• Switch interfaces
About This Book Intended Audience
Intended Audience
The primary audience for this document are system administrators. This includes:
• On-site technicians who perform system administration at the customer site
• End customers who choose to administer their own systems
The secondary audience includes personnel from the Technical Service Organization (TSO) who support the on-site technicians or customers. We assume that the primary users of this book have completed the Intuity CONVERSANT administration course (see Training on page xlviii).
How to Use This Book
This book is designed to step you through the system administration process. Each chapter contains procedures for a specific product area that requires administration.
Administration Procedures and Information
About This Book How to Use This Book
• Chapter 2, UNIX Administration — contains information about how to access the SYSADM menu, as well as the procedures to perform basic UnixWare-level administration.
• Chapter 3, Voice System Administration — contains information about how to access the Voice System Administration menu, and describes all the administrative options. This chapter contains the reference and procedural information for the Configuration Management option.
• Chapter 4, Feature Package Administration — contains information about administering Fax Actions and ASAI for use with the voice system.
• Chapter 5, Switch Interface Administration — contains procedures and reference information for administering the supported analog and digital switch interfaces.
• Chapter 6, Database Administration — contains procedures and information for administering databases for use with the voice system.
About This Book How to Use This Book
• Chapter 8, Common Administration — contains quick reference
information about some of the more common administrative tasks. Daily administration includes running system reports, common procedures such as system monitoring, media formatting, backups, and administering the date and time.
Reference Material • Appendix A, Summary of Commands — provides an alphabetical list of every command in the Intuity CONVERSANT system command language.
• Appendix B, Country Switch Packages — provides an alphabetical list of the country-specific switch package for every country where the
CONVERSANT system is sold, for both the DEFINITY switch and for public switched telephone networks (PSTNs). Also included in this appendix is a list of tunable circuit card/line parameters.
• Glossary— defines the terms, abbreviations, and acronyms used in the system documentation.
About This Book Conventions Used in This Book
Conventions Used in This Book
Understanding the typographical and other conventions used in this book is necessary to interpret the information.
Terminology • The word “type” means to press the key or sequence of keys specified. For example, an instruction to type the letter “y” is shown as
Type y to continue.
• The word “enter” means to type a value and then press the E N T E R key on the keyboard. For example, an instruction to type the letter “y” and press E N T E R is shown as
Enter y to continue.
• The word “select” means to move the cursor to the desired menu item and then press E N T E R. For example, an instruction to move the cursor to the start test option on the Network Loop-Around Test screen and then press E N T E R is shown as
Select Start Test.
About This Book Conventions Used in This Book
Note: Screens shown in this book are examples only. The screens you see on your machine will be similar, but not exactly the same.
Figure 1. Example of an Intuity CONVERSANT Menu
About This Book Conventions Used in This Book
Figure 3. Example of an Intuity CONVERSANT Window Requesting Information
Figure 4. Example of an Intuity CONVERSANT Screen Showing Information
UnixWare Installation Primary Hard Disk Partitioning
In order to install LINCS, you should reserve a UNIX system partition (a portion of your hard disk’s space) containing 100% of the space on your primary hard disk. After you press ’ENTER’ you will be shown a screen that will allow you to create new partitions, delete existing partitions or change the active partition of your primary hard disk (the
partition that your computer will boot from).
WARNING: All files in any partition(s) you delete will be destroyed. If you wish to attempt to preserve any files from an existing UNIX system, do not delete its partitions(s).
The UNIX system partition that you intend to use on the primary hard disk must be at lease 4200 MBs and labeled "ACTIVE."
About This Book Conventions Used in This Book
Figure 5. Example of Intuity CONVERSANT Screen Requesting Information
Keyboard and Telephone Keypad Representations
• Keys that you press on your terminal or PC are represented as small capitalized B O L D text. For example, an instruction to press the enter key is shown as
Press E N T E R.
• Two or three keys that you press at the same time on your terminal or PC (that is, you hold down the first key while pressing the second and/or third key) are represented in small capitalized B O L D text. For example, an instruction to press and hold the Alt key while typing the letter “d” is shown as
Press A LT + D.
UNIX System Installation Set Slice Sizes
Please select whether you would like the recommended slice sizes or would like to customize the slice sizes.
Your choices are:
1. Recommended Slice Sizes 2. Customize Slice Sizes
About This Book Conventions Used in This Book
• Function keys on your terminal, PC, or system screens, also known as soft keys, are represented as small capitalized B OL D text followed by the function or value of that key enclosed in parentheses. For example, an instruction to press function key 3 is shown as
Press F 3 (Choices).
• Keys that you press on your telephone keypad appear in small capitalized B O L D text. For example, an instruction to press the first key on your telephone keypad is shown as
Press 1 to record a message.
Cross References
and Hypertext Blue underlinedyou to another location in the document when you click on it with your mouse. type indicates a cross reference or hypertext link that takes
Screen Displays • Values, system messages, field names, prompts that appear on the screen, and simulated screen displays appear in typewriter-style
constant width type, as in the following examples:
Enter the number of ports to be dedicated to outbound traffic in the
Maximum Simultaneous Ports field.
Alarm Form Update was successful. Press <Enter> to continue.
About This Book Conventions Used in This Book
Start at the Voice System Administration menu and select:
In this example, you would access the Voice System Administration menu and select the Reports menu. From the Reports menu, you would then select the Message Log Report option.
Other Typography • Commands and text you type in or enter appear in bold type, as in the following examples:
Enter change-switch-time-zone at the Enter command: prompt. Type high or low in the Speed: field.
• Command variables are shown in bold italic type when they are part of what you must type in, and in blue italic type when they are referred to, for example:
Enter ch ma machine_name, where machine_name is the name of the call delivery machine you just created.
• Command options are shown inside square brackets, for example:
> Message Log Report
About This Book Safety and Security Alert Labels
Safety and Security Alert Labels
This book uses the following symbols to call your attention to potential problems that could cause personal injury, damage to equipment, loss of data, service interruptions, or breaches of toll fraud security:
!
CAUTION:
Indicates the presence of a hazard that if not avoided can or will cause minor personal injury or property damage, including loss of data.
WARNING:
!
Indicates the presence of a hazard that if not avoided can cause death or severe personal injury.
!
DANGER:
Indicates the presence of a hazard that if not avoided will cause death or severe personal injury.
!
SECURITY ALERT:
About This Book Getting Help
Getting Help
The Intuity CONVERSANT system provides online help to assist you during installation, administration, and application development tasks.
To use the online help:
• Press F 1 (Help) when you are in a menu or window.
The first time you press F 1, the system displays information about the currently active window or menu.
~ When you are in a window, the help explains the purpose of the window window and describes its fields.
~ When you are in a menu, the help explains how to use menus. If you press F 1 again, the system displays a General Help screen that explains how to use the online help.
• Press F 2 (Choices) when you are in a field.
The system displays valid field choices either in a pop-up window or on the status line directly above the function keys.
About This Book Technical Assistance
Technical Assistance
Web Site The following customer support web site contains resources where you can find solutions for technical problems:
http://support.lucent.com
Contact Numbers Technical assistance on the Intuity CONVERSANT product is available through the following telephone contacts:
• In the United States, call 1-800-242-2121.
• In Canada, call one of the following numbers, depending on your location:
~ 1-800-363-1882 for assistance in Quebec and eastern Canada
~ 1-800-387-4268 for assistance in Ontario and western Canada
About This Book Related Resources
Related Resources
Additional documentation and training material is available for you to learn more about the Intuity CONVERSANT product.
Training To obtain training on the Intuity CONVERSANT product, contact the BCS Education and Training Center at one of the following numbers:
• Organizations within Lucent Technologies (904) 636-3261
• Lucent Technologies customers and all others (800) 255-8988 You can also view information on Intuity CONVERSANT training at the Global Learning Solutions (GLS) web site at one of the following web links:
• Organizations within Lucent Technologies
http://training.gls.lucent.com
• Lucent Technologies customers and all others
http://www.lucenttraining.com
The courses listed below are recommended. Other courses are available.
• For technicians doing repairs on Intuity CONVERSANT V7.0 systems
About This Book Related Resources
• For technicians and administrators
~ BTC344M, Intuity CONVERSANT V7 Administration Overview (CD-ROM)
• For application developers
~ BTC128H, Introduction to Script Builder
~ BTC166H, Introduction to Voice@Work
~ BTC204H, Intermediate Voice@Work
~ BTC301H, Advanced CONVERSANT Programming
Documentation Appendix A, "Documentation Guide," in Intuity CONVERSANT System Version 7.0 System Description, 585-313-204, describes in detail all books included in Intuity CONVERSANT documentation library and referenced in this book.
Note: Always refer to the appropriate book for specific information on planning, installing, administering, or maintaining an Intuity CONVERSANT system.
Additional Suggested Documentation
It is suggested that you also obtain and use the following book for information on security and toll fraud issues:
About This Book Using the CD-ROM Documentation
Obtaining Printed Versions of the Documentation
See Documentation Ordering Information on page viii of Copyright and Legal Notices for information on how to purchase Intuity CONVERSANT
documentation in printed form. You can also print documentation locally from the CD-ROM (see Printing the Documentation on page lii).
Using the CD-ROM Documentation
Lucent Technologies ships the documentation in electronic form. Using the AdobeAcrobat Reader application, you can read these documents on a Windows PC, on a Sun Solaris workstation, or on an HP-UX workstation. Acrobat Reader displays high-quality, print-like graphics on both UNIX and Windows platforms. It provides scrolling, zoom, and extensive search capabilities, along with online help. A copy of Acrobat Reader is included with the documents.
Note: When viewing documents online, it is recommended that you use a separate platform and not the Intuity CONVERSANT system.
Setting the Default Magnification
You can set your default magnification by selecting File | Preferences |
About This Book Using the CD-ROM Documentation
Adjusting the Window Size
On HP and Sun workstations, you can control the size of the reader window by using the -geometry argument. For example, the command string
acroread -geometry 900x900 mainmenu.pdf opens the main menu with a
window size of 900 pixels square.
Hiding and Displaying Bookmarks
By default, the document appears with bookmarks displayed on the left side of the screen. The bookmarks serve as a hypertext table of contents for the chapter you are viewing. You can control the appearance of bookmarks by selecting View | Page Only or View | Bookmarks and Page.
Using the Button Bar
The button bar can take you to the book’s Index, table of contents, main menu, and glossary. It also lets you update your documents. Click the corresponding button to jump to the section you want to read.
Using Hypertext
Links Hypertext links appear in other sections or books. blue underlined text. These links are shortcuts to
Navigating with Double Arrow Keys
The double right and double left arrows ( and ) at the top of the Acrobat Reader window are the back and forward functions. The go-back button takes you to the last page you visited prior to the current page. Typically, you use to jump back to the main text from a cross reference or illustration.
Searching for
About This Book Using the CD-ROM Documentation
Displaying Figures If lines in figures appear broken or absent, increase the magnification. You might also want to print a paper copy of the figure for better resolution.
Printing the
Documentation Note: For information on purchasing printed copies of the documents, see Obtaining Printed Versions of the Documentation on page l.
If you would like to read the documentation in paper form rather than on a computer monitor, you can print all or portions of the online screens.
Printing an Entire Document
To print an entire document, do the following:
1 From the documentation main menu screen, select one of the print-optimized documents. Print-print-optimized documents print two screens to a side, both sides of the sheet on 8.5x11-inch or A4 paper.
2 Select File | Print.
3 Enter the page range you want to print, or select All. Note that the print page range is different from the page numbers on the documents (they print two to a page).
4 The document prints.
About This Book How To Comment on This Book
Printing Part of a Document
To print a single page or a short section, you can print directly from the online version of the document.
1 Select File | Print.
2 Enter the page range you want to print, or select Current. The document prints, one screen per side, two sides per sheet.
How To Comment on This Book
While we have tried to make this document fit your needs, we are interested in your suggestions for improving it and urge you to send your comments to us.
Comment Form A comment form, available in paper and electronic versions, is available via the documentation CD-ROM. To use the comment form:
1 Select Comments from the Main Menu of the CD-ROM.
2 Follow the instructions provided on the CD-ROM to do one of the following:
~ Print the paper version of the form, complete it, and either fax or mail it to us.
About This Book How To Comment on This Book
Contact Us Directly If you prefer not to use the comment form, you can contact us directly at the following address or fax number.
Note: Direct your correspondence to the attention of the Lucent Technologies Intuity CONVERSANT writing team. Be sure to mention the title of the book on which you are commenting. Lucent Technologies
GLS Information Development Division Room 22-2H15
1
Administration Overview
Overview
This chapter provides an overview of system administration, the user interface, and the system administration process. Topics covered include:
• User Interface Overview on page 2
• Intuity CONVERSANT User Interface on page 2
~ Cursor Movement Keys on page 3
~ Menus and Windows on page 5
~ Message Line on page 10
~ Function Keys on page 11
~ Intuity CONVERSANT Main Administration Menu Options on page 20
• Online Help on page 17
1
Administration Overview User Interface OverviewUser Interface Overview
A user interface is a method by which a computer user accesses the
information on the computer. For example, Microsoft Windows is a graphical user interface (also known as GUI).
The Intuity CONVERSANT user interface is menu-driven; that is, you select an option from a list to display another menu or window. You can display more than one menu or window concurrently, but only the last one displayed is active. To return to the previous menu or window, you can cancel the active one.
Intuity CONVERSANT User Interface
Administering the voice system involves many activities, and all share a common user interface, or method of interaction. This means that regardless of the administrative task, the user interface follows a consistent format and style. Although the information on the screen changes often, the information arrangement does not change. The typical screen contents is as follows (Figure 6 on page 3):
• Menu and/or window
1
Administration Overview Intuity CONVERSANT User InterfaceFigure 6. Sample Intuity CONVERSANT System Screen
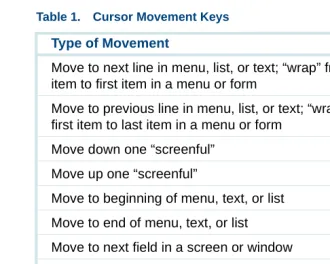
Cursor Movement Keys
Table 1 on page 4 lists the keys used to maneuver within a menu or window. They are referred to throughout this book as the cursor movement keys.
Message Line
Function Key Labels
1
Administration Overview Intuity CONVERSANT User InterfaceTable 1. Cursor Movement Keys
Type of Movement Key
Move to next line in menu, list, or text; “wrap” from last item to first item in a menu or form
Move to previous line in menu, list, or text; “wrap” from first item to last item in a menu or form
Move down one “screenful” Pg Dw
Move up one “screenful” Pg Up
Move to beginning of menu, text, or list H o m e Move to end of menu, text, or list E n d
Move to next field in a screen or window Ta b, or E n t e r Move to previous field in a screen or window S h i f t, or Ta b Move to next character within a field
Move to previous character within a field
1
Administration Overview Intuity CONVERSANT User InterfaceMenus and Windows
You use menus and windows to exchange information with the voice system. This exchange may involve activities such as making menu selections or populating fields. Since the display may contain more than one menu or window at the same time, each menu/window is outlined so that it is clear what information it contains. At any given time, only one menu or window on screen is designated as active.
Menus A menu allows you to select an option that takes you to the next menu or window (Figure 7 on page 5).
1
Administration Overview Intuity CONVERSANT User InterfaceThe components of a menu include:
• Title — The title describes the information contained within the menu, or the tasks you can accomplish using it. In this book, titles are shown with the first letter of each word capitalized, followed by the word menu, such as the Configuration Management menu.
• Scroll Indicator — The scroll bar indicates whether there is additional text to be displayed. The indicates there is more information to view below what is presently shown. The indicates there is more information to view above what is currently displayed. Not every menu has a scroll indicator.
Selecting a Menu Item
To select a menu item, highlight it using one of the following methods and then press E N T E R:
• Use the cursor movement keys to move the highlight bar:
~ Press to move the highlight bar down.
~ Press to move the highlight bar up.
1
Administration Overview Intuity CONVERSANT User Interface• Type the first character(s) of the menu line. The system highlights the first menu item beginning with that letter. For example, in Figure 7 on page 5, type S to select System Control. If there is another menu item beginning
with “s,” type more characters.
The menu items are not case-sensitive; that is, typing A is the same as typing a. If you type a letter for which there is no matching item, the system “beeps” and does not move the highlight bar.
Windows A window allows you to enter and view information, and can range in size. See Figure 8 on page 7 and Figure 9 on page 8.
1
Administration Overview Intuity CONVERSANT User InterfaceFigure 9. Sample Window
The components of a window include:
• Title — The title describes the information contained within the window, or the tasks you can accomplish using it. In this book, titles are shown with the first letter of each word capitalized, followed by the word window, such as the Voice Equipment window.
• Scroll Indicator — The scroll bar indicates whether there is additional text to be displayed. The indicates there is more information to view below what is presently shown. The indicates there is more information to view above what is currently displayed. Not every window has a scroll indicator.
• Fields — Fields are the areas on a window where you enter information. For example, in Figure 6 on page 3 the fields are Channel Numbers,
Service Name, and Startup Service. Use the TAB or E NT E R keys to
1
Administration Overview Intuity CONVERSANT User InterfacePopulating Fields
You can enter information in a field in the following three ways:
• Type the first character(s) of the entry.
With the cursor positioned on the field, begin to type the entry. As soon as you type enough characters to uniquely identify the desired entry, the system automatically supplies the remaining characters. If the entry is invalid, the system beeps and removes the invalid characters.
For example, given the Day: field in Figure 10 on page 10, assume that valid entries are the names of the days in the week. When you type M, the system fills in the entire word Monday because there is only one valid entry that begins with M.
1
Administration Overview Intuity CONVERSANT User InterfaceFigure 10. Fields in the Call Data Summary Report Window
• Type the entire entry.
Move to the desired field and type the entire entry. While in a field, you can also edit the entry.
• Use the CHOICES screen selections.
Press F 2 (Choices) to open a menu which shows the available choices for a field. Select an option as you would in a standard menu. The content of the CHOICES menu varies depending on the situation, and sometimes no CHOICES menu is available for a screen or window.
Message Line
1
Administration Overview Intuity CONVERSANT User InterfaceFunction Keys
Your keyboard has eight to twelve function keys. The system uses the first eight function keys, labeled F 1 through F 8.
The boxed labels at the bottom of the display correspond to the function keys on your keyboard. Function keys are the means by which you command the system to perform a function within the active menu or window. The label describes the instruction that is sent to the system when you press the corresponding function key. The commands, and therefore the labels, that are available at any given time vary depending on the active menu/window. Menus and windows may have one or two rows of function key labels. See
1
Administration Overview Intuity CONVERSANT User InterfaceFigure 11. Function Key Labels — System Monitor Window
Standard Function
Key Labels Standard function key labels remain constant regardless of the active menu or window. They represent commands that are valid for every menu/window
1
Administration Overview Intuity CONVERSANT User InterfaceTable 2. Standard Function Key Labels
Key Description
F 1 (Help)
Opens an online help window. See Online Help on page 17 for more information about online help.
F 6 (Cancel)
Closes the active screen and cancels any additions, deletions, or changes made. The screen that
immediately precedes the just-closed screen becomes the active screen. If there is an activity in progress, such as making a back-up copy of an application on a floppy disk, pressing F 6 (CANCEL) does not interrupt the operation.
F 7
(Cmd-Menu)
1
Administration Overview Intuity CONVERSANT User InterfaceOptional Function Key Labels
The optional function key labels change based on the active menu or window, and provide commands that are unique to the menu or window. See Table 3 on page 14 for a description of optional function key labels.
Table 3. Optional Function Key Labels
Function Key Label
Description
F 2 (Choices)
Opens a menu screen containing choices for the current field, if there is a finite set of choices for a particular field. Move the cursor to the field you want to fill, then press F 2 (CHOICES). The CHOICES menu opens, displaying the options available for that field.
F 2
(Prevpage)
Scrolls back one full page, towards the beginning of text that is too long to fit within the active screen or window. F 3
(Nextpage)
Scrolls forward, toward the end of text that is too long to fit within the active screen, menu, or window. For example, pressing F 3 in Figure 11 on page 12 orders the system to move to the next page, while pressing F 3 in Figure 12 on page 16 sounds a beep, but does nothing else because that key is “empty.”
F 3 (Save) Preserves all changes made in the screen.
1
Administration Overview Intuity CONVERSANT User InterfaceF 4 (Top) Scrolls toward the top of a page. F 5 (Bottom) Scrolls toward the bottom of a page. F 6
(Print)
Prints the information provided by the active screen, such as a report.
F 7
(Frm-Mgmt)
Opens the Frame Management Menu. See Command Menu on page 449 in Chapter 8, Common Administration , for more information.
Options include list, move, refresh, and UNIX system. F 8
(Chg-Keys)
Switches the function key labels displayed from standard to optional, or vice versa. For example, Figure 11 on page 12 and Figure 12 on page 16 show the System Monitor window. Figure 12 on page 16 displays the optional function key labels through the use of F 8 (Chg-Keys) to switch between the standard (Figure 11 on page 12) and optional (Figure 12 on page 16) labels.
Table 3. Optional Function Key Labels
Function Key Label
Description
1
Administration Overview Intuity CONVERSANT User InterfaceFigure 12. Change Keys — System Monitor Screen
1
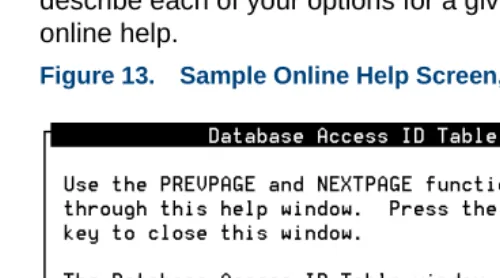
Administration Overview Online HelpOnline Help
Most screens and windows have a companion text window that contains helpful reference information. Figure 13 on page 17 shows the help screen associated with the Database Access ID Table window. The system online help windows are not designed to be a substitute for this book. They briefly describe each of your options for a given menu/window. Press F 1 to access online help.
1
Administration Overview Access the Intuity CONVERSANT Administration MenusAccess the Intuity CONVERSANT Administration Menus
Use the following procedure to access the Intuity CONVERSANT administration menu:
1 At the Console Login: prompt, enter root
The system prompts you for a password.
2 Enter your root password.
The system displays the system prompt #.
3 Enter one of the following commands at the prompt:
~ cvis_mainmenu
The system displays the Intuity CONVERSANT menu (Figure 14 on page 18).
1
Administration Overview Access the Intuity CONVERSANT Administration Menus~ cvis_menu
!
CAUTION:
Do not create multiple, simultaneous cvis_menu processes, as this could severely impact performance and may lock up the system.
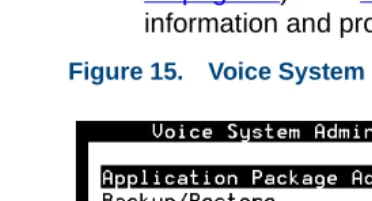
The system displays the Voice System Administration menu (Figure 15 on page 19). See Chapter 3, Voice System Administration , for more information and procedures on voice system administration.
1
Administration Overview Access the Intuity CONVERSANT Administration MenusIntuity CONVERSANT Main Administration Menu Options
From the Intuity CONVERSANT main menu, you can initiate two administration options, UNIX System Administration and Voice System Administration, or you can exit.
UNIX System Administration
The UNIX System Administration menu allows you to set up a variety of generic software operations including backups, printer operations, and peripheral setup. See Chapter 2, UNIX Administration , for more information and procedures on UNIX administration.
Voice System
Administration The Voice System Administration menu allows you to begin your session for administering the system, such as application package administration and
reports. See Chapter 3, Voice System Administration , for more information and procedures on voice system administration.
Exit Exit takes you out of the Intuity CONVERSANT administration menus and returns you to the UNIX system prompt.
1
Administration Overview Access the Intuity CONVERSANT Administration MenusNote: F 6 (Cancel) does not exit from the UNIX System Administration menus. See Exit UNIX System Administration Menu on page 57 in
2
UNIX Administration
Overview
This chapter describes the UnixWare™ system administration user interface and the procedures to access the UnixWare administration menu, as well as the procedures to perform basic UnixWare-level administration.
2
UNIX Administration UnixWare DocumentationUnixWare Documentation
For additional information on UnixWare administration, see the Novell UnixWare documentation.
Start with the System Administration Volume 1 for an overview of the UnixWare system administration and for an introduction to administration concepts and procedures.
Many of the procedures in this chapter reference various UnixWare system administration books. Follow the referenced procedures for additional information.
UNIX System Administration Access
Use the following procedure to access SYSADM (the OA&M menu interface of UnixWare):
1 At the Console Login: prompt, enter root
The system prompts you for a password.
2 Enter your root password.
2
UNIX Administration UNIX System Administration Access3 Enter cvis_mainmenu
The system displays the Intuity CONVERSANT menu (Figure 16 on page 24).
Figure 16. Intuity CONVERSANT V7.0 Menu
4 Select UNIX System Administration.
2
UNIX Administration Application AdministrationFigure 17. UNIX System V Administration Menu
All of the procedures in this book assume that you are using the SYSADM user interface menus. The procedures provide references to the books detailing command line interfaces when possible.
Application Administration
The Application Administration menu provides menu and task for
2
UNIX Administration Backup Scheduling, Setup, and ControlBackup Scheduling, Setup, and Control
The Backup Service Management menu provides two backup options: basic and extended. Backup files can be stored on either tape or diskettes.
Note: Diskettes must be UNIX formatted when you begin this procedure; tapes may be unformatted.
See “Backing Up the Intuity CONVERSANT System” in Chapter 3, “Common System Procedures," in Intuity CONVERSANT System Reference, 585-313-205, for information on when to conduct backups.
The basic backup services allow you to:
• Display the date and time of the last system and incremental backup.
• Conduct a backup of all files or only selected files in your HOME directory.
• Add, change, delete, or display backup requests.
• Back up all system and user files that have been modified or created since your voice system was installed.
The extended backup services allow you to:
• Determine the backup rotation period.
• Specify how backups are to be done for file systems and data partitions.
2
UNIX Administration Backup Scheduling, Setup, and Control• Establish lists of files that should not be backed up.
• Respond to system prompts during backup jobs.
• Schedule backups and the reminder messages that backups should be done.
Note: If you want to backup and restore speech files, see the spsav
command in Appendix A, Summary of Commands. Use the following procedure to access backup services:
1 Start at the UNIX System V Administration menu (Figure 17 on page 25) and select:
The system displays the Backup Service Management menu (Figure 18 on page 27).
Figure 18. Backup Service Management Menu
2
UNIX Administration Backup Scheduling, Setup, and ControlBasic Backup
Use the following procedure to perform a basic backup:
1 Start at the Backup Service Management menu (Figure 18 on page 27) and select:
The system displays the Backup to Removable Media menu (Figure 19 on page 28).
Figure 19. Backup to Removable Media Menu
Use the following procedures to access the different menu options of the Backup to Removable Media menu.
2
UNIX Administration Backup Scheduling, Setup, and ControlBackup History The Backup History menu option displays the date and time of the last system and incremental backup.
Use the following procedure to view the backup history:
1 Start at the Backup to Removable Media menu (Figure 19 on page 28) and select:
The system displays the Backup History window (Figure 20 on page 29).
Figure 20. Backup History Window
2 Press F 3 (Cont) to return to the Backup to Removable Media menu (Figure 19 on page 28).
2
UNIX Administration Backup Scheduling, Setup, and ControlBackup of All Personal Files
A personal backup copies all the files in your HOME (or personal) directory to either tape or formatted diskettes.
Use the following procedure to backup all files in your personal directory:
1 Start at the Backup to Removable Media menu (Figure 19 on page 28) and select:
The system displays the Select Removable Media menu (Figure 21 on page 30).
Figure 21. Select Removable Media Menu
2
UNIX Administration Backup Scheduling, Setup, and Control2 Select the removable media type.
The system displays a message showing the approximate number of diskettes or tapes, as well as the time required to backup the HOME directory.
The system prompts you to insert the first diskette or tape. The system will periodically prompt you to insert more diskettes/tapes, if needed, until the backup is complete.
3 Press E N T E R when the backup is complete.
The system redisplays the Backup to Removable Media menu (Figure 19 on page 28).
Backup of Selected Personal Files
This procedure backs up selected files and directories in your HOME directory to either tape or formatted diskette.
Use the following procedure to back up selected personal files or directories:
1 Start at the Backup to Removable Media menu (Figure 19 on page 28) and select:
The system displays the Select Removable Media menu (Figure 21).
2
UNIX Administration Backup Scheduling, Setup, and Control2 Select the removable media type.
The system displays the Selective Backup of Files under / window (Figure 22 on page 32).
Figure 22. Selective Backup of Files under / Window
3 Enter the file names and directory names to be backed up separated by a space between each entry in the Files or directories to back up:
field.
Note: All files and directories must be in the HOME directory or in a subdirectory of HOME.
4 Press F 3 (Save).
2
UNIX Administration Backup Scheduling, Setup, and ControlThe system prompts you to insert the first diskette or tape. The system will periodically prompt you to insert more diskettes/tapes, if needed, until the backup is complete.
5 Press E N T E R when the backup is complete.
The system redisplays the Backup to Removable Media menu (Figure 19 on page 28).
Schedule a Backup
to Tape The Schedule Backup to Tape menu option allows you to: • Add a system or incremental backup.
• Change a previously scheduled backup request.
• Delete a previously scheduled backup request.
• Display the scheduled backup list.
2
UNIX Administration Backup Scheduling, Setup, and ControlAdd a Backup
Use the following procedure to schedule a new backup to tape:
1 Start at the Backup to Removable Media Menu (Figure 19 on page 28) and select:
The system displays the Schedule a System Backup window (Figure 23 on page 34).
Figure 23. Schedule a System Backup Window
> Add
2
UNIX Administration Backup Scheduling, Setup, and Control2 Press F 2 (Choices) to toggle between System Backup and Incremental System Backup in the Type of Backup: field. A system backup (field
default) performs a back up all system and user files installed or modified since the voice system was first installed. An incremental backup
performs a back up all system and user files since the last backup.
3 Enter a value in the Month(s) of the Year: field:
~ Type a number from 1 to 12, where January is 1 and December is 12 to indicate a single month.
~ Type two numbers separated by a hyphen to indicate a range of months. For example, type 1–8 to instruct the system to perform backups of January through August.
~ Press F 2 (Choices) and press F 2 (Mark) to select one or more months. Press F 3 (Enter) to save the selected month(s) and return to the
Month(s) of the Year: field.
The default value is all to back up all months.
4 Enter a value in the Day(s) of the Month: field:
~ Type a number from 1 to 31 corresponding to the day of the month to indicate a single day.
2
UNIX Administration Backup Scheduling, Setup, and Control~ Press F 2 (Choices) and press F 2 (Mark) to select one or more days. Press F 3 (Enter) to save the selected day(s) and return to the Day(s)
of the Month: field.
The default is all to back up all days of the month.
5 Enter a value in the Day(s) of the Week: field: