AT&T
AT&T 555-230-715 Issue 1
June 1993
Integrated Solution Ill
ORDERING INFORMATION
To order copies of this manual:
Contact: Your AT&T Account Team or your AT&T Authorized Dealer. or
Call: AT&T at 1-800-432-6600 or
Write: AT&T Customer Information Center P.O. Box 19901
Indianapolis, IN 46219
Contents
1
Introduction
1-1■ ■ ■ ■ ■ ■
Overview of Integrated Solution Ill
System Manager’s Responsibilities
security
Passwords
Subscriber Passwords
Administrative Passwords
Login Attempts
Master Controller Access
Master Controller Remote Access
Switch Access
Backup
Toll Fraud
Detecting Toll Fraud
Telephone System Features
Using this Guide
Tasks
Conventions Used in this Guide
Getting Assistance 1-1 1-2 1-4 1-4 1-5 1-5 1-6 1-6 1-6 1-6 1-7 1-7 1-8 1-9 1-9 1-11 1-12 1-12
2
Accessing IS III
■ Overview
■ Logging Into IS Ill
Logging In Locally
Logging In Remotely
Remote Access Problems
■ Screen Navigation
■ Using On-Line Help
■ Logging Out of IS Ill
Contents
3
Accessing IS III Applications
3-1■ Overview 3-1
■ Accessing AUDIX Voice Power 3-2
■ Accessing FAX Attendant 3-6
■ Accessing Call Accounting System 3-10
CAS Alarms 3-10
4
Maintaining IS III
■ Overview
■ Backing Up the System
Backing Up Administrative Files to Diskettes
Backing Up the Entire System to Tape
■ Displaying the Disk Usage Report
Voice, Fax, and CAS Disk Usage
■ Changing Passwords
■ CAS and Hacker Tracker Alarms
Creating and Changing Group Lists
Setting CAS Alarm Notification
■ Restarting the
Printer Scheduler/Spooler
■ Setting the Time and Date
■ Shutting Down the System
■ Accessing Voice System Administration
Contents
A
Appendix A: Master Controller Features
■ Overview
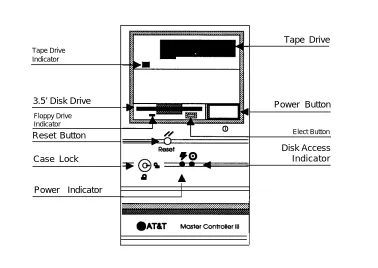
■ Master Controller Processor
Reset Button
Power Button
Drive Indicators
Disk Drive Requirements and Capacities
Diskettes
■ Tape Drive Requirements
and Capacities
Tape Cartridge
■ Video Monitor
■ Keyboard
Escape Key
Enter Key
Tab Key
Ctrl Key
Alt Key
Cursor Control Key Group (Arrow Keys)
Function Key Group
Function Keys
■ Remote Maintenance Device
A-1 A-1 A-2 A-5 A-5 A-6 A-6 A-7 A-8 A-8 A-9 A-9 A-9 A-9 A-9 A-9 A-9 A-9 A-10 A-10 A-11
B
Appendix B: Ordering Information
B-1Contents
C
Appendix C: Terminal Types
C-1■ IS Ill Terminal Types C-1
D: CAS Alarm Notification
D-1D
Appendix
■ CAS and HackerTracker Alarms D-1
Alarm Strategy
Suggested Defautts
D-2
D-2
Figures
A
Appendix A: Master Controller Features
A-1A-1 . The Master Controller II+ A-2
A-2. Master Controller Ill A-3
A-3. Master Controller II+ Front Panel A-4
A-4. Master Controller Ill Front PaneI A-4
Screens
2
Accessing IS III
2-12-1. Integrated Solution Ill Main Menu 2-3
2-2. Integrated Solution Ill Main Menu 2-6
2-3. Page 1 of a Help Screen 2-8
2-4. Page 2 of a Help Screen 2-9
2-5. Integrated Solution Ill Main Menu 2-10
2-6. Confirm Exit Screen 2-11
3
Accessing IS III Applications
3-13-1. Integrated Solution Ill Main Menu 3-2
3-2. AUDIX Voice Power/FAX Attendant Menu (Co-Resident
Configuration) 3-4
3-3. AUDIX Voice Power Menu (Standalone Configuration) 3-5
3-4. Integrated Solution Ill Main Menu 3-6
3-5. AUDIX Voice Power/FAX Attendant Menu (Co-Resident
Configuration) 3-8
3-6. FAX Attendant Menu (Standalone Configuration) 3-9
3-7. Integrated Solution Ill Main Menu 3-11
3-8. Call Accounting System Menu 3-13
4
Maintaining IS III
4-14-1. 4-2. 4-3. 4-4. 4-5. 4-6. 4-7. 4-8. 4-9.
Integrated Solution Ill Main Menu User Maintenance Menu
Backup Files
Integrated Solution Ill Main Menu User Maintenance Menu
Maintenance Log
Sample Disk Usage Report Integrated Solution ill Main Menu User Maintenance Menu
Screens
4-15. 4-16. 4-17. 4-18. 4-19. 4-20. 4-21. 4-22. 4-23. 4-24. 4-25. 4-26. 4-27. 4-28. 4-29. 4-30.CAS Alarm Levels
Sample CAS Alarm Configuration Integrated Solution Ill Main Menu User Maintenance Menu
Confirm Printer Restart Screen Integrated Solution Ill Main Menu User Maintenance Menu
Set Time and Date Screen Choices Menu
Confirm Time and Date Screen Integrated Solution Ill Main Menu User Maintenance Menu
Shutdown Screen
Integrated Solution Ill Main Menu User Maintenance Menu
Voice System Administration Menu
Introduction
Overview of Integrated Solution 111
Integrated SoIution Ill (IS Ill) is a menu-driven software application that allows you to administer and maintain various applications that the AT&T DEFINlTY®
Communications System and the System 75 support.1
Your IS Ill system consists of a processor called the Master Controller (II+ or III), a color video monitor, a keyboard, a remote maintenance device (RMD or RMD-HS), IS Ill Platform Software, and one or more of the following software application packages:
AUDlX® Voice Power™ software
The AUDIX Voice Power application uses voice prompts and announcements to guide callers in sending and retrieving voice messages through the use of touch-tone buttons on the callers’ telephones. AUDIX Voice Power can be used as a personal answering service, a messenger to individuals or groups, an office receptionist, an information service, and a message drop service. AUDIX Voice Power can be standalone or co-resident with AT&T FAX Attendant System™.
AT&T FAX Attendant System software
Introduction
so that you can make informed decisions about your telephone needs. You can monitor the cost of calls, print reports of incoming and/or outgoing calls, track calls made on behalf of clients, and identify cases of telephone abuse. HackerTracker™ software is an optional add-on package that monitors call activity and provides real-time alarms and alerts for any abnormal or undesirable call activity such as toll fraud.
NOTE:
Throughout this guide, references to the Master Controller apply to the Master Controller II+ and Ill. Any information that differs between the two processors will be noted.
System Manager’s Responsibilities
As the IS Ill System Manager, you are responsible for performing the following tasks:
■
■
■
adding passwords initially and changing them periodically
Maintaining passwords for both logging in and accessing each application from within IS Ill helps protect the system from unauthorized access. See Chapter 4 for the procedures to add and change passwords.
NOTE:
In addition to adding and changing passwords, the System Manager is responsible for all aspects of system security. See “Security” later in this chapter.
backing up the system regularly (daily, weekly, or monthly)
The frequency of your backups depends on how up-to-date you want your call accounting records, administrative files, voice files, and fax files to be when you recover from catastrophic failure or any restore. For example, if these files and records change daily, you should back up the system daily. Conversely, if these files and records change no more than once a month, monthly backup is appropriate.
checking and maintaining disk usage space regularly (daily, weekly, or monthly)
Access the Disk Usage Report and check if there are too many Call
Accounting records, voice messages, and fax messages. YOU must monitor
Introduction
shutting down and rebooting the system properly once a month, when the system is idle
By using the procedures in Chapter 4 to shut down and reboot the system at regular intervals, you are able to check the status of the entire system and possibly prevent major problems.
During a reboot, the system performs the following tasks:
—
— — —
repairs any minor corruptions automatically, which, if left uncorrected, could eventually lead to catastrophic failure
checks the “sanity” of its configuration
reloads drivers
re-initializes voice boards, fax boards, and Digital Communications Protocol (DCP) boards, ensuring that they are working properly
creating and changing voice mail group lists for CAS alarm notification
AUDIX Voice Power group lists must be created, configured, and maintained for CAS alarm notification. Additional information is provided in Chapters 3 and 4 and Appendix D.
monitoring error messages
Each application has error logs; be sure to check the error logs periodically and follow the suggested instructions when problems or potential problems occur.
setting the time and date
The time and date for IS Ill must be synchronized with the time and date for the DEFINITY system.
checking printer status
If an optional printer is installed, you are responsible for ensuring that paper is loaded, and that the printer is turned on and functioning.
Introduction
Security
Your Integrated Solution Ill system has been carefully designed to be very secure. As the System Manager, it is your responsibility to protect voice and fax mail subscribers from unauthorized access to their mailboxes. Careful attention to
security-related administrative features, procedures, and maintenance are required to ensure the integrity of user information. It is your responsibility to read this section and implement its recommendations as part of your Integrated Solution Ill
environment.
AT&T also recommends that you purchase BC Systems Products Security Handbook (Document No. 555-225-600) for more information on security-related issues.
Passwords
A password is one of the most effective ways of securing voice and fax mailboxes and the Master Controller. In general, all passwords should adhere to the following guidelines: ■ ■ ■ ■ ■ ■ ■ ■ ■
Do not use ascending digits (1234) for passwords.
Do not use the same digit repetitively (1111) for passwords.
Do not use the current year (1993) for passwords.
Do not use your extension number as a password (extension 3455 password 3455).
Do not use your extension number in reverse order as a password 3455 with password 5543).
Do not use your name or initials as a password.
with
(extension
Passwords should not be posted, shared, or printed in an obvious place.
Passwords should not be coded in programmable function keys or speed-dialing keys.
Passwords should be periodically changed based on the sensitivity of the messages or accessible information.
Introduction
Subscriber Passwords
Make sure that subscribers understand the importance of password security to their mailboxes and implement the following guidelines:
■
■
■
Subscribers must change their passwords the first time they log into the system and periodically thereafter. Consider sending a broadcast message on the first of each month to remind them.
Subscribers can have passwords of up to nine digits to access the AUDIX Voice Power and FAX Attendant systems. There is no minimum password length; however, you should encourage subscribers to make their passwords at least five digits.
Subscriber passwords are specified in their profiles on the Subscriber
Administration screen. A pound sign (#) in the Password field denies access to anyone trying to log into the mailbox. The system responds with login
incorrect regardless of what the caller enters. Use this feature whenever it becomes necessary to restrict mailbox access. Once a subscriber profile is saved, the password value will not be displayed on the screen. This is for security purposes. If subscribers forget their passwords, the System Manager must enter new passwords in their profiles and resave them. The old
passwords are unrecoverable.
Administrative Passwords
Administrative passwords are phone-based and computer-based passwords for the System Managers and Service Administrators. The following are guidelines for administrative passwords:
Make sure that the passwords set during installation are changed.
Establish and enforce procedures among administrators for changing passwords. These procedures should include how often passwords are changed and how notification of new passwords is made.
After a 60-day period has expired, each computer-based login will be prompted for a new password when logging in.
Because subscribers are required to choose passwords, inevitably some will forget their passwords. To prevent unauthorized access to a subscriber’s mailbox, establish a procedure for reissuing passwords in these situations.
Introduction
■ Create a system administration policy concerning employee turnover to ensure
that subscriber mailboxes are removed promptly from the system when they no longer require AUDIX Voice Power or FAX Attendant.
■ Registered Service Administrators have privileges beyond regular subscribers
and should, therefore, change their passwords often and keep them secure.
Login Attempts
Subscribers are allowed four attempts at logging into AUDIX Voice Power or FAX Attendant. If the caller has not successfully entered the extension and password in four attempts, the system recommends that the subscriber contact the system administrator. The call is, then, disconnected. The number of login attempts is not an administrative option.
Master Controller Access
Limit access to the Master Controller and supporting documentation by keeping them in an office that is protected with a changeable combination lock. Keep telephone logs and printed reports in a location that only authorized personnel can enter.
To use the Master Controller, you must enter a login ID and password. When you create your password, it must be at least six characters long, including both letters and numbers. If you must share the password, make sure that you share it only with responsible people that you trust. They will have access to some very powerful system features. Think carefully before telling someone how to access the Master Controller.
If you use PC-based emulation programs to access administration capabilities, never store dial-up numbers, logins, or passwords as part of an automatically executed script.
Master Controller Remote Access
When you are not planning to use remote access, disconnect the analog line from the RMD or RMD-HS.
Switch Access
For information on switch access security, see the BC Systems Products Security
Introduction
Backup
Back up all system data regularly to ensure a timely recovery, should it be required. Implement a regular offsite backup policy so that you will always have a current backup, even if a disaster strikes your company’s office location. See the backup procedures in Chapter 4 for instructions.
Toll Fraud
Toll fraud attempts through voice messaging systems and automated attendant systems have grown dramatically. Toll fraud “hackers” access a voice mail or automated attendant system, transfer through the system, and gain access to a corporation’s interface to a Iong-distance network. This is a security risk that can affect every telecommunications system with a voice mail or automated attendant system. While AT&T is not responsible for the billing resulting from this toll fraud, we wish to assist you in dealing with this problem.
To diminish the risk of toll fraud occurrences, we recommend limiting transfers. The
Transfer to Subscribers Only? parameter on the AUDIX Voice Power System Parameter Administration screen allows you to impose a limitation while still allowing callers and subscribers to use AUDIX Voice Power transfer capabilities.
By leaving the default setting to yes for this parameter, you can restrict transfers to registered subscribers only. When a caller is instructed to enter an extension number from the Automated Attendant, or when a caller enters an extension number from the Voice Mail or Call Answer services, the extension entered is validated against the subscriber database of AUDIX Voice Power. If the extension entered is not in the subscriber database, the caller will hear “That is not a valid extension,” the transfer is denied, and the caller will not have an opportunity to gain access to the outgoing facilities of the telephone communications system. For more information on this parameter, see the AT&T AUDIX™ Voice Power, Release 2.1.1, Planning Guide
and Forms document (Document No. 585-310-901 ).
Introduction
To enhance security for the outcalling feature, you can turn off outcalling on a per-subscriber basis via the Subscriber Administration screen. You can also restrict the number of digits that may be used for outcalling on a system-wide basis via the outcalling Administration screen. For more information, see the AT&T AUDIX™
Voice Power, Release 2.1.1, Planning Guide and Forms document (Document No.
585-310-901 ) or the AT&T FAX Attendant System™, Release 2.1.1, Planning and
Forms document (Document No. 555-007-101).
If your AUDIX Voice Power system is intended to serve only a subset of the
telephone system users, the remaining users may be administered as AUDIX Voice Power subscribers with restricted mailboxes, so that the possibility of making transfers to these users is ensured. Restricted mailboxes can be setup by allocating minimal mailbox space (for example, 1 minute) to each of these subscribers. Other subscribers may address messages to these users, but the limited mailbox size will prevent most messages from being delivered.
Protecting your AUDIX Voice Power and FAX Attendant systems is a vital and important part of your responsibility as a System Manager. You should take every precaution to protect your company’s assets from both internal and external security breaches. AT&T does not warrant that these products will prevent (and AT&T will not be responsible for) unauthorized use (or charges for such use) of common carrier telecommunication services or facilities accessed through (or connected to) AUDIX Voice Power or FAX Attendant. The customer is responsible for
administering AUDIX Voice Power and FAX Attendant to prevent such unauthorized use. Therefore, it is necessary that the person to whom the customer assigns this responsibility read all documents associated with AUDIX Voice Power and FAX Attendant and understand all features that enable the administrator to reduce exposure to unauthorized use.
Detecting Toll Fraud
Once you have instituted the appropriate security measures, monitor call traffic for the following signals of possible hacker activity:
■ Employees cannot get outside lines.
■ Customers have difficulty getting through to your 800 number.
■ Usage is higher than normal.
■ Heavy call volume on nights and weekends.
■ Operators report frequent hangups.
Introduction
Telephone System Features
You can further restrict access to AUDIX Voice Power, subscriber phones, and administrative phones through the telephone system. See the telephone system documentation for instructions on restricting access (called class of restriction).
Using this Guide
At the time you are ready to use this guide, your IS Ill system will already have been installed and initialized by AT&T personnel or your AT&T Authorized Dealer.
Each application supported by IS Ill has its own documentation detailing
administration and daily operation. This System Manager’s Guide is not intended to replace those documents, but is designed to show you how to access those applications via IS Ill. (See Appendix B for information about ordering additional documents related to IS Ill applications.)
This guide consists of the following chapters and appendices:
Chapter 1- Introduction
This chapter offers an overview of Integrated Solution Ill and the software applications it supports.
Chapter 2- Accessing IS Ill
This chapter describes how to log in and log out of IS Ill and how to use on-line help.
Chapter 3- Accessing IS Ill Applications
This chapter shows you how to access each application package.
Chapter 4- Maintaining IS Ill
Introduction
Appendix A - Master Controller Features
This appendix provides an overview of the Master Controller.
Appendix B - Ordering Information
This appendix contains information for ordering additional documents and forms for your IS Ill applications and/or system.
Appendix C - Terminal Types
This appendix indicates the terminal types that IS Ill supports. They are listed in alphabetical order by manufacturer, and each terminal type is listed with the entry that you need to provide at the TERM= prompt when logging into IS Ill from a remote
PC or terminal. The remote login procedure is in Chapter 2.
Appendix D - CAS Alarm Notification
Introduction
Tasks
Refer to the following table for a list of the tasks contained in this guide and the chapter number where you will find these tasks.
TOPIC TASKS CHAPTER
NUMBER
Accessing IS Ill Log into IS Ill Chapter 2
Log out of IS Ill Use On-Line Help
Accessing IS Ill Access: Chapter 3
Applications AUDIX Voice Power FAX Attendant
Call Accounting System
Maintaining IS Ill Back Up the System Chapter 4 Display the Disk Usage Report
Add or Change Passwords Create or Change Group Lists
for CAS Alarms Restart the Printer
Scheduler/Spooler Set the Time and Date Shut Down the System Access Voice System
Introduction
Conventions Used in this Guide
The following conventions are used in this guide:
■
■
■
■
■
Commands and text you should type appear in this style of type.
Values, instructions, and prompts that appear on the screen are in this style of type.
Key names that are always located on the keyboard in the same place appear in key-shaped boxes, as in
A dash (-) connecting two or more keys is used to indicate an operation in which one key is held down while another is pressed. For example,
indicates that the and keys should be held down while the l key is pressed.
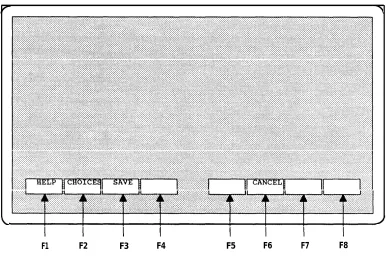
Function keys (keys that start with an F, followed by a number) appear in boxes with the current meaning following in parentheses, such as (SAVE).
F 3
The current meanings of the function keys are shown by labels at the bottom of the screen. On the actual screen, one of two sets of labels will appear. The first label is the meaning of the function key when the screen first appears. These meanings have been selected to be the most useful for that screen.
The second set of labels appears after the (CHG-KEYS) key has beenF 8
pressed. Pressing (CHG-KEYS) again restores the first set of labels.F 8
NOTE:
The menu items shown in this book depend on the applications present.
Getting Assistance
If you have questions or problems with IS Ill that this System Manager’s Guide does not resolve, call the AT&T Support Center at 1-800-628-2888 or your AT&T
Accessing IS III
Overview
This chapter provides the procedures that you will use to access IS III. To administer an IS III application or perform any ongoing system maintenance, you must access the Integrated Solution Ill Main Menu. However, before you can access this menu, you must first log into IS Ill.
Logging Into IS III
The login procedure allows you to access the Integrated Solution Ill Main Menu. During this procedure, you identify yourself to the system by entering your Login ID. The system then prompts you to enter your password. The system uses the Login ID and password to prevent unauthorized individuals from accessing the system.
To log into IS Ill locally (from the Master Controller), perform the following steps:
1.
2.
At the Console Login: prompt, type is and press
— When you log into IS Ill for the first time, you will be prompted to create a password. This password should follow all guidelines stated in Chapter 1. If you have not already read these guidelines, do so now.
— If you have already created the password, the Password: prompt appears.
— If the system determines that your password has expired, you will be asked to change it after entering the old password.
NOTE:
You can change the login password at any time; you do not have to wait for it to expire. For more information, see Chapter 4.
Type the appropriate password and press
For security reasons, your password does not appear on the screen as you type it.
— If you are creating a new password, you will be prompted to re-enter the same password. Re-enter it and then press
— If you are changing an existing password, you have just entered your old password and are being prompted to enter the new password.
a. Type a new password, making sure it follows all guidelines, and press
b. Re-enter the same new password when prompted, and press again.
Accessing IS III
Integrated Solution III
>AUDIX Voice Power/FAX Attendant (AVP/FA) Call Accounting System (CAS)
User Maintenance Exit
Move to an item using the arrow keys and press ENTER.
Screen2-1. Integrated Solution Ill Main Menu
NOTE:
lf you have both AUDIX Voice Power and FAX Attendant installed, they will appear as one option in the integrated Solution lll Main Menu. AUDIX Voice Power and FAX Attendant can be co-resident (that is, both can be installed) or standalone applications.
3. At this point, you can select any of the IS III applications that are installed on your system. See “Screen Navigation” later in this chapter for menu item selection, function keys, and other screen usage information. When you are finished using IS Ill, log out of the system as described later in this chapter under “Logging Out of IS Ill.”
Accessing IS III
Logging In Remotely
Before attempting to log in remotely, make sure you have the following components at the remote site:
■ a terminal (or a PC and terminal emulation software)
■ a modem connected to the terminal or PC
■ an analog line connected to the modem
■ the phone number for the Master Controller’s remote maintenance device
Additionally, make sure the terminal (or the PC’s terminal emulation software) has the following parameter settings:
■ even parity
■ 7 data bits
■ 1 stop bit
■ the appropriate baud rate (not to exceed your modem’s maximum baud rate):
— If you are dialing the RMD (for the Master Controller II+), make sure the modem at the remote site is set to 1200 baud.
— If you are dialing the RMD-HS (for the Master Controller Ill), the modem at the remote site can be set up to 9600 baud.
In the following procedure, you will be prompted for your terminal type. If you are not sure what to enter, see Appendix C for a list of the most commonly used terminal types that IS Ill recognizes.
CAUTION:
Some screens in AUDIX Voice Power and FAX Attendant do not display properly when logging in remotely. Some screen display problems maybe diminished by trying another terminal type. If changing the terminal type is not an adequate solution, you must login locally.
Log into IS Ill remotely as follows:
1. Dial the number of the Master Controller’s remote maintenance device as you would dial any other modem. See the documentation for your modem if necessary.
The modem places the call. When the call is connected, the remote system displays the console Login: prompt.
If the Console Login: prompt does not appear, press the spacebar few times.
Accessing IS III
2. At the Console Login: prompt, type iS and press
— When you log into IS Ill for the first time, you will be prompted to create a password. This password should follow all guidelines stated in Chapter 1. If you have not already read these guidelines, do so now.
— If you have already created the password, the Password: prompt appears.
— If the system determines that your password has expired, you will be asked to change it after entering the old password.
NOTE:
You can change the login password at any time; you do not have to wait for it to expire. For more information, see Chapter 4.
3. Type the appropriate password and press
For security reasons, your password does not appear on the screen as you type it.
— If you are creating a new password, you will be prompted to re-enter the same password. Re-enter it and then press
— If you are changing an existing password, you have just entered your old password and are being prompted to enter the new password.
a. Type a new password, making sure it follows all guidelines, and press
b. Re-enter the same new password when prompted, and press again.
The TERM= prompt appears.
4. At the TERM= prompt, type your terminal type and press
If you are not sure what to enter at the TERM= prompt, see Appendix C for a list of the most commonly used terminal types that IS III
recognizes.
Accessing IS III
Integrated Solution III
>AUDIX Voice Power/FAX Attendant (AVP/FA) Call Accounting System (CAS)
User Maintenance Exit
Move to an item using the arrow keys and press ENTER.
Screen 2-2. Integrated Solution Ill Main Menu
Remote
NOTE:
lf you have both AUDIX Voice Power and FAX Attendant installed, they will appear as one option in the integrated solution lll Main Menu. AUDIX Voice Power and FAX Attendant can be co-resident (that is, both can be installed) or standalone applications.
5. At this point, you can select any of the IS Ill applications that are installed on your system. See “Screen Navigation” later in this chapter for menu item selection, function keys, and other screen usage information. When you are finished using IS Ill, log out of the system as described in “Logging Out of IS Ill,” later in this chapter.
For detailed instructions on accessing IS Ill applications, see Chapter 3.
Access Problems
Accessing IS III
Some screens in AUDIX Voice Power and FAX Attendant do not display properly when logging in remotely. Some screen display problems may be diminished by trying another terminal type. If changing the terminal type is not an adequate solution, you must log in locally.
If some keys are not working properly, it is because the terminal emulation software on your PC does not provide the proper support.
You can still use IS Ill, provided you do the following:
■ Instead of pressing function keys, press and then type the number of
the function key. For example, instead of pressing press andF 8
then type 6.
■ Instead of pressing cursor keys or the spacebar to select menu items, just
type the first letter of the item you want to select.
Screen Navigation
To navigate through the screens in IS Ill, use the following guidelines:
■ To move the cursor between menu items, use the arrow keys, the spacebar,
or type the first letter of the menu item that you want.
If there is more than one menu item beginning with that letter, continue typing the rest of the menu item until it is highlighted.
■ To move the cursor between fields in a form, use the arrow keys or (TAB)
and (BACKTAB).
■ If there is more than one “page” of a screen, , (PREVPAGE) and
(NEXTPAGE) appear as function keys, and the scroll baron the right side of the screen displays arrows [ indicating that (PREVPAGE) can be pressed; and indicating that (NEXTPAGE) can be pressed]. The system beeps when you try to go past the end of a screen (using
NEXTPAGE) and also when you try to go past the beginning, using PREVPAGE.
Accessing IS III
Using On-Line Help
For most of the IS Ill menus and screens, the system provides an on-line help screen. Whenever the system provides (HELP), a help screen is available. Typically, the help screen provides a brief description of the active menu or screen (that is, the menu or screen in which you are currently working).
To access the help screen, press (HELP).
If there is more than one “page” of a help screen, (PREVPAGE) and (NEXTPAGE) appear as function keys, and the scroll baron the right side of the help screen displays arrows [ indicating that (PREVPAGE) can be pressed; and indicating that (NEXTPAGE) can be pressed ]. The system beeps when you try to go past the end of a help screen.
To exit the help screen and return to the menu or screen, press (CANCEL).
As an example of using Help, if you press (HELP) when you are viewing the Integrated Solution Ill Main Menu, the following help screen appears:
Help on IS
The Integrated Solution III (IS III) menu provides access to all installed IS III application packages and maintenance items useful to a user.
The items on the Integrated Solution III Menu are as follows:
An entry for each installed IS III application : You can access the application by hitting <ENTER> when the cursor is next to the application entry.
creen 2-3. Page 1 of a Help Screen
The (PREVPAGE) and (NEXTPAGE) keys indicate that there is at least an additional page of help information.
Accessing IS III
Help on IS
the application by hitting <ENTER> when the cursor is next to the application entry.
User Maintenance: Another menu will appear, allowing you
to access programs for backing up files, restarting the printer, setting the date and time, shutting down the system, password protecting the installed IS III applications and the IS III user login (is), displaying a disk usage report, or accessing the Voice System Administration package (if installed).
Screen 2-4. Page 2 of a Help Screen
lf you press (NEXTPAGE), the system ’’beeps", indicating that you are at the end of the help screen. To view the first page of the help screen, press
Accessing IS III
Logging Out of is III
When you are finished using IS Ill, you must log prevents unauthorized users from accessing the
To log out of IS Iii, perform the following steps:
out of the system. Logging out system via your login.
1. Return to the Integrated Solution Ill Main Menu by exiting from the last application you accessed by pressing (CANCEL) or selecting Exit.
The Integrated Solution Ill Main Menu appears.
Integrated Solution III
>AUDIX Voice Power/FAX Attendant (AVP/FA) Call Accounting System (CAS)
User Maintenance Exit
Move to an item using the arrow keys and press ENTER.
Screen 2-5. Integrated Solution Ill Main Menu
2. Move the cursor to Exit and press
NOTE:
Accessing IS III
The Confirm Exit Screen appears.
Confirm Exit
You are about to exit Integrated Solution III. Press CONT to exit or press CANCEL.
Press CONT to exit or press CANCEL.
Screen 2-6. Confirm Exit Screen
3. Press (CONT) to exit IS lll.
Accessing IS III Applications
Overview
This chapter provides an overview of each IS Ill application and the procedures you will use to access the IS Ill applications installed on your system. Using IS Ill, you can access and administer the following applications:
■ AUDIX Voice Power
■ FAX Attendant
■ Call Accounting System (CAS)
Accessing IS III Applications
Accessing AUDIX Voice Power
AUDIX Voice Power is a software application that uses voice prompts and
announcements to guide callers in sending and retrieving voice messages through the use of touch-tone buttons on the callers’ telephones. AUDIX Voice Power can be used as a personal answering service, a messenger to individuals or groups, an office receptionist, an information service, and a message drop service. AUDIX Voice Power can be standalone or co-resident with FAX Attendant.
To access AUDIX Voice Power, perform the following steps:
1. Log into the system and access the Integrated Solution III Main Menu.
The Integrated Solution Ill Main Menu appears.
Integrated Solution III
>AUDIX Voice Power/FAX Attendant (AVP/FA) Call Accounting System (CAS)
User Maintenance Exit
Move to an item using the arrow keys and press ENTER.
Screen 3-1. Integrated Solution III Main Menu
NOTE:
Accessing IS III Applications
2. At the integrated Solution Ill Main Menu, move the cursor to AUDIX Voice Power/FAX Attendant (AVP/FA) and press
— When you access this application for the first time, you will be prompted to create a password, unless you already added this password via User Maintenance (as described in Chapter 4). This password should follow all guidelines stated in Chapter 1. If you have not already read these guidelines, do so now.
— If you have already created the password, the Password: prompt appears.
— If the system determines that your password has expired, you will be asked to change it after entering the old password.
NOTE:
You can change this password at any time; you do not have to wait for it to expire. For more information, see Chapter 4.
3. Type the appropriate password and press
For security reasons, your password does not appear on the screen as you type it.
— If you are creating a new password, you will be prompted to re-enter the same password. Re-enter it and then press
— If you are changing an existing password, you have just entered your old password and are being prompted to enter the new password.
a. Type a new password, making sure it follows all guidelines, and press
Accessing IS III Applications
If both AUDIX Voice Power and configuration), the AUDIX Voice
FAX Attendant are installed (a co-resident Power/FAX Attendant Menu appears.
If FAX Attendant is not installed, the AUDIX Voice
The following screens show these configurations.
Power Menu appears.
AUDIX Voice Power/FAX Attendant
>Automated Attendant Administration Fax Equipment Operations
Fax Response Administration
Fax System Parameter Administration Outcalling Administration
Service Administrator Registration Subscriber Administration
Voice System Parameter Administration
Highlight menu choice using arrow keys, then press Enter key
Accessing IS III Applications
AUDIX Voice Power
>Automated Attendant Administration Outcalling Administration
Service Administrator Registration Subscriber Administration
System Parameter Administration
Highlight menu choice using arrow keys, then press Enter key
Screen 3-3. AUDIX Voice Power Menu (Standalone Configuration)
To administer AUDIX Voice Power, consult your AT&T AUDIX™ Voice Power,
Release 2.1.1,
Be sure
Release 2.7.1, Planning Guide and Forms document (Document
No.585-310-901) before you make any changes to the system.
System Manager’s Guide (Document No. 585-310-520).
to update the hardcopy forms from the AT&T AUDIX™ Voice Power,
Accessing IS III Applications
Accessing FAX Attendant
FAX Attendant is a software application that enhances the capabilities of all fax machines attached to your company’s DEFINITI system and for its community of subscribers. FAX Attendant can be a resident or standalone application. In a co-resident configuration, FAX Attendant resides with AUDIX Voice Power, providing a single mailbox and integrated notification of both fax and voice messages.
FAX Attendant uses voice prompts and announcements to guide callers in sending and receiving fax messages through the use of touch-tone buttons on the callers’ telephones. FAX Attendant can be used as a personal fax receiving service, a fax
messenger to individuals or groups, or as an information service allowing callers to request different fax messages through an interactive voice prompt/touch-tone interface.
To access FAX Attendant, perform the following steps:
1. Log into the system and access the Integrated Solution Ill Main Menu.
The integrated Solution Ill Main Menu appears.
Integrated Solution III
>AUDIX Voice Power/FAX Attendant (AVP/FA) Call Accounting System (CAS)
User Maintenance Exit
Accessing IS III Applications
2. At the
NOTE:
AUDIX Voice Power and FAX Attendant can be co-resident (that is, both can be installed) or standalone applications. If you have both AUDIX Voice Power and FAX Attendant installed, they will appear as one option in the Integrated Solution III Main Menu.
Integrated Solution II 1 Main Menu, move the cursor to AUDIX Voice Power/FAX Attendant (AVP/FA) and press
— When you access this application for the first time, you will be prompted to create a password, unless you already added this password via User Maintenance (as described in Chapter 4). This password should follow all guidelines stated in Chapter 1. If you have not already read these guidelines, do so now.
— If you have already created the password, the Password: prompt appears.
— If the system determines that your password has expired, you will be asked to change it after entering the old password.
NOTE:
You can change this password at any time; you do not have to wait for it to expire. For more information, see Chapter 4.
3. Type the appropriate password and press
For security reasons, your password does not appear on the screen as you type it.
— If you are creating a new password, you will be prompted to re-enter the same password. Re-enter it and then press
— If you are changing an existing password, you have just entered your old password and are being prompted to enter the new password.
a. Type a new password, making sure it follows all guidelines, and press
Accessing IS III Applications
If both AUDIX Voice Power and FAX Attendant are installed (a coresident configuration), the AUDIX Voice Power/FAX Attendant Menu appears.
If AUDIX Voice Power is not installed, the FAX Attendant Menu appears.
The following screens show these configurations.
AUDIX Voice Power/FAX Attendant
>Automated Attendant Administration Fax Equipment Operations
Fax Response Administration
Fax System Parameter Administration Outcalling Administration
Service Administrator Registration Subscriber Administration
Voice System Parameter Administration
Highlight menu choice using arrow keys, then press Enter key
Accessing IS III Applications
FAX Attendant
>Fax Equipment Operations Fax Response Administration
Fax System Parameter Administration Outcalling Administration
Service Administrator Registration Subscriber Administration
Voice System Parameter Administration
Highlight menu choice using arrow keys, then press Enter key
Screen 3-6. FAX Attendant Menu (Standalone Configuration)
To administer FAX Attendant, consult your AT&T FAX Attendant System™, Release
2.1.1, System Manager’s Guide (Document No. 555-007-100).
NOTE:
Be sure to update the hardcopy forms from the AT&T FAX Attendant
System™, Release 2.1.1, Planning and Forms document (Document No.
555-007-101) before you make any changes to the system.
Accessing IS III Applications
Accessing Call Accounting System
Call Accounting System (CAS) is a software application that allows you to administer telephone expenses and track facility usage in a business, university, or government installation using up to 200 telephone extensions (or up to 500 extensions with the upgrade package). With CAS, you can track incoming and outgoing calls to provide costing reports and accurate records of phone usage.
To further decrease the chances for undetected, unauthorized access, CAS can be installed with HackerTracker, an optional add-on package, which monitors call activity and provides real-time alarms and alerts for any abnormal or undesirable call activity such as toll fraud.
CAS
AlarmsCall Accounting System can be configured to send alarms to AUDIX Voice Power subscribers who are included in voice mail group lists. When the system is installed, you will need to complete the CAS Alarm Notification Form, which will be used to configure these group lists per your specifications. Appendix D provides additional information, including the CAS Alarm Notification Form.
When you are ready to create or change a voice mail group list for CAS alarm notification, see Chapter 4 for detailed instructions.
NOTE:
Accessing IS III Applications
To access CAS, perform the following steps:
1. Log into the system and access the Integrated Solution Ill Main Menu.
The Integrated Solution Ill Main Menu appears.
Integrated Solution III
>AUDIX Voice power/FAX Attendant (AVP/FA) Call Accounting System (CAS)
User Maintenance Exit
Move to an item using the arrow keys and press ENTER.
Screen 3-7. Integrated Solution III Main Menu
Before you administer any changes to CAS, be sure you have synchronized the time and date settings for IS Ill and the communications system. See
Accessing IS III Applications
2. At the Integrated Solution Ill Main Menu, move the cursor to Call Accounting System (CAS) and press
— When you access this application for the first time, you will be prompted to create a password, unless you already added this password via User Maintenance (as described in Chapter 4). This password should follow all guidelines stated in Chapter 1. If you have not already read these guidelines, do so now.
— If you have already created the password, the Password: prompt appears.
— If the system determines that your password has expired, you will be asked to change it after entering the old password.
NOTE:
You can change this password at any time; you do not have to wait for it to expire. For more information, see Chapter 4.
3. Type the appropriate password and press
For security reasons, your password does not appear on the screen as you type it.
— If you are creating a new password, you will be prompted to re-enter the same password. Re-enter it and then press
— If you are changing an existing password, you have just entered your old password and are being prompted to enter the new password.
a. Type a new password, making sure it follows all guidelines, and press
b. Reenter the same new password when prompted, and press again.
Accessing IS III Applications
Integrated Solution Call Accounting System
>Reports Menu
Site Configuration Menu
Organization Configuration Menu CDR Collection Configuration Menu Costing Configuration Menu System Configuration Menu HackerTracker
Exit
Screen 3-8. Call Accounting System Menu
NOTE:
HackerTracker, an optional add-on package, appeares on the Call Accounting System Menu only if it is installed.
To administer CAS, consult your AT&T Call Accounting System (CAS)
Integrated Solution II Site lnstallation and lmplementation Guide (Document
No. 585-247-010).
To return to the Integrated and press
Maintaining IS III
Overview
This section provides the procedures that you will use to maintain IS Ill on a regular basis.
■
■
■
■
■
■
These procedures include:
Backing up files
You should back up the files on a regular basis, so that you have current information in case of a system failure.
Displaying the Disk Usage Report
The Disk Usage Report shows the current disk usage statistics for the Master Controller.
Changing passwords
You can change passwords for the IS Ill login and each IS Ill application.
Administering voice mail group lists for CAS voice message alarm notification (both CAS and AUDIX Voice Power must be installed)
When the system is installed, AUDIX Voice Power voice mail group lists must be created for voice message alarm notification to occur. You can create and change existing group lists as needed.
Restarting the printer scheduler/spooler
You may need to remove all queued printing jobs and restart the printer.
Setting the time and date
Maintaining IS III
Shutting down the system
There are specific steps you should follow when shutting down the UNIX system to avoid damaging the files.
Accessing Voice System Administration
Voice System Administration allows you to access application administration, reports, configuration management, and system monitoring for AUDIX Voice Power and FAX Attendant.
Backing Up the System
The information saved during a backup can be used to restore IS Ill in the unlikely event of a catastrophic failure. You should back up your files when subscriber information or prompt messages are changed.
IS Ill supports the following backup procedures:
complete system backup to tape, which copies all of the IS Ill files. This includes the following items:
— — — — — —
UNIX system files
application program files
administrative files for each application
(the CAS database and the system greetings for AUDIX Voice Power and FAX Attendant)
all voice system files (if AUDIX Voice Power or FAX Attendant is installed), including all voice messages, system greetings, and personal greetings
all fax messages (if FAX Attendant is installed), including Fax Response files
call detail records
back up administrative files to diskette, which copies only the administrative files for each application and the system greetings for AUDIX Voice Power and FAX Attendant
CAUTION:
Maintaining IS III
To back up the system, perform the following steps:
1. Log in and access the Integrated Solution Ill Main Menu.
The Integrated Solution Ill Main Menu appears.
Integrated Solution III
>AUDIX Voice Power/FAX Attendant (AVP/FA) Call Accounting System (CAS)
User Maintenance Exit
Move to an item using the arrow keys and press ENTER.
Screen 4-1. Integrated Solution III Main Menu
2. All the lntegrated Solution III Main Menu, move the cursor to User Maintenance and press
Maintaining IS III
User Maintenance
>Backup Files Maintenance Log Password Protection Printer Restart Set Time and Date System Shutdown
Voice System Administration
Move to an item using the arrow keys and press ENTER.
Screen 4-2. User Maintenance Menu
NOTE:
Voice System Administration appears if AUDIX Voice Power or FAX Attendant is installed.
3. At the User Maintenance Menu, move the cursor to Backup Files and press
Backup Files
>Administrative Files Backup to Diskette Complete System Backup to Tape
Move to an item using the arrow keys and press ENTER.
Screen 4-3. Backup Files
At this point, you may perform one of the following backup procedures:
Back up the administrative files for all of the lS Ill applications supported to diskettes (Administrative Files Backup to Diskette).
Back up the entire system to tape cartridge (Complete System Tape).
CAUTION:
It is strongly recommended that you perform after the other.
both backups,
Backup to
Maintaining IS III
Backing Up Administrative Files to Diskettes
When you back up administrative files to diskette, this backup includes only the administrative files for each application and the system greetings for AUDIX Voice Power and FAX Attendant.
The number of diskettes required to perform the backup may vary.
To back up the administrative files to diskette, perform the following steps:
1. At the Backup Files Menu, move the cursor to Administrative Files Backup to Diskette and press
The following message appears:
Confirm
IS III Application Administrative Files Backup will save the administrative files associated with all installed applications to diskette.
Strike ENTER when ready or ESC to stop.
2. Press
The system lists the number of 1.44 MB, 3.5-inch diskettes you will need and informs you that the diskette(s) will be automatically formatted prior to the backup. When the system is ready, the following message appears:
Confirm
Insert diskette #l to be formatted.
Strike ENTER when ready or ESC to stop.
3. Insert a diskette and then press
The system displays the following message:
Formatting diskette - do not remove.
— lf only one diskette needs to be formatted, the system displays the following message:
Starting IS III Application Administrative Files Backup
Confirm
Insert diskette #1.
Strike ENTER when ready or ESC to stop.
Maintaining IS III
— If more than one diskette needs to be formatted, the following message appears (where n is the number of the diskette in the formatting
sequence):
Confirm
Insert diskette #n to be formatted.
Strike ENTER when ready or ESC to stop.
a. Remove the diskette from the drive and insert the next one to be formatted.
b. Press
The system displays the following message:
Formatting diskette - do not remove.
Repeat this step for each diskette until the following message appears:
Starting IS III Application Administrative Files Backup
Confirm
Insert diskette #1.
Strike ENTER when ready or ESC to stop.
Proceed with step 4.
4. Press to confirm that you are ready to begin backing up administrative fries, using the diskette that you just formatted.
The following message appears:
IS III Application Administrative Files backup in progress
After backing up the administrative files, the system displays the following message:
IS III Application Administrative Files backup to diskette was successful. Remove the diskette from the drive.
Please label the diskette(s) “System Files Backup #n” where “n” is the diskette number.
It is advisable to do a Voice System Backup now, this will be done automatically.
Strike ENTER when ready.
Maintaining IS III
6. Press
— If you do not have AUDIX Voice Power or FAX Attendant, you are returned to the Backup Files Menu.
Proceed with step 10.
— If you have AUDIX Voice Power or FAX Attendant, the following message appears:
Confirm
The Voice System Backup to diskette will save the custom voice prompts for AUDIX Voice Power services. Personal greetings and messages will not be saved.
Strike ENTER when ready or ESC to stop.
Proceed with step 7.
7. Press The system calculates the number of diskettes needed to do the Voice System backup.
The system lists the number of 1.44 MB, 3.5-inch diskettes you will need and informs you that the diskette(s) will be automatically formatted prior to the backup. When the system is ready, the following message appears:
Confirm
Insert diskette #1 to be formatted
Strike ENTER when ready or ESC to stop.
8. Insert a diskette and press
The system responds:
Formatting diskette - do not remove
— lf only one diskette needs to reformatted, the system displays the following message when formatting is complete:
The voice files will now be backed up.
After backing up the voice files, the system responds:
The voice files have been successfully backed up. Remove the diskette and label it “Voice System Backup”
Strike ENTER when ready.
Maintaining IS III
9.
10.
— If more than one diskette needs to be formatted, the following message appears (where n is the number of the diskette in the formatting
sequence):
Confirm
Insert diskette #n to be formatted. Strike ENTER when ready
or ESC to stop.
a. When prompted, remove the diskette from the drive and insert the next one to be formatted.
b. Press
The system displays the following message:
Formatting diskette - do not remove.
Repeat steps a and b for each diskette until the following message appears:
The voice files will now be backed up.
As the voice files are backing up, the system will prompt you each time you need to insert the next diskette.
c. When prompted, remove the diskette from the drive, write-protect it, and label it “Voice System Backup #n,” where n is the number of the diskette in the backup sequence.”
d. insert the next diskette.
Repeat steps c and d for each diskette until the following message appears:
The voice files have been successfully backed up. Remove the diskette and label it “Voice System Backup”
Strike ENTER when ready.
e. Remove the diskette, write-protect it, and then label it “Voice System Backup #n,” where n is the number of the diskette in the backup sequence.”
Proceed with step 9.
Press to return to the Backup Files Menu.
Maintaining IS III
Backing Up the Entire System to Tape
When — — — — — —
you back up the entire system to tape, the following files are stored:
UNIX system files
application program files
administrative files for each application
(the CAS database and the system greetings for AUDIX Voice Power and FAX Attendant)
all voice system files (if AUDIX Voice Power or FAX Attendant is installed), including all voice mailbox messages, system greetings, and personal greetings
all fax messages (if FAX Attendant is installed), including Fax Response files.
call detail records
Perform this procedure only when the switch is idle. If AUDIX Voice Power or FAX Attendant is installed, you will need two blank tapes to perform this backup.
Otherwise, one tape is sufficient. For the Master Controller II+ (with a 125 MB tape drive), DC6320 tapes by 3M are recommended. For the Master Controller Ill (with a 250 MB tape drive), DC6525 tapes by 3M are recommended.
To back up your entire system to tape, perform the following steps:
1. At the Backup Files Menu, move the cursor to Complete System Backup to Tape and press
The system displays the following message:
Confirm
A Complete System Backup will back up all application files, system files and all voice files. This will usually take two cartridge tapes. Each tape will take less than a half hour to complete.
Strike ENTER when ready or ESC to stop.
2. Press
The system responds:
Please insert the first cartridge tape and press ENTER
3. Insert the tape for the application and system files, and press
The light on the tape drive goes on and the system responds:
WORKING . . . .
Maintaining IS III 4. 5. 6. 7. 8. 9.
After the application and system files are saved, the system responds:
The application files and system files have been
successfully backed up. After the light on the tape drive goes out, remove the tape and label it “System Files”.
Strike ENTER when ready.
When you see the Iight on the tape drive go out, remove the tape, write-protect it, and label it with the date and “System Files.”
Press
— lf you do not have AUDIX Voice Power or FAX Attendant, you are returned to the Backup Files menu.
Proceed with step 10.
— lf you have AUDIX Voice Power or FAX Attendant, the following message appears:
Confirm
A Complete Voice System Backup to Tape will back up all system voice files. This will usually take one cartridge tape. This tape will take less than one half hour to complete.
Strike ENTER when ready or ESC to stop.
Press
The system responds:
Please insert the second cartridge tape and press ENTER
Insert the tape for the voice files and pressl
The light on the tape drive goes on, and when ready, the system responds:
The Voice System files have been successfully backed up. After the light on the tape drive goes out, remove the tape and label it “Voice Files”.
Strike ENTER when ready.
After the light on the tape drive goes out, remove the tape, write-protect it, and then label it with the date and ’’Voice Files.”
Press to return to the Backup Files Menu.
Maintaining IS III
Displaying the Disk Usage Report
The Disk Usage Report provides information on the available disk space for system and voice partitions, a partition being an area of the disk reserved specifically for either system files or voice files. If you are experiencing problems with AUDIX Voice Power, FAX Attendant, or the Call Accounting System, there may be a shortage of available disk space for voice messages, fax messages, or call detail records. The Disk Usage Report provides the current status of the hard disk for these applications.
To display the Disk Usage Report, perform the following steps:
1. Log in and access the Integrated Solution Ill Main Menu.
The Integrated Solution Ill Main Menu appears.
Integrated Solution III
>AUDIX Voice Power/FAX Attendant (AVP/FA) Call Accounting System (CAS)
User Maintenance Exit
Move to an item using the arrow keys and press ENTER.
Maintaining IS III
2. At the Integrated Solution Ill Main Menu, move the cursor to User
Maintenance and press
The User Maintenance Menu appears.
User Maintenance
>Backup Files Maintenance Log Password Protection Printer Restart Set Time and Date System Shutdown
Voice System Administration
Move to an item using the arrow keys and press ENTER.
Screen 4-5. User Maintenance Menu
NOTE:
Voice System Administration is installed.
Maintaining IS III
3. At the User Maintenance Menu, move the cursor to Maintenance Log and press
The Maintenance Log Menu appears.
Maintenance Log
>Administer CAS Alarm Levels Dick Usage Raport
Screen 4-6. Maintenance Log
Move to an item using the arrow keys and press ENTER.
NOTE:
The Administer CAS Alarm Levels option CAS and AUDIX Voice Power preinstalled.
appears only if both
4. At the Maintenance Log Menu, move the cursor to Disk Usage Report and press
Maintaining IS III
Disk Usage Report
HARD DISK SIZE: 202.00 MB System Partition Size: 90.25 MB
System Partition Remaining: 48.05 MB
Voice Partition Size: 13 Hours 12 Minutes Voice Partition Remaining: 11 Hours 25 Minutes
Screen 4-7. Sample Dick Usage Report
The report will look different depending on the hard disk size of the Master
Controller. Warning messages for low partition space are displayed if available disk space is less than the system thresholds. Voice Partition information will be
displayed only if you are using AUDIX Voice Power.
lf the System Partition Warning (***** Warning System Space is Low) is
displayed, the disk may contain too many call detail records or faxes (incoming or outgoing). This message appears if the amount of space remaining is less than 4 MB. Refer to the AT&T Call Accounting System (CAS) Integrated Solution User’s
Guide (Document No. 585-247-120) for instructions on how to remove old call detail
records. Refer to the AT&T FAX Attendant System™, Release 2.1.1, System
Manager’s Guide (Document No. 555-007-100) for instructions on how to remove
faxes. See the table on the next page for information on the disk space required in the system partition.
If the Voice Partition Warning (***** Warning Voice Storage Space is Low)
Maintaining IS III
Voice, Fax, and CAS Disk Usage
Assuming each fax page is a full page of text, each fax page requires approximately 40 KB of disk space.
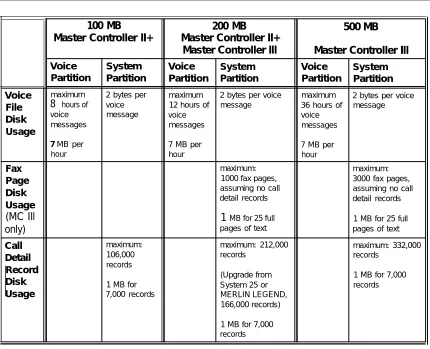
See the following table for additional information on the disk space required for fax pages, voice files, and call detail records. This table also indicates maximum voice hours, fax pages, and call detail records for the Master Controller II+ and the Master Controller Ill.
Table 4-1. System Capacities
100 MB 200 MB 500 MB
Master Controller II+ Master Controller II+
Master Controller Ill Master Controller Ill
Voice System Voice System Voice System Partition Partition Partition Partition Partition Partition
Voice maximum 2 bytes per maximum 2 bytes per voice maximum 2 bytes per voice
File 8 hours of voice 12 hours of message 36 hours of message
Disk voice message voice voice
Usage messages messages messages
7 MB per 7 MB per 7 MB per
hour hour hour
Fax maximum: maximum:
Page 1000 fax pages, 3000 fax pages,
Disk assuming no call assuming no call
Usage detail records detail records
(MC Ill 1 MB for 25 full 1 MB for 25 full
only) pages of text pages of text
Call maximum: maximum: 212,000 maximum: 332,000
Detail 106,000 records records
Record records
Disk 1 MB for (Upgrade fromSystem 25 or 1 MB for 7,000records
Usage 7,000 records MERLIN LEGEND, 166,000 records)
1 MB for 7,000 records
When you are finished reviewing the Disk Usage Report, press (CANCEL) toF6
return to the Maintenance Log Menu. Press (CANCEL) again to return to theF 6
Maintaining IS III
Changing Passwords
Access to IS Ill and each of its applications requires a password. When you log into IS Ill for the first time, IS Ill prompts you to create a login password. Also, IS Ill will prompt you to create a password the first time you access each application.
The following procedure explains how to change passwords, which can be done at any time. If you do not change the login and application passwords from the following procedure, IS Ill will prompt you to change them every 60 days.
For security reasons, only a technician can delete a password. If you wish to delete a password, contact the AT&T Support Center at 1-600-626-2666 or your AT&T Authorized Dealer.
To be accepted by the system, each password must meet the following criteria:
■ Be at least six characters long.
■ Contain at least two alphabetic characters.
■ Contain at least one numeric or special character.
■ Differ from the old passwords by at least three characters.
NOTE:
If you have not already read about security and passwords in Chapter 1, do so before continuing.
To change a password, perform the following steps:
1. Log in and access the Integrated Solution Ill Main Menu.
Maintaining IS III
Integrated Solution III
>AUDIX Voice Power/FAX Attendant (AVP/FA) Call Accounting System (CAS)
User Maintenance Exit
Move to an item using the arrow keys and press ENTER.
Screen 4-8. Integrated Solution III Main Menu
2. At the lntegrated Solution lll Main Menu, move the cursor to User Maintenance and press
Maintaining IS III
User Maintenance
>Backup Files Maintenance Log Password Protection Printer Restart Set Time and Date System Shutdown
Voice System Administration
Move to an item using the arrow keys and press ENTER.
Screen 4-9. User Maintenance Menu
3. At the User Maintenance
The Password Protection
Menu, select Password Protection and press
Maintaining IS III
Password Protection
>AUDIX Voice Power/FAX Attendant (AVP/FA) Call Accounting System (CAS)
IS III User Login (is)
Screen 4-10. Password Protection
Move to an item using the arrow keys and press ENTER.
4. At the Password Protection Menu, move the cursor to the item you want, depending on the password that you want to change, and then press
NOTE:
The password for Voice System Administrati