Installation Guide for WebLogic Windows
Appeon® PowerServer® 2017 Windows
DOCUMENT ID: ADC00809-01-0700-01 LAST REVISED: October 30, 2017
Copyright © 2000-2017 by Appeon Limited. All rights reserved.
This publication pertains to Appeon software and to any subsequent release until otherwise indicated in new editions or technical notes. Information in this document is subject to change without notice. The software described herein is furnished under a license agreement, and it may be used or copied only in accordance with the terms of that agreement.
No part of this publication may be reproduced, transmitted, or translated in any form or by any means, electronic, mechanical, manual, optical, or otherwise, without the prior written permission of Appeon Limited.
Appeon, the Appeon logo, Appeon PowerBuilder, Appeon PowerServer, PowerServer, PowerServer Toolkit, AEM, and PowerServer Web Component are trademarks of Appeon Limited.
SAP, Sybase, Adaptive Server Anywhere, SQL Anywhere, Adaptive Server Enterprise, iAnywhere, Sybase Central, and Sybase jConnect for JDBC are trademarks or registered trademarks of SAP and SAP affiliate company.
Java and JDBC are trademarks or registered trademarks of Sun Microsystems, Inc. All other company and product names used herein may be trademarks or registered trademarks of their respective companies.
Use, duplication, or disclosure by the government is subject to the restrictions set forth in subparagraph (c)(1)(ii) of DFARS 52.227-7013 for the DOD and as set forth in FAR 52.227-19(a)-(d) for civilian agencies.
Appeon Limited, 1/F, Shell Industrial Building, 12 Lee Chung Street, Chai Wan District, Hong Kong.
Contents
1 About This Book ... 1
1.1 Audience ... 1
1.2 How to use this book ... 1
1.3 Related documents ... 1
1.4 If you need help ... 3
2 Introduction ... 4
2.1 Overview ... 4
2.2 System architecture ... 4
2.3 Editions and components ... 7
3 Installation Requirements ... 10 3.1 Client requirements ... 10 3.1.1 Software requirements ... 10 3.1.2 Hardware requirements ... 10 3.2 PowerServer requirements ... 10 3.2.1 Software requirements ... 10 3.2.2 Hardware requirements ... 11
3.2.3 (Optional) Third-party Web Server requirements ... 11
3.3 Database Server requirements ... 11
3.4 Offline synchronization requirements ... 12
3.4.1 Client Database requirements ... 12
3.4.2 Synchronization Server requirements ... 12
3.4.3 Server Database requirements ... 12
4 Installing Appeon PowerServer 2017 ... 13
4.1 Overview ... 13
4.2 Installation scenarios ... 13
4.2.1 Overview ... 13
4.2.2 Developer PC ... 14
4.2.3 Remote PowerServer using WebLogic HTTP Server ... 14
4.2.4 Remote PowerServer using a third-party Web server ... 15
4.2.5 PowerServer Cluster ... 15
4.3 Two installation methods ... 16
4.4 Appeon new installation ... 16
4.4.1 Starting the installation ... 16
4.4.2 PowerServer Mobile/Web installation ... 19
4.4.2.1 Deploying appeonserver.ear package ... 20
4.4.3 PowerServer Web Component installation (for third-party Web servers only) ... 27
4.4.4 PowerServer Help installation ... 28
4.5 Appeon upgrade installation ... 28
4.5.1 Before you upgrade ... 28
4.5.2 Upgrading to PowerServer 2017 ... 29
4.5.2.1 Upgrading PowerServer ... 29
4.5.2.2 Upgrading PowerServer Web Component ... 29
4.5.3 Upgrade configuration settings manually ... 30
4.6 Starting/Stopping PowerServer ... 30
4.6.2 Logging in to WebLogic Server Administration Console ... 31
4.6.3 Stopping PowerServer ... 33
4.7 Troubleshoot Appeon installation problems ... 33
5 Configuring PowerServer Cluster ... 34
6 Post-Installation Configuration Tasks ... 35
6.1 Overview ... 35
6.2 Configuration for Web client PC ... 36
6.2.1 Verifying Web browser settings ... 36
6.2.1.1 Verifying Chrome/Firefox/Opera settings ... 36
6.2.1.2 Configuring IE settings ... 38
6.2.2 Logging in as administrator or normal user ... 40
6.3 System language settings ... 40
7 Uninstalling Appeon PowerServer 2017 ... 42
7.1 Overview ... 42
7.2 Uninstalling PowerServer ... 42
7.3 Uninstalling PowerServer Web Component (for third-party Web servers only) ... 42
7.4 Uninstalling PowerServer Help ... 42
About This Book Appeon® PowerServer® 2017 Windows
1 About This Book
1.1 Audience
This book is for a PowerBuilder programmer to set up the Web and/or mobile development and runtime environment by installing the different components of Appeon PowerServer.
1.2 How to use this book
There are seven chapters in this book. Chapter 1: About This Book
A general description of this book. Chapter 2: Introduction
An overview of Appeon PowerServer 2017 for WebLogic Windows and its system architecture.
Chapter 3: Installation Requirements
The system requirements for installing Appeon PowerServer 2017 for WebLogic Windows. Chapter 4: Installing Appeon PowerServer 2017
Instructions for installing and upgrading PowerServer, PowerServer Toolkit, and PowerServer Web Component.
Chapter 5: Configuring PowerServer Cluster Instructions for configuring a PowerServer cluster. Chapter 6: Post-Installation Configuration Tasks
Instructions on configurations required for Appeon system architecture that affect the running of Web applications.
Chapter 7: Uninstalling Appeon PowerServer 2017
Instructions for uninstalling Appeon PowerServer 2017 for WebLogic Windows.
1.3 Related documents
Appeon provides the following user documents to assist you in understanding Appeon PowerServer and its capabilities:
• Introduction to Appeon:
Gives general introduction to Appeon PowerServer and its editions.
• Getting Started (for PowerServer Mobile):
Guides you though installing PowerBuilder and Appeon PowerServer, and developing and deploying a mobile application.
• New Features Guide:
About This Book Appeon® PowerServer® 2017 Windows
• PowerServer Mobile Tutorials:
Gives instructions on deploying, running, and debugging the mobile application, distributing native mobile apps, and configuring the PowerServer cluster.
• PowerServer Mobile (Offline) Tutorials:
Gives instructions on setting up the PowerServer Mobile (Offline) environment, and configuring, deploying, running, updating, and debugging the offline application.
• Appeon Installation Guide:
Provides instructions on how to install Appeon PowerServer successfully.
• Mobile UI Design & Development Guide:
Introduces general guidelines on designing and developing the mobile app and UI.
• Migration Guidelines for PowerServer Web:
A process-oriented guide that illustrates the complete diagram of the Appeon Web migration procedure and various topics related to steps in the procedure, and includes a tutorial that walks you through the entire process of deploying a small PowerBuilder application to the Web.
• Supported PB Features:
Provides a detailed list of supported PowerBuilder features which can be converted to the Web/Mobile with Appeon as well as which features are unsupported.
• PowerServer Toolkit User Guide:
Provides instructions on how to use the PowerServer Toolkit in Appeon PowerServer.
• Workarounds & API Guide:
Provides resolutions for unsupported features and various APIs to facilitate you to implement the features (including Web and mobile) that are not easy or impossible to implement in the PowerBuilder IDE.
• Appeon Workspace User Guide:
Gives a general introduction on Appeon Workspace and provides detailed instructions on how to use it.
• PowerServer Configuration Guide:
Provides instructions on how to configure PowerServer Monitor, establish connections between PowerServer and database servers, and configure AEM for maintaining PowerServer and the deployed applications.
• Web Server Configuration Guide:
Describes configuration instructions for different types of Web servers to work with the PowerServer.
About This Book Appeon® PowerServer® 2017 Windows
Provides information on troubleshooting issues; covering topics, such as product installation, application deployment, AEM, and Appeon application runtime issues.
• Appeon Performance Tuning Guide:
Provides instructions on how to modify a PowerBuilder application to achieve better performance from its corresponding Web/mobile application.
• Testing Appeon Web Applications with UFT:
Provides instructions on how to test Appeon Web applications with UFT.
1.4 If you need help
If you have any questions about this product or need assistance during the installation process, access the Technical Support Web site at http://www.appeon.com/support.
Introduction Appeon® PowerServer® 2017 Windows
2 Introduction
2.1 Overview
Appeon PowerServer is the first and revolutionary solution that leverages the PowerBuilder IDE for building an application and deploying it as a Windows client/server app, a Windows browser-based Web app, and an iOS/Android native mobile app. PowerBuilder is a very mature and productive 4GL development environment, running on the Windows platform, and offering distinguished features such as MDI windows, DataWindows, menus, and toolbars. All of these powerful features will be available in the deployed application. From the native source code of PowerBuilder applications, Appeon PowerServer can
generate n-tier applications that can run on the Web or mobile environment. The application that run on the Web environment can automatically and precisely replicate the Client/Server user interface with HTML running in standard Windows Web browsers, while the application that run on the mobile environment can automatically take the typical mobile user interface for the iOS and Android OS. The application business logic including DataWindows, Embedded SQL and dynamic SQLs is deployed to a Java-based or .NET-based back-end. These applications offer the rich user experience of the original PowerBuilder applications and deliver the superior Quality Of Service (QOS) of the n-tier architecture and J2EE platform, as well as greater availability, scalability, security and reliability.
Appeon PowerServer allows the entire application conversion process to be executed within the PowerBuilder IDE. It does not require the developer to write a single line of code. Only standard PowerBuilder programming skills are required.
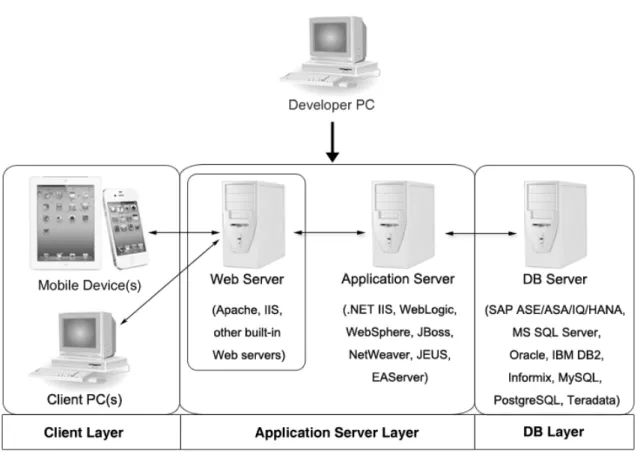
2.2 System architecture
Appeon PowerServer works with standard n-tier architecture. Each tier serves a specific purpose in the architecture, though it may not necessarily reside in the same physical machine. For example, the Web server, application server and database server can reside in one machine or in different machines. A single tier may also be spread across multiple physical machines. For example, the application server can consist of a cluster of PowerServer computers to provide load balancing and failover.
Introduction Appeon® PowerServer® 2017 Windows
Figure 2.1: Appeon system architecture
Appeon applications deploy to the standard n-tier architecture - the client tier, middle tier (application server), and data tier (database) are logically separated. Each tier should have appropriate Appeon components and/or third-party software installed according to its role within the architecture. The following table briefly lists the tiers, roles, their purposes and the required Appeon/third-party software.
Table 2.1: Tiers in the Appeon architecture
Tier Role Purpose Appeon
Component
Third-party Software
Mobile Device
Runs the Appeon native mobile applications. Appeon Workspace (Optional) None Client tier
Client PC Runs the Appeon Web
applications in Web browsers.
Appeon Xcelerator plug-in Microsoft Internet Explorer, Microsoft Edge, Mozilla Firefox, Google Chrome, or Opera Developer PC Developer PC
Deploys your PowerBuilder application to the server.
PowerServer Toolkit PowerBuilder Middle tier Web Server
Responds incoming requests from the client tier, and dispatches requests to the application server.
PowerServer Web Component WebLogic HTTP Server or any
WebLogic-Introduction Appeon® PowerServer® 2017 Windows
Tier Role Purpose Appeon
Component
Third-party Software
Hosts the presentation layer of the deployed Web applications.
compatible Web server
Application Server
Hosts the DataWindows of the Appeon deployed applications, and provides the necessary run-time services to the deployed applications, such as DataWindow retrieval and update, Embedded SQLs, dynamic SQLs, security authentication etc. Appeon application middle-tier can invoke Java components, external DLL functions, and C ++ components. Furthermore, it supports Web Services for the most flexibility integrating with J2EE and .NET.
PowerServerWebLogic Server
Data tier Database Server
Hosts the application database. None JDBC-compliant RDBMS supported by Appeon. Please see Database server requirements for more information.
• Client Tier
Mobile device: The mobile application client layer is implemented using universal C++
libraries and JavaScript libraries. The C++ libraries render the mobile-style UI and provide interface for calling the device native features, information and hardware (camera, GPS, etc.), and support accessing the client/offline database and running the offline application. The JavaScript libraries support the PowerScript or UI logic coded in the Window object, user object (including NVOs), menu object and any other visual objects. These client libraries are automatically included in Appeon Workspace or the packaged mobile app.
Client PC: The Web application client layer consists of two plug-ins and some C++/
JavaScript libraries which are originally built into PowerServer Web Component and then automatically downloaded to the client when the application is run for the first time. The two plug-ins manage the download and caching of the Web application and also act as the bridge to interact between the C++/JS libraries and the Web page. The C++/JS libraries render the PowerBuilder-style Web graphical user interface in the Web browsers.
• Middle Tier
The middle tier, which hosts the business logic, is implemented with J2EE or .NET
components. These components execute the DataWindows, Embedded SQLs, and dynamic SQLs of the deployed application. The middle tier deploys to the Java or .NET compliant
Introduction Appeon® PowerServer® 2017 Windows
PowerServer, leveraging dozens of many-years of investments in DataWindows and other business logic.
• Data Tier
The database stores the raw data for the application and stored procedures, if any. The existing database from the PowerBuilder application can be simply re-used without modification so long as it is an Appeon-certified database.
2.3 Editions and components
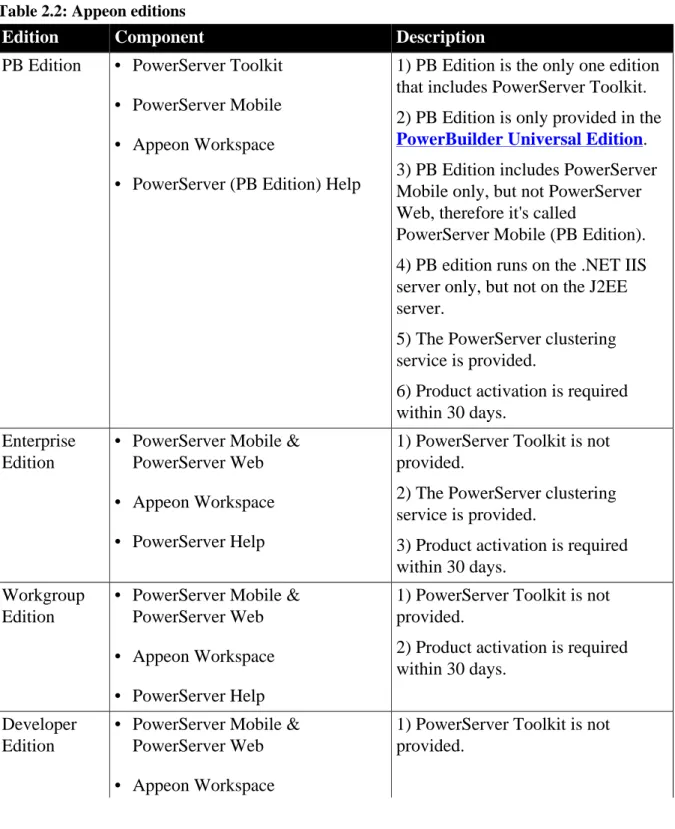
Appeon PowerServer 2017 provides the following editions for the Windows platform. Table 2.2: Appeon editions
Edition Component Description
PB Edition • PowerServer Toolkit
• PowerServer Mobile
• Appeon Workspace
• PowerServer (PB Edition) Help
1) PB Edition is the only one edition that includes PowerServer Toolkit. 2) PB Edition is only provided in the
PowerBuilder Universal Edition. 3) PB Edition includes PowerServer Mobile only, but not PowerServer Web, therefore it's called
PowerServer Mobile (PB Edition). 4) PB edition runs on the .NET IIS server only, but not on the J2EE server.
5) The PowerServer clustering service is provided.
6) Product activation is required within 30 days.
Enterprise Edition
• PowerServer Mobile & PowerServer Web
• Appeon Workspace
• PowerServer Help
1) PowerServer Toolkit is not provided.
2) The PowerServer clustering service is provided.
3) Product activation is required within 30 days.
Workgroup Edition
• PowerServer Mobile & PowerServer Web
• Appeon Workspace
• PowerServer Help
1) PowerServer Toolkit is not provided.
2) Product activation is required within 30 days.
Developer Edition
• PowerServer Mobile & PowerServer Web
• Appeon Workspace
1) PowerServer Toolkit is not provided.
Introduction Appeon® PowerServer® 2017 Windows
Edition Component Description
• PowerServer Help 2) The maximum number of online users is 5.
3) Product activation is required within 30 days.
Trial Edition • PowerServer Mobile & PowerServer Web
• Appeon Workspace
• PowerServer Help
1) PowerServer Toolkit is not provided.
2) Trial Edition has a 30-day time bomb.
3) The PowerServer clustering service is provided.
4) The maximum number of online user is unlimited.
2.3.1 PowerServer Toolkit
PowerServer Toolkit is a plug-in to the PowerBuilder IDE installed to the developer's PC. It provides a set of tools that enable the mobile and Web application generation, maintenance, and upgrades within the PowerBuilder IDE. These tools are accessed via a toolbar in the PowerBuilder IDE, which automatically loads each time PowerBuilder is started.
Note
Starting from version 2017, PowerServer Toolkit is only available in PowerServer
(PB edition) which can be installed from the PowerBuilder Universal Edition
installation package. PowerServer Toolkit 2017 can deploy apps to PowerServer 2017 or 2016 (in version 2016, PowerServer is called Appeon Server).
2.3.2 PowerServer Mobile/Web
PowerServer Mobile/Web is a set of server components that is deployed to the application server. It provides the Appeon applications with necessary run-time services such as data connectivity, DataWindow support, transaction management, and security.
PowerServer also includes AEM and PowerServer Web Component.
AEM is the management console for PowerServer and the deployed applications. When you install PowerServer, AEM is automatically installed.
During the PowerServer Mobile/Web installation, the PowerServer Web Component is automatically installed to the WebLogic Web Server, therefore, if you are using one WebLogic Server as both the Web server and the application server, you will NOT need to run the PowerServer Web Component installation.
Note
PowerServer Mobile (PB Edition) is activated differently from the other editions.
Introduction Appeon® PowerServer® 2017 Windows
follow the Activating PowerServer Mobile (PB Edition) section in the Appeon License User Guide.
2.3.3 PowerServer Web Component
PowerServer Web Component is installed with PowerServer Web/Mobile automatically as aforementioned.
PowerServer Web Component resides in the Web server. It consists of the Web server redirector plug-in (that dispatches the user requests to the PowerServer) and a set of runtime libraries for the Web application (that supports the PowerBuilder-style UI in the Web browser).
If you use a third-party Web server (such as Apache or IIS) and/or physically separate the Web server and the PowerServer, for example, for load balancing purpose, you will need to install PowerServer Web Component to the Web server and configure the Web server with the redirector plug-in. For detailed instructions on configuring the Web server, refer to Web Server Configuration Guide.
2.3.4 Appeon Workspace (for Mobile only)
Appeon Workspace is installed on the mobile device to help simplify the distribution and installation of the native mobile app. It consists of a set of mobile client libraries and a graphical user interface. The mobile client libraries generate the mobile-style UI, support the PowerScript and UI logic, provide interfaces for calling the mobile SDK, and support accessing the client/offline database and running the offline mobile application. The graphical user interface allows end users to install and run the mobile application from PowerServer conveniently, so developers do not need to register their mobile applications in the online application store, and the end users do not need to install them from there.
Appeon Workspace is distributed as a native mobile app thru the online app stores (such as Apple App Store, Google Play) or over-the-air, and it is also automatically included when you package and compile the Appeon mobile application as the iOS application archive (IPA) file or Android application package (APK) file.
2.3.5 PowerServer Help
PowerServer Help provides easy access to all user documents. It saves time and conveniently places the help information, such as, the Appeon supported features, at your fingertips. PowerServer Help is a Microsoft compiled HTML help (.chm) which can be installed and viewed on the Windows OS only. To view the Appeon documentation on all OS, you can visit the online web help at the Appeon web site.
Installation Requirements Appeon® PowerServer® 2017 Windows
3 Installation Requirements
3.1 Client requirements
3.1.1 Software requirementsRequirements for the mobile device:
• Apple iOS 9, 10, or 11
iOS devices: iPad 2/3/4/Mini/Air, iPhone 4/4S/5/5C/5S/6/6 Plus/7, iPad Pro 12.9-inch.
• Google Android 4.2, 4.3, 4.4, 5.0, 6.x, or 7.0, all 32-bit
Android devices that have been certified by Appeon include the recent and popular Samsung phones and tablets, Google Nexus 6P, Google Nexus 7, LG Nexus 4 E960 (smartphone), ASUS ZenPad S8.0, and ASUS MeMo Pad FHD 10 ME 302C.
Requirements for the Web client PC:
• Microsoft Internet Explorer (8.0 thru 11), Microsoft Edge (27 thru 38), Mozilla Firefox (29 thru 55), Google Chrome (35 thru 60), or Opera (30 thru 47)
• Windows 7, Windows 8.1, or Windows 10
• (Optional) Adobe Acrobat Reader 6.0 or above (for viewing printed PDF DataWindows or reports)
3.1.2 Hardware requirements
Requirements for the Web client PC:
• Intel processor(s) running at 1.8 GHz or faster
• At least 2 GB Free RAM
3.2 PowerServer requirements
3.2.1 Software requirements• Windows Operating System that is supported by WebLogic Server
• Oracle® WebLogic Server 8.1.6, 9.2, 10.3, 11g, 12.1.2, or 12.1.3
Please make sure that the WebLogic Server is started by JDK 1.6 or above.
Please also make sure that the following system environment variables includes the correct JDK directories:
• JAVA_HOME: includes the JDK home directory, for example, C:\Program Files\Java \jdk1.6.0_24.
Installation Requirements Appeon® PowerServer® 2017 Windows
• CLASSPATH: includes the JDK lib directory and the tools.jar file, for example, %JAVA_HOME%\lib;%JAVA_HOME%\lib\tools.jar.
• Path: includes the JDK bin directory, for example, %JAVA_HOME%\bin.
3.2.2 Hardware requirements
• Intel processor(s) running at 1.8 GHz or faster
• At least 2 GB Free RAM (4 GB Free RAM recommended)
• 900 MB hard drive space (for WebLogic Server installation) plus 500 MB hard drive space (for PowerServer Mobile/Web installation)
3.2.3 (Optional) Third-party Web Server requirements
• Apache 1.3, 2.0, or 2.2, or Microsoft IIS 7.5, 8.0, or 10
• 50 MB hard drive space (for PowerServer Web Component installation)
To make the third-party Web server work with PowerServer, you must have the Web server redirector plug-in installed and configured. For detailed instructions, refer to Web Server Configuration Guide.
3.3 Database Server requirements
Appeon PowerServer 2017 can connect to any of the following database servers:
• SAP SQL Anywhere 8.0.2, 9.0, 10.0.1, 11.0, 12.0, 16.0, or 17.0 with SAP iAnywhere or jConnect JDBC driver
• SAP SQL Anywhere WEB Edition with SAP jConnect or iAnywhere JDBC driver
• SAP Adaptive Server Enterprise (ASE) 12.5.x or 15.x with SAP jConnect or iAnywhere JDBC Driver
• SAP IQ 12.6.x, 12.7.x or 15 with jConnect JDBC driver
• SAP HANA 1.00.36 with SAP In-Memory Database JDBC driver
• IBM DB2 UDB 8.1, 8.2, 9.5 or 10 with IBM JDBC driver
• Informix 9.x, 10.x or 11.x with IBM JDBC driver
• Microsoft SQL Server 2000 SP4, 2005 SP1, 2008, 2012, 2014, or 2016 with MSFT JDBC driver or JTDS driver
• MySQL 5.5.x or 5.6.x with Connector/J driver
Installation Requirements Appeon® PowerServer® 2017 Windows
• Teradata 13.00.00.27 with Teradata JDBC driver
• PostgreSQL 9.2 with PostgreSQL JDBC driver
For instructions on downloading and installing the driver files, refer to Section 4.2.4, “JDBC driver preparation” in PowerServer Configuration Guide for J2EE.
3.4 Offline synchronization requirements
3.4.1 Client Database requirementsAppeon PowerServer 2017 supports the following client/offline databases:
• UltraLite 17
Upgrade your UltraLite database (both the local database and the server database) to version 17, as PowerServer 2017 supports only UltraLite 17 and does not support 12 any more.
• SQLite 3.x
3.4.2 Synchronization Server requirements
Appeon PowerServer 2017 supports the following offline synchronization server:
• MobiLink Server 17 (included in SQL Anywhere 17 components)
Note
MobiLink can synchronize an UltraLite database, but cannot synchronize a SQLite database. To synchronize a SQLite database, you would need to develop your own synchronization solution.
3.4.3 Server Database requirements
MobiLink Server can connect to the consolidated databases that MobiLink supports. For detailed information, refer to MobiLink consolidated database in SQL Anywhere online help.
Installing Appeon PowerServer 2017 Appeon® PowerServer® 2017 Windows
4 Installing Appeon PowerServer 2017
4.1 Overview
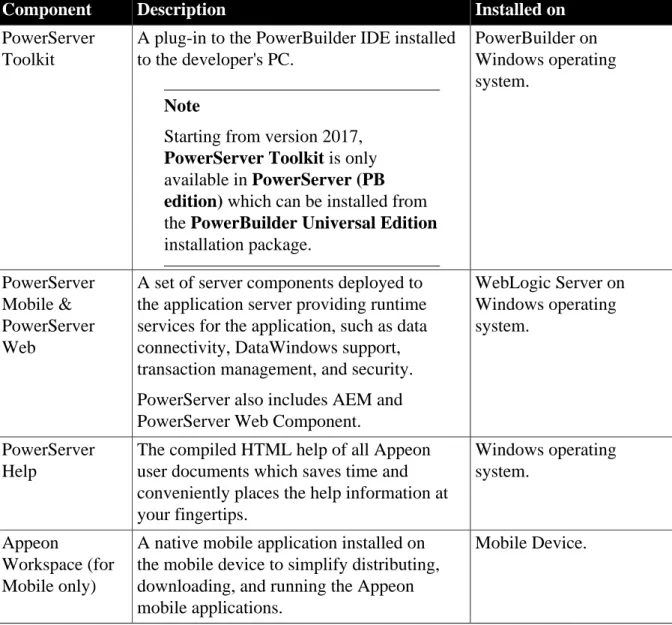
PowerServer 2017 (on Windows) consists of following major components: PowerServer Toolkit, PowerServer Mobile & PowerServer Web, PowerServer Help, and Appeon Workspace.
Table 4.1: Appeon components
Component Description Installed on
PowerServer Toolkit
A plug-in to the PowerBuilder IDE installed to the developer's PC.
Note
Starting from version 2017,
PowerServer Toolkit is only
available in PowerServer (PB
edition) which can be installed from
the PowerBuilder Universal Edition installation package. PowerBuilder on Windows operating system. PowerServer Mobile & PowerServer Web
A set of server components deployed to the application server providing runtime services for the application, such as data connectivity, DataWindows support, transaction management, and security. PowerServer also includes AEM and PowerServer Web Component.
WebLogic Server on Windows operating system.
PowerServer Help
The compiled HTML help of all Appeon user documents which saves time and conveniently places the help information at your fingertips. Windows operating system. Appeon Workspace (for Mobile only)
A native mobile application installed on the mobile device to simplify distributing, downloading, and running the Appeon mobile applications.
Mobile Device.
4.2 Installation scenarios
4.2.1 OverviewAppeon PowerServer 2017 works with n-tier architecture: different Appeon components should be installed to the computer(s) according to their roles in the network. In this section, some practical scenarios are described to demonstrate how Appeon PowerServer 2017 should be installed according to network architecture.
Installing Appeon PowerServer 2017 Appeon® PowerServer® 2017 Windows
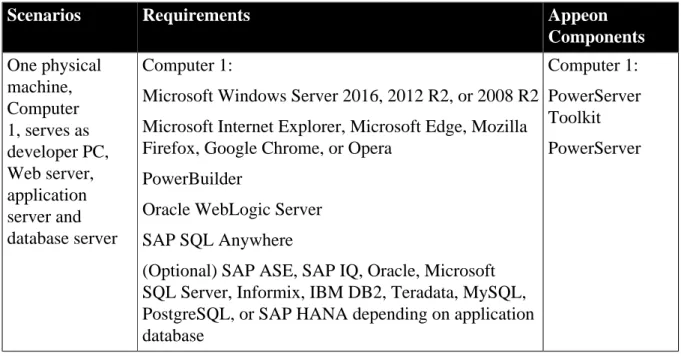
4.2.2 Developer PC
Table 4.2: Developer PC installation
Scenarios Requirements Appeon
Components One physical machine, Computer 1, serves as developer PC, Web server, application server and database server Computer 1:
Microsoft Windows Server 2016, 2012 R2, or 2008 R2 Microsoft Internet Explorer, Microsoft Edge, Mozilla Firefox, Google Chrome, or Opera
PowerBuilder
Oracle WebLogic Server SAP SQL Anywhere
(Optional) SAP ASE, SAP IQ, Oracle, Microsoft SQL Server, Informix, IBM DB2, Teradata, MySQL, PostgreSQL, or SAP HANA depending on application database
Computer 1: PowerServer Toolkit PowerServer
4.2.3 Remote PowerServer using WebLogic HTTP Server
Table 4.3: Remote PowerServer and Web server installation
Scenarios Requirements Appeon
Components In this example, 2 computers are used: Computer 1 serves as developer PC. Computer 1: Microsoft Windows 10, 8.1, or 7
Microsoft Internet Explorer, Microsoft Edge, Mozilla Firefox, Google Chrome, or Opera
PowerBuilder SAP SQL Anywhere Computer 1: PowerServer Toolkit Computer 2 serves as Web server, application server and database server. Computer 2:
Microsoft Windows Server 2016, 2012 R2, or 2008 R2 Oracle WebLogic Server
SAP SQL Anywhere, SAP ASE, SAP IQ, Oracle, Microsoft SQL Server, Informix, IBM DB2, Teradata, MySQL, PostgreSQL, or SAP HANA depending on application database
Computer 2: PowerServer
Installing Appeon PowerServer 2017 Appeon® PowerServer® 2017 Windows
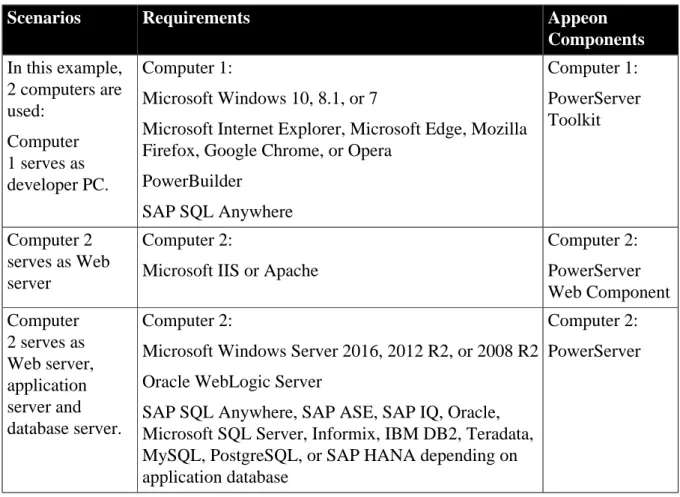
4.2.4 Remote PowerServer using a third-party Web server
Table 4.4: Remote PowerServer and Web server installation
Scenarios Requirements Appeon
Components In this example, 2 computers are used: Computer 1 serves as developer PC. Computer 1: Microsoft Windows 10, 8.1, or 7
Microsoft Internet Explorer, Microsoft Edge, Mozilla Firefox, Google Chrome, or Opera
PowerBuilder SAP SQL Anywhere Computer 1: PowerServer Toolkit Computer 2 serves as Web server Computer 2:
Microsoft IIS or Apache
Computer 2: PowerServer Web Component Computer 2 serves as Web server, application server and database server. Computer 2:
Microsoft Windows Server 2016, 2012 R2, or 2008 R2 Oracle WebLogic Server
SAP SQL Anywhere, SAP ASE, SAP IQ, Oracle, Microsoft SQL Server, Informix, IBM DB2, Teradata, MySQL, PostgreSQL, or SAP HANA depending on application database
Computer 2: PowerServer
4.2.5 PowerServer Cluster
Table 4.5: PowerServer cluster installation
Scenarios Requirements Appeon
Components In this example, N (N>=4) computers are used: Computer 1 is used for developer PC. Computer 1: Microsoft Windows 10, 8.1, or 7
Microsoft Internet Explorer, Microsoft Edge, Mozilla Firefox, Google Chrome, or Opera
PowerBuilder SAP SQL Anywhere Computer 1: PowerServer Toolkit Computer 2 is the database server. Computer 2:
SAP SQL Anywhere, SAP ASE, SAP IQ, Oracle, Microsoft SQL Server, Informix, IBM DB2, Teradata, MySQL, PostgreSQL, or SAP HANA depending on application database
Computer 2: None
Computer 3 is the Web server.
Computer 3:
Microsoft IIS or Apache
Installing Appeon PowerServer 2017 Appeon® PowerServer® 2017 Windows
Scenarios Requirements Appeon
Components PowerServer Web Component Computers 4 to n are a group of WebLogic Servers. Computers 4 to n:
Microsoft Windows Server 2016, 2012 R2, or 2008 R2 Oracle WebLogic Server
Computers 4 to n: PowerServer (After installing PowerServer to each WebLogic Server, configure the PowerServer as a cluster. Refer to Configuring PowerServer Cluster for details)
4.3 Two installation methods
Appeon PowerServer 2017 provides two installation methods: new installation and upgrade
installation.
• If your computer has not installed any version of Appeon PowerServer, the setup program automatically takes the new installation method.
• If your computer has 2013 R2 or an earlier version installed, you must uninstall the version, prepare the environment for Appeon PowerServer 2017 installation, and then use the setup program to install. The setup program takes the new installation method.
• If your computer has 2015 or a later version installed, the setup program automatically takes the upgrade installation method.
4.4 Appeon new installation
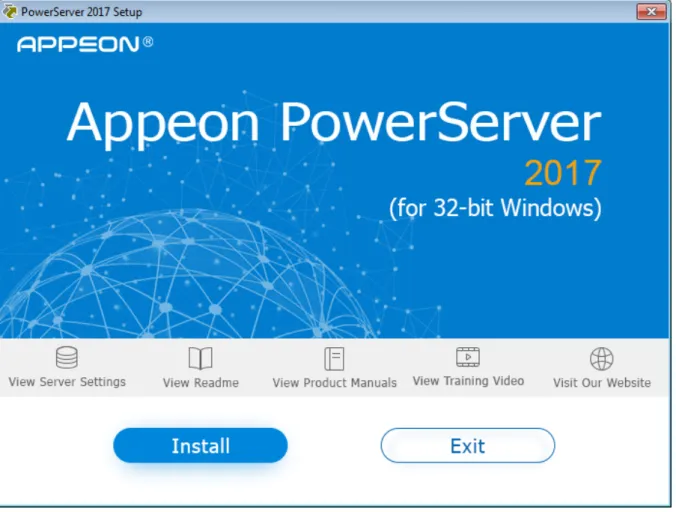
4.4.1 Starting the installationStep 1: Double click the Setup.exe file in the installation package. The Appeon
PowerServer 2017 Setup program starts. The entry page has several options to guide you
through the various installation tasks.
• View Server Settings: Click this button to ensure that the application server settings are appropriate for the PowerServer Mobile/Web installation.
• View Readme: Click this button to read the key system requirements and installation information for the product.
Installing Appeon PowerServer 2017 Appeon® PowerServer® 2017 Windows
• View Product Manuals: Click this button to read the user manuals for the product.
• View Training Video: Click this button to watch the video to learn how to install the product.
• Visit Our Web Site: Click this button to visit the Appeon web site.
• Install: Click this button to start installing the product.
• Exit: Click this button to exit the setup program.
Note: Make sure there is enough space on the C: drive for storing temporary files for installation. Otherwise an error message will pop up, saying "1607: Unable to install InstallShield Scripting Runtime".
Step 2: Click Install.
Figure 4.1: Install Appeon PowerServer
Step 3: Click Next on the introduction screen.
Step 4: Accept the terms in the license agreement page and click Next.
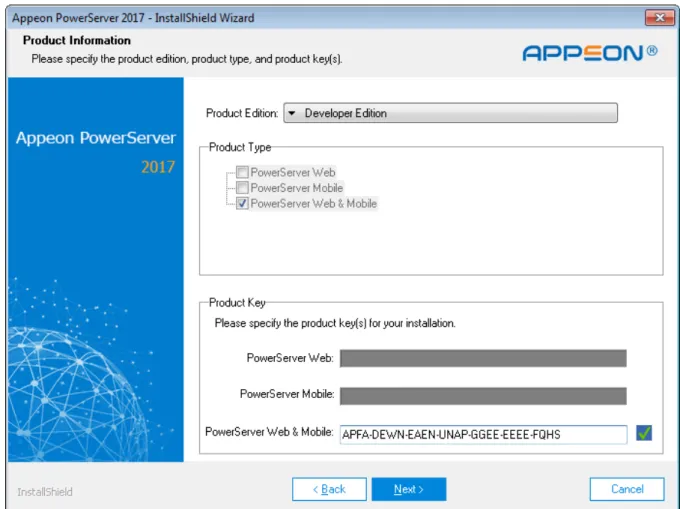
Step 5: According to the license you purchase, select the product edition and the product type: PowerServer Web, PowerServer Mobile, or PowerServer Web & Mobile, and then enter the product key which is shipped with the Appeon product. Click Next.
Installing Appeon PowerServer 2017 Appeon® PowerServer® 2017 Windows
If you select the Developer edition (or the Trial edition), PowerServer Web & Mobile will be automatically selected so you can experience both the Web and Mobile deployments at no additional charge.
Figure 4.2: Product edition, type and key page
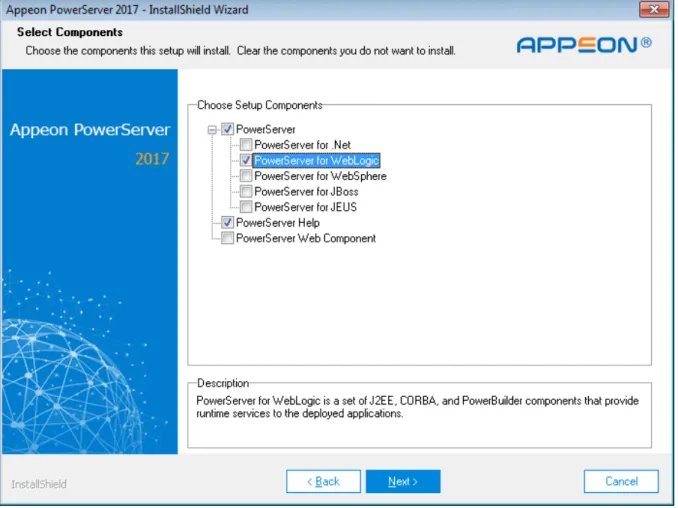
Step 6: Select the component(s) you want to install and click Next. The Setup program will install the selected component(s) in the order listed.
For the WebLogic application server, be sure to select PowerServer for WebLogic, as shown in the following figure.
For Developer Edition and Trial Edition, if more than one application servers such as WebLogic, WebSphere, JBoss etc. are installed on the same computer, you can repeatedly run the setup program to install PowerServer to these application servers, for example, you can first run the setup program and select PowerServer for WebLogic to install PowerServer to the WebLogic Server, you can then run the setup program again and select
Installing Appeon PowerServer 2017 Appeon® PowerServer® 2017 Windows
Figure 4.3: Select components
Refer to the following sections to complete the installation of each component.
• For PowerServer Mobile/Web installation instructions, refer to PowerServer Mobile/Web installation.
• For PowerServer Help installation instructions, refer to PowerServer Help installation.
• For PowerServer Web Component installation instructions, refer to PowerServer Web Component installation.
Note
If you are using one WebLogic Server as both the PowerServer and the Web server, then you will not need to install PowerServer Web Component, because it is included in PowerServer and will be installed automatically during PowerServer Mobile/Web installation.
4.4.2 PowerServer Mobile/Web installation
Follow the instructions below to install PowerServer Mobile/Web to the WebLogic Server. Step 1: Verify that WebLogic Server, as well as any other programs you may be running, is stopped.
Installing Appeon PowerServer 2017 Appeon® PowerServer® 2017 Windows
Step 2: Launch the Appeon PowerServer 2017 Setup program and select to install
PowerServer for WebLogic (see Starting the installation). Wait until PowerServer completes the preparation.
Step 3: Click Browse to specify the home directory of the WebLogic Server where PowerServer will be installed, for example, C:\bea\weblogic92. Click Next.
Step 4: Choose one or more WebLogic Server domains from the list. The PowerServer EAR package (appeonserver.ear) will be installed to the specified WebLogic Server domain(s). Step 5: Specify the user name and password for AEM.
Step 6 : Check the summary of settings. Click Back to change any unwanted settings or click
Next to have Setup begin copying files.
At the click of the Next button, the setup program begins copying files to your computer. Step 7: Wait until PowerServer Mobile/Web installation is completed.
PowerServer has been successfully installed to the specified WebLogic Server home directory and the PowerServer EAR package (appeonserver.ear) has been successfully installed to the selected WebLogic Server domain(s).
Step 8: Choose whether to start a PowerServer instance. It is selected by default. To manually start PowerServer from the Windows shortcut later, uncheck the box, then click Finish to end the installation of PowerServer.
For details about starting PowerServer, refer to Starting/Stopping PowerServer.
4.4.2.1 Deploying appeonserver.ear package
If the WebLogic Server runs in the Production mode (rather than the Development mode), you would need to manually deploy the PowerServer EAR package (appeonserver.ear) in the
WebLogic Server Administration Console after the PowerServer Mobile/Web installation.
Skip this section if WebLogic Server runs in the Development mode because WebLogic Server in Development mode includes an auto-deployment feature which can detect the PowerServer EAR package (appeonserver.ear) and automatically deploy it. In this case, you can verify that PowerServer was successfully installed and deployed by starting
WebLogic Server and then accessing AEM (from Programs | Appeon PowerServer 2017 | PowerServer for WebLogic | Instances | InstanceName | Start WebLogic on the local machine).
Follow the instructions below to deploy the appeonserver.ear package if WebLogic Server runs in the Production mode.
Step 1: Start WebLogic Server from Windows Start | Programs | Appeon PowerServer
2017 | PowerServer for WebLogic | Instances | InstanceName | Start WebLogic. For
details on starting WebLogic Server, refer to Starting/Stopping PowerServer.
Step 2: Access WebLogic Server Administrative Console from Programs | Appeon
PowerServer 2017 | PowerServer for WebLogic | Instances | InstanceName | WebLogic Manager. The WebLogic Login window will appear.
Installing Appeon PowerServer 2017 Appeon® PowerServer® 2017 Windows
Figure 4.4: WebSphere Login window
Step 3: Log in to the WebLogic console with the appropriate user ID.
Step 4: Click the Deployment mode and click Lock & Edit in the left pane, and then click
Install in the right pane.
Installing Appeon PowerServer 2017 Appeon® PowerServer® 2017 Windows
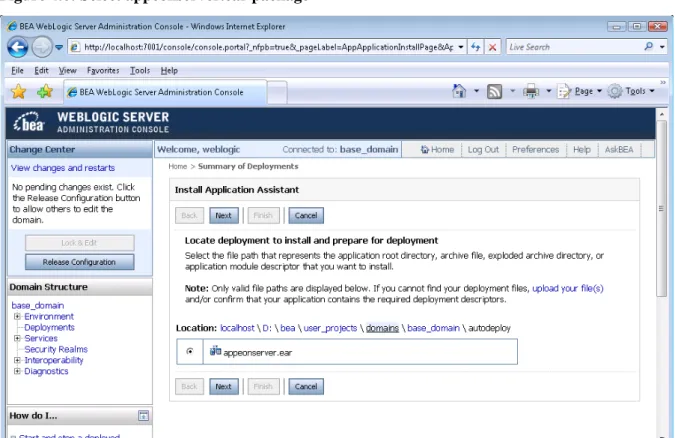
Step 5: Specify an application folder you want to install the appeonserver.ear using Install
Application Assistant in the Install Application Assistant page, and then click Next.
The applications folder is where the PowerServer EAR package (appeonserver.ear) should be placed when it is installed to the WebLogic Server domain.
• If you are using WebLogic 8, the appeonserver.ear resides in %BEA%\user_projects \domains\mydomain\applications.
• If you are using WebLogic 9/10, the appeonserver.ear resides in %BEA%\user_projects \domains\mydomain\autodeploy.
Figure 4.6: Select appeonserver.ear package
Installing Appeon PowerServer 2017 Appeon® PowerServer® 2017 Windows
Figure 4.7: BEA WebLogic Server Administration Console
Step 7: Use the default settings, and then click Next. Figure 4.8: BEA WebLogic Server Administration Console
Installing Appeon PowerServer 2017 Appeon® PowerServer® 2017 Windows
Step 8: Review and check the summary of settings you have chosen, select No, I will review the configuration later, and then click Finish, the Deployment page appears with the installed appeonserver.ear being displayed in the Deployment table.
Figure 4.9: BEA WebLogic Server Administration Console
Step 9: Click the Active Changes in the left pane to commit your pending changes to the server.
Installing Appeon PowerServer 2017 Appeon® PowerServer® 2017 Windows
Figure 4.10: BEA WebLogic Server Administration Console
Installing Appeon PowerServer 2017 Appeon® PowerServer® 2017 Windows
Figure 4.11: BEA WebLogic Server Administration Console
Step 11: Click Yes in the Start Application Assistant window.
Installing Appeon PowerServer 2017 Appeon® PowerServer® 2017 Windows
Wait until the appeonserver.ear is successfully deployed, and the State column shows Active.
Figure 4.13: BEA WebLogic Server Administration Console
Step 12: Go to Programs | Appeon PowerServer 2017 | PowerServer for WebLogic |
Instances | InstanceName | AEM on the local machine to access AEM .
The successfully opened AEM login window confirms that the deployment was successful.
4.4.3 PowerServer Web Component installation (for third-party Web servers only)
Note
If you use a third-party Web server (such as IIS or Apache) or set up an individual machine (separate from the application server) as the Web server, you will need to install the PowerServer Web Component. If not, you do not need to run the installation of the PowerServer Web Component separately since it is included in PowerServer.
4.4.3.1 Prerequisites
• Install a third-party Web server that is compatible with the WebLogic Application Server redirector plug-in. For a list of compatible third-party Web servers, refer to (Optional) Third-party Web server requirements.
• Stop the Web server and any other Windows programs before beginning the installation process.
Installing Appeon PowerServer 2017 Appeon® PowerServer® 2017 Windows
Prerequisites if Web Component installed to multiple Web servers
PowerServer Web Component can be installed to multiple Web servers. Make sure all Web servers meet the above requirements and repeat the installation steps for the PowerServer Web Component on each Web server.
4.4.3.2 Installation instructions
Step 1: Launch the Appeon PowerServer 2017 Setup program and select to install
PowerServer Web Component (see Starting the installation).
Step 2: Click Browse to select the Web root (or document root) for the Web server. Below lists the default Web root (or document root) of the Web server:
Apache 2.0: C:\Program Files\Apache Group\Apache2\htdocs IIS: C:\inetpub\wwwroot
If PowerServer Web Component is installed to the default path: "C:\Program Files\Appeon \WebComponent2017", instead of the Web root (or document root) of the Web server, you would need to manually copy it to the Web root (or document root) later in order to run the Appeon application.
Step 3: Check the summary of settings. Click Back to change any unwanted settings or click
Next and Setup will begin copying files.
Step 4: Click Finish when the installation is complete.
4.4.3.3 Configuring the Appeon redirector plug-in
To ensure the third-party Web server works with PowerServer, install and configure the Appeon redirector plug-in for the Web server. Instructions for installing and configuring the redirector plug-in are provided in Web Server Configuration Guide.
4.4.4 PowerServer Help installation
Step 1: Launch the Appeon PowerServer 2017 Setup program and select to install
PowerServer Help (see Starting the installation).
Step 2: Click Next to install Appeon Help to the default location, or click Browse to select another location.
Step 3: Check the summary of settings. Click Back to change any unwanted settings or click
Next and Setup will begin copying files.
Step 4: Click Finish when the installation is complete.
4.5 Appeon upgrade installation
4.5.1 Before you upgradeIf you have installed Appeon 2015 or a later version, you can upgrade to Appeon
PowerServer 2017, but you cannot upgrade from Appeon 2013 R2 or an earlier version. If you are using Appeon 2013 R2 or an earlier version, uninstall it and then install Appeon PowerServer 2017.
Installing Appeon PowerServer 2017 Appeon® PowerServer® 2017 Windows
Note that applications deployed with the old version and the demo applications must be redeployed with Appeon PowerServer 2017 after the upgrade.
Before upgrading to Appeon PowerServer 2017, upgrade the system environment as required in Installation requirements.
In addition to the system environment requirements, you should meet the installation prerequisites listed in Appeon new installation before upgrading each component.
4.5.2 Upgrading to PowerServer 2017
4.5.2.1 Upgrading PowerServer
Step 1: Launch the Appeon PowerServer 2017 Setup program and select to install
PowerServer for WebLogic (see Starting the installation).
Step 2: Click the OK button in the Confirm Upgrade message box.
Figure 4.14: Confirm upgrade
When the OK button is clicked, a message box opens indicating that the upgrade is preparing files.
The upgrade process uninstalls the old version of PowerServer, backs up configurations and begins the installation of PowerServer based on the backup information. This will take several minutes.
Step 3: Click the Finish button when the upgrade is complete.
4.5.2.2 Upgrading PowerServer Web Component
Step 1: Launch the Appeon PowerServer 2017 Setup program and select to install
PowerServer Web Component (see Starting the installation). Step 2: Click the Yes button in the Confirm Upgrade message box.
Installing Appeon PowerServer 2017 Appeon® PowerServer® 2017 Windows
Figure 4.15: Confirm upgrade
Once you click the Yes button, a message box opens indicating that Setup is preparing files. The upgrade process uninstalls the old version of PowerServer Web Component then begins the installation of PowerServer Web Component. This will take several minutes.
Step 3: Click the Finish button when the upgrade is complete.
4.5.3 Upgrade configuration settings manually
After the product upgrade, most configurations made in the old version are retained and will continue to work in Appeon PowerServer 2017. However, because the configuration settings of Appeon PowerServer 2017 have been adjusted, it is recommended that you review the configuration settings in PowerServer Toolkit and AEM to become familiar with the new settings and make sure the old ones are not lost or mis-configured.
After verifying all settings, Appeon applications deployed with the old version and Appeon Demos must be redeployed in Appeon PowerServer 2017.
Note: If the application uses Appeon Workarounds PBL, you must use the new Appeon Workarounds PBL to replace those of the old version.
4.6 Starting/Stopping PowerServer
4.6.1 Starting PowerServerOnce PowerServer has been installed and integrated into WebLogic Server, starting WebLogic Server will automatically start PowerServer. To start WebLogic Server/ PowerServer:
Open the Windows Start menu and select: Programs | Appeon PowerServer 2017 |
PowerServer for WebLogic | Instances | InstanceName | Start WebLogic.
For Windows 7/2008/8/8.1 with UAC turned on, if you are running on a non-Administrator Windows account (such as an Administrators group member or a User group member), please right click the Start WebLogic shortcut menu and then select Run as administrator to start WebLogic Server/PowerServer.
If you are running WebLogic Server in Production mode, you will be asked to enter your user name and password to start the server. The user name and password was created when you configured the domain.
Installing Appeon PowerServer 2017 Appeon® PowerServer® 2017 Windows
When the server startup process is completed, the following message will appear in the command window.
Figure 4.16: Startup complete
4.6.2 Logging in to WebLogic Server Administration Console
Step 1: From the computer on which the WebLogic Server is running, open the Windows
Start menu and select: Programs | Appeon PowerServer 2017 | PowerServer for WebLogic | Instances | InstanceName | WebLogic Manager.
Installing Appeon PowerServer 2017 Appeon® PowerServer® 2017 Windows
Figure 4.17: Logon page
Step 2: Input user name and password to log in to the Administration Console. The WebLogic Server Administration Console main page appears.
Installing Appeon PowerServer 2017 Appeon® PowerServer® 2017 Windows
4.6.3 Stopping PowerServer
Stopping WebLogic Server will shut down PowerServer.
To stop WebLogic server, navigate to the WebLogic Server domain, for example, C:\bea \user_projects\domains\mydomain\bin, and run the stopWebLogic.cmd file.
If you have any problems in using WebLogic Server, refer to the WebLogic Server documents at http://download.oracle.com/docs/cd/E12839_01/wls.htm.
4.7 Troubleshoot Appeon installation problems
Chapter 1, Troubleshooting Appeon Install in PowerServer Troubleshooting Guide provides solutions to some common problems with installing Appeon PowerServer. If you could not find a solution for your problem, it could be because it is a new problem or an intricate problem that happens only under specific circumstance or environment. In both cases, it is highly recommended that you follow steps below to generate and send the log file to us for investigation.
Step 1: Go to the Appeon folder in the installation package, open the Product.ini file in the text editor, find the RecordDllLog parameter in this file and set the value to 1 (this will enable the logging functionality), by default the value is 0 (which disables logging).
For example:
[DllLog] RecordDllLog=1
Step 2: Run the installation package and reproduce the installation error.
Step 3: Go to …\System32\AppeonInstallLog (or …\SystemWOW64\AppeonInstallLog\ in 64-bit machine) and find the log files there.
Each Appeon component will have a separate log file, for example, AppeonADT2017.txt for PowerServer Toolkit, AppeonDNS2017.txt for PowerServer.
Configuring PowerServer Cluster Appeon® PowerServer® 2017 Windows
5 Configuring PowerServer Cluster
Appeon provides its own tools and plug-ins to configure a PowerServer cluster and implement the load balancing and failover functionalities. A PowerServer cluster is essentially a group of WebLogic servers, each with PowerServer and Appeon plug-in installed.
Following are high level steps for configuring a PowerServer cluster. For detailed instructions, please refer to Chapter 6, Tutorial 5: Configure PowerServer Cluster in PowerServer Mobile Tutorials. The instructions are exactly the same for PowerServer Web and PowerServer Mobile.
1. Install PowerServer to multiple WebLogic servers.
2. Create PowerServer cluster in AEM.
3. Configure the Web server for the PowerServer cluster.
Post-Installation Configuration Tasks Appeon® PowerServer® 2017 Windows
6 Post-Installation Configuration Tasks
6.1 Overview
The previous chapters provide instructions on how to set up Appeon system architecture, including installing Appeon PowerServer components, as well as configuring PowerServer cluster. Once the Appeon system is set up and before you start deploying applications, the post-installation configuration tasks listed in the following table will help ensure that the deployed applications run as desired. Post-installation configuration tasks refer to configurations required for Appeon system architecture that affect the running of all applications but do not include configuration tasks performed in PowerServer Toolkit and AEM for specific applications.
Table 6.1: Post-installation tasks
Task Description Detailed
Instructions Given in...
Configuration for the Web client PC
The IE security settings and Windows login user privileges may prevent downloading the Appeon Xcelerator plug-in for the Web application.
Configuration for client machine
System language setting
Configuration required for the Web client PC, PowerServer and database server. The operating system language settings can affect the characters that are displayed in the Web application.
System language settings
Database JDBC driver preparation
Configuration required for PowerServer. You should copy the corresponding JDBC driver files for the database server in use to the WebLogic server installation folder in the machine hosting PowerServer.
Section 4.2.4, “JDBC driver preparation” in PowerServer Configuration Guide for J2EE Configuration for supporting DataWindow Data Cache feature
Configuration required for database server and Web server.
The DataWindow Data Cache feature can cache DataWindow data that are frequently used on the Web server to improve runtime performance, but will not work until you fulfill the configuration requirements for database server(s) and Web server(s). This feature is not available for Web servers running on Unix\Linux. Section 5.4.8.3, “DataWindow Data Cache” in PowerServer Configuration Guide for J2EE Configuration for supporting dynamic DataWindows
Configuration required for database server. Section 11.5, “Dynamic DataWindow” in Supported
Post-Installation Configuration Tasks Appeon® PowerServer® 2017 Windows
Task Description Detailed
Instructions Given in...
Configuration at the database server is required for support of dynamic DataWindows.
PB Features for PowerServer Web Configuration for
fixing an ASE issue
Appeon provides several SQL files for you modifying the chain modes of stored procedures in ASE database to avoid the following error:
"Select error: Stored procedure... may be run only in unchained transaction mode"
Section 4.6.1, “ASE Chained mode issue” in PowerServer Troubleshooting Guide
6.2 Configuration for Web client PC
Running the deployed Web application on the client machine is dependent on the Appeon Xcelerator plug-in. To ensure (only for the first time) the Appeon Xcelerator plug-in can be downloaded and installed automatically when the Web application is run, the following configuration on the client machine is required.
For more information about the Appeon Xcelerator plug-in and the manual installation method, refer to Section 5.1.2, “Installing Appeon Xcelerator plug-in” in Supported PB Features for PowerServer Web.
6.2.1 Verifying Web browser settings
There are a few settings in the Web browser that may affect the running of the Appeon Web application, such as the JavaScript and the plug-in. By default, these settings are enabled (appropriate for running the Web application) in Edge/Chrome/Firefox/Opera except Internet Explorer. Normally you would not need to go through the following section if you use Edge/ Chrome/Firefox/Opera, unless you encounter problems when running the Web application. However, if you use Internet Explorer, you are recommended to configure Internet Explorer according to the following section.
6.2.1.1 Verifying Chrome/Firefox/Opera settings
If you use Chrome/Firefox/Opera as the Web browser, you should be able to directly run the Appeon Web application in it without any problems, with the default settings of these browsers, however, if you encounter runtime problems, or if you have changed the default settings before, you are recommended to double check that the following two settings are enabled in the browser:
• Enable JavaScript • Enable plug-in
For Firefox, these two settings are automatically enabled and cannot be changed manually. Therefore, you normally need not to verify the settings in Firefox.
For Chrome, go to Settings, then click the Show advanced settings link, then click the
Post-Installation Configuration Tasks Appeon® PowerServer® 2017 Windows
to disable these two settings for some reason, then make sure you add the URL of the Appeon Web application to the exception list.
Figure 6.1: Settings in Chrome
For Opera, go to Settings, then select Websites, and then verify the settings are enabled. If you have to disable these two settings for some reason, then make sure you add the URL of the Appeon Web application to the exception list.
Post-Installation Configuration Tasks Appeon® PowerServer® 2017 Windows
Figure 6.2: Settings in Opera
6.2.1.2 Configuring IE settings
If you use Internet Explorer, we recommend you add the URL of the deployed application to the Trusted Sites zone in Internet Explorer, because the default security settings of this zone are appropriate for downloading and installing the Appeon Xcelerator plug-in. However, if you do not want to add the URL to the Trusted Sites zone, you will need to make sure the security settings (listed in Step 4 below) are enabled for the appropriate zone. The following are detailed steps to add the URL to the Trusted Sites zone.
Step 1: In Internet Explorer, on the Tools menu, click Internet Options.
Step 2: In the Internet Options window, select the Security tab. Then select the Trusted sites Web content zone, and click the Sites button.
Note: Enable Protected Mode on the Security tab should not be selected (it is not selected
by default). If there is any reason this option must be turned on, please make sure to follow the instructions in Section 4.1.5, “"Failed to get resource from PowerServer" error” in PowerServer Troubleshooting Guide to resolve the issue caused by this option. For IE 11, you should also make sure both "Enable Enhanced Protected Mode" and "Enable 64-bit processes for Enhanced Protected Mode" (the latter is available in Windows 8.1 only) are unchecked in the Advanced tab.
Post-Installation Configuration Tasks Appeon® PowerServer® 2017 Windows
Figure 6.3: IE security settings
Step 3: In the Trusted sites window, input the URL of the deployed application to the "Add this website to the zone" box. Uncheck the checkbox of "Require server verification (https:) for all sites in this zone". Click Add then click Close to return to the Internet Options window.
Post-Installation Configuration Tasks Appeon® PowerServer® 2017 Windows
Figure 6.4: Trusted sites
Step 4: Click OK to save the settings and close IE.
6.2.2 Logging in as administrator or normal user
No special privilege is required to download and install the Appeon Xcelerator plug-in, no matter you use Edge, Chrome, Firefox, Opera, or Internet Explorer, which means, you can log into the Windows OS with any user.
Note when running the Appeon Web application for the first time, the Web browser would prompt you to run the Appeon cross-browser plug-in with two options: "only this time" or "always run for this site". It is highly recommended that you select the "always run for this
site" option, especially for Chrome, because the application will fail to run in Chrome if you
select "only this time".
6.3 System language settings
Sometimes the operating system language settings can affect the characters displayed in the Appeon Web application. To avoid any such display issues, verify that:
• The language of the data in the database used by the application matches the operating system language settings on the machine where PowerServer is installed.
• The language of the data in the database used by the application matches the Windows language settings on each Client machine where the Web application will be viewed.
• The language of the data in the database used by the Appeon-deployed Web application matches Windows language settings on the machine where PowerServer Toolkit is installed.
Post-Installation Configuration Tasks Appeon® PowerServer® 2017 Windows
Step 1: Open Windows Start Menu and select Settings | Control Panel. Step 2: Double-click Regional Options.
Step 3: Select the appropriate language from the Your locale DropDownListBox. Step 4: Click the Set Default button. The Select System Local window displays.
Step 5: Select the appropriate locale. Verify that it is the same as that selected in the Your
locale list box in Regional Options.
Step 6: Click OK to return to the Regional Options window.
Step 7: Verify that the language selected in the Your locale list box and the language
checked as default in Language settings for the system settings are the same. The language can be from different regions as long as it is the same language.
Step 8: Click Apply and OK in the Regional Options window to accept the settings.
To set the language settings in Unix\Linux operating system:
Step 1: Change to the etc/default folder and edit the init file.
Step 2: Set the value of the LANG command to the appropriate language. You can use command "locale -a" to view the locale languages supported by the operating system.
Uninstalling Appeon PowerServer 2017 Appeon® PowerServer® 2017 Windows
7 Uninstalling Appeon PowerServer 2017
7.1 Overview
To uninstall Appeon PowerServer 2017, uninstall each of its components separately. The uninstall process reverses the actions performed by the Appeon setup program. Uninstall does not delete any files created by the user in Appeon, such as application files generated while deploying the demo applications or your own application to PowerServer. Delete these files manually from the Web root (or document root) of the Web server.
Do not try to reverse installation steps or uninstall Appeon by deleting files manually or changing your Registry. This can create serious problems with your system in general and new Appeon releases in particular.
7.2 Uninstalling PowerServer
Step 1: Shut down PowerServer and WebLogic Server.
Step 2: Select Windows Start | Control Panel; under Programs, click Uninstall a program; select Appeon PowerServer 2017 for WebLogic and click Uninstall to begin the uninstall process.
Step 3: Click Next and then OK to confirm the removal of PowerServer. Step 4: Click Finish when PowerServer is completely uninstalled.
Step 5: After the uninstall process is complete, remove any files or folders left in the PowerServer installation folder.
7.3 Uninstalling PowerServer Web Component (for third-party Web
servers only)
Step 1: Stop Web server and other Windows programs.
Step 2: Select Windows Start | Control Panel; under Programs, click Uninstall a program; select Appeon PowerServer Web Component 2017 and click Uninstall to begin the
uninstall process.
Step 3: Click Next and then OK to confirm the removal of PowerServer Web Component. Step 4: Click Finish when the uninstallation is complete.
7.3.1 Uninstalling Web Component if multiple Web servers are involved
Repeat the Web Component uninstall steps for each third-party Web server.
7.4 Uninstalling PowerServer Help
Step 1: Select Windows Start | Control Panel; under Programs, click Uninstall a program; select Appeon PowerServer Help 2017 and click Uninstall to begin the uninstall process. Step 2: Click Next and then OK to confirm the removal of PowerServer Help.
Index Appeon® PowerServer® 2017 Windows
Index
A Appeon components Appeon Workspace, 9 PowerServer, 8 PowerServer Help, 9 PowerServer Toolkit, 8PowerServer Web Component, 9 Appeon editions, 7
Appeon Workspace, 9
B
before you upgrade, 28
C
Client Database requirements, 12 Client requirements, 10
hardware requirements, 10 software requirements, 10
Configuration for Web client PC, 36 configure IE settings, 38
configure PowerServer cluster, 34
D
database server requirements, 11 Developer PC, 14 H hardware requirements, 10, 11 I installation instructions, 28 installation scenarios, 13 PowerServer cluster, 15
Remote PowerServer using a third-party Web server, 15
Remote PowerServer using WebLogic HTTP Server, 14
Installation scenarios Developer PC, 14
L
log in as administrator or normal user, 40 log in to WebLogic Server console, 31
P
PowerServer, 8
PowerServer cluster, 15
PowerServer Help, 9
PowerServer Help installation, 28
PowerServer Mobile/Web installation, 19 PowerServer requirements, 10
hardware requirements, 11 software requirements, 10 Web Server requirements, 11 PowerServer Toolkit, 8
PowerServer Web Component, 9
PowerServer Web Component installation, 27
installation instruction, 28 prerequisites, 27
prerequisites, 27
R
Remote PowerServer using a third-party Web server, 15
Remote PowerServer using WebLogic HTTP Server, 14
S
server database requirements, 12 software requirements, 10, 10 start PowerServer, 30
start the installation, 16 stop PowerServer, 33
Synchronization requirements, 12 synchronization server requirements, 12 system architecture, 4
system language settings, 40
U
uninstall PowerServer, 42 uninstall PowerServer Help, 42
uninstall PowerServer Web Component, 42 upgrade configuration settings manually, 30 upgrade PowerServer, 29
upgrade PowerServer Web Component, 29
V
verify Chrome/Firefox/Opera settings, 36 verify Web browser settings, 36
W