Notice
Table of Contents
ELITE IPK TELEPHONES ...1
GENERAL INFORMATION ...2
ATTENDANT ADD-ON CONSOLE ...4
Answering Calls ... 4
Transferring Calls ... 4
Placing Internal Calls ... 5
Placing Calls to Call Arrival Keys ... 5
Placing Outgoing Calls ... 5
NIGHT TRANSFER ...6
TRUNK TO TRUNK TRANSFER ...6
AUTOMATIC TRUNK TO TRUNK TRANSFER ...7
MESSAGE WAITING OR STATION OUTGOING LOCKOUT ...7
STATION OUTGOING LOCKOUT ...8
PAGING ...8
Paging Using the Direct Paging Access Key ... 8
Paging Using the Access Code ... 9
SET RELOCATION MODE ...9
DIRECT INWARD SYSTEM ACCESS (DISA) ...10
Setting Passwords ... 10
Confirming DISA Passwords ... 10
DISA Set/Cancel ... 11
RECORDING VOICE PROMPTS ...13
PROGRAMMING SYSTEM SPEED DIAL ...13
PROGRAMMABLE FORCED (VERIFIED) ACCOUNT/
AUTHORIZATION CODE ...14
CLOCK/CALENDAR SETTING ...15
CONFERENCE BRIDGE SETUP ...15
Setting Supervisor Password ... 16
Setting Conference 1 and/or Conference 2 Passwords ... 16
Record Customized Greeting ... 16
SYSTEM SPEED DIAL DIRECTORY ...17
Character Entry ... 19
ELITE IPK TELEPHONES
Legend:
1 DSS keys (Direct Sta-tion SelecSta-tion) or CO keys (Central Office Lines)
2 Status Indicators 3 Dedicated Feature
Keys
IPK DCR Console with DSS/BLF 1
2
GENERAL INFORMATION
The following should be considered when reviewing this Attendant User Guide:
• Attendant console keys can be assigned as Direct Station Selection/Busy Lamp Field (DSS/BLF), Call Arrival, or as additional central office lines (CO Add-On Console).
• Refer to the Multiline Telephone User Guide for additional information on telephone operation.
• All operational instructions assume Prime Line Pickup is assigned to intercom dial tone, Ringing Line Preference is assigned, a Call
Appearance and Call Arrival key is assigned to all multiline telephones and only a single tenant has been assigned in the system.
• All access codes listed are standard; some may vary based on system assignment.
• Access to many features is based on system assignments. Not all features may be available from your telephone.
DSS/BLF LEDs ADD-ON CONSOLE LEDs
Telephone Status
DSS/BLF
Status CO Line Status LED Indication
Attendant Message
Steady Green Idle Unlit
Idle Unlit Incoming Call Rapid Flashing
Red In-Use Steady Red In-Use (by
Attendant)
Steady Green
Hold Steady Red Other-Use Steady Red
FWD All (DND) Flashing Red Held Call • Your
Telephone
• Other Telephone
Slow Flashing Green
ATTENDANT ADD-ON CONSOLE
Answering Calls
When CO incoming ringing occurs:
1. Lift the handset.
2. Converse and process the call.
Transferring Calls
With a call in progress:
1. Press DSS/BLF key for the desired station (call is placed on Non-Exclusive Hold.)
2. Voice announce after the tone burst.
OR
Wait for the ringing call to be answered.
Press Transfer on the Attendant Add-on Console. Replace the handset.
Note 1: Pressing Transfer immediately after the DSS key will result in an unscreened ring transfer or camp-on.
Note 2: If the called station is busy or unanswered, press the flashing Line key, Call Appearance key, or Conf key (internal calls) to return to the original party.
Placing Internal Calls
To make a call within the organization:
1. Lift the handset.
2. Press the DSS/BLF key on the Attendant Add-On Console.
3. Voice announce after the tone burst.
OR
Wait for the ringing call to be answered.
Note 1: When calling a multiline telephone, dialing 1 after the station number will change the ringing to voice or voice to ringing.
Note 2: To directly access a personal voice mailbox, dial 7 after dialing the station number.
Placing Calls to Call Arrival Keys
To make a call using Call Arrival Keys:
1. Lift the handset.
2. Press DSS/BLF key on the Attendant Add-On Console representing a Call Arrival key.
3. Wait for the ringing call to be answered.
Placing Outgoing Calls
To place an outside call:
1. Lift the handset.
2. Press an idle CO Line key on the Attendant Add-On Console.
3. Dial the telephone number.
NIGHT TRANSFER
Note: When programmed for Automatic Day/Night Transfer, the system will enter/exit night mode at the pre-programmed times.
TRUNK TO TRUNK TRANSFER
With an outside call in progress:
1. Press the Transfer key.
2. Dial the trunk access code, i. e. 9.
3. Dial the telephone number and wait for an answer.
4. Press the Feature key.
5. Press the Transfer key.
6. Replace the handset.
Note: Once established, a trunk to trunk connection cannot be re-entered. Set/Cancel Using Console Set/Cancel Using Access Code
With a call in progress: 1. Press the NT key.
With a call in progress: 1. Press the Feature key. 2. Dial Night Transfer code
80.
AUTOMATIC TRUNK TO TRUNK TRANSFER
Note:Once set, incoming calls to the selected CO/PBX line(s) will automatically be routed to the programmed telephone number.
MESSAGE WAITING OR STATION OUTGOING
LOCK-OUT
To set/cancel a message waiting or station outgoing lockout:
1. Press the MSG/Station Lockout key.
2. Press the desired DSS/BLF key.
Note 1: An Attendant Add-On Console can be assigned with Message Waiting OR Station Outgoing Lockout capability.
Program/Modify/Erase Forward
Assignment Set/Cancel
1. Press the Feature key. 2. Dial Automatic Trunk
Transfer code 63. 3. Dial the incoming trunk
number to be forwarded: • Individual trunks
01 ~ 64 or • All trunks 00. 4. Dial #.
5 Dial the outgoing tele-phone number where calls are to be directed. 6. Press the Feature key.
1. Press the Feature key. 2. Dial Automatic Trunk
Transfer code:
• Set 61
• Cancel 62
3. Dial the incoming trunk number to be set/can-celled:
4. Individual trunks 01 ~ 64 5. All trunks 00
STATION OUTGOING LOCKOUT
To cancel Station Outgoing Lockout and default the password on a per station basis:
1. Press the Speaker key.
2. Dial Attendant Reset Password access code ____.
3. Dial the Station number to be canceled.
4. Press the Speaker key again.
PAGING
Paging Using the Direct Paging Access Key
To make the page:
1. Lift the handset.
2. Press the Direct Paging Access key.
3. Page.
Paging Using the Access Code
To make the page:
1. Lift the handset.
2. Dial the Paging code:
3. Page.
4. Wait for the Meet-Me Answer or replace the handset.
SET RELOCATION MODE
Set/Cancel using the Access Code:
1. Press the Feature key.
2. Dial Set Relocation Mode code 84.
Internal External
• All Zones 51
• Zone A 52
• Zone B 53
• Zone C 54
• All internal and
external 59
• All Zones 55
• Zone A 56
• Zone B 57
DIRECT INWARD SYSTEM ACCESS (DISA)
Setting Passwords
Note 1: The Password may be a maximum of 10 digits. If the new password is less than 10 digits, replace the handset to enter.
Note 2: It is recommended that DISA passwords be 10 digits and changed frequently to prevent unauthorized use.
Note 3: Resetting DISA Passwords will return them to the default value of 0000000000 (10 zeros).
Confirming DISA Passwords
To confirm the DISA password:
1. Lift the handset.
2. Dial the DISA Password confirmation access code ____.
3. Dial the DISA ID code of the station to be confirmed ____.
4. Confirm the password.
Setting DISA Passwords Resetting DISA Passwords
1. Lift the handset.
2. Dial the DISA Password set access code ____. 3. Dial the DISA ID code of
the station to be set ____. 4. Dial current DISA
Pass-word ____.
Default is 0000000000 (10 zeros).
5. Replace the handset.
1. Lift the handset.
2. Dial the DISA Password reset access code ____. 3. Dial DISA ID code of
DISA Set/Cancel
To set or cancel DISA:
1. Press the Feature key.
2. Dial the DISA code:
• Set 81
• Cancel 82
3. Dial the trunk number to be set/canceled from DISA: • Individual trunks 01 ~ 64
• All trunks 00
AUTOMATED ATTENDANT
Automated Attendant Set/Cancel
To set or cancel the Automated Attendant:
1. Press the Feature key.
2. Dial VRS Voice Message access code:
• Set 81
Recording Messages Verify/Delete Messages
1. Lift the handset.
2. Dial the VRS Voice Mes-sage access code ____. 3. Dial 1.
4. Dial 1 again.
5. Dial the Automated Atten-dant message number
1 ~ 8.
6. Dial operation: • Record day
mode 1
• Record night
mode 2
• Record weekend
mode 3
7. Record a message via the handset.
8. Replace the handset.
1. Lift the handset.
2. Dial the VRS Voice Mes-sage access code ____ 3. Dial operation:
• Verify message 2 • Delete message 3
4. Dial 1.
5. Dial the Automated Atten-dant message number
1 ~ 8.
6. Dial operation: • Verify/delete
day mode 1
• Verify/delete
night mode 2 • Verify/delete
weekend mode 3
7. Verify/delete the mes-sage.
3. Dial the trunk number to be set/canceled for the Automated Attendant:
• Individual trunks 01 ~ 64 • All trunks 00
4. Press the Feature key again.
RECORDING VOICE PROMPTS
PROGRAMMING SYSTEM SPEED DIAL
1. Press the Feature key.
2. Press the Redial key.
3. Dial the System Speed Dial Memory location 00 ~ 79.
4. Dial the trunk access code, i. e. 9.
Set Verify/Delete
1. Lift the handset.
2. Dial the VRS Voice Mes-sage access code ____. 3. Dial 1.
4. Dial 2.
5. Dial operation:
• Dial tone message 1 • Call waiting tone 2
6. Record a message via the handset.
7. Replace the handset. 8. Verify/delete the
mes-sage.
1. Lift the handset.
2. Dial the VRS Voice Mes-sage access code ____ 3. Dial operation:
• Verify message 2 • Delete message 3
4. Dial 2.
5. Dial operation:
• Dial tone message 1 • Call waiting message 2
6. Press the Hold key (if entering name) and dial the name of the party (13 characters maximum).
7. Press the Feature key again.
Note 1: Press the Redial key to insert a pause or the Recall key to store a hookflash.
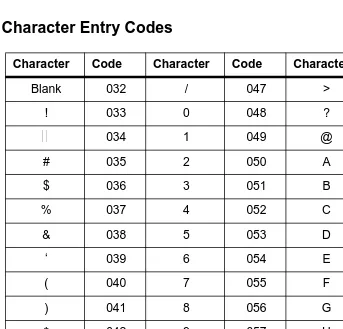
Note 2: Refer to the Character Entry Codes when entering the name of the party.
PROGRAMMABLE FORCED (VERIFIED) ACCOUNT/
AUTHORIZATION CODE
To program a forced accout or authorization code:
1. Lift the handset.
2. Dial the Forced Account Programming access code ____. Hear the second dial tone.
3. Dial the Forced Account Number (001 ~ 500).
4. Dial the Forced Account Code ____. Hear the Confirmation tone.
5. Press the Transfer key.
6. The next Forced Account Number (001 ~ 500) is displayed. Dial additional Forced Account Codes as desired.
7. Replace the handset.
Note 1: A maximum of 500 Account Codes may be entered. Each Forced Account Code must be assigned a number (001 ~ 500).
CLOCK/CALENDAR SETTING
To set the clock or calendar:
1. Press the Feature key.
2. Dial 9#.
3. Enter the hour and minute via the dial pad.
4. Press the Recall key to change the AM/PM setting.
5. Press the Hold key to change to the calendar setting.
OR
Press the Feature key to exit this feature.
6. Press the Recall key to select the day of the week.
7. Dial # to move the cursor to the day of the month field.
8. Enter the day of the month via the dial pad.
9. Press the Recall key to select the month.
10. Dial # to move the cursor to the year field.
11. Enter the last two digits of the year via the dial pad.
12. Press the Feature key.
CONFERENCE BRIDGE SETUP
Setting Supervisor Password
To set a supervispr Password:
1. Call a Conference Bridge extension.
2. When the Conference Bridge extension answers, dial the default Supervisor Password (0000#).
3. Follow the voice prompt and enter the setting verification mode. Then enter the setting change mode.
4. Follow the voice prompt to change the Supervisor Password (4 ~ 8 digits).
Setting Conference 1 and/or Conference 2 Passwords
To set a conference password:
1. Set the Supervisor Password, if necessary.
2. Call a Conference Bridge extension.
3. When the Conference Bridge extension answers, dial the Supervisor Password and #.
4. Skip the steps by pressing
*
until the conference Setup mode is available for conference 1 or conference 2.5. Follow the voice prompt and set the conference 1 or the conference 2 password (4 ~ 8 digits).
Record Customized Greeting
To recording your greeting:
1. Set the Supervisor Password, if necessary.
4. Press
*
to skip the setting verification mode. 5. Press # to change the system settings.6. Skip the steps until the Customized Greeting option is played.
7. Follow the voice prompt and record a new Customized Greeting.
SYSTEM SPEED DIAL DIRECTORY
00 18
01 19
02 20
03 21
04 22
05 23
06 24
07 25
08 26
09 27
10 28
11 29
12 30
13 31
14 32
15 33
16 34
SYSTEM SPEED DIAL DIRECTORY (continued)
36 56
37 57
38 58
39 59
40 60
41 61
42 62
43 63
44 64
45 65
46 66
47 67
48 68
49 69
50 70
51 71
52 72
53 73
54 74
Character Entry
To add a name to each speed dial entry, use the Character Entry Code table or press the dial pad number corresponding to the alpha character desired (six characters maximum).
i.e. 2 = A, B, D, a, b, c, or 2 3 = D, E, F, d, e, f, or 3 4 = G, H, I, g, h, i, or 4
For the name Bob press: 2-2-6-6-6-2-2
Character Entry Codes
Character Code Character Code Character Code
Blank 032 / 047 > 062
! 033 0 048 ? 063
034 1 049 @ 064
# 035 2 050 A 065
$ 036 3 051 B 066
% 037 4 052 C 067
& 038 5 053 D 068
‘ 039 6 054 E 069
( 040 7 055 F 070
) 041 8 056 G 071
* 042 9 057 H 072
+ 043 : 058 I 073
, 044 ; 059 J 074
M 077 ^ 094 o 111
N 078 _ 095 p 112
O 079 \ 096 q 113
P 080 a 097 r 114
Q 081 b 098 s 115
R 082 c 099 t 116
S 083 d 100 u 117
T 084 e 101 v 118
U 085 f 102 w 119
V 086 g 103 x 120
W 087 h 104 y 121
X 088 i 105 z 122
Y 089 j 106 { 123
Z 090 k 107 124
[ 091 l 108 } 125
¥
092 m 109 → 126] 093 n 110 127
780316
*780316 *
© 2003 NEC America, Inc.
The material contained herein is subject to change without prior notice at the sole discretion of NEC America, Inc.
Electra Elite is a registered trademark of NEC Corporation.
Document Revision 1
For more information contact: NEC America, Inc. 6555 N State Highway 161